ADEEPT Hexapod 6 Legs Spider Robot User manual
www.adeept.com
1

www.adeept.com
1
Warning
Please pay attention to the following issues when purchasing or using the product:
There are small components included in this kit. Swallowing mistakenly or misoperation can
cause serious infection and be even fatal. When an accident occurs, please seek medical
assistance immediately.
Please place the product in a safe place where an under-3-year-old cannot touch, who should
not use or approach the product.
Juveniles should use the product with their parents.
Do not place the product or the components near any AC socket or other circuits, in case of
potential risks of electric shock.
Do not use the product near any liquid or flame.
Do not use or store the product in an extreme environment such as extremely cold or hot
and heavily humid.
Please remember to power off when the product is not in use.
Do not touch the moving or rotating part of the product.
The product may get heat at some part, which is just normal. But misoperation may cause
overheat.
Misoperation may cause damage to the product. Please take care.
Do not connect the positive and negative poles of the power inversely, or the devices in the
circuit may be damaged.
Please place and put the product gently. Do not smash, shock, or break it violently.
About
Adeept is a technical service team of open source software and hardware. Dedicated to applying
the Internet and the latest industrial technology in open source area, we strive to provide best
hardware support and software service for general makers and electronic enthusiasts around the
world. We aim to create infinite possibilities with sharing. No matter what field you are in, we
can lead you into the electronic world and bring your ideas into reality.
The code and circuits of our product are open source. You can check on our website:
www.adeept.com
If you have any problems, feel free to send an email for technical support and assistance:
support@adeept.com
On weekdays, we usually will reply within 24 hours. Also welcome to post forums on our
website.

www.adeept.com
2
Copyright
This user manual can be used for learning, DIY, refitting, etc., except for commercial purpose. The
Adeept Company owns all rights of contents in the manual, including but not limited to texts,
images, data, etc. Any distribution or printing should be implemented with the permission of the
Company, or it will be deemed illegal.

www.adeept.com
Contents
Components List..................................................................................................................................1
Acrylic Sheets.............................................................................................................................. 1
Machinery Parts.......................................................................................................................... 2
Electronic Parts............................................................................................................................2
Tools.............................................................................................................................................4
Self-prepared Parts......................................................................................................................4
About Adeept 6-Leg Spider Robot...................................................................................................... 5
Introduction.................................................................................................................................5
Functions..................................................................................................................................... 6
Assembly..............................................................................................................................................9
Preparations................................................................................................................................ 9
Assemble the upper part.......................................................................................................... 11
Install the right feet...................................................................................................................28
Assemble the left feet............................................................................................................... 37
Complete the whole assembly..................................................................................................46
Remote Control......................................................................................................................... 54
Circuit Connection.............................................................................................................................57
Software & Hardware........................................................................................................................64
What is Arduino?.......................................................................................................................64
Why Arduino?............................................................................................................................64
How Should I Use Arduino?...................................................................................................... 65
Arduino Software (IDE)..............................................................................................................66
Install Library............................................................................................................................. 69
Upload Program........................................................................................................................ 72
Afterword.......................................................................................................................................... 78

www.adeept.com
1
A02
1pcs
A01
1pcs
A05
6pcs
A04
6pcs
A03
6pcs
A07
1pcs
A06
6pcs
A09
1pcs
A08
1pcs
Components List
Acrylic Sheets
The acrylic plates are fragile, so please be careful when assembling them in case of breaking the
plates. Do not smash or shock them violently.
The acrylic sheet is covered with a layer of protective film. You need to remove it first.
Some holes in the acrylic have residues, so you need to clean them before using it.

www.adeept.com
2
www.adeept.com
X40
M2*8
Screw
www.adeept.com
X19
M2.5*8
Screw
www.adeept.com
X20
M3
Nut
www.adeept.com
X48
M2
Nut
M3*5
Screw
X8
www.adeept.com
M3*6
Copper
Standoff
www.adeept.com
X4
M3*40
Copper
Standoff
www.adeept.com
X6
www.adeept.com
X26
M3*8
Screw
M3*10
Countersunk
Head
Screw
M1.4*6
Self-tapping
Screw
X4
X4
www.adeept.com
www.adeept.com
Adeept Ultrasonic Module X1
Servo X19
Adeept Passive Buzzer Module X1
Adeept RGB LED Module X1
Adeept Bluetooth Module X1
Adeept Photoresistor Module X2
Machinery Parts
Electronic Parts
www.adeept.com
X26

www.adeept.com
3
Adeept UNO R3 X1
Adeept 32 Channel PWM Drive X1
Adeept Remote Control Shield X1
Arduino Nano X1
NRF24L01 X2
18650x2 Battery Holder-A X1
Male-Female Cable X4
Female-Female Cable X12
18650x2 Battery Holder-B X1

www.adeept.com
4
Mini USB Cable X1
USB Cable X1
Cross Screwdriver X1
Cross Socket Wrench X1
Slotted Screwdriver X1
Large Cross-head Screwdriver X1
Wingding pipe X1
Ribbon X1
18650 Battery X4
Tools
Self-prepared Parts

www.adeept.com
5
About Adeept 6-Leg Spider Robot
Introduction
Developed based on Arduino, this hexapod robot simulates the movements of 6-feet insects via
programming in the Arduino IDE programming software and controlling 19 servos.
Hexapod robot, or spider robot, is one type of multi-legged robots. The design of this hexapod is
derived from insects in nature, especially principles of their movement. Foot is the motion organ
of insects. Some have 3 pairs of feet with each in the front, middle, and back breast; the feet are
named respectively the frontfoot, midfoot and rear-foot. This hexapod robot is of the similar
structure.
In this robot kit, a complete set of hardware devices are provided as well as example code for
your learning. Also you can write the code for control by yourself if applicable. By programming
the robot, you can control each leg and even each joint of the legs precisely, and truly feel the
thrill and joy of learning and making.
The Adeept Arduino UNO R3 board is used as the core control board for this kit, and an Adeept
32 Channel PWM Drive board for control of 19 servos onside.After assembly, you can see 2 parts,
the hexapod robot and a remote control. They communicate through an NRF24L01 2.4G wireless
communication module on each, which supports data transmission. In the example code
provided, the robot supports 3 working modes: Remote control mode, Automatic obstacle
avoidance mode, Finding light mode. We can use Android APP or remote-control unit
respectively to control the robots. Once powered, it connects with the remote control
successfully; the LED1 on the remote will blink.
When the robot is in remote control mode, the LED2 lights up, and LED3 lights off; when the
robot is in automatic obstacle avoidance mode, the LED3 lights up and the LED2 lights off.; when
the robot is in finding light mode, the LED2 and LED3 both light up.

www.adeept.com
6
Functions
The functions of Spider Robot:
1. When the robot is in remote control mode, it can move forward、backward and
turn left or right, and it can shift to the left and right. This function supports
remote control of Adeept Remote Control Shield Board, shifting to the left and
right can’t be supported by Android APP remote control.
2. When the robot is in finding light mode, it detects the light source from left and
right and it follows the light source to move to left or right. This function supports
Adeept Remote Control Shield Board remote control and Android APP.
3. Automatic obstacles avoidance mode, this function supports Adeept Remote
Control Shield Board remote control and Android APP.
The function introduction on Mobile interface:
Notice:
1. When we use NRF24L01 communication(Adeept Remote Control Shield Board) we need to
modify a parameter in the program, as shown below:
Buzzer beeping
Finding light
mode
The connection and
disconnection of
Bluetooth
communication
Automatic obstacles
avoidance mode
Turning left
Going forward
Going backward
Turning right
Remote control
mode
www.adeept.com
7
2. When we use Bluetooth communication( Android APP) we need to modify a parameter in
the program, as shown below:
Before using android APP, we need to let the phone find the bluetooth module provided by us
and conduct the matching operation, so that the android APP provided by us can connect to the
robot. The Bluetooth module is called “Adeept_blue_Tooth”and the password is "1234".
NRF24L01 module needs to be removed when using the mobile phone to control the robot, and
the Bluetooth module needs to be installed to complete the communication with the mobile
phone. Note that the Bluetooth module should not be installed backwards or misplaced to
prevent the Bluetooth module from burning. When the Bluetooth module does not establish
communication with the APP, the LED on the Bluetooth module is flashing. When the
communication with the mobile APP is established, the LED on the Bluetooth module is always
flashing.
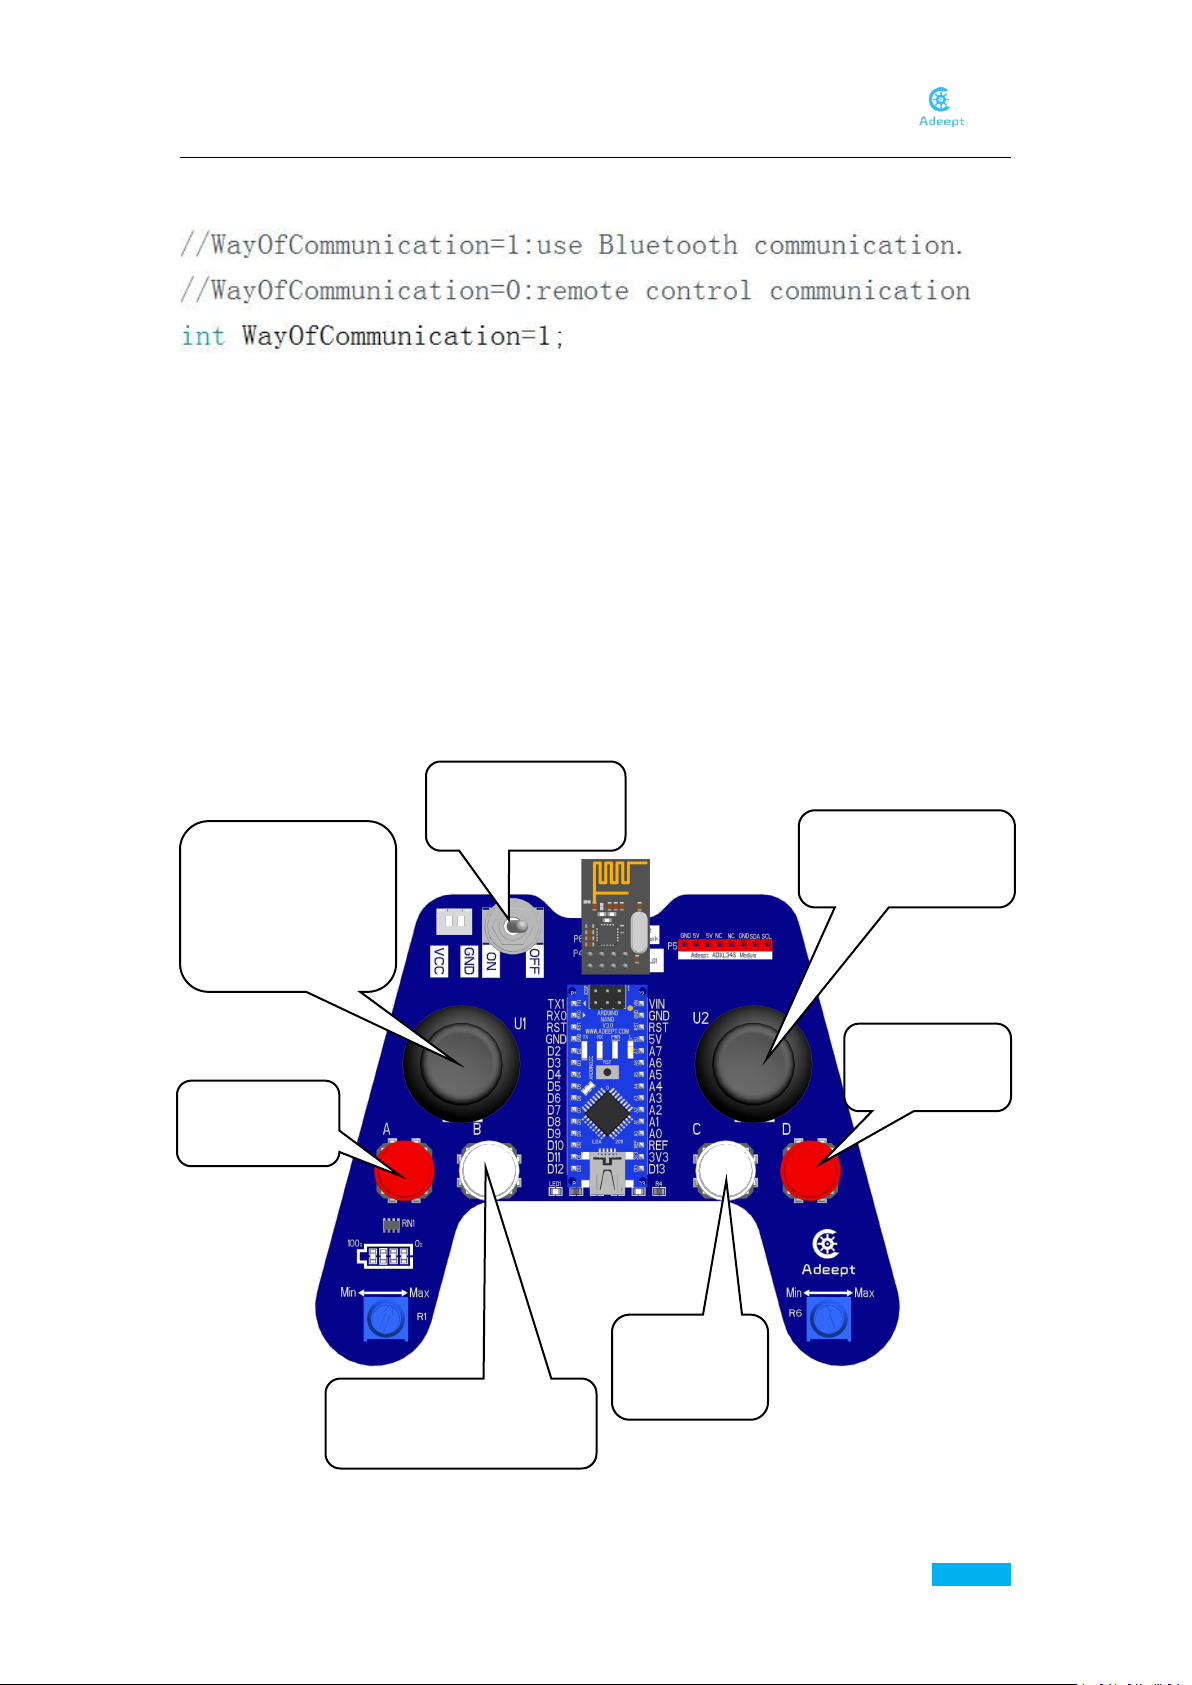
Remote Control functions:
The rocker U1 moves to the left and the robot rotates to the left in situ. The rocker U1 moves to
Control the robot to
shift to left and right
Remote
control mode
Automatic obstacles
avoidance mode
Finding light
mode
Control the
buzzer to beep
Remote control
switch
Control the robot
to go left and right;
move forward and
backward

www.adeept.com
8
the right and the robot rotates to the right in suit. The rocker U1 moves forward and the robot
moves forward. Rocker U1 moves backwards, the robot moves backwards.
The rocker U2 shifts to the left, and the robot shifts to the left.
The rocker U2 shifts to the right, and the robot shifts to the right.
Button A: the robot enters the remote control mode, the LED2 lights up and the LED3 goes out.
Button B: the robot enters the automatic obstacle avoidance mode, LED2 goes out and LED3
lights up.
Button C: the robot enters the finding light mode. LED2 lights up and LED3 lights up
Button D: control the buzzer to beep
Notice: when we use Bluetooth communication we need to modify a parameter in the program,
as shown below:
By default, WayOfCommunication=0 in the program. When using remote control, the Bluetooth
module on the robot needs to be removed and replaced with NRF24L01 module. When using
Bluetooth communication, the NRF24L01 module on the robot needs to be removed and
replaced with Bluetooth module.

www.adeept.com
9
Assemble the following components
Female-Female
Cable x2
Adeept Ultrasonic Module x1
Male-Female Cable x2
Effect diagram after assembling
Female-Female Cable connects to VCC
and GND respectively
Adeept Passive Buzzer Module x1
Male-Female Cable x1
Assembly
URL for the video:https://www.adeept.com/video/details/index/id/45
Preparations
A. Connect Adeept Ultrasonic Module to Cable
B. Connect Adeept Passive Buzzer Module to Cable
Assemble the following components
Female-Female Cable x2
Effect diagram after assembling
Female-Female Cable connects to
“+”and “-“respectively

www.adeept.com
10
Assemble the following components
Adeept RGB LED Module x1
Effect diagram after assembling
Assemble the following components
Adeept Photoresistor Module x1
Male-Female Cable x1
Effect diagram after assembling
C. Connect Adeept RGB LED Module to Cable
D. Connect Adeept Photoresistor Module to Cable(2 sets).
Female-Female Cable x4
Female-Female Cable x2
Female-Female Cable connects to
“+”and “-“respectively
www.adeept.com
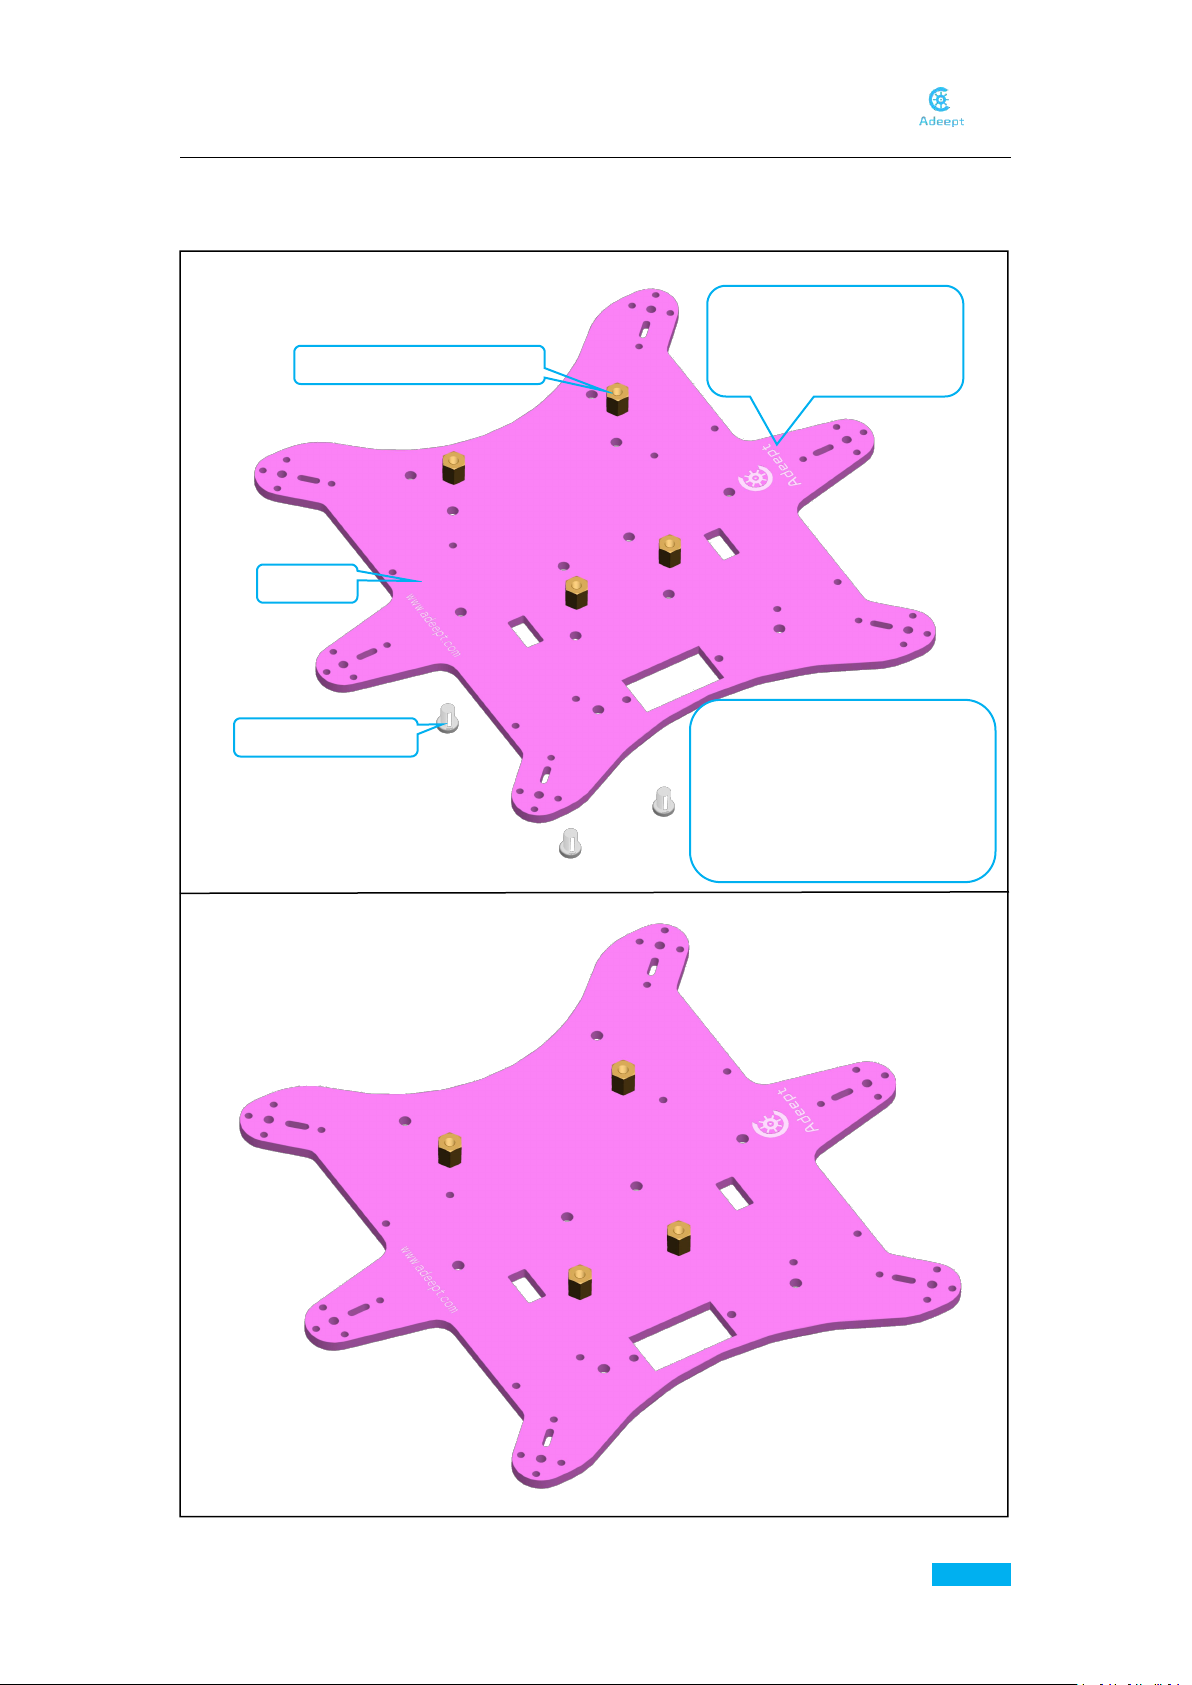
11
Assemble the following components
M3*6 Copper Standoff is at
the same side with LOGO
M3*6 Copper Standoff x4
A01 x1
M3*5 Screw x4
For the convenience of reading,
here the Acrylic Sheets is
colorized; in this manual Acrylic
Sheets’ color depends on the
reality
Effect diagram after assembling
Assemble the upper part
A. Keep the four M3*6 Copper Standoffs fixed on A01

www.adeept.com
12
Assemble the following components
Effect diagram after assembling
B. Keep the six M2*8 Screws fixed on A01
M2 Nut x6
M2*8 Screw x6
Pay attention to the installation
place of M2x8, not to install in a
wrong way.

www.adeept.com
13
C. Keep the two M3*10 Countersunk Head Screws fixed on 18650x2 Battery Holder-B
Assemble the following components
M3*10 Countersunk
Head Screw x2
18650x2 Battery
Holder-B x1
M3 Nut x2
Effect diagram after assembling
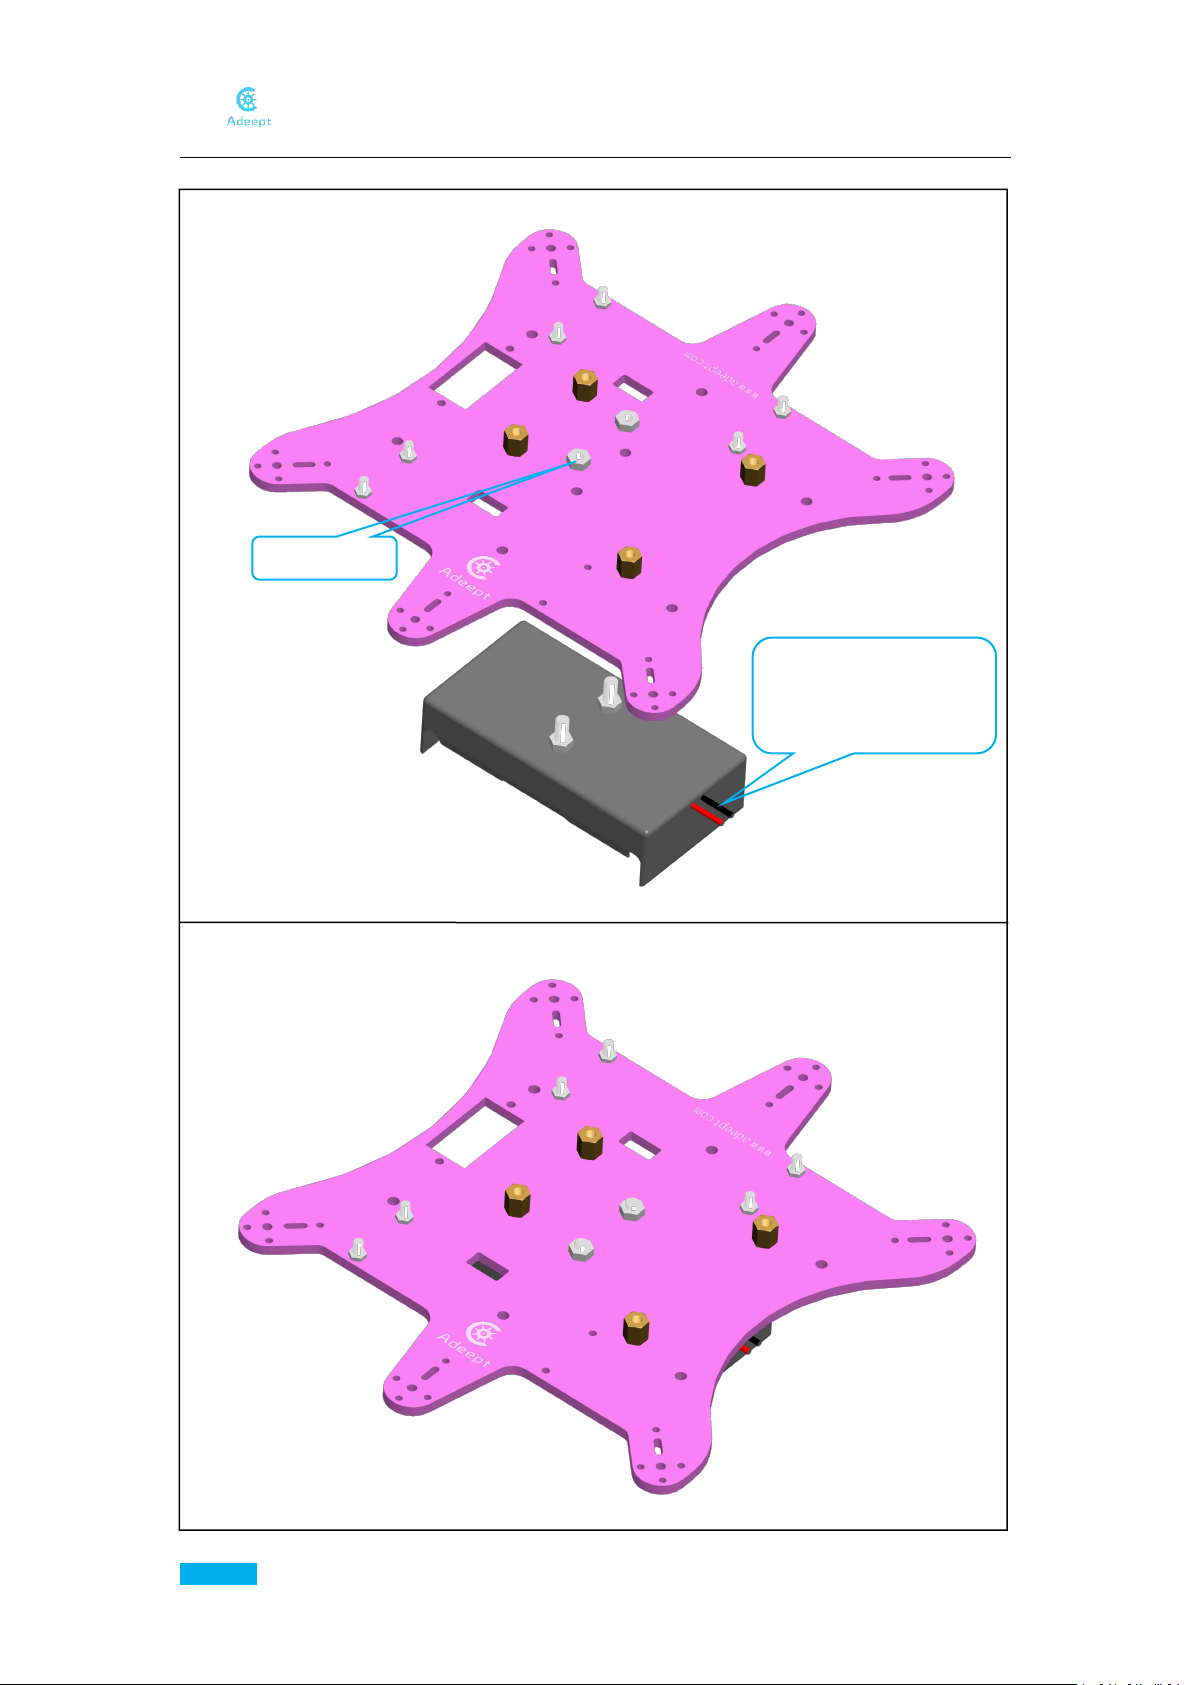
www.adeept.com
14
D. Keep 18650x2 Battery Holder fixed on A01
Assemble the following components
M3 Nut x2
18650x2 Battery Holder’s
wiring is on the right as
the picture shown
Effect diagram after assembling

www.adeept.com
15
E. Keep the six M3*40 Copper Standoff fixed on A01
Effect diagram after assembling
Assemble the following components
M3*8 Screw x6
M3*40 Copper
Standoff x6

www.adeept.com
16
F. Keep the Adeept UNO R3 fixed on M3*6 Copper Standoff
Effect diagram after assembling
Assemble the following components
M3*5 Screw x4
Adeept UNO R3 x1
M3*6 Copper
Standoff
Table of contents
Other ADEEPT Robotics manuals

ADEEPT
ADEEPT ADA031 User manual

ADEEPT
ADEEPT RaspRover User manual

ADEEPT
ADEEPT RaspTank User manual

ADEEPT
ADEEPT RaspArm User manual

ADEEPT
ADEEPT PiCar-Pro User manual

ADEEPT
ADEEPT Hexapod User manual

ADEEPT
ADEEPT Quadruped Robot User manual

ADEEPT
ADEEPT PiCar-B User manual

ADEEPT
ADEEPT RaspClaws User manual

ADEEPT
ADEEPT RaspClaws User manual


