manuals.online logo
Brands
  1. Home
  2. •
  3. Brands
  4. •
  5. ADEMCO
  6. •
  7. Security System
  8. •
  9. ADEMCO Alpha Vista 5130XT User manual

ADEMCO Alpha Vista 5130XT User manual

INSTALLATION INSTRUCTIONS
7
ADEMCO ALPHA VISTA
\
NO. 5130XT
SECURITY SYSTEM I
N3122-3 3/89
Previous Menu
“. .-----
Specifications ............................ ....... ...... ...... . ... ... . ....... . .... ... .. . .. .. .... . .... ............... 86
5130XT Security Control ............................................. . 86
4171XTDigital Communication interface Board . . . ... ..... ...... .. ... .. . .. ..... . . .. ... . .... . ..... 86
5137 Remote Console ... ...... ...... ....... .... . .. ... ...... .... .. ...... .... .. .... .. . . 86
4131 Remote Keypad ..... ...... ...... ...... ....... ..... ...... ...... . .. . ... . ....... .. . . . . . .... .. ... 87
4152LM Loop Module ...................... ...... .............. ...... . . 87
4208 Zone Expander ............................................................. . .. 87
The Limitations ofthis Alarm SyWem ....... . .... ...... .. . . . .... . .... .. ... .. . .. .. . . . . . .... .. ....... .. 91
Limited Warranty . .... . ...... ....... ...... ... .. ...... ..... ... . ....... .... . . ... ...... .. .... .. .... ............ 93
Appendix A. Cabinet Mounting, ....... ....... ........ . ... ... . ... . .. .... ...... ... .. . .... ... .. .... . 88
Diagrams
Diagraml.
Diagram 2.
Diagram 3.
Diagram 4.
Diagram 5.
Diagram 6.
Diagram 7.
Diagram 8.
Diagram 9.
Diagram 10.
Summary of Connections ......................................................................................................... 17
24-Pin Connector with Flying Leads
(5130XT Field Wiring interface) ... ....... ...... .... .... . . .... . . .. ...... ....... . . . ...... .. 18
KeyswitchWiring .,.......,,.,.,..,,.. .... ...... ....... ...... ...... ...... .. . .. . .. . .... . . . .... 19
Installing the Digital Communication
interface Board (4171 XT) ....... ...... ...... ...... . ... ....... ...... .. .... ... . . . .. .... . .... .. 21
4152LMlnstaHation and Wiring to4208 ..... .... .. ...... .. ... .... . .. .... .. .... ..... ....... .... .. .. 22
5130XTConnection interfacing and 4171XTWiring Connections 25
Inserting Nameplate ................................................................................................................ 26
Wall Preparation for Flush Mounting 28
Flush Mounting the5130XT/5137/4137 . . 29
Removing Main Circuit Board for Fuse Replacement .. . ....... ...... ..... .. ...... ... .. . . . .. . .. 83
Templatefor Mounting the5130XT/5137/41 37 (provided onseparate sheet)
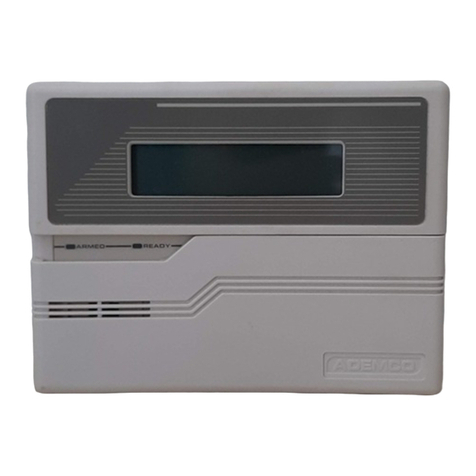
The ALPHA VISTA 5130XT is amicroprocessor-based security control
which provides up to 9wired zones in the basic product, with expansion
to an additional 8wired zones when connected to a2-wire zone expan-
sion bus driven by the optional No. 4152LM Loop Module. The security
control is housed in awall-mounted plastic enclosure measuring only
8.4” (21.3 cm) wide x4.75” (12 cm) high x1.1” (2.8 cm) deep, and is
equipped with amultifunction 12-key digital keypad, a2-line, 32-
character multipurpose LCD English language display and a built-in 85
db piezoelectric sounder that meets UL requirements as an alarm
sounder (an external sounder is therefore optional), Connections to the
security control are made via a24-pin plug-in connector equipped with
flying leads which interface to the wired loops, plug-in DC Power Pack,
back-up battery, optional external alarm sounder, etc.
The security control can be easily programmed from its own keypad, or
from an optional 5137 or 4137 remote console; the control can also be
programmed locally from the 699 Programmer (using a695-30XT car-
tridge). Programmed options to establish specific alarm and reporting
features are stored in electrically erasable, non-volatile EEPROM
memory. This means that the unit can be reprogrammed many times
(unlike units equipped with PROMS) and that information which has been
programmed will not be lost in the event of acomplete loss of power, For
installer convenience, the control is factory-programmed to aset of
values that is designed to meet the needs of many installabons. However,
these can be altered by the installer 10suit the specific needs of apaflic-
ular installation or installation company, following the instructions pro-
vided in the programming section of this manual (factory-programmed
values are also shown there).
This system also contains abbreviated operating instructions in memory,
designed primarily as an aid to the end user. This feature, which func-
tions when the system is in the armed or the disarmed mode, is activated
by simply pressing any of the function keys for 5seconds. The display on
the control will then scroll information related to the use of that function.
Aplug-in Communication Interface board (4171XT) provides communi-
cation capability (central station reporting, etc.) over existing telephone
lines as well as zone expansion connections.
An optional, economical, remote keypad (4131) can be used for arming,
disarming, etc., from aremote indoor location within the protected premises.
This unit is acompact 12-button keypad with two system status indicators
(LEDs) and a built-in piezoelectricsounder that provides warning and alarm
sounds. Requires a10-wire connection to reconnection to the control.
An optional remote console (4137) pmwdes functions similar to that of
the 5137 with one notable exception. It utihzes an LCD display that dis-
plays numerics for zone identification and predefine words for mode,
status, and alarms.
Acomplete list of optional accessories will be found in asection toward
the end of this manual under the heading “Optional Accessories” (see
Index).
Zone Characteristics
Zone 1: Programmable Zone, may be used as EOLR supervised Fire
Zone (supports 2-wire Smoke Detectors) or for non-fire usage,
or may be used as anon-fire zone with N.C. contacts only
350-500 msec response.
Zones 2-8 Programmable Zones, EOLR supervised, 350-500 msec
response.
Zone 9: Programmable Zone, N.C. contacts only, fast 10-15 msec
response.
Back-up 12V DC Battery DC Power Pack
Mounted externally, Aspecial backbox (4132) is available for mounting the Plug-in Power Pack (DC power converter), Plugs into unstitched 2-prong
battery in the wall behind the Control. Rechargeable 12-volt, 1.2 AH Lead
Acid. 110 volt AC outlet providing 24-hour service Power Pack (1350) supplies
unregulated 18V DC outpui (700 mA max) for powering the Control.
The No. 5130XT allows the installer to call it using switched network phone
lines so that the control/communicator can be remotely programmed and/
or commanded from aNo. 699MD Intelligent Programmer or an IBM com-
patible Personal Computer (PC). See Note 2under Remote Capabilities in
this section.
Accessing of the No, 5130XT from aremote location is protected against
compromise by someone attempting to defeat the system, using 4levels of
security protection
1. Security Code Handahake An 8-digit Central Station ID code must be
matched between the No. 5130XT and the Central Station.
2. Hang-up and call back Calling the No.5130XT does not directly allow
programming, as asuccessful handshake merely results in the No.
5130XT breaking the phone line connection and then calling back the
(internally stored) central station service phone number*.
3. Data Encryption: Data passed between the central station and the No.
5130XT ISencrypted for security so that it is very difficult for aforeign
device tapped mto the phone line to take over communication and sub-
stitute system compromising information.
*NOTE: In situations where aservice person is on site and the system is
installed inside aPABX, it is ~ossible to initiate adownload from
the protected premises by keying [installer or master security
code] +[#] +[1].
4. Central Station Advisory Note Any condition that causes the system
to initiate acall back to atelephone number from which Itcan be
reprogrammed or commanded (in fact, even for alocal reprogramming
of the EEPROM) causes aunique report to be sent to the central sta-
tion’s alarm logging digital receiver.
Equipment Required
At the premiaas
The No. 5130XT must be used with Its No, 4171 XT Communication inter-
face board if remote programming and/or control is desired,
At the centrai station (or the installer’s office/home):
●ANo 699MD Intelligent Programmer that incorporates an internal
modem and a No. 695-30XT Program Carfndge,
OR
●An IBM PC compatible computer, aModem (check with Ademco Fac-
tory Technical Support for the specific brand and model to be used),
No. 4130PC Downloading Software Dlakette, and appropriate inter-
connecting cables.
Remote Capabilities (See Note 2)
Programming:
All programming functions accessible from the unit’s keypad or via local
No. 699 direct programming.
Commanding:
There are two types of commands that can be issued to the system:
t. Control Commands
-To Arm the System in the Away Mode* (1)
-To Disarm the System’ (1)
-To Bypass aZone
-To Force the System to Accept aNew Program Download
-To Shut Down Communication (dialer) Functions (non-payment
of monitoring fees in an owned system)
-To Shut Down all Security System Functions (non-payment for a
leased system)
-To Inhibit Local Keypad Programming (prevents takeover of your
accounts)
2. Status Commands
-To Cause the System to Upload aCopy of its Resident Program to
the central station
-To Read System Status:
Arming Status
Ready Status and Current Faults
Presence of Alarms (pastor present)
Presence of Troubles (pastor present)
AC Power Status
Bypass Status and Current Bypasses
‘NOTES:
1, If the system is programmed for open/close repofling by user, User
#7 will be reported,
2. After the5130XT and the 699 or PC have established valid communi-
cation, each console will become inactive The 5130XT will resume
the normal security functions (including responding to faults that took
place during the downloading) after it is commanded to hang up. See
the 4130PC or 695-30XT instructions for details.
The detailed operation of the functions described below is covered in the
Installation Instructions for the No. 695-30XT Program Cartridge and for
the 4130PC Download Software Diskette.
-To Read List of Faulted Sensors
-To Read List of Bypassed Sensors
-To Read 10 Day Alarm History Log
-To Read 10 Day Trouble History Log
-To Read List of Sensors Currently in Alarm
-To Read List of Sensors Currently in Trouble
Remote Communication Specifications:
.Program Download Time -fminute for acomplete program
.Typical Total Time Including Call Up/Call-Back -3-4 minutes
Remote Command/Programming Advisory Notes:
.Alarm and Trouble Reporting are disabled during the time that the sys
tern and the central station are linked to each other for the described
functions, following avalid exchange of codes.
.Keypad entries are ignored during the same time Interval cited above.
●Should an alarm transpire during the remote program/control Interval, ●
the system would not respond to the alarm condition until the remote
mode was ended, The local zones and the Nos. 4139WH, 4190WH,
4192S0, 4194WH, 4196, 4208 and 4275 all store their fault conditions
until they are read by the Control, As such, alarm conditions from the
local and expansion zones would not be missed, only delayed
Acopy of the program downloaded may be produced from either the
No, 699 Intelligent Programmer or the IBM PC compatible computer,
using those products’ internal report generators, when an optional prin-
ter is connected.
For each zone used, one of the following zone types must be selected:
1.
2.
3.
4.
Entry/Exit Burglary (Delay #l). Assigned to sensors on doors
through which entry and exit will normally take place when the sys-
tem is armed.
Entry/Exit Burglary (Delay #2), May be set for different delay than
above. For use with sensors on overhead garage doors, etc., where
longer delay is needed 10reach the keypad in the main portion of
the house or building, and more delay is needed to exit the
premises.
Perimeter Burglary. Normally assigned to all sensors on exterior
doors and windows requiring instant alarm,
Interior, Follower. Delayed alarm only if the Entry /Extt zone IS
faulted first; otherwise, produces an instant alarm, Assigned to zone
covering an area such as afoyer or lobby through which one must
pass upon entry to reach the keypad to disarm the system.
Designed to provide instant intrusion alarm in the event an intruder
hides on the premises prior to the system being armed or gains
access to the premises through an unprotected area.
5. Trouble by Day/Alarm by night, Can be assigned to azone which
contains a-foil-protected d-oor& window (such-as in astore), or to a
zone covering a“senstive” area such as astockroom, drug supply
room, etc., or other controlled access area where immediate notifica.
bon of an entry is desired. During the disarmed state (day), the sys-
tem will provide latched Control/Console annunciation (and central
station report, if desired) of openings or troubles (such as sensor
malfunctions or foil breaks) During the armed state (night), viola-
tions will initiate an alarm.
6. 24-hour Silent Alarm. This type generally assigned to azone con-
taining an Emergency button that is designed to irutiate an alarm
report to the Central Station, but which produces no local displays
or alarm sounds.
7. 24-hour Audible Alarm. This type also assigned to azone contain-
ing an Emergency button, but which will initiate an audible alarm in
addition to an alarm report to the Central Station
8.
9.
24-hour Auxiliary Alarm (Control internal sounder only). This type 10. Interior that always has Entry/Exit Delay #1 (except that Entry
assigned to azone containing abutton for use in personal emer- delay is suppressed in the INSTANT mode). This type typically
gencies, or to azone containing monitoring devices such as water ass!gned to an interior zone containing aPIR that covers an area
sensors, temperature sensors, etc. Designed to initiate an alarm through which the user must pass to reach the Control for disarming
report to the Central Station and also provide Control/Console purposes (whether inside or first entering). ideal for an area such as
alarm sounds and alarm displays. an apartment entrance foyer in which akeypad is located.
Superslsed Fire [alarm on short/trouble on open).
The following isadescription ofthe vaflous zone types available which must be
selected for each physical zone.You may wish to use Table Aat the end of this
description to record your selections.
Type 1. BURGLARY ENTRYEXIT (DELAY #l): This zone type is not
enabled after arming until termination of the (EEPROM defined) Exit
delay #1. Upon entry, the Control will simply emit short beeps as a
warning that the system must be disarmed, If Code +OFF is not
entered before termination of the (EEPROM defined) Entry delay
#1, an alarm will be initiated at the built-in sounder, if program
enabled, and an external alarm and latched LCD display. A
system-wide EEPROM defined number of alarm reports for this
zone will be allowed to be transmitted (swinger suppression) in one
armed period, Restorals will be sent when the zone is restored for a
time greater than its physical response time (less than 1second).
During the disarmed state, afaulted zone will result in a
“DISARMED-Press Ato show faults” display. Subsequent
depression of the* key will cause all the descriptors of the faulted
zones to be sequentially displayed. No communicator reports will
be initiated.
Type 2.
Type 3.
BURGLARY ENTRY/EXIT (DELAY #2): This zone type is not
enabled after arming until termination of the (EEPROM defined) Exit
delay #2. Upon entry, the Control will simply emit short beeps as a
warning that the system must be disarmed. If Code +OFF ISnot
entered before termination of the (EEPROM defined) Entry delay
#2, an alarm will be initiated at the built-in sounder, if program
enabled, and an external alarm and latched LCD display. A
system-wide EEPROM defined number of alarm reports for this
zone WIIIbe allowed to be transmitted (swinger suppression) in one
armed interval, Restorals will be sent when the zone is restored for
atime greater than its physical response time (less than 1second).
During the disarmed state, afaulted zone will result n a
“DISARMED-Press *to show faults” display. Subsequent
depression of lhe *key WIIIcause all the descriptors of the faulted
zones to be sequentially displayed. No communicator reports will
be initiated.
BURGLARY PERIMETER While the System is armed, afaulted
zone WIIIinitiate an alarm at the built-in sounder, if program
Type 4.
enabled, and an external alarm, alatched LCD display, and a
(EEPROM selected) communicator report. Depression of any key
will silence the Control’s local alarm sounder for 10 seconds, A
system-wide EEPROM defined number of alarm reports for this
zone will be allowed to be transmitted (swinger suppression) by the
communicator in one armed period. The communicator will trans-
mit arestoral message when the zone is restored for atime greater
than its physical response time (less than 1second).
During the disarmed state, afaulted zone will result in a
“DISARMED-Praaa *to show faults” display. Subsequent
depression of the* key will cause all the descriptors of the faulted
zones to be sequentially displayed. No communicator reports will
be initiated.
BURGLARY INTERIOR, FOLLOWER: This zone will always
have Exit Delay W. The zone has an Entry Delay if preceded by a
fault man Entry/Exit zone (type #1 or #2). If not pracadad by an
Entry/Exit zone fault, an immediate audible local (Control) and
external alarm, latched display, and a (EEPROM selected) com-
municator report are initiated. Depressing any key at the Control
will silence the Control sounder for 10 seconds. Asystem-wide
EEPROM defined number of alarm reports for this zone will be
allowed to be transmitted (swinger suppression) by the communi-
cator in one armed period. The communicator will transmit ares-
toral message when the zone is restored for atime greater than its
phys!cal response time (less than 1second),
During the disarmed state, afaulted zone will result in a
“DISARMED-Press xto afrow faulta” display. Subsequent
depression of the* key will cause all the descriptors of the faulted
zones to be sequentially displayed, No communicator reperk will
be initiated,
Type 5.
TyfJs 6.
BURGLARY PERIMETER, TROUBLE BY DAY/ALARM BY
NIGHT During the disarmed state (day), faulting the zone will
initiate a‘trouble” display and a latched sounder (beeping), The
Control will beep rapidly along with alatched display of the faulted
zone and the word CHECK. Pressing any key will silence the beep-
ing for 10 seconds, Code +OFF will silence the beeping but will
only clear the display of azone that had the fault condition
removed.
Each trouble will result in a“trouble” report (if programmed). A
trouble restoral message will be sent as each zone is restored to
normal condition. The maximum number of trouble reports per
armed petiod will be limited by the system-wide EEPROM number
of alarm reports option (swinger suppression).
During the armed state (night), the local (Control) and external (if
used) alarm sounders will activate and the communicator will
report alarms, Asystem-wide EEPROM defined number of alarm
reports for this zone will be allowed to be transmitted in one armed
period. Restorals will be sent when the zone is restored for atime
greater than its physical response time (less than 1second).
24-HOUR SILENT ZONE: Sensors assigned to this zone, when
faulted, will initiate acommunicator report. There will be no local
displays or alarm sounds. Upon keying Code plus OFF, there will
be a memory indication of the faulted zone
Asystem-wide EEPROM defined number of alarm reports for this
zone will be allowed ‘to be transmitted (swinger suppression) by the
communicator until an OFF sequence is performed. The communi-
cator will transmit arestoral message when the zone is restored for
atime greater than its physical response time (less than 1second).
During the disarmed state, afaulted zone will result in a
“DISARMED-Prees Ato show faults” display. Subsequent
Type 7.
Type 8.
Type 9.
depression of the *key will cause all the descriptors of the faulted
zones to be sequentially displayed. No additional communicator
reports will be initiated.
The burglary portion of the system cannot be armed if this zone is
faulted. An OFF sequence (code plus OFF) should be performed
ptior to arming the system or viewing the faulted zones,
24-HOUR AUDIBLE ZONE: Faulting azone of this type will
initiate aloud audible alarm externally and at the Control, an LCD
display, and a (EEPROM selected) communicator report. Pressing
any key will silence the Control sounder for 10 seconds. Keying
Code plus OFF will permanently silence the alarm, Asystem-wide
EEPROM defined number of alarm reports for this zone will be
allowed to be transmitted (swinger suppression) by the communi-
cator until an OFF sequence is performed The communicator will
transmit arestoral message when the zone is restored for atime
greater than its physical response time (less than 1second),
24-HOUR AUXILIARY ZONE: Faulting azone of this type will
initiate asteady alarm sound at the Control, an ALARM display, and
a(EEPROM selected) communicator report Pressing any key will
silence the Control sounder for 10 seconds. Keying Code PIUSOFF
will permanently silence the alarm. Asystem-wide EEPROM
defined number of alarm reports for this zone will be allowed to be
transmitted (swinger suppression) by the communicator until an
OFF sequence is performed. The communicator WIIItransmit ares-
toral message when the zone is restored for atime greater than its
physical response time (less than 1second)
FIRE ZONE: Opens in this zone will result in “troubles”. Shorts will
result in alarms. Note: Zone 1will support 2-wire Smoke Detectors
Type +0.
(using the EOL resistor configuration), Zones 2through 8can be
used for heat detectors and pull stations and for 4-wire Smoke
Detectors with external (manual) power interrupt; Zone 9cannot be
used for Fire.
Fire zones may not be bypassed. Afire zone in trouble will not pre-
vent the burglary system from being armed in any mode.
Asystem-wide EEPROM defined number of alarm reports for this
zone will be allowed to be transmitted (swinger suppression) by the
communicator in one armed period. The communicator will transmit
arestoral message when the zone is restored (less than 1second,)
INTERIOR DELAY ZONE: This type of zone will always have Ent~
delay #1 and Exit delay #1. This zone is not enabled after arming
until termination of the (EEPROM defined) Exit delay #1. If this zone
is faulted, beeps will be emitted by the Control. If Code +OFF is not
entered before termination of the (EEPROM defined) Entry delay #l,
an alarm will be initiated Asystem-wide EEPROM defined number
of alarm reports for this zone will be allowed to be transmitted
(swinger suppression) by the communicator in one armed period,
The communicator will transmit arestoral message when the zone
is restored for atime greater than its physical response time (less
than 1second).
During the disarmed state, afaulted zone will result in a
“DISARMED-Press Xto show faults” display. Subsequent
depression of the *key will cause all the descriptors of the faulted
zones to be sequentially displayed No communicator reports will
be initiated.
TABLE A. ZONE ASSIGNMENTS
Azone type must be assigned to each physical zone in use For convenience, the following chart has been provided for checktng off
selections made
PHYSICAL ZONES
ZONE TYPE 1 2 3 4 5 6 7 8 910$+II** 12*+’ 13** 14** 15** 16*W 1w+’
tENTRY/EXIT, Delay /41 (Burglary)
2ENTRY/EXIT, Delay H2 (Burglary)
3PERIMETER (Burglary)
4, INTERIOR, FOLLOWER (Burglary)
5TROUBLE BY DAY/ALARM BY NIGHT
(Burglary)
6. 24-HOUR SILENT
7, 24-HOUR AUDIBLE
824-HOUR AUXILIARY
9FIRE ZONE’
10 INTERIOR DELAY (Burolarv) I I
‘Physical Zone 9cannot be used for Fire,
“Available when 4152LM and 4208 Zone Expander used
Zone expansion to an additional 8zones is achieved by first installing the
optional No. 4152LM Loop Module onto the No 4171 XT (after it has been
Installed), The No, 4152LM can then be connected to aNo. 4208 Eight
Zone Expander by asrrgle par of wires providing both power and slgnal-
Iing. Each of the 8zones on the No. 4208 can be programmed from the
various types described in this manual that are available for use on the
basic 9zones, wtth one exception. There kno ablity to support 2wire
smoke detectors on any of the zones available in the No. 4208 Zone
Expander. The No. 4208 Zone Expander may be located near the No.
5130XT or remotely from it. The two wire run to tshould utihze twlated
pair wiring and should not be run in close proximity to protected pre-
mises intercom wiring [at least a3-inch (8 cm) separation]. For the max-
imum wiring run permissible to the zone expander for various wiring
gauges, see the Specifcatons Section relative to the No. 4208 Zone
Expander later in this manual.
IMPORTANT In order to utilize the No. 4208 to obtain zones 10-17, that
product’s DIP switches must be set as follows”
23 4 5
nom
(as If set for sensor numbers 113-120, as cited
in the instructions for the No. 4208)
Installation instructions for the No. 4152LM and wiflng connections to the
No. 4208 are provided in asubsequent section entitled “INSTALLATION
OF No. 4152LM AND WIRING TO No. 4208”.
Installer Code:
The installer programs the Installer Code mtially as part of the pro- ❑000 ‘ns’a’’ercode(user”)’
assigned during programming.
grammng procedure (see “Programming the Security Control”) In this
system, the installer Econsidered to be user #1. Tt’e installer code per- Installer exits programming mode with:
mits re-entry mto the programming mode (unless ’98 has been pre-
viously used 10exit the programming mode) and also allows access to *99 (allows re-entry into programming mode with installer code).
the normal functions of the system. During initial programming, the or
installer also programs the Master security code into the system, ●98 (does not allow re-entry to programming mode unless system IS
Open/Close reporting must be enabled for User #1 for this code to be first powered down and then repowered). Installer code isdisabled
operational. when this exit is used.
Master Security Code:
The Master security code can be used to assign up to thirteen secondary
codes (to users #3-#1 5); it can also be used to remove all secondary
codes from the system (individually), The person to whom the Master
code ISassigned is considered to be user #2. In some applications
(commercial installations, for example), user #2 (with Master code) will
be the main user of the system (see Application ton a following page).
In other apphcations (such as In an apartment complex, for example),
user #2 (with Master code) may not be the actual end user of the system
(see Application 2 on a following page).
Secondary security codes are assigned by user (with Master Code) as
follows
Master Code +CODE key +User #(03-15) +Secondary Code
The system will emit asingle beep when each secondary code has been
successfully entered.
Note When asecondary code is inadvertently repeated for different
users, or one user’s code is another’s duress code, the lower user
number will take priority.
Individual secondary security codes can be deleted by user #2 (with
Master Code) as follows:
Master Code +CODE key +User #(03-1 5) +Master Code
Note All security codes, master and secondary, permit access to the
system for arming, disarming, etc.
Secondary (Temporary) Security Codes:
As stated previously, up to thirteen secondary codes can be assigned to
users 3through 15 The configuration mApplication 1shows that secon-
dary (or temporary) codes may be assigned by the primary user (user
#2) to as many as thirteen employees, each with aunique code. Note
that user #3 can also assign secondary codes to users 4-14 if required,
but in the typical arrangement shown in Apphcation 1, there may never
be a practical need for this. If so, the primary user (#2) can elect to omit
user #3 when assigning secondary codes.
In the configuration shown in Application 2, user #3, who is the primary
user, may need to assign secondary (temporary) codes to maids, clean-
ing persons, etc. Since the system allows user #3 to assign secondary or
temporary codes to as many as eleven users (4-1 4), this need can be
met. User #3 cannot assign (or delete) user #15’s code, which is strictly
under the control of user #2, who may be the building manager or owner
in the configuration shown mApplication 2. See Table B, which illustrates
the various levels of authority that exist for security codes.
User #3 can assign secondary (temporary) codes for users 4-14 as
follows:
User #3 Code+ CODE key+ User #(04-14)+ Secondary Code
User #3 can delete secondary codes assigned to users 4-14 as follows:
User #3 code+ CODE key+ User #(04-1 4) +User #3 Code
TABLE B. LEVELS OF AUTHORITY FOR
SECURITY CODES
User Can assign or delete
No. Secondary Code of Usen
#1(Installer) NONE
#2 #3 through #15
#3 #4 through #14
#4 -#15 NONE
APPLICATION 1
MASTER SECURITY CODE
MAIN USER dxlmluserw
I
CAN ASSIGN TEMPORARY CODES TO: 1
J
?
EMPLOYEE, CLEANING PERSON, ETC.
(Users 3thru 15) K❑00 “s?r!43+
l--c ❑DU User#4
Note: All codes can Arm/Disarm the System
‘User #3 can assign secondary codes to users 4-142
1A secondary (temporary) code is assigned as follows:
User #2 (Master) Code +CODE key +User #(03-1 5) +Temporary
Code
‘User #3 can assign temporary codes as follows”
User #3 Code +CODE key+ User #(04-14) +Temporary Code 1=8
❑UU.ser#ll
❑UOlJser#12
APPLICATION 2
BUILDING MANAGER, ETC. MASTER SECURITY CODE
(User lf2) ‘0000 Userl#2
I
CAN ASSIGN SECONDARY CODES TO 1
nnnLE&ErlE3&!EE1-.mi!i!ouse,,
User #15 CAN ASSIGN TEMPOiARY CODES TO 2TEMPORARY
+SECURITY CODES
7-
MAID, CLEANING PERSON, ETC. z❑00
(User #4 -#14) z❑00
4❑on
<❑00
Note: All Codes can arm and disarm the system,
*This code, although actually asecondary code, will serve as a
master security code for the apartment owner, etc. since user #3 is
the primary user of the system in this application,
~Asecondary code is assigned as follows:
Master Code +CODE key+ User #(03-1 5) +Secondary Code
2A temporary code is assigned as follows:
User #3 Code +CODE key+ User #(04-1 4) +Temporary Code N
El
•1
El
El
•1
❑
❑l
❑n
ITI
❑o
❑o
❑o
User #4
User #5
User #6
User #7
User #8
User #9
User #10
User #11
User #12
User #13
User #14
(See Diagram 1, Summary of Connections)
A24-pm plug-in connector with flying leads is provided to interface the of wires used in these harnesses is identical to that used in the 24-pin
5130XT to the wired loops, the external alarm sounder, the back-up bat- connector with 18-inch leads. Refer to “Optional Accessories” for
tery, to externally powered dewces (auxiliary current), and to the plug-in
DC Power Pack, part numbers of available wiring harnesses.
Grounding the Svstem
The 24 flying leads, each 18 inches (46 cm) In length, are uniquely color .
coded, as shown in Diagram 1 and also in Table Cwtlich indicates the Aproper earth ground must be provided for the system in order to pro-
color, usage and pm connection for each lead. tect the system from lightning and electrostatic discharge damage. The
White lead (cm 11) on the 24-~ln connector is the earth around lead (see
Note: Optional 30-ft(9 m) and 15-ft (46 m) wiring harnesses with a24-pin Table C). Connect this lead to”asuitable earth ground (a-metallic cold
connector at one end are available for interface wiring, Color cod!ng water pipe or electrical box may be used in some locations).
TABLE C. WIRE ASSIGNMENTS
WireColor Usage connector Pins Usage WireColor
Blue DC(-IINPUT (12) (24) DC(+)INPUT RedlGreen
(from plug-tr (from plug-n
DC Power Pack) DC Power Pack)
While EARTH (3ND [11) (23) BATTERY(+) Red
Black BATTERY(-) and [10) (22) AUX/REMOTE Redl Black
REMOTE CONSOLE CONSOLE/EXT
GROUND ALARM SOUNDER
PwR (+)
V<olel AuX PWR (-) (9) (21) ExT ALARM Brown
SOUNDER(-)
Gray ZONE RETURN (8) (20) ZONE4(+) White/Yellow
Tan ZONERETURN (7) (19) ZONE5(+) Wh[tel Green
Wh,te/Red ZONE 2[+] (6) (18) ZONE 6(+) White/Blue
White/Orange ZONE 3(+) (5J (17) ZONE 9(+) Whl!e/Biack
While/Brown ZONE 1RETURN (4) (16) ZONE 7(+) Whte/Vlolel
Ora~ge ZONE 1(+) NC Loop (3) (15) ZONE 8(+) Wh,te/Gray
Pink ZONE RETuRN (2) (14) ZONE 1(+) Red/Yellow
EOLR LOOP
Greeo DATA IN [1) (13) DATA OUT Yellow
(Remole Console) [Remote Console)
l-l
2. ?,. .......0.
W(TH FLYING ,,.0s
w“. ,. ,0.,.
F
.
..” .0 !,*
+— ,. ,,. . .
.N,. !TC. ED
0.,,,, ,...,
4,37/5137
ONLY (ORIONALI
.s, .L,(s,,0 .,.,,,0,.,.,” c...,
,0. ALL CO,t+cm,o.s
M.XIMUM OF T!WIEE 2-W(RE SMOKE
OR COMBUSTION DETECTORS ,(R5 ,.0,,.,,0. MU,, ,0,,0. .,,, ST. . . . . . .0,4
<,..,,0 ...,,., ..0,..,, ”. .,s0. .,,,,. ”....”
(BRK 1403 24C0 2400TH. 1451 2451 2451THI ,.,. .“,.., . . mm,,
,E!zkI-
,,,.,.....s
El w!,. ,.s, ON
,.s,s ,... <.,0,, ON ,..
2.., SAT7E*Y $“$6 *mzaw ,7ETLJ,7N(WW2, 70, ?81
,s,0 ,.0,
.0,..0 NO *,. “m,. ,UJOO”M. E,,,TO.
. . A.? . . . . . . . . . . ‘Ax Loop ‘~s, sTANc* 3~ 0“.s
ACtwo NO *2, ‘,0,.
!lIm2@ s~~~~$y’w ‘EOLR
*TO Z!WERETUEU,PIN Z70R8, . I ,->%,”.!!:3
m,. ::
A
;=,ypy s!.”, *TO ZCWE mm.. (P,. 2, 7ma)
,—,... I‘..o~’~. ,“0., ‘.,
TO ,0., .,,.,. ,,,?4 , , 0.,)
II
;=:~p I...0s.. ,0., !,, SOW,”S,C. CS.O.., “,0., 7. . . ., !,,.. . . . R...,, .,”,.,,,” . . . . . . . . .. . . . . . . 12VDC (-) t I
TO BLACK(P!N 101- ---- A
,.0., ,, NOLo..,. .“.),.s,! ASaPmr,c,)m ,0., .“,. 50
D“”m . . . . . !*,, . . . . . . . . . . . . “,,. s,, ,,., ,. ,.,,..,.,!0. ,.s,...,,0., TO RED (PIN 23) *!?v:c~~ 2
,,, ., ,,, .0., ,..” ...,,0., A,,., LO., ,“s, ., O,, ELLOW ,,.0,,,. ,.,]
&w., m,mow. ,,.0 (PIN 4,,
:
,‘~ T0t5137
RED LEADS
~
I
+~w.c!.l
. . . m.,.
-(m.. !4,,,
.(2, +,r.,, m., .,2V
P&tfi:::&cmAMU,
IE&’:.”B:;:&
1: C,TERN., 81,”
l______
;------ --m~’~~~+””
OPTIONAL 4148 RELAY MODULE
L------------- ______
3AMP FUSE
[SL::::O)
,0., ,,,.s, .,,.0.s,,
,0 ZONE WETURN (P,, , , 0R8,~ !,, ,
L!L_2!lw%%www R. .0...,,, .,0s.. ,.0, ,“s, 0..,., LEA. ,,,. ,, *WH,TE,.,WN ,,.O,,,. .,,
Diagram 1. SUMMARY OF CONNECTIONS
w.,. -
,.s . ..
,.. ,,, m
*,0”, ”..,.,,
.
ISEE NOTE BELOWI
.n ,RECORDING
INSTALLATION
DATA
When all interface
wiring iscompleted,
record wiring usage
in the spaces pro-
vided on the Wire
Assignment tag
attached to the
wires on the 24-pin
connector. This will
provide aperma-
nent record of the
interface wiring con-
nections for future
servicing.
PINS ~3-24‘d
SEE
WIRING ASSIGNMENT
TABLE IN TEXT
NOTE
TO REMOVE cONNEcTOR FROM CONTROL 60ARD
AFTER INSERTION, SOUEEZE TAB AND PULL
OUTWARD WITH A SIDE TO SIDE ROCKING MOTION
Diagram 2.
24-PIN CONNECTOR WITH FLYING LEADS
(5130XT WIRING iNTERFACE)
Remote Keyswitch Operation &Wiring
An optional Remote Keyswitch may be used for remote arming and disarm-
ing (this is an installer-programmed option). Anormally-open momentary
switch is connected across Zone 7(which must be given up as aprotection
zone). Amomentary short of the zone will arm the System in the AWAY
mode; if the key is held (short maintained) for over 3seconds, the System
will arm in the STAY mode. When amomentary short is applied subse-
quently, the System will disarm. Akeyswitch tamper (normally-closed)
switch wired in series with zone 7will disable keyswitch operation until the
system is next disarmed via akeypad, if activated. Refer to Diagram 3for
Keyswitch wiring details.
NOTE: Regardless whether End-of-Line supervision is selected or not (in
Address ’41 ), an end-of-line resistor must still be used for proper function-
ing of the keyswitch.
CONNECTSTO
REMOTE KEYPAD
INTERFACEON
CONTROL
(SEE DIAG.1)
r-— -—— ——— ——— -—— .
I(ARMEDI IREADY)
IRED GREEN
REMOTE I
KEYPAD
CONNECTOR I
D
0I
IA
Q
d
BLUE
[
RED (PlN3)-
TO FLYING LEADS I
GREEN ON 1O-PIN REMOTE BLUE (PI N6)+ 1n
KEYPAD CONNECTOR GREEN (PIN 5)4 ?
I
RED ITAMPER
ISWITCH IN. C.)
I
[
wHITE/vlo LET(Pl N16)4 I
I
TO FLYING LEADS ON
24-PIN INTERFACE ILOCK
CONNECTOR (SEE DIAG. 1) 1
SWITCH (N. O.)
1
ZONE RETURN (PIN 2, 7OR 6) =I
I
NOTE:
I
SUGGESTED PARTS FOR REMOTE KEYSWITCH I
No.4073-70 IS NOT ANo. 9787 TYPE SLIM DOU8LE LED PLATE I
UL LISTED TEM. No. 112 NC. TAMPER SWITCH
NO. 4073-70 HIGH SECURITy KEY LOCK, SPRING LOADEO (NO.) ID
1000 OHMS EOLR
I
I
I
I
I
I
I
I
I
I
I
I
I
I
I
I
I
I
I
I
I
I
I
L!————— ———— ———— .— -
Diagram 3. KEYSWITCH WIRING
Optional Remote Keypad Connection (4131)
An optional remote keypad (4131 may be used with the System. Two
10-pin femaie connectors have been supplied for keypad interfacing
to the 5130XT Control (see Diagram 1, Summary of Connections).
The two connectors, which are identical, are equipped with color-
coded flying leads that are 12 inches (30 cm) in length.
One of these connectors is attached directly to the mating 10-pin male
connector on the remote keypad (the connector can only be inserted
one way, and will lock in place).
The other connector is connected to the 5130XT Control via a“straight”
male-to-male 10-pin adapter (supplied).
Specific information regarding the use of the adapter and connection to
the 5130XT Control is provided in the section entitled MOUNTING THE
5130XT.
Optional Remote Console Connection (5137 or 4137)
An optional Remote Console (5137 or 4137) can be used with the
System. Connections are as follows:
513714737 24-pin Connector
Lesds Flying Leads
RED to RED/BLACK (Pin 22)
GREEN to GREEN (Pin 1)
YELLOW to YELLOW (Pin 13)
BLACK to BLACK (Pin 10) -Connect also to (-) out-
put of optional separate No.1350 Power
Pack.
BLUE to (+) output of optional separate No. 1350
Power Pack.
Refer also to Diagram 1for the above connections

This manual suits for next models

1

Other ADEMCO Security System manuals

ADEMCO VISTA-20SE User manual

ADEMCO

ADEMCO VISTA-20SE User manual

ADEMCO 4130XM User manual

ADEMCO

ADEMCO 4130XM User manual

ADEMCO Alarm System Instruction manual

ADEMCO

ADEMCO Alarm System Instruction manual

ADEMCO 4130XM User manual

ADEMCO

ADEMCO 4130XM User manual

ADEMCO VISTA-120 User manual

ADEMCO

ADEMCO VISTA-120 User manual

ADEMCO VISTA-128FBP User manual

ADEMCO

ADEMCO VISTA-128FBP User manual

ADEMCO LYNX User manual

ADEMCO

ADEMCO LYNX User manual

ADEMCO VISTA-50PUL User manual

ADEMCO

ADEMCO VISTA-50PUL User manual

ADEMCO 5600 Alert II User manual

ADEMCO

ADEMCO 5600 Alert II User manual

ADEMCO Vista-10SEa User manual

ADEMCO

ADEMCO Vista-10SEa User manual

ADEMCO VISTA-128B User manual

ADEMCO

ADEMCO VISTA-128B User manual

ADEMCO 4286 - Ademco Phone Module User manual

ADEMCO

ADEMCO 4286 - Ademco Phone Module User manual

ADEMCO via30+ User manual

ADEMCO

ADEMCO via30+ User manual

ADEMCO Security System VISTA-15 Operating instructions

ADEMCO

ADEMCO Security System VISTA-15 Operating instructions

ADEMCO Vista-10P Operating instructions

ADEMCO

ADEMCO Vista-10P Operating instructions

ADEMCO VISTA-32FB User manual

ADEMCO

ADEMCO VISTA-32FB User manual

ADEMCO VISTA-100 User manual

ADEMCO

ADEMCO VISTA-100 User manual

ADEMCO 5120XM User manual

ADEMCO

ADEMCO 5120XM User manual

ADEMCO Vista-128FB  User manual

ADEMCO

ADEMCO Vista-128FB User manual

ADEMCO 676 User manual

ADEMCO

ADEMCO 676 User manual

ADEMCO Vista-10SEa Assembly instructions

ADEMCO

ADEMCO Vista-10SEa Assembly instructions

ADEMCO VISTA-250BP Assembly instructions

ADEMCO

ADEMCO VISTA-250BP Assembly instructions

ADEMCO Vista-10SEa User manual

ADEMCO

ADEMCO Vista-10SEa User manual

ADEMCO LYNXR User manual

ADEMCO

ADEMCO LYNXR User manual

Popular Security System manuals by other brands

Starline E96 bt User manual instruction

Starline

Starline E96 bt User manual instruction

NAPCO XP-400 Programming instructions

NAPCO

NAPCO XP-400 Programming instructions

DSC Maxsys PC6010 Quick reference guide

DSC

DSC Maxsys PC6010 Quick reference guide

Camlite Video Systems 1000 Operating instructions and warranty

Camlite Video Systems

Camlite Video Systems 1000 Operating instructions and warranty

Belco Multi-Biometric quick start guide

Belco

Belco Multi-Biometric quick start guide

Mongoose MAP77 Installation

Mongoose

Mongoose MAP77 Installation

ZUDSEC ZDSH-108 quick start guide

ZUDSEC

ZUDSEC ZDSH-108 quick start guide

Tennant 9045205 Instruction bulletin

Tennant

Tennant 9045205 Instruction bulletin

Metal Defender MD-1 user manual

Metal Defender

Metal Defender MD-1 user manual

Code Blue CB 1-s w Administrator's guide

Code Blue

Code Blue CB 1-s w Administrator's guide

Silencer 7910K installation instructions

Silencer

Silencer 7910K installation instructions

Assa Abloy Yale AC-KF quick start guide

Assa Abloy

Assa Abloy Yale AC-KF quick start guide

Vingtor Stentofon SPA-V2 user manual

Vingtor Stentofon

Vingtor Stentofon SPA-V2 user manual

Careline 24 CL24 User's installation guide

Careline 24

Careline 24 CL24 User's installation guide

Acroprint TimeQ+ Biometric installation guide

Acroprint

Acroprint TimeQ+ Biometric installation guide

AKO 52067 manual

AKO

AKO 52067 manual

TECHVIEW QC-3762 user manual

TECHVIEW

TECHVIEW QC-3762 user manual

Eldes ESIM384 installation manual

Eldes

Eldes ESIM384 installation manual

manuals.online logo
manuals.online logoBrands
  • About & Mission
  • Contact us
  • Privacy Policy
  • Terms and Conditions

Copyright 2025 Manuals.Online. All Rights Reserved.