ADIATEK Baby-e User guide

230V
11 2011
Uso e manutenzione
(istruzioni originali)
Use and maintenance
Emploi et entretien
Bedienung und
Wartungsanleitung
Uso y mantenimiento
Attenzione! Leggere le istruzioni prima dell'uso.
Attention! Please read the instructions before use.
Attention! Lire les instructions avant de l'emploi.
Achtung! Vor dem Gebrauch die Anleitungen lesen.
Atención! Leer las instrucciones antes del empleo.
COD. 65311001


I I
SOMMARIO
LEGENDA CRUSCOTTO E COMANDI 4
LEGENDA MACCHINA 4
DESCRIZIONE TECNICA 5
PREMESSA 6
NORME GENERALI DI SICUREZZA 6
SIMBOLOGIA 6
PRIMA DELL’USO 7
Movimentazione della macchina imballata 7
Disimballo della macchina 7
Movimentazione del manubrio 7
Serbatoio di recupero 7
Serbatoio della soluzione detergente 7
PULIZIA DEI PAVIMENTI 7
Azionamento della macchina 7
Regolazione manubrio 7
Dispositivo troppopieno 8
ARRESTO DELLA MACCHINA AL TERMINE DELLA PULIZIA 8
MANUTENZIONE GIORNALIERA 8
Svuotamento e pulizia del serbatoio di recupero 8
Svuotamento e pulizia del serbatoio soluzione detergente 8
Pulizia del filtro aspirazione 8
Rimessaggio verticale della macchina 8
Pulizia della spazzola 9
Smontaggio/montaggio spazzola 9
Pulizia del tergipavimento 9
MANUTENZIONE ORDINARIA 9
Sostituzione della spazzola 9
Sostituzione della gomma tergipavimento posteriore 9
Sostituzione della gomma tergipavimento anteriore 9
CONTROLLO DEL FUNZIONAMENTO 10
Il motore aspirazione non funziona 10
Il motore spazzola non funziona 10
L'acqua sulla spazzola non è sufficiente 10
La macchina non pulisce bene 10
Il tergipavimento non asciuga perfettamente 10
Produzione eccessiva di schiuma 10
MANUTENZIONE PROGRAMMATA 11
SPAZZOLE CONSIGLIATE 11
3

I I
LEGENDA CRUSCOTTO E COMANDI
1.
INTERRUTTORE MOTORE SPAZZOLA E RELATIVA SPIA
2.
INTERRUTTORE MOTORE ASPIRAZIONE E RELATIVA SPIA
3.
INTERRUTTORE ELETTROVALVOLA E RELATIVA SPIA
4. LEVA SOLLEVAMENTO TERGIPAVIMENTO
5. IMPUGNATURA
6. LEVE PRESENZA UOMO
7. LEVA SBLOCCO MANUBRIO
LEGENDA MACCHINA
8.
RUOTE
9.
GRUPPO BASAMENTO SPAZZOLA
10.
REGOLATORE DI FLUSSO DELLA SOLUZIONE DETERGENTE
11.
SERBATOIO SOLUZIONE DETERGENTE
12.
TAPPO SCARICO SOLUZIONE DETERGENTE
13.
GRUPPO TERGIPAVIMENTO
14. TAPPO CARICO SOLUZIONE DETERGENTE
15. SERBATOIO RECUPERO
16. COPERCHIO ASPIRAZIONE
17. CRUSCOTTO
18. PRESA PER ALIMENTAZIONE ELETTRICA
19. TARGA MATRICOLA
4

I I
DESCRIZIONE TECNICA
Larghezza di lavoro mm 345
Larghezza tergipavimento mm 410
Tensione alimentazione V 230
Frequenza di rete Hz 50
Potenza installata W 650
Capacità di lavoro (max) m2/h 1240
Diametro spazzola mm 345
N° giri spazzola giri/min 145
Pressione sulla spazzola (max) kg 30
Depressione motore aspirazione mbar 70
Tipo di avanzamento semi automatico
Pendenza superabile (max) % 2
Capacità serbatoio soluzione l 12.5
Capacità serbatoio recupero l 13.5
Lunghezza macchina (min) mm 685
Altezza macchina mm 490
Larghezza macchina mm 415
Peso macchina (a vuoto) kg 44
Livello di pressione acustica (in conformità alla EN604_01) dB (A) < 70
Lunghezza cavo alimentazione m 20
Classe I
Grado di protezione IP 23
5

I I
PREMESSA
Vi ringraziamo per aver scelto la nostra macchina.
Questa macchina lavasciuga pavimenti viene utiliz-
zata nella pulizia industriale e civile per qualsiasi tipo
di pavimentazione esclusa la pulizia di moquettes.
Durante il moto di avanzamento l'azione combinata
della spazzola e della soluzione detergente rimuove
lo sporco il quale viene raccolto dal gruppo aspirante
posteriore, lasciando una superficie perfettamente
asciutta.
La macchina deve essere utilizzata solo per tale sco-
po. Fornisce le migliori prestazioni se usata corret-
tamente e mantenuta in piena efficienza. Vi pre-
ghiamo di leggere attentamente il presente libretto
uso e manutenzione e tenerlo sempre a disposizione.
In caso di necessità, Vi preghiamo di contattare il
nostro servizio di assistenza.
NORME GENERALI DI SICUREZZA
Le norme sotto indicate vanno seguite attentamente
per evitare danni all'operatore e alla macchina.
- Leggere attentamente le etichette sulla macchina,
non coprirle per nessuna ragione e sostituirle imme-
diatamente in caso venissero danneggiate.
- La macchina deve essere utilizzata esclusivamente
da personale autorizzato ed istruito all'uso.
- Durante il funzionamento della macchina fare at-
tenzione alle altre persone ed in particolare ai bam-
bini.
- In presenza di bambini sorvegliare la macchina in
modo che non possa accadere che giochino con la
stessa.
- Non toccare o scavalcare il cavo di alimentazione
con la spazzola in lavoro.
- La presa della rete di alimentazione deve essere
fornita di messa a terra regolamentare.
- Non danneggiare il cavo di alimentazione con pie-
gature, schiacciamenti o sollecitazioni.
- Controllare l’integrità del cavo di alimentazione. Se
in fase di lavoro si nota un danneggiamento, fermare
immediatamente la macchina e sostituirlo.
- Non mescolare detergenti di tipo diverso per evita-
re la produzione di gas nocivi.
- Temperatura di magazzinaggio: tra 0°C e +55°C.
- Temperatura ottimale di lavoro: tra 0°C e 40°C.
- L'umidità non deve superare il 95%.
- Non usare la macchina in atmosfera esplosiva.
- Non usare la macchina come mezzo di trasporto.
- Non percorrere le scale.
- Non utilizzare soluzioni acide che potrebbero dan-
neggiare la macchina e/o le persone.
- Evitare che la spazzola lavori con la macchina fer-
ma per non provocare danni al pavimento.
- Non usare la macchina su superfici cosparse di li-
quidi o polveri infiammabili (ad esempio idrocarburi,
ceneri o fuliggine).
- In caso di incendio usare estintori idonei.
Non usare acqua.
- Non urtare scaffalature o impalcature dove esista il
pericolo di caduta di oggetti.
- Non utilizzare l'apparecchio su superfici aventi
un'inclinazione superiore a quella indicata in targa.
- La macchina deve eseguire le operazioni di lavaggio
ed asciugatura contemporaneamente. Operazioni di-
verse dovranno essere eseguite in zone vietate al
passaggio di persone non addette e l’operatore dovrà
indossare calzature adeguate.
- Segnalare le zone di pavimento umido con appositi
cartelli segnalatori.
- Quando si dovessero riscontrare anomalie nel fun-
zionamento della macchina, accertarsi che non siano
dipendenti dalla mancata manutenzione ordinaria. In
caso contrario richiedere l'intervento del centro assi-
stenza autorizzato.
- In caso di sostituzione di pezzi, richiedere i ricambi
ORIGINALI ad un Concessionario e/o Rivenditore
Autorizzato.
- Impiegare solamente spazzole ORIGINALI indicate
nel paragrafo "SPAZZOLE CONSIGLIATE".
- Per ogni intervento di pulizia e/o manutenzione
togliere l'alimentazione elettrica dalla macchina.
- Non togliere le protezioni che richiedano l'uso di
utensili per essere rimosse.
- Non lavare la macchina con getti d'acqua diretti o
in pressione, o con sostanze corrosive.
- Ogni 200 ore far controllare la macchina da un
centro di assistenza autorizzato.
- Prima di utilizzare la macchina, verificare che tutti
gli sportelli e le coperture siano posizionati come in-
dicato nel presente manuale uso e manutenzione.
- Ripristinare tutti i collegamenti elettrici dopo qual-
siasi intervento di manutenzione.
- Provvedere allo smaltimento dei materiali di con-
sumo attenendosi scrupolosamente alle norme di
legge vigenti.
- Quando la Vostra macchina dovrà cessare l'attività,
provvedere allo smaltimento appropriato dei mate-
riali in essa contenuti specialmente oli e componenti
elettronici, e tenendo conto che la macchina stessa è
stata costruita, per quanto possibile, con l'impiego di
materiali riciclabili.
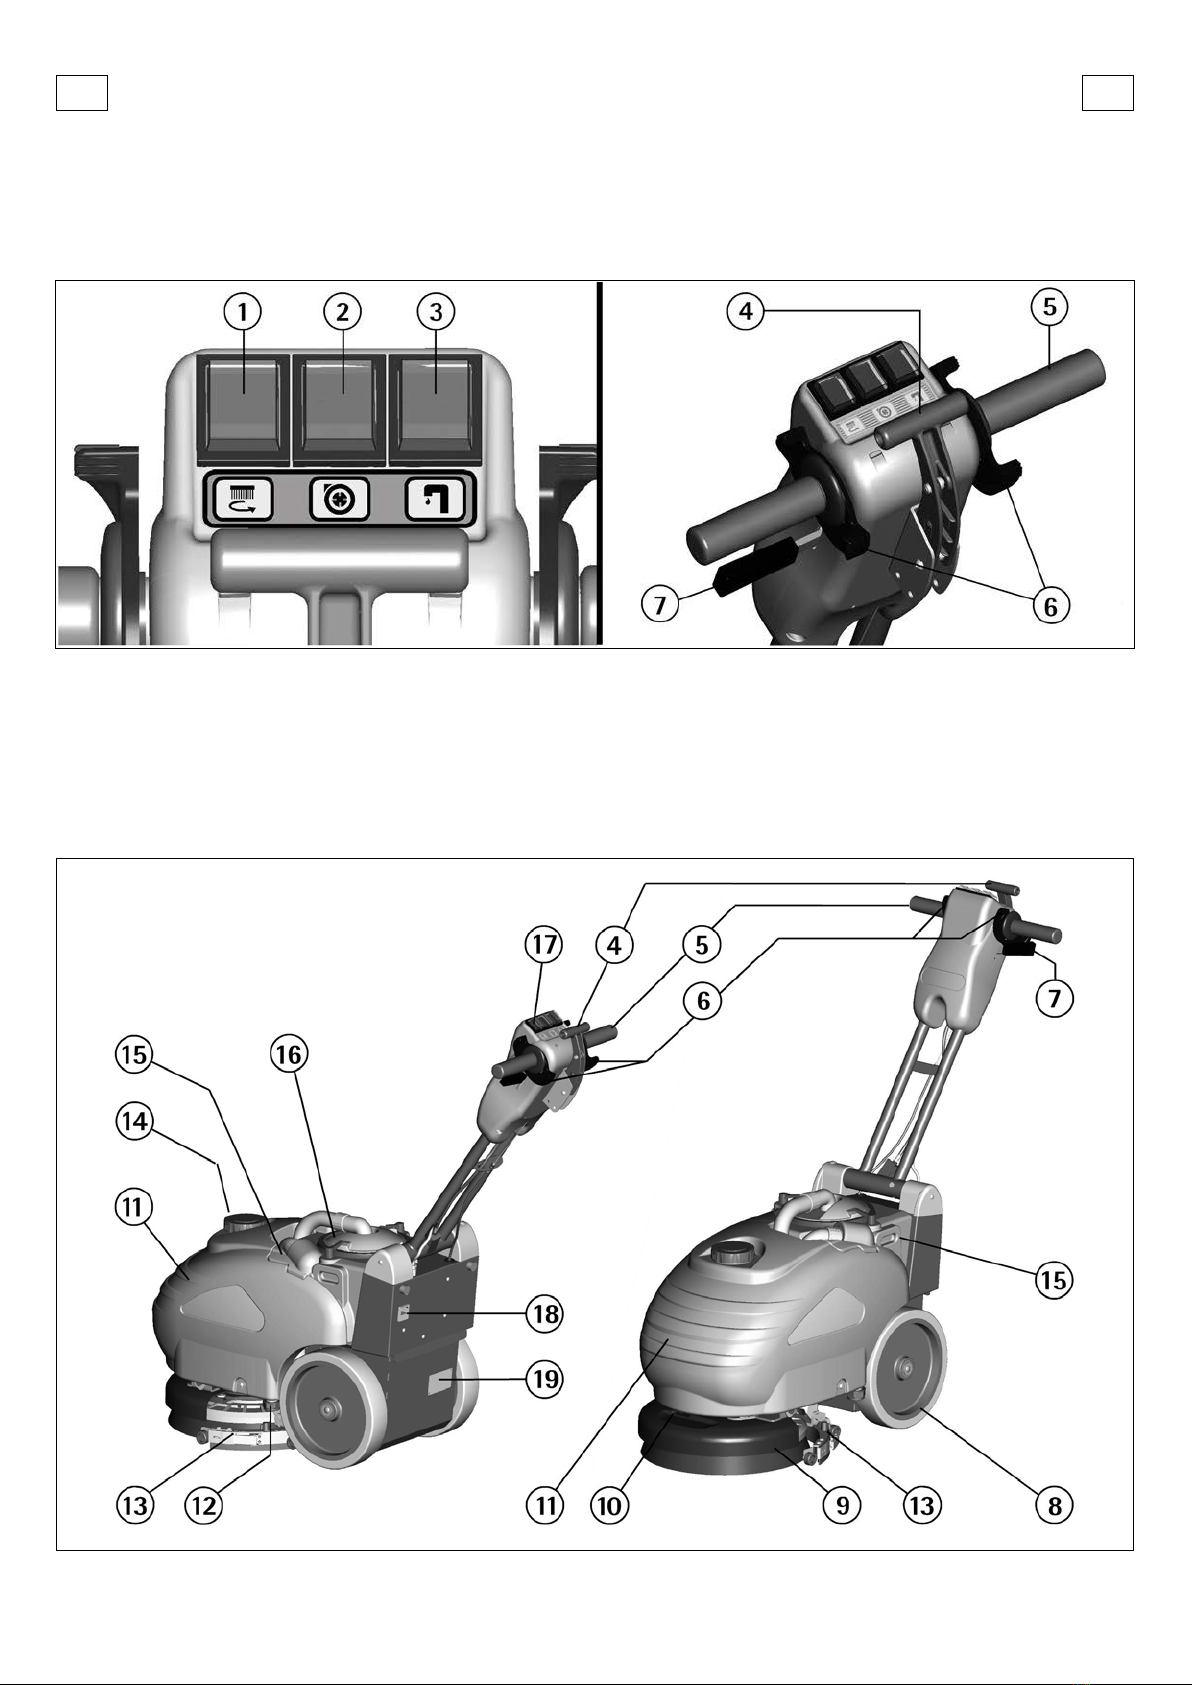
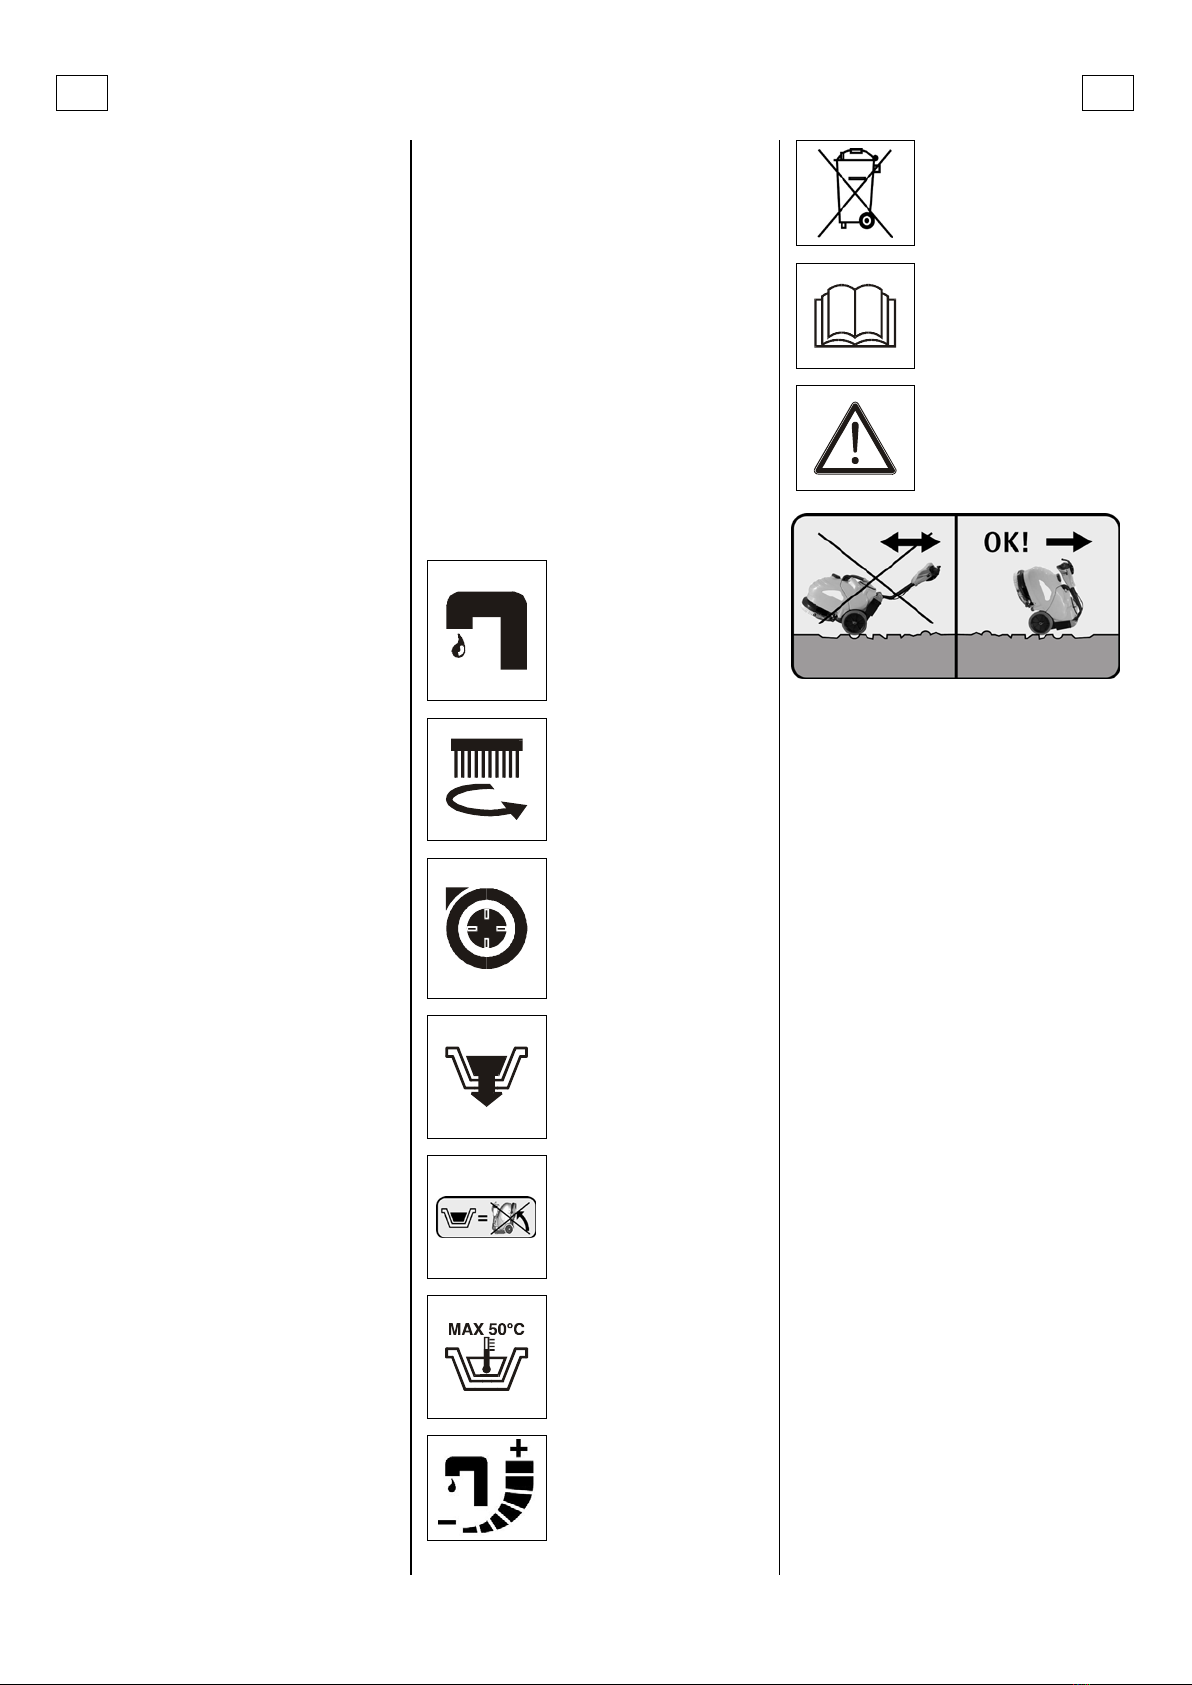
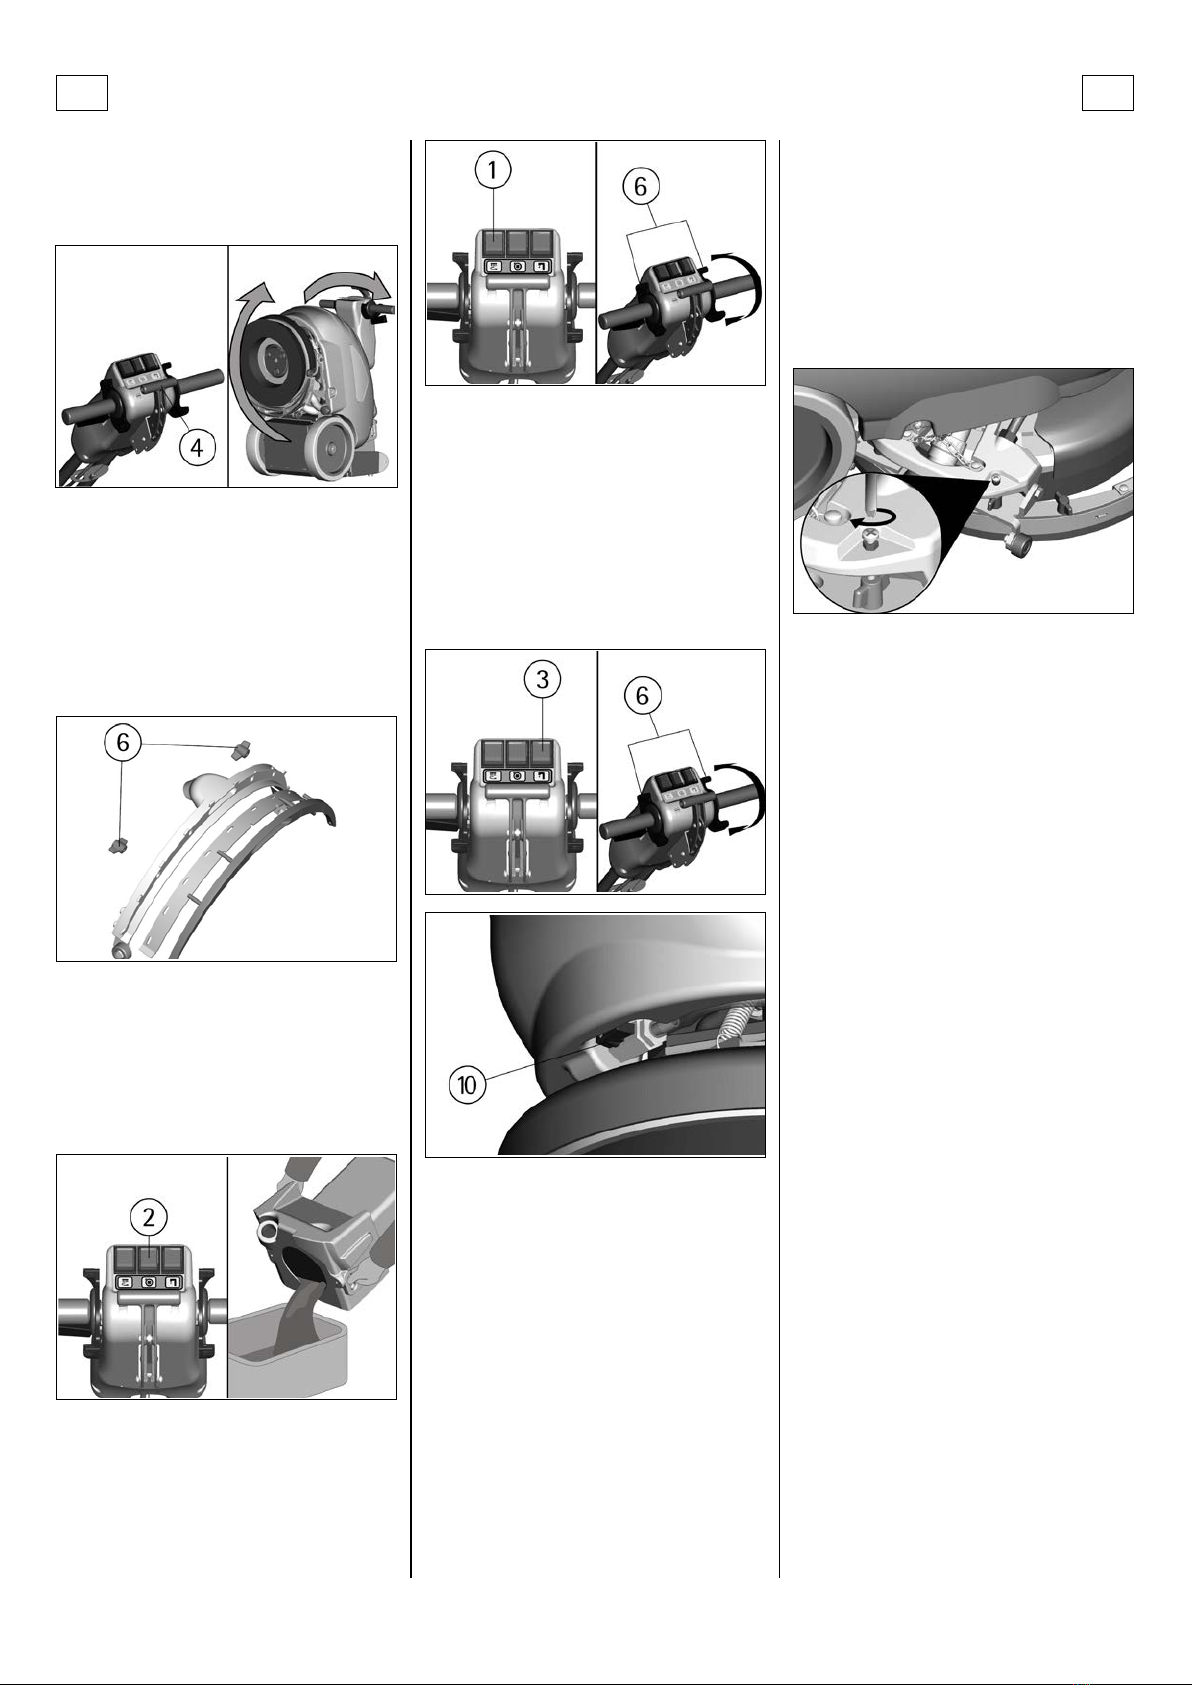
SIMBOLOGIA
Simbolo del rubinetto.
Indica l’interruttore e la spia
dell’elettrovalvola.
Simbolo della spazzola.
Indica l'interruttore e la spia del
motore spazzola.
Simbolo del motore aspirazione.
Indica l'interruttore e la spia del
motore aspirazione.
Simbolo che indica la posizione
del tappo di scarico del
serbatoio soluzione.
Simbolo che indica di svuotare i
serbatoi prima di ruotare la
macchina.
Simbolo che indica la
temperatura massima della
soluzione detergente.
Simbolo che indica il regolatore
di flusso della soluzione
detergente.
Simbolo del bidone barrato.
Indica che alla fine della propria
vita utile la macchina dovrà
essere smaltita in conformità
alla legislazione vigente.
Simbolo del libro aperto.
Indica all’operatore di leggere i
manuali prima dell’uso della
macchina.
Simbolo di avvertimento.
Leggere attentamente le sezioni
precedute da questo simbolo,
per la sicurezza dell'operatore e
della macchina.
Simbolo che indica il modo corretto di trasferire la
macchina su percorsi comunque accidentati.
6

I I
PRIMA DELL’USO
MOVIMENTAZIONE DELLA MACCHINA IMBALLA-
TA
La macchina viene fornita imballata.
La massa complessiva è di 50 kg (max).
Le dimensioni dell’imballo sono:
senza pallet:
Base: 80 cm x 43 cm Altezza: 65 cm
con pallet:
Base: 80 cm x 43 cm Altezza: 75 cm
ATTENZIONE:
Non sovrapporre più di 2 imballi.
DISIMBALLO DELLA MACCHINA
1. Rimuovere l’imballo esterno.
2. Svitare i due dadi che fissano le due staffe alla
macchina.
3. Svitare le viti che fissano le staffe alla pedana e
rimuovere le staffe.
4. Riavvitare nella medesima posizione i due dadi
sulla macchina in quanto necessari per bloccare il
serbatoio.
5. Portare il manubrio in posizione di lavoro (vedere
in “MOVIMENTAZIONE MANUBRIO”) per far scendere
la macchina dalla pedana, spingendola in avanti sulle
ruote in posizione un po’ inclinata posteriormente
per evitare urti violenti alle parti meccaniche.
6. Conservare la pedana per eventuali necessità di
trasporto.
MOVIMENTAZIONE DEL MANUBRIO
Il manubrio nell’imballo si trova in posizione chiusa
sulla macchina.
Per ruotare il manubrio in una delle varie posizioni di
lavoro e poter quindi movimentare la macchina:
1. Agire sulla leva di sblocco (7) presente vicino
all’impugnatura del manubrio.
2. Ruotare il manubrio nella posizione di lavoro
mantenendo premuta la leva di sblocco (7).
3. Rilasciare la leva di sblocco (7) per ottenere il
bloccaggio del manubrio.
Agire allo stesso modo per un'ulteriore regolazione
dell’altezza del manubrio al fine di trovare la posi-
zione di lavoro più confortevole.
SERBATOIO DI RECUPERO
Controllare che il coperchio filtro aspirazione (16) sia
correttamente bloccato, dopo aver ruotato le levette
(B). Verificare inoltre che il tubo tergipavimento sia
correttamente inserito nella sede (A).
SERBATOIO DELLA SOLUZIONE DETERGENTE
La capacità del serbatoio soluzione è indicata nella
scheda tecnica.
Aprire il tappo a vite (14) che si trova superiormente
e riempire il serbatoio soluzione con acqua pulita, ad
una temperatura non superiore a 50°C. Aggiungere il
detersivo liquido nella concentrazione e con le mo-
dalità previste dal fabbricante. Per evitare la forma-
zione di un’eccessiva quantità di schiuma, che po-
trebbe creare problemi al motore di aspirazione, usa-
re la minima percentuale di detersivo. Avvitare il
tappo del serbatoio soluzione.
ATTENZIONE:
Usare sempre detersivo a schiuma frenata. Per evita-
re con sicurezza la produzione di schiuma, prima di
iniziare il lavoro introdurre nel serbatoio di recupero
una minima quantità di liquido antischiuma.
Non utilizzare acidi allo stato puro.
PULIZIA DEI PAVIMENTI
AZIONAMENTO DELLA MACCHINA
Con la macchina è fornito un cavo di alimentazione
con spina per il collegamento alla rete di alimenta-
zione e di presa di connettore da inserire nella spina
(20) posteriormente alla macchina.
1. Inserire la presa nella spina (18) della macchina.
2. Inserire la spina nella presa di rete appropriata.
3. Abbassare il tergipavimento ruotando verso il
basso la leva (4) posta al centro del manubrio.
4. Premere l’interruttore del motore spazzola (1).
5. Premere l’interruttore del motore aspirazione (2).
6. Premere l’interruttore dell’elettrovalvola (3).
La macchina è equipaggiata di elettrovalvola per cui
il flusso di soluzione detergente verrà azionato au-
tomaticamente agendo sulla presenza uomo (6). Ri-
lasciando la presenza uomo il flusso si fermerà au-
tomaticamente.
7. Agendo sulle leve presenza uomo (6) la spazzola
inizierà a ruotare. Il flusso di soluzione detergente
comincerà a defluire e il tergipavimento comincerà
ad aspirare.
8. Durante i primi metri controllare che il flusso di
soluzione detergente sia adeguato. Il regolatore di
flusso della soluzione detergente è già tarato in fab-
brica per soddisfare la pulizia della maggior parte dei
pavimenti. Se fosse necessario modificare la quantità
di soluzione detergente sul pavimento, agire sulla le-
va del regolatore di flusso (10).
9. Nell’effettuare spostamenti anche brevi in retro-
marcia, assicurarsi che il tergipavimento sia sollevato.
REGOLAZIONE MANUBRIO
In prossimità di ostacoli o pareti è possibile facilitare
la manovra della macchina regolando il manubrio
con una posizione dell’impugnatura più verticale ri-
spetto alla macchina.
Per ruotare il manubrio:
1. Agire sulla leva di sblocco (7) presente vicino
all’impugnatura del manubrio.
2. Ruotare il manubrio nella nuova posizione di la-
voro mantenendo premuta la leva di sblocco (7).
3. Rilasciare la leva di sblocco (7) per ottenere il
bloccaggio del manubrio.
Una volta superato l’ostacolo e completata la mano-
vra ripetere l’operazione per tornare alla posizione di
lavoro precedente.
Questa operazione è possibile anche con la macchina
in movimento mantenendo premuta contemporane-
amente la leva di presenza uomo (6) e la leva di
sblocco (7).
7

I I
DISPOSITIVO TROPPOPIENO
Al fine di evitare seri danni al motore aspirazione, la
macchina è dotata di un galleggiante che interviene
quando il serbatoio di recupero è pieno provocando
la chiusura del tubo di aspirazione e quindi dell'aspi-
razione.
Quando questo accade, è necessario svuotare il ser-
batoio di recupero.
1. Spegnere la macchina agendo su tutti gli inter-
ruttori e togliere la spina dalla presa di rete.
2. Togliere il coperchio filtro aspirazione (16) dopo
aver ruotato le levette (B) che lo bloccano.
3. Togliere il tubo del tergipavimento dalla sede (A).
4. Sollevare e togliere il serbatoio di recupero (15)
impugnandolo dalle apposite maniglie ricavate late-
ralmente al serbatoio.
Svuotare il serbatoio di recupero, versando il liquido
sporco nelle vasche previste, in ottemperanza alle
norme vigenti per quanto riguarda lo smaltimento
dei liquidi.
5. Rimontare il tutto.
ATTENZIONE:
Questa operazione deve essere eseguita utilizzando
dei guanti per proteggersi dal contatto con soluzioni
pericolose.
ARRESTO DELLA MACCHINA AL
TERMINE DELLA PULIZIA
Prima di eseguire qualsiasi tipo di manutenzione:
1. Spegnere la macchina agendo su tutti gli inter-
ruttori e togliere la spina dalla presa di rete.
2. Alzare il tergipavimento ruotando verso l’alto la
leva (4) posta al centro del manubrio.
3. Portare la macchina fino al luogo previsto per lo
scarico dell’acqua.
ATTENZIONE:
La macchina non è dotata di freno di stazionamento
pertanto non abbandonarla su piani inclinati.
MANUTENZIONE GIORNALIERA
SVUOTAMENTO E PULIZIA DEL SERBATOIO DI
RECUPERO
Per svuotare e pulire il serbatoio di recupero.
1. Spegnere la macchina agendo su tutti gli inter-
ruttori e togliere la spina dalla presa di rete.
2. Togliere il coperchio filtro aspirazione (16) dopo
aver ruotato le levette (B) che lo bloccano.
3. Togliere il tubo del tergipavimento dalla sede (A).
4. Sollevare e togliere il serbatoio di recupero (15)
impugnandolo dalle apposite maniglie ricavate late-
ralmente al serbatoio.
Svuotare il serbatoio di recupero, versando il liquido
sporco nelle vasche previste, in ottemperanza alle
norme vigenti per quanto riguarda lo smaltimento
dei liquidi.
5. Provvedere al risciacquo e alla pulizia del serba-
toio.
6. Rimontare il tutto.
ATTENZIONE:
Questa operazione deve essere eseguita utilizzando
dei guanti per proteggersi dal contatto con soluzioni
pericolose.
SVUOTAMENTO E PULIZIA DEL SERBATOIO SOLU-
ZIONE DETERGENTE
Per scaricare la soluzione detergente rimasta nel ser-
batoio soluzione:
1. Spegnere la macchina agendo su tutti gli inter-
ruttori e togliere la spina dalla presa di rete.
2. Svitare il tappo di carico (14) del serbatoio solu-
zione.
3. Svitare il tappo di scarico (12) posto inferiormen-
te sul fianco sinistro della macchina.
ATTENZIONE:
Questa operazione deve essere eseguita utilizzando
dei guanti per proteggersi dal contatto con soluzioni
pericolose.
PULIZIA DEL FILTRO ASPIRAZIONE
1. Togliere il coperchio filtro aspirazione (16) dopo
aver ruotato le levette (B) che lo bloccano.
2. Togliere il filtro con il galleggiante facendo flet-
tere il bordo del filtro per disimpegnarlo dalle viti
presenti sul coperchio.
3. Pulire il tutto con un getto d’acqua e special-
mente le pareti ed il fondo del filtro.
4. Eseguire le operazioni di lavaggio in modo accu-
rato.
5. Rimontare il tutto.
RIMESSAGGIO VERTICALE DELLA MACCHINA
La macchina deve assumere una posizione verticale
ribaltata posteriormente dopo aver ripiegato il ma-
nubrio sulla macchina.
Questa posizione permette un minore ingombro per
il rimessaggio della macchina e facilita le operazioni
di manutenzione sulla stessa.
Per ruotare la macchina bisogna:
1. Spegnere la macchina agendo su tutti gli inter-
ruttori e togliere la spina dalla presa di rete.
2. Controllare che entrambi i serbatoi siano vuoti e
nel caso provvedere a svuotarli (vedere in “SVUOTA-
MENTO E PULIZIA DEL SERBATOIO DI RECUPERO” e
“SVUOTAMENTO E PULIZIA DEL SERBATOIO SOLU-
ZIONE").
3. Agire sulla leva di sblocco (7) presente vicino
all’impugnatura del manubrio.
4. Ruotare il manubrio ripiegandolo verso i serbatoi
mantenendo premuta la leva di sblocco (7).
5. Rilasciare la leva di sblocco (7) per ottenere il
bloccaggio del manubrio.
6. Posizionarsi sul lato destro della macchina.
7. Impugnare la macchina con entrambe le mani nel
punto (A) dal bordo serbatoio e (B) dall’impugnatura
manubrio indicati in figura.
8. Sollevare la parte anteriore della macchina fa-
cendola ruotare sulle ruote posteriori portandola in
posizione verticale come in figura.
ATTENZIONE:
La posizione di rimessaggio verticale è indicata
quando si prevede di non utilizzare la macchina
per un periodo superiore a 2/3 giorni, per evitare
8

I I
che il peso della macchina possa con il tempo
danneggiare la spazzola compromettendo quindi
il corretto funzionamento della macchina.
PULIZIA DELLA SPAZZOLA
Smontare la spazzola e pulirla con un getto d’acqua
(per lo smontaggio della spazzola vedere in seguito
“SMONTAGGIO/MONTAGGIO SPAZZOLA”).
SMONTAGGIO/MONTAGGIO SPAZZOLA
1. Ribaltare la macchina posteriormente (vedere in
“RIMESSAGGIO VERTICALE DELLA MACCHINA") fa-
cendo attenzione a ricordare di spegnere la macchi-
na agendo su tutti gli interruttori e togliere la spina
dalla presa di rete.
2. Con la macchina in questa posizione ruotare la
spazzola in senso orario, come indicato in figura, af-
finché esca dalle sedi del piatto portaspazzola.
3. Per rimontare la spazzola inserire i bottoni di ag-
gancio presenti sulla spazzola nelle apposite sedi del
piatto portaspazzola e ruotare in senso antiorario fi-
no ad ottenere il bloccaggio.
ATTENZIONE:
Le operazioni di manipolazione della spazzola devo-
no essere eseguite utilizzando dei guanti idonei per
proteggere sia meccanicamente dal contatto con le
setole che dal rischio chimico per contatto con solu-
zioni pericolose.
PULIZIA DEL TERGIPAVIMENTO
Mantenere il tergipavimento pulito è garanzia di una
migliore asciugatura.
1. Ribaltare la macchina posteriormente (vedere in
“RIMESSAGGIO VERTICALE DELLA MACCHINA") fa-
cendo attenzione a ricordare di spegnere la macchi-
na agendo su tutti gli interruttori e togliere la spina
dalla presa di rete.
2. Con la macchina in questa posizione pulire accu-
ratamente l’interno dell’innesto sul tergipavimento
eliminando eventuali depositi di sporco e pulire ac-
curatamente le gomme del tergipavimento.
MANUTENZIONE ORDINARIA
SOSTITUZIONE DELLA SPAZZOLA
La spazzola va sostituita quando le setole raggiun-
gono 10 mm di lunghezza. Si possono inoltre provare
spazzole di tipo diverso in funzione del tipo di pavi-
mento che si deve lavare e delle condizioni di sporco
in cui si trova (vedere in “SPAZZOLE CONSIGLIATE”).
Smontare la spazzola vecchia e sostituirla con quella
nuova (vedere in "SMONTAGGIO/MONTAGGIO SPAZ-
ZOLA").
SOSTITUZIONE DELLA GOMMA TERGIPAVIMENTO
POSTERIORE
Controllare lo stato di usura della gomma tergipavi-
mento ed eventualmente girarla o sostituirla.
Per la sostituzione è necessario:
1. Abbassare il tergipavimento ruotando verso il
basso la leva (4) posta al centro del manubrio.
2. Ribaltare la macchina posteriormente (vedere in
“RIMESSAGGIO VERTICALE DELLA MACCHINA") fa-
cendo attenzione a ricordare di spegnere la macchi-
na agendo su tutti gli interruttori e togliere la spina
dalla presa di rete.
3. Con la macchina in questa posizione agire sui
galletti (1) svitandoli completamente per liberare il
tergipavimento.
4. Sfilare il manicotto (2) del tubo tergipavimento e
togliere il tergipavimento.
5. Sganciare la chiusura (4) della lama premigomma
e sfilare la gomma per girarla o sostituirla.
6. Controllare che il manicotto e il tubo tergipavi-
mento non siano ostruiti ed eventualmente rimuove-
re lo sporco.
Per rimontare il tergipavimento ripetere all’inverso le
operazioni sopra descritte.
SOSTITUZIONE DELLA GOMMA TERGIPAVIMENTO
ANTERIORE
Controllare lo stato di usura della gomma tergipavi-
mento anteriore ed eventualmente sostituirla.
Per la sostituzione è necessario:
1. Abbassare il tergipavimento ruotando verso il
basso il maniglione (4) posto al centro del manubrio.
9

I I
2. Ribaltare la macchina posteriormente (vedere in
“RIMESSAGGIO VERTICALE DELLA MACCHINA") fa-
cendo attenzione a ricordare di spegnere la macchi-
na agendo su tutti gli interruttori, togliere la spina
dalla presa di rete e di svuotare i serbatoi.
3. Con la macchina in questa posizione procedere a
smontare il tergipavimento e quindi la gomma del
tergipavimento posteriore (vedere in “SOSTITUZIONE
DELLA GOMMA TERGIPAVIMENTO POSTERIORE”).
4. Togliere i galletti (6) posti sulla parte superiore
del corpo tergipavimento.
5. Separare le due parti metalliche che lo compon-
gono per togliere la gomma anteriore.
6. Pulire con un getto d’acqua tutti i componenti.
Per rimontare il tergipavimento ripetere all’inverso le
operazioni sopra descritte.
CONTROLLO DEL FUNZIONAMENTO
IL MOTORE ASPIRAZIONE NON FUNZIONA
Verificare di aver attivato l’interruttore del motore
aspirazione (2) verificando che sia accesa la relativa
spia.
Se il guasto persiste, contattare il centro di assisten-
za tecnica autorizzato.
IL MOTORE SPAZZOLA NON FUNZIONA
1. Verificare di aver attivato l’interruttore del moto-
re spazzola (1) verificando che sia accesa la relativa
spia.
2. Azionare le leve presenza uomo (6).
Se il guasto persiste, contattare il centro di assisten-
za tecnica autorizzato.
L'ACQUA SULLA SPAZZOLA NON È SUFFICIENTE
1. Verificare di aver attivato l’interruttore
dell’elettrovalvola (3) verificando che sia accesa la
relativa spia.
2. Controllare il livello di liquido nel serbatoio solu-
zione (vedere in “SERBATOIO DELLA SOLUZIONE DE-
TERGENTE”).
3. Verificare che il regolatore di flusso della soluzio-
ne detergente (10) posto anteriormente sotto al ser-
batoio soluzione sia sufficientemente aperto.
4. Azionare le leve presenza uomo (6).
Se il guasto persiste, contattare il centro di assisten-
za tecnica autorizzato.
LA MACCHINA NON PULISCE BENE
1. La spazzola non ha le setole della dimensione ap-
propriata: utilizzare solo spazzole originali. Per sug-
gerimenti, contattare il centro di assistenza tecnica
autorizzato.
2. La soluzione detergente è insufficiente: aprire di
più il regolatore di flusso della soluzione detergente
(10).
3. Controllare che il detersivo sia nella percentuale
consigliata.
Consultare il centro di assistenza tecnica autorizzato
per un suggerimento.
IL TERGIPAVIMENTO NON ASCIUGA PERFETTA-
MENTE
1. Controllare che le gomme tergipavimento siano
pulite, integre e non troppo usurate. Se necessario
vanno eventualmente girate o sostituite (vedere in
“SOSTITUZIONE DELLA GOMMA TERGIPAVIMENTO
POSTERIORE”).
2. Controllare che il manicotto del tubo di aspira-
zione sia inserito correttamente nell’alloggiamento
sul serbatoio di recupero.
3. Intervenire sul filtro di aspirazione pulendolo.
4. Sostituire le gomme se usurate.
5. Controllare che l’interruttore del motore aspira-
zione sia acceso.
6. Controllare il livello nel serbatoio di recupero
(vedere in “DISPOSITIVO TROPPO PIENO”) e se neces-
sario, svuotare il serbatoio.
7. Se il pavimento rimane bagnato nella fascia cen-
trale di asciugatura è necessario caricare maggior-
mente il peso nella parte posteriore del tergipavi-
mento, avvitando di qualche giro l’apposita vite, co-
me mostrato in figura.
PRODUZIONE ECCESSIVA DI SCHIUMA
Controllare che sia stato usato detersivo a schiuma
frenata. Eventualmente aggiungere una minima
quantità di liquido antischiuma nel serbatoio recu-
pero.
Si tenga presente che si ha una maggior produzione
di schiuma quando il pavimento è poco sporco. In tal
caso diluire maggiormente la soluzione detergente.
10

I I
MANUTENZIONE PROGRAMMATA
INTERVENTO
GIORNALIERO
ORDINARIO/MENSILMENTE
PULIZIA SERBATOIO DI RECUPERO
•
PULIZIA FILTRO ASPIRAZIONE
•
PULIZIA SPAZZOLA
•
SMONTAGGIO SPAZZOLA
•
PULIZIA TERGIPAVIMENTO
•
SOSTITUZIONE GOMMA TERGIPAVIMENTO ANTERIORE
•se richiesto
SOSTITUZIONE GOMMA TERGIPAVIMENTO POSTERIORE
•se richiesto
PULIZIA TUBO TERGIPAVIMENTO
•
PULIZIA SERBATOIO SOLUZIONE
•
SPAZZOLE CONSIGLIATE
Le spazzole devono essere scelte in funzione del tipo di pavimento e dello sporco da asportare.
Il materiale impiegato ed il diametro delle setole sono gli elementi che differenziano le spazzole.
MATERIALE CARATTERISTICHE
PPL (Polipropilene) Buona resistenza all’usura. Mantiene le caratteristiche con acqua calda fino a 60°C. Non è igroscopico.
SPESSORE DELLE SETOLE
Le setole di spessore più grosso sono più rigide e quindi vanno usate su pavimento liscio o con piccole fughe. Su pavimento
irregolare o con rilievi o fughe profonde è consigliabile usare setole più morbide le quali penetrano più facilmente in profondità.
Va tenuto presente che quando le setole della spazzola sono consumate e quindi troppo corte, diventano rigide e non riescono più
a penetrare e pulire in profondità anche perché, come per le setole troppo grosse, la spazzola tende a saltellare.
DISCO TRASCINATORE
Il disco trascinatore è consigliabile per pulire superfici lisce. E’ dotato di una serie di punte ad ancora che permettono di trattenere
e trascinare il disco abrasivo (pad) durante il lavoro. E’ importante che l’altezza del disco più il pad sia uguale all'altezza della
spazzola.
CODICE QUANTITÀ DESCRIZIONE IMPIEGO
48903020
1
Spazzola PPL 0,6 Ø 345
Pavimenti normali.
48903030
1
Spazzola PPL 0,9 Ø 345
Pavimenti lisci con piccole fughe e sporco persistente.
48903050
1
Spazzola mischia 5 Ø 345
Per qualsiasi tipo di pavimento.
48803010
1
Disco trascinatore Ø 330
Per pad da 14”, per la pulizia di superfici lisce.
48803030
1
Disco trascinatore Ø 330 + center lock verde
Per pad da 14”, per la pulizia di superfici lisce.
48803040
1
Disco trascinatore Ø 330 + center lock nero
Per pad da 14”, per la pulizia di superfici lisce.
11

GB GB
SUMMARY
LEGEND INSTRUMENT BOARD AND CONTROLS 14
LEGEND MACHINE 14
TECHNICAL DESCRIPTION 15
INTRODUCTORY COMMENT 16
GENERAL RULES OF SAFETY 16
SYMBOLOGY 16
BEFORE USE 17
Handling of the packed machine 17
Unpacking of the machine 17
Movements of the handle bar 17
Recovery tank 17
Solution tank 17
FLOOR CLEANING 17
Starting of the machine 17
Handle bar adjustment 17
Overfill protection 17
STOPPING THE MACHINE AFTER CLEANING OPERATION 18
DAILY MAINTENANCE 18
Emptying and cleaning of the recovery tank 18
Emptying and cleaning of the solution tank 18
Suction filter cleaning 18
Vertical positioning of the machine 18
Brush cleaning 19
Brush removal/fitting 19
Squeegee cleaning 19
ORDINARY MAINTENANCE 19
Brush replacement 19
Rear squeegee rubber replacement 19
Front squeegee rubber replacement 19
TROUBLESHOOTING GUIDE 20
The suction motor does not work 20
The brush motor does not work 20
Insufficient water on the brush 20
The machine does not clean properly 20
The squeegee does not dry perfectly 20
Excessive foam production 20
PROGRAMMED MAINTENANCE 21
RECOMMENDED BRUSHES 21
13

GB GB
LEGEND INSTRUMENT BOARD AND CONTROLS
1.
BRUSH MOTOR SWITCH WITH SIGNAL LAMP
2.
SUCTION MOTOR SWITCH WITH SIGNAL LAMP
3.
SOLENOID VALVE SWITCH WITH SIGNAL LAMP
4. SQUEEGEE LIFT LEVER
5. HANDLE BARS
6. SCRUB CONTROL LEVERS
7. HANDLE BAR RELEASE LEVER
LEGEND MACHINE
8.
WHEELS
9.
BRUSH BASE ASSEMBLY
10.
SOLUTION FLOW ADJUSTMENT
11.
SOLUTION TANK
12.
DRAIN PLUG SOLUTION TANK
13.
SQUEEGEE ASSEMBLY
14. FILLING CAP FOR SOLUTION TANK
15. RECOVERY TANK
16. SUCTION COVER
17. INSTRUMENT BOARD
18. MAINS PLUG FOR ELECTRIC CABLE
19. SERIAL NUMBER PLATE
14

GB GB
TECHNICAL DESCRIPTION
Cleaning width mm 345
Squeegee width mm 410
Power supply V 230
Frequency rate Hz 50
Power rating W 650
Working capacity, up to sqm/h 1240
Brush diameter mm 345
Brush rpm rpm 145
Brush pressure (max) kg 30
Suction vacuum mbar 70
Type of drive semi automatic
Maximum gradient % 2
Capacity solution tank l 12.5
Capacity recovery tank l 13.5
Machine length (min) mm 685
Machine height mm 490
Machine width mm 415
Machine weight (empty) kg 44
Acoustic pressure level (in conformity with EN604_01) dB (A) < 70
Mains cable (length) m 20
Class I
Protection level IP 23
15

GB GB
INTRODUCTORY COMMENT
Thank you for having chosen our machine. This floor
cleaning machine is used for the commercial clean-
ing and is able to clean most types of hard floor, ex-
cept carpet cleaning (if unsure please consult your
floor manufacturer/supplier). During its forward
movement, the combined action of the brush and
the detergent solution removes the dirt which is re-
covered through the rear suction assembly, giving a
perfectly dry surface.
The machine must be used only for such purpose. It
gives the best performance if it is used correctly and
maintained in good condition. We therefore ask you
to read this instruction booklet carefully whenever
difficulties arise in the course of the machine’s use.
In case of need, we ask you to contact our service
department for all advice and servicing as may prove
necessary.
GENERAL RULES OF SAFETY
The rules below have to be followed carefully in or-
der to avoid injury to the operator and damage to
the machine.
- Read the labels carefully on the machine. Do not
cover them for any reason and replace them imme-
diately if damaged.
- The machine must be used exclusively by author-
ized staff that have been instructed on its correct
and proper use.
- During the operation of the machine, pay attention
to other people and especially to the children.
- In the presence of children guard the machine, so
that they do not play with it.
- Do not touch or pass over the mains cable while
the brush is operating.
- The socket for the power supply must be equipped
with a standard earthing (ground) system.
- Do not damage the mains cable by squashings,
bendings or stressings.
- Check the integrity of the mains cable. If during
working a damage is noticed, stop the machine im-
mediately and replace the cable.
- Do not mix different detergents, avoiding harmful
odours.
- Storage temperature: between 0°C and +55°C.
- Perfect operating temperature: between 0°C and
40°C.
- The humidity should not exceed 95%.
- Do not use the machine in explosive atmosphere.
- Do not use the machine as a means of transport.
- Do not go up or down the stairs.
- Do not use acid solutions which could damage the
machine and/or the persons.
- Avoid brush operation when the machine is stand-
ing still in order to prevent floor damages.
- Do not use the machine on surfaces covered with
inflammable liquids or dusts (for example hydrocar-
bons, ashes or soot).
- In case of fire, use a powder based fire-
extinguisher. Do not use water.
- Do not strike shelvings or scaffoldings where there
is danger of falling objects.
- Do not use the machine on areas having a higher
gradient than the one stated on the number plate.
- The machine has to carry out simultaneously the
operations of washing and drying. Different opera-
tions must be carried out in restricted areas prohib-
ited to non-authorized personnel and the operator
has to wear suitable shoes.
- Signal the areas of moist floors with suitable signs.
- If the machine does not work properly, check by
conducting simple maintenance procedures. Other-
wise, as for technical advice from an authorized as-
sistance centre.
- Where parts are required, ask for ORIGINAL spare
parts from the distributor and/or from an authorized
dealer.
- Use only ORIGINAL brushes indicated in the para-
graph “RECOMMENDED BRUSHES".
- For any cleaning and/or maintenance operation
take off the power supply from the machine.
- Do not take off the protections which require the
use of tools for their removal.
- Do not wash the machine with direct water jets or
with high water pressure nor with corrosive material.
- Every 200 working hours have a machine check by
an authorized service department.
- Before using the machine, check that all panels
and coverings are in their position as indicated in
this use and maintenance catalogue.
- Restore all electrical connections after any mainte-
nance operation.
- Provide for the scrapping of the material of normal
wear (brushes, squeegee blades etc.) following strict-
ly the respective rules.
- When your machine has to stop activity, provide
for the appropriate waste disposal of its materials,
especially oils and electronic components, and con-
sidering that the machine itself has been, where pos-
sible, constructed using recyclable materials.
SYMBOLOGY
Symbol denoting the solution
valve.
Indicates the switch and the
signal lamp of the solenoid valve.
Symbol denoting the brush.
Indicates the switch and the
signal lamp of the brush motor.
Symbol denoting the suction
motor.
Indicates the switch and the
signal lamp of the suction motor.
Symbol that indicates the
position of the outlet plug of
the solution tank.
This symbol indicates that tanks
are to be emptied before rotating
the machine.
Indication of the maximum
temperature of the solution
detergent.
Symbol that indicates the flow
adjuster of the detergent
solution.
Symbol denoting the crossed
bin. Indicates that at the end of
its activity, the machine has to
be disposed conforming to the
laws in force.
Symbol denoting the open
book.
Indicates that the operator has
to read the manual before the
use of the machine.
Warning symbol.
Read carefully the sections
marked with this symbol, for
the security of both the
operator and the machine.
Symbol denoting the correct mode to transfer the
machine on uneven surfaces.
16

GB GB
BEFORE USE
HANDLING OF THE PACKED MACHINE
The machine is supplied with suitable packing.
The total weight is 50 kg (max).
Packing dimensions:
without pallet:
Base: 80 cm x 43 cm Height: 65 cm
with pallet:
Base: 80 cm x 43 cm Height: 75 cm
ATTENTION:
Do not stack more than 2 machines.
UNPACKING OF THE MACHINE
1. Remove the outer package.
2. Loosen the two nuts that fix the two brackets to
the machine.
3. Unscrew the screws that fix the brackets to the
pallet and remove the brackets.
4. Retighten the two nuts into their initial position
onto the machine, necessary for the tank blocking.
5. Bring the handle bar into working position (see
under “MOVEMENTS OF THE HANDLE BAR”) to lower
the machine from the pallet and pushing it forwards
by the wheels inclining the machine a little back-
wards to avoid heavy contacts to the mechanical
parts.
6. Keep the packaging for eventual transport needs.
MOVEMENTS OF THE HANDLE BAR
The handle bar in the package arrives in closed posi-
tion.
To rotate the handle bar into one of the different
working positions:
1. Pull up the release lever (7) near the handle bars.
2. Rotate the handle bar into the working position
while holding the release lever (7).
3. Let go of the release lever (7) to lock the handle
bar.
Use the same procedure for further height adjust-
ment of the handle bar in order to find the most
comfortable working position.
RECOVERY TANK
Check that the cover of the suction filter (16) is cor-
rectly secured, after rotating the levers (B). Further-
more, check that the squeegee hose is correctly seat-
ed in its seat (A).
SOLUTION TANK
The capacity of the solution tank is indicated in the
technical data.
Open the screw plug (14) situated on top and fill the
solution tank with clean water at a maximum tem-
perature of 50°C. Add the liquid detergent in the
percentage recommended by the manufacturer. To
avoid excessive foaming, which could cause prob-
lems to the suction motor, use the minimum per-
centage of detergent. Screw down the plug to close
the tank.
ATTENTION:
Use always low foam detergent. To avoid excessive
foaming, before starting working operation, add into
the recovery tank a minimum quantity of anti-foam
product.
Never use acid.
FLOOR CLEANING
STARTING OF THE MACHINE
The machine is equipped with a mains cable com-
plete with a plug for the connection to the mains
system and with a socket connector to insert inside
the plug (20) situated behind the machine.
1. Insert the socket inside the machine plug (18).
2. Insert the plug into the appropriate mains socket.
3. Lower the squeegee by rotating downwards the
handle of the squeegee lifting lever (4) placed in the
centre of the handle bar.
4. Press the switch for the brush motor (1).
5. Press the switch for the suction motor (2).
6. Press the switch for the solenoid valve (3).
The machine is equipped with a solenoid valve,
which activates the solution flow automatically
when the scrub control levers (6) are engaged. Re-
leasing these levers will stop the flow automatically.
7. Activating the levers (6) the brush will start ro-
tating. The solution flow begins and the squeegee
will start drying the floor.
8. During the first few meters check that the solu-
tion flow is appropriate. The flow adjuster of the so-
lution is already adjusted at the factory to satisfy the
cleaning of most floors. If it is necessary to adjust
the quantity of solution onto the floor, adjust the
lever of the flow adjuster (10).
9. When moving the machine backwards, make sure
that the squeegee is lifted.
HANDLE BAR ADJUSTMENT
When approaching obstacles or near walls, it is pos-
sible to simplify the handling of the machine by ad-
justing the handle bar more vertically with respect to
the machine.
To rotate the handle bar:
1. Pull up the release lever (7) near the handle bars.
2. Rotate the handle bar into the new working posi-
tion keeping the release lever (7) pulled.
3. Release the lever (7) to lock the handle bar in the
desired position.
Once the obstacle has been passed and the maneu-
ver completed repeat the operation to return to the
previous working position.
This operation is possible also with the machine in
motion maintaining pressed contemporarily the
handle bar levers (6) and the release lever (7).
OVERFILL PROTECTION
In order to avoid serious damages to the suction mo-
tor, the machine is equipped with a float that inter-
venes when the recovery tank is full, closing the suc-
tion hose and stopping the suction.
When this happens, it is necessary to empty the re-
covery tank.
17

GB GB
1. Switch off the machine pressing all the switches
and take off the plug from the mains socket.
2. Take off the suction filter cover (16) after turning
the blocking levers (B).
3. Take off the squeegee hose from its seat (A).
4. Lift and remove the recovery tank (15) holding it
from the provided handles on the tank sides.
Empty the recovery tank into appropriate containers,
according to the standard norms for the liquid dis-
posal.
5. Reassemble everything.
ATTENTION:
This operation should be carried out wearing gloves
to prevent contact with dangerous solutions.
STOPPING THE MACHINE AFTER
CLEANING OPERATION
Before carrying out any type of maintenance:
1. Switch off the machine pressing all the switches
and take off the plug from the mains socket.
2. Lift the squeegee rotating upwards the lever (4)
placed in the centre of the handle bar.
3. Move the machine to an appropriate place for
tank draining.
ATTENTION:
The machine is not equipped with a parking brake,
therefore do not leave it on slopes.
DAILY MAINTENANCE
EMPTYING AND CLEANING OF THE RECOVERY
TANK
To empty and clean the recovery tank.
1. Switch off the machine pressing all the switches
and take off the plug from the mains socket.
2. Take off the suction cover (16) after rotating the
blocking levers (B).
3. Take off the squeegee hose (A) from the seat.
4. Lift and take off the recovery tank (15) holding it
from the provided handles located on the tank sides.
Empty the recovery tank into appropriate containers,
according to the standard norms for the liquid dis-
posal.
5. Rinse and clean the tank.
6. Reassemble everything.
ATTENTION:
This operation should be carried out wearing gloves
to prevent contact with dangerous solutions.
EMPTYING AND CLEANING OF THE SOLUTION
TANK
To empty the solution remained in the solution tank:
1. Switch off the machine pressing all the switches
and take off the plug from the mains socket.
2. Unscrew the filling cap (14) of the solution tank.
3. Unscrew the drain plug (12) placed in the rear
low left part of the machine.
ATTENTION:
This operation should be carried out wearing gloves
to prevent contact with dangerous solutions.
SUCTION FILTER CLEANING
1. Take off the suction cover (16) after rotating the
blocking levers (B).
2. Take off the filter with the float bending the fil-
ter edge to release it from the screws present on the
cover.
3. Clean all parts with a water jet and especially the
surfaces and the filter bottom.
4. Carry out carefully the cleaning operations.
5. Reassemble everything.
VERTICAL POSITIONING OF THE MACHINE
The machine has to assume a vertical positioning
tipped over at the back after having folded the han-
dle bar onto the machine.
This position allows the unit to be stored in a small
space and simplifies maintenance operations.
To rotate the machine it is necessary to:
1. Switch off the machine pressing all the switches
and take off the plug from the mains socket.
2. Check that both tanks are empty, otherwise pro-
vide to empty them (see under “EMPTYING AND
CLEANING OF THE RECOVERY TANK” and “EMPTYING
AND CLEANING OF THE SOLUTION TANK”).
3. Pull up on the handle bar release lever (7) near
the handle bar.
4. Rotate the handle bar towards the tanks keeping
the release lever (7) pulled.
5. Release the lever (7) to lock the handle bar.
6. Position yourself on the right side of the machine.
7. Hold the machine with both hands in point (A) of
the tank side and (B) from the handle bar as indicat-
ed in the figure.
8. Lift the front part of the machine rotating it on
the rear wheels and bringing it into the vertical posi-
tion as shown in the figure.
ATTENTION:
The position of the vertical parking is indicated
when you expect not to use the machine for a
period of more than 2/3 days, to avoid that the
weight of the machine may damage the brush
compromising hence the correct functioning of
the machine.
18

GB GB
BRUSH CLEANING
Remove the brush and clean it with a water jet (for
the disassembly see under “BRUSH REMOVAL/ FIT-
TING”).
BRUSH REMOVAL/FITTING
1. Tip the machine over backwards (see under “VER-
TICAL POSITIONING OF THE MACHINE") paying atten-
tion to remember to switch off the machine pressing
all the switches and take off the plug from the mains
socket.
2. With the machine in this position rotate the
brush clockwise, as indicated in the figure, until it is
released from their seats of the brush holder plate.
3. To reassemble the brush insert the coupling but-
tons into the slots of the brush holder plate and ro-
tate counterclockwise until it locks.
ATTENTION:
The handling of the brush operation must be carried
out wearing suitable gloves to protect both mechan-
ically from contact with the bristles and the chemi-
cal risk of contact with dangerous solutions.
SQUEEGEE CLEANING
Keeping the squeegee clean guarantees the best dry-
ing action.
1. Tip over the machine backwards (see under “VER-
TICAL POSITIONING OF THE MACHINE") paying atten-
tion to remember to switch off the machine pressing
all the switches and take off the plug from the mains
socket.
2. With the machine in this position take care to
clean both the rubber squeegee blades and particu-
larly the suction inlet. Also remove any fibres (string
or hair) that can prevent the support turning freely.
ORDINARY MAINTENANCE
BRUSH REPLACEMENT
The brush has to be replaced when the bristles have
reached a length of 10 mm. It is possible to use also
other brush types, depending on the type and dirt of
floor to be cleaned (see under “RECOMMENDED
BRUSHES”).
Remove the old brush and replace it with a new one
(see under “BRUSH REMOVAL/FITTING").
REAR SQUEEGEE RUBBER REPLACEMENT
Check the squeegee rubber wear and eventually turn
or replace it.
For the replacement it is necessary to:
1. Lower the squeegee by lowering the handle lever
(4) placed in the centre of the handle bar.
2. Tip over the machine backwards (see under “VER-
TICAL POSITIONING OF THE MACHINE") paying atten-
tion to remember to switch off the machine pressing
all the switches and take off the plug from the mains
socket.
3. With the machine in this position release the
wing nuts (1) unscrewing them completely to free
the squeegee.
4. Take off the coupling (2) of the squeegee hose
and take off the squeegee.
5. Release the catch (4) of the rubber blade clamp
and take the rubber off to turn it to a new side or
replace it.
6. Check that the coupling and the squeegee hose
are not obstructed and if necessary, clean the entire
assembly.
To reassemble the squeegee reverse the operations
above.
FRONT SQUEEGEE RUBBER REPLACEMENT
Check the wear of the front squeegee rubber and re-
place it if worn out.
For the replacement it is necessary to:
1. Lower the squeegee by lowering the handle lever
(4) placed in the centre of the handle bar.
2. Tip over the machine backwards (see under “VER-
TICAL POSITIONING OF THE MACHINE") paying atten-
tion to remember to switch off the machine pressing
all the switches, take off the plug from the mains
socket and empty the tanks.
3. With the machine in this position take off the
squeegee and then the rear squeegee rubber (see
under “REAR SQUEEGEE RUBBER REPLACEMENT”).
4. Take off the wing nuts (6) in the upper part of
the squeegee body.
5. Separate the two metal parts that form the
squeegee body to take off the front rubber.
6. Clean all the components with water.
To reassemble the squeegee reverse the operations
above.
19

GB GB
TROUBLESHOOTING GUIDE
THE SUCTION MOTOR DOES NOT WORK
Verify that the suction motor switch (2) is activated,
checking that its signal lamp is on.
If the problem persists, please contact the authorized
technical assistance.
THE BRUSH MOTOR DOES NOT WORK
1. Verify that the brush motor switch (1) is activat-
ed, checking that its signal lamp is on.
2. Activate the scrub control levers (6).
If the problem persists, please contact the authorized
technical assistance.
INSUFFICIENT WATER ON THE BRUSH
1. Check that the solenoid valve switch (3) is acti-
vated verifying that the signal lamp is on.
2. Check the level of the liquid in the solution tank
(see under “SOLUTION TANK”).
3. Check that the solution flow adjuster (10), placed
in front underneath the solution tank, is sufficiently
open.
4. Press the brush control levers (6).
If the problem persists, please contact the authorized
technical assistance.
THE MACHINE DOES NOT CLEAN PROPERLY
1. The brush does not have the suitable bristle di-
mension: use only original brushes. For advice, con-
tact the authorized technical assistance.
2. The detergent solution is insufficient: open the
solution flow adjuster (10).
3. Check that the liquid detergent is in the recom-
mended percentage.
Contact the authorized technical assistance for ad-
vice.
THE SQUEEGEE DOES NOT DRY PERFECTLY
1. Check that the squeegee rubbers are clean, inte-
gral and not too much worn. If necessary, they need
to be eventually rotated or replaced (see under
“REAR SQUEEGEE RUBBER REPLACEMENT”).
2. Check that the coupling of the suction hose is
correctly inserted in the proper seat on the recovery
tank.
3. Check the suction filter is clean.
4. Replace the rubbers if worn.
5. Check that the suction motor switch is on.
6. Check the level in the recovery tank (see under
“OVERFILL PROTECTION”) and if necessary, empty the
tank.
7. If the floor remains wet in the central part of the
drying, it is necessary to give more pressure in the
rear part of the squeegee, screwing down of some
turns the screw, as shown in the picture.
EXCESSIVE FOAM PRODUCTION
Check that low foam detergent has been used. Add
small quantities of anti foam liquid into the recovery
tank.
Do not use excessive amounts of detergent as even
with low foaming agent, the foam will be created
and lead to vacuum motor damage. Also excessive
detergent will result in solution pipe blockages over
time.
Please be aware that a larger quantity of foam is
produced when the floor is not very dirty. In this ca-
se please dilute detergent solution.
20

GB GB
PROGRAMMED MAINTENANCE
INTERVENTION
DAILY
ORDINARY/MONTHLY
RECOVERY TANK CLEANING
•
SUCTION FILTER CLEANING
•
BRUSH CLEANING
•
BRUSH REMOVAL
•
SQUEEGEE ASSEMBLY CLEANING
•
FRONT SQUEEGEE RUBBER REPLACEMENT
•as required
REAR SQUEEGEE RUBBER REPLACEMENT
•as required
SQUEEGEE HOSE CLEANING
•
SOLUTION TANK CLEANING
•
RECOMMENDED BRUSHES
Brushes must be chosen depending on type of floor and dirt to be removed.
The employed material and the bristle diameter are the elements that distinguish different types of brushes.
MATERIAL CHARACTERISTICS
PPL (Polypropylene) Good wear resistance. Maintains characteristics with hot water up to 60°C. It is not hygroscopic.
BRISTLES THICKNESS
Thicker bristles are more rigid and must be used on smooth floor or floor with small joints.
On irregular floors with deep joints or relieves, softer bristles penetrate more easily and deeper. Please be aware that when brush
bristles are worn out they become rigid and unable to penetrate and clean deeper. This may also cause brush vibration with thicker
bristles.
PAD HOLDER
Pads are recommended to clean smooth surfaces. The pad holder has anchor points to retain the pad. It is important that the
height of the pad holder with its pad is the same as the one of the brush.
CODE QUANTITY DESCRIPTION USE
48903020
1
Brush PPL 0,6 Ø 345
Normal floors.
48903030
1
Brush PPL 0,9 Ø 345
Smooth floors with small joints and persistent dirt.
48903050
1
Brush 5-mix Ø 345
For all types of floors.
48803010
1
Pad holder Ø 330
For pads of 14”, for smooth surfaces cleaning.
48803030
1
Pad holder Ø 330 + center lock green
For pads of 14”, for smooth surfaces cleaning.
48803040
1
Pad holder Ø 330 + center lock black
For pads of 14”, for smooth surfaces cleaning.
21
Table of contents
Languages:
Other ADIATEK Scrubber manuals
Popular Scrubber manuals by other brands

RoboVent
RoboVent ProCube HVP-120-575 Owner's manual & operating instructions

Viper
Viper DRAGON Series owner's manual

ServiceMASTER Clean
ServiceMASTER Clean SOLUS-500-CSA Information & operating instructions

Kärcher
Kärcher B 95 RS instruction manual

AL-KO
AL-KO mobil JET 250 manual

Tennant
Tennant T681 Operator's manual