ADX FIREPOWER V01 User manual

FIREPOWER V01
RGB GAMING MOUSE
INSTRUCTION MANUAL
AFPV0119

GB Contents
Safety Warnings...................................................................................................4
Unpacking............................................................................................................6
Product Overview................................................................................................7
System Requirements .........................................................................................8
Software Installation...........................................................................................8
User Interface.......................................................................................................8
Buttons Setting....................................................................................................9
Customising the Buttons ................................................................................. 10
Master Controls Setting................................................................................... 14
Macro Setting.................................................................................................... 15
General Setting................................................................................................. 16
Hints and Tips.................................................................................................... 17
Specications.................................................................................................... 17
NO Innhold
Instruksjonsmanual ............................................................................................4
Pakke opp.......................................................................................................... 18
Produktoversikt................................................................................................ 19
Systemkrav........................................................................................................ 20
Installasjon av programvare............................................................................ 20
Brukergrensesnitt............................................................................................. 20
Knappinnstilling............................................................................................... 21
Tilpasse knappene............................................................................................ 22
Hovedkontrollinnstillinger.............................................................................. 26
Makroinnstilling ............................................................................................... 27
Generelle innstillinger ..................................................................................... 28
Råd og tips ........................................................................................................ 29
Spesikasjoner ................................................................................................. 29
SE Innehållsförteckning
Instruktionsbok ...................................................................................................4
Packa upp.......................................................................................................... 30
Produktöversikt................................................................................................ 31
Systemkrav........................................................................................................ 32
Installation av fast programvara..................................................................... 32
Användargränssnitt ......................................................................................... 32

Tangentinställning ........................................................................................... 33
Anpassa knapparna.......................................................................................... 34
Översiktskontrollernas inställning ................................................................. 38
Makroinställning .............................................................................................. 39
Allmänna inställning........................................................................................ 40
Tips och råd....................................................................................................... 41
Specikationer.................................................................................................. 41
FI Sisältö
Käyttöopas...........................................................................................................5
Pakkauksesta purkaminen .............................................................................. 42
Tuotteen yleiskatsaus ...................................................................................... 43
Järjestelmävaatimukset................................................................................... 44
Ohjelmistoasennus........................................................................................... 44
Käyttöliittymä................................................................................................... 44
Painikeasetus.................................................................................................... 45
Painikkeiden mukauttaminen......................................................................... 46
Päähallinta-asetukset ...................................................................................... 50
Makroasetus ..................................................................................................... 51
Yleiset asetukset............................................................................................... 52
Vihjeitä ja vinkkejä........................................................................................... 53
Tekniset tiedot.................................................................................................. 53
DK Indholdsfortegnelse
Brugervejledning ................................................................................................5
Udpakning ........................................................................................................ 54
Produktoversigt................................................................................................ 55
Systemkrav........................................................................................................ 56
Soiftwareinstallation........................................................................................ 56
Brugergrænseade........................................................................................... 56
Indstillingsknap................................................................................................ 57
Tilpasning af knapperne.................................................................................. 58
Styring af hovedindstillingerne ...................................................................... 62
Makro-indstilling.............................................................................................. 63
Generel indstilling............................................................................................ 64
Gode råd............................................................................................................ 65
Specikationer.................................................................................................. 65

GB Safety Warnings
Never point the optical sensor towards the face, particularly
the eyes, to avoid possible injury.
While the mouse is in use, the optical light is visible to the naked eye.
Avoid looking directly into the emitter hole while the mouse is active.
Your product complies with CE rules.
This product has no serviceable parts. Use of controls or adjustments
of procedures other than the Instruction Manual may result in danger.
NO Sikkerhetsadvarsler
Sikt aldri den optiske sensoren mot ansiktet , spesielt øynene ,
for å unngå mulig skade.
Når musen er i bruk, er det optiske lyset synlig for det blotte øye. Ikke
se direkte inn i utstrålingshullet mens musen er i bruk.
Produktet er i samsvar med CE-reglene.
Dette produktet har ingen servicedeler. Bruk av kontroller
eller justeringer av andre typer enn de som er oppgitt i
Instruksjonsmanual, kan føre til fare.
SE Säkerhetsföreskrifter
Rikta aldrig den optiska sensorn mot ditt ansikte, särskilt inte
mot ögonen, för att undvika skador.
När musen används kan man se den optiska strålen med ögat. Undvik
att titta direkt i strålningshålet när musen är aktiv.
Din produkt uppfyller CE-reglerna.
Denna produkt har inga servicebara delar. Användning av kontroller
eller justeringar av procedurer andra än de i Instruktionsbok kan
resultera i fara.

FI Turvavaroitukset
Älä koskaan suuntaa optista anturia kohti kasvoja, erityisesti
kohti silmiä. Näin vältät mahdolliset vammat.
Optinen valo näkyy paljain silmin, kun hiiri on käytössä. Vältä
katsomasta suoraan lähetinreikään hiiren ollessa aktiivinen.
Tämä tuote on CE-sääntöjen mukainen.
Tässä tuotteessa ei ole huollettavia osia. Ohjainten käyttö tai
toimenpiteiden säätäminen toisin kuin tässä Käyttöopas voi johtaa
vaaratilanteeseen.
DK Sikkerhedsforanstaltninger
Peg aldrig den optiske sensor mod ansigtet, især øjnene, for at
undgå mulige skader.
Når musen er i brug, er det optiske lys synligt for øjet. Undgå at kigge
direkte i laserhullet, mens musen er aktiv.
Produktet overholder CE-reglerne.
Dette produkt har ingen servicerbare dele. Brug af kontroller eller
justeringer på anden måde end beskrevet i denne Brugervejledning
kan medføre fare.

GB
6
Unpacking
Remove all items from the packaging. Retain the packaging. If you
dispose of it please do so according to local regulations.
The following items are included:
Thank youfor purchasing your new product.
We recommend that you spend some time reading this
instruction manual in order that you fully understand all
the operational features it oers. You will also nd some
hints and tips to help you resolve any issues.
Read all the safety instructions carefully before use and
keep this instruction manual for future reference.
Gaming Mouse

GB
7
1. Right Button
2. Scroll Wheel
3. Hyperfast Scrolling
Button
4. Prole Button
Select prole 1-5
5. Left Button
5
2
1
6. DPI Buttons
Select dierent dpi
7. DPI Indicator
Indicate selected dpi
8. Forward / Backward
Buttons
Product Overview
9
6
7
8
4
3

GB
8
System Requirements
Operating Systems: Microsoft® Windows® 7 / 8 / 10
Hardware: 1 available USB port
Software Installation
1. Plug the unit into the USB port of your computer.
2. Download the latest gaming software from
https://downloads.adxgaming.com
3. Run the software installer.
4. Follow the installation instruction to complete the installation.
5. Choose ADX Gaming.exe from the desktop to start the
software.
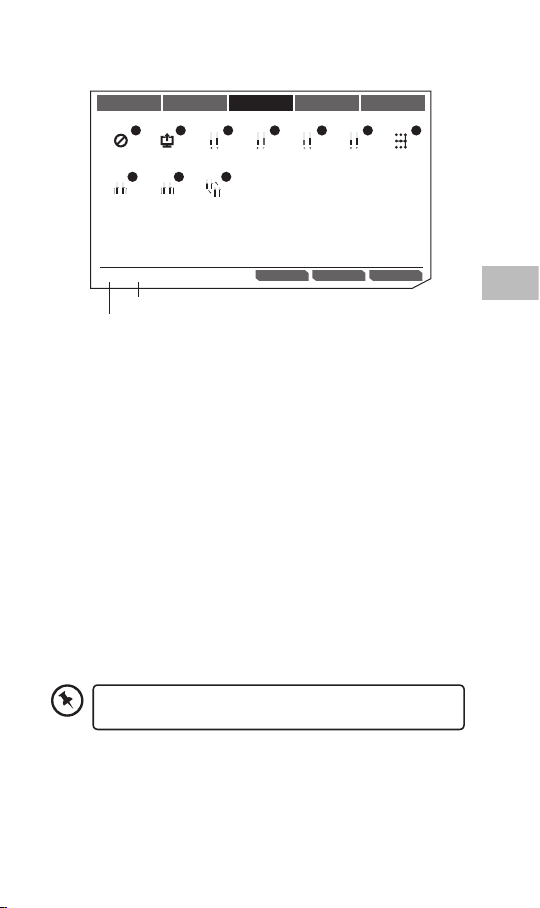
User Interface
Choose ADX Gaming.exe from the desktop to start the software.
1. Setting options.
2. Colour
Select desired LED colour.
3. Minimise the software.
4. Exit the software.
SETTINGSMACRO EDITORDPIBUTTONS
Profile 1 Profile 2 Profile 3 Profile 4 Profile 5
Back
Scroll up
Wheel click
Right click
Scrol up
Left click
Tilt left
Scroll down
Forward
DPI decrease
DPI Increase
1 32 4
The software is not available for MAC OS.

GB
9
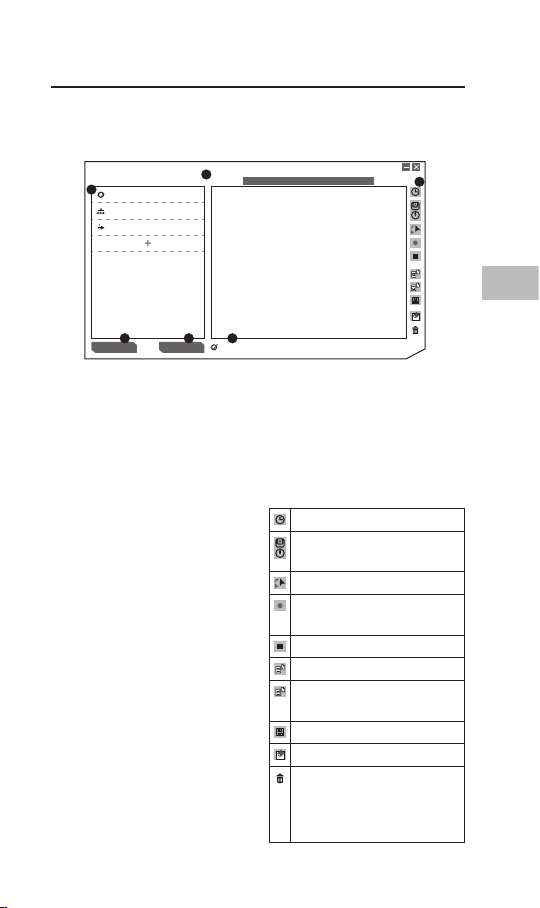
Buttons Setting
Select BUTTONS from the user interface.
1. Prole
You can save 5 dierent proles with customising the buttons.
Dierent colour indicates dierent prole.
Prole rename
Prole can be renamed followed by a double click.
Enter profile name
Magic Casting
OK
Cancel
2. Customising the Buttons
• Change the mouse button into desired functions from the
function list.
• Left click cannot be customised unless another left click is
set.
3. Quick Apply
Click to quick apply with desired keyboard keypress or
mouse button to replace with.
4. Trash
• Drag the button with customised setting to will reset to
default.
• Drag the button with default setting to will disable the
function.
SETTINGSMACRO EDITORDPIBUTTONS
Profile 1 Profile 2 Profile 3 Profile 4 Profile 5
Back
Scroll up
Wheel click
Right click
Scrol up
Left click
Tilt left
Scroll down
Forward
DPI decrease
DPI Increase
1
23
5

GB
10
Customising the Buttons
Click on the mouse button you wish to customise, the options will
be show as below. A chosen function icon will be highlighted then
click SELECT to conrm.
1. Mouse Functions
1. Left click
2. Right click
3. Wheel click
4. Forward
5. Back
6. Scroll up
7. Scroll down
8. Tilt left
9. Tilt right
10. Universal scroll
11. Double left click
12. Triple left click
13. Fire button
Click and hold to continue
re.
14. On-to-go re
Click and hold to enable on-
to-go re. At the same time,
click on any other button to
re continuously.
Customise function
Default function
MOUSE FUNCTIONS KEYBOARD FUNCTIONS ADVANCED FUNCTIONS MACRO KEY CYCLE
DEFAULT CANCEL SELECT
Left click Right click Wheel click Forward Back Scroll up Scroll down
Tilt left Tilt right Universal scrolling Double left click Triple left click Fire button On-to-go fire
[Right click] : Right click
1 2 3 4 5 6 7
8 9 10 11 12 1413

GB
11
MOUSE FUNCTIONS KEYBOARD FUNCTIONS ADVANCED FUNCTIONS MACRO KEY CYCLE
DEFAULT CANCEL SELECT
Ctrl
Shift
PrtSc SrcLk Pause
Caps Lock
Tab
Shift
CtrlAppWinAltWin Alt
Insert Home PgUp Num
Delete End PgDn
[Right click] : Right click
1 2 3 4 5 6 7 8 9 10 11 12 13
1. Web browser
2. Calculator
3. Media player
4. Mute
5. Volume down
6. Volume up
7. Play/pause
8. Play
9. Pause
10. Fast forward
11. Next track
12. Previous track
13. Stop
Customise function
Default function
2. Keyboard Functions
Customising mouse button can choose keypress from keyboard or
other media functions as below.
GB
12
MOUSE FUNCTIONS KEYBOARD FUNCTIONS ADVANCED FUNCTIONS MACRO KEY CYCLE
No function Launch driver
menu Angle snapping
on/off
DEFAULT CANCEL SELECT[Right click] : Right click
Adjust DPI Lock Y-axis Lock X-axis Sniper function
DPI Decrease DPI loopDPI Increase
1 2 3 4 5 6 7
8 9 10
Customise function
Default function
1. No Function
Disable the current mouse
function.
2. Launch Driver Menu
3. Adjust DPI
Click to turn on DPI menu,
and then use scroll up/
down to adjust DPI.
4. Lock Y-axis
Click and hold to allow
cursor to move horizontally
only.
5. Lock X-axis
Click and hold to allow
cursor to move vertically
only.
6. Sniper Function
• Click and hold to use
sniper function with
presetting DPI.
• Release to resume normal.
7. Angle Snapping on/o
Help to draw a horizontal or
vertical straight line.
8. DPI Increase
9. DPI Decrease
10. DPI Loop
3. Advanced Functions
Some functions are not available for specic mouse
button.

GB
13
KEY CYCLE TYPE KEY CYCLE
Cycle
MOUSE FUNCTIONS KEYBOARD FUNCTIONS ADVANCED FUNCTIONS MACRO KEY CYCLE
DEFAULT
Add CLEAR
CANCEL SELECT
Reverse cycle
Current position
[Right click] : Right click
1
2
3
4 5
MOUSE FUNCTIONS KEYBOARD FUNCTIONS ADVANCED FUNCTIONS MACRO KEY CYCLE
DEFAULT CANCEL SELECT
MACRO EDITOR
Attack Mode
Attack Mode
SpecialAttack
1
2
1. Cycle
Click customised mouse
button to type out added
keypress in sequence.
2. Reverse Cycle
Click customised mouse
button to type out added
keypress in reverse
sequence.
1. Macro list
Choose a macro and press
SELECT to conrm.
4. Macro Functions
5. Key Cycle Functions
Key cycle can add up to 5 keyboard keypress.
3. Current Position
Click customised mouse
button once to type out
1 keypress each time in
sequence.
4. Add
Add a keypress.
5. Clear
Clear all keypress.
2. Macro Editor
Click to enter MACRO
EDITOR section for editing.

GB
14
Master Controls Setting
Select DPI from the user interface.
1. DPI Setting
Sensitivity (DPI) pertains to how much eort is needed to
move the mouse pointer in any direction. The higher the DPI,
the faster the mouse movement.
The X-axis (horizontal) and Y-axis (vertical) use the same
sensitivity values.
2. Auto
Sensitivity (DPI) will change depending on your mouse
movement.
The faster the mouse movement, the higher the DPI.
3. X-Y Sensitivity
You may set dierent sensitivity values to each of the axis by
selecting X-Y axis Independent.
SETTINGSMACRO EDITORDPIBUTTONS
X/Y axis independent
X800
Y 800
X 1600
Y 1600
X 3200
Y 3200
X 7200
Y 7200
Auto
Auto
Auto
Auto
1
2
3
GB
15
Create new macro Delete current item
MACRO EDITOR
MACRO TYPE One-time modeMouse memory (Free 7064 bytes)
Record delays
Attack Mode
Attack Mode
SpecialAttack
34 bytes
34 bytes
34 bytes
1
2
3 4 5
6
Macro Setting
By assigning a macro to a mouse button, you can execute complex
combinations with ease.
Select MACRO EDITOR from
the user interface.
1. Macro List
A list of macro prole.
2. Macro Type
Choose a macro type.
One-time mode: macro
will run once.
Loop mode: click once to
start looping the macro,
click again to stop.
Firekey mode: macro
will repeat as long as the
button is clicked.
3. Create New Macro
Create new macro prole.
4. Delete Current Item
Delete selected macro or
command.
5. Record Delays
Insert time delay between each
command while recording
macro.
* Delay (1sec = 1000ms)
6. Macro Tool Bar
Insert delay
Insert keyboard, mouse
or scroll command
Insert mouse movement
Record keyboard and
mouse commands
Stop record
Import macro from file
Export current macro
to file
Save macro
Clear command list
Remove selected
command or drag &
drop command here to
remove it.

GB
16
SAVE LOAD RESET
SETTINGSMACRO EDITORDPIBUTTONS
Angle snapping
500Hz
POLLING RATE
GENERAL OPTIONS
INFORMATION
DIVER SETTINGS
Model:
Dirver version:
Firmware Version
Enable DPI/profile OSD
Disable mouse acceleration (OS)
1
2
3
4
5 6 7
General Setting
Select SETTINGS from the user interface.
1. Polling Rate
The higher the polling rate, the more often the computer
receives information about the status of your mouse, thus
increasing the mouse pointer’s reaction time.
You can select among 125Hz (8ms), 500Hz (2ms) and 1000Hz
(1ms).
2. Angle Snapping
Snapping function helps to move cursor in horizontal or
vertical straight line.
3. Enable DPI/prole OSD
Display on screen when changing to dierent DPI or prole.
4. Disable Mouse Acceleration (OS)
Acceleration increases the cursor’s movement speed
depending on how quickly the mouse is moved. Tick to disable
this function.
5. Save
Save the current setting.
6. Load
Load the saved setting.
7. Reset
Restore to default setting.

GB
17
Hints and Tips
• Make sure the USB plug is fully plugged into a USB port and
the computer is on or try to use a dierent USB port.
• If the mouse is moving erratically, change the working surface
which the mouse is operating on.
• If the software is not working properly, uninstall it and then
reboot the computer. Re-install the software.
• If the unit is not working properly, re-insert the USB plug into
the USB port.
Specications
Model AFPV0119
Resolution 100 – 12000 dpi
Dimension (L x W x H) 128,7 x 76 x 42 mm
Net Weight 148,2g
Features and specications are subject to change without prior
notice.
The symbol on the product or its packaging indicates that this
product must not be disposed of with your other household
waste. Instead, it is your responsibility to dispose of your waste
equipment by handing it over to a designated collection point for
the recycling of waste electrical and electronic equipment. The
separate collection and recycling of your waste equipment at the
time of disposal will help conserve natural resources and ensure that it is
recycled in a manner that protects human health and the environment.
For more information about where you can drop o your waste for recycling,
please contact your local authority, or where you purchased your product.
Windows is a registered trademark of Microsoft Corporation in the United
States and other countries.
All trademarks are the property of their respective owners and all rights are
acknowledged.

NO
18
Spillmus
Pakke opp
Fjern alle gjenstander fra emballasjen. Ta vare på emballasjen. Ta
hensyn til lokale forskrifter om avfallshåndtering hvis du må kaste
emballasjen.
Følgende elementer er vedlagt:
Takk for at du kjøpte ny produktet.
Vi anbefaler at du tar deg tid til å lese gjennom
hele bruksanvisningen så du blir fortrolig med alle
funksjonene. Veiledningen gir deg også mange tips og råd
for å løse eventuelle problemer.
Les alle sikkerhetsanvisningene nøye før bruk og behold
bruksanvisningen for framtidig referanse.

NO
19
5
2
1
9
6
7
8
4
3
1. Høyre knapper
2. Rullehjul
3. Hyperrask-rulleknappen
4. Prol knapp
Velg prol 1–5
5. Venstre knapp
6. DPI knapp
Velg en annen dpi
7. DPI-indikator
Indikerer valgt ppt
8. Forover-/Bakover-
knapper
Produktoversikt

NO
20
Systemkrav
Operativsystemer: Microsoft® Windows® 7 / 8 / 10
Maskinvare: 1 tilgjengelig USB-port
Installasjon av programvare
1. Koble enheten til en USB-port på datamaskinen.
2. Last ned den nyeste spillprogramvaren fra
https://downloads.adxgaming.com/NO
3. Kjør installasjonsprogrammet for programvaren.
4. Følg instruksjonene for å fullføre installasjonen.
5. Velg ADX Gaming.exe fra skrivebordet for å starte
programvaren.
Brukergrensesnitt
Velg ADX Gaming.exe fra skrivebordet for å starte programvaren.
1. Innstillingsvalg.
2. Farge
Velg ønsket LED-farge.
3. Minimer programmet.
4. Avslutt programmet.
SETTINGSMACRO EDITORDPIBUTTONS
Profile 1 Profile 2 Profile 3 Profile 4 Profile 5
Back
Scroll up
Wheel click
Right click
Scrol up
Left click
Tilt left
Scroll down
Forward
DPI decrease
DPI Increase
1 32 4
Programvaren er ikke tilgjengelig for Mac OS.
Other manuals for FIREPOWER V01
1
Table of contents
Languages:
Other ADX Mouse manuals

ADX
ADX FIREPOWER A01 User manual

ADX
ADX FIREPOWER A04 User manual

ADX
ADX FIREPOWER ADV.23 User manual

ADX
ADX FIREPOWER WIRELESS 23 User manual

ADX
ADX FIREPOWER ADV. 24 User manual

ADX
ADX FIREPOWER V02 User manual

ADX
ADX FIREPOWER H02 User manual

ADX
ADX FIREPOWER MK06 User manual

ADX
ADX FIREPOWER M04 User manual

ADX
ADX Firepower H03 User manual

ADX
ADX FIREPOWER H01 User manual

ADX
ADX FIREPOWER M05 User manual

ADX
ADX FIREPOWER H05 User manual

ADX
ADX FIREPOWER V01 User manual

ADX
ADX FIREPOWER PRO 23 User manual

ADX
ADX FIREPOWER H02 User manual

ADX
ADX FIREPOWER V02 User manual

ADX
ADX FIREPOWER H01 User manual

ADX
ADX FIREPOWER V03 User manual

ADX
ADX Firepower WMK07 User manual


