AEG Voxtel D81 User manual

1
UK
CORDLESS
TELEPHONE
Voxtel D81
QUICK START GUIDE
UK
V2

2
P1 P2
P3
3
8
9
10
11
12
13
4
5
6
7
1
2
P4 P5
P6
14
Press
down
1
Slide
2

3
UK
1 BECAUSE WE CARE
Tha
nk you for purchasing this product. This product has been designe
d
and
assembled with utmost care for you and the environment. This i
s
why
we supply this product with a quick installation guide to reduce th
e
num
ber of paper (pages) and therefor save trees to be cut for making thi
s
pap
er.
A
full and detailed user guide with all the features descripted can b
e
fou
nd on our website www.aegtelephones.eu. Please download the ful
l
use
r guide in case you want to make use of all the advanced features o
f
you
r product. To save the environment we ask you not to print this full use
r
gui
de. Thankyou for supporting us to protect our environment.
2
IMPORTANTSAFETY INSTRUCTIONS
Whe
n using your telephone, basic safety precautions should always b
e
foll
owed to reduce the risk of fire, electric shock and injury, including th
e
foll
owing:
1
. Read and understand all the instructions.
2
. Follow all warnings and instructions marked on the product.
3
. Unplug the power adapter from the wall outlet before cleaning. Do no
t
use liquid cleaners or aerosol cleaners. Use a damp cloth for cleaning.
4
. Keep your phone away from hot, humid conditions or strong sunligh
t
and don’t let it get wet or use this product near water (for example
,
near a bath tub , kitchen sink, swimming pool).
5
. Do not overload wall outlets and extension cords as this can result i
n
the risk offire or electric shock.
6
. Unplug this product from the wall outlet under the following conditions:
•
When the power supply cord or plug is damaged.
•
If the product does not operate normally by following the operatin
g
instructions.
•
If the product has been dropped andthe cabinet has been damaged.
•
If the product exhibits a distinct change in performance.
7
. NEVER use your phone outdoors during a thunderstorm-unplug th
e
base from the telephone line and the mains socket when there ar
e
storms in your area. Damage caused by lightning is not covered b
y
the guarantee.
8
. Do not use the telephone to report a gas leak in the vicinity of the leak.
9. Use only the supplied NiMH (Nickel Metal Hydride) batteries!
P1 P2
P3
3
8
9
10
11
12
13
4
5
6
7
1
2
P4 P5
P6
14
Press
down
1
Slide
2

4
10. The use of other battery types or non-rechargeable batteries/primary
cells can be dangerous. These may cause interference and/or damag
e
to the unit or surroundings. The manufacturer will not be held liable fo
r
damage arising from such non-compliance.
11
. Do not use third party charging bays. Damage may be caused to th
e
batteries.
12
. Please ensure the batteries are inserted in the correct polarity.
13
. Dispose of batteries safely. Do not immerse them in water, burn them
,
or put themwhere they could get punctured.
3
INTENDED USE
Thi
s telephone is intended to be connected to a public analogu
e
tele
phone network or to an analogue extension of an compatible PB
X
sys
tem.
4
UNPACKING YOUR PHONE
In t
he box you will find:
•
1 Handset
•
1 Base station
•
1 Mains power adapter
•
1 Telephone line cord
•
2 Rechargeable batteries
•
1 User manual
Kee
p the packing materials in a safe place in case you later need t
o
transport the device.
Note:
If you have a Twin, Triple or Quad system, you will also have the extra
handset(s), batteries and a charger pod for each extra handset.

5
UK
5 GETTING TO KNOW YOUR PHONE
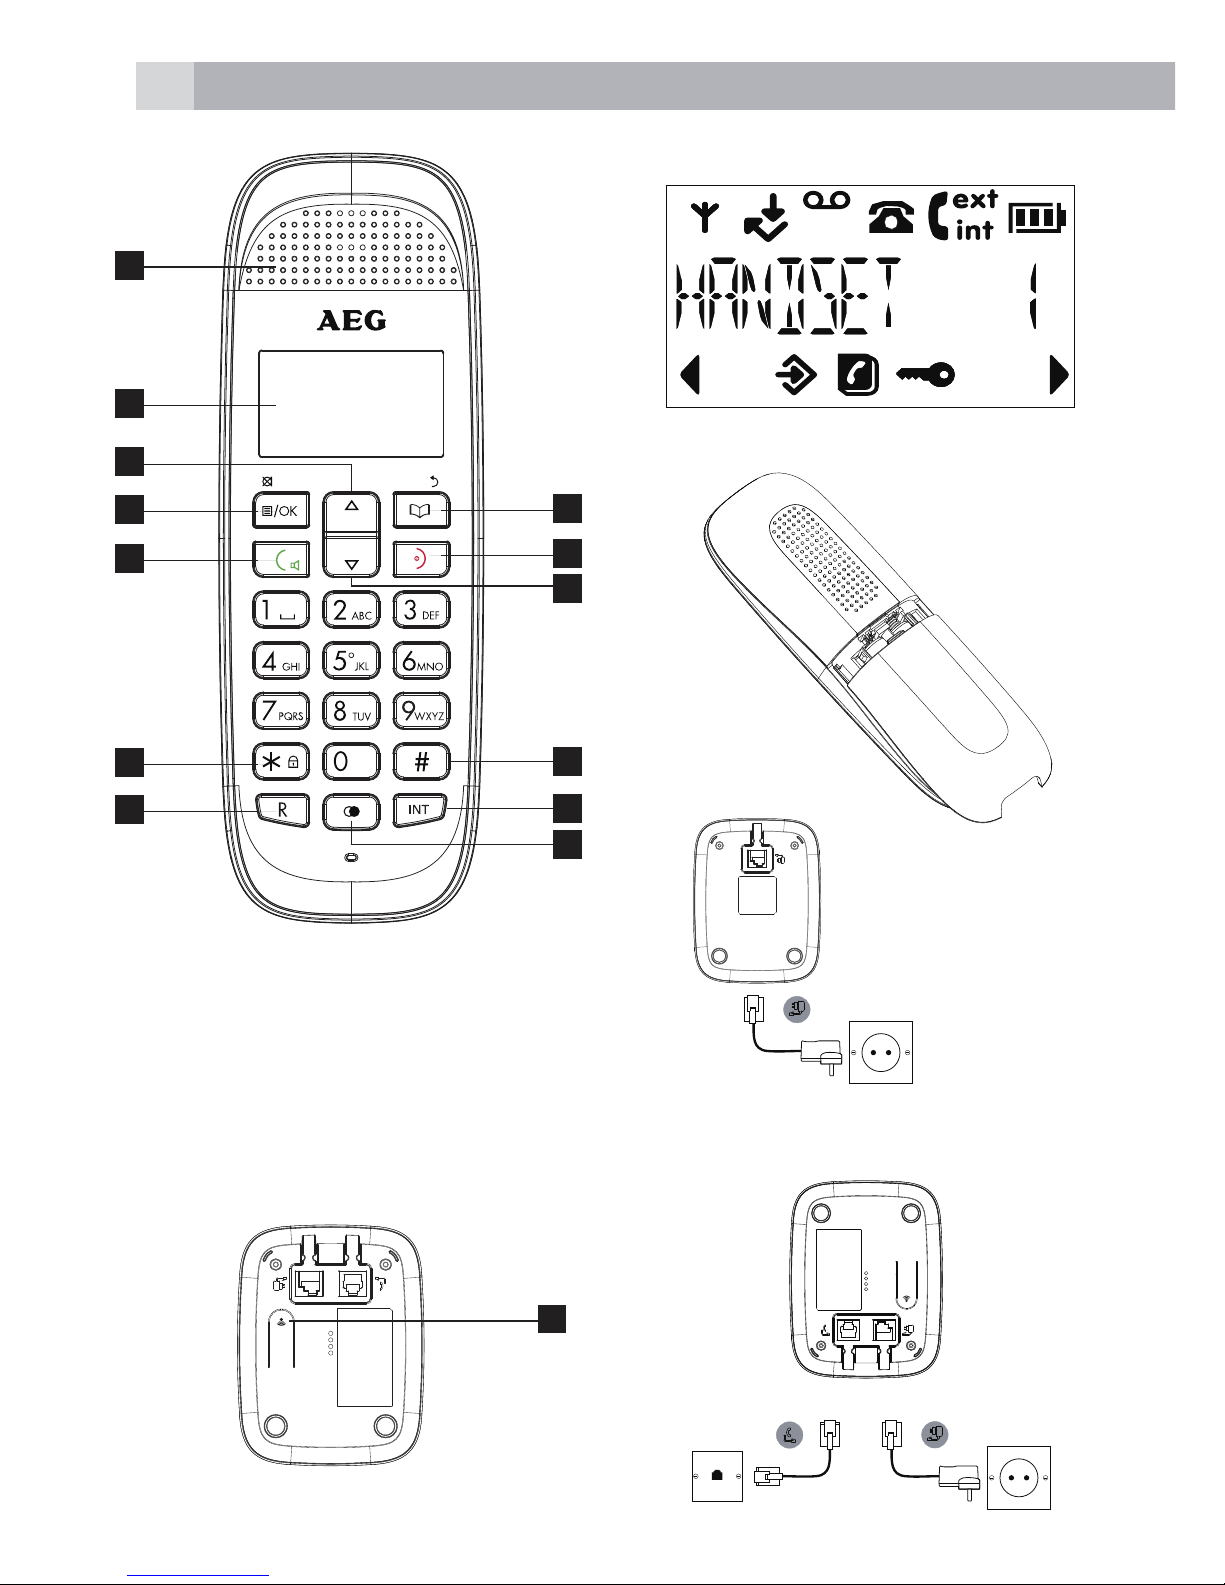
5.1 Overview of the handset
# Meaning
1Earpiece
2Display
3
• During a call, press to increase earpiece
volume.
• When the phone is ringing, press to increase
the handset ringer volume.
• Press to scroll through the menu options,
redial list, calls list and phonebook entries.
4
• Press to open the Menu.
• Press to select menu options and to conrm a
displayed option.
• During a call, press to turn mute on/off.
5
• Press to switch hands-free on or off during a
call.
• Press to make and receive calls.
6
• To unlock, press any key and follow the on screen
instructions.
• Press and hold to lock the keypad.
7• Press to generate a Flash signal
8
• In standby mode, press to open the
phonebook menu. In editing mode, press to
delete characters and digits.
• Go back to the previous menu level.
9
• Press to end a call. When viewing the redial
/ calls list / phonebook or when in the menu,
press to exit and return to standby.
• Press and hold for 3 seconds to switch the
handset on / off.

6
10
• During a call, press to decrease earpiece
volume.
• When the phone is ringing, press to decrease
the handset ringer volume.
• Press to scroll through the menu options,
redial list, calls list and phonebook entries.
• In standby mode, press to open the calls list.
11 • Press and hold to enter a pause (P) when pre-
dialling or storing numbers.
12 • Used to make internal calls and transfer calls to
other handsets registered to the base.
13 • In standby mode, press to open the redial list.
5.2 Display icons and symbols(see P2)
The LCD display gives you information on the current status of the
telephone.
Meaning
Flashes to indicate an incoming external call
External call in progress
Flashes to indicate an incoming internal call
Internal call in progress
3-way call in progress or transfer an external call to
another handset registered to the base
Eco mode is ON
Flashes to indicate new voicemail messages received
Off when there is no voicemail messages
Indicates signal strength
Flashes when handset is not registered to the base or when
out of range

7
UK
Hands-free mode is ON
Phonebook is opened
Flashes to indicate new call in call list
Answered call (when viewing the Calls list)*
Unanswered call (when viewing the Calls list)*
Keypad is locked
Displayed number is longer than
12 digits
* For this feature, subscribe to the Caller ID from the network operator.
5.3 Base station (see P4)
14
Press to nd misplaced handsets registered to the
base.
Use to register handsets to the base.
5.4 Navigating the menu
The phone has an easy to use menu system.
When the handset is switched on and in standby:
1. Press Menu to open the main menu.
2. Then use Up or Down buttons to scroll through the available options.
3. Press to select an option.
To return to the previous menu level, press Return . To exit the menu
and return to standby, press End call .
Note:
If no button is pressed for 20 seconds, the handset returns to standby
automatically and is preset to tone dialling.

8
6 INSTALLATION
6.1 Connecting the base station (see P5)
• Plug the power supply and line cord into the base station.
• Plug the power adapter into a 100-240 Vac 50/60Hz mains socket
and the line cord into your telephone line socket.
Warning:
Use only the provided adaptor, using other power supplies may cause
a hazard or damage the phone.
Install the base unit in a position where the mains adapter plug will
reach an easily accessible mains socket to unplug in case needed.
Never try to lengthen the mains power cable.
Note:
The base unit needs mains power for normal operation, not just
for charging the handset batteries.
6.2 Installing and charging the batteries (see P3)
• Place the 2 supplied batteries into the battery compartment
with the polarity markings. Use only the NiMH rechargeable
battery type provided with the telephone.
• Position the battery compartment cover over the batteries and slide
up to click into place.
• Put the handset on the base and charge for 24 hours before using
the handset for the rst time.
> The handset will give a beep when it is properly placed on the
base or charger.

9
UK
7 USING THE PHONE
Note:
The handset will automatically time the duration of all external calls.
The call timer will display after the first 15 seconds of the call. When
the call ends, the total duration of the talk time flashes for 2 seconds.
7.1 Switch the handset on/off
Press and hold End Call to switch the handset on or off.
7.2 Calls
7.2.1 Make a call
1. Press Talk .
2. When there is a the dial tone, dial the number.
7.2.2 Preparatory dialling
1. Dial the number rst. If a mistake is made press Delete to
delete the last digit.
2. Press Talk to dial.
7.2.3 End a call
press End call , or place the handset back on the base or charger.
7.2.4 Receive a call
When an external call is received, the phone rings and icon ashes
on the display.
1. Press Talk to answer the call, or simply lift up the handset to
answer the call.
Note:
To answer calls by pressing Talk even when the handset is lifted,
switch Auto answer off.
7.3 Adjust the earpiece volume
During a call, press Up or Down to increase or decrease
the volume.

10
7.4 Mute
The handset can be muted so that a conversation can be held without
the caller hearing.
1. During a call, press Mute . The display shows «MUTE » and
the caller cannot hear.
2. press Mute again to resume the call.
7.5 Redial
The last 10 entries dialled are stored in the redial list.
7.5.1 View or dial an entry
1. Press Redial to open the Redial list.
2. Scroll Up or Down to the required entry.
3. Press Talk to dial the displayed entry or press End call to
return to standby.
Note:
If you have Caller ID and the caller’s number exactly matches an entry
stored in the phonebook, the name is displayed. Press Menu to
see the caller’s number.
7.5.2 Copy a Redial list number to the phonebook
1. Press Redial to open the Redial list.
2. Scroll Up or Down to the required entry.
3. Press Menu . The display shows « ADD ? ».
4. Press Menu again. The display shows « NAME ? ».
5. Enter the name and Press Menu . The number is displayed.
6. Edit the number if necessary, then Press Menu .
7. Press Up or Down to select the required ringer melo-
dy and Press Menu . The number is stored.
7.5.3 Delete an entry
1. Press Redial to open the Redial list.
2. Scroll Up or Down to the required entry and Press
Delete . The display shows « DELETE ? ».
3. Press Menu to conrm or Return to cancel.

11
UK
7.5.4 Delete the entire Redial list
1. Press Redial to open the Redial list.
2. Press and hold Delete . The display shows « DELETE ALL ? ».
3. Press Menu to conrm or Return to cancel.
7.6 Lock/unlock the keypad
The keypad can be locked so that it cannot be operated accidentally
while carrying it around.
Note:
When the keypad is locked an incoming call can still be answered
and the handset will operate as normal. When the call ends, the
keypad lock comes on again.
1. Press and hold *. icon is displayed.
2. To unlock the keypad, press any key on the handset. The dis-
play shows « PRESS * ».
3. Press * within 5 seconds.
7.7 Paging/Find handset
Page can be used to alert a handset user that they are wanted or lo-
cate a missing handset. Paging calls cannot be answered by a handset.
1. Press Page on the base. All handsets registered to the base will ring.
2. To stop the ringing, Press Page on the base again or press
any button on the handset.
8 PHONEBOOK
The phonebook can store up to 50 names and numbers. Names can be
up to 12 characters long and numbers up to 24 digits. Different ringer
melodies can also be selected for the phonebook entries.
Entering names
Use the keypad letters to enter names, e.g. to store TOM: Press 8 once
to enter T.
Press 6 three times to enter O. Press 6 once to enter M.

12
Writing tips
Press Phonebook to delete the last character or digit. press Up
or Down to move between characters/digits. Press 1 to
insert a space.
Use 1 twice to insert a dash.
8.1 Store a name and number
When subscribed to Caller ID, to display the name of the caller instead
of the number, save the full telephone number including the area code
to the phonebook.
Multiple entries can stored with the same number. However, to prevent
unnecessary duplicated entries, the same name can be stored only
once.
1. Press Menu . Scroll Down to « PHONEBOOK ».
2. Press Menu to select. The display shows « ADD ENTRY ».
3. Press Menu to select. The display shows « NAME ? ».
4. Enter the name and Press Menu . The display shows « NUM-
BER ? ».
5. Enter the number and Press Menu . The display shows
« MELODY 1 ».
6. press Up or Down to select the required ringer melo-
dy and Press Menu . The display shows « ADD ENTRY ».
7. Enter the next name and number entry that needs to be stored in
the phonebook or press End call to return to standby.
8.2 View or dial an entry
1. Press Phonebook . icon is displayed.
2. Scroll Up or Down to the required entry. OR
Enter the rst letter of the name to search alphabetically. The rst
name that starts with this letter or the nearest letter in the alphabet will
be displayed.
Scroll Up or Down to the required entry.
3. Press Talk to dial or End Call to return to standby.

13
UK
Note:
When the name is displayed, to switch between the name and num-
ber Press Menu .
8.3 Edit a name and number
1. Press Menu . Scroll Down to « PHONEBOOK ».
2. Press Menu to select.
3. Scroll Down to « MODIFY ENTRY » and Press Menu .
4. Scroll Up or Down to the entry the needs to be
edited, or search alphabetically and Press Menu . The existing
name is displayed.
5. Press Phonebook to delete the name if required, then enter
the new name and Press Menu . The existing number is dis-
played.
6. Press Phonebook to delete the number if required, then
enter the new number and Press Menu .
7. Scroll Up or Down to select a new ringer melody and
Press Menu . The display shows « ADD ENTRY ».
8. Scroll Down to « MODIFY ENTRY » and Press Menu .
9. Enter the next name and number entry to be stored in the phone-
book or press End call twice to return to standby.
8.4 Delete an entry
1. Press Menu . Scroll Down to « PHONEBOOK ».
2. Press Menu to select.
3. Scroll Down to « DELETE ENTRY » and Press Menu .
4. Scroll Up or Down to the entry the needs to be deleted,
or search alphabetically and Press Menu . The display shows «
CONFIRM ? ».
5. Press Menu to conrm or Return to cancel.

14
9 HANDSET SETTINGS
9.1 Handset ringer volume
The ring volume can be set to different volume levels for internal and
external calls. Choose from 5 volume levels or Off.
1. Press Menu , Scroll Down to «HANDSET » and Press
Menu .
2. press Up or Down to select « INT RING VOL » or
« EXT RING VOL » and Press Menu .
3. press Up or Down to select the volume (1 - 5 or « OFF »).
4. Press Menu to conrm or Return to return to the previous
menu.
Note:
When the phone is ringing, adjust the ringer volume by pressing Up or Down.
9.2 Handset ringer melody
Different ringer melodies can be set for internal and external calls.
Choose from 5 different ringer melodies. While scrolling a sample ring
will be heard for each melody.
1. Press Menu , Scroll Down to «HANDSET » and Press
Menu .
2. press Up or Down to select «INT MELODY » or
«EXT MELODY » and Press Menu .
3. press Up or Down to select the ringer melody (1 - 5).
4. Press Menu to conrm or Return to return to the previous
menu.
Note:
Calls from the numbers that have been stored in the phonebook will
ring using the ringer melody set when the entry was stored.
9.3 Auto answer
The phone is set to answer calls by lifting the handset off the base
or charger. This feature can be switched off so that calls can only be
answered by pressing Talk.

15
UK
1. Press Menu , Scroll Down to «HANDSET » and Press
Menu .
2. Scroll Down to « AUTO ANSWER » and Press Menu .
3. press Up or Down to select « ON » or « OFF » and
press Menu to conrm.
9.4 Handset name
When using more than one handset with the base, a personalized
name can be set for each handset to easily distinguish between them.
A name can be up to 10 characters long.
1. Press Menu , Scroll Down to «HANDSET » and Press
Menu .
2. Scroll Down to « NAME » and Press Menu .
3. Enter the new handset name and Press Menu to conrm.
Note:
The handset name will only be displayed for approximately 20 sec-
onds when no button is pressed. If a mistake is made, Press Delete
to delete the last character or digit.
See ‘Entering names’ and ‘Writing tips’ on page 16.
9.5 Language
1. Press Menu , Scroll Down to «HANDSET » and Press
Menu .
2. Scroll Down to « LANGUAGE » and Press Menu .
3. press Up or Down to select the preferred language and
Press Menu to conrm.
9.6 Key beep
When pressing a button on the handset keypad, a beep will be heard.
These beeps can be switched on or off.
1. Press Menu , Scroll Down to «HANDSET » and Press
Menu . The display shows « BEEP ».
2. Press Menu to select. The display shows « KEYTONE ».

16
3. Press Menu to select.
4. press Up or Down to select « ON » or « OFF » and
Press Menu to conrm.
9.7 Battery low warning beep
When the battery is almost fully discharged, a warning beep will be
heard every
minute during a call. These beeps can be switched on or off.
1. Press Menu , Scroll Down to «HANDSET » and Press
Menu . The display shows « BEEP ».
2. Press Menu to select.
3. Scroll Down to « LOW BATTERY » and Press Menu .
4. press Up or Down to select « ON » or « OFF » and
Press Menu to conrm.
9.8 Out of range warning beep
If the handset goes out of range, warning beeps will be heard during a
call. These warning beep can be switched on or off.
1. Press Menu , Scroll Down to «HANDSET » and Press
Menu .
The display shows « BEEP ».
2. Press Menu to select.
3. Scroll Down to « OUT RANGE » and Press Menu .
4. press Up or Down to select « ON » or « OFF » and
Press Menu
to conrm.
9.9 Keypad lock using the menu
The menu can be used to lock the keypad.
1. Press Menu , Scroll Down to «HANDSET » and Press
Menu .
2. Scroll Down to « KEYLOCK ? » and press Menu to confirm.
icon is displayed.

17
UK
Note:
To unlock the keypad, press any button on the keypad, then press
within 5 seconds.
10 BASE SETTINGS
10.1 Change base PIN code
Some functions are protected by a 4 digit PIN code which must be
entered if the settings are changed. The default PIN is 0000. The PIN
can be changed to a preferred number.
When entering a PIN, the digits are shown as ****.
1. Press Menu , Scroll Down to « SETUP » and Press Menu
.
2. Scroll Down to « PIN CODE » and Press Menu .
3. Enter the 4 digit PIN code (default = 0000) and Press Menu .
4. Enter a new 4 digit PIN and Press Menu .
5. Re-enter the new PIN again and Press Menu to conrm.
IMPORTANT
If the PIN code is changed, please keep a record of the new number.
10.2 Dial mode
The phone is set to tone dialling. The dialling mode should only need
to change if connected to an older type of switchboard/PABX which
requires Pulse dialling.
1. Press Menu , Scroll Down to « SETUP » and Press Menu
.
2. Scroll Down to « DIAL MODE » and Press Menu .
3. press Up or Down to select «TONE DIAL » or «
PULSE DIAL » and Press Menu to conrm.
Note:
The dial mode is based on the country version, for some countries it
will not show in the menu and is preset to tone dialling.

18
10.3 Recall Mode
Depending on the country and network operator, the phone has the
recall time set as 100 ms (TIMED BR,1) or 280 ms (TIMED BR,2).
1. Press Menu , Scroll Down to « SETUP » and Press Menu
.
2. Scroll Down to « RECALL » and Press Menu .
3. press Up or Down to select << TIMED BR,1 >> or
<< TIMED BR,2 >> and Press Menu to conrm.
10.4 Restore default settings
The phone can be restored to its default (original) settings. All the
handsets that are registered to the base will be retained.
IMPORTANT
Resetting the phone to its default settings will delete all entries in
the Phonebook and Calls list. Current handset and base settings will
also be reset.
1. Press Menu , Scroll Down to « SETUP » and Press Menu
.
2. Scroll Down to « DEFAULT » and Press Menu .
3. Enter the 4 digit PIN code (default = 0000) and Press Menu .
The display shows « CONFIRM ? ».
4. Press Menu to confirm or Phonebook to return to the previous
menu. The phone will restart automatically.
10.5 Emergency default
If the PIN code has been lost, the phone can still be restored to its
default settings.
1. Remove the batteries from the handset.
2. Press and hold while replacing the batteries. The display shows
« DEFAULT ».
3. Press Menu to conrm. The phone will restart automatically.

19
UK
10.6 Eco mode
By operating the phone in Eco mode the level of power emissions can
be reduced. When the ECO mode is set to ON, the base transmission
power will be reduced. This feature is set to OFF by default.
To switch Eco mode on:
1. Press Menu , Scroll Down to « SETUP » and Press Menu
.
2. Scroll Down to « ECO MODE » and Press Menu .
3. press Up or Down to select « ON » or « OFF » and
Press Menu to conrm.
Eco mode ON
When Eco mode is switched off, the circle around disappears.
Note: When ECO mode is set to ON, the handset range will be
reduced.

20
11 CLOCK & ALARM
If subscribed to Caller ID, the date and time will be set on all the
handsets whenever a call is received. The date and time can also be set
manually on the individual handsets.
11.1 Set the date
1. Press Menu, scroll Down to « DATE-TIME » and press Menu.
The display shows DATE SET.
2. Press Menu to select.
3. Enter the date (e.g. 12--08 for 12th of August) and Press Menu to
conrm.
11.2 Set the time
1. Press Menu , Scroll Down to « DATE-TIME » and Press
Menu .
2. Scroll Down to « CLOCK SET » and Press Menu .
3. Enter the time in 24 hour format (e.g. 18--30 for 6.30pm) and
Press Menu to conrm.
11.3 Set alarm
Each handset can have a different alarm setting.
1. Press Menu , Scroll Down to « DATE-TIME » and Press
Menu .
2. Scroll Down to « ALARM SET » and Press Menu .
3. press Up or Down to select « ON » or « OFF » and
Press Menu to conrm.
4. If ON is selected, enter the time in 24 hour format (e.g. 07--30 for
7.30am) and Press Menu to conrm.
11.4 Switch off alarm ring
When the alarm sounds, press any button to switch it off.
Note: If the handset is being used to make a call when the alarm ring is
due, a beep will be heard in the earpiece.
Other manuals for Voxtel D81
1
Table of contents
Other AEG Cordless Telephone manuals

AEG
AEG Voxtel Smart 3 User manual

AEG
AEG Boomerang 10 User manual

AEG
AEG LloydCombo 15 Instruction manual

AEG
AEG Voxtel Smart 3 User manual

AEG
AEG Voxtel D570 twin Guide

AEG
AEG Voxtel D220BT User manual

AEG
AEG Pyramid User manual

AEG
AEG Voxtel D205 User manual

AEG
AEG Voxtel D235 User manual

AEG
AEG Voxtel D210 User manual

AEG
AEG Voxtel S110 Combo User manual

AEG
AEG voxtel D550BT User manual

AEG
AEG Lloyd Combo15 Instruction manual

AEG
AEG Prism 15 Instruction manual

AEG
AEG Voxtel S105 User manual

AEG
AEG Voxtel D200 User manual

AEG
AEG Voxtel S100 User manual

AEG
AEG Voxtel D235 User manual

AEG
AEG VOXTEL D500 User manual

AEG
AEG Voxtel D200 User manual