AEG Milano 40 User manual

Milano 40
USER MANUAL
and Safety Precautions
Corded Telephone
with Caller ID
11/05hj V3

2 AEG Milano 40 V.2_en
TABLE OF CONTENTS
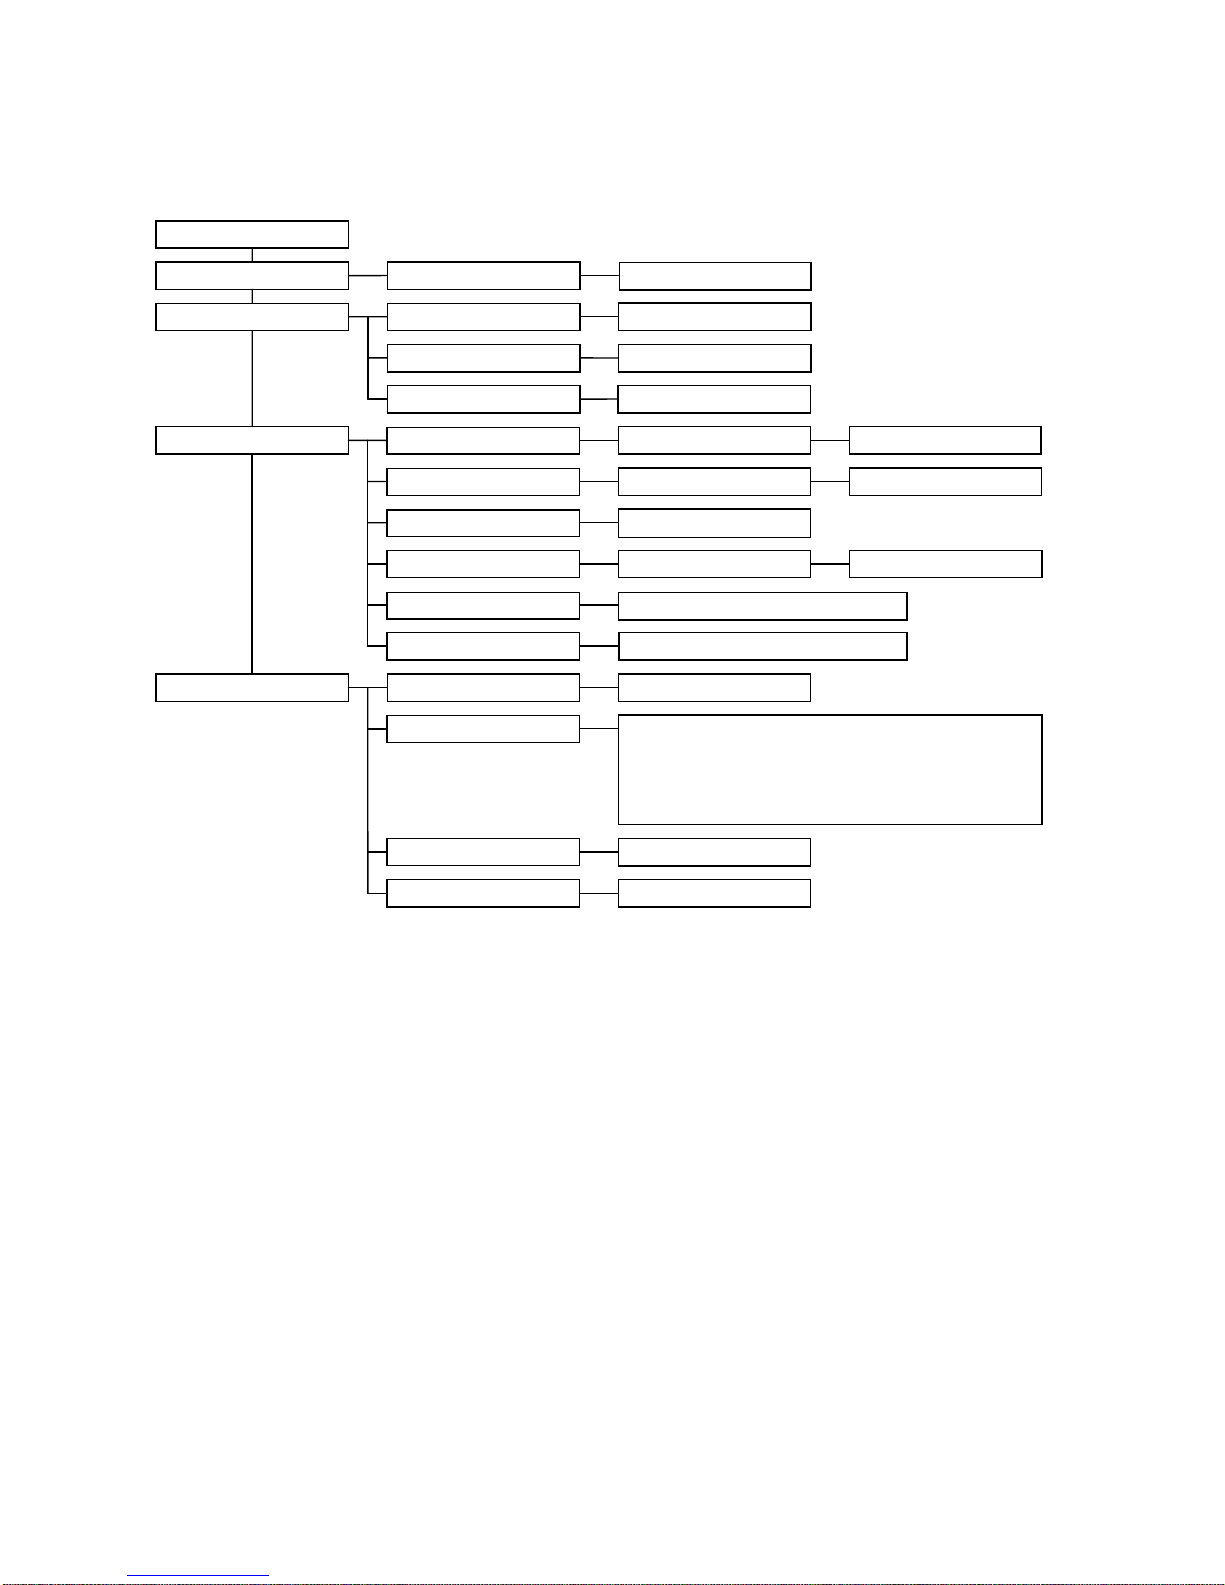
Description of the Appliance.........................................................4
Menu structure .............................................................................................4
Appliance overview ......................................................................................5
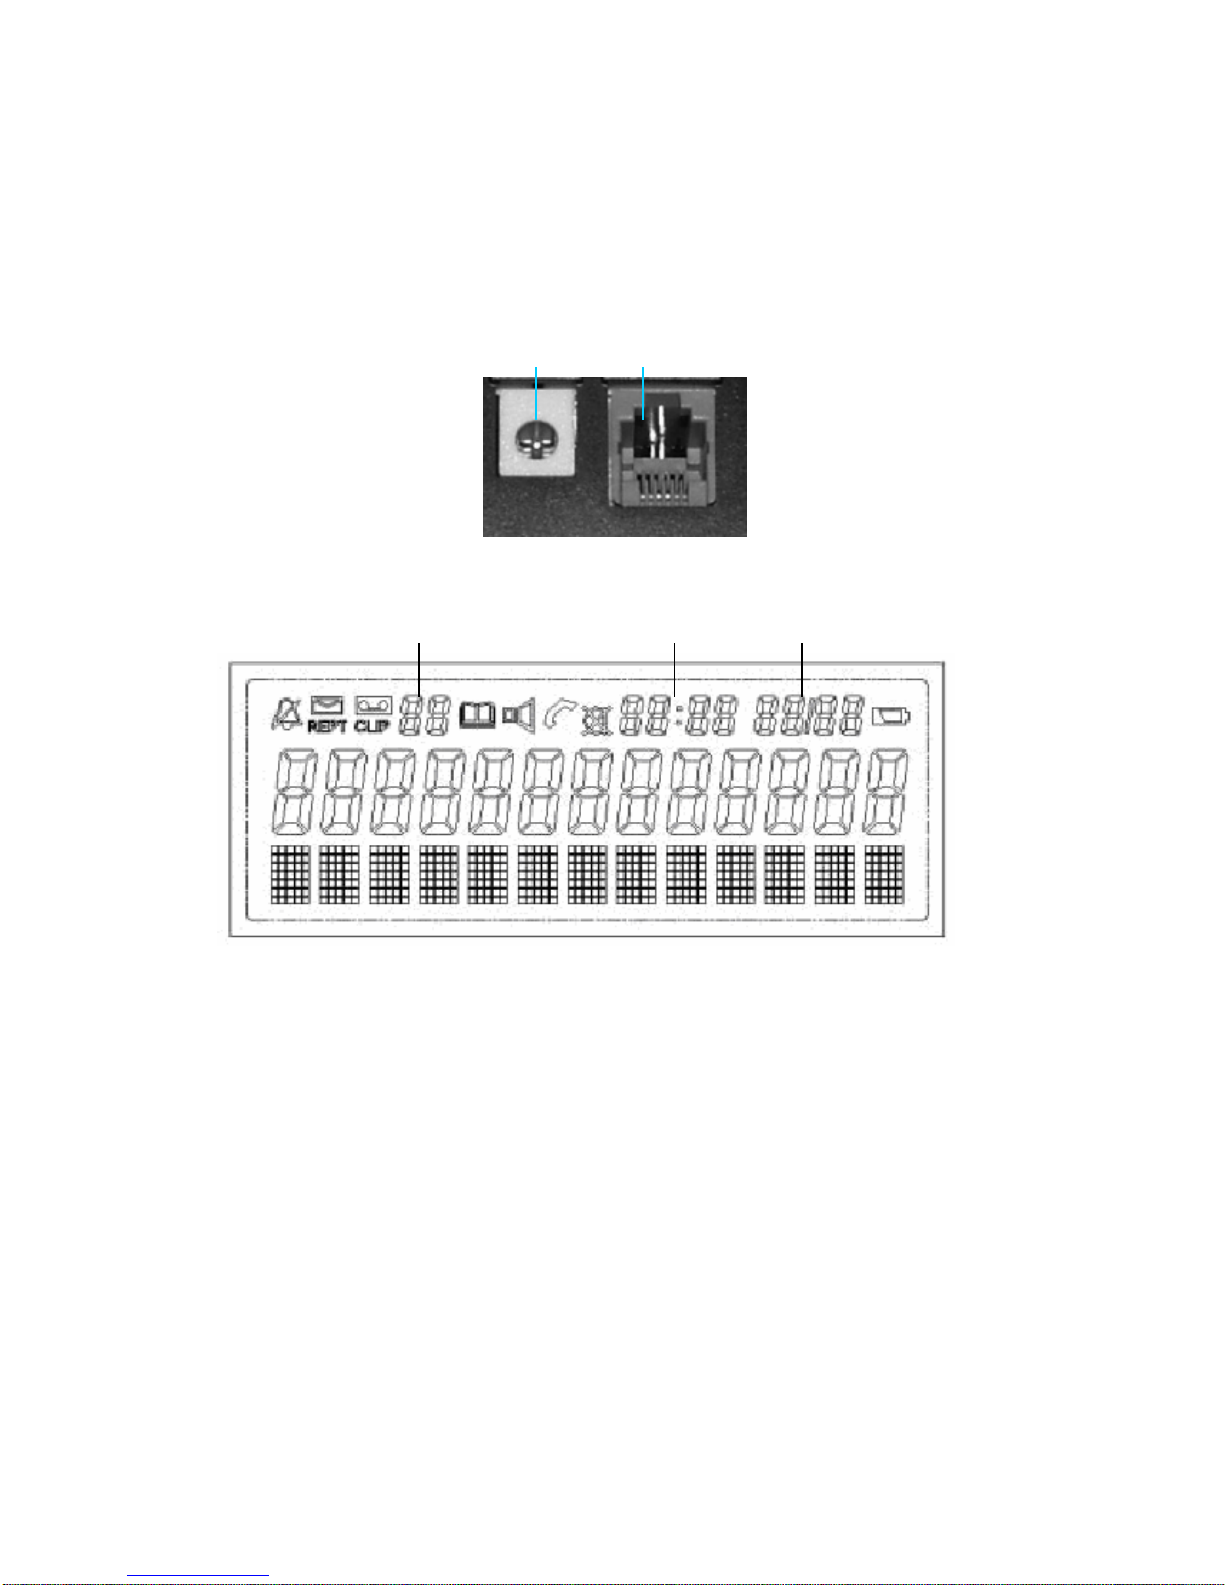
Backside view of the base............................................................................6
Display and symbols ....................................................................................6
Contents of the packing................................................................................7
Specific features...........................................................................................7
Default settings (set in the factory)...............................................................7
Installation of the appliance ..........................................................8
Emergency call with locked keypad .............................................................8
Safety precautions........................................................................................9
Configuration................................................................................10
Choice of the ringer melody .......................................................................10
Setting the ringer volume ...........................................................................10
Switching key tones ON and OFF..............................................................10
Activating or deactivating the keypad lock .................................................11
Changing the PIN.......................................................................................11
Inputting the network provider's pre-selection number (Call by call)..........11
Activating the prefix number.......................................................................12
Saving the access code for external calls..................................................12
Setting the Flash time.................................................................................13
Setting the dialing mode.............................................................................13
Setting the date and the time .....................................................................14
Setting the contrast of the display..............................................................14
Setting the language ..................................................................................15
Returning the settings to the defaults.........................................................15
Insert pause................................................................................................15
USING THE TELEPHONE....................................................16
Answering an incoming call........................................................................16
Making a hands-free call............................................................................16
Setting the volume for speaker phone calling ............................................16
Calling Outside...........................................................................................17
Dialing preparation.....................................................................................17
Redial (simple) ...........................................................................................17
Redialing the last five numbers called........................................................17
Dialing a number from the phonebook.......................................................18
Dialing a number from the CID list .............................................................18
Dialing a number from the shortcut dialing keys ........................................18

AEG Milano 40 V.2_en 3
External comfort functions..........................................................19
Waiting call and toggling............................................................................ 19
Consultation and toggling.......................................................................... 19
Conference call with three people ............................................................. 19
Turning off the microphone (Mute) ............................................................ 20
Saving numbers in the shortcut memories ................................................20
Reading the call duration........................................................................... 20
PHONEBOOK ...................................................................... 21
Generalities................................................................................................21
Table of characters (Standard).................................................................. 21
Add a new phonebook entry...................................................................... 22
Searching in the phonebook...................................................................... 22
Editing phonebook records........................................................................ 23
Deleting a phonebook entry....................................................................... 23
Deleting all phonebook entries .................................................................. 23
CID LIST (caller list - CLIP)................................................. 24
Generalities................................................................................................24
Opening the CID list................................................................................... 24
Dialing from the CID-list.............................................................................25
Copying a number from the CID list to the phonebook..............................25
Copying a number from the CID list to the shortcut memories..................25
Deleting numbers from the CID list individually......................................... 26
Deleting all telephone numbers from the CID list ......................................26
APPENDICES....................................................................... 27
Technical data ........................................................................................... 27
Troubleshooting......................................................................................... 28
Maintenance..............................................................................................28
Recycling...................................................................................................28
INDEX..........................................................................................29
CE declaration of conformity......................................................................32
Environmental Protection........................................................................... 32

4 AEG Milano 40 V.2_en
Description of the Appliance
Menu structure
MENU
Key Lock
Audio Ring Tone
Key PIN-_
Prefix-On/Off
Dialing Tone/Pulse
Key PIN-_
New PIN-_PABX Setting
Date / Time
Contrast Contrast 1-5
Sure?
01 / 01 - 0000:00
Setting
Deutsch / English / Français / Italiano /
Key Lock-Off/On
Ring Loudness
Key Tone-Off/On
Loudness-1-4/Off
Ring Tone-1-5
Key Tone
Reset
Dialing mode
Language
Prefix
Key PIN
Dial Pref._
Prefix Number
Key PIN-_
Prefix_
Key PIN-_
Dial Pref*
Flash Time Flash-80 / 100 / 270 ms
Nederlands / Portugues / Turkce /
Magyar / Ukrainia / Bulgaria / Czech /
Polski / Romania / Greek

AEG Milano 40 V.2_en 5
Appliance overview
1. LED indicating communication.
2. Shortcut dialing memories M1 – M3.
3. "R" - key.
4. "Mute" – key (microphone off).
5. Repeat key / Pause.
6. Volume ringer / handset / hands-free +.
7. Volume ringer / handset / hands-free –.
8. Hands-free key.
9. Scroll down key – back in the menu.
10. Phonebook.
11. MENU - key / "OK" key.
12. Scroll up key – forward in the menu.
13. Dialing key (dials the displayed phone number).
14. ESC – key to quit the menus.
15. Menu - key.
16. Delete key.
17. Open caller log (CID list).
18. Alphanumeric keypad.
19. LED indicating hands-free.
20. Hook.
21. Loudspeaker.
B A 1110920 1412 13
21
C 17 16 15 18 19 8
3
1
2
D 4
5
6
7

6 AEG Milano 40 V.2_en
A. Basic appliance
B. Handset
C. Handset cable inlet at the handset
D. Handset cable inlet at the base
E. Inlet for the telephone cord
F. Power supply inlet
Backside view of the base
Display and symbols
xring tone is switched off
Mmute (microphone switched off)
vhands-free on
ihandset is picked up, the telephone line is engaged
)no function
Bphonebook open
REPT repeat = several calls from same number came in
CLIP caller list open
'no function
1 counter for caller list and phonebook
2 time display in hours : minutes
3 date display in day / month
FE
1 2 3

AEG Milano 40 V.2_en 7
Contents of the packing
•1 base
•1 handset
•1 cable for the handset
•1 telephone line cord
•1 power supply adapter
•1 manual
Specific features
•Display with 1 Alphanumeric DOT-matrix-line for the name and two lines with
7-segment display for number and symbols
•Hands-free
•Caller ID (CLIP) with a maximum of 30 telephone numbers in the log
•Phonebook with a maximum of 50 different telephone numbers
•Re-dialing the last 5 numbers dialed
•Display of the call duration
•Volume of the ringer selectable in 5 levels or switched off
•Table appliance
•Can be used in connection with a switchboard
•Tone or pulse dialing – Flash-time adjustable
•LED for optical call indication
•Keypad locking
•Volume of the earpiece adjustable
•Mute (microphone switched off)
•3 memories for shortcut dialing M1-M3
•14 menu languages
Default settings (set in the factory)
Contrast 3
Menu language German (or your country’s language)
Date / hour 01/01/05 12:00
Dialing mode tone dialing
Flash – time 300 or 100 ms (depending on your
country’s version)
Pause 3 seconds
Caller list and phonebook empty
Shortcut memories and repeat list empty
Keypad lock off
Volume of the earpiece level 2
Volume of the hands-free loudspeaker level 4
PIN - code 0000
Ringer melody type 1
Ringer volume level 4

8 AEG Milano 40 V.2_en
Installation of the appliance
1. Plug in the small connector of the power supply (coming from the adapter)
at the backside of the base in power inlet (F). Plug in the adapter in the wall
outlet (230V~).
2. Use the telephone line cord to realize the connection between the tele-
phone inlet and the connection (E) at the back of the base.
3. Connect the handset cable to the inlet (D) of the base (A) and with plug (C)
to the handset (B).
This manual is meant for your information. Its contents are no part of
the contract. All values quoted are standard values.
The described equipment and the options can be different, depending
on the requirements of your country. We reserve our right to technical
modifications.
Emergency call with locked keypad
When the keypad is locked, it is not possible to make calls without prior dis-
abling the keypad locking. Making an emergency call (110 or 112), on the other
hand, is an exception to this rule. Emergency numbers with 4 figures at the
most will still be accessible.
When you programmed a zone prefix number of 3 digits and / or an operator
prefix number of maximum 6 digits, these numerals are put in front of the tele-
phone number for emergencies and dialed before the telephone number.
Attention:
If you use more than 4 digits, when dialing an emergency telephone number,
the announcement "Key Lock-On" appears on the display, and after the fifth
digit, further input will be ignored.

AEG Milano 40 V.2_en 9
Congratulations
Thanks for purchasing this telephone!
In order to be able using your phone in full comfort, we advise to read this man-
ual completely, so you will be familiar with its possibilities.
Safety precautions
Do not place the set in the proximity of heat sources and don't expose
is to direct sunrays, dust or vibrations.
Do not place the base station in a moist room, such as bathroom or
shower. The ideal temperature range is between +5° and +35° C and
the humidity between 25 % and 85 %.
Do not use the phone in environment subject to explosion hazard e.g.
auto paint booths.
Read these instructions carefully, and make sure that they accompany
the appliance, when you give it to others to use.
Dispose of the battery and phone in accordance with
environmental regulations!
Modern furniture generally has a surface finish with synthetic materials
or paintwork of different types. They need to be maintained with spe-
cific products of different make.
These products can affect the feet of your telephone! Avoid scratches
on your furniture by placing the appliance on an antiskid mat. We will
not accept any reliability for this kind of damage!

10 AEG Milano 40 V.2_en
Configuration
For changing the settings, you open the menu by pressing the "MENU" - key.
One can navigate inside the menus with the scrolling keys dand c. Confirm-
ing and saving a choice is done by pressing the "OK" - key. Leaving menus or
submenus is done with the "ESC" -key (14).
Choice of the ringer melody
MENU Press the key MENU. The display shows Key Lock.
dPress the key d, on the screen appears Audio.
OK Press OK, on the screen appears Ring Tone.
OK Press OK, on the screen appears Ring Tone-1 and you hear the cor-
responding melody.
cd Select the desired melody (1-5) with the scroll keys.
OK Confirm your choice with OK. You hear a confirmation tone and your
setting is saved.
@Press ESC twice to leave the menu.
Setting the ringer volume
MENU Press the key MENU. The display shows Key Lock.
dPress the key d, on the screen appears Audio.
OK Press OK, on the screen appears Ring Tone.
dPress the key d, on the screen appears Ring Loudness.
OK Press OK, on the screen appears Ring Loudness-4 and you hear the
chosen melody with the volume set as explained above.
cd Select the wanted volume (1-4) with the scroll keys, or choose OFF (si-
lence – no ring tone).
OK Confirm your choice with OK. You hear a confirmation tone and your
setting is saved.
@Press ESC twice to leave the menu.
Switching key tones ON and OFF
Each time you press a key, you hear a beep. If you want to, you can turn these
beeps off and back on again. The default setting is ON.
MENU Press the key MENU. The display shows Key Lock.
dPress the key d, on the screen appears Audio.
OK Press OK, on the screen appears Ring Tone.
dPress the key dseveral times, until Key Tone appears on the display.
OK Press OK, on the screen appears Key Tone AAN.
cd Select ON or OFF with the scroll keys.

AEG Milano 40 V.2_en 11
OK Confirm your choice with OK. You hear a confirmation tone and your
setting is saved.
@Press ESC twice to leave the menu.
Activating or deactivating the keypad lock
MENU Press the key MENU. The display shows Key Lock.
OK Press OK, on the screen appears Key PIN-****.
nInput the PIN code on the keypad (default 0000, set at the factory).
OK Confirm your choice with OK, on the screen appears Key Lock-Off.
cd Select ON or OFF with the scroll keys.
OK Confirm your choice with OK. You hear a confirmation tone and your
setting is saved.
@Press ESC twice to leave the menu.
Attention:
Please also read the remark on page 10 concerning emergency calls!
Changing the PIN
MENU Press the key MENU. The display shows Key Lock.
dPress the key dseveral times, until PABX Setting appears.
OK Press OK, on the screen appears Key PIN.
OK Press OK, on the screen appears Key PIN-****.
nInput the PIN code on the keypad (default 0000, set at the factory). On
the screen appears New PIN-0000.
nInput the new PIN code on the keypad, e.g. 1234.
OK Confirm your choice with OK. You hear a confirmation tone and your
setting is saved.
@Press ESC twice to leave the menu.
Setting network provider's pre-selection number (Call by call)
In this menu point, you have the possibility to input the pre-selection number of
a network provider, which allows cheaper calls or to input a prefix number that
you use frequently.
MENU Press the key MENU. The display shows Key Lock.
dPress the key dseveral times, until PABX Setting appears.
OK Press OK, on the screen appears Key PIN.
dPress the key dseveral times, until Prefix number appears.
OK Press OK, on the screen appears Prefix-.

12 AEG Milano 40 V.2_en
nUse the keypad to input the prefix number.
OK Confirm your choice with OK. You hear a confirmation tone and your
setting is saved.
@Press ESC twice to leave the menu.
The length of the prefix number is limited to 6 digits!
Activating the prefix number
Only if you activate the prefix number (described above), this number will be di-
aled before every telephone number you call.
MENU Press the key MENU. The display shows Key Lock.
dPress the key dseveral times, until PABX Setting appears.
OK Press OK, on the screen appears Key PIN.
dPress the key dseveral times, until Prefix number appears.
OK Press OK, on the screen appears Prefix-Off.
cd Select ON or OFF with the scroll keys. When you select ON, the prefix
number will always be dialed. Selecting OFF disables the dialing of the
prefix number.
OK Confirm your choice and save it by pressing OK.
@Press ESC twice to leave the menu.
Saving the access code for external calls
When used with a PABX, it is sometimes required that an access code for ex-
ternal calls is entered (mostly 0 or 9), sometimes followed by a pause. When it
is activated, this access code will be dialed automatically by your telephone,
each time you make an external call from the caller list. The length of this ac-
cess code is limited to 3 digits.
MENU Press the key MENU. The display shows Key Lock.
dPress the key dseveral times, until PABX Setting appears.
OK Press OK, on the screen appears Key PIN.
dPress the key dseveral times, until Dial pref appears on the display.
OK Press OK, on the screen appears Dial pref.-.
nUse the keypad for entering the access code for external calls. You can
find this access code in the documentation of your PABX.
OK Confirm your choice and save it by pressing OK.
@Press ESC twice to leave the menu.

AEG Milano 40 V.2_en 13
Setting the Flash time
The flash key "R" can be set with three different flash-times (80 / 100 / 270 ms).
The flash-time to be used depends on the installation, on which your unit is
connected
•connected to the public telephone network with comfort functions;
•connected to a PABX with similar functions.
The comfort functions:
waiting call
toggling
consultation
second call
conference call with three
must be ordered and paid for with your local telephone network operator. Your
provider will also be able to tell you, which flash-time has to be used on his in-
stallation (the flash-time to be set is usually 270 ms).
When the appliance is connected to a personal PABX, its supplier or the deliv-
ered manual can inform you about the flash-time to be set (the flash-time to be
set is usually 100 or 80 ms). The following description does not necessarily cor-
respond to the description in the manual of your PABX.
MENU Press the key MENU. The display shows Key Lock.
dPress the key dseveral times, until PABX Setting appears.
OK Press OK, on the screen appears Key PIN.
dPress the key dseveral times, until Flash Time appears on the dis-
play.
OK Press OK, on the screen appears Flash-270ms.
cd Select the wanted flash-time with the scroll keys.
OK Confirm your choice and save it by pressing OK.
@Press ESC twice to leave the menu.
Setting the dialing mode
Two dialing modes are available:
•MFV (tone): the actual standard (DTMF mode)
•IWV (pulses): only necessary for older installations
Proceed as follows for setting the correct dialing mode:
MENU Press the key MENU. The display shows Key Lock.

14 AEG Milano 40 V.2_en
dPress the key dseveral times, until PABX Setting appears.
OK Press OK, on the screen appears Key PIN.
dPress the key dseveral times, until Dialing mode appears.
OK Press OK, on the screen appears Dialing-Tone.
cd Select your dialing mode between Dialing-Tone and Dialing-Pulse.
OK Confirm your choice and save it by pressing OK.
@Press ESC twice to leave the menu.
Setting the date and the time
MENU Press the key MENU. The display shows Key Lock.
dPress the key dseveral times, until Setting appears on the display.
OK Press OK, on the screen appears Contrast.
dPress the key dseveral times, until Date/Time appears on the display.
OK Press OK, on the screen appears 01 / 01-00 12:00.
nUse the keypad to enter the actual date, e.g. for August 8th 2005:
080805. Then, you enter the correct time, e.g. for 15:37h:
1537.
OK Confirm your choice and save it by pressing OK.
@Press ESC twice to leave the menu.
Setting the contrast of the display
You can set the contrast of the display at 5 different levels, in order to adjust it
to the ambient light. Proceed as follows:
MENU Press the key MENU. The display shows Key Lock.
dPress the key dseveral times, until Setting appears on the display.
OK Press OK, on the screen appears Contrast.
OK Press OK, on the screen appears Contrast-3.
cd Select the wanted level with the scroll keys.
OK Confirm your choice and save it by pressing OK.
@Press ESC twice to leave the menu.

AEG Milano 40 V.2_en 15
Setting the language
There is a choice of fourteen languages available for the screen menus. To set
a language please proceed as follows:
MENU Press the key MENU. The display shows Key Lock.
dPress the key dseveral times, until Setting appears on the display.
OK Press OK, on the screen appears Contrast.
dPress the key dseveral times, until Language appears on the display.
OK Press OK, on the screen appears the actually set language.
cd Select your language with the scroll keys.
OK Confirm your choice and save it by pressing OK.
@Press ESC twice to leave the menu.
Returning the settings to the defaults
When you make a reset, all settings return to the default values, as they were at
delivery. This is necessary, when you have forgotten your PIN. Proceed as fol-
lows:
MENU Press the key MENU. The display shows Key Lock.
dPress the key dseveral times, until Setting appears on the display.
OK Press OK, on the screen appears Contrast.
dPress the key dseveral times, until Reset appears on the display.
OK Press OK, on the screen appears Sure?.
OK You must press OK to confirm. The telephone's settings are returned to
the default settings, originally set at the factory.
@Press ESC twice to leave the menu.
Insert pause
When you use the telephone connected behind an older PABX, it is possible
that the access code for external calls must be followed by a pause, before the
telephone number may be dialed.
Unhook.
nEnter the access code for external calls.
/P Press the key /P, the pause is inserted.
nEnter the telephone number you wish to call.
This pause takes the place of one digit in the telephone number for repeating, in
the shortcut memories and in the phonebook.

16 AEG Milano 40 V.2_en
USING THE TELEPHONE
Be aware that, in the case of a power failure or in case of a defect of the tele-
phone's power supply, the basic functions (making and receiving calls) remain
intact.
Answering an incoming call
A ring tone and the LED (1), flickering in the same rhythm as the ring tone sig-
nal the incoming calls. The screen displays the number of the caller (when the
network provider delivers it) and the name of the caller (when the delivered
number is stored in the phonebook).
Pick up the handset for answering the call, or press the hands-free key v(8).
The symbol of the picked-up handset "i" appears on the screen, and about 8
seconds later, the duration of the call is displayed. When in hands-free mode,
the loudspeaker symbol vappears on the display.
To end the conversation, you hang up or press the hands-free key again. The
total duration of the call remains visible for about 5 seconds.
Making a hands-free call
This function allows you to have a telephone conversation without having to
hold the handset. You can use this function to make the connection, but also
activate it during the call.
1. Press the key vto switch on the hands-free function.
2. Press the key vto switch off the hands-free function.
3. To end the conversation, you simply hang up.
The volume of the loudspeaker in hands-free mode corresponds
with the volume of the ear piece.
Setting the volume for speaker phone calling
1. Press the key vfor a call in hands-free mode.
2. Press one of the keys v+ or v-, you hear the actual volume and on the
screen appears Speaker-5.
3. Press one of the keys v+ of v-, to select the desired volume in the range
from 1 to 5. The chosen level is stored in memory

AEG Milano 40 V.2_en 17
Calling Outside
External calls are calls to the public telephone network.
1. Pick up the handset or press the hands-free key. You hear the dialing tone.
2. Input the desired number on the keypad (18).
3. The input number appears on the display and is dialed automatically.
4. To end the conversation, you hang up or press the hands-free key again.
Dialing preparation
1. This stands for inputting the desired telephone number in standby, before
picking up the handset. When you input a wrong digit, you can correct it
with the scroll, delete and number keys.
2. The input number appears on the display. Press the talk key i(13) or
pick up the handset, the number is dialed automatically.
3. To end the conversation, you hang up or press the hands-free key again.
Redial (simple)
To redial the very last number called, just press the redial key (5).
1. Press the redial key (5), the last number called (of maximum 32 digits)
appears on the display.
2. Press the talk key i(13) or pick up the handset, the displayed telephone
number is dialed automatically.
3. To end the conversation, you hang up or press the hands-free key again.
Redialing the last five numbers called
The redial key (5) also allows you to redial one of the last five telephone
numbers called.
1. Press the redial key several times (5), with each activating of the redial
key, the previous number called appears on the display.
2. Press the talk key i(13) or pick up the handset.
3. The displayed telephone number is dialed automatically.
4. To end the conversation, you hang up or press the hands-free key again.

18 AEG Milano 40 V.2_en
Dialing a number from the phonebook
Also read the chapter "PHONEBOOK".
1. Press the key phonebook B. .
2. On the screen appears Review, press OK. The first number (in alphabeti-
cal order) of the phonebook appears on the display.
3. Press the scroll keys cd to scroll through the phonebook. You can also
input the first letter of the name you are looking for; the list will then start
from the first name with this initial letter.
4. When you have found the wanted telephone number, you press the talk
key i(13) or pick up the handset, the displayed telephone number is di-
aled automatically.
5. When your appliance is connected behind a PABX, that does not open the
outside line automatically, the number in the phonebook must be preceded
by the access code for outside lines and, if necessary, a pause.
6. Just hang up to end the conversation.
Dialing a number from the CID list
Also read the chapter "CID list".
1. Press the key CID list y(17).
2. The first number in the CID list appears on the display, with number, name
(if saved in the phonebook), time and date of the call.
3. Press the scroll keys cd to scroll through the list for searching the
wanted telephone number.
4. When you have found the wanted telephone number, you press the talk
key i(13) or pick up the handset.
5. The displayed telephone number is dialed automatically.
6. Just hang up to end the conversation.
Dialing a number from the shortcut dialing keys
1. Press the key M1, M2 or M3.
2. The number and the name appear on the display.
3. Press the talk key i(13) or pick up the handset, the displayed telephone
number is dialed automatically.
4. When your appliance is connected behind a PABX, that does not open the
outside line automatically, the number in the shortcut memory must be pre-
ceded by the access code for outside lines and, if necessary, a pause.
5. Just hang up to end the conversation.

AEG Milano 40 V.2_en 19
External comfort functions
The comfort functions: waiting call, toggling, consultation, second call, con-
ference call with three must be ordered and paid for with your local telephone
network provider.
Your provider will also be able to tell you which flash-time has to be used on his
installation (please also read the chapter on "Flash time" (page 13).
When the unit is connected to a personal branch exchange (PBX), its supplier,
or the delivered instruction manual will be able to inform you.
Waiting call and toggling
You have the necessary subscription at your telephone network provider. While
you are having a telephone conversation, you hear a tone, i.e. a signal that indi-
cates that another user "knocks" (signal second call).
Use the R- key to put the actual conversation on hold. You hear the extra dial-
ing tone. By pressing "2" you can answer the second call. When you want to
return to the first conversation partner, you press the R- key again and dial "2"
again. You are now connected to the first conversation partner, and the second
caller is put on hold. This action (called toggling) can be repeated as often as
you wish, until one of the parties hangs up.
Consultation and toggling
With the function consultation / toggling, you can talk in turns to two different
callers, without one hearing what you discuss with the other. You can accept an
incoming call or call another participant yourself. This function also creates the
base for a conference call with three people.
You are calling with somebody and wish to retrieve information with another
participant (internal or external). To achieve this, you press the "R" - key to park
the first communication. You hear the extra dialing tone.
Dial the number of the other participant and have your conversation. When you
press the "R" - key again, you can park the second communication. Press "2",
and you return to the first conversation partner.
Now you can toggle between both conversation partners.
When you wish to end your call after the consultation, use the R- key and press
"1". The connection with the second conversation partner is broken.
Conference call with three people
This function allows you to talk with two conversation partners simultaneously;
each of the three parties is participating simultaneously, and hears both other
participants all the time. The connection between the three partners is built up
as described above, in the chapter consultation and toggling.

20 AEG Milano 40 V.2_en
When you want to set up a conference call, press the "R" – key again. The ac-
tive conversation is parked and you hear an extra dialing tone. Now press "3".
The conference with 3 people is now activated.
When one of the conversation partners hangs up, the communication with the
other partner can continue.
When you hang up yourself, the conference call is ended.
Turning off the microphone (Mute)
The microphone can be turned off temporarily. This allows you to talk to people
in your direct environment, without the telephone conversation partner over-
hearing it.
1. You are making a call.
2. Press the "Mute" key M(4) to turn off the microphone, it is inactivated and
the symbol Mappears on the display.
3. Now, you can talk to the people around you. Your conversation partner at
the other side of the line can't hear what is said.
4. To continue the call, Press the "Mute" key M(4) again, to switch on the mi-
crophone. You can continue your conversation.
Saving numbers in the shortcut memories
Three telephone numbers with the corresponding name can be saved in the
shortcut memories. Proceed as follows:
1. Press the key M1, M2 of M3. On the screen appears New.
2. Press the key OK.
3. Enter the number that you want to save. When your appliance is connected
behind a PABX, that does not open the outside line automatically, the
number in the shortcut memory must be preceded by the access code for
outside lines and, if necessary, a pause.
4. Press OK again.
5. Enter the name, corresponding to the number entered.
6. Press OK again, on the screen appears Saved and a confirmation signal
sounds.
Reading the call duration
About 8 seconds after you have pressed the hands-free key or picked up the
handset, the duration in minutes and seconds 00:00 appears on the display;
e.g.: 01:20 = 1min, 20 sec. At the end of the conversation, this duration remains
on the screen during approximately 5 seconds.
Table of contents
Other AEG Telephone manuals
Popular Telephone manuals by other brands

3Com
3Com NBX V3000 Analog Quick reference guide

AEI COMMUNICATIONS
AEI COMMUNICATIONS AFT-4100 Quick installation guide

Fanvil
Fanvil X1S Quick installation guide

Vodavi
Vodavi starplus 308 ex Installation and maintenance manual

Sony
Sony IT-D10 operating instructions

Philips
Philips TU5352/BA071P user manual