AEG DD8694-M User manual

DD8694-M USER MANUAL
MODE D’EMPLOI ET INSTALLATION
BEDIENUNGSANLEITUNG
INSTRUCTIES VOOR HET GEBRUIK EN INSTALLEREN
INSTRUCCIONES PARA EL USO Y LA INSTALACIÒN
INSTRUÇÕES PARA O USO E A INSTALAÇÃO
EN
FR
DE
NL
ES
PT
COOKER HOOD
HOTTE DE CUISINE
DUNSTABZUGSHAUBE
DAMPKAP
CAMPANA
EXAUSTOR
2
14
26
38
50
62

FOR PERFECT RESULTS
Thank you for choosing this AEG product. We have created
it to give you impeccable performance for many years, with
innovative technologies that help make life simpler – fea-
tures you might not find on ordinary appliances. Please
spend a few minutes reading to get the very best from it.
ACCESSORIES AND CONSUMABLES
In the AEG webshop, you’ll find everything you need to keep
all your AEG appliances looking spotless and working per-
fectly. Along with a wide range of accessories designed and
built to the high quality standards you would expect, from
specialist cookware to cutlery baskets, from bottle holders to
delicate laundry bags…
Visit the webshop at:
www.aeg-electrolux.com/shop

3
CONTENTS
4
5
7
10
11
Recommendations And Suggestions
Characteristics
Installation
Use
Maintenance
Contents

RECOMMENDATIONS AND SUGGESTIONS 4
RECOMMENDATIONS AND SUGGESTIONS
The Instructions for Use apply to several versions of this appliance. Ac-
cordingly, you may find descriptions of individual features that do not
apply to your specific appliance.
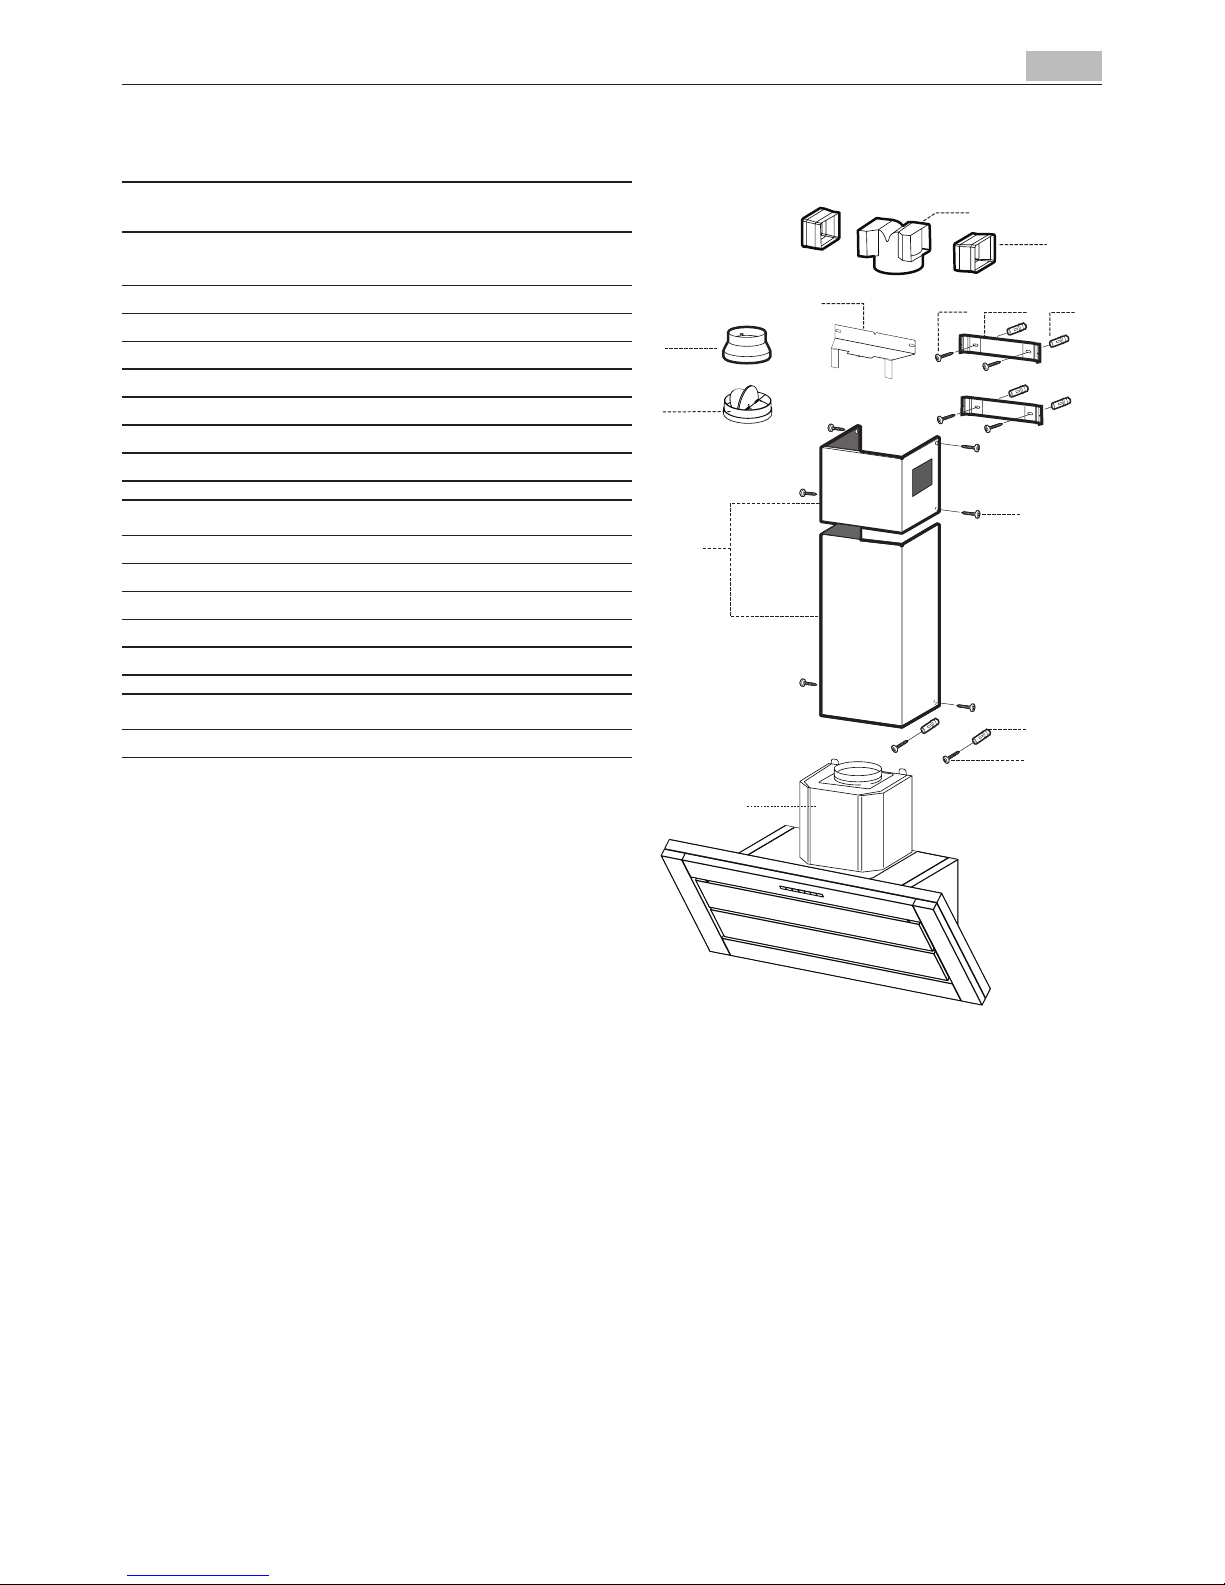
INSTALLATION
• Themanufacturerwillnotbeheldliableforanydamagesresultingfrom
in-correct or improper installation.
• Theminimumsafetydistancebetweenthecookertopandtheextractor
hood is 650 mm (some models can be installed at a lower height, please
re-fer to the paragraphs on working dimensions and installation).
• Checkthatthemainsvoltagecorrespondstothatindicatedontherating
plate fixed to the inside of the hood.
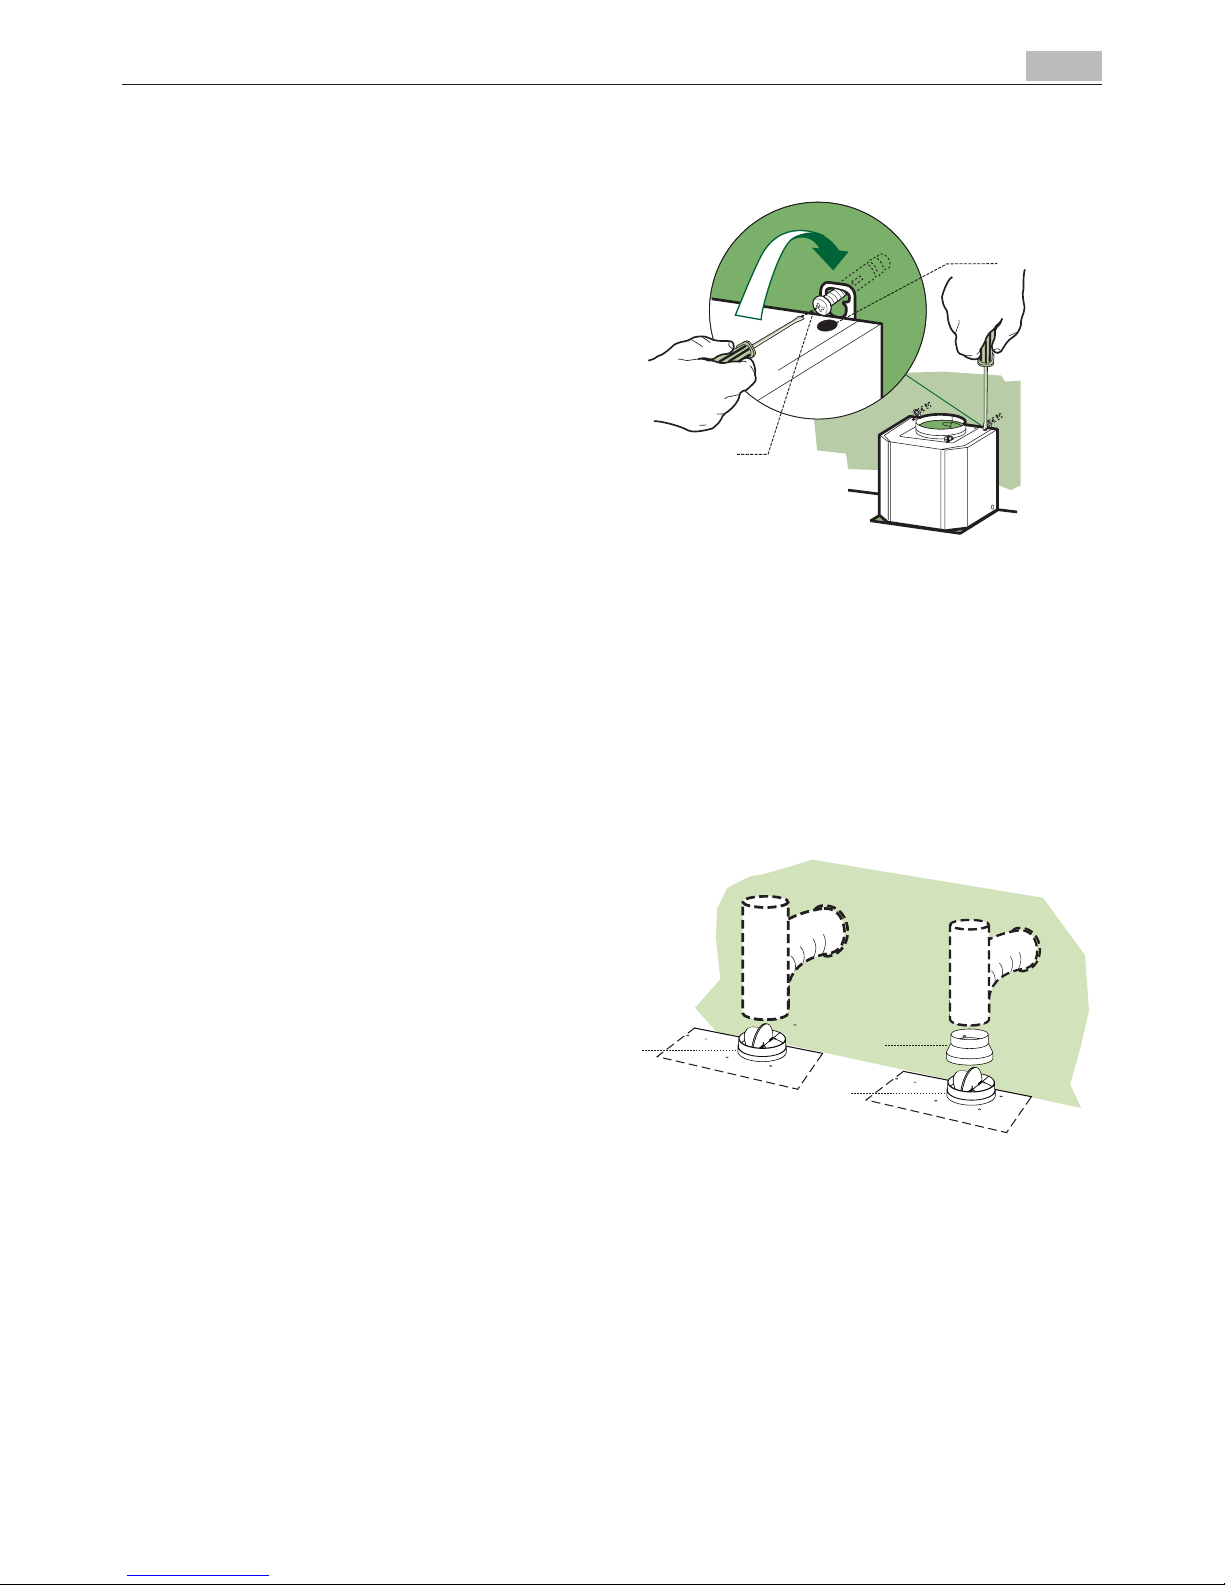
• ForClassIappliances,checkthatthedomesticpowersupplyguarantees
adequate earthing. Connect the extractor to the exhaust flue through a
pipe of minimum diameter 120 mm. The route of the flue must be as short
as possible.
• Donotconnecttheextractorhoodtoexhaustductscarryingcombustion
fumes (boilers, fireplaces, etc.).
• Iftheextractorisusedinconjunctionwithnonelectricalappliances(e.g.
gas burning appliances), a sufficient degree of aeration must be guaran-
teed in the room in order to prevent the backflow of exhaust gas. The
kitchen must have an opening communicating directly with the open air
in order to guarantee the entry of clean air.
USE
• The extractor hood has been designed exclusively for domestic use to
eliminate kitchen smells.
• Neverusethehoodforpurposesotherthanforwhichithasbeende-
signed.
• Neverleavehighnakedflamesunderthehoodwhenitisinoperation.
• Adjusttheflameintensitytodirectitontothebottomofthepanonly,
making sure that it does not engulf the sides.
• Deepfatfryersmustbecontinuouslymonitoredduringuse:overheatedoil
can burst into flames.
• Donotflambèundertherangehood;riskoffire
• Thisapplianceisnotintendedforusebypersons(includingchildren)with
reduced physical, sensory or mental capabilities, or lack of experience and
knowledge, unless they have been given supervision or instruction con-
cerning use of the appliance by a person responsible for their safety.
• Childrenshouldbesupervisedtoensurethattheydonotplaywiththe
appliance.
MAINTENANCE
• Switchofforunplugtheappliancefromthemainssupplybeforecarrying
out any maintenance work.
• Cleanand/orreplacetheFiltersafterthespecifiedtimeperiod(Firehaz-
ard).
• Cleanthehoodusingadampclothandaneutralliquiddetergent.
The symbol on the product or on its packaging indicates that this product may not be treated as household waste. In-
stead it shall be handed over to the applicable collection point for the recycling of electrical and electronic equipment. By
ensuring this product is disposed of correctly, you will help prevent potential negative consequences for the environment
and human health, which could otherwise be caused by inappropriate waste handling of this product. For more detailed
information about recycling of this product, please contact your local city office, your household waste disposal service or
the shop where you purchased the product.

CHARACTERISTICS
5
CHARACTERISTICS
Dimensions

CHARACTERISTICS 6
Components
Ref. Q.ty Product Components
1 1 Hood Body, complete with: Controls, Light,
Blower, Filters
2 1 Telescopic Chimney comprising:
2.1 1 Upper Section
2.2 1 Lower Section
9 1 Reducer Flange ø 150-120 mm
10 1 Damper ø 150
14.1 2 Air Outlet Connection Extension
15 1 Air Outlet Connection
Ref. Q.ty Installation Components
7.2.1 2 Upper Chimney Section Fixing Brackets
7.3 1 Air Outlet Connection Support
11 6 Wall Plugs
12a 6 Screws 4,2 x 44,4
12c 6 Screws 2,9 x 9,5
Q.ty Documentation
1 Instruction Manual

INSTALLATION
7
INSTALLATION
Wall drilling and bracket fixing
Wall marking:
• Drawaverticallineonthesupportingwalluptotheceiling,orashighaspractical,atthe
centre of the area in which the hood will be installed.
• Drawahorizontallineat450mmabovethehob.
• Placebracket7.2.1 on the wall as shown about 1-2 mm from the ceiling or upper limit align-
ing the centre (notch) with the vertical reference line.
• Markthewallatthecentresoftheholesinthebracket.
• Placebracket7.2.1 on the wall as shown at X mm below the first bracket (X = height of the
upper chimney section supplied), aligning the centre (notch) with the vertical line.
• Markthewallatthecentresoftheholesinthebracket.
• Markareferencepointasindicatedat116mmfromtheverticalreferencelineand590mm
abovethehorizontalreferenceline.
• Repeatthisoperationontheotherside.
• Drillø8mmholesatallthecentrepointsmarked.
• Insertthewallplugs11intheholes.
• Fixthelowerbracket7.2.1 using the 12a screws (4,2 x 44,4) supplied.
• Fixtheupperbracket7.2.1 and the air outlet connection support 7.3 together using the 2
screws 12a (4,2 x 44,4) supplied.
• Insertthetwoscrews12a (4,2 x 44,4) supplied in the hood body fixing holes, leaving a gap of
5-6 mm between the wall and the head of the screw.

INSTALLATION 8
HOOD BODY MOUNTING
• Beforeattachingthehoodbody,tightenthe
two screws Vr located on the hood body
mounting points.
• Hookthehoodbodyontothescrews12a.
• Fullytightenthesupportscrews12a.
• Adjust the screws Vr to level the hood
body.
CONNECTIONS
DUCTED VERSION AIR EXHAUST SYSTEM
When installing the ducted version, connect the
hood to the chimney using either a flexible or
rigid pipe ø 150 or 120mm, the choice of which
is left to the installer.
To install a ø 150
• Toinstallthedumper10
• Fixthepipein positionusingsufficientpipe
clamps (not supplied).
To install a ø 120
• Toinstallaø120mmairexhaustconnection,
insert the reducer flange 9 on the dumper
10.
• Fixthepipein positionusingsufficientpipe
clamps (not supplied)
.• Removeanyactivatedcharcoalfilters.

INSTALLATION
9
RECIRCULATION VERSION AIREOUTLET
• Inserttheconnectionextensionpieceslaterally
14.1 in connection 15.
• Insert the Connector 15 into the Support
bracket 7.3 and fix it with a screw.
• Make sure that the outlet of the extension
pieces 14.1 is horizontally and vertically
aligned with the chimney outlets.
• Connecttheairoutletconnection15 to the
hood body outlet using either a flexible or
rigid pipe ø 150 mm, the choice of which
is left to the installer.
• Ensurethattheactivatedcharcoalfiltershave
been inserted.
ELECTRICAL CONNECTION
• Connect the hood to the mains through a
two-pole switch having a contact gap of at
least 3 mm.
• Remove the grease filters (see paragraph
Maintenance) being sure that the connector
of the feeding cable is correctly inserted in
the socket placed on the side of the fan.
CHIMNEY ASSEMBL
Y
Upper exhaust Chimney
• Slightlywidenthetwosidesoftheupperflue
and hook them behind the brackets 7.2.1,
making sure that they are well seated.
• Securethesidestothebracketsbyusingthe
4 screws 12c (2,9 x 9,5) supplied.
• Make sure that the outlet of the extensions
pieces is aligned with the chimney outlets.
Lower exhaust Chimney
• Slightlywidenthetwosidesofthechimney
and hook them between the upper chimney
and the wall, making sure that they are well
seated.
• Fixthelowerpartlaterallytothehoodbody
using the 2 screws 12c (2,9 x 9,5) supplied.

USE 10
USE
Button Function Display
A
Turns the suction motor on and off at
speed one.
Displays the set speed
B
Decreases the working speed. Displays the set speed
C
Increases the working speed. Displays the set speed
D
Activates intensive speed from any other
speed, including motor off. This speed is set
to operate for 5 minutes, after which the
system returns to the speed that was set
before. Suitable to deal with maximum levels
of cooking fumes.
Displays HI and the time remaining once every
second.
When the filters alarm is triggered, the alarm
can be reset by pressing and holding this
button for ap-proximately 3 seconds. These
indications are only visible when the motor
is turned off.
F indicates the need to wash the metal grease filters.
The alarm is triggered after the Hood has been in
operation for 100 working hours.
C indicates the need to change the activated charcoal
filters, and also to wash the metal grease filters. The
alarm is triggered after the Hood has been in opera-
tion for 200 working hours.
E
Delay function
Activates automatic switch-off with a 20’
delay. Suit-able to complete elimination of
residual odours. Can be activated from any
position, and is disabled by pressing the button
or turning the motor off.
Displays the operating speed and the dot at the bottom
right flashes alternately with the remaining time.
Press and hold the button for approximately 5
sec-onds, with all the loads turned off (Motor
and Lights), to turn the Activated Charcoal
Filter alarm On and Off.
-C flashes twice - A.C. Filter alarm Activated.
-C flashes once - A.C. Filter alarm Deactivated
F
Turns the lighting system on and off at
maximum intensity.

MAINTENANCE
11
MAINTENANCE
CLEANING THE COMFORT PANELS
•PulltheComfortPaneltoopenit.
•Disconnect the panel from the hood canopy by
sliding the fixing pin lever.
•The comfort panel must never be washed in a
dishwasher.
•Clean the outside by using a damp cloth and
neutral liquid detergent.
•Clean the inside as well by using a damp cloth
and neutral detergent; do not use wet cloths or
sponges, or jets of water; do not use abrasive
substances.
•When the above operation has been completed,
hook the panel back to the hood canopy and close
it by turning the knob in the opposite direction.
METAL GREASE FILTERS
Filters can be washed in the dish machine. They need
to be washed when F-sign appears on the display or
in any case every 2 months, or even more frequently
in case of particularly intensive use of the hood.
Alarm reset
•Switchoffthehoodandthelights.
•PresstheD-key till the display is unlit.
Cleaning the filters
•Pullthecomfortpanelstoopenthem.
•Remove the filters one by one pushing them
towards the back side of the hood unit and si-
multaneously pulling downwards.
•Anykindofbendingofthefiltershastobeavoided
when washing them. Before fitting them again
into the hood make sure that they are completely
dry. (The colour of the filter surface may change
through-out the time but this has no influence
to the filter efficiency).
•Whenfittingthefiltersintothehoodpayatten-
tion that they are mounted in correct position the
handle facing outwards.
•Closethecomfortpanel.

MAINTENANCE 12
Charcoal filter (recycling version)
This filter cannot be washed or regenerated. It must be replaced when the Cappears on the
display or at least once every 4 months. The filter saturation alarm has to be activated already
before.
Activation of the alarm signal
• InRecirculationVersionHoods,theFilterSaturationAlarmmustbeactivatedoninstallation
or at a later date.
• Press and hold button E(Delay) for 5 seconds, until confirmation appears on the display:
• Cflashestwice–ActivatedCharcoalFiltersaturationalarmACTIVATED.
• Cflashesonce–ActivatedCharcoalFiltersaturationalarmDEACTIVATED.
REPLACING THE CHARCOAL FILTER
Reset of the alarm signal
• Switchoffthehoodandthelighting.
• PresstheD-key until the display is unlit.
Replacing of the filter
• Openthecomfortpanelspullingthemdownwards.
• Removethemetalgreasefilters.
• Removethesaturatedcharcoalfilterbyreleasing
the fixing hooks
• Fitthenewfilterandfastenitinits correctposi-
tion.
• Putthemetalgreasefiltersintheirseats.
• Closethecomfortpanels.
Lighting
LIGHT REPLACEMENT
20 W halogen light.
• Removethe2screwsfixingthe Lightingsupport,
and pull it out of from the Hood.
• ExtractthelampfromtheSupport
• Replacewithanotherofthesametype,making
sure that the two pins are properly inserted in the
lamp holder socket holes.
• RefittheSupport,fixingitinplacewiththetwo
screws removed as above.

POUR DES RÉSULTATS PARFAITS
Merci d'avoir choisi ce produit AEG. Nous l'avons créé pour
vous offrir la meilleure performance pour une longue durée,
avec des technologies innovantes qui vous simplifient la
vie-autantdecaractéristiquesquevousnetrouverezpas
sûrementpassurd'autresappareils.Veuillezprendrequel-
ques instants pour lire cette notice afin d'utiliser au mieux
votre appareil.
ACCESSOIRES ET CONSOMMABLES
Danslaboutiqueenligned'AEG,voustrouvereztoutcequ'il
vous faut pour que vos appareils AEG fonctionnent parfai-
tement. Sans oublier une vaste gamme d'accessoires conçus
etfabriquésselonlescritèresdequalitélesplusélevésqui
soient, des articles de cuisine spécialisés aux range-couverts,
des porte-bouteilles aux sacs à linge délicats...
Visit the webshop at:
www.aeg-electrolux.com/shop

14
SOMMAIRE
16
17
19
22
23
RECOMMENDATIONS AND SUGGESTIONS
CHARACTERISTICS
INSTALLATION
USE
MAINTENANCE
SOMMAIRE

CONSEILS ET SUGGESTIONS 15
CONSEILS ET SUGGESTIONS
La présente notice d’emploi vaut pour plusieurs versions de l’appareil. Elle
peut contenir des descriptions d’accessoires ne figurant pas dans votre ap-
pareil.
INSTALLATION
• Lefabricantdéclinetouteresponsabilitéencasdedommagedûàuneinstal-
lationnoncorrecteounonconformeauxrèglesdel’art.
• Ladistanceminimaledesécuritéentreleplandecuissonetlahottedoitêtre
de650mmaumoins(certainsmodèlespeuventêtreinstallésàunehauteur
inférieure : se reporter aux paragraphes « Encombrement » et « Installation »).
• Vérifierquelatensiondusecteurcorrespondàlavaleurquifiguresurlapla-
quette apposée à l’intérieur de la hotte.
• PourlesAppareilsappartenantàlaIèreClasse,veilleràcequelamiseàlaterre
de l’installation électrique domestique ait été effectuée conformément aux
normes en vigueur.
• Connecterlahotteàlasortied’airaspiréàl’aided’unetuyauteried’undiamè-
treégalousupérieurà120mm.Leparcoursdelatuyauteriedoitêtreleplus
court possible.
• Eviterdeconnecterlahotteàdesconduitesd’évacuationdefuméesissues
d’unecombustiontelque(Chaudière,cheminée,etc…).
• Sivousutilisezdesappareilsquinefonctionnentpasàl’électricitédansla
pièceouestinstalléelahotte(parexemple:desappareilsfonctionnantau
gaz),vous devezprévoirune aérationsuffisante dumilieu.Si lacuisineen
estdépourvue,pratiquezuneouverturequicommuniqueavecl’extérieurpour
garantir l’infiltration de l’air pur.
UTILISATION
• Lahotteaétéconçueexclusivementpourl’usagedomestique,danslebut
d’éliminer les odeurs de la cuisine.
• Nejamaisutiliserabusivementlahotte.
• Nepaslaisserlesflammeslibresàforteintensitéquandlahotteestenser-
vice.
• Toujoursréglerlesflammesdemanièreàévitertoutesortielatéraledeces
dernièresparrapportaufonddesmarmites.
• Contrôlerlesfriteuseslorsdel’utilisationcarl’huilesurchaufféepourraits’en-
flammer.
• Nepaspréparerd’alimentsflambéssouslahottedecuisine:risqued’incen-
die
• Cetappareilnedoitpasêtreutilisépardespersonnes(ycomprislesenfants)
ayant des capacités psychiques, sensorielles ou mentales réduites, ni par des
personnes n’ayant pas l’expérience et la connaissance de ce type d’appareils,
àmoinsd’êtresouslecontrôleetlaformationdepersonnesresponsablesde
leur sécurité.
• Lesenfantsdoiventêtresurveilléspour s’assurerqu’ilsnejouent pasavec
l'appareil.
ENTRETIEN
• Avantdeprocéderàtouteopérationd’entretien,retirerlahotteenretirantla
fiche ou en actionnant l’interrupteur général.
• Effectuer un entretien scrupuleux et en temps dû des Filtres, à la cadence
conseillée (Risque d’incendie).
• Pourlenettoyagedessurfacesdelahotte,ilsuffitd’utiliserunchiffonhumide
et détersif liquide neutre.
Le symbole surleproduitousonemballageindiquequeceproduitnepeutêtretraitécommedéchetménager.Ildoitplutôtêtre
remis au point de ramassage concerné, se chargeant du recyclage du matériel électrique et électronique. En vous assurant que ce produit
estéliminécorrectement,vousfavorisezlapréventiondesconséquencesnégativespourl’environnementetlasantéhumainequi,sinon,
seraientlerésultatd’untraitementinappropriédesdéchetsdeceproduit.Pourobtenirplusdedétailssurlerecyclagedeceproduit,veuillez
prendrecontactaveclebureaumunicipaldevotrerégion,votreserviced’éliminationdesdéchetsménagersoulemagasinoùvousavez
acheté le produit.

CARACTERISTIQUES
16
CARACTERISTIQUES
Encombrement

CARACTERISTIQUES 17
Composants
Réf. Q.té Composants du produit
1 1 Corps Hotte équipé de: Comandes,
Lumière,GroupeVentilateur,Filtres
2 1 Cheminée Télescopique formée de :
2.1 1 Cheminée Supérieure
2.2 1 Cheminée Inférieure
9 1 Flasque de Réduction ø 150-120 mm
10 1 Buse avec clapet
14.1 2 Rallonge Raccord Sortie Air
15 1 Raccord Sortie Air
Réf. Q.té Composants de l’installation
7.2.1 2 Brides Fixation Cheminée Supérieure
7.3 1 Bride Support Raccord
11 6 Chevilles
12a 6 Vis 4,2 x 44,4
12c 6 Vis 2,9 x 9,5
Q.té Documentation
1 Notice d’emploi

INSTALLATION
18
INSTALLATION
Perçage du mur et fixation des équerres
Tracer sur la paroi:
• uneligneverticaleallantjusqu’auplafondouàlalimitesupérieure,aucentredelazonepré-
vuepourlemontagedelahotte;
• unelignehorizontaleà450mmmin.au-dessusduplandecuisson.
• Posercommeindiquéunebride7.2.1 sur la paroi à 1-2 mm du plafond ou de la limite supé-
rieure,enalignantsoncentre(découpes)surlaligneverticalederepère.
• Marquerlescentresdestrousrainurésdelabride.
• Posercommeindiquélabride7.2.1àXmmsouslapremièrebride(X=hauteurcheminée
supérieurefournie),enalignantsoncentre(découpes)surlaligneverticalederepère.
• Marquerlescentresdestrousrainurésdelabride.
• Marquercommeindiqué,unpointderéférenceà116mmdelaligneverticalederepère,et
590mmaudessusdelalignehorizontalederepère.
• Répétercetteopérationsurlecôtéopposé.
• Percerdeø8mmtouslespointsmarqués.
• Insérerleschevilles11danslestrous.
• Fixerlabrideinférieure7.2.1 en utilisant les vis 12a (4,2 x 44,4) fournies.
• Fixerensemblelabridesupérieure7.2.1 et le support 7.3 en utilisant les vis 12a (4,2 x 44,4)
fournies.
• Visserles2vis12a (4,2 x 44,4) fournies dans les trous de fixation du corps hotte, en laissant
unleespacede5-6mmentrelemuretlatêtedelavis

INSTALLATION 19
MONTAGE CORPS HOTTE
• Avant d’accrocher le corps hotte, serrer les
deux vis Vr situées sur les points d’accrochage
du corps hotte.
• Accrocherlecorpshotteauxvis12a prévues
à cet effet.
• Serrer définitivement les vis 12a de sup-
port.
• Agir sur les vis Vr pour niveler le corps
hotte.
BRANCHEMENTS
SORTIE AIR VERSION ASPIRANTE
En cas d’installation en version aspirante, bran-
cher la hotte à la tuyauterie de sortie via un
tube rigide ou flexible de ø 150 ou 120 mm,
au choix de l’installateur.
Branchement avec un tube de ø150
• Insérerlabuseavecclapet10.
• Fixer le tube par des colliers appropriés. Le
matériau nécessaire n’est pas fourni.
Branchement avec un tube de ø120
• Insérerleflasquederéduction9 sur la buse
avec clapet 10.
• Fixer le tube par des colliers appropriés. Le
matériau nécessaire n’est pas fourni.
• Retirer les éventuels filtres antiodeur au
charbon actif.

INSTALLATION
20
SORTIE AIR VERSION FILTRANTE
•Insérerlatéralementlesrallongesraccord14.1
sur le raccord 15.
• Placer le raccord 15 dans l’étrier de soutien
7.3 en le fixant avec une vis.
•S’assurer que la sortie des rallonges raccord
14.1 se trouve au niveau des bouches de
la cheminée aussi bien en horizontal qu’en
vertical.
• Brancher le raccord 15 à la sortie du corps
de la hotte avec un tube rigide ou flexible de
ø 150 mm, selon le choix de l’installateur.
•S’assurerdelaprésencedesfiltresantiodeur
au charbon actif.
BRANCHEMENT ÉLECTRIQUE
• Brancherlahottesurlesecteureninterposant
un interrupteur bipolaire avec ouverture des
contacts d’au moins 3 mm.
• Enleverlesfiltresàgraisse(voir§“Entretien”)
et s’assurer que le connecteur du câble d’ali-
mentation soit bien branché dans la prise du
diffuseur.
MONTAGE CHEMINÉE
Cheminée supérieure
•Elargir légèrement les deux bords latériaux,
et lesaccrocherderrièreslesbrides7.2.1;
refermerjusqu’àlabutée.
•Fixer latéralement aux brides à l’aide des 4
vis 12c fournies.
•S’assurer que la sortie des rallonges raccord
se trouve au niveau des bouches de la che-
minée.
Cheminée inférieure
• Elargirlégèrementlesdeuxbordslatériauxde
la Cheminée et les accrocher entre la Chemi-
néesupérieureetlaparoi;refermerjusqu’àla
butée.
• Fixerlatéralementlapartieinférieureaucorps
hotte, à l’aide des deux 2 vis 12c fournies.
Other manuals for DD8694-M
2
Table of contents
Languages:
Other AEG Ventilation Hood manuals
Popular Ventilation Hood manuals by other brands

Frigidaire
Frigidaire HV40 installation instructions

Furrion
Furrion FHO23SACR-BL instruction manual

Franke
Franke FSW 918 BK/XS Instructions for use and installation

Beko
Beko CFB 6433 XH user manual

Küppersbusch
Küppersbusch EMD 700.0 Instructions for use and installation instructions

Zephyr
Zephyr Okeanito COK-E42SX Use, care and installation guide