AEG 2600 D User manual

2600 D
Cooker hood
Operating and Installation Instructions

2
Printedonrecycledpaper
AEG - putting words into action

3
Contents
Safety warnings 4
fortheuser 4
fortheinstaller 4
Description of the Appliance 6
Extractorversion 6
FilterVersion 6
Control Panel 7
LEDIndicatorlightsforverifyingthesaturationoffilters 8
Led–IndicatorforgreasefilterC 8
Led-indicatorfor charcoal filter D 8
Resettingthesaturationindicator 8
Maintenance and care 9
Metalgreasefilter 9
Openthemetalgreasefilter 9
Charcoalfilter 10
Removetheupperglasspanel 11
Changingthelight bulb 11
Cleaning 12
Special accessories 12
Technical assistance service 12
Technical Specifications 13
Mountingaccessoriesincluded 13
Electrical connection 14
Safetywarningsfortheelectrician 14
Mounting 15

4
Safety warnings
for the user
• Alwayscoverlighted elements, to prevent excess heat from
damaging the appliance. In the case of oil, gas and coal fired
cookers it is essential to avoid open flames.
• Also, when frying, keep the deep frying pan on the cooker top/cooker
undercareful control.
• Thehotoil in the frying panmightignite due to overheating.
• The risk of self-ignition increases when the oil being used is dirty.
• It is extremely important to note that overheating can cause a fire.
•Never carry out any flambé cooking under the hood.
•Always disconnect the unit from the power supply before
carrying out any work on the hood, including replacing the
light bulb (take the cartridge fuse out of the fuse holder or switch off
theautomatic circuit breaker).
•It is very important to clean the hood and replace the filter at
the recommended intervals. Failure to do so could cause
grease deposits to build up, resulting in a fire hazard.
• Theapplianceis not intended for use byyoungchildren or infirm
personswithout supervision.
• Young children should be supervised to ensure that they do not play
withtheappliance.
•WARNING - Ensure that theapplianceis switched offbefore
replacing the lamp to avoid the possibility of electric shock.
for the installer
• When used as an extractor unit, the hood must be fitted with a
150mmdiameter hose.
• Should there already be a pipe of diameter 125 mm that ducts to the
outside through the walls or roof, it is possible to use the 150/125
mm reduction flange provided. In this case the hood will be slightly
morenoisy.
•When installing the hood, make sure you respect the following
minimum distance from the top edge of the cooking hob/ring
surfaces:
electric cookers 500 mm
gascookers 650 mm
coal and oil cookers 700 mm min.
• ThenationalStandardonfuel-burningsystemsspecifies a maximum
depression of 0.04 bar in such rooms.

5
• The air outlet must not be connected to chimney flues or combustion
gas ducts. The air outlet must under no circumstances be connected
toventilationductsforroomsinwhichfuel-burningappliancesare
installed.
• Itisadvisabletoapplyforauthorizationfromtherelevantcontrolling
authority when connecting the outlet to an unused chimney flue or
combustion gas duct.
The air outlet installation must comply with the regulations laid down
bytherelevantauthorities.
• When the unit is used in its extractor version, a sufficiently large
ventilationholemustbeprovided,withdimensionsthatare
approximately the same as the outlet hole.
• Nationalandregional building regulations imposeanumberof
restrictionsonusinghoodsandfuel-burningappliancesconnectedto
a chimney, such as coal or oil room-heaters and gas fires, in the
sameroom.
• Hoods can only be used safely with appliances connected to a
chimneyiftheroomand/orflat (air/environment combination) is
ventilatedfromoutsideusing a suitable ventilation hole approximately
500-600cm2 largeto avoid thepossibilityof a depression being
createdduring operation of the hood.
• Ifyouhaveanydoubts, contact the relevant controlling authority or
buildinginspector’soffice.
• Since the rule for rooms with fuel burning appliances is “outlet hole of
the same size as the ventilation hole”, a hole of 500-600 cm2, which
is to say a larger hole, could reduce the performance of the extractor
hood.
• If the hood is used in its filter version, it will operate simply and
safelyin the above conditionswithout the need for any of the
aforementionedmeasures.
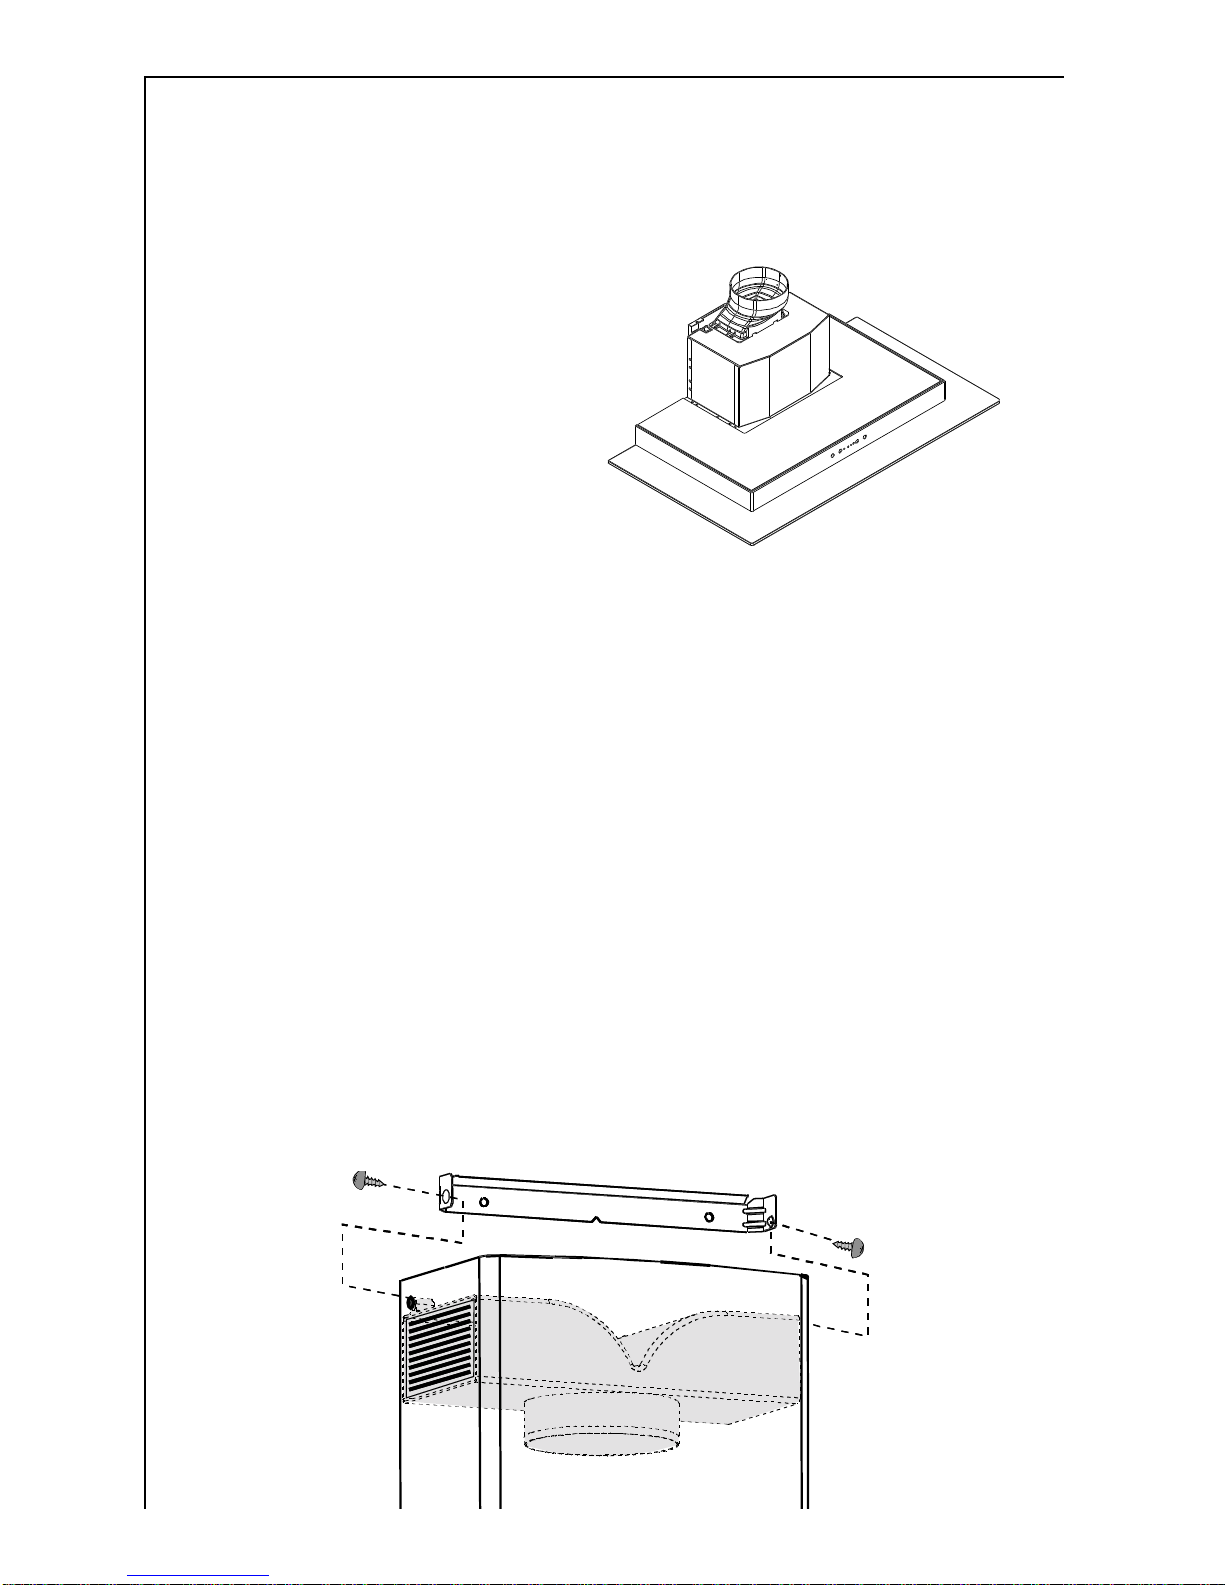
• When the hood is used in its extractor function, the following rules
mustbefollowedtoobtain optimal operation:
— short and straight outlet hose
— keep bends in outlet hose to a minimum
— never install the hoses with an acute angle, they must
always follow a gentle curve only
— keep the hose as large as possible (preferably the same diameter
as the outlet hole).
• Failure to observe these basic instructions will drastically reduce the
performanceandincreasethenoiselevelsoftheextractorhood.

6
Description of the Appliance
Extractor version
• The hood is supplied as an
extractor unit and can also be
usedwithafilteringfunction
byfitting one charcoal filter
(special accessory).
• You will need original AEG
charcoalfilterforthis function
(see Special Accessories).
• The air is discharged to the
outsidethroughapipe,which
must be fitted to connection
flange A. Fig. 1.
• Inordertoobtainthebest performance the hose should have a
diameter equal to the outlet hole.
Should there already be a pipe of diameter 125 mm that ducts to the
outside through the walls or roof, it is possible to use the 150/125
mm reduction flange provided. In this case the hood will be slightly
noisier.
Fig. 1
Filter Version
• Theair is filtered througha charcoal filter and returned to the kitchen
through the top grill of the outlet pipe.
• You will need an original AEG KF8 charcoal filter for the filtering
function. (See Special Accessories).
• Fix the deflector using 2 screws. Fig. 2.
• Optionally, the position of the chimney elements can be changed.
When using the hood in the filter version the chimney must be fixed
at the top, with the air outlet grill at the side.
A
Fig. 2

7
Control Panel
• Best result are obtained by using a low speed for normal conditions
andahighspeedwhenodoursaremoreconcentrated.
Turn the hood on a few minutes before you start cooking, you will
then get an under pressure in the kitchen. The hood should be left on
aftercookingfor about 15 minutes or untilall the odours have
disappeared.
The control switches are located on the unit’s front panel:
A- Mainswitch,hoodon/off.
B- Start and choice of motor speed 1-2-3-1-2.........
C- Indicatesspeed1(LED)and indication of the grease
saturationforthefilter (flashing indicator).
D- Indicatesspeed2 (LED) and indication of the charcoal
saturationforthefilter (flashing indicator).
E- Indicatesspeed3(LED)
F- IndicatesIntensive speed(LED).
G- Intensivespeed on/off.TheIntensivespeed runsfor5
minutes:
Ifthe hood is on whenthe Intensive speed is activated,the
hoodrevertsto previous speed after 5 minutes.
Ifthehood is off when the Intensive speedisactivated, the
hoodwillbe turned off after 5 minutes.
To interrupt the Intensive speed, press button A or B.
H- LightON/OFF
Should the hood or the controls fail to operate: disconnect the power
supply for at least 5 seconds, then turn the hood back on again.

8
LED Indicator lights for verifying the saturation
of filters
This hood is supplied without a charcoal filter. If the hood is to be used
inthefilter version mode with acharcoal filter, the saturation indicator
must be activated as follows:
Depress and hold the A and B buttons simultaneously for 3 seconds.
Initially only the LED indicator signal for the grease filter C is activated,
shortly after the LED indicator for the charcoal filter D will activate, at
this point the saturation detection has been enabled.
To switch off the saturation detection : depress and hold the A and B
buttons for 3 seconds until the LED indicator for the active carbon filter
isflashing.
Led – Indicator for grease filter C
TheLEDindicatorfor the grease filter will flash whenitrequires
cleaning.
Followthemaintenanceinstructions.
Led - indicator for charcoal filter D
TheLEDindicatorfor the charcoal filter illuminates when the filter
requiresreplacing.
Thisoccursafterabout160workinghoursfromwhentheactivecarbon
filter was first put into operation.
Resetting the saturation indicator
Aftercleaning or replacing the filter depress and hold the G andH
buttons again for 3 seconds until the grease filter LED or the charcoal
indicatorLEDare no longer flashing.

9
Maintenance and care
•The hood must always be disconnected from the electricity
supply before beginning any maintenance work.
Metal grease filter
• Thepurpose of the grease filters is to aspirate grease particles which
form during cooking and it must always be used, either in the
externalevacuationor internal recycling function.
Attention:themetal grease filters must be removedandwashed,
eitherbyhandorin the dishwasher, every four weeks.
Open the metal grease filter
• First, push the metal grease filter
stop backwards, then extract the
filter,pullingdownwards.Fig. 3.
Hand washing
Soakgreasefiltersforaboutone
hourinhot water with a grease-
looseningcleaner,thenrinseoff
thoroughlywithhot water.Repeat
the process if necessary. Refit the
greasefilterswhen they are dry.
Dishwasher
Placegrease filters in dishwasher.Select most powerful washing
programmeandhighesttemperature,atleast65°C.Repeatthe
process. Refit the grease filters when they are dry.
When washing the metal grease filter in the dishwasher a slight
discoloration of the filter can occur, this does not have any impact on
itsperformance.
• Clean the inner housing using a hot detergent solution only
(never use corrosive, abrasive or flammable cleaning
products).
Fig. 3

10
Charcoal filter
• The charcoal filter should only be used if you want to use the hood in
itsfilterversion.
• To do this you will need an original AEG charcoal filter (see special
accessories).
•Cleaning/replacing the charcoal filter
Unlikeothercharcoal filters, the LONGLIFE charcoal filter canbe
cleanedandreactivated.At normal use the filter shouldbecleaned
every second month. The best way to clean the filter is in the
dishwasher.Usenormaldetergentandchoosethehighesttempera-
ture (65º C). Wash the filter separately so that no food parts gets
stuck on the filter and later causes bad odours. To reactivate the
charcoal, the filter should be dried in an oven for 10 minutes with a
temperatureofmaximum100ºC.
After approximately three years of use, the charcoal filter should be
replaced with a new, as the odour reduction capacity will be reduced.
•Mounting
Fit the charcoal filter first on the rear side, then use its red lock-keys
A to fix to the body of the hood. Fig. 4.
•To dismount proceedin reverseorder.
• Alwaysspecifythe hood model code number andserialnumber
whenorderingreplacementfilters.Thisinformationisshownonthe
registration plate located on the inside of the unit.
• The charcoalfilter can beordered from theAEG technical
assistanceservice.
Fig. 4
AA

11
Remove the upper glass panel
Theupper glass panel canberemovedforcleaning.
• Removethe greasefilters.
• Pull the handle Ldown. Fig. 5.
• Removethe glass panel.
Fig. 5
Warning
• Failuretoobserve the instructions on cleaning the unitandchanging
thefilters will cause a fire hazard. Youare therefore strongly
recommendedtofollowtheseinstructions.
• Themanufacturerdeclinesallresponsibility for any damage to the
motororanyfiredamagelinkedtoinappropriatemaintenanceor
failureto observetheabovesafety recommendations.
Changing the light bulb
• Disconnect the cooker hood from the main supply.
• Remove the lamp cover, use a screw driveras a lever. Fig. 6.
• Replace the old bulb with a new one of the same type.
• Remountthe lampcover.
• If the light does not come on, make sure the bulb has been inserted
in correctly before contacting the technical assistance service.
Fig. 6
L

12
Cleaning
• Warning:always disconnect the hood from the mains powersupply
beforecleaning it.
Neverinsertpointedobjectsinthe motor’s protective grid.
• Washtheoutside surfaces using a delicate detergentsolution.Never
usecausticdetergentsorabrasivebrushesorpowders.
• Only ever clean the switch panel and filter grille using a damp cloth
anddelicatedetergents.
• It is extremely important to clean the unit and change the filters at
therecommendedintervals. Failure to do so will causegrease
deposits to build up that could constitute a fire hazard.
Special accessories
CharcoalfilterKF8 E-Nr.:942118648
Technical assistance service
You are welcome to telephone our technical assistance service (see list
oftechnicalassistancecentres)wheneveryouneedinformationorin
theunlikely event of a fault.
When calling, please be ready to specify:
1. The model code number
2. The serial number (E-Nr.)
3. The manufacturing number (F-Nr.)
This information is shown on the registration plate inside the unit
behind the grease filter.
We reserve the right to change specifications and colours as a result of
ourpolicy of continuing technological development.

13
Technical Specifications
Models 9600D
Dimensions (in cm):
Height 80-122,5
Width 89,8
Depth 52
Maximum absorbed power: 175 W
Motorabsorption: 1 x 130 W
Lighting: 2 x 20W
Lengthofthecable:150 cm
Mounting accessories included
2 hooks
2 metal screws 2,9x13
6wood-screws5x45mm
6 wall plugs Ø 8 mm
4 metal screw 2,9x6,5
1deflector
1reduction flange

14
Electrical connection
Safety warnings for the electrician
Before connecting the appliance to the power supply, check that the
voltageindicatedontherating plate corresponds to the mains power
supply available. Appliances fitted with a plug can be connected to any
standard power socket within easy access.
Should it be necessary to provide a fixed connection, the hood must
only be installed by an electrician authorised by the local electricity
board. To isolate the cooker hood from the mains, pull the mains plug.
If the appliance is permanently connected to the mains, then it must be
isolatedfromthe mains using measures provided in theelectrical
installation (fuses -unscrew-type fuses, cut-out, current trips or similar
thathaveacontactseparation of >3mm when open).
Themanufacturedeclinesallresponsibilityformalfunctionsresulting
fromfailureto comply with the above instructions.
If the power socket is applied directly above the hood this gives two
advantages:
1. The socket is not visible.
2.Theappliancecanbe disconnected at need merely be removing the
plug.
Electrical connection
220-240 V – by means of fixed power cable with plug.
(Fixed connection of the appliance must only be carried out by an
authorisedelectrician.)

15
Mounting – Figure 8
• Position the template (1) on the wall and mark the position, and drill
the holes (2 x Ø 8 mm).Mount the two rawl plugs with the hooks (3)
• Hang the hood on the hooks and level it with the adjustment screws
(4)
• Removethegreasefilters(5) andmarkfor the two screws(6).
Remove the hood and drill the holes (2 x Ø 8 mm).
• Insert the rawl plugs (7) and hang the hood on the wall again. Adjust
it horizontally with the screws (8) and secure it with the screws (9)
• Mount the wall bracket (10) with the wall plugs (9a) and the screws
(11).
Becareful that it is centered over thehood and horizontally aligned.
Fitting for extractor version (S)
Connect a tube between the hood air outlet and the wall or roof exhaust
channel. Fix it with the tube clamps supplied.
Fitting for filter version
Mountthe deflector (12) with the twoscrews (13) supplied.
Mounting the chimney
• Place the chimney and fix it to the top wall bracket with the two
screws(16) supplied.
• Lower the bottom part of the chimney and fasten it to the top of the
hoodwith two screws (17), supplied.
Note that the top part of the chimney can be mounted with the side
grids up or down. For use as a filter version hood it must be mounted
with the grids upwards. Fig. 7.
Fig. 7

16
Fig. 8
Electric hob 500 mm
Gas hob 650 mm
Charcoal and oil 700 mm

17
Exhaust tube
Power outlet
Electric hob 500 mm
Gas hob 650 mm
Charcoal and oil 700 mm
Electric hob 500 mm
Gas hob 650 mm
Charcoal and oil 700 mm
Wall bracket

18

19

AEG Hausgeräte GmbH
Postfach 1036
D-90327 Nürnberg
http://www.aeg.hausgeraete.de
© Copyright by AEG LI1V8B Ed. 05/02
Other manuals for 2600 D
1
Table of contents
Other AEG Ventilation Hood manuals
Popular Ventilation Hood manuals by other brands

Zephyr
Zephyr AK6500 Use, care and installation guide

Zephyr
Zephyr AK7500BS Use, care and installation guide

Smeg
Smeg KSEV96X instruction manual

GE
GE JV935 Owner's manual and installation instructions

GE
GE UVW9364 Owner's Manual & Installation Instructions

Broan
Broan rangemaster 64000 series installation instructions

Electrolux
Electrolux 316488521 Installation, use & care guide

Viking
Viking Professional Indoor & Outdoor Hoods Use & care manual

Amana
Amana UVL5430JSS Installation Instructions and Use & Care Guide

Hotpoint
Hotpoint kitchen think HDF92X Instructions for and... Instructions for installation and use

Faber
Faber TENDER installation manual

Xo
Xo XOE36 quick start guide