manuals.online logo
Brands
  1. Home
  2. •
  3. Brands
  4. •
  5. AEG
  6. •
  7. Ventilation Hood
  8. •
  9. AEG HE 3160 User manual

AEG HE 3160 User manual

This manual suits for next models

2

Other AEG Ventilation Hood manuals

AEG X91384MI02 User manual

AEG

AEG X91384MI02 User manual

AEG DE 3160 User manual

AEG

AEG DE 3160 User manual

AEG X68165WV10 User manual

AEG

AEG X68165WV10 User manual

AEG HD 8990 User manual

AEG

AEG HD 8990 User manual

AEG X79263MK10 User manual

AEG

AEG X79263MK10 User manual

AEG CHDD 8694 User manual

AEG

AEG CHDD 8694 User manual

AEG DGR9960HB User manual

AEG

AEG DGR9960HB User manual

AEG DECT6151S User manual

AEG

AEG DECT6151S User manual

AEG DPB3931S User manual

AEG

AEG DPB3931S User manual

AEG CHDE 6260 User manual

AEG

AEG CHDE 6260 User manual

AEG X56143MDO User manual

AEG

AEG X56143MDO User manual

AEG D 6.30 Quick start guide

AEG

AEG D 6.30 Quick start guide

AEG DGE5660HM User manual

AEG

AEG DGE5660HM User manual

AEG DGB2530M User manual

AEG

AEG DGB2530M User manual

AEG DU 3150 User manual

AEG

AEG DU 3150 User manual

AEG DTB3651M User manual

AEG

AEG DTB3651M User manual

AEG DD 8625 User manual

AEG

AEG DD 8625 User manual

AEG DF 6260 Specification sheet

AEG

AEG DF 6260 Specification sheet

AEG DK 1160 User manual

AEG

AEG DK 1160 User manual

AEG DKB2630M User manual

AEG

AEG DKB2630M User manual

AEG 350 D User manual

AEG

AEG 350 D User manual

AEG DBE6980HM User manual

AEG

AEG DBE6980HM User manual

AEG 222 D User manual

AEG

AEG 222 D User manual

AEG DL 7275 User manual

AEG

AEG DL 7275 User manual

Popular Ventilation Hood manuals by other brands

Gorenje S3 IHGC963S4X manual

Gorenje

Gorenje S3 IHGC963S4X manual

KOBE ISX2136SQB-1 Installation instructions and operation manual

KOBE

KOBE ISX2136SQB-1 Installation instructions and operation manual

U.S. Products ADVANTAGE-100H Information & operating instructions

U.S. Products

U.S. Products ADVANTAGE-100H Information & operating instructions

Kuppersberg DUDL 4 LX Technical Passport

Kuppersberg

Kuppersberg DUDL 4 LX Technical Passport

Framtid HW280 manual

Framtid

Framtid HW280 manual

Thermador HGEW 36 FS installation manual

Thermador

Thermador HGEW 36 FS installation manual

Electrolux LFT769X user manual

Electrolux

Electrolux LFT769X user manual

Broan B5836SS manual

Broan

Broan B5836SS manual

Heinner HDCH-6060RGBK quick start guide

Heinner

Heinner HDCH-6060RGBK quick start guide

Baumatic AS35SS instruction manual

Baumatic

Baumatic AS35SS instruction manual

Franke FTF 604 XS V2 Instructions for use and installation

Franke

Franke FTF 604 XS V2 Instructions for use and installation

Best UCB3I30SBW installation instructions

Best

Best UCB3I30SBW installation instructions

Gram EFU 503-90 X instruction manual

Gram

Gram EFU 503-90 X instruction manual

CIARRA CBCS6803 Installation and user manual

CIARRA

CIARRA CBCS6803 Installation and user manual

sauter SHG501 Instructions for installation and use

sauter

sauter SHG501 Instructions for installation and use

Franke 392-17 User instructions

Franke

Franke 392-17 User instructions

FALMEC Polar Black 35 Instruction booklet

FALMEC

FALMEC Polar Black 35 Instruction booklet

Remus 7783 089518L Installation instruction

Remus

Remus 7783 089518L Installation instruction

manuals.online logo
manuals.online logoBrands
  • About & Mission
  • Contact us
  • Privacy Policy
  • Terms and Conditions

Copyright 2025 Manuals.Online. All Rights Reserved.

CHDE 3160
HE 3160
Cooker Hood
Operating and Installation Instructions
2
Contents
Safety warnings 3
For the User 3
For the Installer 3
Description of the Appliance 5
Extractor version 5
Filter Version 6
Control Panel 7
Maintenance and care 8
Cleaning the hood 8
Metal grease filter 8
Removing the metal grease filter 8
Charcoal filter
Changing the light bulb 10
What to do if 11
Service and Spare Parts 1
Guarantee Conditions 13
Technical Specifications 15
Mounting accessories included 15
Electrical connection 15
Installing the hood between cupboards with hanging rails 16
Installing the hood to the wall 17
Fixing a furniture door to the visor 18
Printed on recycled paper
AEG - putting words into action
3
Safety warnings
For the User
 The cooker hood is designed to extract unpleasant odours from the
kitchen, it will not extract steam.
 Always cover lighted elements, to prevent excess heat from
damaging the appliance. In the case of oil, gas and coal fired
cookers it is essential to avoid open flames.
 Also, when frying, keep the deep frying pan on the cooker top/
cooker under careful control.
 The hot oil in the frying pan might ignite due to overheating.
 The risk of self-ignition increases when the oil being used is dirty.
 It is extremely important to note that overheating can cause a fire.
Never carry out any flambé cooking under the hood.
Always disconnect the unit from the power supply before
carrying out any work on the hood, including replacing the
light bulb (take the cartridge fuse out of the fuse holder or switch
off the automatic circuit breaker).
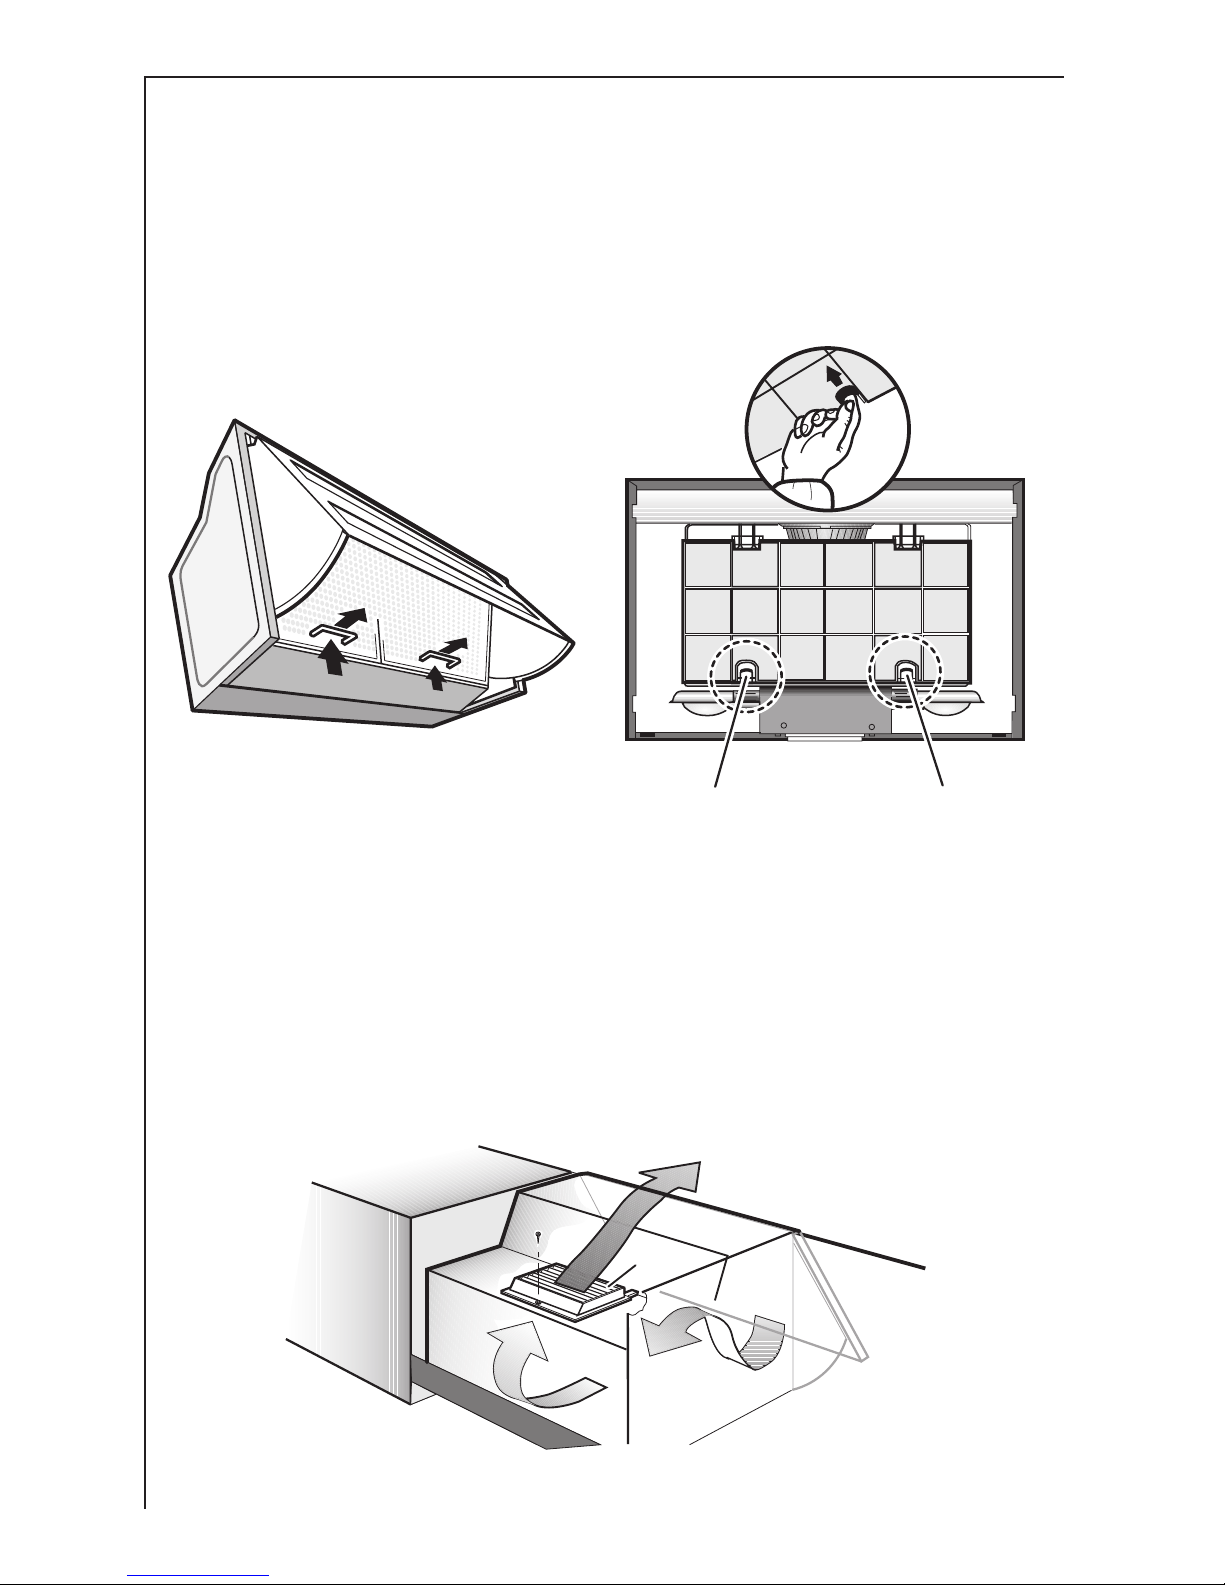
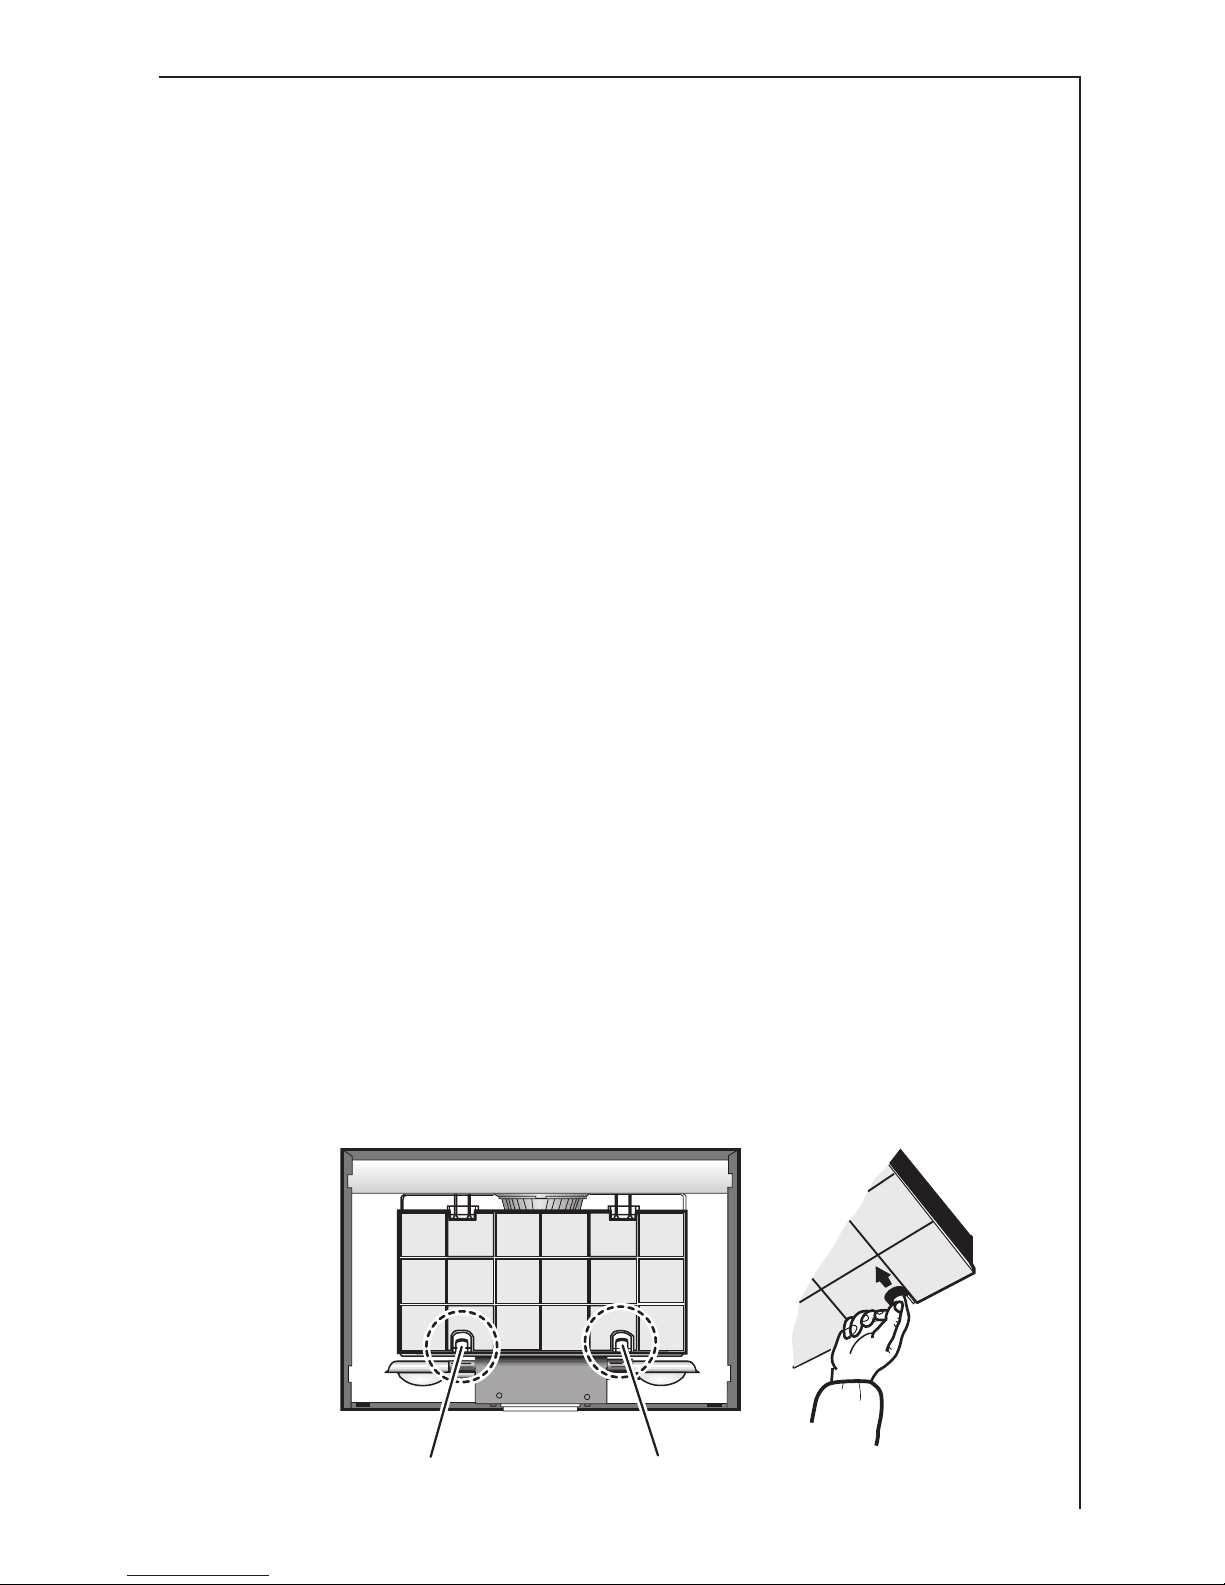
It is very important to clean the hood and replace the filter at
the recommended intervals. Failure to do so could cause
grease deposits to build up, resulting in a fire hazard.
For the Installer
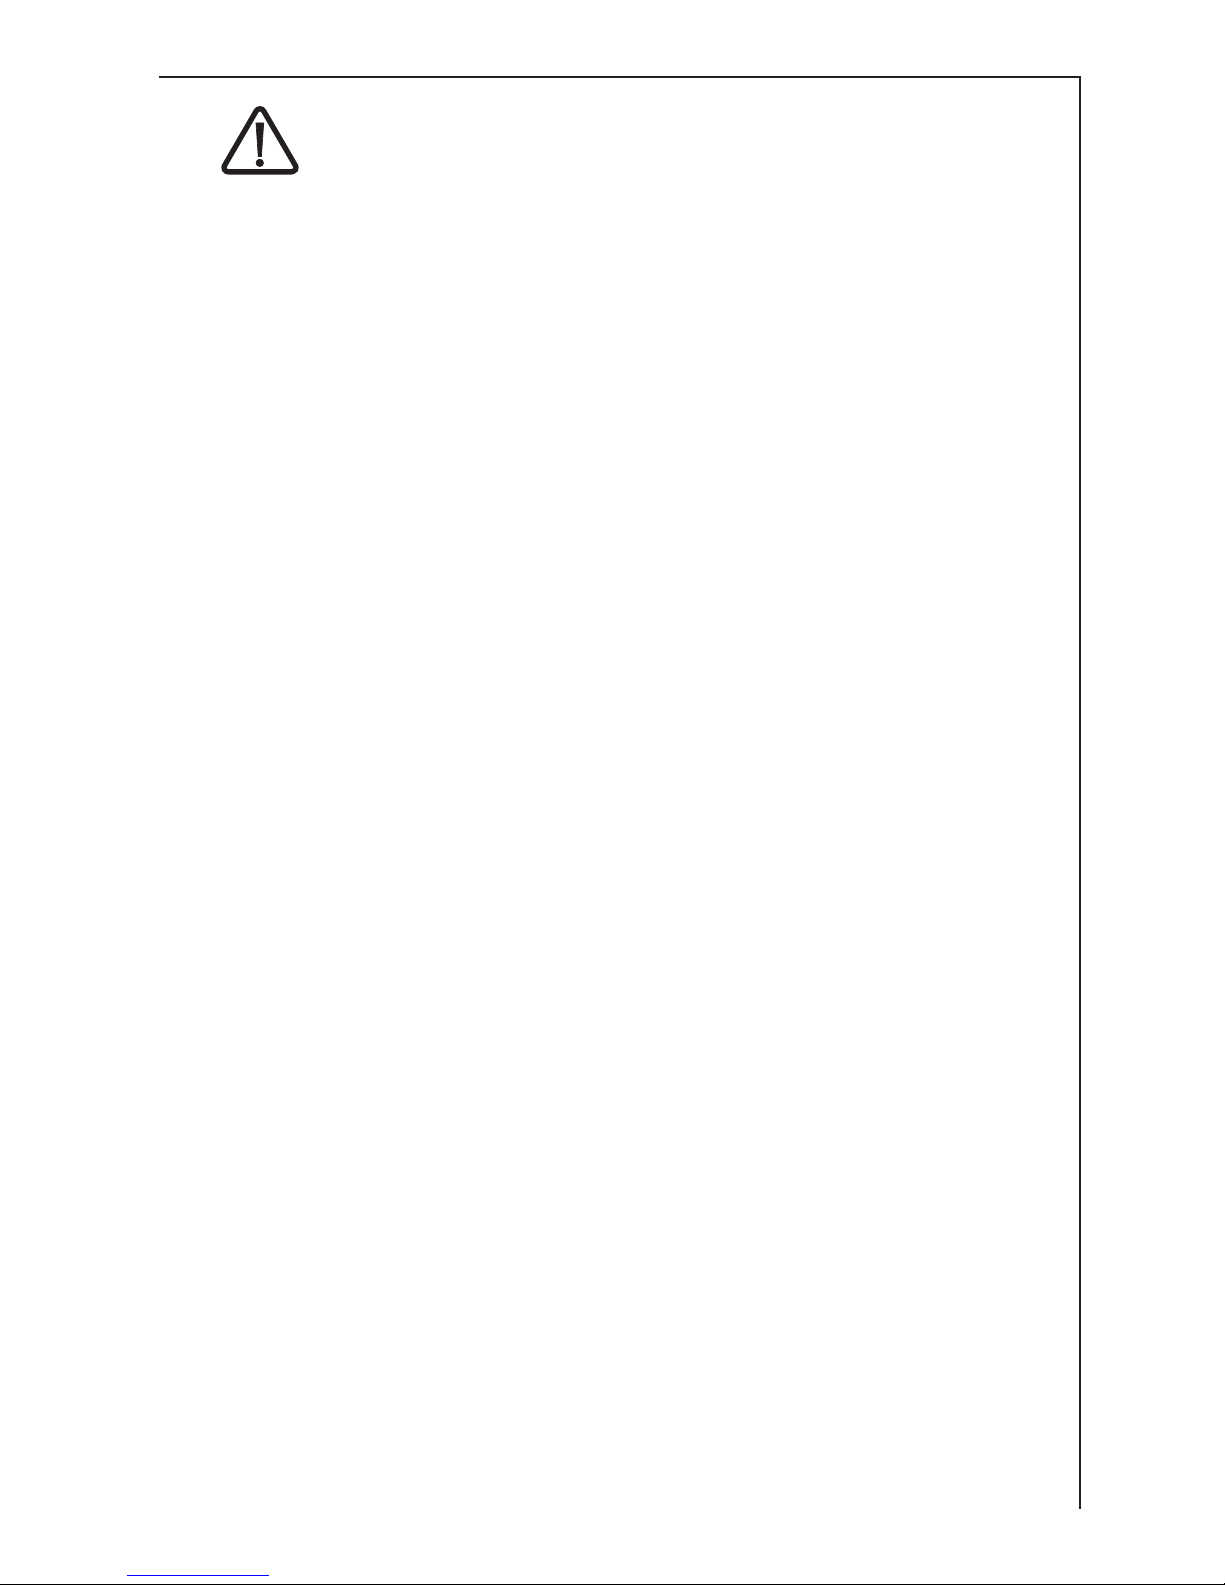
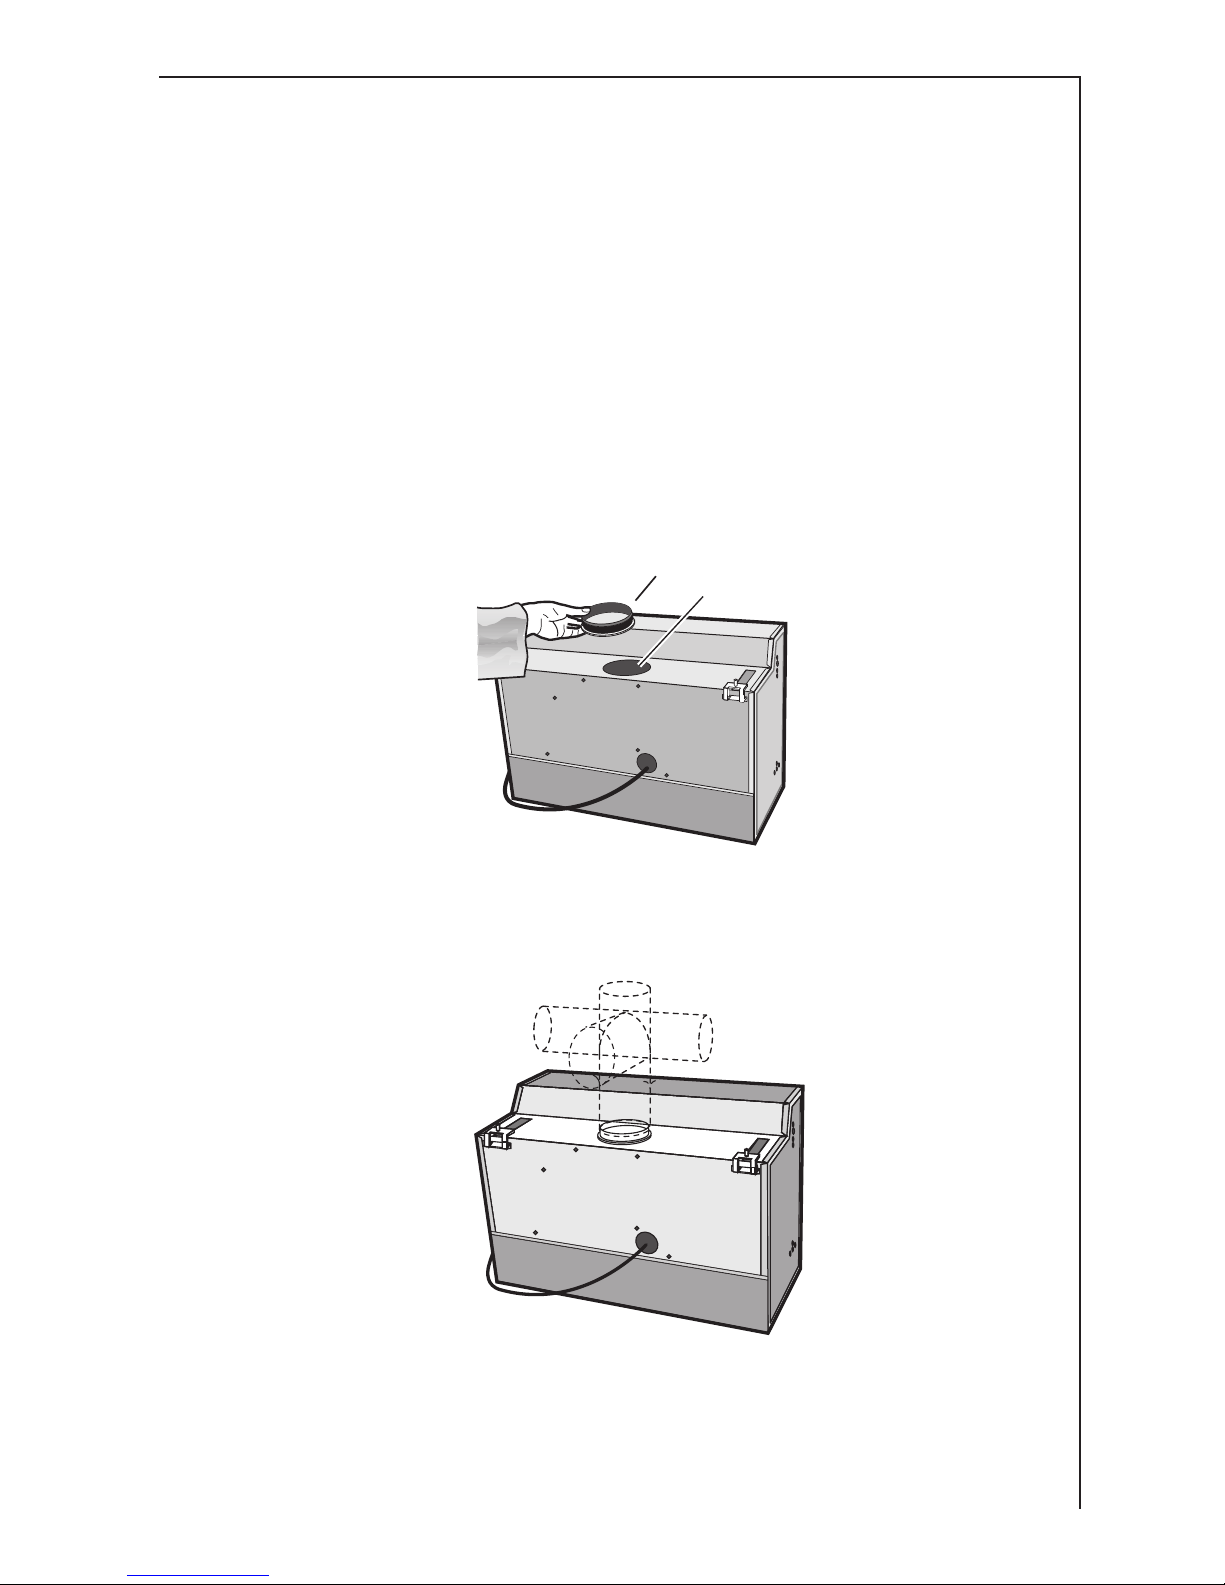
 When used as an extractor unit, the hood must be fitted with a
120mm diameter hose.
When installing the hood, make sure you respect the following
minimum distance from the top edge of the cooking hob/ring
surfaces:
electric cookers 600 mm
gas cookers 650 mm
coal and oil cookers 800 mm min.
 The national standard on fuel-burning systems specifies a maxi-
mum depression of 0.04 bar in such rooms.
 The air outlet must not be connected to chimney flues or combus-
tion gas ducts. The air outlet must under no circumstances be
connected to ventilation ducts for rooms in which fuel-burning
appliances are installed.
 It is advisable to apply for authorization from the relevant controlling
authority when connecting the outlet to an unused chimney flue or
combustion gas duct.
The air outlet installation must comply with the regulations laid down
by the relevant authorities.
4
 When the unit is used in its extractor version, a sufficiently large
ventilation hole must be provided, with dimensions that are
approximately the same as the outlet hole.
 National and regional building regulations impose a number of
restrictions on using hoods and fuel-burning appliances connected
to a chimney, such as coal or oil room-heaters and gas fires, in the
same room.
 Hoods can only be used safely with appliances connected to a
chimney if the room and/or flat (air/environment combination) is
ventilated from outside using a suitable ventilation hole approxi-
mately 500-600 cm2 large to avoid the possibility of a depression
being created during operation of the hood.
 If you have any doubts, contact the relevant controlling authority or
building inspectors office.
 Since the rule for rooms with fuel burning appliances is outlet hole
of the same size as the ventilation hole, a hole of 500-600 cm2,
which is to say a larger hole, could reduce the performance of the
extractor hood.
 If the hood is used in its filtering function, it will operate simply and
safely in the above conditions without the need for any of the
aforementioned measures.
 When the hood is used in its extractor function, the following rules
must be followed to obtain optimal operation:
 short and straight outlet hose
 keep bends in outlet hose to a minimum
 never install the hoses with an acute angle, they must
always follow a gentle curve only
 keep the hose as large as possible (preferably the same
diameter as the outlet hole).
 Failure to observe these basic instructions will drastically reduce the
performance and increase the noise levels of the extractor hood.
5
A
B
Description of the Appliance
 The hood is supplied as an extractor unit and can also be used with
a filtering function by fitting one charcoal filter.
 You will need an original AEG charcoal filter for this function
(Available from your local AEG Service Force Centre).
Extractor version
 In this version fumes are extracted to the outside via a hose
connected to the coupling ring A, placed in the outlet hole B. Fig. 1.
 In order to obtain the best performance the hose should have a
diameter equal to the outlet hole.
 Depending on your installation the hose can be directed either
towards the ceiling or towards the walls. Fig. .
Fig. 1
Fig.
6
EE
E
Filter version
 The air is filtered through a charcoal filter and returned to the
kitchen.
 You will need an original AEG charcoal filter for the filtering function.
(Available from your local AEG Service Force Centre).
 Remove the grease filters, first pull the handles upwards, then
extract the filter outwards. Fig. 3.
 Fit the charcoal filter first in the upper hooks into the lower, then lock
in position using tabs E. Fig. 4.
 Refit the grease filters.
 The deflector F must be fitted over the hole B (Fig. 1) fixing it with
the screw provided. Fig. 5.
Fig. 4
Fig. 3
F
Fig. 5
7
Control Panel
 Best results are obtained by using a low speed for normal
conditions and a high speed when odours are more concentrated.
Turn the hood on a few minutes before you start cooking, you will
then get an under pressure in the kitchen. The hood should be left
on after cooking for about 15 minutes or until all the odours have
disappeared.
The control switches are located on the units front panel:
 the light switch switches the hood lamp on and off
 the motor switch switches the cooking smoke and vapour extrac-
tor motor on and off, enabling you to select one of the three different
speeds.
The hood is also equipped with a micro-switch which can be found
under the lower runner of the visor on the right hand side.
With this micro-switch, the appliance may be automatically switched
on and off by opening and closing the pull-out panel, but only if the fan
speed has already been set and the light button is turned to I.
Motor switch
Light switch
8
Maintenance and care
The hood must always be disconnected from the electricity
supply before beginning any maintenance work.
Cleaning the hood
 Clean the outside of the hood using a damp cloth and a mild deter-
gent.
 Never use corrosive, abrasive or flammable cleaning products.
 Never insert pointed objects in the motors protective grid.
 Wash the outside surfaces using a delicate detergent solution.
Never use caustic detergents or abrasive brushes or powders.
 Only ever clean the switch panel and filter grille using a damp cloth
and delicate detergents.
 It is extremely important to clean the unit and change the filters at
the recommended intervals. Failure to do so will cause grease
deposits to build up that could constitute a fire hazard.
Metal grease filter
 The purpose of the grease filters is to aspirate grease particles
which form during cooking and it must always be used, either in the
external evacuation or internal recycling function.
Attention: the metal grease filters must be removed and washed,
either by hand or in the dishwasher, every four weeks.
Open the metal grease filter
 To remove the grease
filters, first pull the handles
upwards, then extract the
filter outwards. Fig. 6.
Hand washing
Soak grease filters for about
one hour in hot water with a
grease-loosening cleaner,
then rinse off thoroughly with
hot water. Repeat the process
if necessary. Refit the grease
filters when they are dry.
Fig. 6
Dishwasher
Place grease filters in dishwasher. Select the most powerful
washing programme and highest temperature, at least 65°C.
Repeat the process. Refit the grease filters when they are dry.
When washing the metal grease filter in the dishwasher a slight
discolouration of the filter can occur, this does not have any impact
on its performance.
 Clean the inner housing using a hot detergent solution only
(never use corrosive, abrasive or flammable cleaning
products).
Charcoal filter
 The charcoal filter should only be used if you want to use the hood
in its filtering function.
 To do this you will need an original AEG charcoal filter.
Replacing the charcoal filter
The charcoal filters cannot be cleaned, we recommend that they
should be replaced approximately every three months or more often
if the hood is used for more than three hours per day.
Mounting
Fit the charcoal filter first in the upper hooks then lock in position
using tabs E. Fig. 7.
Removing
Push both tabs E and pull the charcoal filter downwards to extract it.
Fig. 7.
 Always specify the hood model code number and serial number
when ordering replacement filters. This information is shown on the
rating plate located on the inside of the appliance.
 The charcoal filter can be ordered from your local AEG Service
Force Centre.
Fig. 4
EE
E
Fig. 7
10
Warning
 Failure to observe the instructions on cleaning the unit and
changing the filters will cause a fire hazard. You are therefore
strongly recommended to follow these instructions.
 The manufacturer declines all responsibility for any damage to the
motor or any fire damage linked to inappropriate maintenance or
failure to observe the above safety recommendations.
Changing the light bulb
 Disconnect the cooker hood from the mains supply.
 Remove the grease filters so to access the bulbs.
 Replace the old bulb with a new one of the same type.
 Refit the grease filters.
 If the light does not come on, make sure the bulb has been inserted
in correctly before contacting your local AEG Service Force Centre.
Special accessories
Charcoal filter Type 150