manuals.online logo
Brands
  1. Home
  2. •
  3. Brands
  4. •
  5. agape
  6. •
  7. Shower Cabin
  8. •
  9. agape FLAT D C3 Guide

agape FLAT D C3 Guide

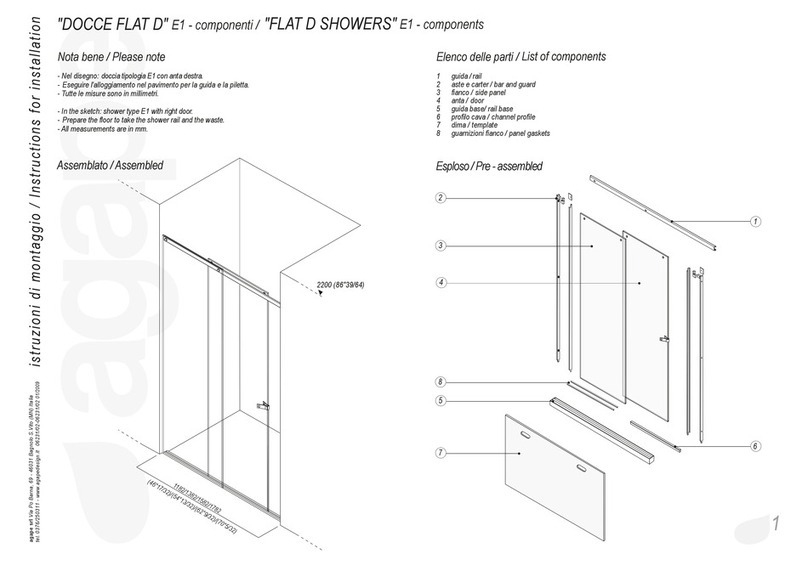
Nota bene / Please note
- Nel disegno: doccia tipologia C3 con anta a sinistra.
- Verificare il senso di apertura dell’anta, se destra o sinistra!
-Eseguire l'alloggiamento nel pavimento per la guida e nella parete per l'asta
- Tutte le misure sono in millimetri.
- In the sketch: shower type C3 with left door.
- Verify the sense of door opening, if right or left!
- Prepare the floor to take the rail and the wall to take bars.
- All measurements are in mm.
1
2
1618
(63"45/64)
1600
(62"63/64)
3
4
1
5
6
7
8
9
3/b
1asta per anta / door bar
2fianco / side panel
3anta / door
3/bguarnizioni per anta / door gaskets
4guida base / rail base
5basetta anta / door base
6profilo cava / channel profile
7dima anta e fianco / door and side panel template
8 guarnizioni per fianco / side panel gaskets
9tubi adduzione / water supply pipes
10 fermaporta /door block
Elenco delle parti / List of components
Esploso / Pre - assembledAssemblato / Assembled
10
"DOCCE FLAT D"C3 - componenti / "FLAT D SHOWERS"C3 - components
2200 (86"39/64)
800/900/1000
(31"1/2)/(35"7/16)/(39"3/8)
818/918/1018
(32"13/64)/(36"9/64)/(40"5/64)
istruzioni di montaggio / Instructions for installation
agape srl Via Po Barna, 69 - 46031 Bagnolo S.Vito (MN) Italia
tel. 0376/250311 - www.agapedesign.it 06231/02-06231/02
01/2009
2
Ripiegare le alette per un fissaggio efficace con la malta di sottofondo.
Fold the wings in order to fix effectively with mortar.
18 mm (45/64)
da incassare nella parete
to be recessed into the wall
riempitivo di protezione
protective insert
Preparazione della guida per la posa
Preparation of rail for installation
ATTENZIONE!
La guida va installata con il riempitivo di protezione in poliuretano espanso all’interno
della cava.
ATTENTION!
The rail has to be installed with the protective insert made of polyurethane foam
of high density in the channels.
togliere le zanche per
utilizzare i tasselli.
to use the floor expansion plugs
remove the wings from the rail.
18 mm (45/64)
da incassare nella parete
to be recessed into the wall
vista sotto
view from below
"DOCCE FLAT D" C3 - preparativi / "FLAT D SHOWERS"C3 - preparation
istruzioni di montaggio / Instructions for installation
agape srl Via Po Barna, 69 - 46031 Bagnolo S.Vito (MN) Italia
tel. 0376/250311 - www.agapedesign.it 06231/02-06231/02
01/2009
1618
(63"45/64)
818/918/1018
(32"13/64)/(36"9/64)/(40"5/64)
istruzioni di montaggio / Instructions for installation
agape srl Via Po Barna, 69 - 46031 Bagnolo S.Vito (MN) Italia
tel. 0376/250311 - www.agapedesign.it 06231/02-06231/02
01/2009
"DOCCE FLAT D"
C3
- posa guida / "
FLAT D SHOWERS" C3 - installation of rail
sigillare
rivestimento finito (piastrelle o altro)
finished wall surface (e.g. tiles, etc.)
seal
pavimento finito
sigillare sigillare
finished wall surface (e.g. tiles, etc.)
seal finished floor surface
seal
sigillare
seal
3
rivestimento finito (piastrelle o altro)
sottofondo/
underfloor surface
solaio/floor
pavimento finito
finished floor
surface
sottofondo/
underfloor surface
solaio/floor
pavimento finito
finished floor
surface
sottofondo/
underfloor surface
solaio/floor
Sezione guida:soluzione alternativa
Shower rail section:alternative solution
Sezione guida doccia: soluzione a filo pavimento
Shower rail section: tray installed flush with finished
floor surface
Sezione guida doccia: soluzione fuori pavimento
Shower rail section: tray installed above finished
floor surface
3a
3b
3c
800/900/1000 (31" 1/2)/(35"7/16)/(39" 3/8)
800/900/1000 (31" 1/2)/(35"7/16)/(39" 3/8)
800/900/1000
(31" 1/2)/(35"7/16)/(39" 3/8)
max30 (1" 3/16)
max30 (1" 3/16)
max30 (1" 3/16)
asta / bar
rivestimento finito
finished wall surface
asta
bar
guida doccia
shower rail
per posizionare le aste utilizzare la dima.
use the template to position the bar.
attacco G 1/2" F filo
rivestimento.
G 1/2" F connection
flush with finished
surface.
4
90°
90
90°
90°
498
(19"39/64)
600
(23"5/8)
*
livella
spirit level
parete al
rustico.
unfinished wall.
parete al finito
finished wall
surface
pavimento finito
finished floor
sottofondo
underfloor surface
90°
Installazione a parete / Wall mounting
*Verificare che l'asta, in prossimità di eventuali spigoli, possa essere vincolata con
sicurezza.
*Make sure that the bar is securely fixed when placed close to the edge of the wall.
sottofondo/
underfloor surface
solaio/floor
Dettaglio: sezione di posa dell'asta nella parete
Detail: section of wall bar installation
Attenzione: posizionare l'asta nella cava facendo attenzione che appoggi al perimetro esterno
del piatto doccia.
Attention: place the bar into the channel making sure that it rests outside the perimeter of
the shower tray.
4
posizionamento corretto asta
correct bar installation
"DOCCE FLAT D" C3 - posa asta / "FLAT D SHOWERS" C3 - installation of bar
istruzioni di montaggio / Instructions for installation
agape srl Via Po Barna, 69 - 46031 Bagnolo S.Vito (MN) Italia
tel. 0376/250311 - www.agapedesign.it 06231/02-06231/02
01/2009
800/900/1000
(31"1/2)/(35"7/16)/(39"3/8)
2100
82" 43/64
20mm (25/32)
18mm (45/64)
istruzioni di montaggio / Instructions for installation
agape srl Via Po Barna, 69 - 46031 Bagnolo S.Vito (MN) Italia
tel. 0376/250311 - www.agapedesign.it 06231/02-06231/02
01/2009
2
Dettaglio fissaggio elementi di sostegno orizzontali
Detail of the horizontal support elements fixing
livella
spirit level
spessori 2 mm.
tickness 2 mm. (5/64)
5
Posa del fianco / Installing the side panel
Controllare la posizione del foro
e inserire il fianco con spessori di 2 mm all'interno della
cava.
Check the position of the hole and insert the 2 mm thick side panel into the channel.
*Per il montaggio dell’elemento di sostegno orizzontale vedere le istruzioni allegate.
*To install the horizontal support element, see the instructions attached.
5
"DOCCE FLAT D" C3 - posa fianchi / "FLAT D SHOWERS" C3 - installing the panels
+/- 5 mm. (13/64)
istruzioni di montaggio / Instructions for installation
agape srl Via Po Barna, 69 - 46031 Bagnolo S.Vito (MN) Italia
tel. 0376/250311 - www.agapedesign.it 06231/02-06231/02
01/2009
6
A
B
regolare la posizione della piastrina
adjust the position of the plate
1° per sbloccare
to loosen
3° per bloccare
to tighten
2° per sbloccare
to loosen
per regolare l'anta / to adjust the hang
of the door
A - regolazione eccentrico
B - serraggio posizione basetta
A - adjust the eccentric fixing
B - fixing the position of the base
3
interno
inside
3
Posa dell’anta / Installing the door
6
"DOCCE FLAT D"C3 - posa dell'anta / "FLAT D SHOWERS" C3 - installing the door
10(25/64)
10(25/64)
istruzioni di montaggio / Instructions for installation
agape srl Via Po Barna, 69 - 46031 Bagnolo S.Vito (MN) Italia
tel. 0376/250311 - www.agapedesign.it 06231/02-06231/02
01/2009
silicone
silicone
silicone
silicone
200
6
Maniglia
Handle
Fermaporta
Door block
Informazioni generali / General information
ATTENZIONE: attendere 24 ore prima dell'utilizzo della doccia!
ATTENTION: allow 24 hours before using the shower!.
Per il montaggio delle guarnizioni anta vedere le istruzioni allegate.
To install the door gaskets, see the instructions attached.
silicone
7
200
200
10 mm (25/64)
"DOCCE FLAT D"
C3 - finiture/ "FLAT D SHOWERS"
C3 - fitting

Other agape Shower Cabin manuals

agape FLAT D E1P Guide

agape

agape FLAT D E1P Guide

agape FLAT D E1 Guide

agape

agape FLAT D E1 Guide

agape FLAT D F1 Guide

agape

agape FLAT D F1 Guide

agape FLAT D E2 Guide

agape

agape FLAT D E2 Guide

agape FLAT D A2 Guide

agape

agape FLAT D A2 Guide

agape FLAT D C2 Guide

agape

agape FLAT D C2 Guide

agape FLAT D E2P Guide

agape

agape FLAT D E2P Guide

Popular Shower Cabin manuals by other brands

Teuco 154 Assembly instructions

Teuco

Teuco 154 Assembly instructions

Jacuzzi J-SHOWER TOWERTM Installation and operating manual

Jacuzzi

Jacuzzi J-SHOWER TOWERTM Installation and operating manual

Dolphin K1116 installation instructions

Dolphin

Dolphin K1116 installation instructions

Mirolin ACCESS 66 AROS66L/R installation guide

Mirolin

Mirolin ACCESS 66 AROS66L/R installation guide

OVE CAICOS installation manual

OVE

OVE CAICOS installation manual

Samo B0924 Assembly instruction

Samo

Samo B0924 Assembly instruction

Noro FIX R installation instructions

Noro

Noro FIX R installation instructions

Arrow 6004 installation manual

Arrow

Arrow 6004 installation manual

Radaway Arta KDS II Assembly instruction

Radaway

Radaway Arta KDS II Assembly instruction

REARO selkie BOARD installation guide

REARO

REARO selkie BOARD installation guide

Aurlane FACTORY FAC282 manual

Aurlane

Aurlane FACTORY FAC282 manual

Welltime Florenz 65934541 Installation instruction

Welltime

Welltime Florenz 65934541 Installation instruction

SANPLAST TX4b Series installation guide

SANPLAST

SANPLAST TX4b Series installation guide

Fleurco B027 instruction manual

Fleurco

Fleurco B027 instruction manual

Kinedo DES1272D installation instructions

Kinedo

Kinedo DES1272D installation instructions

OVE SEDONA 60 installation manual

OVE

OVE SEDONA 60 installation manual

Camargue Granvik installation guide

Camargue

Camargue Granvik installation guide

glass 1989 SOHO QR Installation & maintenance manual

glass 1989

glass 1989 SOHO QR Installation & maintenance manual

manuals.online logo
manuals.online logoBrands
  • About & Mission
  • Contact us
  • Privacy Policy
  • Terms and Conditions

Copyright 2025 Manuals.Online. All Rights Reserved.