agape FLAT D E2 Guide
1982/2182/2382
(78” - 85”7/8 - 93”2/3)
1
2
4
8
5
7
3
6
1
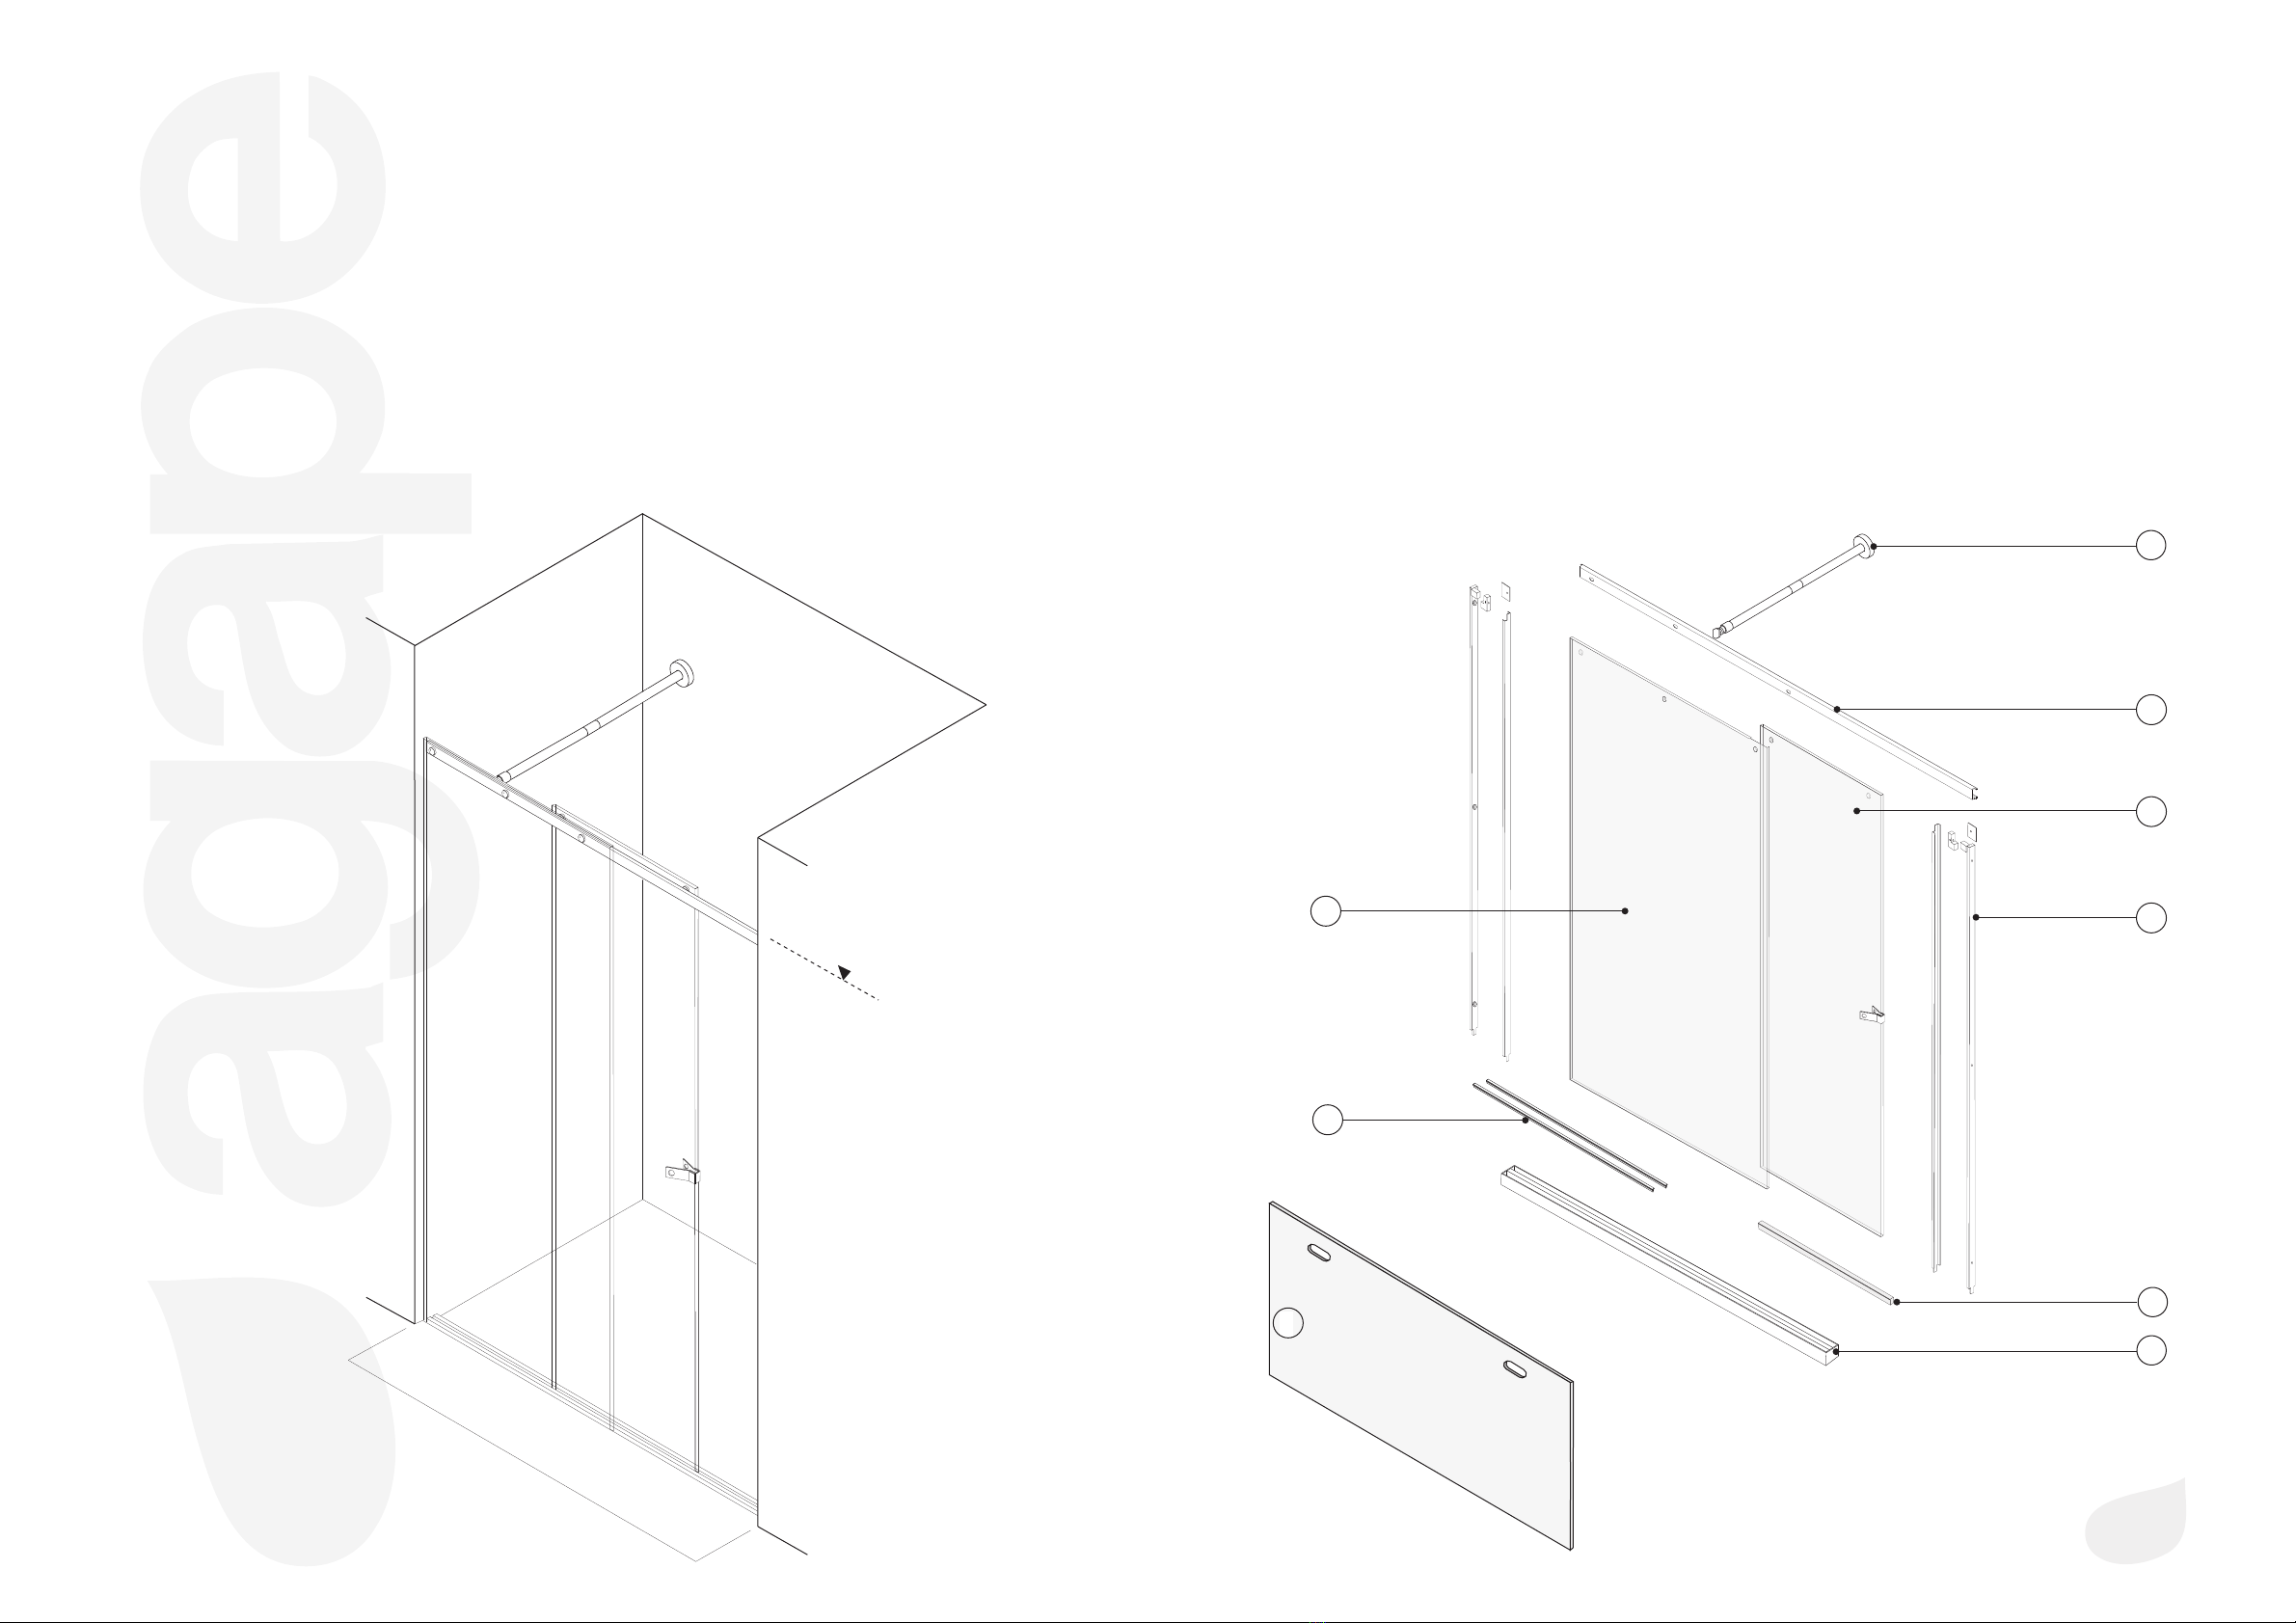
Elenco delle parti / List of components
1guida dell'anta /rail the door
2aste e carter / bar and guard
3fianco / side panel
4anta / door
5guida base/ rail base
6profilo cava / channel profile
7guarnizioni / gaskets
8tubo supporto / orizzontal supporting element
Esploso / Pre - assembled
Nota bene / Please note
- Nel disegno: doccia tipologia E2 con anta destra.
- Eseguire l'alloggiamento nel pavimento per la guida e la piletta.
- Tutte le misure sono in millimetri.
- In the sketch: shower type E2 with right door.
- Prepare the floor to take the shower rail and the waste.
- All measurements are in mm.
Assemblato / Assembled
"DOCCE FLAT D" E2 - componenti / "FLAT D SHOWERS" E2 - components
5
2200 (86"39/64)
istruzioni di montaggio / Instructions for installation
agape srl Via Po Barna, 69 - 46031 Bagnolo S.Vito (MN) Italia
tel. 0376/250311 - www.agapedesign.it 06231/02-06231/02
01/2009
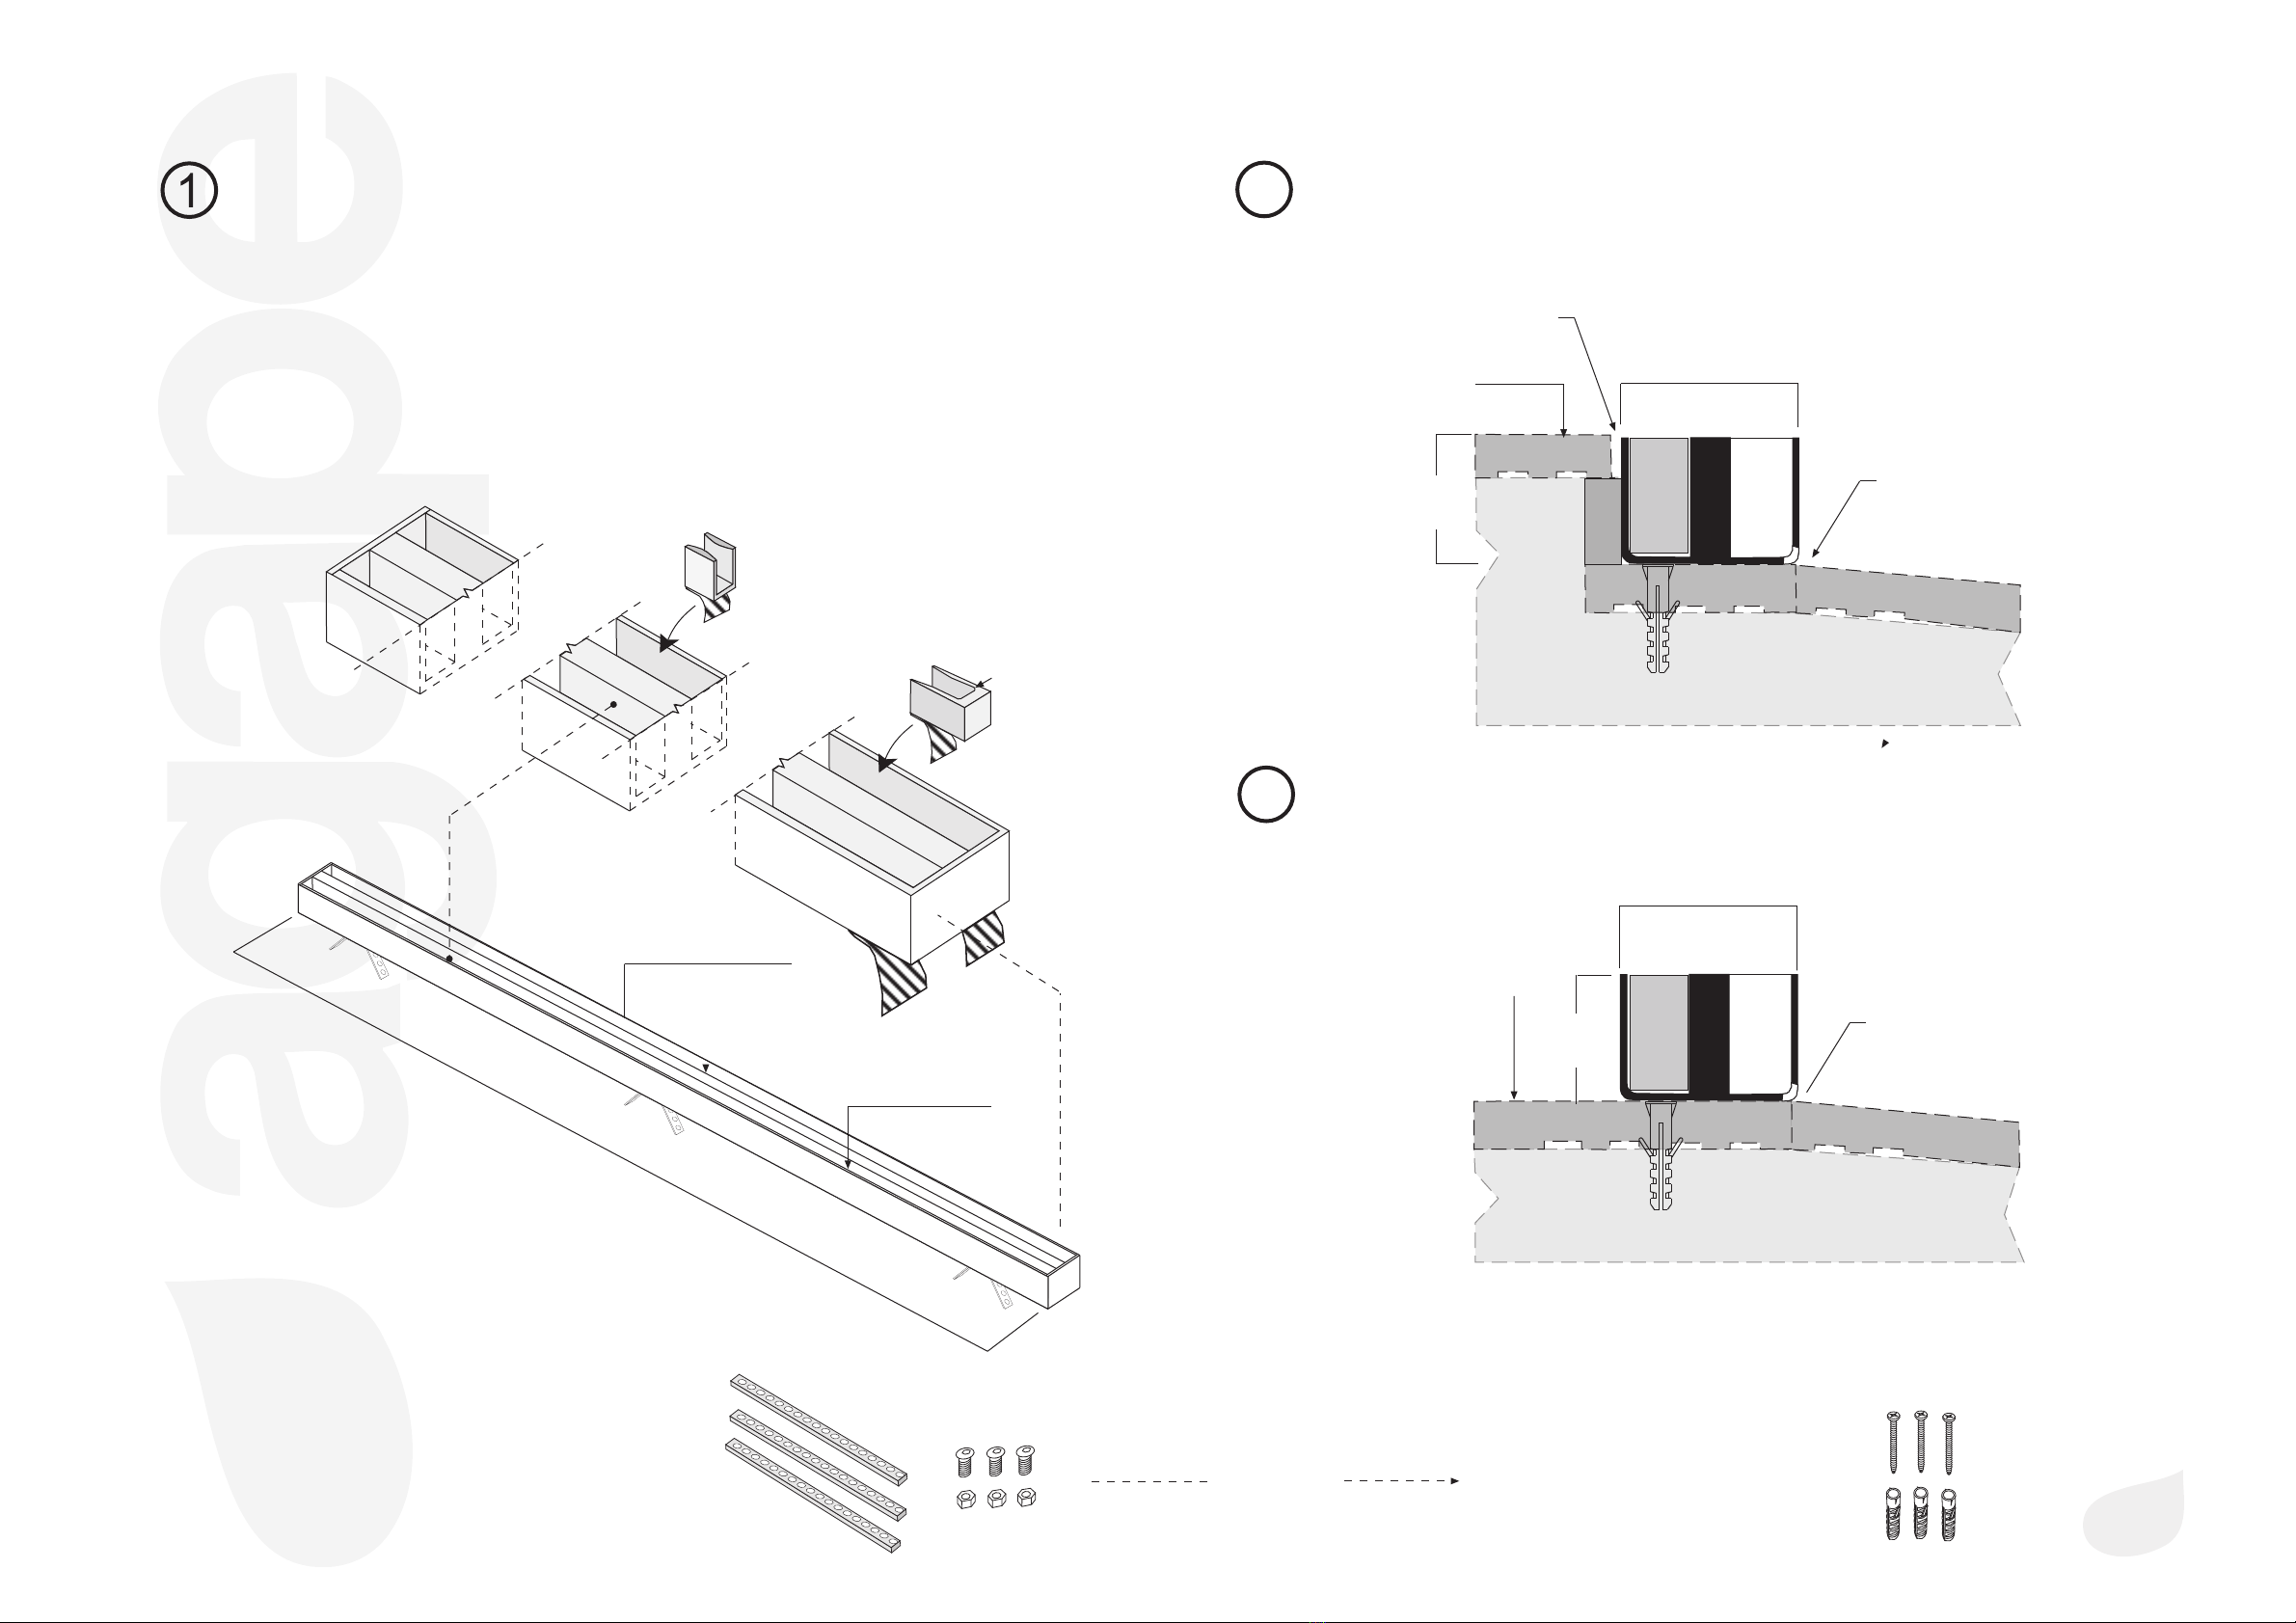
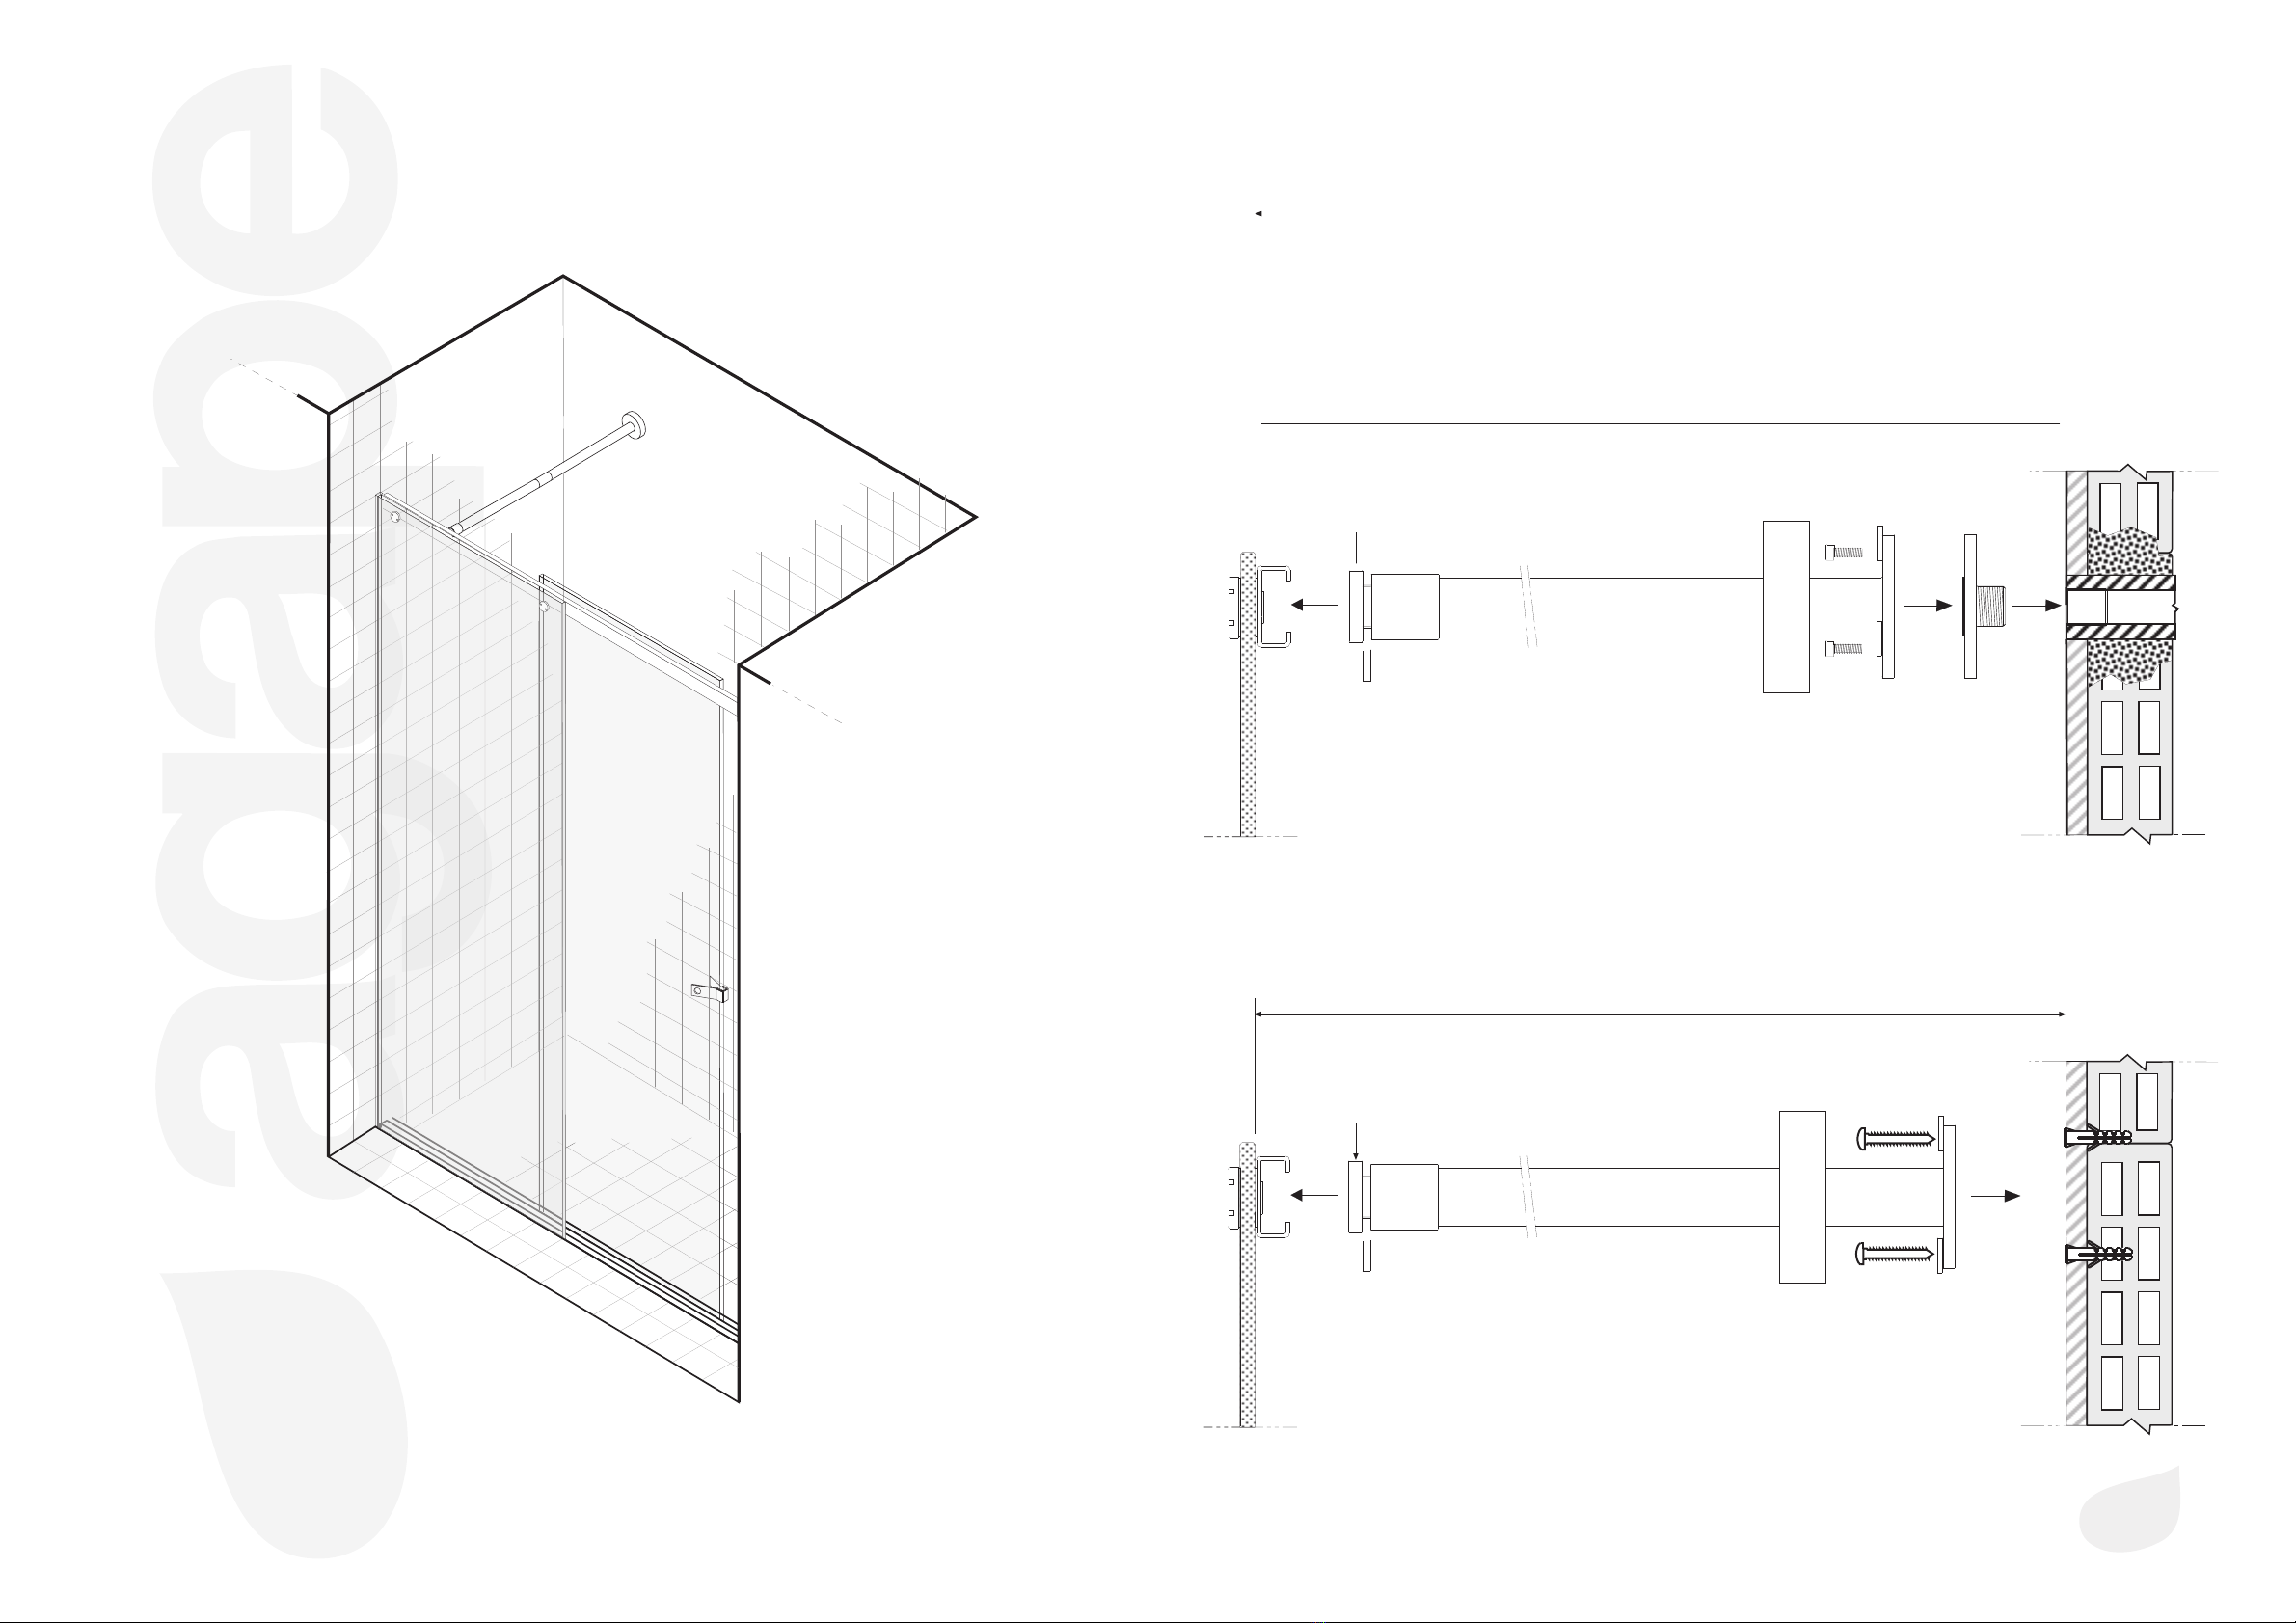
riempitivo di protezione
protective insert
Utilizzare le zanche per fissare la guida con
la malta di sottofondo.
Please employ the clamps in order to fix the
rail in the mortar with mortar.
Utilizzare i tasselli per avvitare la
guida al pavimento.
Please employ the plugs to fix the
rail to the floor.
fori per scolo acqua
water drainage holes
pavimento finito
finished floor
surface
fori per scolo acqua
water drainage holes
sigillare
seal
Cava esterna
Outer channel
Guida fine corsa
siliconata nella cava
End of run stopped fixed into
the channel with silicone
Guida siliconata al centro
della cava
Rail fixed with silicone at
the centre of the channel
cava interna
internal channel
Preparazione della guida per la posa
Preparation of rail for installation
ATTENZIONE!
La guida va installata con il riempitivo di protezione in poliuretano espanso all’interno
della cava.
ATTENTION!
The rail has to be installed with the protective insert made of polyurethane foam
of high density in the channels.
2
pavimento finito
finished floor
surface
Oppure
Or
*
*
*
*
Sezione guida doccia: soluzione a filo pavimento
Shower rail section:Option with rail base installed flush
with finished floor surface
Sezione guida doccia: soluzione fuori pavimento
Shower rail section: tray installed above finished floor
surface
2a
2b
46 (1”2/3)
max 30
(1”3/16)
46 (1”2/3)
max 30
(1”3/16)
"DOCCE FLAT D" E2 - preparativi e sezioni / "FLAT D SHOWERS" E2- preparation end section
1981/2181/2381
(77"63/64)/(85"55/64)/ (93"47/64)
istruzioni di montaggio / Instructions for installation
agape srl Via Po Barna, 69 - 46031 Bagnolo S.Vito (MN) Italia
tel. 0376/250311 - www.agapedesign.it 06231/02-06231/02
01/2009

silicone
dima per controllo luce tra le pareti al finito
template for checking gap between finished wall surfaces
Attacco G 1/2" F filo rivestimento. Solo per tubi adduzione.
G 1/2" F connection flush with finished surface. Only for
water supply pipe.
parete al
rustico.
unfinished wall.
parete al finito
finished wall
surface
pavimento finito
finished floor
Installazione a parete / Wall mounting
** Verificare che l'asta, in prossimità di eventuali spigoli, possa essere vincolata consicurezza.
** Make sure that the bar is securely fixed when placed close to the edge of the wall.
3
90°
90°
*
livella / spirit level
2
1
7
3
3
1982/2182/2382
(78"1/32)/(85"29/32)/(93"25/32)
1982/2182/2382
(78” - 85”7/8 - 93”2/3)
"DOCCE FLAT D" E2 - posa piatto doccia / "FLAT D SHOWERS" E2 - shower tray installation
h.2200
(86"39/64)
420
(16" 17/32)
istruzioni di montaggio / Instructions for installation
agape srl Via Po Barna, 69 - 46031 Bagnolo S.Vito (MN) Italia
tel. 0376/250311 - www.agapedesign.it 06231/02-06231/02
01/2009
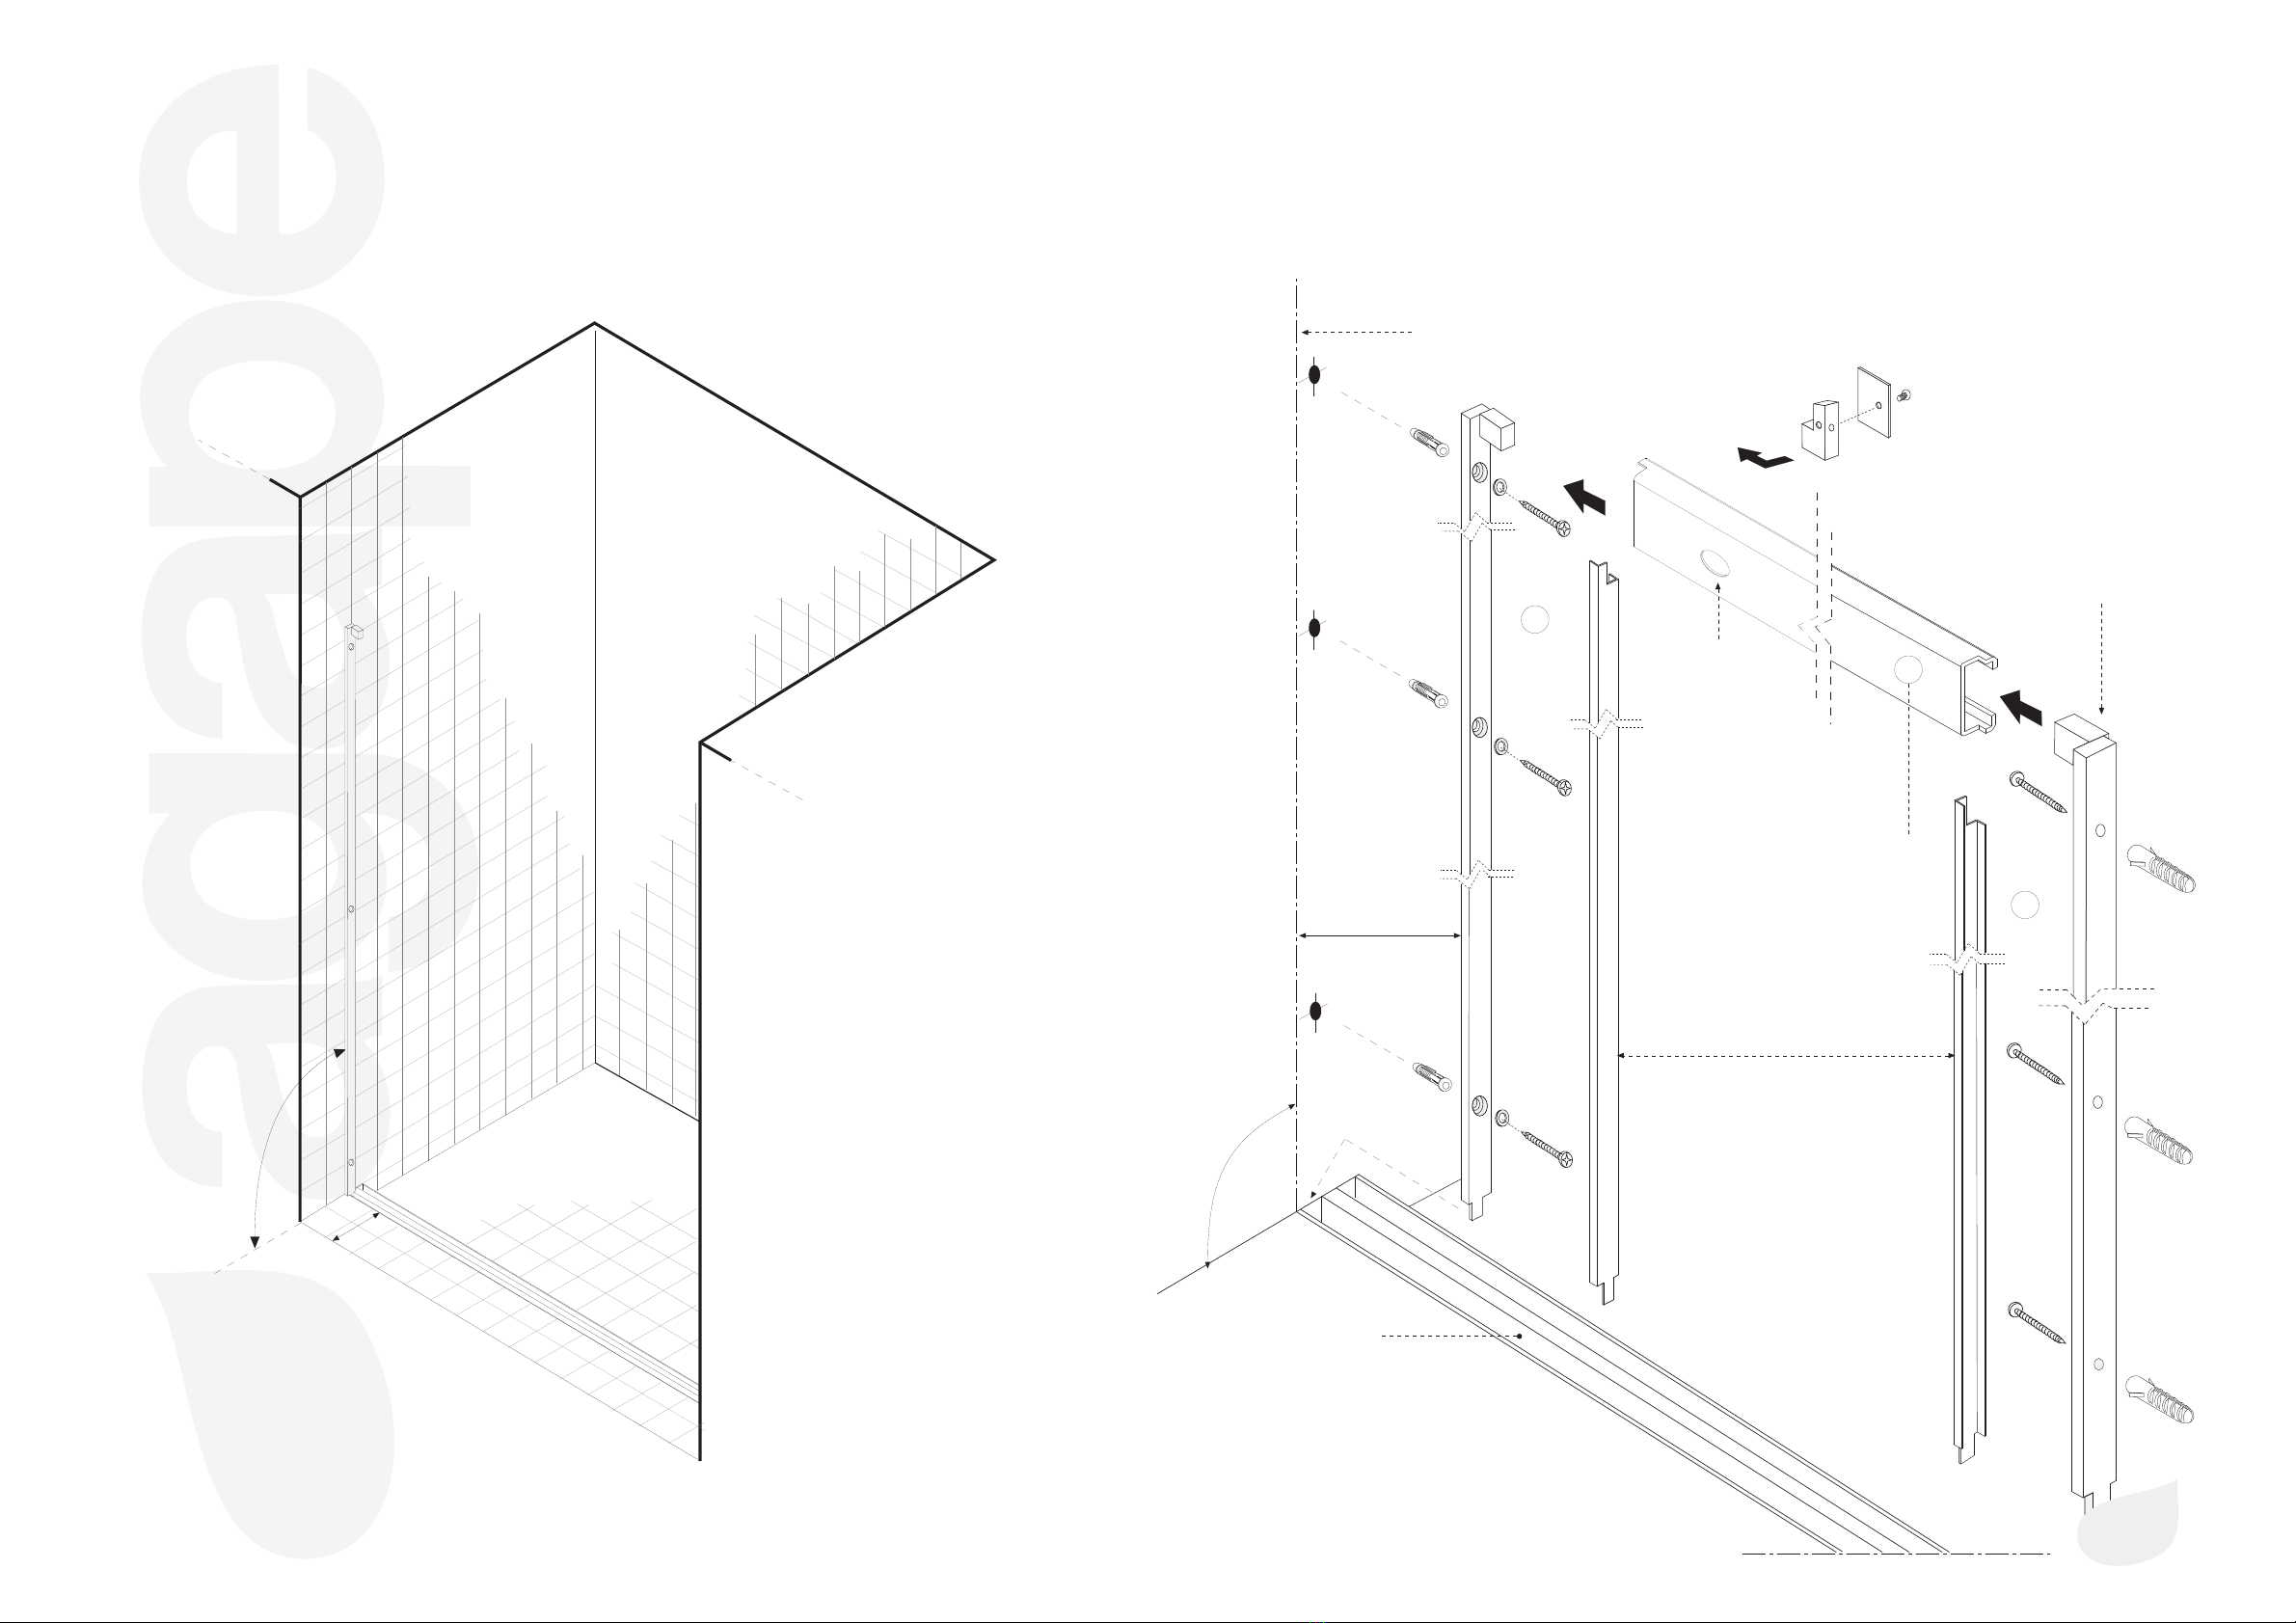
2
2
1
**
asola
elliptical hole
carter adesivo
adhesive guard
piastrina
metal plate
squadretta
L- shaped bracket
filo esterno
external edge
90°
segnare il filo esterno e fissare l'asta a parete
mark the external edge and fix the bar to the wall
filo esterno
external edge
cava esterna
outer channel
fissare l'asta con la guida
superiore già inserita
fix the bar once the upper
rail has been fixed
4
guida
superiore
upper rail
Dettaglio / Detail
Attenzione: Le asole*della guida superiore definiscono la posizione del fianco.
Attention: The elliptical holes
*in the upper rail determine the position of the vertical side panel.
90°
N.B . : - verificare che l'asta, in prossimità di eventuali spigoli, possa
essere vincolata con sicurezza.
PLEASE NOTE: make sure that the bar is securely fixed when placed
close to the edge of the wall
"DOCCE FLAT D" E2 - posa aste / "FLAT D SHOWERS" E2 - installation of bars
*
istruzioni di montaggio / Instructions for installation
agape srl Via Po Barna, 69 - 46031 Bagnolo S.Vito (MN) Italia
tel. 0376/250311 - www.agapedesign.it 06231/02-06231/02
01/2009

istruzioni di montaggio / Instructions for installation
agape srl Via Po Barna, 69 - 46031 Bagnolo S.Vito (MN) Italia
tel. 0376/250311 - www.agapedesign.it 06231/02-06231/02
01/2009
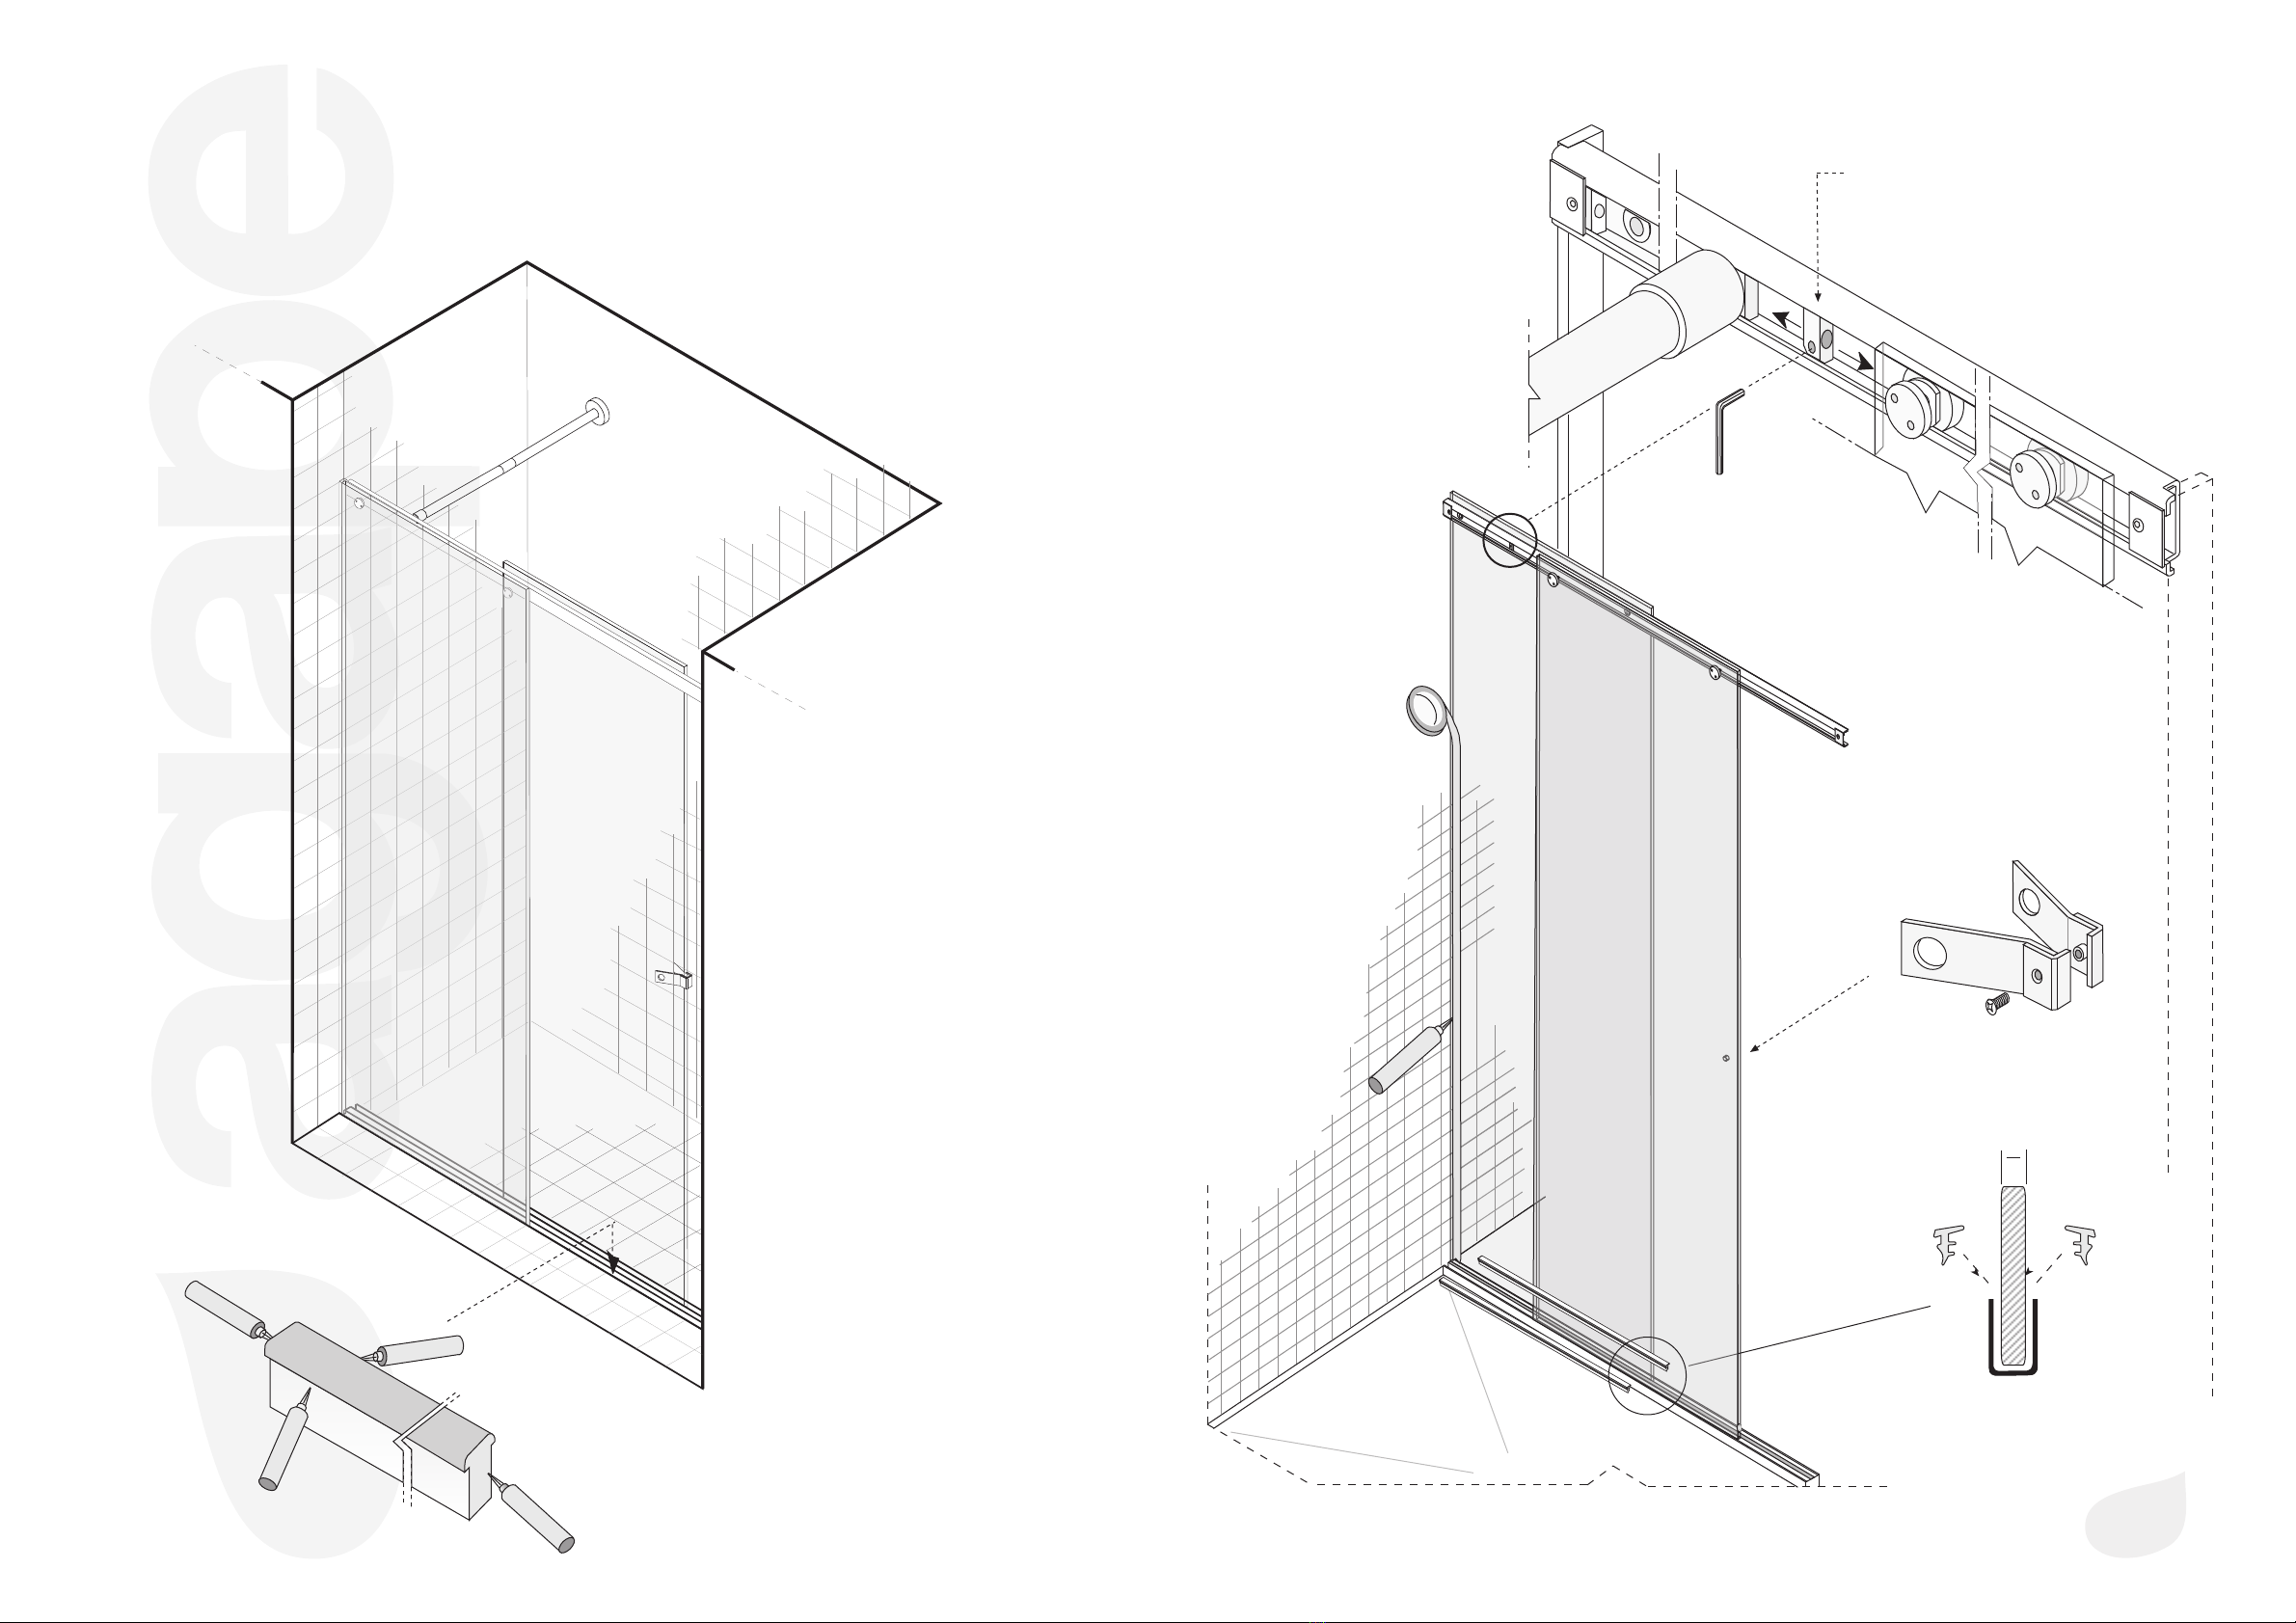
chiave speciale
snake-eye key
3
5
controllare che le boccole siano inserite
correttamente.
make sure that the bushes are correctly installed
3
spessori 4 mm
thickness 4 mm
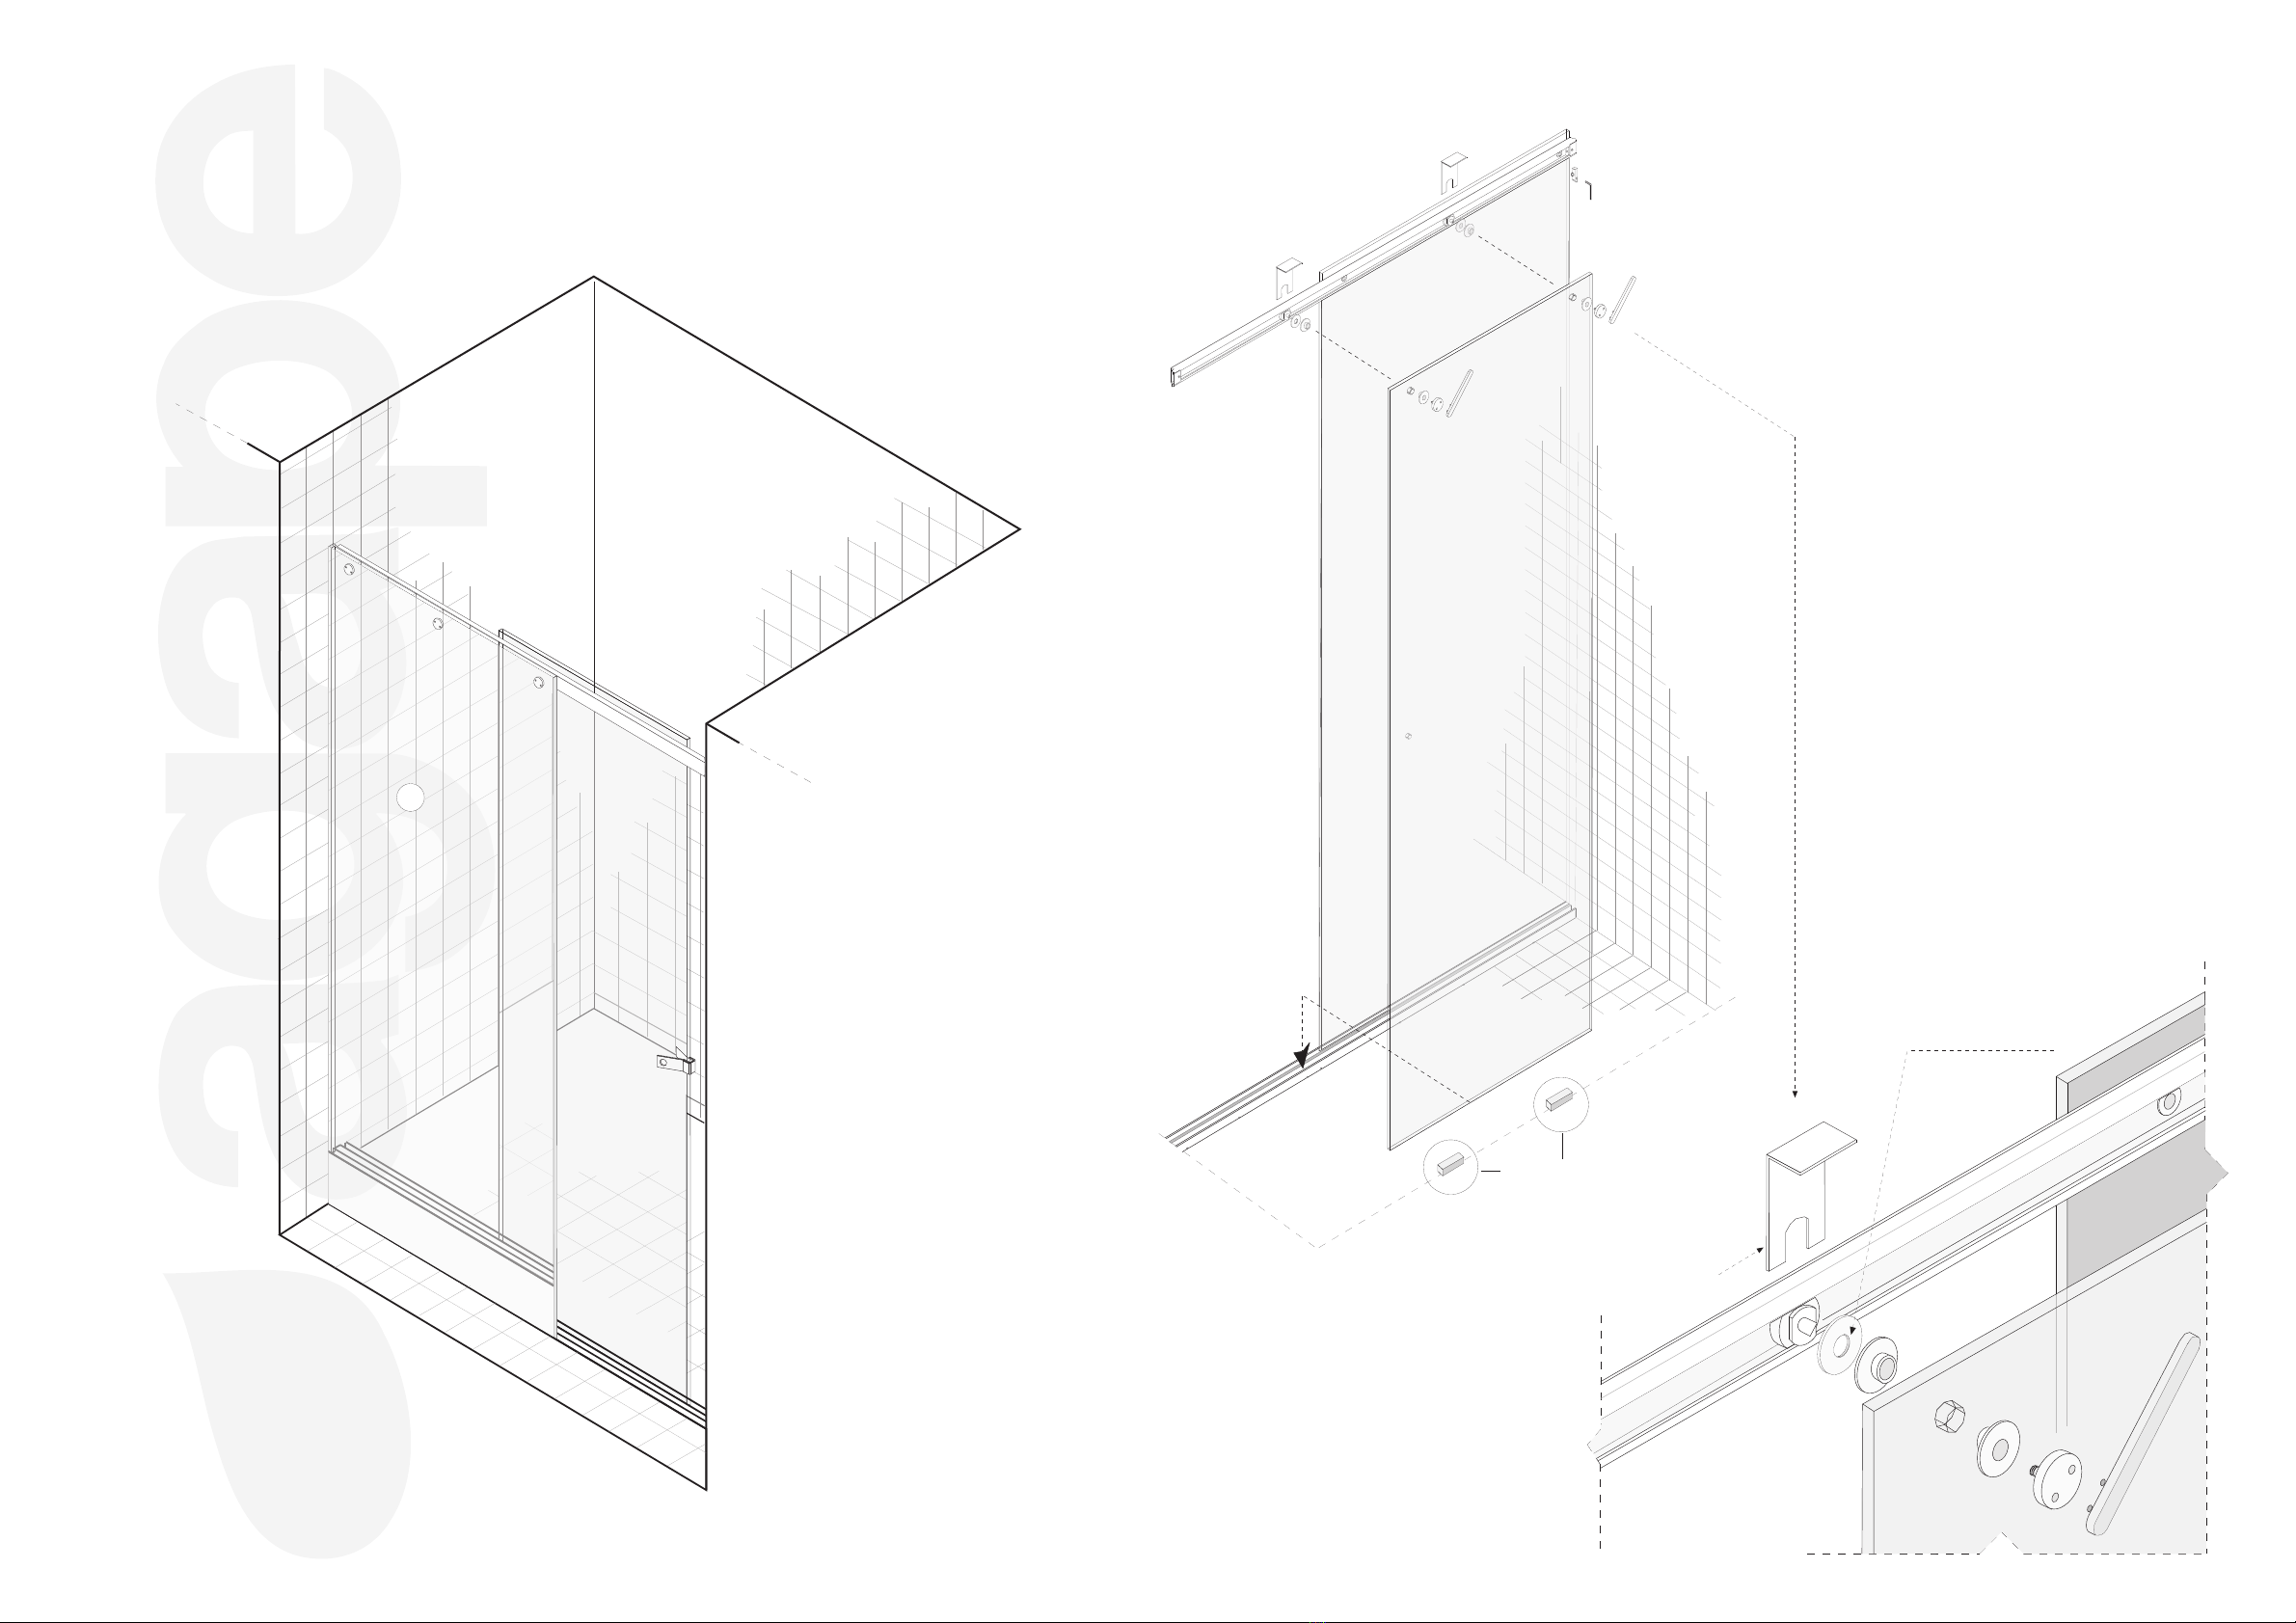
Applicare il fianco alla guida superiore.
Insert the side panel into the upper rail.
"DOCCE FLAT D" E2 - posa del fianco / "FLAT D SHOWERS" E2 - installing the panel
(5/32)
istruzioni di montaggio / Instructions for installation
agape srl Via Po Barna, 69 - 46031 Bagnolo S.Vito (MN) Italia
tel. 0376/250311 - www.agapedesign.it 06231/02-06231/02
01/2009
4
chiave speciale
snake-eye key
foro maniglia
hole to take
rondella sp.1 mm
washer 1 mm thick (3/64)
vista interna
Inside view
6
spessori 14 mm
thickness 14 mm (35/64)
Applicare l'anta alle ruote della guida superiore.
Attach the door to the wheels of the upper rail.
4
"DOCCE FLAT D" E2- posa dell’anta / "FLAT D SHOWERS" E2 - installing the door
istruzioni di montaggio / Instructions for installation
agape srl Via Po Barna, 69 - 46031 Bagnolo S.Vito (MN) Italia
tel. 0376/250311 - www.agapedesign.it 06231/02-06231/02
01/2009
B
7
tubo adduzione / water supply pipe
-B - regolare a 3 mm. /regulate at 3 mm.
-C - ghiera blocco del tubo. / ring to block pipe.
tubo supporto / water supply pipe
-B - regolare a 3 mm. /regulate at 3 mm.
-C - ghiera blocco del tubo. / ring to block pipe.
Dettaglio fissaggio elemento di sostegno orizzontale
Detail of the horizontal support element fixing
- Collegare solo la flangia (A) alla parete. Infilare il tubo nella guida con (B) regolato a 3 mm.
- Bloccare il tubo con (C) in corrispondenza dell'attacco adduzione e avvitare il tubo alla parete.
- Connect only the flange (A) to he wall. Insert the pipe into the guide rail with (B) adjusted at 3 mm.
- Block the pipe with (C) matching the water supply pipe's connection and screw the pipe to the wall.
3mm.
C
A
B
770/870/970
(30" 5/16)/ (34"1/4)/( 38"3/16) ± (1/8)
±3mm
3mm.
C
"DOCCE FLAT D"E2- tubo supporto/ "FLAT D SHOWERS" E2 - horizontal supporting element
770/870/970
(30" 5/16)/ (34"1/4)/( 38"3/16) ± (1/8)
±3mm
istruzioni di montaggio / Instructions for installation
agape srl Via Po Barna, 69 - 46031 Bagnolo S.Vito (MN) Italia
tel. 0376/250311 - www.agapedesign.it 06231/02-06231/02
01/2009
guarnizioni per fianco
side panel gaskets
nastro adesivo
di carta
masking tape
vista interna
Inside view
maniglia
handle
8
ATTENZIONE: attendere 24 ore prima dell'utilizzo della doccia!
ATTENTION: allow 24 hours before using the shower!
silicone
silicone
silicone
silicone
silicone
10 mm (25/64)
"DOCCE FLAT D" E2-
finiture
/"FLAT D SHOWERS" E2 -
fittings
Other agape Shower Cabin manuals


Popular Shower Cabin manuals by other brands


Arblu
Arblu PERSEO ANGOLO Q-R 2SL+1LF Assembling instructions

Novellini
Novellini R90 base p.80 Instructions for installation, use and maintenance manual

SANPLAST
SANPLAST KP1DJa/TX5b Installation instruction

Insignia
Insignia 9015 Assembly & fitting instructions

Kohler
Kohler Sterling 2375 Series installation guide

ELEGANT
ELEGANT SPR870 quick start guide