AIGOSTAR 300008HGZ User manual

INSTRUCTIONS
MODEL: 300008HGZ
CODE : 8433325504014
MULTI PRESSURE COOKER
AIGOTECH ONSYNK, S.L.
C/LOS TRANSPORTISTAS N.43 NUMANCIA
DE LA SAGRA 45230, TOLEDO, ESPAÑA
C.I.F.: B-85712198
HTTP://WWW.AIGOSTAR.COM
MADE IN P.R.C

GB
ES
IT
F
CONTENT
01-28
29-56
57-84
85-112

GB
01
GB
02
Please read the User Manual carefully before use and keep
it in a convenient place for future reference. Pictures in the
text are for reference only. Please refer to the actual product.
1. If the supply cord is damaged, it must be replaced by
a special cord or assembly available from the
manufacture or its service agent.
2. This appliance is for household use only. Do not use
outdoors.
3. Keep electrical appliance out of reach from children
or inform person. Do not let them use the
appliances without supervision.
4. Appliances can be used by persons with reduced
physical, sensory or mental capabilities or lack of
experience and knowledge if they have been given
supervision or instruction concerning use of the
appliance in a safe way and understand the hazards
involved.
5. This appliance is intended to be used in household
and similar applications such as:
-Staff kitchen areas in shops, ofÞce and other working
environments;
-farm houses;
-by clients in hotels, motels and other residential type
environments;
-bed and breakfast type environments;
6. The appliance is not intended to be operated by means
of an external timer or a separate remote-control system.
7. Cooking appliances should be positioned in a stable
situation with the handles positioned to void spillage of
the hot liquids.
8. The heating element surface is subject to residual heat
after use, do not touch
9. Please turn off and unplug the appliance before
cleaning, maintenance or relocation and whenever
it is not in use
Safety precautions
To ensure safe use and to avoid personal injury and
property loss, be sure to observe the following safety
precautions. Failure to observe the safety precautions
and improper use may cause accidents.
This product does not take into account the following cases:
------ Use of the appliance by unattended infants and the
disabled.
------ Infants playing with the appliance.
Meanings of the marks:
Means “forbidden” items
Table of Contents
Safety precautions
Product Naming
Applicable Model Description
Product Description
Operation Guidelines
Instructions for Use
Cleaning and Maintenance
Electrical Schematic Diagram
Troubleshooting
User Manual

GB
03
GB
04
Warning: Items which may possibly cause
personal injury or death.
Means “Mandatory” items
Caution: Items which may cause light injury
or property damage
Forbidden
As the vent valve exhausts automatically, do not
touch it with a hand.
●In cooking process, never
move your hands or face to
close to the exhaust port to
avoid burns.
●During cooking, do not
cover the vent with a cloth
and other items.
●Modification or repair by non-
professionals is prohibited.
●Violation may cause a fire or
electric shock.
●Repair or replacement of parts
shall be made in a designated
service center.
No transformation
●Place it beyond the reach of
infants and young children;
●In order to avoid electric shock,
burns and otherdangerous accidents.
Do not allow children to operate this product
independently
●When moving the product, never
lift the rotary handle directly in order
to avoid damage to the product.
●Do not move the product when
the lid is open to avoid injury.
When moving the product, please lift the cooker
handle
●It is prohibited to insert metal
shavings, needles and other foreign
matter in the gap; as this may cause
electric shock or movement
anomalies.
Do not put foreign objects

GB
05
GB
06
●When there is foreign object on
the bottom of pot and heating
plate surface, remove the foreign
object before use. Otherwise,
it may cause overheating, pressure
relief and other abnormalities,
please clean before use.
Do not use a pot other than the dedicated pot
●This product comes with a
standard inner pot, which shall
not be used for other purposes
to avoid deformation of the inner
pot and influence on use.
Do not put the inner pot on other appliance
for heating
●Failure to use AC 220~240V 50Hz
civil electricity or dedicated electricity
can cause fire or electric shock.
Use 220~240V 50Hz power outlet
●Do not insert and pull the plug
with wet hands
Do not insert and pull the plug with wet hands
●May cause the failure of product to work properly.
●The container cannot be opened until full release of
pressure.
Avoid distortion of seal rings
Mandatory
Safe uncovering
●Never cook seaweed, laver, oatmeal and other foods
prone to clogging, to avoid causing an accident or
damage to the pressure cooker.
Do not cook the following foods

GB
07
GB
08
●Be sure to check periodically the
block proof cover and exhaust valve
core to make sure that they are not
be blocked;
●Do not add any heavy object on
the exhaust valve or replace with
other objects;
Periodic inspection
●It is strictly prohibited to use other
lid for heating, and in the (switching
on )process, the use of non-original
lid is not allowed, as this may cause
poor performance or safety hazards.
Do not use other lid for heating
●Doing so could cause electric
shock and electrical short circuits.
Products may not be immersed or sprinkled
in water
●The total amount of food and water
cannot exceed Max scale, otherwise food
may be cooked unfamiliar, or cause
malfunction. When food prone to
expansion and blockage, total amount
shall not exceed 3⁄4 of the maximum scale,
otherwise it may cause an accident.
Cooking cannot exceed Max scale
●If the power cord is damaged, to avoid
danger, it must be replaced by the
professionals of the manufacturer, its
service department or similar department.
Please use dedicated power cord
●If the plug end is not inserted completely,
it may cause electric shock, short circuit,
and even a fire.
Plug should be firmly plugged in
●When pulling the plug, you must pinch the plug;
●Do not pull the power cord, otherwise it will damaged
the cord, causing electric shock and short circuit.
When pulling the plug, pinch the plug

GB
09
GB
10
●Do not use in unstable locations on the table;
●Do not use in locations near water and fire;
●Do not use near walls and furniture;
●Do not use in locations exposed to direct
sunlight and oil splatter.
●If attached with dust or moisture, please wipe
it away, otherwise it may cause a fire.
●Porridge or beans should be naturally cooled
until there is no pressure, manual venting not allowed.
●A socket of more than 10 A rated
current with grounding wire shall be
used alone; If shared with other
electrical appliances, the socket
may cause abnormal heat and
result in fire.
Do not use in the following locations
Always clean the plug inserts
Warning
Cooking porridge or Beans
●If the seal is damaged or the inner pot is deformed,
do not use the electric pressure cooker pot, and must
replace with a special seal ring or inner pot purchased
from the manufacturer or maintenance department.
About seal damage or inner pot deformation
●Persons with pacemakers or users with hearing aids
or implanted cochlear, when using this product, please
consult with authorized medical personnel and refer to
the instructions of medical equipment providers.
●Cleaning products should be carried out after cooling,
and contact the section of high temperature may cause
scalding.
Special populations using pressure cookers
●If it is difficult to open a lid, do not open with force,
otherwise it may cause burns or other injuries.
●After completion of cooking and full release of pressure,
the lid can be opened.
Opening warming
Caution
The power socket to be used separately
Cleaning the products after cooling

GB
11
GB
12
●Otherwise, it may produce leakage,
fire or failure.
Unplugging when not in use
●The power cord is prohibited to contact the lid and
other external removable metal parts, otherwise,
normal operation may occur.
Power cord is prohibited to touch the metal parts
Product Description
Introduction to Products
The product combines the advantages of ordinary
pressure cookers, rice cookers, and thermal cookers,
makes up for the shortcomings of these appliances,
and integrates a variety of functions, easy to operate,
saving power, the essential cookware for modern families!
1. Exhaust valve 2. Safety eye (float valve)
3. Exhaust button 4. Rotary handle base
5. Rotary handle cover 6. Top cover
7. Seal ring 8. Lid
9. Safety eye (float valve) 10. Block proof cover
11. Outer pot 12. Housing
13. Menu knob 14. IMD
15. Base
Introduction to Accessories
Multi-purpose spoon Measuring cup User Manual
Appliance Model Descripon
Rated voltage/ Rated frequency 220-240V 50Hz
Model Rated Power Capacity Working Pressure
8433325504014 1000W 6L 70kpa
Product Structure
Upper cover

GB
13
GB
14
(Standby screen)
How to use the Menu
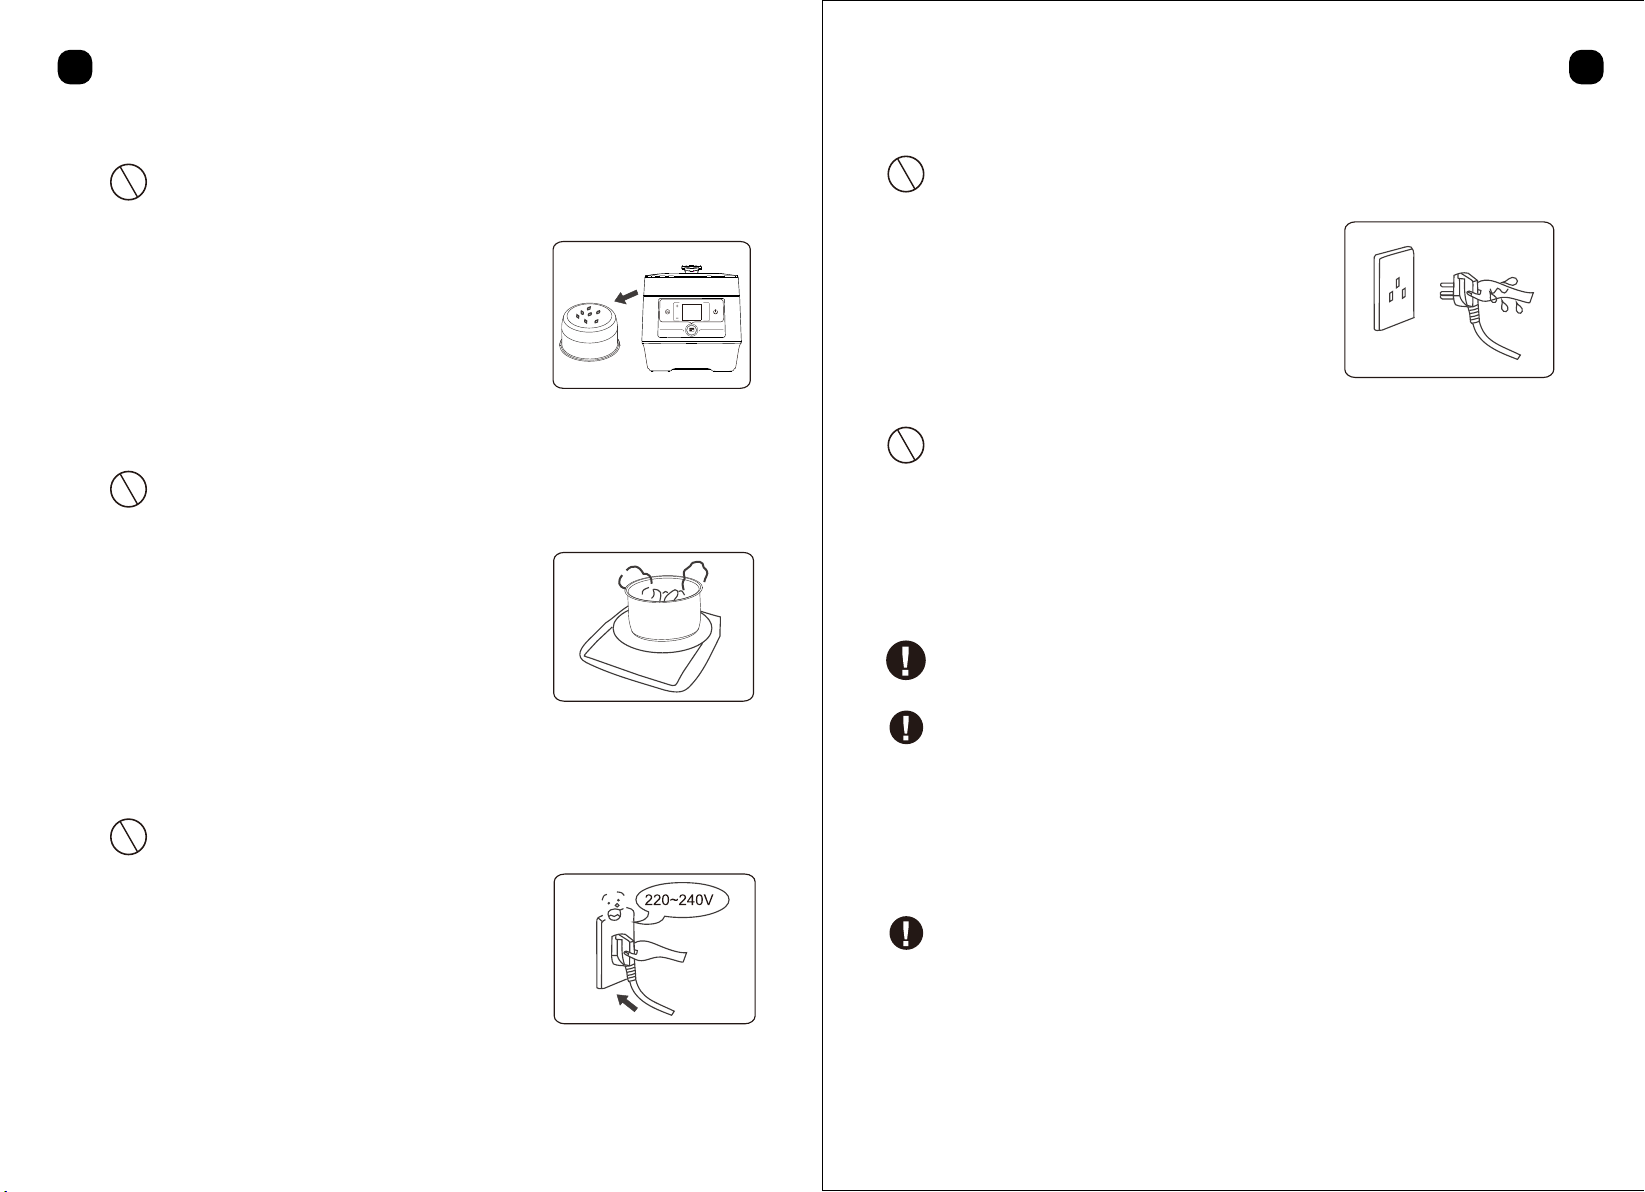
For initial use, remove from the pot all the accessories, read
the User Manual carefully, and pay particular attention to the
use methods and precautions to avoid damage to your
property or personal injury.
Introduction to Use of Product Control Panel
“Keep Warm/Cancel” Function button:
In standby mode, press this button to enter the Keep Warm
condition; you can cancel any operation that the electric
pressure cooker is performing.
“Preset” “+” “-” button:
To preset, after selection of the function, press the “Preset”
button. (Some functional items cannot be preset) to adjust
the preset time, press the “preset” button, then press “+” “-”
button to set the hour portion preset adjustment; press the
“Preset” button, then press “+” “-” button to set minute
portion preset adjustment.
“Texture” Function button:
Some functions of the product have full tasty function
selection, and press this button to select your desired tastes
of “Light”, “Standard” and “Strong”.
“Start” Function button:
After selection of the desired function, press “Start” button to
confirm the selection, the pressure cooker beginning to
work.
“DIY” Function button:
Use this button to select DIY function. Press “+” “-” to select
the desire cooking time.
“Temperature” Function button:
When select DIY menu, please select the button. Adjust the
temperature by press “+” “-”.
“Menu” knob
Rotate the “Menu” knob left to select the left function menu;
Rotate the “Menu” knob right to select the right function
menu;
Tips
*When the product is not
working after switching on,
the display shows the
standby mode, as shown in
the figure.
*In function operation, press
the “Keep Warm/ Cancel”
button to automatically
convert into a standby state.
Fry Use this funcon for pan frying
Rice Use this funcon to cook rice
Stew
Use this funcon for stewing
Bread
Use this funcon for make bread
Meat Use this funcon to cook meat/ chicken/beef
Pasta
Use this funcon to cook pasta
Fish Use this funcon to cook sh
Vegetables Use this funcon for vegetables
Slow cook Use this funcon for slow cooking
Oven Use this funcon for baking
Yoghurt
Use this funcon to make yoghurt
Cake Use this funcon to make cake
Desserts
Use this funcon to make desserts
Steam
Use this funcon for steaming
Temperature
DIY
Fry Stew Meat Fish
Yoghurt Desserts
Rice Bread Pasta Vegetables
Oven CakeSlow cook Steam
Menu

GB
15
GB
16
Operation Guidelines
1. Opening the lid correctly
First rotate the uncovering knob to the uncovering position,
and then press the uncovering button, the lid opening
automatically.
(In hot-state lid opening, it is normal for the uncovering
speed to be extended due to the influence of difference
between inner and outer pressures of product )
2. Check the exhaust port and block proof cover
Check the exhaust port and block proof cover are clean, if
dirty should be cleaned immediately.
4. Close the lid correctly
Close the lid, rotate the uncovering knob to the closing
position; ensure to screw into place, otherwise it cannot work
properly.
5. Switch on
Power on, close the lid in place, with music tips, the display
showing “---“, and
labels flashing, indicating that the electric pressure cooker
enters into standby state.
3. Put food in the inner pot
Remove the inner pot, put food and water into the inner pot,
with the total amount of food and water not exceeding the
Max line of the water level line of the inner pot, wipe clean
the outer surface of the inner pot, heating plate surface and
outer pot surface, and then replace the inner pot into the
cooker.

Instructions for Use
All the menus for this product can be cooked
according to the following procedures.
Example: Use method for Stew cooking
(default cooking model)
Do you look for a culinary taste suitable for yourself?
Look for the cheats for cuisine. Follow me to learn the
“Texture” and “+”/ “-” time settings, and from now on,
it’s easy to cater for all tastes:
Example: Use method for Stew cooking
(“Texture” and “+”/ “-” time )
1. According to page 07 to finish the operation guidelines
When the product fails to operate after switch on, the
display shows the standby mode;
2. Select “Stew” function
Rotate the “Menu” knob right to select “Stew” function;
3. Cooking start
After the “Start” button is pressed, prompting music is
sounded, and cooking begins. Also, cooker starts working
automatically 5 seconds after any function is selected.
17 18
GB GB
6. Safety lid
If, during or after cooking, there is pressure inside the
product, it is prohibited to forcibly open the lid and move
the product, as shown in Figure I “Pressure” state: Figure II
“No Pressure” state. Move the product with care, but do not
move it when the lid is open, to avoid splashing of hot food
in the pot and causing injury.
After cooking, turn off the power, then open the lid
according Step I, and if it is difficult to open the lid, do not
open with forces, as this may cause burns or other injuries.
Temperature
DIY
Fry Stew Meat Fish
Yoghurt Desserts
Rice Bread Pasta Vegetables
Oven CakeSlow cook Steam
Menu
Temperature
DIY
Stew
Temperature
DIY
Stew
Temperature
DIY
Strong Strong

1. According to page 07 to finish the operation
guidelines When the product fails to operate after
switch on, the display shows the standby mode;
2-1. “Texture” Function Selection
Pressure “Texture” function key to select the following
cooking modes;
Note: The “Texture” defaults as “Standard”
2-2. “+”/ “-” time Function Setting
Press “+”/ “-” to adjust to your desired cooking time
3. Cooking Starts
After the “Start” button is pressed, the product will
give out prompt music according to the chosen function.
For example: Method for use of cooking ingredients (DIY)
1. According to page 07 to finish the operation guidelines
When the product fails to operate after switch on,
the display shows the standby mode;
2. Select “DIY” function
Press “DIY” function key to select the function.
Adjust the cooking time by press “+”/ “-” to your
desired time.
3. Temperature adjusting
Press “Temperature” key to enter temperature adjusting
mode.Adjust the temperature by press “+”/ “-” to your
desired temperature.
4. Cooking Starts
After the “Start” button is pressed, prompting music is
sounded, and cooking begins.
When the temperature pressure reach, the “Time left”
will light up.
Select the desired function and then enter the next
step; rotate the “Menu” knob right to select “Stew”
function;
19 20
GB GB
Temperature
DIY
DIY
Temperature
Stew
Temperature
DIY
Strong
Temperature
DIY
Temperature
DIY
Strong
Temperature
DIY
Time left
Temperature
DIY
Time left
Temperature
DIY
Stew
Strong

Example: Use method for Rice cooking “Preset”
Tips:
*Prolonged preset steaming is not recommended.
*When you use this cooker for rice cooking, the water
level is the same as rice amount in CUP
*Please use the attached measuring cup to take rice
and water.
*When cooking sticky foods, it is prohibited to carry
out forced exhaust to avoid damage to your property.
●Now it is 6:00 pm, and you want to have the RICE
cooked at 7:30 tomorrow morning.
(Note: 6:00-7:30 preset time is 13 hours and 30 minutes)
1. Complete the operation guidelines according to the
method stated in the above.
●Press the “Preset” button, and press the “+” or “-”
button to set the hour portion adjustment of preset time.
●Press the “Preset” button again, and press the “+”
or “-” button to set the minute portion adjustment
of preset time.
●Press the “Preset” button, the “Preset” indicator
flashing, the display showing “2:00”, indicating 2
hours, and press the “+” “-” buttons to adjust the
hour portion of preset time.
(The hour portion of preset time is increased or
decreased in “1 hour”, the minimum preset hour
is “2” hours, and maximum “24” hours.)
2. Rotate the “Menu” knob left, to select the “RICE”
function.
3. Set a preset time
4. After the “Start” button is pressed, prompting music
is sounded, and cooking begins.
21 22
GB GB
Temperature
DIY
Temperature
DIY
Standard
Rice
Temperature
DIY
Timer
Rice
Temperature
DIY
Rice
Timer

●Press the “Preset” button again, the minute
portion of preset time flashing digitally, and
press the “+” “-” buttons for adjustment. (The
minute portion of preset time is increased or
decreased in “10 minutes”)
●No “Preset” function: fry, yoghurt, desserts, cake.
●“Fry” description: This function is for pan frying,
when the pot reach the default temperature, the
time indicator begin to count down, and the “:
” flashing, you can put your food into pot at the
moment, and start cooking. This function is without lid.
●When cooked without lid, or with glass cover,
cannot be fill to the maximum level, cannot use
“Preset”, not be left unattended.
It is not recommended to leave the “Pasta” “Rice”
in “Preset”.
DIY may not be desired effect.
When cooked with lid open, the time between the
start and the countdown time default menu is longer
than with the lid closed, the times are not real and
it is not advisable to leave the product unattended.
Precautions:
The cooking to end at 7:30 tomorrow morning,
prompting music to sound, the Keep Warm
indicator to be bright, and the electric pressure
cooker to automatically enter the Keep Warm state.
For the first use, remove all the accessories from
the cooker body, read the use manual carefully,
and pay particular attention to the use methods
and precautions to avoid damage to your property
or personal injury.
The cooking and cooling time for each function is
different, cooking time varies slightly with the voltage,
amount of food, amount of water, rice quality, water
quality, etc., and when the grid voltage is significantly
lower, the cooking time will increase accordingly;
The greater the amount of cooking, the longer the
cooking and cooling time.
Cleaning and Maintenance
1. Clean after each use.
2. Before cleaning product, please unplug the power
cord until the product cools.
3. Remove the inner pot after opening the lid correctly,
first clean with detergent, then rinse well with water,
and wipe dry with a soft cloth.
4. Remove the removable coverplate, and rinse with
water. After the cleaning is completed, replace the
removable coverplate, otherwise normal working is
impossible.
5. Remove the exhaust valve and the float valve, rinse
with water, and put them into the original positions.
6. Remove and clean the water storage box, and then
put it into the original position.
7. Check the float valve port and the exhaust valve port
for blockage, and clean the keep warm seat plate with
a reg.
23 24
GB GB

8. Wipe clean the lid and the cooker body with a rag,
and it is prohibited to soak the cooker body in water or
spray water to it.
9. After cleaning and maintenance is completed, please
check again the removable coverplate, exhaust valve,
float valve and other components for correct installation.
Electrical Schematic Diagram
The cases in the following tables do not always
indicate a faulty cooker. Please examine the cooker
carefully before contacting the support for repair.
Troubleshooting
25 26
GB GB
S/N Problem Possible Reason Soluon
1 Dicult to close
the lid
Float valve stuck Close the cover aer pulling
downwards the oat
Sealing ring not installed
properly Posion the sealing ring well
2 Dicult to open
the lid
Float valve in the popped-up
posion
Press the oat valve lightly
with a chopsck
Pressure exists inside the
cooker
Open the lid aer the
pressure is completely
released.
3 Steam leaks from
the lid
No sealing ring or
sealing ring installed
improperly
Install the sealing ring as
required
Food debris aached to the
sealing ring Clean the sealing ring
Sealing ring damaged
Replace the sealing ring
4
Steam leaks from
oat valve
Food debris on the oat
valve gasket Clean the oat valve gasket
Float valve gasket worn-out Replace the oat valve
gasket
5 Float valve unable
to rise
Too lile food and water in
inner pot
Add water and food
according to the recipe
Steam leaks from the lid or
exhaust valve
Send to the service center
for repair
6
Steam comes out
from exhaust
valve non-stop
Exhaust valve not in sealing
posion
Press release buon, the
pressure release valve li
down to the sealing posion
Pressure control fails Send to the service center
for repair
Thermal fuse
220-240 VAC/50Hz
Power cord connector
L
N
E
Heating
element
Reed switch
(Lid detect switch)
Main sensor
Pressure
switch
N
L
θ
Thermostat
Power PCB
Control PCB

For any technical improvement in product, shall be
placed in the revised manual without further notice.
In case of changes in appearance and color, please
refer to the actual product for detailed information.
27 28
GB GB
7
Heang plate not
heang in working
condion
Lid not closed completely Close the lid again
Heang plate fails Send to the service center
for repair
Circuit failure Send to the service center
for repair
8
E1 code appearing
on screen Boom sensor fault Send to the service center
for repair
E2 code appearing
screen
Display goes o
during cooking
Temperature of boom
sensor is too high
Unplug the power supply,
and aer cooling, switch on
again. If failure is not
removed, send to the
service center for repair
Display screen
displays E8 Pressure switch fault
Send to the service center
for repair
9
Rice/food half
cooked or too
hard
Too lier water
Add water accordingly
Lid opened prematurely
Aer cooking cycle
completes,
leave the lid on for 5 more
minutes
Frozen food
Unfreeze food before
cooking
10 Rice too soToo much water Reduce water accordingly
11
Water ows
behind the
appliance
Condensaon overowing
on housing
Use wet cloth to warp the
condensaon aer use
every me
This marking indicates that this product should not be disposed
with other household
wastes throughout the EU. To prevent possible harm to the
environment or human health
from uncontrolled waste disposal, recycle it responsibly to promote
the sustainable reuse
of material resources. To return your used device, please use the
return and collection
systems or contact the retailer where the product was purchased.
They can take this product for environmental safe recycling
WARRANTY: 2 YEARS

1. Si el cable de alimentación está dañado, debe ser
reemplazado por un cable especial o un conjunto
proporcionado de la fabricación o su agente de servicio.
2. Este aparato es solamente para uso doméstico.
No utilice al aire libre.
3. Mantener aparato eléctrico fuera del alcance de niños
o de informar persona. No deje que los utilizan los
aparatos sin supervisión.
4. Los aparatos pueden ser utilizados por personas con
discapacidad física reducida, sensoriales o mentales o
falta de experiencia y conocimiento, si se les ha dado la
supervisión o instrucciones relativas al uso del aparato
de una manera segura y entender los riesgos involucrados.
5. Este aparato está destinado a ser utilizado en aplicaciones
domésticas y similares, tales como:
áreas de cocina -Los empleados en tiendas, oficinas y otros
entornos de trabajo;
-Farm casas;
-Por clientes en hoteles, moteles y otros entornos de tipo
residencial;
ambientes -ALOJAMIENTO y tipo de desayuno;
6. El aparato no está diseñado para ser operado por medio
de un temporizador externo o un sistema de control remoto
separado.
7. Los aparatos para cocinar se deben colocar en una
situación con las asas colocadas para anular el derrame
de los líquidos calientes.
8.La superficie del elemento de calentamiento está sujeto
a calor residual después del uso, no toque.
9. Por favor, apagar y desenchufar el aparato antes de la
limpieza, mantenimiento o cambio y siempre que no esté
en uso.
ES
29
ES
30
Por favor, lea el manual del usuario cuidadosamente antes
de usarlo y guardarlo en un lugar conveniente para
referencia futura. Las imágenes en el texto son sólo
para referencia. Por favor referirse al producto real.
Precauciones de seguridad
Para garantizar un uso seguro y para evitar daños
personales y pérdida de propiedad, asegúrese de
observar las siguientes precauciones de seguridad.
Al no observar las precauciones de seguridad y el
uso inadecuado puede provocar accidentes.
Este producto no tiene en cuenta los siguientes casos:
------ El uso del aparato por parte de los niños sin
vigilancia y los discapacitados.
------ Los bebés que juegan con el aparato.
Significados de las marcas:
Means “forbidden” items
Tabla de contenido
Precauciones de seguridad
Denominación del producto
Descripción del modelo aplicable
Descripción del producto
Operación Directrices
Instrucciones de uso-
Limpieza y mantenimiento
Diagrama esquemático eléctrico
Troubleshooting
Manual de usuario

ES
31
ES
32
Advertencia: Los artículos que puedan
causar lesiones o la muerte.
Medios artículos "obligatorios"
Precaución: Los productos que pueden
causar lesiones leves o daños materiales
prohibido
A medida que la válvula de ventilación agota
automáticamente, no lo toque con una mano.
●En proceso de cocción, sin
mover las manos o la cara para
cerrar la lumbrera de escape,
para evitar quemaduras.
●Durante la cocción, no cubra
la ventilación con un paño y
otros artículos.
●La modificación o reparación
por personas no profesionales
está prohibido.
●Violación puede causar un
incendio o una descarga eléctrica.
●Reparación o sustitución de las
piezas se efectuarán en un
centro de servicio designado.
ninguna transformación
●Coloque fuera del alcance de los
bebés y los niños pequeños;
●Para evitar descargas eléctricas,
quemaduras y otros accidentes
peligrosos.
No permita que los niños operen este producto
de forma independiente
●Al mover el producto, no levante
la manija giratoria directamente con
el fin de evitar daños en el producto.
●No mueva el producto cuando la
tapa está abierta para evitar lesiones.
Al mover el producto, por favor, levante la
palanca cocina
●Se prohíbe insertar virutas de metal,
agujas y otros elementos extraños
en la brecha; ya que esto puede
causar choque o movimiento
anomalías eléctricas.
No ponga objetos extraños

ES
33
ES
34
●Cuando hay un objeto extraño
en el fondo de la olla y la superficie
de la placa de calentamiento, retire
el objeto extraño antes de su uso.
De lo contrario, podría producirse
recalentamiento, alivio de presión
y otras anomalías, limpie antes de su uso.
No utilice una olla que no sea la olla dedicada
●Este producto viene con una olla
interior norma, que no podrá ser
utilizada para otros fines para evitar
la deformación del recipiente interior
y la influencia de su uso.
No coloque la olla interior de otro aparato
para la calefacción
●La no utilización de CA 220 ~
240V 50Hz electricidad civil o
electricidad dedicado puede
provocar un incendio o una
descarga eléctrica.
Utilice la toma de corriente de 220 ~ 240V 50Hz
●Para evitar lesiones debido a una
descarga eléctrica.
No inserte y retire la clavija con las manos mojadas
●Puede causar la avería del aparato para que funcione
correctamente.
●El contenedor no se puede abrir hasta la liberación
completa de la presión.
Evitar la distorsión de los anillos de sellado
Obligatorio
descubrimiento segura
●Nunca cocine alga marina, lavar, harina de avena y
otros alimentos propensas a la obstrucción, para evitar
causar un accidente o daños en la olla a presión.
No cocine los siguientes alimentos

ES
35
ES
36
●Asegúrese de revisar periódicamente
la prueba de núcleo y cubierta de la
válvula de escape de bloque para
asegurarse de que no se bloquearán;
●No añada ningún objeto pesado
sobre la válvula de escape o reemplazar
con otros objetos.
Inspección periódica
●Está estrictamente prohibido el
uso de otra tapa para la calefacción,
y en el proceso (la conexión), no está
permitido el uso de la tapa no
original, ya que esto puede causar
peligros pobre rendimiento o la seguridad.
No utilice otra tapa para la calefacción
●Si lo hace, podría provocar una
descarga eléctrica y cortocircuitos
eléctricos.
Los productos no pueden ser sumergidos
en agua o rociado
●La cantidad total de alimentos y el agua no
puede ser superior a la escala máxima, de lo
contrario los alimentos pueden ser cocinados
desconocida, o causar un mal funcionamiento.
Cuando Los Alimentos propensos a la expansión
y el Bloqueo, el total de de cantidad que
no excederá de 3/4 de la escala máxima,
de lo contrario puede provocar un accidente.
Cocinar no puede exceder escala Max
●Si el cable de alimentación está dañado,
para evitar el peligro, debe ser
reemplazado por los profesionales del
fabricante, su departamento de servicio
o departamento similar.
Utilice siempre el cable de
alimentación dedicada
●Si el extremo del enchufe no se inserta
por completo, se podría provocar una
descarga eléctrica, cortocircuito, e incluso
un incendio.
Enchufe debe estar bien enchufado
●Al tirar de la clavija, debe apretar el tapón;
●No tire del cable de alimentación, de lo contrario
será dañado el cable, provocando una descarga
eléctrica y cortocircuitos.
Al tirar de la clavija, apriete el tapón
This manual suits for next models
1
Table of contents
Languages:
Other AIGOSTAR Electric Pressure Cooker manuals