ASV2
AirSaver F2
3
F2 Machine Setup
F2 MACHINE SETUP
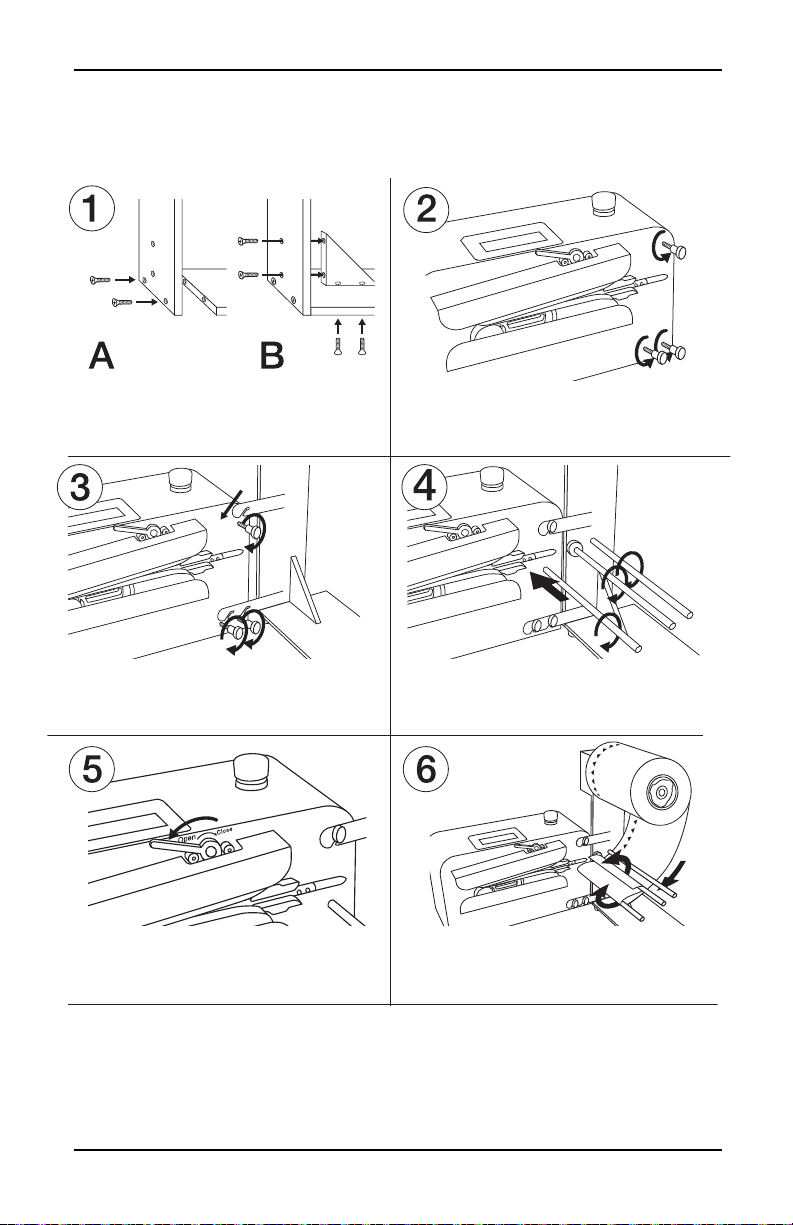
Please refer to above images A & B to assemble
the Film Roller. Use the six screws & triangle
brace provided.
Loosen (but DO NOT remove completely) the back
three hand screwson the F2 Machine.
Connect the assembled Film Roller to the back
three hands screws on the F2 Machine. Once in
place, tighten the three screws.
Screw in the three metal rods into the designated
screw holes (one on the F2 machine, Two on the lm
Roller). Once the rods are in place take the white
washer and place it through the middle rod.
Flip the lever located on top of the F2 Machine
to the Open position.
Load film onto the Film Roller ensuring that the text
Loads toward machineis in that direction. Afterthe
film has been loaded, refer to the above image to
properly feed the filmthrough the three metal rods.
On the side of the filmthat is closest to the machine,
create a small opening and thread it through the
feeding tube. Pull the film to the front of the machine.
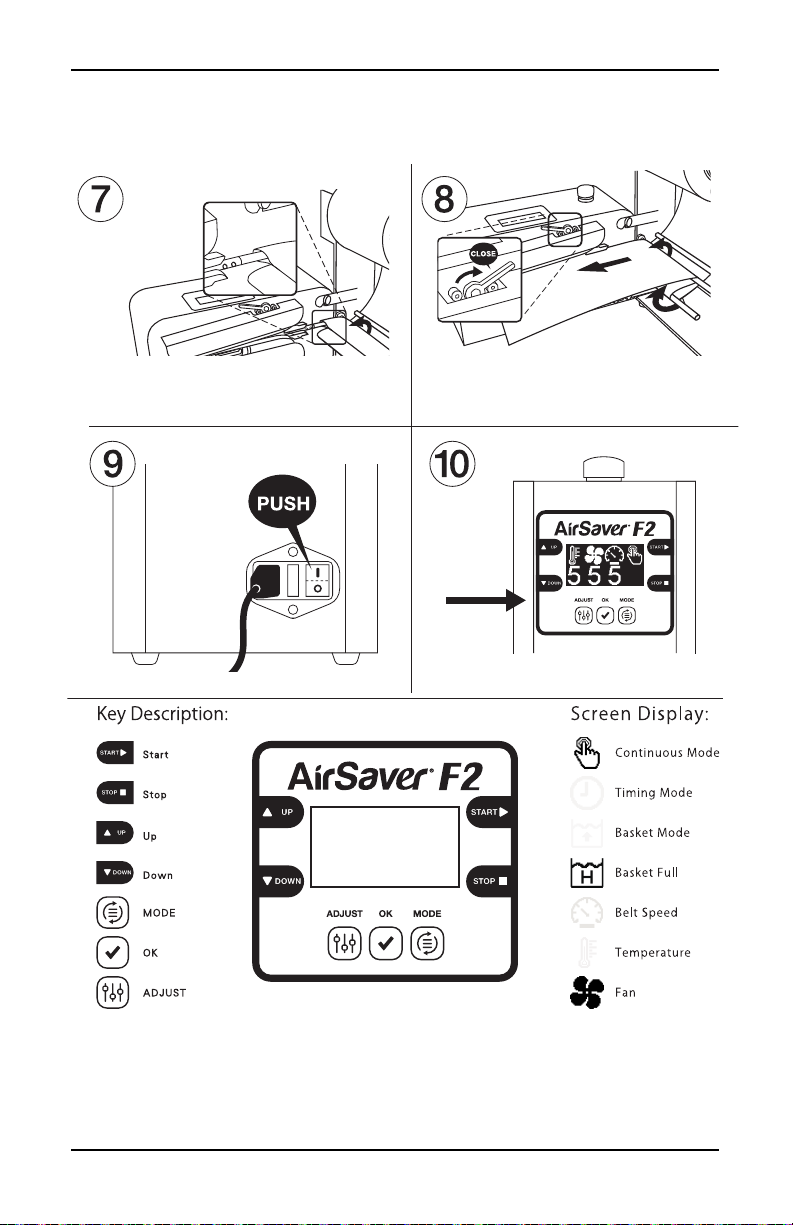
Flip the lever located on the top of the F2 Machine
to the Close position.
On the back of the F2 Machine, plug in the power
cable and turn on the power switch.
Press the Adjust button to configure the panel
with the recommended setting located on top of
the F2 Machine. Press and hold the Mode button
to cycle the various options provided.
Please refer to above images A & B to assemble
the Film Roller. Use the six screws & triangle
brace provided.
Loosen (but DO NOT remove completely) the back
three hand screwson the F2 Machine.
Connect the assembled Film Roller to the back
three hands screws on the F2 Machine. Once in
place, tighten the three screws.
Screw in the three metal rods into the designated
screw holes (one on the F2 machine, Two on the lm
Roller). Once the rods are in place take the white
washer and place it through the middle rod.
Flip the lever located on top of the F2 Machine
to the Open position.
Load film onto the Film Roller ensuring that the text
Loads toward machineis in that direction. Afterthe
film has been loaded, refer to the above image to
properly feed the filmthrough the three metal rods.
On the side of the filmthat is closest to the machine,
create a small opening and thread it through the
feeding tube. Pull the film to the front of the machine.
Flip the lever located on the top of the F2 Machine
to the Close position.
On the back of the F2 Machine, plug in the power
cable and turn on the power switch.
Press the Adjust button to configure the panel
with the recommended setting located on top of
the F2 Machine. Press and hold the Mode button
to cycle the various options provided.
Please refer to above images A & B to assemble
the Film Roller. Use the six screws & triangle
brace provided.
Loosen (but DO NOT remove completely) the back
three hand screwson the F2 Machine.
Connect the assembled Film Roller to the back
three hands screws on the F2 Machine. Once in
place, tighten the three screws.
Screw in the three metal rods into the designated
screw holes (one on the F2 machine, Two on the lm
Roller). Once the rods are in place take the white
washer and place it through the middle rod.
Flip the lever located on top of the F2 Machine
to the Open position.
Load film onto the Film Roller ensuring that the text
Loads toward machineis in that direction. Afterth
film has been loaded, refer to the above image to
properly feed the filmthrough the three metal rods.
On the side of the filmthat is closest to the machine,
create a small opening and thread it through the
feeding tube. Pull the film to the front of the machine.
Flip the lever located on the top of the F2 Machine
to the Close position.
On the back of the F2 Machine, plug in the power
cable and turn on the power switch.
Press the Adjust button to configure the panel
with the recommended setting located on top of
the F2 Machine. Press and hold the Mode button
to cycle the various options provided.