manuals.online logo
Brands
  1. Home
  2. •
  3. Brands
  4. •
  5. U-Line
  6. •
  7. Packaging Equipment
  8. •
  9. U-Line H-5334 User manual

U-Line H-5334 User manual

Other manuals for H-5334

1

Other U-Line Packaging Equipment manuals

U-Line H-7242 User manual

U-Line

U-Line H-7242 User manual

U-Line H-1459 User manual

U-Line

U-Line H-1459 User manual

U-Line H-8254 User manual

U-Line

U-Line H-8254 User manual

U-Line H-7241 User manual

U-Line

U-Line H-7241 User manual

U-Line H-2079 User manual

U-Line

U-Line H-2079 User manual

U-Line H-573 User manual

U-Line

U-Line H-573 User manual

U-Line H-528 User manual

U-Line

U-Line H-528 User manual

U-Line H-1586 User manual

U-Line

U-Line H-1586 User manual

U-Line Green Machine H-3518 User manual

U-Line

U-Line Green Machine H-3518 User manual

U-Line Green Machine H-3518 User manual

U-Line

U-Line Green Machine H-3518 User manual

U-Line H-951 User manual

U-Line

U-Line H-951 User manual

U-Line H-167 User manual

U-Line

U-Line H-167 User manual

U-Line S-11303 User manual

U-Line

U-Line S-11303 User manual

U-Line Uline User manual

U-Line

U-Line Uline User manual

U-Line H-2079 Operating instructions

U-Line

U-Line H-2079 Operating instructions

U-Line H-959 Operating instructions

U-Line

U-Line H-959 Operating instructions

U-Line H-1482 User manual

U-Line

U-Line H-1482 User manual

U-Line H-4025 User manual

U-Line

U-Line H-4025 User manual

U-Line S-15179 User manual

U-Line

U-Line S-15179 User manual

U-Line S-15188 User manual

U-Line

U-Line S-15188 User manual

U-Line H-140 User manual

U-Line

U-Line H-140 User manual

U-Line S-7344 User manual

U-Line

U-Line S-7344 User manual

U-Line H-109 User manual

U-Line

U-Line H-109 User manual

U-Line H-7630 User manual

U-Line

U-Line H-7630 User manual

Popular Packaging Equipment manuals by other brands

Signode TH-114 Operation, parts and safety manual

Signode

Signode TH-114 Operation, parts and safety manual

ITATOOLS ITA22 Operation manual

ITATOOLS

ITATOOLS ITA22 Operation manual

Fieldpiece MG44 user manual

Fieldpiece

Fieldpiece MG44 user manual

R.G.V. FreshQuality SV 400 instruction manual

R.G.V.

R.G.V. FreshQuality SV 400 instruction manual

ITW Mima Ecomat EASY Troubleshooting

ITW Mima

ITW Mima Ecomat EASY Troubleshooting

Smart wasp X300 manual

Smart wasp

Smart wasp X300 manual

Carl Valentin DPM III xi Series Service instructions

Carl Valentin

Carl Valentin DPM III xi Series Service instructions

Lacor 69352 Instructions for use and maintenance

Lacor

Lacor 69352 Instructions for use and maintenance

Minipack-Torre Eco Tunnel instruction manual

Minipack-Torre

Minipack-Torre Eco Tunnel instruction manual

CombiSteel 7529.0015 user manual

CombiSteel

CombiSteel 7529.0015 user manual

AirSaver F2 Safety instructions, setup & installation manual

AirSaver

AirSaver F2 Safety instructions, setup & installation manual

HUALIAN M-PE Series Operation manual

HUALIAN

HUALIAN M-PE Series Operation manual

Pro Pack Solutions Eagle 710 Operation manual

Pro Pack Solutions

Pro Pack Solutions Eagle 710 Operation manual

Oliver 1808-D User's operation

Oliver

Oliver 1808-D User's operation

Kronos H-46 Series Operation, safety and spare parts manual

Kronos

Kronos H-46 Series Operation, safety and spare parts manual

Robopac ROBOT S7 Use and maintenance manual

Robopac

Robopac ROBOT S7 Use and maintenance manual

AETNAGROUP Robopac SPIROR HP 300 instruction manual

AETNAGROUP

AETNAGROUP Robopac SPIROR HP 300 instruction manual

CAB WICON instructions

CAB

CAB WICON instructions

manuals.online logo
manuals.online logoBrands
  • About & Mission
  • Contact us
  • Privacy Policy
  • Terms and Conditions

Copyright 2025 Manuals.Online. All Rights Reserved.

PAGE 1 OF 2 0915 IH-5334
πH-5334
TABLETOP PAPER
MACHINE
1-800-295-5510
uline.com
TOOLS INCLUDED TOOL NEEDED
1/8" 1/2" Wrench5/16"
Allen Wrench
1. Remove all parts from the three shipping cartons.
2. Position the tabletop base on flat workstation
surface.
3. Rotate the base so the
shaft channel is facing
the direction you want the
paper to exit the machine
from. (See Figure 1)
4. Fasten the base to
workstation using holes
in base. (Figure 1)
NOTE: Mounting
bolts not included.
5. Rotate black collar so
the shaft channel is on
the opposite side of
the groove in the collar.
(Figure 1)
6. Fasten spring-loaded
pin and spacer using a
1/2" wrench all the way
into the welded nut on
the front of the bottom
mast. (Figure 2)
7. While pulling
spring-loaded
pin, place bottom
mast onto the
shaft of the
tabletop base.
Lower the body
so crossbar fits
into black collar
groove.
(See Figure 3)
8. Release spring-loaded pin and rotate body until the
pin clicks into the channel on the shaft.
9. Position top mast
so the paper exit
is facing front.
Insert the top mast
into the top of
the bottom mast.
Secure with 3/8-16
x 3/4" bolts and
3/8" lock washers
(2 each). (See
Figure 4)
10. Pull spring-loaded
pin out and turn
unit 180 degrees.
ASSEMBLY
Tabletop Base
Collar
Groove
Black
Collar
Shaft
Channel
Figure 1
Figure 2
Figure 4
Bottom
Mast
Top
Mast
Figure 3
Bottom
Mast
Black
Collar
Groove
PAGE 2 OF 2 0915 IH-5334
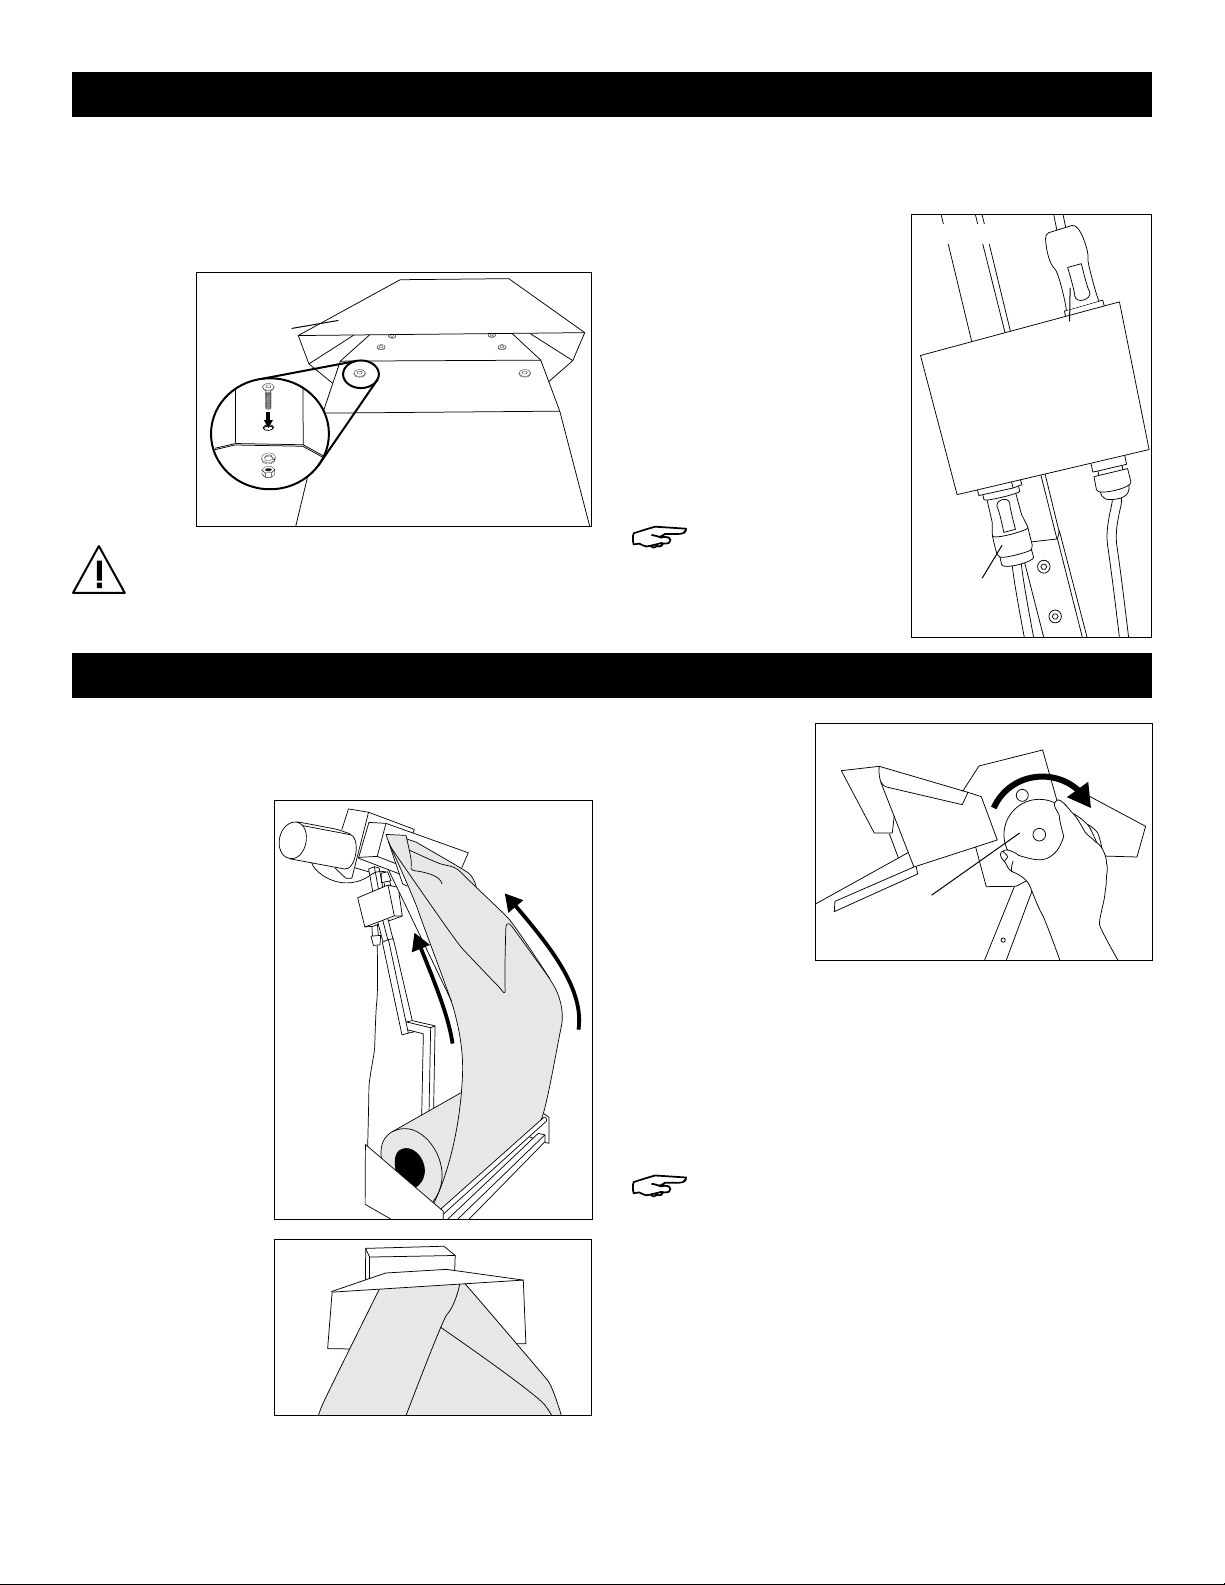
Figure 5
Paper
Ramp
Entrance
Funnel
ASSEMBLY CONTINUED
11. Place paper ramp onto paper entrance funnel
and secure with 10-32 x 1/2" bolts (6), ensuring bolt
head is on the inside of the funnel. Secure with #10
locking washers (6) and 10-32 nuts (6) underneath
the paper ramp. (See Figure 5)
CAUTION: If the bolt head is not on the inside of
the funnel, paper can catch on the bolt shaft
and nut.
12. Rotate unit 180 degrees back to original position,
with paper exit shoot facing front.
13. Insert blue motor
connector plug into
the blue plug on top of
power box and give a
quarter twist to lock.
(See Figure 6)
14. Insert gray foot pedal
connector plug into the
gray plug on the bottom
of the power box and
give a quarter twist to
lock. (See Figure 6)
NOTE: Both plugs
will click when
locked in place.
Motor
Connector
Foot Pedal
Connector
Figure 6
1. Plug power cord into a standard 115V outlet.
2. Make sure power switch is turned off.
3. Pull spring-
loaded pin
and turn unit
180 degrees to
make paper
cradle easily
accessible.
4. Load kraft paper
onto the paper
cradle with
the paper roll
unspooling from
the outside.
(See Figure 7)
5. Pull end of
paper up
towards the
paper entrance
funnel and
fold paper into
itself in a rough
triangle shape.
(See Figure 8)
6. Insert paper
into the paper
entrance
funnel. Using
the threading
disk, turn knob
clockwise until
it catches the
paper and
feeds it through
the head and
out the exit shoot. (See Figure 9)
7. Rotate unit 180 degrees back to original position,
with the paper exit shoot facing front. Turn on with
power switch on the power box.
8. Press down on the foot pedal to eject paper from
the exit shoot.
NOTE: The machine will continue dispensing
paper until foot is let off the foot pedal.
9. Release foot pedal.
10. Grab the ejected paper and pull strongly in a
downward motion to tear paper from the machine.
OPERATION
Figure 7
Figure 9
Figure 8
Threading
Disk
Power Box
πCHICAGO • ATLANTA • DALLAS • LOS ANGELES • MINNEAPOLIS • NYC/PHILA • SEATTLE • MEXICO • CANADA
1-800-295-5510
uline.com