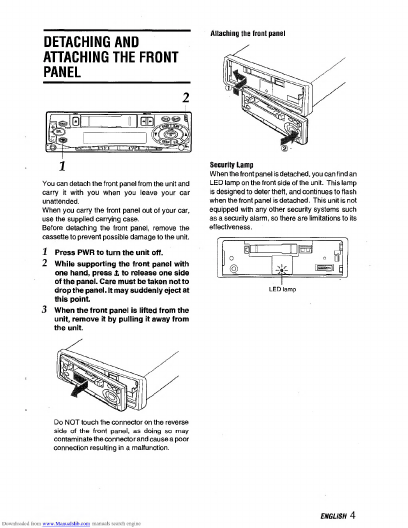
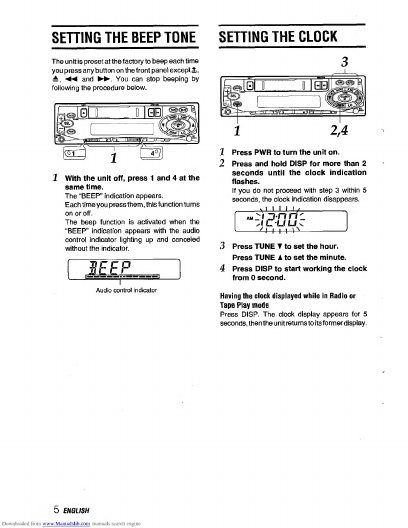
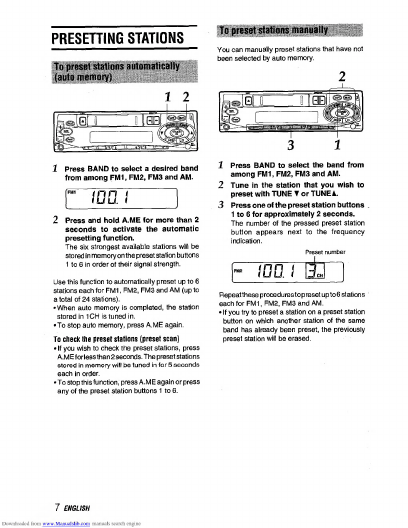
Aiwa CT-X409 User manual

aiu/a
OPERATING
INSTRUCTIONS
MANUAL
DE
INSTRUCCiONES
MODE
D’EMPLOI
OWNER’S
RECORD
For
your
convenience,
record
the
model
number
and
serial
number
(you
will
find
them
on
the
right
side
of
your
set)
in
the
space
provided
below.
Please
refer
to
them
when
you
contact
your
AIWA
dealer
in
case
of
difficulty.
Model
No.
fCT-X40B
'
|
Serial
No
'
I
"
|
CT-X409
yu
STEREO
CAR
CASSETTE
RECEIVER
RADIO-CASSETTE
ESTEREOFONICO
PARA
AUTOMOVIL

Welcome
Thankyouforyourpurchasingthis
AIWA
product.
To
optimize
the
performance
of
this
unit,
please
read
through
this
manual
carefully.
In
addition
to
this
operating
instructions
manual,
be
sure
to
refer
to
the
separate
installation
and
connections
manuals
as
well.
PRECAUTIONS
•
This
unit
is
designed
to
be
operated
on
a
12-volt
DC
negative-ground
electrical
system
only.
•To
prevent
short-circuiting,
disconnect
the
negative
car
battery
terminal
until
the
unit
has
been
mounted
and
connected
completely.
•When
replacing
the
fuse,
be
sure
to
use
one
whose
amperage
rating
is
identical.
Use
of
a
fuse
of
higher
amperage
may
cause
serious
damage
to
the
unit.
•
Keep
screwdrivers,
etc.
and
other
metallic
or
magnetic
objects
away
from
the
playback
head.
•When
your
car
was
parked
in
direct
sunlight
resulting
in
a
considerable
rise
in
temperature
inside
the
car,
allow
the
unit
to
cool
off
before
operating
it.
•
Keep
the
volume
at
such
a
level
that
you
can
hear
outside
warning
sounds
(horns,
sirens,
Do
NOT
expose
cassettes
to
direct
sunlight,
extremely
high
or
cold
temperature
or
moisture.
Keep
cassettes
away
from
equipment
with
built-
in
magnets
to
avoid
unwanted
noise
or
loss
of
sound
quality.
Do
NOT
touch
the
tape
of
a
cassette,
as
any
dirt
or
dust
will
contaminate
the
heads.
Be
sure
to
remove
any
cassette
from
the
unit
if
you
are
not
using
it.
NOTE
This
equipment
has
been
tested
and
found
to
comply
with
the
limits
foraClass
B
digital
device,
pursuant
to
Part
15
of
the
FCC
Rules.
These
limits
are
designed
to
provide
reasonable
protection
against
harmful
interference
in
a
residential
installation.
This
equipment
generates,
uses,
and
can
radiate
radio
frequency
energy
and,
if
not
installed
and
used
in
accordance
with
the
instructions,
may
cause
harmful
interference
to
radio
communications.
However,
there
is
no
guarantee
that
interference
will
not
occur
in
a
particular
installation.
If
this
equipment
does
cause
harmful
interference
to
radio
ortelevision
reception,
which
can
be
determined
by
turning
the
equipment
off
and
on,
the
user
is
encouraged
to
try
to
correct
the
interference
by
one
or
more
of
the
following
measures:
—
Reorient
or
relocate
the
receiving
antenna.
—
Increase
the
separation
between
the
equipment
and
receiver.
—
Connect
the
equipment
into
an
outlet
on
circuit
different
from
that
to
which
the
receiver
is
connected.
—
Consult
the
dealer
or
an
experienced
radio/
TV
technician
for
help.
CAUTION
Modificationsoradjustmentsto
this
product,
which
are
not
expressly
approved
by
the
manufacturer,
may
void
the
user’s
right
or
authority
to
operate
this
product.
Caution
on
the
transit
protection
pad
The
unit
is
shipped
with
a
transit
protection
pad
in
the
cassette
compartment.
Be
sure
to
press
EJECT
±
to
remove
the
pad
before
operating
the
unit.
Transit
protection
pad
1
ENGLISH

TABLE
OF
CONTENTS
FRONT
PANEL.....
DETACHING
AND
ATTACHING
THE
FRONT
PANEL.
SETTING
THE
BEEP
TONE.
SETTING
THE
CLOCK.
RADIO
OPERATION
.
PRESETTING
STATIONS.
MY
INFORMATION
SWITCH
.
TAPE
PLAYBACK.
SOUND
ADJUSTMENTS
...........
CONNECTING
A
PORTABLE
CD/MD
PLAYER
OR
OTHER
EQUIPMENT.
MAINTENANCE.
SPECIFICATIONS.
13
13
This
unit
can
be
operated
using
the
AIWA
RC-SW1
or
RC-CD1
remote
control
(sold
separately).

FRONT
PANEL
©
+/—
(audio
control)
button
©SEL
(select)
button
©
H-BASS
button
©EJECT
±.
button
©
Cassette
compartment
©
DIRECTION
button
©
BAND
button
©TAPE
button
©
MUTE
button
@
A.ME
(auto
memory/preset
scan)
button
fOl
(release)
button
©TUNE
JIA
buttons
©
CD/MD
IN
jack
(3.5-mm
dia.)
©
PWR
(power
on/off)
button
©
Preset
station
buttons
1-6
©
DISP
(display)
button
©
LO
(local/DX)
button
©
MY
INFO
(my
information)
button
©CD/MD
IN
button
©
Band
indicator
®
AM/PM
indicator
ai
Main
display
section
©
ST
(stereo)
indicator
©
Subdisplay
section
©
LO
(local)
indicator
©
MY
INFO
(my
information)
indicator
@
(tape
direction)
indicators
©Audio
control
indicator
@H
BASS
indicator
3
ENGLISH

DETACHING
AND
ATTACHING
THE
FRONT
PANEL
Attaching
the
front
panel
You
can
detach
the
front
panel
from
the
unit
and
carry
it
with
you
when
you
leave
your
car
unattended.
When
you
carry
the
front
panel
out
of
your
car,
use
the
supplied
carrying
case.
Before
detaching
the
front
panel,
remove
the
cassette
to
prevent
possible
damage
to
the
unit.
1
Press
PWR
to
turn
the
unit
off.
2
While
supporting
the
front
panel
with
one
hand,
press
1,
to
release
one
side
of
the
panel.
Care
must
be
taken
not
to
drop
the
panel.
It
may
suddenly
eject
at
this
point.
Security
Lamp
When
the
front
panel
is
detached,
you
can
find
an
LEED
lamp
on
the
front
side
of
the
unit.
This
lamp
is
designed
to
deter
theft,
and
continues
to
flash
when
the
front
panel
is
detached.
This
unit
is
not
equipped
with
any
other
security
systems
such
as
a
security
alarm,
so
there
are
limitations
to
its
effectiveness.
3
When
the
front
panel
is
lifted
from
the
unit,
remove
it
by
pulling
it
away
from
the
unit.
Do
NOT
touch
the
connector
on
the
reverse
contaminate
the
connector
and
cause
a
poor
connection
resulting
in
a
malfunction.
ENGLISH
4

SETTING
THE
BEEP
TOME
SETTING
THE
CLOCK
The
unit
is
preset
at
the
factory
to
beep
each
time
you
press
any
button
on
the
front
panel
except
1,,
-4M
and
You
can
stop
beeping
by
following
the
procedure
below.
1
W
ith
the
unit
off,
press
1
and
4
at
the
same
time.
The
“BEEP”
indication
appears.
Each
time
you
press
them,
this
function
turns
The
beep
function
is
activated
when
the
“BEEP”
indication
appears
with
the
audio
control
indicator
lighting
up
and
canceled
without
the
indicator.
I
fff
FF
1
Press
PWR
to
turn
the
unit
on.
2
Press
and
hold
DISP
for
more
than
2
seconds
until
the
clock
indication
If
you
do
not
proceed
with
step
3
within
5
seconds,
the
clock
indication
disappears.
3
Press
TUNE
T
to
set
the
hour.
Press
TUNE
k
to
set
the
minute.
4
Press
DISP
to
start
working
the
clock
from
0
second.
Audio
control
indicator
Having
the
clock
displayed
while
in
Radio
or
Tape
Play
mode
Press
DISP.
The
clock
display
appears
for
5
seconds,
then
the
unit
returns
to
its
former
display.

RADIO
OPERATION
To
turn
the
unit
off
Press
PWR.
1
Press
PWR
to
turn
the
unit
on.
The
radio
frequency
appears.
2
Press
BAND
to
select
the
band
from
among
FM1,
FM2.
FM3
and
AM.
The
band
indicators
appear
cyclically
in
order.
(FM1,
FM2
and
FM3
share
the
same
frequency
range.)
Band
Frequency
indicator
indication
t
i>flhn
i
3
Press
(more
than
2
seconds)
either
TUNETor
TUNE
Ato
tune
in
the
desired
station.
The
unit
starts
scanning
and
tunes
in
a
station
automatically
(seek
tuning).
Press
TUNE
T
to
decrease
and
TUNE
A
to
increase
the
frequency.
Press
the
button
again
to
cancel
seek
tuning.
Repeat
the
procedure
until
the
desired
station
Note
The
unit
turns
on
in
the
last
selected
mode
when
you
turned
off
the
unit
with
the
exceptions
of
pressing
the
following
buttons.
•Pressing
TAPE
turns
on
the
unit
in
Tape
Play
•
Pressing
BAND
turns
on
the
unit
in
Radio
mode.
•
Pressing
CD/MD
IN
turns
on
the
unit
in
CD/MD
Switching
modes
When
the
unit
is
in
Radio
mode,
inserting
a
cassette
switches
the
unit
to
Tape
Play
mode
automatically.
LO
(local/DX)
button
You
can
use
Local
mode
when
you
wish
to
tune
in
only
strong
stations
during
seek
tuning.
In
Radio
mode,
press
LO
to
select
Local
mode.
The
“LO”
indicator
lights
up.
•
Press
LO
to
deactivate
Local
mode
and
switch
to
DX
(distance)
mode.
•The
“ST”
(stereo)
indicator
lights
up
when
the
tuned-in
station
is
broadcasting
in
stereo
and
the
reception
is
good.
Note
If
you
press
(less
than
0.5
second
at
a
time)
either
TUNE
▼
or
TUNE
A,
the
frequency
decreases
or
increases
step
by
step.
4
Adjust
the
volume
with
+/—.
ENGLISH
6

PRESETTING
STATIONS
To
preset
stations
automatically
(auto
memory)
1
2
1
Press
BAND
to
select
a
desired
band
from
among
FM1,
FM2,
FM3
and
AM.
r
ion,
t
i
2
Press
and
hold
A.ME
for
more
than
2
seconds
to
activate
the
automatic
presetting
function.
The
six
strongest
available
stations
will
be
stored
in
memory
on
the
preset
station
buttons
1
to
6
in
order
of
their
signal
strength.
Use
this
function
to
automatically
preset
up
to
6
stations
each
for
FM1,
FM2,
FM3
and
AM
(up
to
a
total
of
24
stations).
•
When
auto
memory
is
completed,
the
station
stored
in
1CH
is
tuned
in.
•To
stop
auto
memory,
press
A.ME
again.
To
check
the
preset
stations
(preset
scan)
•
If
you
wish
to
check
the
preset
stations,
press
A.M
E
for
less
than
2
seconds.
The
preset
stations
stored
in
memory
will
be
tuned
in
for
5
seconds
•
To
stop
this
function,
press
A.ME
again
or
press
any
of
the
preset
station
buttons
1
to
6.
To
preset
stations
manually
-
You
can
manually
preset
stations
that
have
not
been
selected
by
auto
memory.
2
3
1
1
Press
BAND
to
select
the
band
from
among
FM1,
FM2,
FM3
and
AM.
2
Tune
in
the
station
that
you
wish
to
preset
with
TUNE
T
or
TUNEA.
3
Press
one
of
the
preset
station
buttons
.
1
to
6
for
approximately
2
seconds.
The
number
of
the
pressed
preset
station
button
appears
next
to
the
frequency
indication.
I-
inn
7
ill
i
Repeatthese
procedures
to
preset
up
to
6
stations
each
for
FM1,
FM2,
FM3
and
AM.
•
If
you
try
to
preset
a
station
on
a
preset
station
button
on
which
another
station
of
the
same
band
has
already
been
preset,
the
previously
preset
station
will
be
erased.
7
ENGLISH

To
tune
in
the
preset
stations
1
2
1
Press
BAND
to
select
a
desired
band
from
among
FM1,
FM2,
FM3
and
AM.
2
Press
the
desired
preset
station
button.
The
number
of
the
pressed
preset
station
button
is
displayed
next
to
the
frequency
indication.
Active
tuning
reception
control
(ATRC)
This
unit
automatically
suppresses
FM
noise
caused
by
varying
signal
strength
resulting
from
movement
of
the
car.
•
The
built-in
automatic
blending
circuit
mixes
the
left
and
right
channel
signals
according
to
the
strength
of
the
reception.
At
the
same
time,
the
high-cut
circuit
activates
to
maintain
the
sound
quality.
•
If
the
reception
becomes
even
weaker,
the
unit
automatically
switches
to
Monaural
mode
to
MY
INFORMATION
SWITCH
You
can
timer-activate
the
radio
for
a
daily
radio
program.
The
unitfurns
on
and
off
in
Radio
mode
at
the
preset
time
automatically.
Setting
the
timer
2
3
1
1
With
the
unit
off,
press
and
hold
MY
INFO
for
more
than
2
seconds.
The
“PO”
indication
flashes
in
the
display
window.
2
Press
SEL.
Timer
indication
flashes.
i
i
3
S
et
the
time
you
wish
the
unit
to
turn
on
in
Radio
mode.
Press
TUNEY
to
set
the
hour.
Press
TUNEA
to
set
the
minute.
ENGLISH
8

MY
INFORMATION
SWITCH
4,7
6,8
5
9
4
P
ress
SEL.
Radio
indication
flashes.
5
Press
BAND
to
select
the
band.
6
Tune
in
the
station
that
you
wish
to
preset
with
TUNE
T
or
TUNE
A.
7
Press
SEL.
Timer
indication
flashes.
8
Set
the
time
you
wish
the
unit
to
turn
off.
Press
TUNE
T
to
set
the
hour.
Press
TUNE
A
to
set
the
minute.
9
Press
and
hold
MY
INFO
for
more
than
2
seconds.
Your
setting
is
stored
in
memory
and
the
unit
turns
off.
Activating
the
timer
BAND
TAPE
CD/MD
IN
J
1
With
the
unit
on,
press
MY
INFO.
The
“MY
INFO”
indicator
lights
up
and
the
timer
is
activated.
To
cancel
the
timer
Press
MY
INFO
again
so
that
the
“MY
INFO”
indicator
disappears.
To
check
the
setting
With
the
unit
off,
press
MY
INFO.
The
turn-on
time,
followed
by
the
radio
frequency
and
the
turn-off
time,
appears
in
the
display
window
each
for
1
second,
then
the
unit
turns
off.
Notes
•
Even
if
the
unit
is
in
a
mode
other
than
Radio
mode,
the
unit
switches
to
Radio
mode
and
tunes
in
the
preset
radio
program
at
the
preset
time
automatically.
•
Even
if
you
are
listening
to
a
radio
program
with
this
function,
pressing
the
following
buttons
switches
the
unit
to
other
mode:
—
Pressing
BAND
changes
the
unit
to
Radio
—
Pressing
TAPE
changes
the
unit
to
Tape
Play
mode.
—
Pressing
CD/MD
IN
changes
the
unit
to
CD/
MD
IN
mode.
If
you
switch
modes
with
these
buttons,
the
unit
does
not
turn
off
at
the
turn-off
time
of
the
timer.
ENGLISH

1
Insert
a
cassette
to
start
playback.
If
a
cassette
is
already
inserted,
press
TAPE
to
start
playback.
Playback
starts
in
the
direction
that
the
unit
played
back
previously.
[
TP,PE
H
2
Adjust
the
volume
with
+/—.
Press
the
following
buttons
to
operate
tape
transport.
To
do
this
Press
this
button
Eject
the
cassette*
0
Change
the
playback
side
3
and
0
simultaneously
Fast-forward
upper
side
of
the
tape
Rewind
lower
side
of
0
Rewind
upper
side
of
the
tape
Fast-forward
lower
side
of
the
tape
a
Stop
fast
winding
and
resume
playback
go
r
0
lightly**
*
When
you
eject
the
cassette,
the
unit
switches
to
Radio
mode.
_
**
Do
not
press
3
or
R
all
the
way.
Doing
so
may
change
the
direction
of
tape
transport.
Auto
reverse
function
When
the
end
of
the
tape
is
reached
during
playback
or
fast
tape
transport,
the
direction
of
the
tape
is
automatically
reversed,
and
playback
starts
again.
Tape
direction
Indications
ENGLISH
10

TAPE
PLAYBACK
Before
turning
the
Ignition
off
Be
su
re
to
eject
any
cassette
from
the
unit
before
turning
the
ignition
off.
Otherwise,
the
unit
may
be
damaged
when
you
detach
the
front
panel.
Switching
modes
When
the
unit
is
in
Radio
mode,
inserting
a
cassette
switches
the
unit
to
Tape
Play
mode
automatically.
To
prevent
tape
problems
Before
inserting
a
cassette
into
the
unit,
make
su
re
that
there
is
no
slack
in
the
tape.
If
necessary,
take
up
the
slack
by
inserting
a
pencil
into
the
spindle
hole
and
winding.
90-minute
or
longer
tapes
are
extremely
thin
and
easily
deformed
or
damaged.
They
are
no
recommended.
SOUND
ADJUSTMENTS
2
1
MUTE
1
Press
SEL
to
select
the
mode
that
you
wish
to
adjust
from:
VOL(volume),
BAS
(bass),
TRE
(treble),
BAL
(balance)
and
FAD
(fader).
The
following
indications
appear
in
cyclic
r
+UDL-lR5-‘TPE->]lf1L-FR]l
1
If
you
do
not
proceed
with
step
2
within
5
seconds,
the
selected
mode
is
canceled,
and
the
indication
returns
to
the
current
source
2
Press
+/—
to
adjust
the
level.
Press
and
hold
either
button
to
change
the
level
rapidly.
Adjust
each
mode
referring
to
the
audio
control
indicators
in
the
display
window
(see
page
3).
-
+
urn
u
U
L
Decreases
the
volume
level
Increases
the
volume
level
BRS
Decreases
the
bass
level
Increases
the
TRE
Decreases
the
treble
level
Increases
the
treble
level
SFIL
Decreases
the
level
of
the
right
speaker(s)
Decreases
the
level
of
the
left
speaker(s)
FRJS
Decreases
the
level
of
the
front
speakers
Decreases
the
level
of
the
rear
speakers
Without
selecting
any
mode
with
SEL,
only
the
volume
level
can
be
adjusted
by
pressing
MUTE
button
Press
this
button
to
temporarily
lowerthe
volume.
Press
it
again
to
restore
the
previous
volume.
11
ENGLISH

H-BASS
(High
BASS)
You
can
enjoy
music
with
strong
bass
sound.
H-BASS
Press
H-BASS
to
obtain
powerful
bass.
The
“EBASS"
indicator
lights
up.
Each
time
you
press
H-BASS,
this
function
turns
CONNECTING
A
PORTABLE
CD/MD
PLAYER
OR
OTHER
EQUIPMENT
This
unit
is
equipped
with
the
line-level
input
(CD/
MD
IN)
jack
enabling
high
quality
of
the
sound.
1
2
3
4
1
If
a
cassette
is
inserted,
remove
it
to
prevent
possible
damage
to
the
unit.
2
Connect
a
portable
CD/MD
player,
etc.
via
the
CD/MD
IN
jack
(3.5-mm
dia.)
on
the
unit.
3
Press
PWR
to
turn
the
unit
on.
4
Press
CD/MD
IN
to
listen
to
the
connected
equipment.
The
“CD”
indication
appears.
•For
further
information
on
the
connected
equipment,
refer
to
the
operating
instructions
for
the
equipment.
Note
Be
sure
to
press
CD/MD
IN
after
you
connect
a
portable
CD/MD
player,
etc.
to
the
CD/MD
IN
jack
to
listen
using
the
connected
equipment.
Even
if
equipment
is
connected
to
the
CD/MD
IN
jack,
you
cannot
listen
using
the
connected
equipment
without
switching
the
unit
to
CD/MD
IN
mode
by
pressing
CD/MD
IN.
ENGLISH
12

SPECIFICATIONS
MAINTENANCE
Cleaning
the
front
panel
When
the
front
panel
is
soiled,
wipe
the
surface
of
the
panel
with
a
dry
and
soft
cloth.
Cleaning
the
tape
head
Use
a
cleaning
cassette
to
clean
the
playback
head
and
capstans
approximately
once
a
month.
If
the
playback
head
is
dirty,
the
high
tones
may
not
be
reproduced
properly.
Cleaning
the
connector
The
connector
on
the
reverse
side
of
the
front
panel
needs
to
be
cleaned
occasionally.
Wipe
the
surface
of
the
connector
with
a
cotton
swab
slightly
moistened
with
alcohol.
RADIO
SECTION
(FM)
Frequency
Range:
87.5
MHz-108
MHz
(100-kHz
steps)
87.5
MHz-108
MHz
(50-kHz
steps)
Usable
Sensitivity:
12.7dBf
50
dB
Quieting
Sensitivity:
17.2
dBI
IF
Rejection:
80
dB
Frequency
Response:
30
Hz-15,000
Hz
S/N
Ratio:
63
dB
Stereo
Separation:
35
dB
at
1
kHz
Alternate
Channel
Selectivity:
70
dB
Capture
Ratio:
3
dB
(AM
(MW))
Frequency
Range:
530
kHz-1,710
kHz
(10-kHz
steps)
522
kHz-1,620
kHz
(9-kHz
steps)
Usable
Sensitivity:
30
pV
(30
dB)
TAPE
SECTION
Tape
Speed:
4.8
cm/sec.
(1
7
la
ips)
S/N
Ratio:
50
dB
Frequency
Response:
40
Hz-14,000
Hz
Stereo
Separation:
40
dB
FF/REW
Time:
190
sec.
(C-SO)
AUDIO
SECTION
Max.
Power
Output:
35
W
x
4
channels
CD/MD
IN
input
Input
sensitivity
(load
impedance)
CD/MD
IN:
500mV(10k£2)
GENERAL
Power-Supply
Voltage:
14.4
V
(11
to
16
V
allowable),
DC,
negative
ground
Load
Impedance:
4
Q
Tone
Control:
Bass
±
10
dB
at
100
Hz
Treble
±
10
dB
at
10
kHz
Preamp
Output
Voltage
(load
impedance):
2.2
V
(10
kQ)
Installation
size:
182
(W)
x
53
(H)
x
155
(D)
mm
(7
Va
(W)
x
2
Vs
(H)
x
6
Vs
(D)
inches)
Accessory
supplied:
Carrying
case
(1)
•
Specifications
and
external
appearance
are
subject
to
change
without
notice
due
to
product
improvement.


Bienvenidos
Muchas
gracias
por
su
compra
de
este
producto
AIWA.
Para
utilizar
este
aparato
en
las
mejores
condiciones
posibles,
lea
cuidadosamente
las
instrucciones
de
este
manual.
Ademas
de
este
manual
de
instrucciones,
lea
tambien
los
manuales
de
Instalacion
y
de
conexiones
que
vienen
por
separado.
PRECAUCIONES
•
Este
aparato
fue
disenado
para
funcionar
solo
con
un
sistema
electrico
de
CC
de
12
voltios
con
conexion
a
tierra
negativa.
•Para
evitar
un
cortocircuito,
desconecte
el
terminal
negativo
de
la
baterla
del
coche
hasta
haberterminado
de
instalary
de
hacertodas
las
conexiones.
•Cuando
tenga
que
cambiar
un
fusible,
utilice
otro
que
tenga
las
mismas
especificaciones.
El
uso
de
un
fusible
con
un
amperaje
mayor
puede
provocar
danos
graves
en
el
aparato.
•
No
acerque
destornilladores,
etc.
u
otros
objetos
metalicos
o
magneticos
a
la
cabeza
de
reproduction.
•Si
deja
estacionado
el
coche
en
un
lugar
expuesto
a
los
rayos
del
sol,
en
verano,
el
interior
del
vehfculo
puede
calentarse
excesivamente.
Espere
hasta
que
baje
la
temperature
lo
suficiente
antes
de
empezar
a
reproducir.
•
Mantenga
el
volumen
a
un
nivel
tal
que
pueda
escuchar
los
sonidos
de
advertencia
del
exterior
(bocinas,
sirenas,
etc.).
Notas
sobre
las
cassettes
NO
exponga
las
cassettes
a
los
rayos
del
sol,
gran
calor
o
frlo
o
humedad.
No
acerque
las
cassettes
a
un
equipo
con
un
iman
incorporado
para
evitar
ruidos
o
perdidas
en
la
calidad
del
NO
toque
la
cinta
de
la
cassette
ya
que
la
suciedad
o
polvo
pueden
hacer
que
se
ensucien
las
cabezas.
No
se
olvide
de
sacar
la
cassette
del
aparato
si
no
piensa
seguir
escuchando.
PRECAUCION
Las
modificaciones
y
ajustes
de
este
producto
que
no
han
sido
autorizadas
a
titulo
expreso
por
el
fabricante
pueden
anular
el
derecho
o
autoridad
del
usuario
para
hacer
funcionar
este
producto.
Precaution
sobre
el
protector
para
transporte
El
aparato
se
entrega
con
un
protector
para
transporte
en
el
compartimiento
de
cassettes.
Presione
EJECT
±
para
sacar
el
protector
antes
de
hacer
funcionar
el
aparato.
Protector
para
transpote
1
FSPANOL

INDICE
PANEL
DELANTERO.
DESMONTAJE
E
INSTALACION
DEL
PANEL
DELANTERO.
AJUSTE
DEL
TONO
DEL
TIMBRE.
AJUSTE
DEL
RELOJ.
FUNCIONAMIENTO
DE
LA
RADIO.
PROGRAMACION
DE
LAS
ESTACIONES.
INTERRUPTOR
DE
INFORMACION
PROPIA.
REPRODUCCION
DE
LA
CINTA.
AJUSTES
DEL
SONIDO.
...L
,
a
CONEXION
DE
UN
TOCADISCOS
DE
DISCOS
COMPACTOS/MIN1DISCOS
PORTATIL
U
OTRO
EQUIPO.
MANTENIMIENTO.
ESPECIFICACIONES.
Puede
hacer
funcionar
este
aparato
con
el
control
remoto
RC-SW1,
RC-CD1
de
AIWA
(vendido
por
separado).
ESPANOL
2
ESPANOL

PANEL
DELANTERO
®
Boton
+/—
(control
de
audio)
©
Boton
SEL
(seleccion)
©Boton
H-BASS
©
Boton
EJECT
±
(expulsion)
©
Compartimiento
de
cassettes
©
Botones
DIRECTION
®
Boton
BAND
©
Boton
TAPE
©Boton
MUTE
®
Boton
A.ME
(memoria
automatics/
exploration
de
estaciones
programadas)
©
Boton
i,
(soltar)
©
Botones
TUNE
T/A
©Toma
CD/MD
IN
(diam.
3,5
mm)
©
Boton
PWR
(conexion/desconexion)
©
Botones
de
estaciones
programadas
1
-
6
®
Boton
DISP
(visualization)
©
Boton
LO
(local/distante)
©
Boton
MY
INFO
(informacion
propia)
©
Boton
CD/MD
IN
S
Indicador
de
banda
©
Indicador
AM/PM
©
Seccion
del
visualizador
principal
©
Indicador
ST
(estereo)
@
Seccion
de
visualizador
secundario
©
Indicador
LO
(local)
<§)
Indicador
MY
INFO
(informacion
propia)
@
Indicadores
(sentido
de
la
cinta)
(fl
Indicador
de
control
de
audio
©
Indicador
H
BASS
search
f

DESMONTAJE
E
INSTALACION
DEL
PANEL
DELANTERO
2
1
Se
puede
desmontar
el
panel
delantero
de
aparato
y
llevarlo
consigo
cuando
se
deja
el
coche
estacionado
sin
vigilancia.
Cuando
se
lleve
el
panel
delantero
dp
su
coche
ahilice
la
cij
de
transporte.
Antes
de
soltar
el
panel
delantero,
expulse
la
cassette
para
evitar
que
se
pueda
dafiar
el
aparato.
1
Presione
PWR
para
desconectar
el
aparato.
2
Sujete
el
panel
delantero
con
una
mano,
presione
2,
para
soltar
un
lado
del
panel.
Debe
tener
cuidado
de
no
dejar
caer
el
panel.
Puede
salirse
repentinamente
en
este
momento.
3
Cuando
se
levanta
el
panel
delantero
del
aparato,
desmonte
tirandolo
del
aparato.
panel
delantero
ya
que
puede
ensuciar
el
conector
y
provocar
un
mal
contacto
que
puede
ser
la
causa
de
una
averia
posterior.
Instalacion
del
panel
delantero
Cuando
se
desmonta
el
panel
delantero
aparece
una
luz
LED
en
el
lado
delantero
del
aparato.
Esta
luz
fue
disenada
para
evitar
el
robo
y
permanece
destellando
con
el
panel
delantero
desmontado.
Este
aparato
no
tiene
otro
sistema
de
seguridad,
por
ejemplo
una
alarma
y
el
dispositivo
antirrobo
no
es
completamente
etectivo.
:
LED
ESPAflOL
4

AJUSTE
DELTONO
DEL
TIMBRE
Este
aparato
se
ajust6
en
fabrics
para
que
suene
un
timbre
cada
vez
que
presione
uno
de
los
botones
en
el
panel
delantero
excepto
1,
A,
«
y
Se
puede
cancelar
el
timbre
con
el
siguiente
procedimiento.
1
C
on
el
aparato
desconectado,
presione
simultaneamente
1
y
4.
Aparece
la
indication
“BEEP”.
Cada
vez
que
los
presione,
esta
funcion
se
activa
o
desactiva.
La
funcion
biiip
se
activa
cuando
aparece
la
indicacion
“BEEF'
con
el
indicador
del
control
de
audio
encendido
y
se
desactiva
cuando
el
indicador
esta
apagado.
I
JE££_
_
1
Indicador
de
control
de
audio
AJUSTE
DEL
RELOJ
3
1
2,4
1
Presione
PWR
para
conectar
el
aparato.
2
Mantenga
presionado
DISP
durante
mas
de
2
segundos
hasta
que
la
indicacion
del
reloj
empiece
a
destellar.
Si
no
realiza
el
paso
3
antes
de
5
segundos,
la
indicacion
del
reloj
se
apaga.
3
Presione
TUNE
▼
para
ajustar
la
hora.
Presione
TUNE
A
para
ajustar
los
minutos.
4
Presione
DISP
para
que
el
reloj
empiece
a
funcionar
desde
0
segundo.
Para
que
aparezca
el
reloj
con
el
modo
de
radio
o
reproduccion
de
cinta
Presione
DISP.
La
indicacibn
del
reloj
aparece
durante
5
segundos
y
despues
vuelve
a
la
indicacibn
anterior.
,'-5m
m
anuals
search
engine
Other manuals for CT-X409
2
This manual suits for next models
1
Table of contents
Languages:
Other Aiwa Car Receiver manuals

Aiwa
Aiwa CDC-X207 User manual

Aiwa
Aiwa CDC-X2670 User manual

Aiwa
Aiwa CT-R430M User manual

Aiwa
Aiwa CDC-X145 User manual

Aiwa
Aiwa CT-X218 User manual

Aiwa
Aiwa CDC-X175M User manual

Aiwa
Aiwa CDC-X927M YUC User manual

Aiwa
Aiwa CDC-XI User manual

Aiwa
Aiwa CT-FX531M User manual

Aiwa
Aiwa CDC-R146M Specification sheet