Aiwa ADC-M65 YZ User manual

d
OPERATING INSTRUCTIONS
MANUAL DE INSTRUCCIONES
MODE D’EMPLOI
BEDIENUNGSANLEITUNG
ISTRUZIONI PER L’USO
GEBRUIKSAANWIJZING
INSTRUKCJA OBSŁUGI
KEZELÉSI ÚTMUTATÓ
NÁVOD K OBSLUZE
ADC-M65YZ
COMPACT DISC CHANGER
CAMBIADOR DE DISCOS COMPACTOS
ENGLISH
ESPAÑOL
FRANÇAIS
DEUTSCH
ITALIANO
NEDERLANDS
POLSKI
MAGYAR
ČESKY
c

8Z-KM4-908-01
991216ATM-OX A

Welcome
Thank you for your purchasing this AIWA product. To optimize the performance of this unit, please read
through this manual carefully.
TABLE OF CONTENTS
FEATURES .......................................................................................................................................... 1
PRECAUTIONS ................................................................................................................................... 2
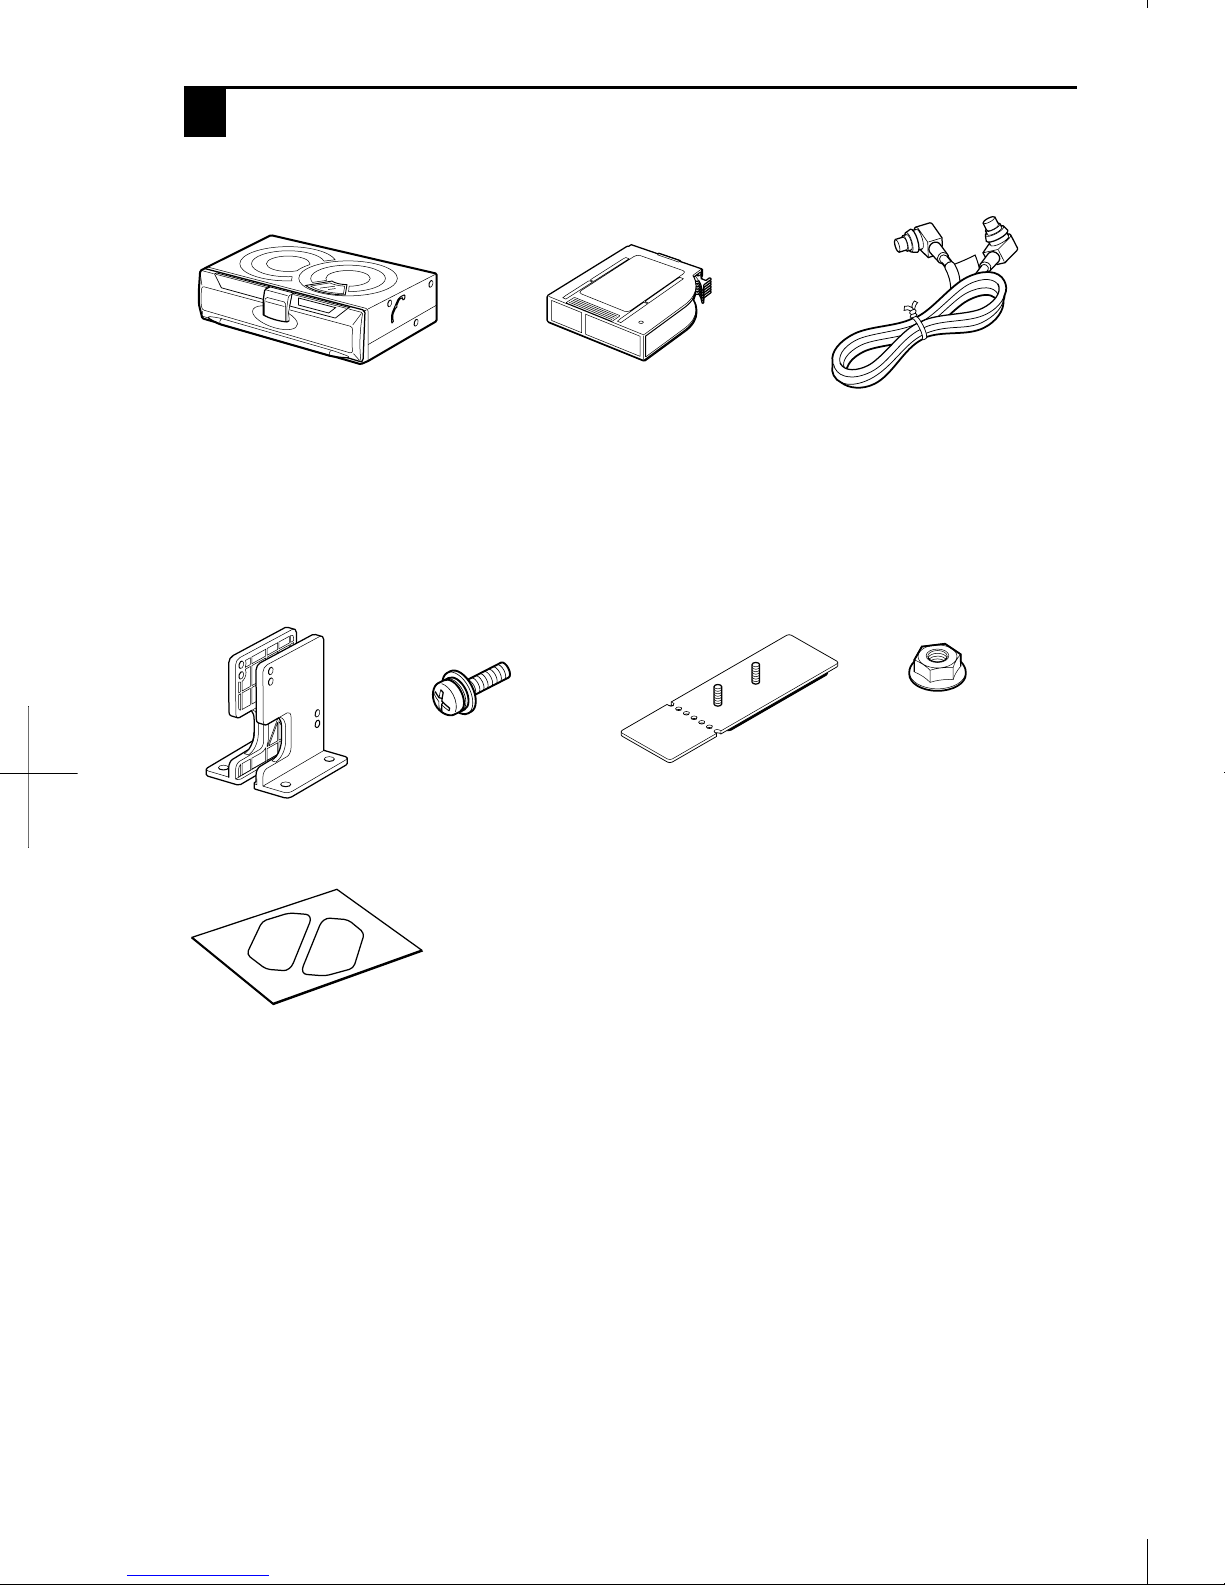
UNPACKING ........................................................................................................................................ 3
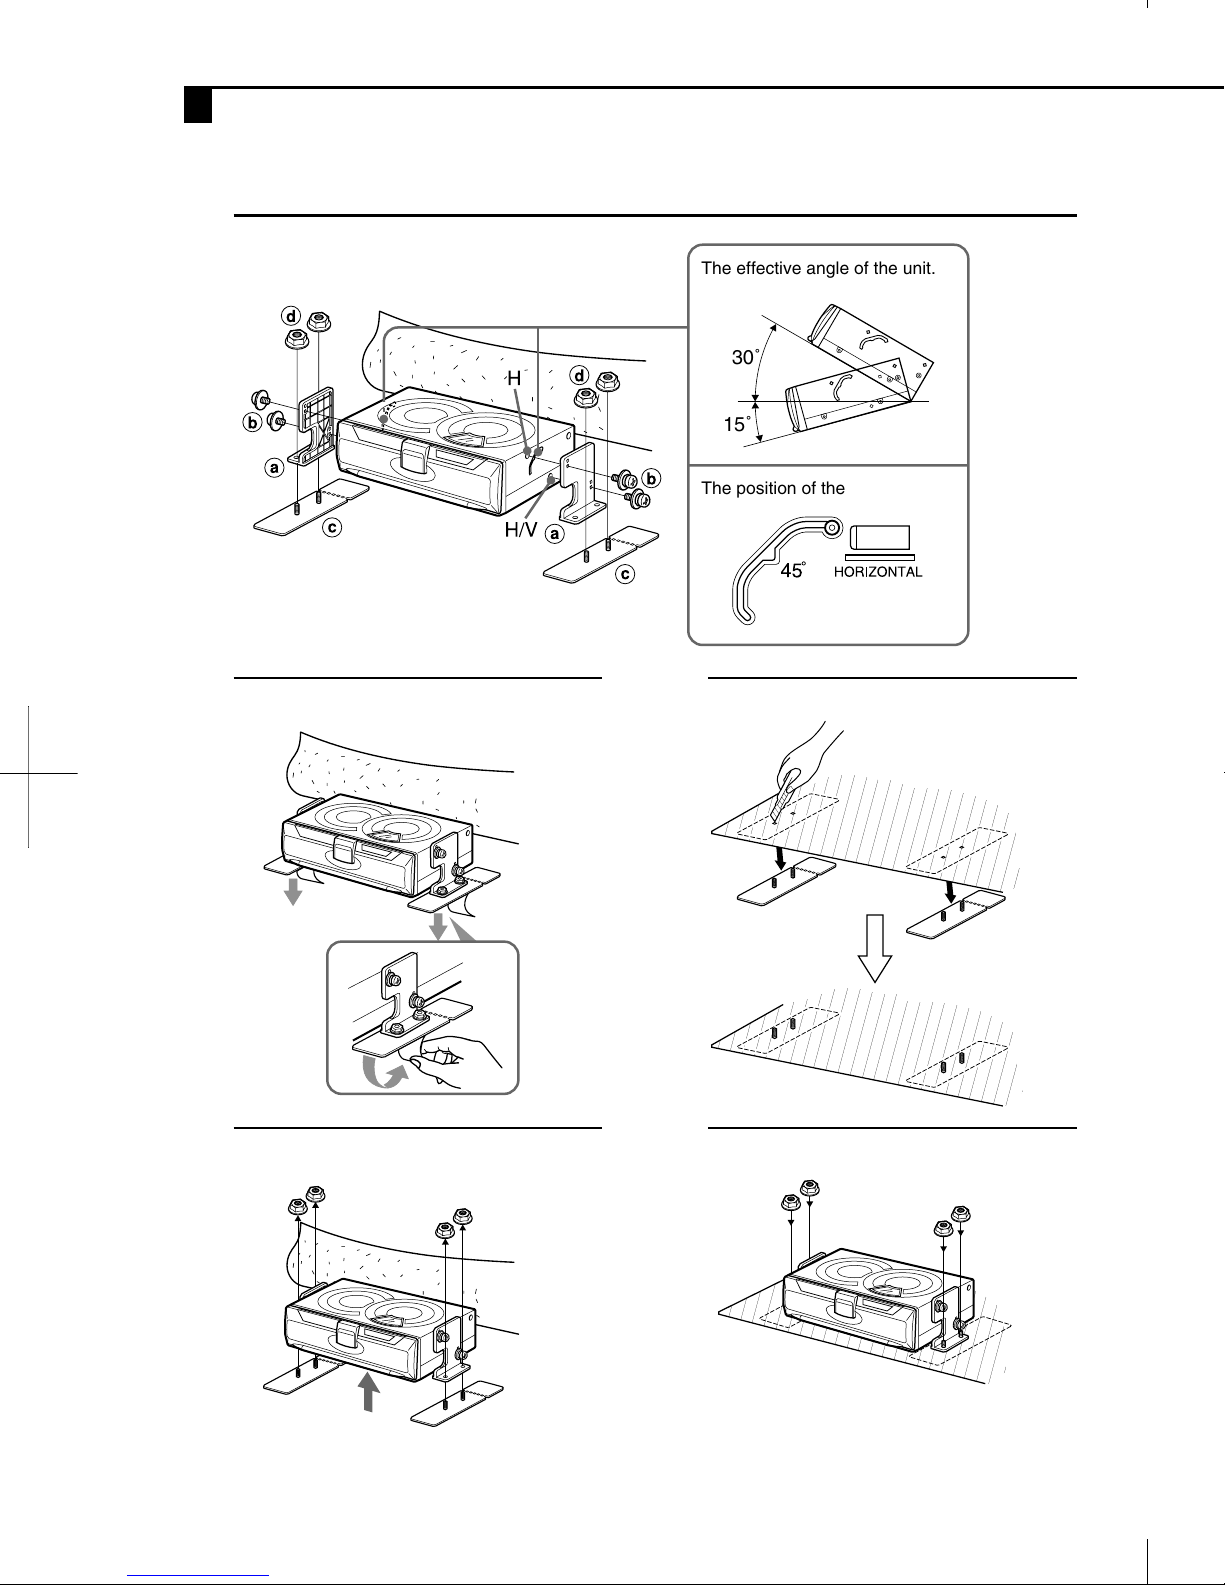
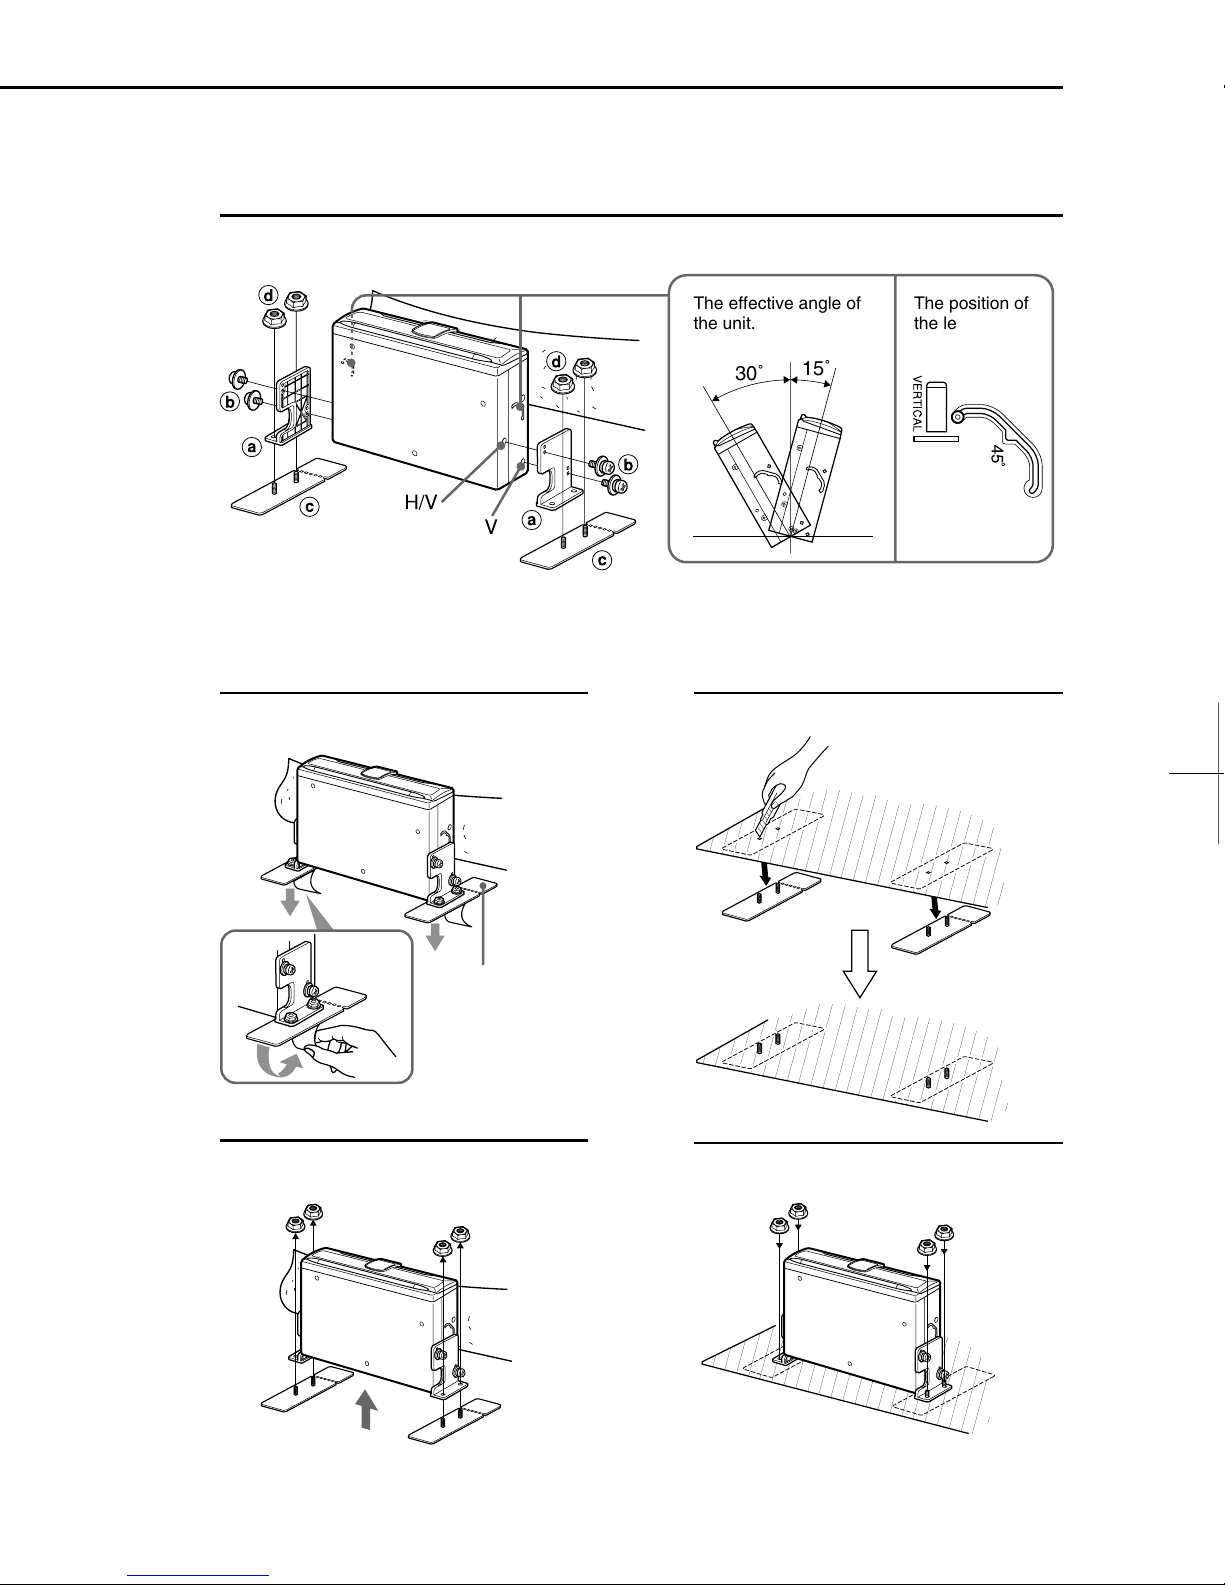
INSTALLATIONS ................................................................................................................................. 4
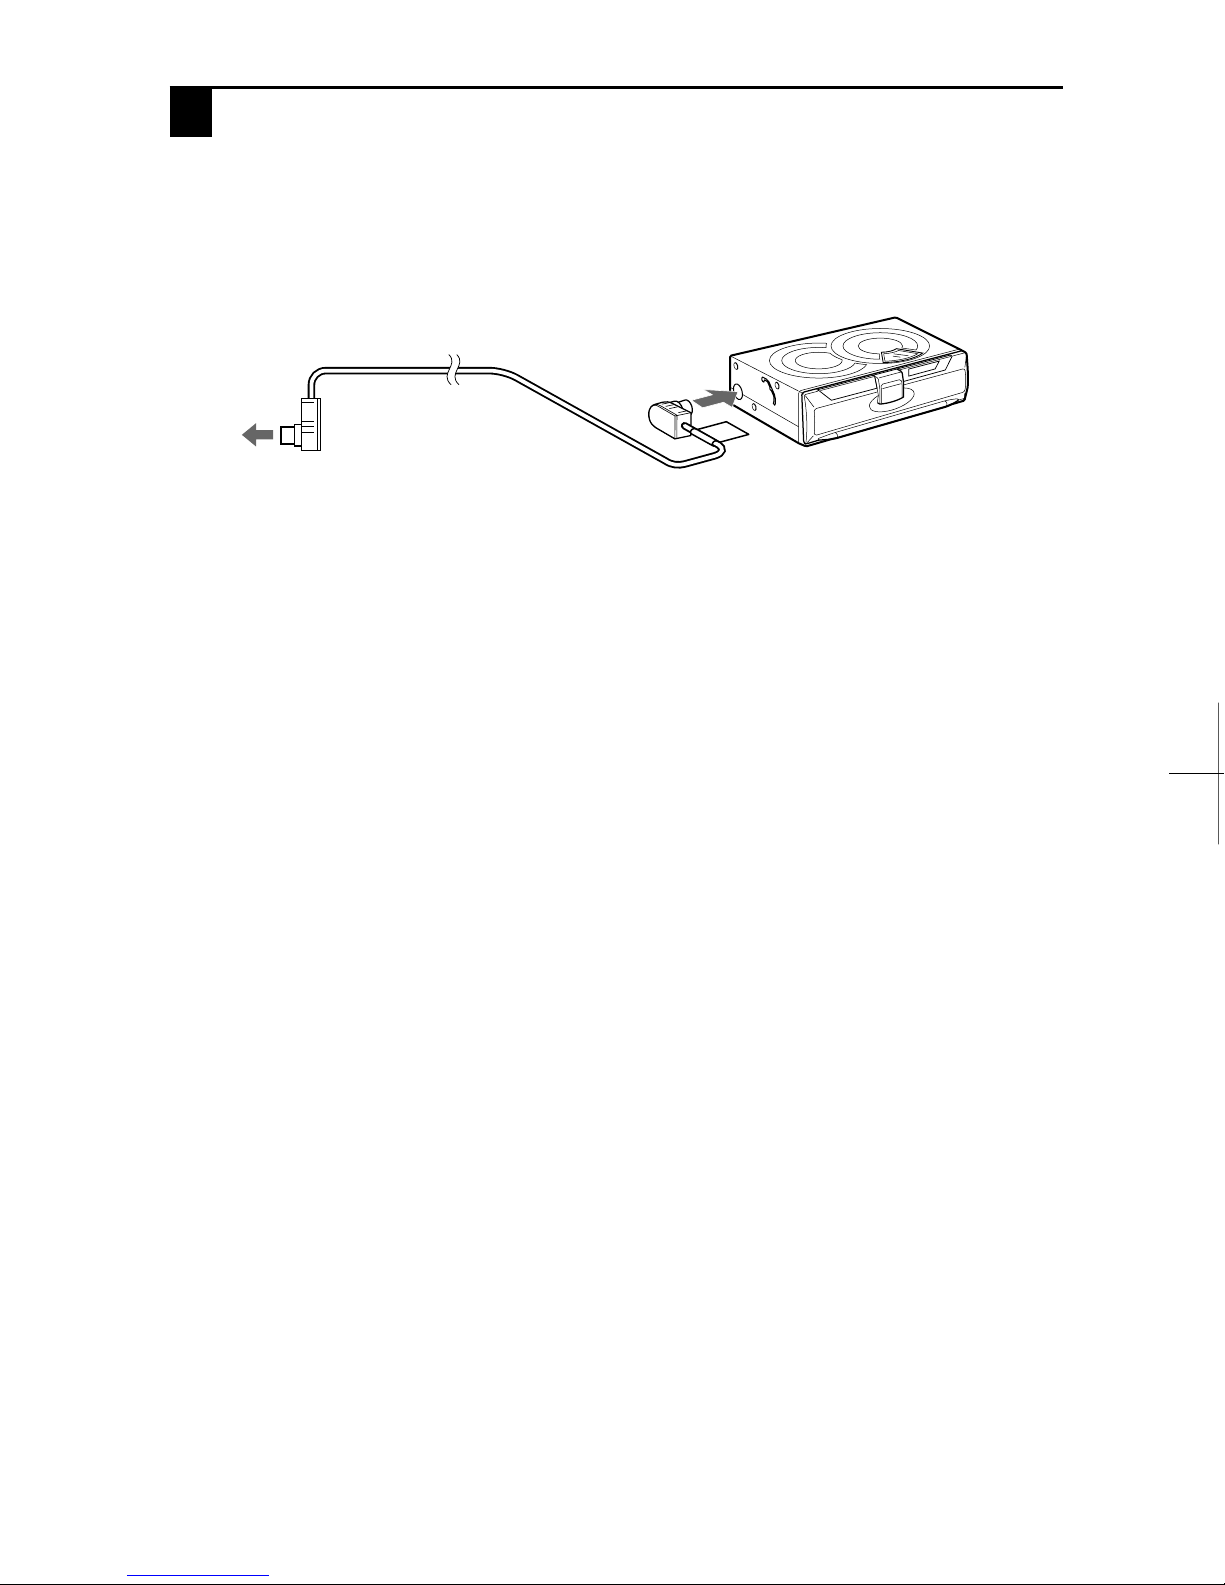
CONNECTIONS .................................................................................................................................. 8
HOW TO USE ...................................................................................................................................... 9
SPECIFICATIONS ............................................................................................................................. 10
FEATURES
1
ENGLISH
• Tracks from 6 CDs stored in the disc magazine can
be selected and played.
• Horizontal, vertical, slanted or suspended
installation can be made.
• Through the window at the top of the unit, you can
see a disc spinning as it plays.
• Since it is smaller in size, you will find it easier to
install the unit.
CAUTION
Use of controls or adjustments or performance of
procedures other than those specified herein may
result in hazardous radiation exposure.
This compact disc player is classified as a CLASS 1
LASER product. The CLASS 1 LASER PRODUCT
label is located on the exterior.
CAUTION! Invisible laser radiation when open
and interlocks defeated. Avoid
exposure to beam.
ADVARSEL!
Usynlig laserståling ved åbning, når
sikkerhedsafbrydereer ude af funktion. Undgå
udsættelse for stråling.
VAROITUS!
Laitteen käyttäminen muulla kuin tässä
käyttöohjeessa mainitulla tavalla saattaa altistaa
käyttäjän turvallisuusluokan 1 ylittävälle
näkymättömälle lasersäteiylle.
VARNING!
Om apparaten används på annat sätt än i denna
bruksanvisningspecificerats,kananvändarenutsätta
för osynlig laser-strålning, som överskrider gränsen
för laserklass 1.
CAUTION
Modifications or adjustments to this product, which
are not expressly approved by the manufacturer,
may void the user’s right or authority to operate this
product.
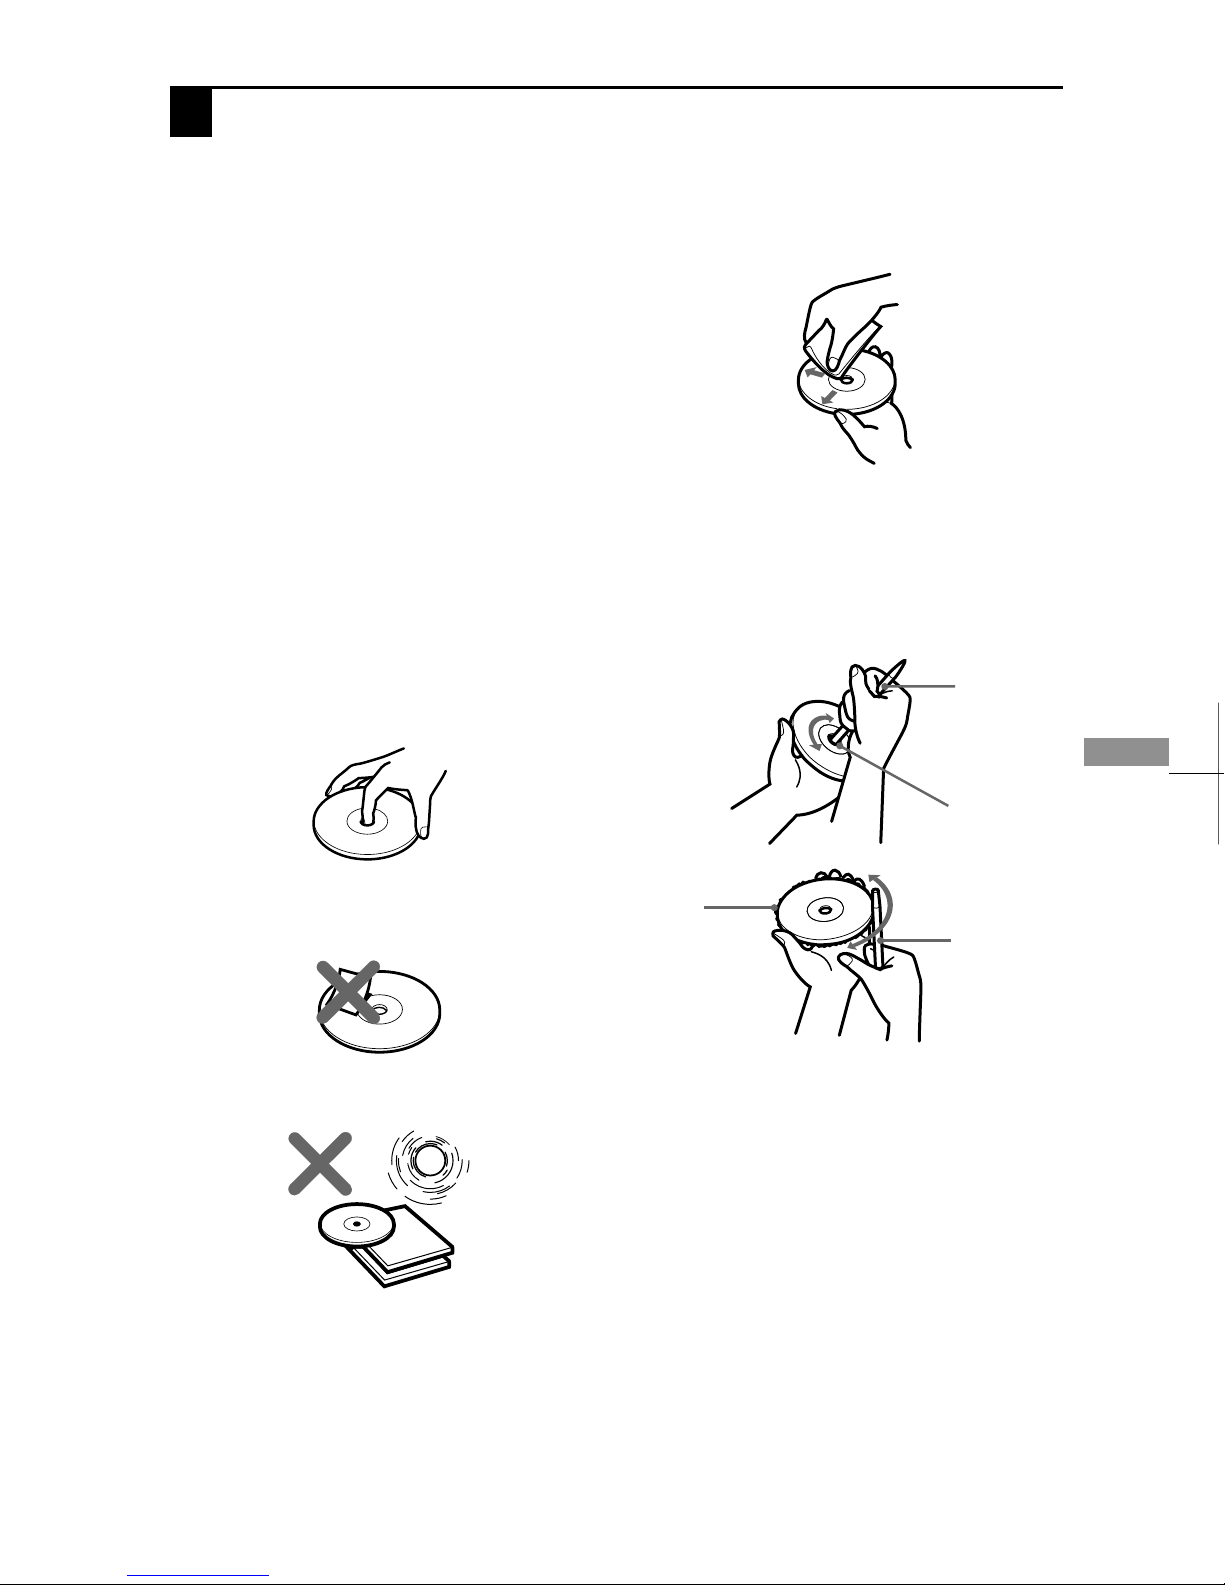
In addition to ordinary CDs, CD-Rs or CD-RWs
can be read by this unit. However, NEVER use
a CD-R or CD-RW that contains no data or data
in the wrong format, such as MP3 or other
computer files.
When you insert a CD-R/CD-RW, it may take
longer to start playing.

PRECAUTIONS
• Do NOT install the unit in a location where it
may be subjected to:
— Direct sunlight or other sources of excessive
heat
— Fluid, rain or moisture
— Excessive dirt or dust
— Excessive vibration
• This unit is designed to be operated on a 12-volt
DC negative-ground electrical system only.
• Choose the mounting location carefully so that
the unit will not interfere with normal driving
functions.
• Before making connections, disconnect the (
terminal of the car battery to avoid short
circuiting.
Notes on CDs
• A defective or soiled disc stored in the disc
magazine can cause the sound to drop out
during play.
• Always handle a disc by holding its inner and
outer edges.
• Do NOT touch the surface of the unlabeled side
of the disc.
• Do NOT attach paper or tape etc. to a disc.
• Do NOT expose the discs to direct sunlight or
excessive heat.
• Clean the discs before inserting them into the
disc magazine. Always clean a disc from the
center outward with a cleaning cloth.
• There may be burrs left on the inner and outer
edges of a brand-new disc. The burr may
cause the malfunction of the unit or sound drop-
out. To prevent these problems, if the burr is
left on the disc, be sure to remove them with a
ball-point pen, etc. as illustrated.
• NEVERuse solventssuchasbenzine oralcohol
to clean a disc.
• You cannot play an 8-cm (3-inch) CD — even
with the specially designed adaptor.
• Do NOT use irregular shape CDs (example:
heart-shaped, octagonal ones).
It may result in malfunction.
Notes on the disc magazine
• Do NOT leave the disc magazine in a place
subject to excessive temperature or humidity.
• Do NOT insert more than one disc per slot.
• Do NOT drop the disc magazine.
ENGLISH
ENGLISH
2
Ball-point pen
Burr
Ball-point pen
Burr

UNPACKING
aBrackets (1 pair)
Supplied mounting kit
for the compact disc changer
The letters are keyed to those in the instructions.
Use only the supplied mounting hardware for safe and secure installation.
Compact disc changer
eAdhesive label
(1 sheet)
dNuts (4 ea.)cPlate brackets
(2 ea.)
bWasher screws
(4 ea.)
Compact disc magazine Connecting cable
3
ENGLISH

INSTALLATIONS
Precautions
Select the mounting location very carefully,
referring to the following points.
• Make sure that there is no fuel tank, wiring or
pipingon theotherside ofthemounting surface.
• Make sure that the installation of the unit will not
hinder the movement of the deck lid or interfere
with the spare tire, etc.
• Use only the supplied mounting kit for safe and
proper installation.
Removing the transport screws
Find the three transport screws at the bottom of
the unit, which lock the unit’s mechanism during
transport. Remove these screws before
installation.
Retain these screws and replace them in the
original positions if the unit is transported for
service or maintenance.
Mounting angle setting levers
Be sure to change the position of both mounting
angle setting levers according to the angle at
which the unit is to be installed.
Notes
• Be sure to eject the disc magazine when you set the
levers.
• Be sure to set both levers to the same position.
• Be sure to set the levers exactly at the position (notch).
If the lever is deviate from the position, the sound may
drop out.
• Care must be taken when you mount the unit at the
angleof lower than level. The disc magazinemay drop
if you eject the magazine.
• Do NOT turn over the unit or slide the lever when the
unitisactivated. Doingsomaydamagethemechanism
or the discs in the unit.
• The mounting angle setting levers on each side of the
unit are factory-set to the HORIZONTAL position.
• When you complete the setting, attach the supplied
adhesive labels eover the slots.
ENGLISH
4
Insert a pointed object such as a screw driver or
ball-point pen, etc. into the low spot of the lever
and slide the lever to the position from among
HORIZONTAL, 45°, and VERTICAL positions.
Mounting angle setting levers

Horizontal installation
1Construction
For details on abc..., see page 3.
INSTALLATIONS
2Deciding the position
3Removing temporarily
4Making holes in the carpet
5Completion
5
ENGLISH
Note
If the mounting surface needs to be strengthened,
secure the plate brackets cto the bottom surface of the
car trunk, etc. with the tapping screws (not supplied).
;
;
;
;
;
;
;
;
;
;
;
;
;
;
;
;
;
;
;
;
;
;
;
;
;;
;;
;
;
;
;
;
;
;
;
;
;
;
;
;
;
;
;
;
;
;
;
;
;
;
;
;
;
;
;
;
;
30˚
15˚
The effective angle of the unit.
The position of the lever.
;
;
;
;
;
;
;
;
;
;
;
;
;
;
;
;
;
;
;
;
;
;
;
;
;
;

2Deciding the position
3Removing temporarily
4Making holes in the carpet
5Completion
Vertical installation
1Construction
For details on abc..., see page 3.
Notes
•If the mounting surface needs to be strengthened,
secure the plate brackets cto the bottom surface
of the car trunk, etc. with the tapping screws (not
supplied).
ENGLISH
6
•If installation space is narrow, bend the plate bracket
cback and forth along the perforated line to break off
the end.
;
;
;
;
;
;
;
;
;
;
;
;
;
;
;
;
;
;
;
;
;
;
;
;
;;
;;
;
;
;
;
;
;
;
;
;
;
;
;
;
;
;
;
;
;
;
;
;
;
;
;
;
;
;
;
;
;
30˚15˚
The effective angle of
the unit. The position of
the lever.
Cut the plate
bracket cif it
is too long.
;
;;
;;
;;
;;
;;
;;
;;
;;
;;
;;
;;
;;
;;
;;
;
;
;
;
;
;
;
;
;
;
;

2Making holes
Slanted installation
Be sure to set the
mounting angle
setting levers to the
45°position.
Suspended installation
When installing the unit in the trunk below the
package tray, observe the following.
•Select the mounting location carefully so that
the unit does not hinder the movement of the
torsion bars of the deck lid.
INSTALLATIONS
1Construction
For details on abc..., see page 3.
Caution
Before drilling the holes, make sure that there is
nothingon the other sideof the mounting surface.
7
ENGLISH
Tapping screws are not supplied.
Note on the brackets a
To save installation space, you can place the
brackets ainside out, as illustrated below.
15˚
15˚
45˚
30˚
15˚
3Completion
The position of the lever.
The effective angle of the unit.

Compact disc changer
to AIWA brand car stereo
Connecting cable
(supplied)
Caution
Be sure to disconnect the ground wire terminal of
the car battery before making a connection in
order to prevent short circuiting.
ENGLISH
8
This unit is designed only for AIWA brand car
stereo. Therefore you cannot use the unit with
other brand’s equipment.
CONNECTIONS
Note
Use only the supplied connecting cable. Using an
unspecified connecting cable may cause background
noise.

How to use a compact disc magazine
1
2
3
4
HOW TO USE
With the label side up, insert a disc all the way.
To remove a disc, pull part Ain the direction
of the arrow as illustrated.
Disc magazine
To remove the magazine, press the zbutton
and pull out the disc magazine.
Insert the magazine (which has been taken
out of the unit) firmly with the mark visible
on the top side.
9
ENGLISH
z(eject) button
Open the door.
Close the door.
6 discs, one in
each disc tray
Labeled side
Recorded side

Notes on the disc magazine
•Be sure to place a disc on the disc tray with the
label side up. If a disc is not set properly, it may
cause damage to the unit.
•Thedisctray maybetaken offfromthe magazine
if you pull the tray forcibly. If the tray is taken
out, put it back into the magazine as illustrated.
Be sure that both ends of the tray are aligned to
the grooves of the magazine correctly.
ENGLISH
10
Disc magazine
Disc tray
Disc
Disc tray
SPECIFICATIONS
Compact disc changer
System Compact disc digital audio
system
Frequency response 5 Hz –20 kHz
Wow and flutter Below measurable limit
Signal to noise ratio 91 dB or more
Outputs Line output (for changer
connector only)
Operating temperature–10 °C to 55 °C
Dimensions 244 ×63 ×169 mm (w/h/d)
(9 5/8×2 1/2×6 5/8in.)
Weight 1.8 kg
(3.96 lbs.)
Power requirement 12 V DC car battery
(negative ground)
D/A converter 1 bit DAC, 8 times over
sampling
Sampling rate 44.1 kHz
Disc size 120 mm
Supplied accessories Disc magazine (1)
Mounting kit (1 set)
Connecting cable (5 m)
(16.4 ft.) (1)
Design and specifications are subject to change without
notice.
Disc
magazine
Disc tray
Groove
Groove
•Be sure all the trays are set in the magazine
when using the unit.

CT-R431M
YZ
CT-R421
YZ
CT-R411
YZ
STEREO CAR CASSETTE RECEIVER
RADIO-CASSETTE ESTEREOFONICO PARA AUTOMOVIL
OPERATING INSTRUCTIONS
MANUAL DE INSTRUCCIONES
MODE D’EMPLOI
BEDIENUNGSANLEITUNG
ISTRUZIONI PER L’USO
GEBRUIKSAANWIJZING
INSTRUKCJA OBSŁUGI
KEZELÉSI ÚTMUTATÓ
NÁVOD K OBSLUZE
8B-KTA-901-01
001030ATM-OX
ENGLISH
ESPAÑOL
FRANÇAIS
DEUTSCH
ITALIANO
NEDERLANDS
POLSKI
MAGYAR
ČESKY
(CT-R431M, CT-R421)

1
ENGLISH
PRECAUTIONS
• Use only in a 12-volt DC negative-ground electrical
system.
• Disconnect the vehicle’s negative battery terminal
while mounting and connecting the unit.
• When replacing the fuse, be sure to use one with an
identical amperage rating. Using a fuse with a higher
amperage rating may cause serious damage to the
unit.
• Keep screwdrivers, etc. and other metallic or magnetic
objects away from the playback head.
• When your vehicle has been parked in direct sunlight
resulting in a considerable rise in the temperature
inside, allow the unit to cool off before operating it.
• Keep the volume at a level at which you can hear
outside warning sounds (horns, sirens, etc.).
NOTE
AIWA CO. LTD. - JAPAN - DECLARES UNDER ITS
OWN RESPONSIBILITY THAT THE PRODUCT
DESCRIBED IN THIS MANUAL IS IN COMPLIANCE
WITH THE DIRECTIVES OF D.M. 28.8.95 No. 548,
ACCORDING TO THE STIPULATIONS OF
PARAGRAPH 3 OF ATTACHMENT A OF D.M. 25.6.85
AND PARAGRAPH 3 OF ATTACHMENT 1 OF D.M.
27.8.87 (REGULATIONS REGARDING
FREQUENCIES).
The above information is only for Italy.
CAUTION
Modifications or adjustments to this product, which are
not expressly approved by the manufacturer, may void
the user’s right or authority to operate this product.
1
ENGLISH
TABLE OF CONTENTS
THEFT PROTECTION .............................................. 2
BASIC OPERATION, AUDIO AND CLOCK
ADJUSTMENT ..................................................... 2
RADIO OPERATION ................................................. 3
TAPE PLAYBACK ..................................................... 6
AUXILIARY EQUIPMENT ......................................... 7
OTHER FUNCTIONS ............................................... 7
CD CHANGER OPERATION (CT-R431M only) ....... 8
TROUBLESHOOTING .............................................. 9
MAINTENANCE ........................................................ 9
SPECIFICATIONS .................................................. 10
Notes
• These operating instructions cover the CT-R431M,
CT-R421, and CT-R411.
• The figures in these operating instructions show the
CT-R431M.
• Some buttons are assigned two or more functions.
For detailed descriptions, refer to the related pages.
Notes on cassettes
Do NOT expose cassettes to direct sunlight, extremely
high or cold temperature or moisture.
Keep cassettes away from equipment with built-in
magnets to avoid unwanted noise or loss of sound
quality.
Do NOT touch the tape of a cassette, as any dirt or dust
will contaminate the heads.
Be sure to remove any cassette from the unit if you are
not using it.
DEMO (Demonstration) mode
Theunit has anextra displaymode, which demonstrates
the display of the operation modes of the unit. The unit
switches to DEMO mode automatically if you turn the
unit on and leave it as it is for 5 seconds after all the
connections have been completed.
To cancel DEMO mode
During DEMO mode, press and holdDISP for more than
2 seconds.
To resume DEMO mode, press and hold DISPagain for
more than 2 seconds.
Caution on the transit protection pad
Be sure to remove the pad before operating the unit.
Transit protection pad
CD changer
(optional) control
function
CT-R431M
yes
CT-R421,
CT-R411
no

ENGLISH
2
ENGLISH
2
THEFT PROTECTION
Take the front panel with you when leaving the car, and
keep it in the supplied carrying case.
Detaching the front panel
Before detaching the front panel, remove the cassette to
prevent possible damage to the unit.
1Press zto remove the cassette.
2Press and hold PWR/MUTE until the unit turns off.
3Press %. (Hold the panel with one hand to prevent
accidentally dropping it.)
4Remove the panel.
Attaching the front panel
1Engage the left side of the front panel to the left catch
on the unit.
2Push the panel forward until it locks. Be sure not to
press any buttons while you are attaching the panel.
Note
Do not touch the front panel connector. This could cause
a poor or faulty connection.
Security lamp
The security lamp will continue to flash while the front
panel is detached from the unit.
BASIC OPERATION,
AUDIO AND CLOCK
ADJUSTMENT
Turning the unit on/off
•You can turn the unit on by pressing any button on the
front panel except %, z, f, gand the Smart Jog.
The unit also turns on when you insert a cassette.
•Press and hold PWR/MUTE until the unit turns off.
Note
Most operations described in this manual require
the unit to be turned on before starting the operation,
unless explicitly stated otherwise.
Changing the source mode
1Press FNC.
Pressing FNC cycles through source modes in the
following order:
* Tape Play mode (available while a cassette is in the
player)
**CD Changer Play mode (CT-R431M only, available
when an optional CD Changer is connected)
Adjusting the volume
1Turn the Smart Jog.
VOL (volume)
indication appears.
Muting the sound
1Press PWR/MUTE briefly.
MT indicator flashes.
To restore volume, briefly press PWR/MUTE again.
Smart Jog
ENGLISH

3
ENGLISH
3
ENGLISH
Adjusting sound
You can select the following modes for adjusting sound
depending on the music you listen to: BASS (low
frequencies), TRE (high frequencies), BAL (left/right),
FAD (front/rear), H-BASS (high bass)*, and DSSA
(Drivers Sound Stage Adjustment)**
* You can reinforce the bass sound.
** You can adjust sound stage and tone balance to best
serve a particular seat in the car.
1Press SEL repeatedly to select the mode to be
adjusted.
Pressing SEL cycles through the modes. The
selected mode’s indicator appears.
2Turn the Smart Jog to increase or decrease the level
for the selected mode (except for H-BASS and
DSSA).
In H-BASS mode, turn the Smart Jog to select 1
(low), 2 (medium), 3 (high), or OFF.
In DSSA mode, turn the Smart Jog to select L (for the
front left seat), R (for the front right seat), or OFF.
Notes
•Adjust the level or select an item within 5 seconds, or
the selected mode will return to previous state.
•When DSSA is activated, you cannot adjust BAL, FAD,
BASS, and TRE.
Aligning the source levels
(Source Level Adjuster)
Volume may vary each time you change the source
mode. In this case, you can align each source mode’s
volume to almost the same level.
1PressFNCrepeatedlytoselectthedesired mode.
2Press DISP while pressing SEL.
“LEVEL 0”appears in the display.
3Turn the Smart Jog to adjust the level.
Note
Adjust the level within 5 seconds, or the selected mode
will be canceled.
Restoring the factory settings
1Turn off the unit.
2Press and holdDISP until “LEVEL --”appears in the
display.
Note
You can restore the factory settings only for VOL, BASS,
TRE,BAL, FAD, H-BASS,andDSSA and alignedsource
volume levels.
Muting button beep sounds
1Turn off the unit.
2Press and hold SEL until “BEEP”appears in the
display.
3Turn the Smart Jog to select ON or OFF.
4Press SEL.
The unit turns off.
Setting the clock
1Press and hold SEL until the clock indication flashes
in the display.
2Press TUNEi(to set hour) or TUNEk(to set
minute) and turn the Smart Jog.
3Press SEL.
Displaying the clock
1Press DISP.
To return to the former display, press DISP again.
RADIO OPERATION
Tuning in to a station
(Seek/Manual Tuning)
*“F”means FM.
Stereo indicator
Band indicator* Frequency indication

ENGLISH
4
ENGLISH
4
1Press FNC repeatedly to select the desired band
(F1, F2, F3, MW or LW).
2Press TUNEi(to move to higher frequencies) or
TUNEk(to move to lower frequencies) to tune in to
a station.
“ST”appears in the display when an FM station is
broadcasting in stereo, and receiving conditions are
good.
Seek Tuning and Manual Tuning
•Press and hold TUNEior TUNEkuntil Seek
Tuning starts.
The unit locates a station automatically (Seek
Tuning).
•Press TUNEior TUNEkrepeatedly to search for
a desired station while increasing or decreasing
the frequency step by step (Manual Tuning).
To stop Seek Tuning, press TUNEior TUNEk
again.
Monaural mode
When FM signals become weak, or FM reception
becomes poor, the unit automatically switches to
Monaural mode to reduce noise.
Using preset stations
Youmust preset stations before you can tune in astation
using preset station number buttons.
Preset station
number
Presetting stations automatically
(Auto Memory)
1Press FNC repeatedly to select the desired band
(F1, F2, F3, MW or LW).
2Press and hold PS/A.ME until automatic presetting
starts.
The unit automatically stores up to 6 stations for
each band.
After completion of automatic presetting, the unit
tunes in to all the stations stored on the preset
station buttons in order (Preset Scan).
Tocancelautomaticpresetting, pressPS/A.MEagain.
Checking the preset stations (Preset Scan)
1Press PS/A.ME briefly.
Each preset station will be tuned in for 5 seconds in
order.
To cancel Preset Scan, press PS/A.ME again or any
preset station button.
Presetting stations manually
(Manual Memory)
1Press FNC repeatedly to select the desired band
(F1, F2, F3, MW or LW).
2Press TUNEior TUNEkto tune in to a desired
station (see “Tuning in to a station,”page 3).
3Pressand hold the desired preset station button until
the unit beeps.
Note
A newly preset station replaces the station on the same
band that was previously stored on that preset station
button.
Tuning in to a preset station
1Press FNC repeatedly to select the desired band
(F1, F2, F3, MW or LW).
2Press the preset station button on which the desired
station is stored.
Active tuning reception control (ATRC)
The unit automatically suppresses FM noise caused by
vehicle movement, and maintains sound quality.
Radio data system (RDS) features
The following RDS features are available with this unit.
Important
•The RDS features are available only during FM
reception.
•You may not be able to activate the RDS features fully
in the areas where the station is test-broadcasting the
RDS signals.
Preset station buttons 1 –6
Smart Jog

Tuning in to Alternative Frequency (AF)
stations
There are programs transmitted at different frequencies
in different areas. Along with the program itself, an RDS
stationsendsthe AF list data that contains the frequencies
sending the same program. If the signal of the tuned-in
frequency becomes weak while you are driving, the unit
automaticallysearchesthesameprogramsentatanother
stronger frequency according to the AF list, so that you
do not have to seek and tune in to the other frequency
again.
1PressAFduringFMreceptiontoactivate AF function.
“AF”appears in the display.*
* “AF”flashes when the unit cannot receive AF list
data.
Tuning in to an EON*, Traffic Program (TP)
The unit automatically switches to FM reception and
tunes in to an EON, traffic announcement program
when the program starts.
* EON: Enhanced Other Network
1PressTAduringFMreceptiontoactivate TP function.
“TP”appears in the display.*
During reception, “TA”appears in the display.
* “TP”flashes when the unit cannot receive TP data.
To turn off TP function, press TA.
“TP”disappears.
Setting the volume of TP reception
When TP function is activated, the traffic announcement
program is tuned in at the volume set in the following
procedure regardless of the volume of the other source
at the time TP function is activated.
1Press and hold AF until “BOOST 40”appears in the
display.
“BOOST 40”disappears approx. 5 seconds later.
2Turn Smart Jog to select a volume level (0 to 80 in
increments of 5).
3Press SEL.
Activating AF function and TP function at the
same time
1Press AF, and then press TA.
“AF”and “TP”appears in the display.
Notes
•During MW or LW reception, the unit will not
automaticallytunein to a traffic announcement program.
Be sure to select “FM1/2/3,”“TAPE,”“CD-CH”
(CT-R431M only), or “AUX IN”to activate TP function.
•When the unit tunes in to a traffic announcement
program by way of TP function, you can increase the
volume, but cannot decrease it.
•When the traffic announcement program finishes, the
unit automatically returns to the previous state.
•When CD changer play resumes after TP function,
Repeat and Intro Play will be canceled.
Tuning in to a station by specifying a
Program Type (PTY)
1Press and hold TA until “PRO-TYPE”appears in the
display.
“PRO-TYPE”disappears approx. 5 seconds later.
2While “PRO-TYPE”is displayed, press one of the
preset station buttons* for more than 0.5 seconds to
select a Program Type.
The unit starts to search for a station of the selected
Program Type and tunes in to the station.
* The Program Types are assigned to the preset station
buttons as follows:
Preset station button Program Type (default)
1 NEWS
2 SPORT
3 EDUCATE
4 SCIENCE
5 ROCK M
6 CLASSICS
Changing the Program Types assigned to
preset station buttons
You can assign one of the following Program Types to
each preset station button.
NEWS, AFFAIRS, INFO, SPORT, EDUCATE,
DRAMA, CULTURE, SCIENCE, VARIED POP M,
ROCK M, EASY M, LIGHT M, CLASSICS, and
OTHER M
1Turn off the unit.
2Press and hold TA until “PRO-TYPE”appears in the
display.
3While “PRO-TYPE”is displayed, turn Smart Jog to
select the desired Program Type.
4Whilethe selected ProgramType is displayed,press
adesiredpreset station buttonfor2 or moreseconds.
5
ENGLISH

Adjusting the clock by Clock Time (CT)
service
The unit adjusts the clock automatically according to the
CT data sent from a currently tuned-in RDS station.
1Press and hold TA, and then press AF during FM
reception.
“CT”appears in the display.
2Turn Smart Jog to select “CT ON.”
“CT”appearsin thedisplay and the clock isadjusted.
To turn off CT function, select “CT OFF”in step 2.
Notes
•In the following cases, “CT”flashes and the clock will
not be adjusted:
—The tuned-in signal is too weak to activate this
function.
—The tuned-in station is not sending CT data.
•The clock may not always be correct even when CT
function is on.
Tips and other information
Presetting Alternative Frequency (AF) stations
automatically
Only the strongest frequencies among the AF stations
that are broadcasting the same program are selected
and assigned to each preset station button.
1During FM reception, make sure that “AF”and/or
“TP”appear(s) in the display (see “Tuning in to
Alternative Frequency (AF) stations”and “Tuning in
to an EON Traffic Program (TP)”).
2Press and hold PS/A.ME until Auto Memory for AF
stations starts.
Displaying a Program Service (PS) name
You can check the name of currently tuned-in station in
the display. When the unit is tuned in to an RDS station
sending PS data, the station name appears in the
display.
Note
In the following cases, the station name will not appear
in the display:
—The tuned-in signal is too weak to activate this
function.
—The tuned-in station is not sending PS data.
Notes on emergency broadcasts
•The unit automatically switches to FM reception and
tunes in to emergency broadcast when it starts. When
the broadcast finishes, the unit automatically returns to
the previous state.
•Be sure to turn on AF function and TP function to
receive emergency broadcasts.
•During MW or LW reception, the unit will not tune in to
the urgent broadcast.
TAPE PLAYBACK
Playing a tape
1Insert a cassette to start playback.
Ifacassetteis already inserted, press FNC repeatedly
to select Tape Play mode to start playback.
Playback starts in the direction that the unit played
back previously.
Press the following buttons to operate tape transport.
To
Eject a cassette*
Change the playback side
Fast-forward the upper side
(l) of the tape
Rewind the lower side (j)
of the tape
Rewind the upper side (l)
of the tape
Fast-forward the lower side
(j) of the tape
Stop fast transport and
resume playback
Press
z
fand g
simultaneously
g
f
for glightly**
* When you eject the cassette, the unit switches to the
previous mode.
** Do not press for gall the way. Doing so may
change the direction of tape transport.
Auto Reverse function
When the end of the tape is reached during playback or
fast tape transport, the direction of the tape is
automatically reversed, and playback starts on the other
side.
ENGLISH
6

7
ENGLISH
Direction indications
Displayed when the upper side of the
cassette is being played.
Displayed when the lower side of the
cassette is being played.
Tape transport display
Upper side: During playback
Lower side: During playback
When you do not play back a tape
Be sure to eject any cassette from the unit.
To prevent tape problems
Before inserting a cassette into the unit, make sure that
there is no slack in the tape. If necessary, take up the
slack by inserting a pencil through the spindle hole and
winding.
Tapes of 90 minutes or longer are extremely thin and
easily deformed or damaged. They are not
recommended.
AUXILIARY EQUIPMENT
Listening to a CD/MD/MP3 portable
player or other equipment
You can listen to equipment connected to the unit. Refer
to the operating instructions for the corresponding
equipment for more detailed information.
Be sure to remove inserted cassette to prevent possible
damage to the unit before connecting the equipment.
1Connect a CD/MD/MP3 portable player or other
equipment via the unit’s AUX IN jack (3.5-mm dia.).
2Press FNC repeatedly until “AUX IN”appears in the
display.
OTHER FUNCTIONS
Changing the display contrast
1Press and hold FNC until “CONT.”appears in the
display.
2Turn the Smart Jog to select L (low), M (medium), or
H (high).
Muting the sound while using the phone
When the telephone mute lead (brown) of the unit is
connected to a cellular phone hands-free car kit, etc.,
theunitmutesthe sound fromthespeakersautomatically
during your conversation on the cellular phone.
For details, refer to the separate “INSTALLATION AND
CONNECTIONS”for the unit and the instruction manual
for the cellular phone hands-free car kit.
Smart Jog
AUX IN jack
Other manuals for ADC-M65 YZ
4
Table of contents
Other Aiwa CD Player manuals

Aiwa
Aiwa XP-ZR850 User manual

Aiwa
Aiwa CSD-ES977 User manual

Aiwa
Aiwa SIMPLE-2 XP-R120 User manual

Aiwa
Aiwa XP-R210 AHA User manual

Aiwa
Aiwa XP-SP30 User manual

Aiwa
Aiwa CSD-TD20 User manual

Aiwa
Aiwa XP-V7260C User manual

Aiwa
Aiwa XP-Z5 AEZ User manual

Aiwa
Aiwa XP-R970 User manual

Aiwa
Aiwa XP-Z3C User manual