AJAX Hub 2 Plus User manual

Hub 2 Plus User manual
Updated May 30, 2023
Hub 2 Plus is a central device in the Ajax system, which controls the operation
of all connected devices and interacts with the user and the security company.
The hub reports the opening of doors, breaking of windows, threat of re or
ood, and automates routine actions using scenarios. If outsiders enter the
secure room, Hub 2 Plus will send photos from /
motion detectors and notify a security company patrol.
Hub 2 Plus central unit must be installed indoors only.
Hub 2 Plus needs Internet access to connect to the Ajax Cloud service. The
central unit is connected to the Internet via Ethernet, Wi-Fi, and two SIM cards
(2G/3G/4G).
Connecting to Ajax Cloud is necessary for conguring and managing the system
through Ajax apps, transmitting notications about alarms and events, as well
MotionCam MotionCam
Outdoor

as for updating . All data on Ajax Cloud is stored under multilevel
protection, information is exchanged with the hub via an encrypted channel.
Connect all communication channels to ensure a more reliable connection with Ajax
Cloud and to secure against interruptions in the work of telecom operators.
You can manage the security system and quickly respond to alarms and
notications through for iOS, Android, macOS, and Windows. The system
allows you to choose of what events and how to notify the user: by push
notications, SMS, or calls.
If the system is connected to a security company, events and alarms will be
transmitted to the monitoring station — .
Functional elements
OS Malevich
apps
How to set up push notications on iOS
How to set up push notications on Android
directly and/or through Ajax Cloud
Buy Hub 2 Plus central unit
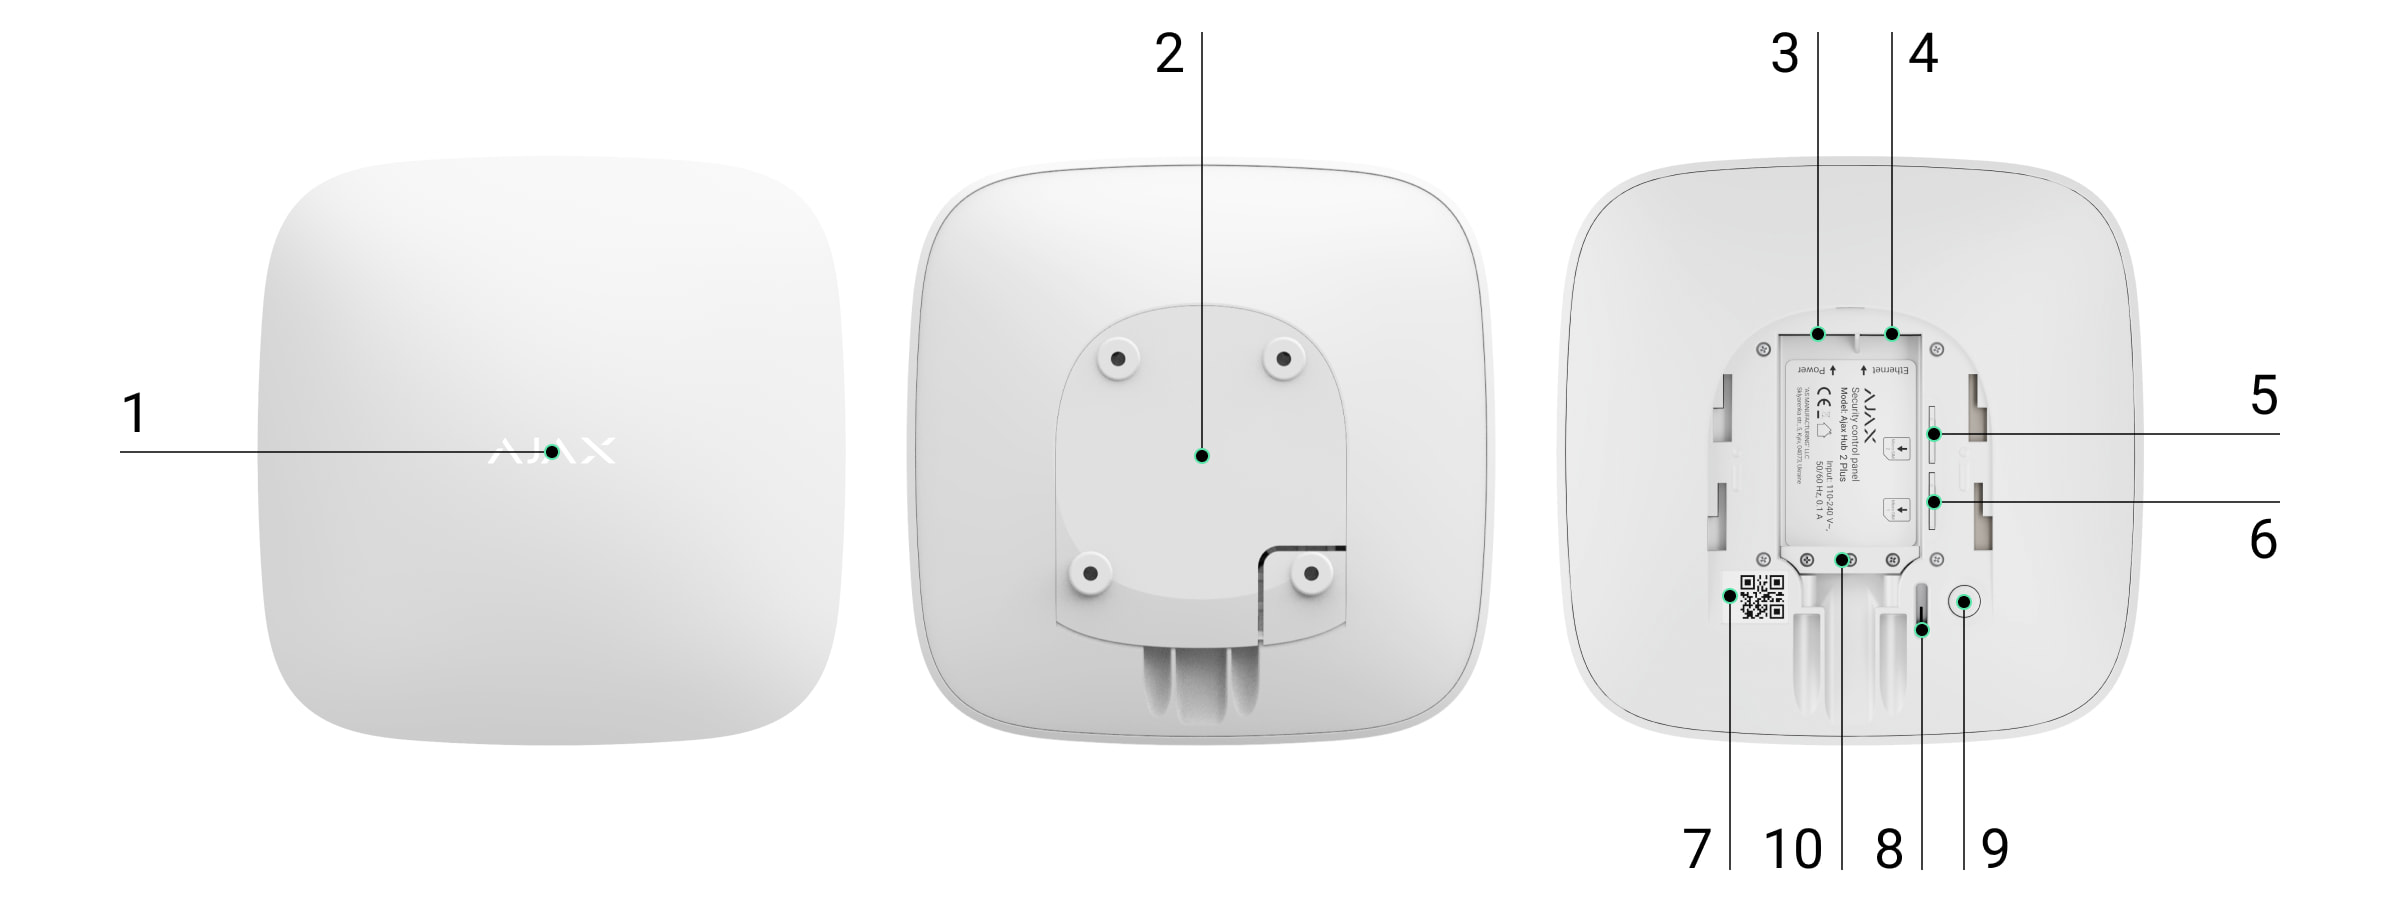
1. Ajax logo featuring LED indicator
2. SmartBracket mounting panel. Slide it down with force to open

Operating principle
The hub monitors the security system operation by communicating with
connected devices via the . The communication
range is up to 2000 m without obstacles (for example, walls, doors, inter-oor
constructions). If the detector is triggered, the system raises the alarm in 0.15
seconds, activates the sirens, and noties the central monitoring station of the
security organization and the users.
If there is interference at the operating frequencies or when jamming is
attempted, Ajax switches to a free radio frequency and sends notications to
the central monitoring station of the security organization and to system users.
Hub 2 Plus supports up to 200 Ajax devices connected, which protect against
intrusion, re, and ooding, as well as control electrical appliances automatically
according to scenarios or manually from an app.
To send photos from / motion detector, a
separate Wings radio protocol and a dedicated antenna are used. This ensures
the delivery of visual alarm verication even with an unstable signal level and
interruptions in communication.
Perforated part is required for actuating the tamper in case of any attempt to
dismantle the hub. Do not break it off.
3. Power cable socket
4. Ethernet cable socket
5. Slot for micro SIM 2
6. Slot for micro SIM 1
7. QR Code
8. Tamper button
9. Power button
10. Сable retainer clamp
Jeweller encrypted protocol
What jamming of a wireless security system is and how to resist it
MotionCam MotionCam Outdoor

Hub 2 Plus is running under a real-time operating system OS Malevich. Similar
OS control spacecraft systems, ballistic missiles, and car brakes. OS Malevich
expands the capabilities of the security system, by air
without user intervention.
to automate the security system and decrease the number of
routine actions. Set up the security schedule, program actions of automation
devices ( , , or ) in response to an alarm, temperature
change, pressing of the or by schedule. A scenario can be created
remotely in the Ajax app.
LED indication
The hub LED has a list of indications showing the system state or events
occurring. The Ajax logo on the front side of the hub can light up red, white,
purple, yellow, blue, or green, depending on the state. When nothing is happening
in the system (no alarm, malfunction, lid opening, etc.), the LED displays two hub
states:
Indication Event Note
Lights up white. Two communication channels
are connected: Ethernet and
If the external power supply is
off, the indicator will ash
List of Jeweller devices
automatically updating
Use scenarios
Relay WallSwitch Socket
Button
How to create and congure a scenario in the Ajax system
0:00 / 0:06
Armed/partially armed or Night Mode enabled — the LED lights up white.
Disarmed — the LED lights up green.

SIM card. every 10 seconds.
After a loss of power, the hub
will not light up immediately,
but will start ashing in 180
seconds.
Lights up green.
One communication channel is
connected: Ethernet or SIM
card.
If the external power supply is
off, the indicator will ash
every 10 seconds.
After a loss of power, the hub
will not light up immediately,
but will start ashing in 180
seconds.
Lights up red.
The hub is not connected to
the internet or there is no
connection with the Ajax
Cloud service.
If the external power supply is
off, the indicator will ash
every 10 seconds.
After a loss of power, the hub
will not light up immediately,
but will start ashing in 180
seconds.
Lights up 180 seconds after
the loss of power, then ashes
every 10 seconds.
The external power supply is
disconnected.
The LED indication colour
depends on the number of
communication channels
connected.
Blinks red. The hub is reset to factory
settings.
If your hub has different indications, please contact our . They
will help you.
Access to indications
Hub users can see the Alerts and Malfunctions indication after they:
Technical Support
Arm/disarm the system using the Ajax keypad.
Enter the correct user ID or personal code on the keypad and perform an
action that has already been performed (for example, the system is

All users can see the Changing hub’s state indication.
British Disco
The function is enabled in the hub settings in the PRO app (Hub
→
Settings
→
Services
→
LED indication).
Indication is available for hubs with rmware version OS Malevich 2.14 or higher and in
apps of the following versions or higher:
Indication Event Note
Changing hub’s state
White LED ashes once per
second.
Two-Stage Arming or Delay
When Leaving.
One of the devices is
performing Two-Stage Arming
or Delay When Leaving.
Green LED ashes once per
second. Entry indication.
One of the devices is
performing Delay When
Entering.
White LED lights up for 2
seconds.
Arming is completed. The hub (or one of the groups)
is changing its state from
disarmed and the disarm button is pressed on the keypad).
Press the SpaceControl button to arm/disarm the system or activate Night
Mode.
Arm/disarm the system using Ajax apps.
Ajax PRO: Tool for Engineers 2.22.2 for iOS
Ajax PRO: Tool for Engineers 2.25.2 for Android
Ajax PRO Desktop 3.5.2 for macOS
Ajax PRO Desktop 3.5.2 for Windows

Disarmed to Armed.
Green LED lights up for 2
seconds. Disarming is completed.
The hub (or one of the groups)
is changing its state from
Armed to Disarmed.
Alerts and Malfunctions
Red and purple LED ashes in
sequence for 5 seconds. Conrmed hold-up alarm.
There is an unrestored state
after a conrmed hold-up
alarm.
The indication
is displayed
only if
Restoration
after conrmed
hold-up alarm is
enabled in the
settings.
Red LED lights up for 5
seconds. Hold-up alarm.
There is an unrestored state
after a hold-up alarm.
The indication
is not displayed
if there is a
conrmed hold-
up alarm state.
The indication
is displayed
only if
Restoration
after hold-up
alarm is
enabled in the
settings.
Red LED ashes. The number of ashes equals
the Device No. of a hold-up
There is an unrestored state
after the conrmed or
unconrmed hold-up alarm:

device (DoubleButton), the rst
to generate the hold-up alarm.
or
Yellow and purple LED ashes
sequentially for 5 seconds. Conrmed intrusion alarm.
There is an unrestored state
after the conrmed intrusion
alarm.
The indication
is displayed
only if
Restoration
after conrmed
intrusion alarm
is enabled in the
settings.
Yellow LED lights up for 5
seconds. Intrusion alarm.
There is an unrestored state
after the intrusion alarm.
The indication
is not displayed
if there is a
conrmed
intrusion alarm
condition.
The indication
is displayed
only if
Restoration
after intrusion
alarm is
enabled in the
settings.
Single hold-up alarm
Conrmed hold-up alarm

Yellow LED ashes.
The number of ashes equals
the Device No. that rst
generated the intrusion alarm.
There is an unrestored state
after the conrmed or
unconrmed intrusion alarm:
or
Red and blue LED ashes in
sequence for 5 seconds. Lid opening.
There is an unrestored tamper
state or an open lid on any of
the devices, or the hub.
The indication
is displayed
only if
Restoration
after Lid
opening is
turned on in the
settings.
Yellow and blue LED ashes in
sequence for 5 seconds.
Other malfunctions. There is an unrestored fault
state or a malfunction of any
device or the hub.
The indication
is displayed
only if
Restoration
after faults is
enabled in the
settings.
Currently,
Restoration
after faults is
not available in
Ajax apps.
Single intrusion alarm
Conrmed intrusion alarm

Dark blue LED lights up for 5
seconds. Permanent deactivation.
One of the devices is
permanently deactivated or
the lid state notications are
disabled.
Blue LED lights up for 5
seconds. Automatic deactivation.
One of the devices is
automatically deactivated by
an opening timer or the
number of detections.
Green and blue LED ashes in
sequence.
Alarm timer expiration.
Displayed after the alarm timer
expires (to conrm the alarm).
Alert indication
If the system is disarmed and any of the indications from the table is present,
the yellow LED ashes once per second.
If there are several states in the system, the indications are displayed one by one, in the
same sequence as shown in the table.
Ajax account
The security system is congured and controlled through . Ajax
applications are available to professionals and users on iOS, Android, macOS,
and Windows.
The settings of Ajax system users and the parameters of connected devices are
stored locally on the hub and are inextricably linked with it. Changing the hub
administrator does not reset the settings of the connected devices.
To congure the system, install the Ajax app and . One phone
number and email address may be used to create only one Ajax account. There
Learn more about
Alarm conrmation
feature
Ajax apps
create an account
Other manuals for Hub 2 Plus
5
Table of contents
Other AJAX Switch manuals


 User manual")


