Akai AKDVD10 User manual

10.1”Portable
DVD Player
User Manual
MODEL: AKDVD10

2
Welcome
Welcome to AKAI.
This user manual tells you all you need to know about setting up your new product.
Please take special note of any important safety and usage information presented with the symbol.
All products brought to you by AKAI are manufactured to the highest standards of performance and safety
and, as part of our philosophy of customer service and satisfaction, are backed by a comprehensive
1Year Warranty.

3
Welcome 2
Product Overview 4
Controls and Connections 5
Remote Control 9
Operation 12
Troubleshooting 21
Specifications 23
Compliance and Responsible Disposal 24
Contents

4 | PRODUCT OVERVIEW
Product Overview
A. 10.1” Portable DVD Player
B. Remote Control
C. AAA Batteries
D. Car Adaptor
E. AC Adaptor
F. AV Cable
G. User Manual
H. Warranty Certificate
I. General Safety Warnings
What’s in the box:
I

CONTROLS AND CONNECTIONS | 5
Controls and Connections
1. LCD screen
2. Speakers
3. Infra-red signal receiver: Accepts
remote control signal.
Left LED Indicator: Red during charging,
green when fully charged.
Right LED indicator: Green when player
is on, red when on standby.
Front view
1
3
2

6 | CONTROLS AND CONNECTIONS
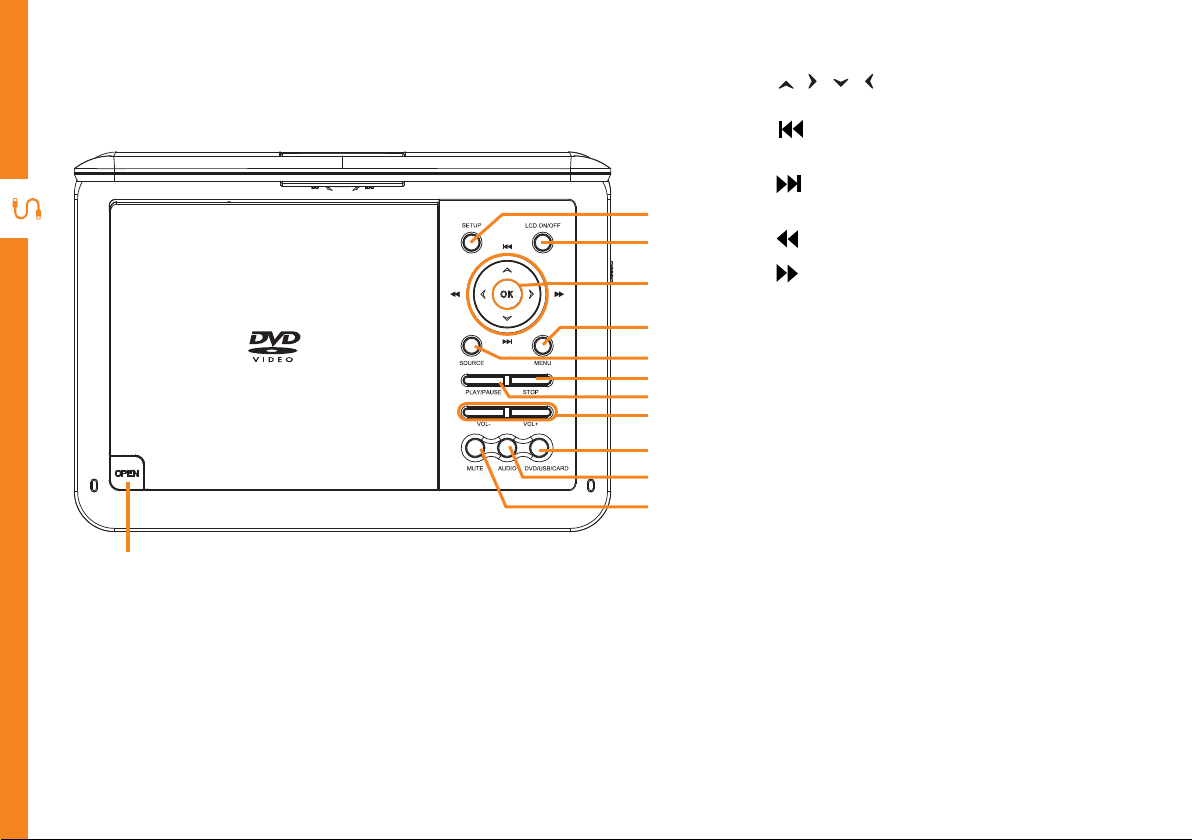
Top view
15
4
5
6
7
8
9
10
11
12
13
14
4. SETUP: Access/exit the System
Setup menu.
5. LCD ON/OFF: Press to turn on/off the
display.
6. / / / : Navigate in the system
menu.
PREV: Skip to the previous title,
chapter, or track.
NEXT: Skip to the next title,
chapter, or track.
REV: Fast rewind.
FWD: Fast forward.
OK: Confirm or enter.
7. MENU: Return to disc main menu in
DVD mode. Set the PBC menu function
on/off in VCD mode.
8. SOURCE: Press repeatedly to cycle
through DVD/AV IN modes.
9. STOP: Stop media playback.
10. PLAY/PAUSE: Play and pause playback.
11. VOL - / VOL + : Decrease/Increase
volume.
12. DVD/USB/CARD: Switch between DVD,
USB and SD Card mode.
13. AUDIO: Press to select different audio
tracks.
14. MUTE: Mute or unmute the sound.
15. OPEN: Push down to open the disc
compartment cover.

CONTROLS AND CONNECTIONS | 7
More on next page.
Side view
16 17 18 19 20 21 22
16 USB
STORAGE
Insert a USB to playback your music and photos.
17 SD Card Slot
STORAGE
Insert a SD/MMC memory card to playback your multi-media
files, including videos, music and photos.
18 Headphone
Jack
SOUND
Connect to your earphones, amplifier or audio device, using
an AUX cable (not included).
16. USB Slot: See below.
1 7. SD Card Slot: See below.
18. Headphone Jack: See below
19. AV OUT Socket: See next page.
20. AV IN Socket: See next page.
21. ON/OFF Switch: Turn ON/OFF
power to the unit completely.
22. DC IN: See next page.

8 | CONTROLS AND CONNECTIONS
19 AV OUT
PICTURE
SOUND
Send the image from the DVD player to aTV screen using
the supplied AV cable.The AV cable must be connected to
an externalTV device and the DVD screen will be off when
viewing from aTV screen.
20 AV IN
PICTURE
SOUND
Send the image from another device to the DVD player using
the supplied AV cable.
22 DC IN
POWER
Connect the supplied AC adaptor or car adaptor to power and
charge the unit.

REMOTE CONTROL | 9
Setup
Insert two AAA size batteries according to the polarity
markings (+ / -) inside the compartment. Make sure
the batteries are correctly aligned and properly
pushed into place.
Precautions When Using Batteries
• Do not use old and new batteries together.
• Do not use different types of batteries (e.g.
Manganese and Alkaline batteries) together.
• Remove the batteries from the remote if you do
not intend to use it for a long time.
• When discarding used batteries, follow any
guidelines for recycling and disposal of batteries
that apply in your local area.
• Keep batteries away from children and pets.
• Never throw batteries into a fire or expose them
to extreme heat.
Remote Control
AAA size
batteries
included
1
2
3

10 | REMOTE CONTROL
POWER
VOLUME
1 2 3 +
-
4 5 6
78 9
0/10 10+
MUTE
SOURCESETUP
OK
OSD DVD/USB/SD
LCD ON/OFF
POWER
VOLUME
1 2 3 +
-
4 5 6
78 9
0/10 10+
MUTE
SOURCESETUP
OK
OSD
SUBTITLE STEP STOP TITLE/MENU
ANGLE ZOOM GOTO AUDIO
PROG A-B SLOW REPEAT
DVD/USB/SD
LCDON/OFF
Remote Control
LCD ON/OFF:Turns off the
display while still playing audio
to help save battery life.
NUMBER BUTTONS: Numerical
input to directly access a specific
chapter or track.
SETUP: Access/exit the System
Setup menu.
/ / / : Navigate the
System menu.
OK: Confirm a selection.
: Skip to the previous title,
chapter or track.
: Fast rewind current track.
POWER: Put the DVD Player on
Standby/ON.
VOL + / VOL - : Adjust the
volume level.
/ MUTE: Mute the sound;
press again to restore the sound.
(This will mute the AV output
sound aswell).
SOURCE: Press repeatedly to
cycle through DVD/AV IN mode.
: Skip to the next title, chapter
or track.
: Fast forward current track.
: Play/pause playback.

REMOTE CONTROL | 11
POWER
VOLUME
1 2 3 +
-
4 5 6
7 8 9
0/10 10+
MUTE
SOURCESETUP
OK
OSD
SUBTITLE STEP STOP TITLE/MENU
ANGLE ZOOM GOTO AUDIO
PROG A-B SLOW REPEAT
DVD/USB/SD
LCD ON/OFF
POWER
VOLUME
1 2 3 +
-
4 5 6
78 9
0/10 10+
MUTE
SOURCESETUP
OK
OSD
SUBTITLE STEP STOP TITLE/MENU
ANGLE ZOOM GOTO AUDIO
PROG A-B SLOW REPEAT
DVD/USB/SD
LCDON/OFF
OSD: Display/hide detailed
information about the currently
playing media.
SUBTITLE:Turn the subtitle on/off.
STEP: Press to freeze the current
frame, press repeatedly for
following frames.
ANGLE: While playing a DVD
with multi-angle recording, press
repeatedly to select the viewing
angle.
ZOOM: During DVD playback, press
repeatedly to zoom in or out of the
picture.
PROG: Enter or exit the PROGRAM
function.
A-B: During DVD playback, press to
define a starting point, then press
again to define a finishing point.The
selected portion will then be played
continuously.To cancel, press the
A-B button again. (Function not
available for all discs.)
DVD/USB/SD: Switch between
DVD, USB and SD card playback
mode.
TITLE/MENU: Return to the disc’s
title menu in DVD mode.Turn
the PBC menu on/off during VCD
playback.
/ STOP: Stop playback.
AUDIO: DVD mode: select multi
language sound. CD/VCD/SD card/
USB: select audio channel.
GOTO: Press to input a specific
title/chapter/time to jump to on the
DVD/CD.
REPEAT: Press repeatedly to cycle
through available repeat modes.
SLOW:To play the video in slow
speed.

12 | OPERATION
Operation
Rotating the Screen
Place the player on a level surface and open up the monitor vertically, while holding the lower side of the
player.
• To rotate the monitor for viewing from the right side, turn it to the right slowly. It can be turned up to 90°.
• To rotate the monitor for viewing on the left side, turn it to the left slowly. Do not force it beyond 180°.
• Adjust the angle of the monitor backwards or forwards for comfortable viewing.The monitor can also be
laid flat.
NOTE: Do not store the DVD Player with the screen side facing up.This can damage the screen.
Powering the DVD Player
• This device is powered by a rechargeable lithium battery.
• To charge the battery, connect the DC jack of the AC/car adaptor to the socket and connect the adaptor to
an appropriate electrical outlet.
WARNING: Only use the supplied AC/car adaptor for charging the DVD Player. Charging with a different
adaptor may cause damage or an explosion.
WARNING: Do not leave the DVD player unattended while charging.
• During charging, the red LED light will illuminate indicating that the battery is being charged. It takes about
4 hours to fully charge the battery. With a full charge, the player can be used continuously for up to 120
minutes hours without recharging.

OPERATION | 13
• Once fully charged you can disconnect the device from the charger, or leave the charger connected and
run the player on the mains electricity to save battery power.
• You can also recharge and run the player in the car with the supplied car power adaptor, which attaches
easily to the car’s cigarette lighter.The car adaptor can only support vehicles with 12V output. Larger
vehicles that may use 24V output are not supported.
NOTE: During playback, it is normal for the appliance to produce heat. Avoid using for an extended period of
time.
Turning the Player ON/OFF
Once the player is fully charged, or connected to an electrical outlet via the AC/DC power adaptor, slide the
POWER switch (on the right side of the player) to turn the player on.The indicator light will glow green. Slide
the power switch to OFF to turn it off.

14 | OPERATION
DVD/CD Playback
• Gently press on the OPEN button to open the disc cover. Any protective sheeting under the disc cover
must be removed before first use.
• Place a disc with the playback side facing down and the label facing up and gently push on the center of
the disc to fix it to the spindle.The player will not recognise the disc if it is not inserted correctly.
• Close the disc cover.The disc will begin to play automatically. If this does not occur, press the button.
• Pause: Press the button to pause playback. Press again to resume playing.
• Stop: Press the button to stop playback.
• Forward/Rewind: Press the / buttons to fast forward/rewind. Repeat this motion to increase the speed.
Press PLAY to resume playing.
• Previous/Next track:Tap the / buttons for previous/next track.
• GOTO: Press the GOTO button and enter a title, chapter, track or time and press OK.
• PROGRAM: Press the PROG button to access the playlist setup menu. Key in the desired track or chapter
numbers into the list in sequence. Select the PLAY option at the bottom of the screen to start playing the
programmed sequence. Select CLEAR to cancel the program function.
• Other functions such as angle, audio language and subtitles are available depending on the disc format
and content.
• NOTE: If the unit is connected to an external screen such as aTV, ensure that theTV is switched to the
correct input mode (such as AV mode). The DVD screen will turn off when the AV cable is plugged into the
TV.To resume watching from the DVD screen, please unplug the AV cable from theTV.
• To remove the disc, press the OPEN button and remove the disc by lifting from beneath while gently
pressing down on its centre.

OPERATION | 15
Adjusting the Volume
Use the VOL- and VOL+ buttons on the main unit (or on the remote control) to adjust the volume of the speaker
or headphones.
NOTE: If the unit is connected to an external screen such as aTV, muting the DVD player’s volume will muteTV
sound as well. For all other sound controls, useTV controls.
Using Headphones
To listen to audio using headphones, plug them into the headphone jack on the right side of the player. The
speakers will automatically disable the sounds output when headphones are connected.
• Turn OFF the player before connecting/disconnecting the headphone cable as movements from moving
the plug may cause disc damage.
CAUTION:To prevent permanent hearing damage, keep the volume at a moderate level when using
headphones. Before connecting, turn down the volume and then re-adjust it when playback starts.

16 | OPERATION
USB/Multimedia Playback
This unit only supports USB devices with a FAT32 file system and maximum of 32GB.
• This unit supports playback of video, music, JPEG and e-book (txt) files. However, due to other variations
in file formats, some files may not play even though they are supported devices.
• DO NOT use external Hard Disk Drives as they are generally not suitable for use with this unit. We suggest
using USB flash drives up to 32GB and formatted in the FAT32 file system.
• Only use USB2.0 USB media.
Playing Content From a USB Drive or SD/MMC Card
This unit supports playback of video, music, JPEG and e-book (txt) files.
• Insert a USB drive into the USB port (and/or a SD/MMC memory card into the card slot) on the right side of
the player.
• Press the DVD/USB/CARD button on the unit or the DVD/USB/SD button on the remote to enter the source
selection screen.
• Use the / / / navigation buttons to select the desired source and press the OK button to confirm
selection.
• Press theTITLE/MENU button to return to the USB/SD card main menu.
• Use the appropriate buttons on the unit or on the remote to control multimedia playback.

OPERATION | 17
Connecting to TV
• Connect the 3.5mm end of the supplied AV cable to the AV OUT jack of the Portable DVD Player.
• Connect theYellow RCA plug to the Video In jack of theTV.
• Connect the Red RCA plug to the Audio In R jack of theTV.
• Connect the White RCA plug to the Audio In L jack of theTV.
• Using theTV remote control, switch theTV input source to AV mode.
• Note: AV IN and AV OUT modes cannot work simultaneously. During AV IN mode, the AV OUT port has no
signal output.The DVD screen will turn off when the AV cable is plugged into theTV.To resume watching
from the DVD screen, please unplug the AV cable from theTV.
Watch Videos From an External Video Source
• Connect the 3.5mm end of an AV cable (included) to the AV IN jack of the Portable DVD Player.
• Connect theYellow RCA plug to the Video Out jack of the external video device.
• Connect the Red RCA plug to the Audio Out R jack of the external video device.
• Connect the White RCA plug to the Audio Out L jack of the external video device.
• Press the SOURCE button on the Portable DVD Player or the remote control to change the input source to
AV IN mode.

18 | OPERATION
System Setup Options
Menu Operation
• Press the SETUP button on the unit or the remote control to display the system setup menu, where you
can configure the operation of the player.
• Use the and arrow keys to select the setup page.
• Use the and keys to select the setup items you want to adjust, then press OK or to access. Press the
and arrow keys to choose options, and press the OK button to confirm your adjustments.
• Use the arrow keys to keep selecting other setup items for adjustment.
• Press to return to the previous level menu.
• Press the SETUP button again to exit the system setup menu.
System Setup Menu
TV System
You can select PAL, NTSC or Auto, depending on the disc type.
Note: this function only works when an AV cable is plugged into the AV OUT port of the DVD player to a
externalTV screen.
Power Resume
This enables the player to remember the last playback point on the disc before it was turned OFF or stopped.
When the disc is started again, it will start playing from this memory point.This feature can be turned on or off.

OPERATION | 19
Screen Saver
The screen saver will activate when you pause the video for over 5 minutes. Press any button to exit the
screen saver. You can turn this setting on or off.
When the screen saver is on for 5 minutes, the DVD player will go into standby mode. Press the power button
on the remote control to turn the DVD player back on.
TV Type
Set screen aspect ratios:
• 4:3PS: When the unit is connected to aTV, a wide screen picture will display on the entireTV screen, but
sections of the right and left of the picture are cut off.
• 4:3LB: when the unit is connected to aTV, a wide screen picture will display on the entire screen, but with
black stripes above and beneath the picture.
• 16:9: When this machine is connected to a wide screenTV, you can select this option.The wide screen
image will be displayed across the full screen, stretched horizontally.
Default
Restore to factory default settings.
Language Setup
Choose from a selection of languages for OSD (On-Screen Display), Audio, Subtitle and Menu language.
Note: if the video disc does not contain the selected language, the default setting of the video will be selected.

20 | OPERATION
TFT Setup
Adjust the brightness, Contrast, Hue and Saturation of the DVD screen.
Video Setup
Adjust the Video Out signal, including Brightness, Contrast, Hue, Saturation and Sharpness.
Digital Setup Menu
Downmix
Use to combine 5.1 channel digital audio and 2.0 channel stereo audio.
• LT/RT: downmixes from 5.1 channel to stereo. Available for 5.1 channel DVDs only. For CD play, please
select "stereo".
• Stereo: available for CD play. The left speaker will play on the rear left channel and the right speaker will
play on the rear right channel.
Table of contents
Other Akai Portable DVD Player manuals

Akai
Akai AKPD-890 User manual

Akai
Akai ACVDS737TG User manual

Akai
Akai ACVDS950 User manual

Akai
Akai ACVDS820T User manual

Akai
Akai ACVDS727 User manual

Akai
Akai AKPDVD702D User manual

Akai
Akai HC-PDV9018 User manual

Akai
Akai ACVDS736T User manual

Akai
Akai ACVDS940UCX User manual

Akai
Akai ACVDS955 User manual