Akai APV-4300MB User manual


E - 1
SAFETYPRECAUTIONS
WARNING:
TO PREVENT FIRE OR SHOCK HAZARD, DO NOT EXPOSE THIS APPLIANCE TO RAIN OR
MOISTURE.
WARNING: TO REDUCE THE RISK OF ELECTRIC
SHOCK, DO NOT REMOVE COVER (OR BACK). NO
USER-SERVICEABLE PARTS INSIDE. REFER
SERVICING TO QUALIFIED SERVICE PERSONNEL.
WARNING The lightning flash with an arrowhead symbol, within
theequilateraltriangle,isintendedtoalerttheuserto
the presence of uninsulated "dangerous voltage"
withintheproduct'senclosurethatmaybeofsufficient
magnitude to cause an electric shock.
The exclamation point within the equilateral triangle
is intended to alert the user to the presence of
important operating and maintenance (servicing)
instructions in this owner manual.
Notes on Copyright
It is forbidden by law to copy, broadcast, show, broadcast on cable, play in public, rent copyrighted material
without permission.
Apparatus Claims of U.S. Patent Nos. 4,631,603; 4,577,216; 4,819,098 and 4,907,093 licensed for limited
viewing uses only.
DVD video discs are copy protected, and any recordings made from these discs will be distorted. This product
incorporates copyright protection technology that is protected by method claims of certain U.S. patents and
other intellectual property rights owned by Macrovision Corporation and other rights owners. Use of this
copyright protection technology must be authorized by Macrovision Corporation, and is intended for home and
other limited viewing uses only, unless otherwise authorized by Macrovision Corporation. Reverse engineering
or disassembly is prohibited.
On Placement
• Do not use the Unit in places which are extremely hot, cold, dusty, or humid.
• Place the Unit on a flat and even surface.
• Do not restrict the air flow of the Unit by placing it in a place with poor air flow, by covering it with a cloth, or
by placing it on carpeting.
On Safety
• When connecting or disconnecting the AC cord, grip the plug and not the cord itself. Pulling the cord may
damage it and create a hazard.
• When you are not going to use the Unit for a long period of time, disconnect the AC power cord.
On Condensation
• When left in a heated room where it is warm and damp, water droplets or condensation may form inside the
Unit. When there is condensation inside the Unit, the Unit may not function normally. Let the Unit stand for
1 to 2 hours before turning the power on, or gradually heat the room up and dry the Unit before use.
WARNING:
• Should any trouble occur, disconnect the AC power cord and refer servicing to a qualified technician.
This product contains a
low power laser device.
CAUTION
INVISIBLELASERRADIATIONWHEN
OPENANDINTERLOCKSDEFEATED.
AVOIDEXPOSURETOBEAM
CLASS 1 LASER PRODUCT
APPAREIL À LASER DE CLASSE 1
PRODUCTO LASER DE CLASE 1
PRODUTO LASER CLASSE 1
This symbol means that the unit complies with
European safely and electrical interference
directives.

E - 2
TABLE OF CONTENTS
Repeat Playback .............................. 20-21
Repeatingatitle/chapter(DVD)............................20
Repeatingasingletrack/wholedisc(CD)...........20
Repeatingaspecificsection(DVD/CD)..............21
PlayingMP3andPictureFileDisc...22-23
PlayingaMP3filedisc............................................22
PlayingaPicturefiledisc.......................................23
PlayingaMP3/Picturefiledisc...............................23
Customizing the Function
Settings.............................................24-27
LANGUAGEsetting..................................................24
VIDEOsetting......................................................24-25
AUDIOsetting....................................................25-26
RATINGsetting...................................................26-27
Language Code List for
Disc Language ...................................... 28
Maintenance..........................................29
CleaningDisc..........................................................29
CleaningtheUnit...................................................29
ImportantNote.......................................................29
Trouble Shooting Guide ................. 29-30
Videobaginstallation............................31
Safety Precautions ..................................1
TableOfContents ....................................2
DiscFormats............................................3
Accessories...............................................4
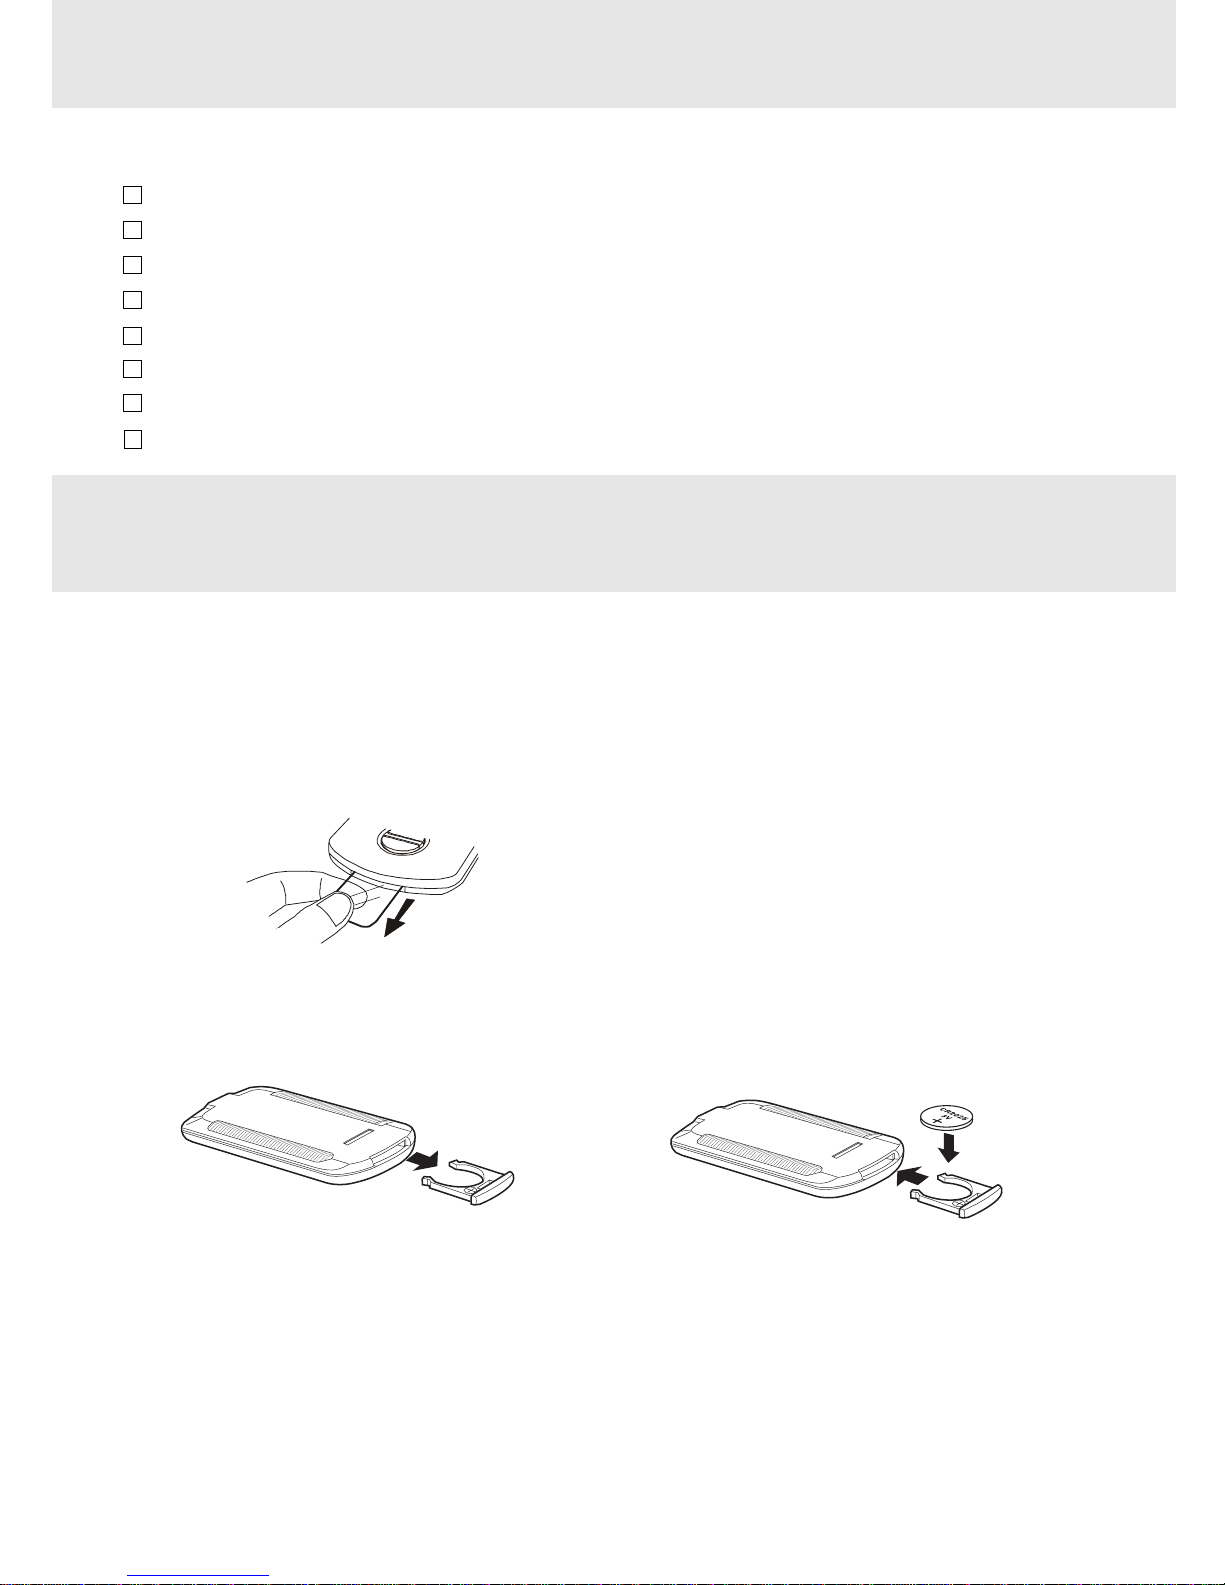
RemoteControl........................................4
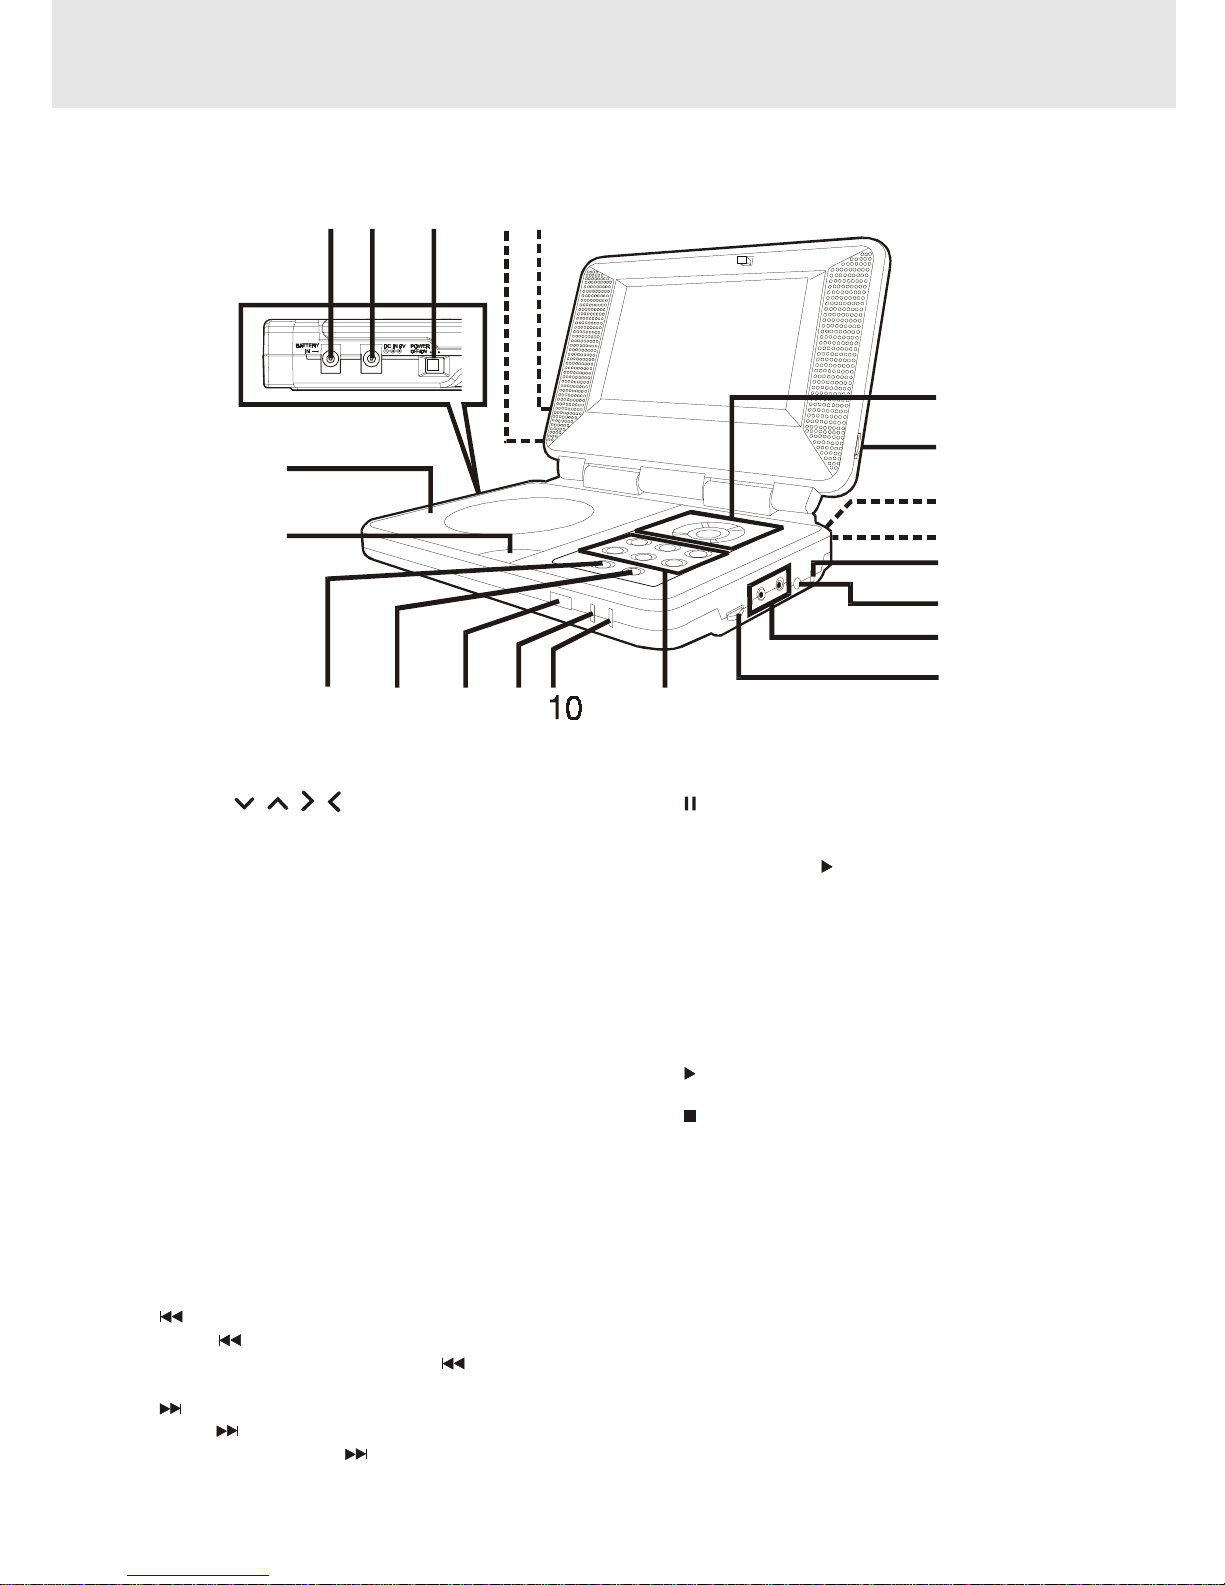
Control Reference Guide .................... 5-6
Power Supply ...................................... 7-9
Using the AC adaptor ...................................... 7
Usingthecaradaptor............................................7
Using therechargeablebatterypack...............8-9
Turningontheunit................................................9
Connecting other Equipment ......... 10-12
ConnectingtheVCR............................................10
ConnectingtheTV................................................10
Anothersourceconnection................................11
Usingearphones....................................................12
Adjusting the Sound ............................ 12
Playing a Disc ................................... 13-15
PlayingDisc..........................................................13
Pausingplayback(stillmode)...............................13
Stoppingplayback.................................................13
Toskiptoadifferenttrack......................................13
FastFoward/FastReverse.....................................14
Skip(Forward/Reverse)..........................................14
Zoomingintoanimage .........................................14
Angleselection.......................................................15
Audioselection.......................................................15
Subtitleselection....................................................15
Special Functions ............................ 16-18
Displayfunction..................................................16
Locatingaspecifictitle .........................................17
Locatingaspecifictitle/chapter/track..................17
Locatingaspecifictime.........................................18
Anglesetting...........................................................18
Audiosetting..........................................................18
Subtitlesetting.......................................................18
CD / DVD programmable memory ....... 19
DVDprogrammablememory.................................19
CDprogrammablememory..................................19

E - 3
The unit can playback.
Region Management Information
RegionManagementInformation:ThisunitisdesignedandmanufacturedtorespondtotheRegionManagement
Information that is encoded on DVD discs. If the Region number printed on the DVD disc does not correspond
to the Region number of this unit, this unit cannot play that disc.
The region number of this unit is 2.
Disc Function or Operation that is Not Available
Whenthe symbolappearsonthe screen,itindicatesthatthefunctionor operationattemptedisnotavailable
at that time. This occurs because the DVD disc manufacturer determines the specific functions. Certain
functions may not be available on some discs. Be sure to read the documentation provided with the DVD.
6
+D=FJAH +D=FJAH+D=FJAH +D=FJAH +D=FJAH!
DVDs
[8cm/12cm disc]
Notes on Unauthorized Discs
You may not be able to play back some DVD discs on this unit if they were purchased from outside your
geographic area or made for business purposes.
Title, Chapter and Tracks
• DVDs are divided into “titles” and “chapters”. If the
disc has more than one movie on it, each movie would
be aseparate “title”. “Chapters” are sections of titles.
• Audio CDs are divided into “tracks”. A “track” is
usually one song on an Audio CD.
Note :
• Numbers identify each title, chapter, and track on a disc. Most discs have these numbers recorded on them,
but some do not.
Track 1 Track 2 Track 3 Track 4 Track 5
Icons Used on DVDs
Sample lcons Language selections for audio
Language selections for subtitles
Screen aspect ratio
Multiple camera angles
Region code indicator
Notes:
• ThisUnit supports2-channel(L/R) audio and 5.1ch (Multi-channel)MPEG Audio1/2(only when the DIGITAL
AUDIO OUT coaxial jack is used for connection). It does not support 7.1 channel MPEG Audio Version 2.0.
• When playing back a CD-G (Graphics) or CD EXTRA disc, the audio portion will be played, but the graphic
images will not be shown.
DISCFORMATS
Compatible
Audio CDs
[8cm/12cm disc]
2
2
2
2
1. English
2. French
1. English
2. French

E - 4
Using the Remote Control
• Point the Remote Control at the REMOTE SENSOR located on the unit.
• When there is a strong ambient light source, the performance of the infrared REMOTE SENSOR may be
degraded, causing unreliable operation.
• The recommended effective distance for remote operation is about 16 feet (5 meters).
Take out the PVC sheet before operating the Remote Control.
REMOTECONTROL
ACCESSORIES
BATTERY REPLACEMENT
When battery become weak, the operating distance of the Remote Control is greatly reduced and you
will need to replace the battery.
NOTE:
• If the Remote Control is not to be used for a long time, remove the battery to avoid damage caused by
battery leakage corrosion.
• WARNING: Do not dispose of batteries in fire, batteries may explode or leak.
TO CHANGE REMOTE BATTERY
1. Open the battery door. 2. Insert one CR2025 (3V) size battery.
Please check and identify the supplied accessories.
Remote control(withbattery).............................................................................................x1
ACadaptor..........................................................................................................................x1
ACpowercord.....................................................................................................................x1
Carplugadaptor..................................................................................................................x1
Earphones...........................................................................................................................x1
Rechargeable battery pack (For APV-4300MB only) ........................................................ x 1
Batterycharger(ForAPV-4300MBonly)............................................................................x1
Carryingbag........................................................................................................................x1

E - 5
CONTROLREFERENCEGUIDE
Remote Control
1) ZOOMbutton
Zoom into an image of a DVD.
TV MODE button
In stop mode, select whether to output the
video signal. TV shows "AUTO" means output
signal depends on DVD (either NTSC or PAL).
TVshows"PAL"or"NTSC"whichmeansoutput
signal fixed to PAL or NTSC.
2) STOP button
Stop playing a disc.
PLAY button
Press to start or resume playback a disc.
PAUSE button
Pause playback, frame advance.
3) PREV button
Move reverse through titles, chapters or tracks
on a disc.
4) / SEARCH buttons
SEARCH:Fast reverse playback.
SEARCH:Fast forward playback.
5) Number (0 - 9) buttons
Use when creating programs, and entering a
parental level password. To select a CD/MP3
track directly.
6) MEM / ANGLE button
In stop mode, enter the number of a selected
chapter or track.
During DVD playing, switch the camera angle
of the video presentation when scenes with
multiple camera angles are recorded on a
DVD.
7) REPEAT A - B button
Perform point-to-point repeat playback on a
DVD or CD.
8) MENU button
Open and close DVD's menu.
9) NEXT button
Moveforwardthroughtitles, chaptersortrackson
a disc.
10) Cursor ( , , , ) buttons
Use to highlight selections on a menu screen and
make adjust certain settings.
ENTERbutton
Confirm selections on a menu screen.
11) AUDIObutton
Selectoneoftheaudiosoundtracksprogrammed
on a DVD or selects the audio output mode on a
AUDIO CD.
12) SUBTITLE/RETURN button .....
Selectone of thesubtitle languagesprogrammed
on a DVD.
Return to the normal operation after using the
SETUP menu of a DVD.
13)GOTO button
Skip directly to a specific location on a DVD disc.
14) DISPLAY button
Change disc status information displayed on the
screen.
15) VIRTUALbutton
To obtain expansive virtual surround sound
effects from just two speakers.
16) SETUP/REPEAT-DISC button
In stop mode, Open and close the SETUP menu
of the unit.
Repeat chapter or title of a DVD.
Repeat single track or whole CD.

E - 6
Unit
CONTROLREFERENCEGUIDE
1) Cursor ( , , , ) button
Use to highlight selections on a menu screen and
makeadjustcertainsettings.
ENTER button
Confirmselectionsonamenuscreen.
2) BRIGHTNESSbutton
Adjusttherelativelightnessordarknessofthecolour.
3) S-video output jack
4) DIGITAL OUT jack
5) AV IN / DVD switch
Turnoff to AV IN mode. Turninto DVD mode.
6) AV IN / OUT jacks
7) Headphonejacks
8) VOLUMEcontrol
Adjustthevolume.
9) ZOOM button
ZoomintoanimageofaDVD.
AUDIO button
Select one of the audio soundtracks programmed
on a DVD or selects the audio output mode on a
AUDIOCD.
MENU button
Open and close DVD's menu.
PREV button
Press PREV button to go back to previous
chapters /tracks. Press and hold PREV button
tobeginfastscan.Fourspeedsare available.
NEXT button
Press NEXT button to advance to chapters /
tracks.Pressandhold NEXTbuttontobeginfast
scan.Fourspeeds areavailable.
PAUSE/SETUPbutton
Presstopauseplaybackofdisc.Eachtimeyoupress
thePAUSEbuttonthepictureadvancesoneframe.
Pressthe PLAY buttonto resumeplayback.
In stop mode, open and close the SETUP menu
of the unit.
10) Battery low indicator
11) POWERONindicator
WhenthePOWERON/OFFbuttonisswitchedtoON
position,thelightwillilluminate.
12) Remotesensor
Receivetheremotecontrolunitsignals.
13) PLAY button
Press to start or resume playback a disc.
14) STOP button
Stopplayingadisc.
15) Open button
Openthe disc door.
16) DiscDoor
Close tray by pushing the disc door.
17) Batteryinjack
18) DC IN 9V jack
19) POWER ON/OFF switch
20) SCREENswitch
16:9Wide-screen
4:3 Pan screen
21) COLOUR control
Adjustforcolourintensity.
1
2
3
4
5
6
7
8
9
20 21
111213
14
16
15
1718 19

E - 7
POWERSUPPLY
B. Using the car adaptor
The included 9V car plug adaptor is designed for use with vehicles that have a 12V, negative ground
electrical system.
Cautions:
• Use this unit only with the included 9V car plug adaptor, use with other car adaptor could damage the unit.
• The included 9V car plug adaptor are for use with this unit only. Do not use them with other equipment.
• In the interests of the traffic safety, do not perform operations on the unit or view video software while driving
a vehicle.
• Make sure the unit is fastened correctly to prevent from falling in the vehicle in the event of an accident.
• When the inside of the cigarette lighter socket is dirty with ashes or dust, the plug section may become hot
due to poor contact. Be sure to clean the cigarette lighter socket before use.
• After use, disconnect the 9V car plug adaptor from both the unit and cigarette lighter socket.
Cautions:
• The included AC power supply cord and AC adaptor are for use with this unit only. Do not use them with other
equipment.
• When the unit is not going to be used for long time, disconnect the AC power supply cord from the AC outlet.
Input:12V
Output:9V
Carplugadaptor
Left side of unit
1
To DC IN 9V jack
2
To the cigarette lighter socket
ACadaptor
SP0902200-W01
Left side of unit
3
To AC outlet
Powerindicator
1
To DC IN 9V jack
2
To AC adaptor
ACpowercord
A. Using the AC adaptor
This AC adaptor operates on AC between 100V and 240V, but
• IntheEuropeandHongKong,theACpowersupplycordmustbeconnectedto a230V-240VACpowersupply
only.
• When connecting to an AC supply outside of the Europe and Hong Kong, use a plug adaptor to suit the AC
outlet configuration.
(continuedtonextpage)(continuedtonextpage)
(continuedtonextpage)

E - 8
POWERSUPPLY
C. Using the rechargeable battery pack (For APV-4300MB only)
• Charge the rechargeable battery pack before using them for the first time.
• The rechargeable battery pack is suitable when adapting the unit for portable use and when it is convenient for
you to enjoy the unique functions of the unit out of doors.
To recharge the battery
Remove the rechargeable battery pack from the unit (if being used).
• Recharging is complete when charging indicator goes out. Unplug the AC power supply cord from the AC
adaptor, then unplug the battery pack from the battery charger.
To attach rechargeable battery pack
Attach it at the corresponding position at the back of the unit.
ACADAPTOR
BATTERYCHARGER
(DC 9V 2.2A) 2
To "ADAPTOR IN" jack
TO "BATTERY
IN" JACK
RECHARGEABLE BATTERY PACK
Left side of unit
6
Rear of unit
RECHARGEABLE
5
ATTACH
RECHARGEABLE
BATTERYPACK
TO UNIT
BATTERY PACK
RECHARGEABLE BATTERY PACK
(7.4V3600mAhLi-ionBattery)
1
To "BATTERY IN" jack
POWERindicator
CHARGINGindicator
4
To wall outlet 3
To AC ADAPTOR
Cautions:
• The included AC power supply cord and AC adaptor are for use with this unit only. Do not use them with other
equipment.
• When the unit is not going to be used for long time, disconnect the AC power supply cord from the AC outlet.
S-VIDEO
OUT DIGITAL
OUT
(continuedtonextpage)(continuedtonextpage)
(continuedtonextpage)

E - 9
Disconnecting the Battery Pack from the unit.
POWERSUPPLY
Condition and attention:
• When RECHARGEABLE BATTERY PACK battery is low, player will stop playing.
• During the playback, if the battery is low, the BATTERY LOW indicator on the unit front panel will turn red and
blink. At this time, please recharge the battery.
• Do not short-circuit the terminals.
• Use only the supplied AC ADAPTOR and BATTERY CHARGER to recharge the rechargeable battery pack.
• Detach the battery pack. (Even if the unit is off, it still uses some power.This can lead to over discharging of the
battery and malfunction.)
• Recharge the battery pack when you are ready to use it again.
• If the rechargeable battery pack is not used for a long period of time, discharge it and store it in a place that is cool,
dry and dark.
• While using the rechargeable battery pack, the environmental temperature should be 5°C (41°F) to 35°C (95°F).
• To ensure that the longest left of your battery pack is achieved, charge it under or close to indoor-temperature.
• Never dispose of in fire, water or heat up.
• Do not open the rechargeable battery pack, refer servicing only to qualified service personnel.
Turning ontheunit
1. Slide the POWER ON/OFF button to on position on the left side of unit.
2. Slide the FUNCTION button to DVD or AV IN mode on right side of unit.
• If you select DVD the DVD logo (start-up picture) will appear on unit screen.
Push the button to disconnect the
RECHARGEABLEBATTERYPACK
bottom of the unit
RECHARGEABLE BATTERY PACK
PUSH

E - 10
CONNECTINGOTHEREQUIPMENT
A. Connecting a VCR
• you can connect your video cassette recorder to playback.
Watching aVideotape
1.Turn on the unit, slide the FUNCTION button to select "AV IN".
2.Turn on the VCR and follow the instructions included with it to play the videotape.
Note: If you have a mono VCR, the volume level from the speakers will be low.
(continuedtonextpage)(continuedtonextpage)
(continuedtonextpage)
Watching a DVD on yourTV
1.Turn on the unit, slide the FUNCTION button to select "DVD".
2.Turn on the TV and follow the instructions included with it to play the DVD.
Notes: Please use connect Audio/Video cable.
• If your TV is equipped with the Scart socket
B. Connecting a TV
• If your TV has Audio/Video inputs
TV
(Yellow)
(Red)
(White)
Right side of unit RCA (3 phono)/Scart adaptor
(not included)
AUDIO/VIDEO CABLE
AUDIO/VIDEO CABLE
When using an S-Video cable, do not
connect the yellow video cable.
(Yellow)
(Red)
(White)
Right side/
Rear of unit
Right side of unit
VCR
(Yellow)
(Red)
(White)
To AV IN/OUT
Jack
White (Audio )
R
L
Yellow
(Video)
Ground Red ( )Audio
3.5mm plug description AUDIO/VIDEO CABLE

E - 11
AUDIO
IN
Notes:
• If the external equipment is a television and this audio system is closed to it, you may experience interference
if the tuner function is selected while the television is working.
• Make sure to use correct Audio/Video cable, wrong plug connection may cause weak signal.
• If you have a stereo VCR, make sure you set it in stereo mode.
• Due to copyright protection, DVD movies cannot be copied. If you copy a DVD movie onto a videotape, the
resulting copy will be unclear, with poor sound quality.This is NOT caused by a defective DVD system.
C. Another source connection
This unit can play Dolby Digital, but only in two channels.
Digital connection
Analogue connection
CONNECTINGOTHEREQUIPMENT
Listening to another audio equipment
1.Turn on the Unit.
2.Turn on your audio equipment and follow the instructions included with it to select the AUDIO IN or DIGITAL IN
function.
Audio equipment with
digital audio input jack
Rear side of unit
COAXIAL DIGITAL AUDIO CABLE
DIGITAL
OUT
Amplifier of
stereo system, etc.
Right side of unit
(No need to connect
theYellow video plug)
(Red)
(White)
AUDIO/VIDEO CABLE

E - 12
Dolby Digital (for DVD)
Dolby Digital is a sound system developed by Dolby Laboratories Inc. that gives movie theatre ambience to
audio output when the unit is connected to a Dolby Digital 5.1 channel processor or amplifier.
This unit automatically recognizes DVDs that have been recorded with Dolby Digital.
Not all Dolby Digital sources are recorded with 6 channels.
Some sources marked Dolby Digital may be recorded in Dolby Surround, a 2 channel system. Look for this logo
on your unit.
Manufactured under license from Dolby Laboratories.
'Dolby' and the double-D symbol are trademarks of Dolby Laboratories.
CONNECTING OTHEREQUIPMENT
ADJUSTINGTHESOUND
Right side of unit
UsingEarphones
• Turn down the volume before connection, and then
adjust the level.
• When earphones are connected, no sound will be
output from the unit's speakers.
Caution:
• Avoid listening to sound at levels which may be harmful
to your ears.
EARPHONES

E - 13
PLAYING A DISC
This owner’s manual explains the basic instructions of this unit.Some DVD discs are produced
ina mannerthat allowsspecific or limitedoperation duringplayback. Assuch, theunit may not
respondto all operatingcommands.Thisis nota defectin theunit.Referto the instructionnotes
ofdiscs.
“ ”may appear on the screen during operation. A“ ”means that the desired operation
is not permitted by the unit or disc.
Basic playback
Playing a Disc
1.Slide the POWER ON/OFF button on the left side of unit into on mode.
2.Slide the FUNCTION button on the right side of unit to select DVD mode.
See CUSTOMIZINGTHE FUNCTION SETTINGS (page 24 to 27) before proceeding to step 3.
3.Press the OPEN button on the left side of unit to open the disc door.
4.Hold the disc by its sides and carefully make it fit onto the central support of compartment with the label side
facing up until you hear a “click”.
5.Push the door where to close is printed to close the disc door.
It takes a short while for your unit to load the disc. After loading, for some discs, the unit will automatically start
playback of the disc.
6.Press the PLAY button.
DVD CD
Pausing playback (still mode)
Press the
II
PAUSE button.To resume normal playback, press the PLAY button.
Stopping playback
Press the STOP button at the location where you want to interrupt playback. To resume playback at the position
where the disc was stopped, press the PLAY button.
If you press the STOP button twice, the unit’s memory will be cleared and pressing the PLAY button will reset
the disc to the beginning.
To skip to a different track
• Press the PREV button repeatedly to skip to the start of the current or previous track.
• Press the NEXT button to skip to the next track.
• For audio CD disc, use the number buttons (remote control only) to jump straight to that track number.
(continuedto nextpage)(continuedto nextpage)
(continuedto nextpage)

E - 14
(continued on next page)(continued on next page)
(continued on next page)
Fast Forward/Fast Reverse
1.Press the SEARCH or SEARCH button of the remote unit
when a disc is playing.
• The disc begins fast scan at x2 speed.
• Four speeds are available. Each time SEARCH or
SEARCH button is pressed, the speed of fast scan changes in
the following sequence:
Note :
You also can press and hold / (PREV/NEXT) buttons on unit repeatedly to select different fast scan speed.
2.Press the PLAY button when you reach the desired point to resume playback at normal speed.
PLAYING A DISC
• When you reach the edge of the image, the display will not shift anymore in that direction.
SKIP (Forward / Reverse)
While you are playing a disc, press the NEXT button to move to the beginning of the next chapter or track. Press
the PREV button to move to the previous chapter or track and automatically start playing it.
CD
DVD
CD
DVD
DVD
Zooming into an image
While a disc is playing, press the ZOOM button of unit.
• While an image is zoomed, you can use , , and button to shift the view and display the part you want.
• To return to the normal view, press the ZOOM button until the “
off
“ symbol shows. The screen will return to
normal.

E - 15
Angle selection
Some DVDs contain scenes which have been shot from a
number of different angles. For these discs, the same scene
can be viewed from each of these different angles.
1.While you are playing a DVD with different angles recorded,
press the ANGLE button to view the number of the current
angle.
2.Press the ANGLE button repeatedly to change the scene
to the next angle in those recorded.
• About two seconds later, playback continues from the new
angle you selected.
• If no button is pressed within 10 seconds, playback
continues without changing the current angle.
Notes:
• This function can only be used for discs on which scenes shot from multiple angles have been recorded.
• If only one angle is recorded, “
1/1
” is displayed.
PLAYING A DISC
Audio selection
On some discs, the sound is recorded in two or more formats.
Follow the directions below to select the type of playback.
1.While a disc is playing, press theAUDIO button to show the
current audio format number.
2.Press the AUDIO button repeatedly to select the desired
audio format.
DVD
Subtitle selection
1.While a DVD is playing, press the SUBTITLE button to display the current language setting, as shown in the
example below.
2.Press the SUBTITLE button repeatedly to select the desired subtitle language.
Notes :
• If only one language is recorded, the language does not change.
• About two seconds later, playback continues with the new subtitle you selected.
• The number of languages recorded differs depending on the disc.
• If no button is pressed within a few seconds, playback continues without changing the current subtitle.
• This function can only be used for discs on which subtitles have been recorded in multiple languages.
• On some DVDs, subtitles are activated from the main menu of the DVD. Press the MENU button to activate the
main menu.
Sequence of angle shots (Example)
Notes :
• If only one audio format is recorded, the number does not change.
• About two seconds later, playback continues in the new audio format.

E - 16
(continued on next page)(continued on next page)
(continued on next page)
SPECIAL FUNCTIONS
Title skip
• The number of the title currently playing and total titles of disc.
• Press the GOTO button to set your desired title, then press the ENTER button to confirm.
Chapter skip
• The number of the chapter currently playing and total chapters of the currently played title.
• Press the GOTO button to set your desired chapter, then press the ENTER button to confirm.
Time skip
• Elapsed time from the beginning of the currently playing chapter and the remaining time from the beginning of the
currently playing title.
• Press the GOTO button to set your desired point to start playback, then press the ENTER button to confirm.
Angle setting
• The current angle is displayed.When a disc with only one angle is played back, “
Angle 1/1
” is displayed.
• Press the ANGLE button to select the desired angle.
Audio setting
• The type of audio currently selected is displayed.
• Press the AUDIO button to select your desired type of audio.
Subtitle setting
• The subtitle number and language currently selected is displayed. When a disc with only one subtitle is played
back, “
1/1 Eng
” is displayed.
• Press the SUBTITLE button to select your desired language.
GOTO function
This function allows you to skip directly to any part of the disc while a disc is playing.
Note :
• After settings, press the DISPLAY button again of the remote unit to return to the normal screen.
Basic playback
DVD
DISPLAY function
Using DISPLAY, you can check and change the current settings of the following items: ANGLE, AUDIO and
SUBTITLE.
• While the disc is playing, press the DISPLAY button of the remote unit to display the screen shown below.
Elapsed time: Elapsed time from the beginning of the chapter which is currently playing.
Remaining time: Remaining time of the title which is currently playing.
• Press the DISPLAY button twice of the remote unit to display the screen shown as below.
• Press the ANGLE, AUDIO and SUBTITLE button to change the selected item.
Elapsed Time Remaining Time
BitRate 7.1Mbps
Chapter Time
Audio setting
Subtitle setting
Angle setting
Title
BitRate infomation

E - 17
Locating a specific title
If a DVD disc contains title numbers, you can locate a specific title by directly selecting a title number.
1.Press the GOTO button.
2.Press , or button to highlight a specific field and press the corresponding number button(s) for the title you
want.
3.Press the ENTER button to confirm.The unit will start playback about 3 seconds later.
Locating a specific title / chapter / track
If you know the title / chapter / track number you want to play, you can locate a specifc title / chapter / track by directly
selecting a title / chapter / track number.
1.Press the GOTO button to search your desired title / chapter / track.
2.Press , or button to highlight a title / chapter / track and press the corresponding number button(s) for the
chapter you want.
3.Press the ENTER button to confirm.The unit will start playback about 3 seconds later.
DVD
CD
(continued on next page)(continued on next page)
(continued on next page)
SPECIAL FUNCTIONS
Basic playback
CD
DVD
DVD

E - 18
Locating a specific time
You can move to a specific location by entering its corresponding time (hours, minutes, seconds)
1.Press the GOTO button.
2.Press or button to highlight time.
3.Press the corresponding number buttons for the setting point you want.
• The first two numbers you entered represent hours.
• The second two numbers you entered represent minutes.
• The third two numbers you entered represent seconds.
4.Press the ENTER button to confirm.The unit will start playback about 3 seconds later.
Notes :
• Some discs may not respond to this process.
• Some scenes may not be located as precisely as you specified.
• This method for accessing specific locations is available only within the current title of the DVD disc.
• You can move through the menu by pressing the and buttons.
DVD CD
SPECIAL FUNCTIONS
Basic playback
CD
DVD
DVD
DVD
DVD
Angle setting
1.Press the DISPLAY button twice of the remote unit. The
FUNCTION menu is displayed on the screen and you can see
how many angles are recorded on the disc.
2.Press the ANGLE button repeatedly to select your desired angle.
3.The unit will change to your desired angle about 3 seconds later.
4.PresstheDISPLAY buttonof theremoteunittoresumethenormal
screen.
Audio setting
1.Press the DISPLAY button twice of the remote unit. The
FUNCTION menu is displayed on the screen and you can see
how many audio formats are recorded on the disc.
2.Press the AUDIO button repeatedly to select your desired type of
audio.
3.The unit will change to your desired type audio about 3 seconds
later.
4.PresstheDISPLAYbuttonof the remote unittoresumethenormal
screen.
Subtitle setting
1.Press the DISPLAY button twice of the remote unit. The
FUNCTION menu is displayed on the screen and you can see
how many subtitle formats are recorded on the disc.
2.Press the SUBTITLE button repeatedly to select your desired
language.
3.The unit will change to your desired language about 3 seconds
later.
4.PresstheDISPLAY buttonoftheremoteunittoresumethe normal
screen.

E - 19
Programmable memory
Thetwotypes of programmed playback providedby this unitare title programmedplayback and chapterprogrammed
playback.
Title / Chapter programmed playback
1.Press the MEM (Memory) button while the disc is stopped.
2.Enter the title numbers in
- -
. Use or button to move the highlight to chapter and enter the chapter numbers
in
- -
.
3.Use , , or button to move to the other field.
4.Repeat steps 2 to 3.
5.Press the PLAY button to start the programmed playback.
Notes :
• If you press the STOP button, the programmed selections will be cleared.
3.Use , , or button to other field.
4.Repeat steps 2 to 3.
5.Press the PLAY button to start the programmed playback.
Track
CD / DVD PROGRAMMABLE MEMORY
Advanced
playback
Title Chapter
Programmable memory
Track programmed playback
1.Press the MEM (Memory) button while the disc is stopped.
2.Enter the track numbers in
- - -
.
DVD
CD
This manual suits for next models
1
Table of contents
Other Akai Portable DVD Player manuals

Akai
Akai ACVDS737TG User manual

Akai
Akai ACVDS950 User manual

Akai
Akai ACVDS735 User manual

Akai
Akai ACVDS736T User manual

Akai
Akai Walt Disney's Donald Duck ACVDS9DD User manual

Akai
Akai A51006 User manual

Akai
Akai AKPDVD702D User manual

Akai
Akai LTC789A-DRU User manual

Akai
Akai A51007 User manual

Akai
Akai ACVDS940UCX User manual