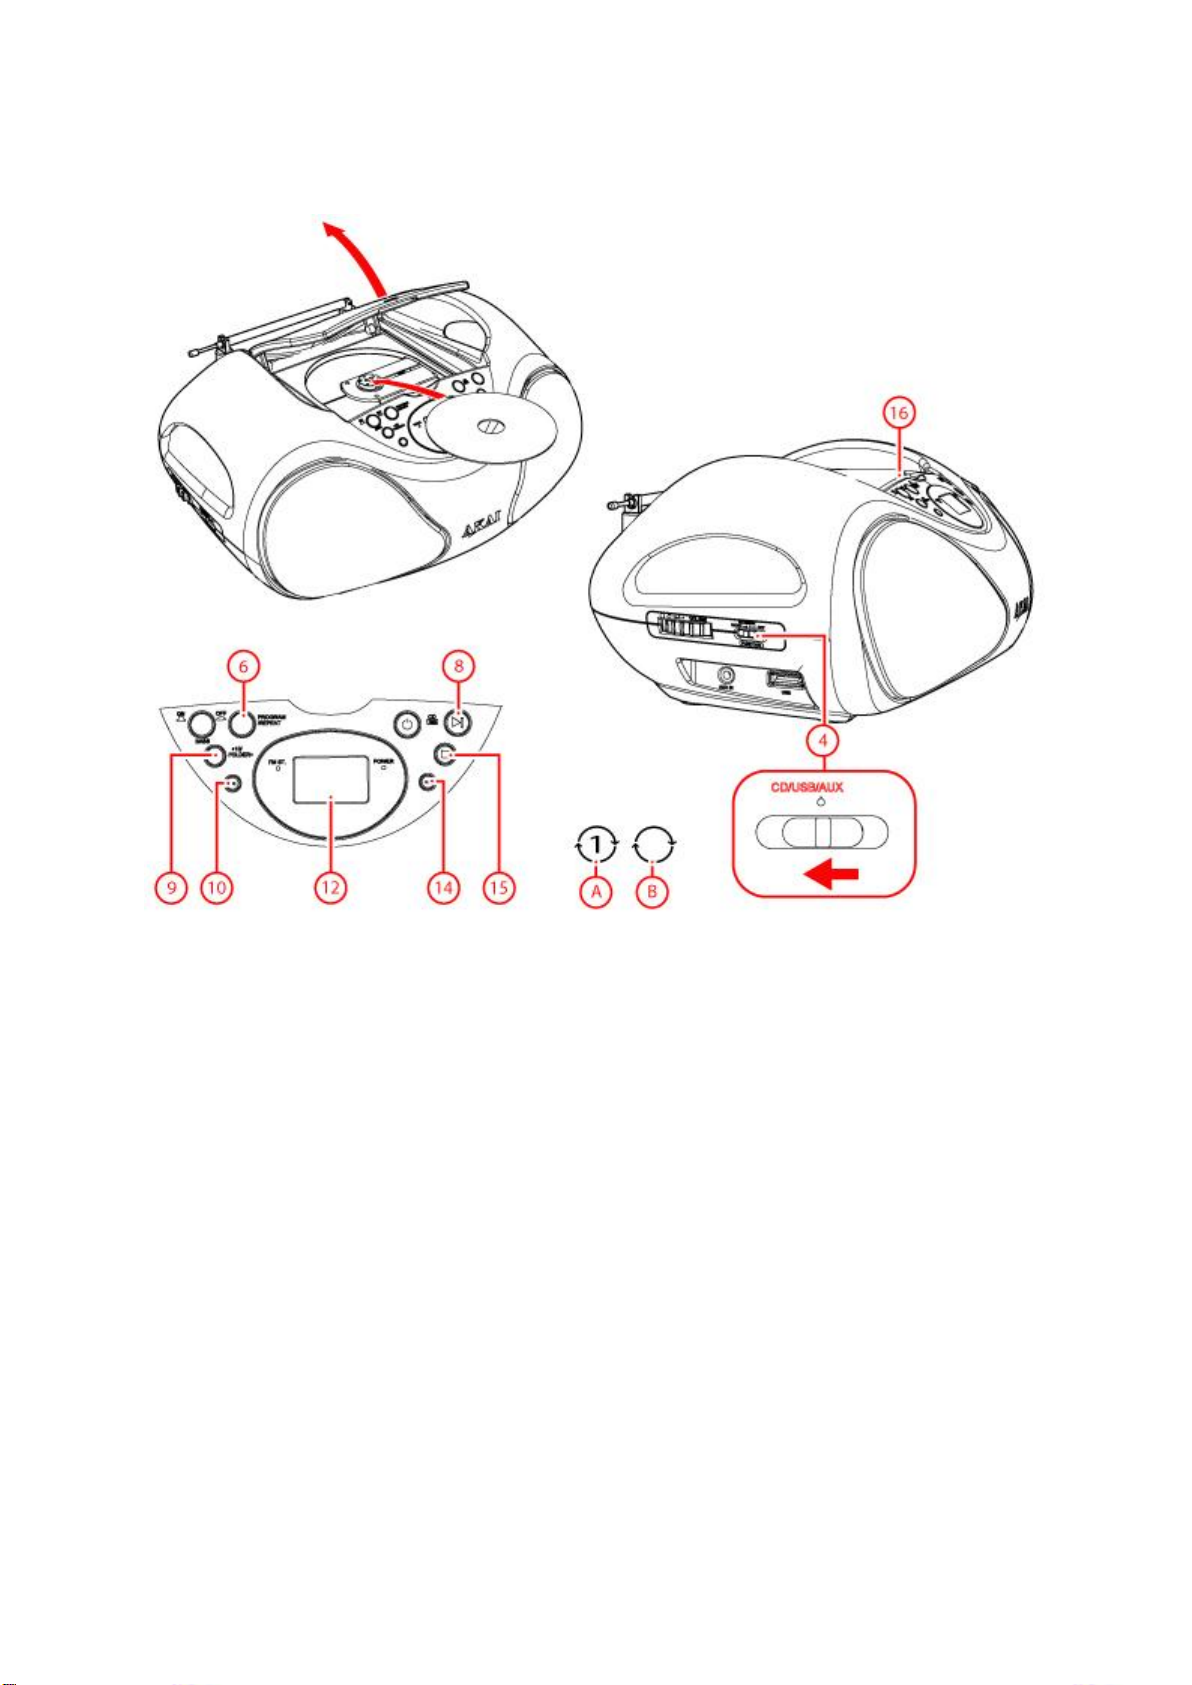
Akai APRC60AT User manual

APRC60AT manual
Index
1. Safety
o1.1. Intended use
o1.2. Labels in this manual
o1.3. General safety instructions
2. Preparations for use
o2.1. Unpacking
o2.2. Package contents
3. Installation
o3.1. Connecting to the mains
o3.2. Install batteries
4. Functions
o4.1. APRC60AT
5. Operation
o5.1. Quick start
o5.2. Radio functions
o5.3. CD functions
o5.4. USB functions
o5.5. AUX IN
o5.6. Auto Power System (APS)
6. Cleaning and maintenance
o6.1. Handle and care of a disc
7. Technical data
8. Disposal of used electrical and electronic equipment

1.Safety
1.1. Intended use
The device functions as a portable radio/CD audio player. The device can play music (MP3) via CD and USB. It is
also possible to play music via the AUX port.
Read the manual carefully before the first use.
1.2. Labels in this manual
WARNING A warning means that injury or death is possible if the instructions are not obeyed.
CAUTION A caution means that damage to the equipment is possible.
A note gives additional information, e.g. for a procedure.
1.3. General safety instructions
WARNING Do not put force on the appliance. The appliance can fall and can cause serious injury.
CAUTION Do not spill any liquid on the appliance.
WARNING Do not insert any objects in the ventilation holes.
CAUTION Do not block the ventilation holes.
This appliance is double insulated; therefore no earth wire is required. Always check that the mains voltage
corresponds to the voltage on the rating plate.

2.Preparations for use
2.1. Unpacking
Check the package contents as described below. If any item is missing, please contact your reseller.
Remove the labels from the front panel carefully if present.
We recommend that you retain the original carton and packing materials in case it ever becomes necessary to
return your product for service. This is the only way to safely protect the product against damage in transit. If you
do dispose of the carton and the packing materials, please remember to recycle with due care to the environment.
2.2. Package contents
The following items are included in the received package:
1 x Quick start guide
1 x Mains cable
If any item is missing, please contact your reseller.

3.Installation
Put the appliance on a horizontal flat surface.
Connect the appliance to the mains.
CAUTION Do not put the appliance near a heat source.
CAUTION Do not expose the appliance to direct sunlight.
This appliance is equipped with rubber feet to prevent it from moving. The feet are made from non-migrating
material specially formulated to avoid leaving any marks or stains on furniture. However, certain types of furniture
polishes, wood preservatives or cleaning sprays cause the rubber to soften and leave marks or a residue on the
furniture, and potentially risk the surface to become damaged. To prevent damage to wooden surfaces, we
recommend that you apply self-adhesive pads to the bottom of the rubber feet before installation.
3.1. Connecting to the mains
Connect the 8-shaped connector of the power cable to the device's power connection.
Connect the mains plug to a wall socket.

3.2. Install batteries
The appliance can also be operated on battery power. For this purpose, the appliance uses six batteries (UM-2 /
C).
Please note: these batteries are not included.
Batteries are not necessary for normal operation.
If you do not use the appliance for an extended period, remove the batteries.
Install batteries
Remove the battery cover.
Insert the batteries matching the (+) and (-) polarity markings.
Re-install the battery cover.
CAUTION Incorrect installation can cause battery leakage and corrosion which will damage the appliance.
Corrosion, oxidation, battery leakage and any other gradually acidic defect of this nature will invalidate the
guarantee.

4.Functions
4.1. APRC60AT
1. VOLUME dial
2. AUX jack: 3.5 mm
3. USB slot
4. FUNCTION switch (RADIO-CD/USB/AUX-OFF)
5. BASS button
6. PROG/REP button
7. STANDBY button
8. PLAY/PAUSE button
9. 10+/FOLDER+ button
10. PREV button
11. REPEAT iFM/ST
12. LCD Display
13. REPEAT iSTANDBY
14. NEXT button
15. STOP button
16. CD compartment
17. AM/FM/FM ST. switch
18. TUNING dial

5.Operation
5.1. Quick start
General functions
Turn the device on by sliding the FUNCTION switch (4) to the CD/USB/AUX position and pressing the
STANDBY button . You can put the device in standby mode by pressing the STANDBY button one more
time.
To select the source mode (RADIO-CD/USB/AUX-OFF), slide the FUNCTION switch (4) to the desired
position.
To adjust the volume level, turn the VOLUME dial (1) until the desired level is set.
To enable the enhanced bass, press the BASS button (5). Press the button again to disable the enhanced
bass.
Radio functions
To select the radio function, slide the FUNCTION switch (4) to the radio position.
Slide out the antenna
To adjust the frequency, turn the TUNING knob (18) until the desired frequency is reached.
For extended instructions, read the paragraph "Radio functions" further on in this manual.
CD functions
To select the CD function, slide the FUNCTION switch (4) to the CD/USB/AUX position.

To insert a CD:
Press the CD compartment (16) to open the appliance
Insert the CD with the label upwards
Close the CD compartment
Make sure that no external device is connected to the AUX IN port.
To start playback, press the PLAY/PAUSE button (8) once.
Hold down the button PLAY/PAUZE (8) for longer than 1 second to switch between USB mode and CD
mode.
For extended instructions, read the paragraph "CD functions" further on in this manual.
USB functions
To select the USB function, slide the FUNCTION (4) switch to CD/USB/AUX.
Make sure that no external device is connected to the AUX IN port.
Insert the USB device in the slot (3). The device can only be connected one way.
To start playback, press the PLAY/PAUSE button (8) once.
Hold down the button PLAY/PAUZE (8) for longer than 1 second to switch between CD mode and USB
mode.
For extended instructions, read the paragraph "USB functions" further on in this manual.
AUX IN jack
To use the AUX-IN port, slide the FUNCTION switch (4) to the position CD/USB/AUX
To connect an external audio device, insert the cable plug in the AUX IN jack (2).
For extended instructions, read the paragraph "AUX INۥ" further on in this manual.

5.2. Radio functions
Slide out the antenna
To select the radio function, slide the FUNCTION switch (4) to the radio position.
Use the switch BAND (17) to switch between AM, FM and FM Stereo.
To adjust the frequency, turn the TUNING knob (18) until the desired frequency is reached.
The frequency is shown on the display. (12)

5.3. CD functions
To insert a CD:
Press the CD compartment (16) to open the appliance
Insert the CD with the label upwards
Close the CD compartment
Playing a CD:
To select the CD function, slide the FUNCTION switch (4) to the CD/USB/AUX position.
Make sure that no external device is connected to the AUX IN port.
To start playback, press the PLAY/ PAUSE button (8) once.
Hold down the button PLAY/PAUSE (8) for longer than 1 second to switch between USB mode and CD
mode.
During playback, the following functions are available:
To select a track, press the PREV button (10) or the NEXT button (14) until the desired track is set.
To search for a specific point on the disc, hold the PREV button (10) or the NEXT button (14) until the point
is reached and release the button.

To pause playback, press the PLAY/PAUSE button (8) once; to resume playback, press the button again.
To stop playback, press the STOP button (15).
Hold down the button 10+/Folder+ (9) to go to the following 10 numbers.
Press the button 10+/Folder+ (9) to select the next folder on an MP3 disc or a USB flash drive
Using the REPEAT function
To repeat the current number, press the button PROG/REP (6) until the icon (A) appears on the display.
To repeat all numbers, press the button PROG/REP (6) until the icon (B) appears on the display.
(Only for MP3) To repeat all the numbers in one folder, press the button PROG/REP (6) until the icon (B)
and the icon FOLDER appear on the display.
To shut off the function REPEAT press the button PROG/REP (6) until no REPEAT icon is visible anymore.
Using the PROGRAM function
To use the PROGRAM function for CD, the playback must be in STOP mode.
To play a list of tracks (max. 20) in a program, press the PROG/REP button (6).
P01 appears on the display.
Press the PREV button (10) or the NEXT button (14) to select a desired track.
Press the PROG/REP button (6) to confirm the selection. Repeat the previous step to select more tracks
and confirm every selection with the PROG/REP button (6).
Press the PLAY/PAUSE button (8) to start the program.
To play the program again, press the PROG/REP button (6) after the program has finished. Press the
PLAY/PAUSE button (8) to start the program again.
To stop the program during playback, press the STOP button (15).
To delete the program during the playback, press the STOP button (15) twice.

5.4. USB functions
Due to the great variety of products with USB ports and their sometimes quite manufacturer-specific functions we
can neither guarantee that all devices will be recognised, nor that all operating options that are possible in theory
will actually work.
Insert the USB device in the slot USB (3). The device can only be connected one way.
To select the USB function, slide the FUNCTION (4) switch to CD/USB/AUX.
After connecting the appliance, the contents are loaded.
Next, the total number of tracks appears on the display (12).
To start playback, press the PLAY/PAUSE button (8) once.
During playback, the following functions are available:
To select a track, press the PREV button 10 or the NEXT button 14 until the desired track is set.
Press and hold the PREV button (10) or the NEXT button (14) to rewind or forward the track.
To pause playback, press the PLAY/PAUSE button (8) once; to resume playback, press the button again.
To stop playback, press the STOP button (15).
Hold down the button 10+/Folder+ (9) to go to the following 10 numbers.
Press the button 10+/Folder+ (9) to select the next folder on an MP3 disc or a USB flash drive

Using the REPEAT function
To repeat the current number, press the button PROG/REP (6) until the icon (A) appears on the display.
To repeat all numbers, press the button PROF/REP (6) until the icon (B) appears on the display.
(Only for MP3) To repeat all the numbers in one folder, press the button PROF/REP (9) until the icon (B)
and the icon FOLDER appear on the display.
To shut off the function REPEAT press the button PROG/REP (9) until no REPEAT icon is visible anymore.
Using the PROGRAM function
To use the PROGRAM function for USB, the playback must be in STOP mode.
To play a list of tracks (max. 20) in a program, press the PROG/REP button (6).
P01 appears on the display.
Press the button 10+/F+ (9) to select the desired folder.
Press PROG/REP (6) to confirm.
Press the PREV (10) button or the NEXT (14) button to select the desired file.
Press the PROG/REP button (6) to confirm the selection. Repeat the previous step to select more tracks
and confirm every selection with the PROG/REP button (6).
Press the PLAY/PAUSE button (8) to start the program.
To stop playback, press the STOP button (15).
To delete the program during the playback, press the STOP button (15) twice.
To remove the device, gently pull it out of the slot.

5.5. AUX IN
To use the AUX-IN port, slide the FUNCTION switch (4) to the position CD/USB/AUX
Connect the external appliance to your APRC60AT.
AUX appears on the display.
5.6. Auto Power System (APS)
The Auto Power System (APS) is intended to save energy. In the following situations, the device will go into
Standby mode after 15 minutes:
The FUNCTION (4) switch is in the CD/USB/AUX position and there is no CD in the CD compartment, or the
CD has finished playing.
The FUNCTION (4) switch is in the CD/USB/AUX position and there is no USB drive in the USB port, or the
USB drive has finished playing.
The FUNCTION (4) switch is in the CD/USB/AUX position and there is no AUX cable connected.
To switch on the appliance, press the STANDBY button (7).

6.Cleaning and maintenance
WARNING Before performing any cleaning or maintenance, switch off and unplug the appliance.
Clean the outside of the appliance with a soft cloth. When the appliance is very dirty, dampen the cloth slightly
with water and a neutral solution.
6.1. Handle and care of a disc
Hold the disc with fingers. Hold the disc outer edge and/or the centre spindle hole. Do not touch the disc
surface.
Do not bend or press the disc. Do not expose the disc to direct sunlight or heating sources.
Clean the disc surface with a soft, dry cleaning cloth. Wipe the disc surface gently, radially, from centre
towards the outer edge.
Do not apply thinner, alcohol, chemical solvent, or sprays when cleaning. Such cleaning fluids will
permanently damage the disc surface.
7.Technical data
Specifications
Voltage: 230VAC / 50 Hz
Speaker output: 2 x 5 Watt
Max power: 2 x 1,8 Watt RMS
Battery size: UM-2 / C (8x)
Disc types: CD/ CD-R/ CD-RW
Maximum USB memory: 8 GB
Audio formats: MP3
Frequency range
FM radio: 87,5 - 108 Mhz
AM radio: 520 - 1620 kHz
Dimensions: 13,5 x 33,0 x 23,0 cm
Accessories
Mains cable
User manual

8.Disposal of used electrical and electronic equipment
The meaning of the symbol on the material, its accessory or packaging indicates that this product shall not be
treated as household waste. Please, dispose of this equipment at your applicable collection point for the recycling
of electrical and electronic equipments waste. In the European Union and Other European countries which there
are separate collection systems for used electrical and electronic product. By ensuring the correct disposal of this
product, you will help prevent potentially hazardous to the environment and to human health, which could
otherwise be caused by unsuitable waste handling of this product. The recycling of materials will help conserve
natural resources. Please do not therefore dispose of your old electrical and electronic equipment with your
household waste.
For more detailed information about recycling of this product, please contact your local city office, your household
waste disposal service or the shop where you purchased the product.
For more information and warranty conditions, please visit: www.akai.eu
Do not dispose of batteries as household waste but take them to a battery recycling facility.
Table of contents
Other Akai Stereo System manuals

Akai
Akai CEU5000-BT User manual

Akai
Akai AX-M430 User manual

Akai
Akai MPC 5000 Installation and operating instructions

Akai
Akai FX SYSTEM M630 User manual

Akai
Akai AMN250UC Guide

Akai
Akai AMD60 User manual

Akai
Akai MPC 5000 User manual

Akai
Akai MPC User manual

Akai
Akai KHS888W1 User manual

Akai
Akai QX-D4300 User manual