AKG C747 V11 User manual

BEDIENUNGSANLEITUNG . . . . . . . . . .S. 2
Bitte vor Inbetriebnahme des Gerätes lesen!
USER INSTRUCTIONS . . . . . . . . . . . . . . .p. 12
Please read the manual before using the equipment!
MODE D’EMPLOI . . . . . . . . . . . . . . . . . . . . .p. 22
Veuillez lire cette notice avant d’utiliser le système!
ISTRUZIONI PER L’USO . . . . . . . . . . . . .p. 32
Prima di utilizzare l’apparecchio, leggere il manuale!
MODO DE EMPLEO . . . . . . . . . . . . . . . . . . .p. 42
¡Sirvase leer el manual antes de utilizar el equipo!
INSTRUÇÕES DE USO . . . . . . . . . . . . . . .S. 52
Favor leia este manual antes de usar o equipamento!
C747 V11
BDA_C747_D030901_Hex:Layout 1 03/26/2009 10:04 Seite 1 (Schwarz/Black Auszug)

Inhaltsverzeichnis
Seite
Willkommen!............................................................................................................3
1 Sicherheit und Umwelt ......................................................................................3
1.1 Sicherheit.....................................................................................................3
1.2 Umwelt.........................................................................................................3
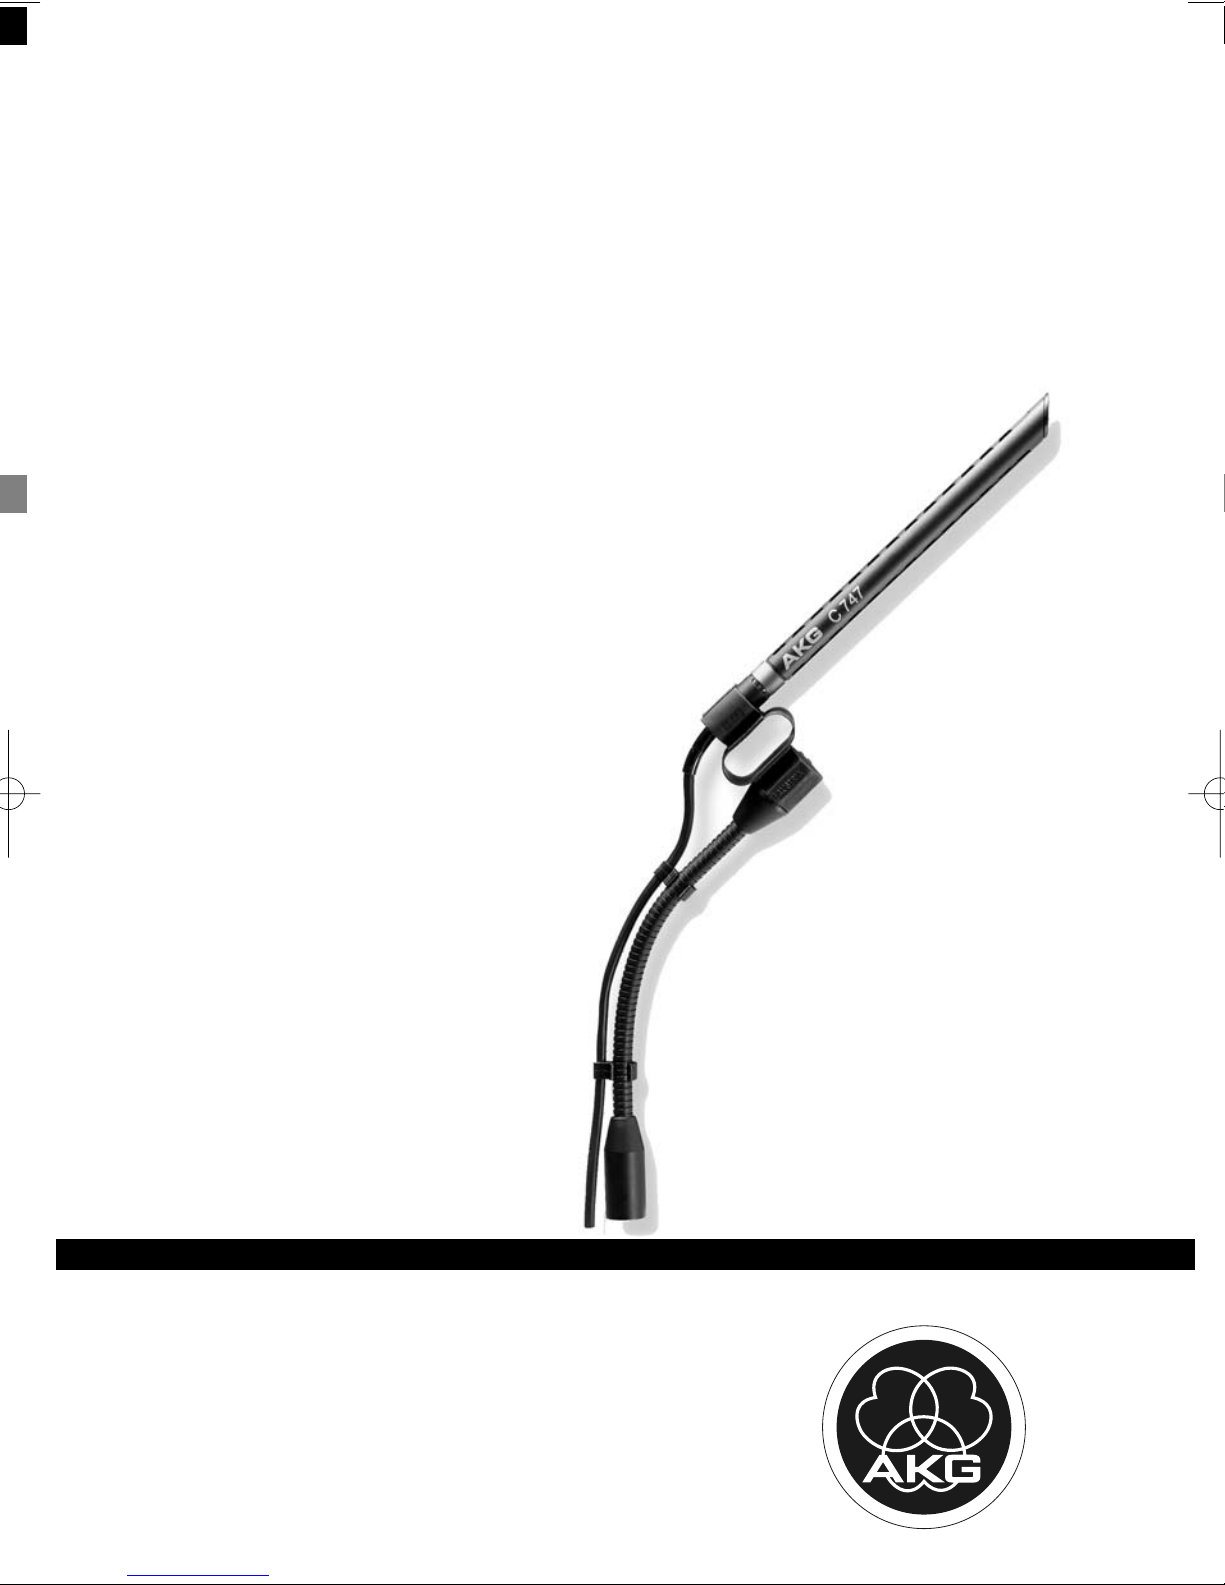
2 Beschreibung ....................................................................................................4
2.1 Lieferumfang ................................................................................................4
2.2 Optionales Zubehör .......................................................................................4
2.3 Mikrofon.......................................................................................................4
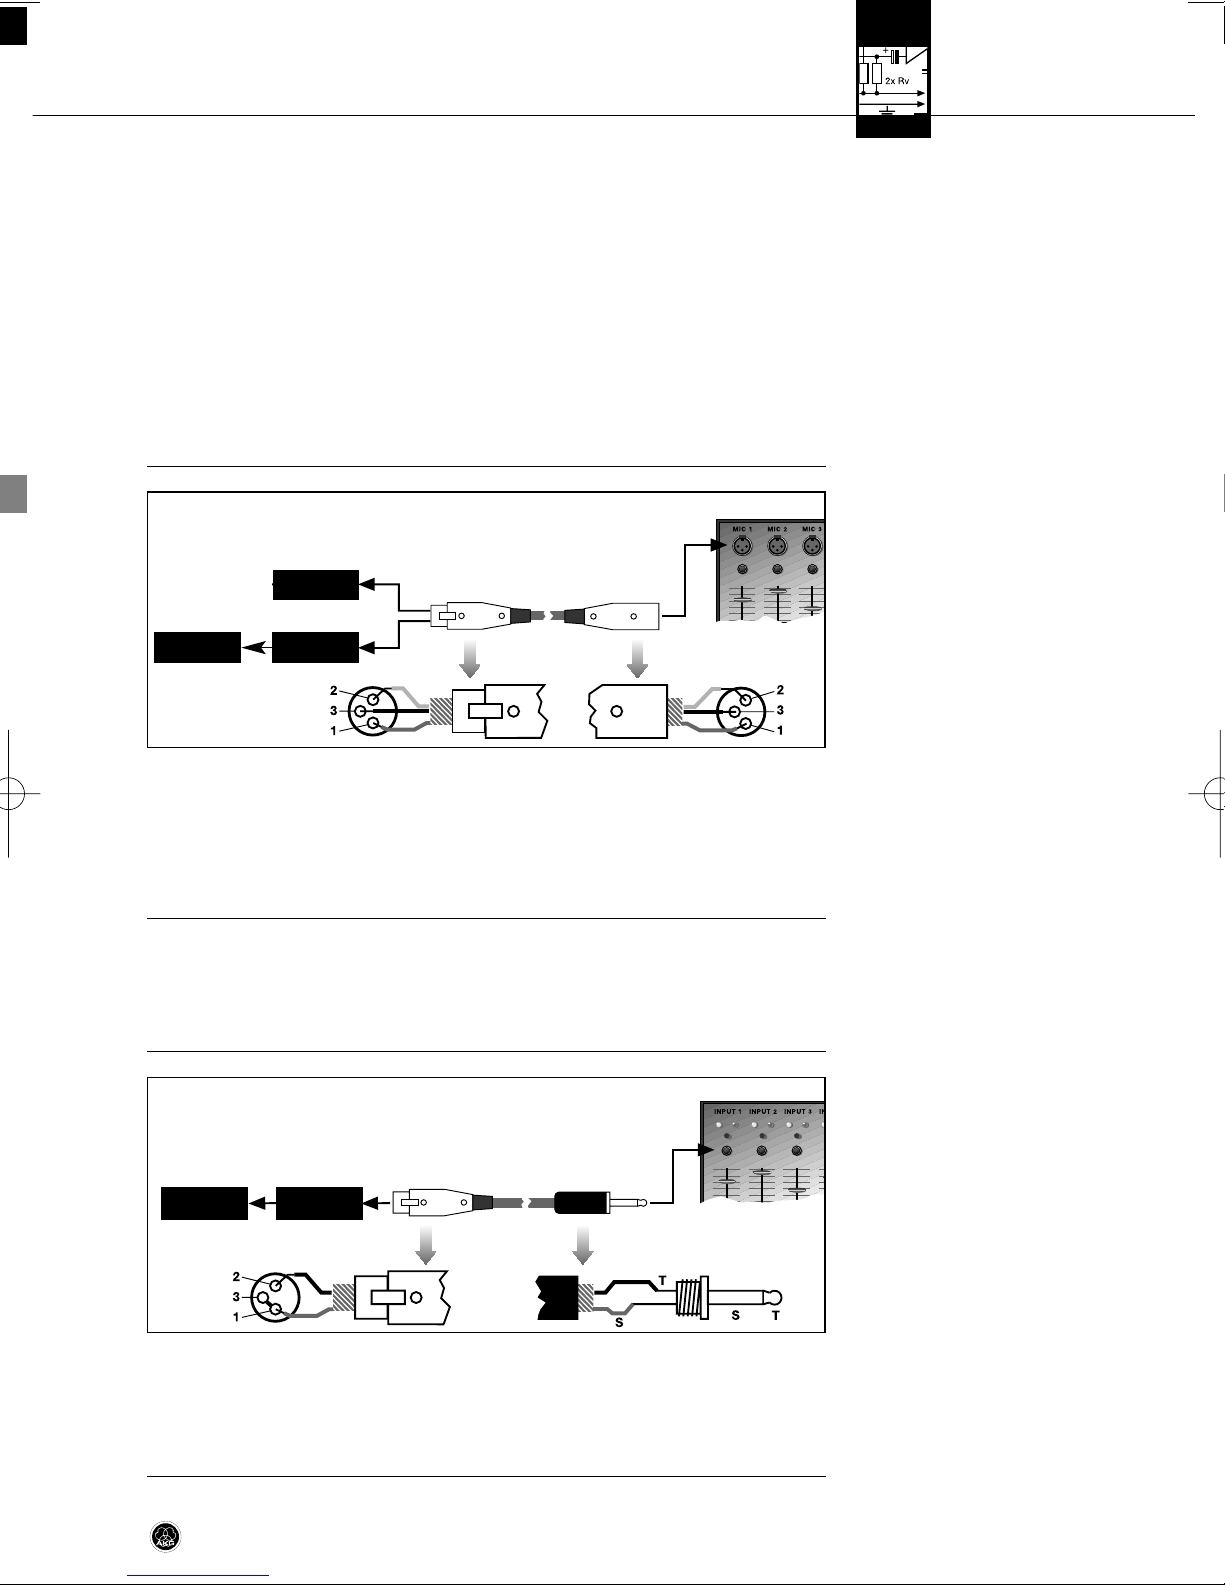
3 Anschluss..........................................................................................................5
3.1 Allgemeines..................................................................................................5
3.2 Symmetrischer Eingang mit Phantomspeisung ................................................5
3.3 Symmetrischer Eingang ohne Phantomspeisung..............................................5
3.4 Unsymmetrischer Eingang .............................................................................5
4 Anwendung .......................................................................................................6
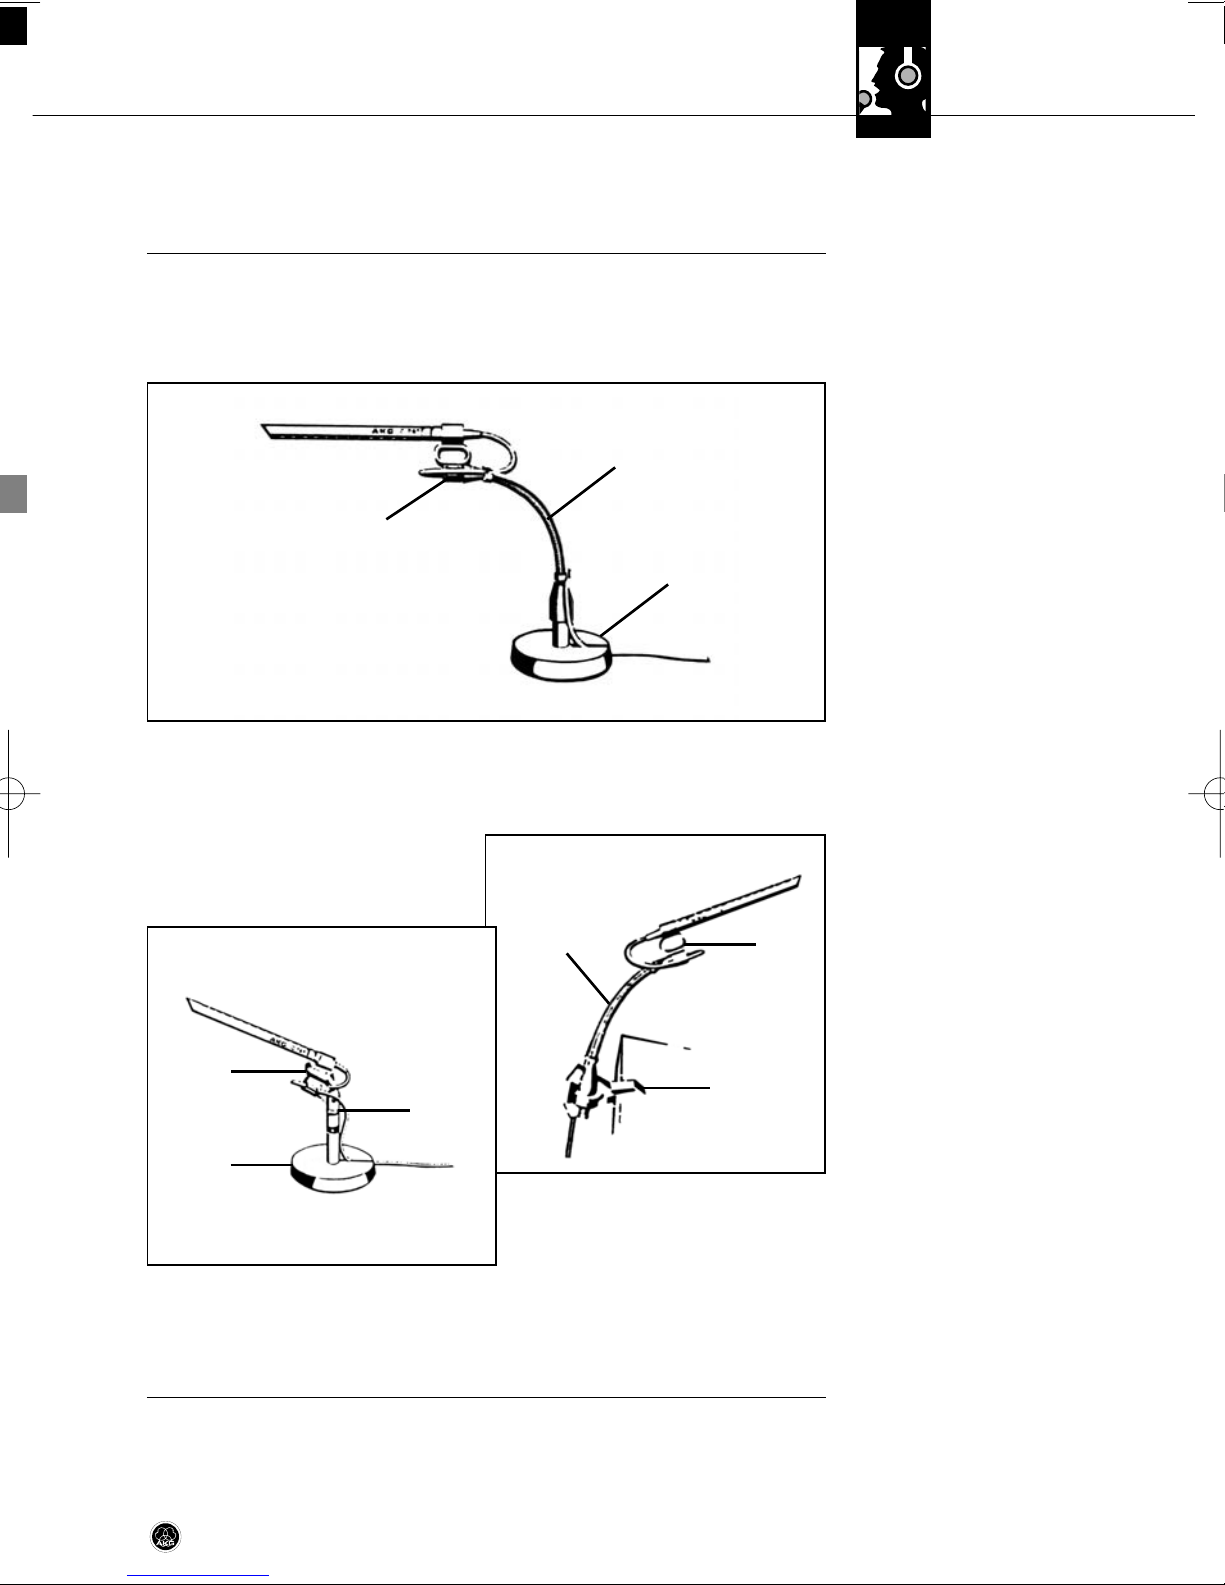
4.1 Befestigung ..................................................................................................6
4.1.1 Querbefestigung des Schwanenhalses ...................................................6
4.2 Sprache........................................................................................................7
4.3 Snare Drum ..................................................................................................8
4.4 Saxophon .....................................................................................................8
4.5 Akustische Gitarre.........................................................................................8
4.6 Stützmikrofon ...............................................................................................9
5 Reinigung ..........................................................................................................9
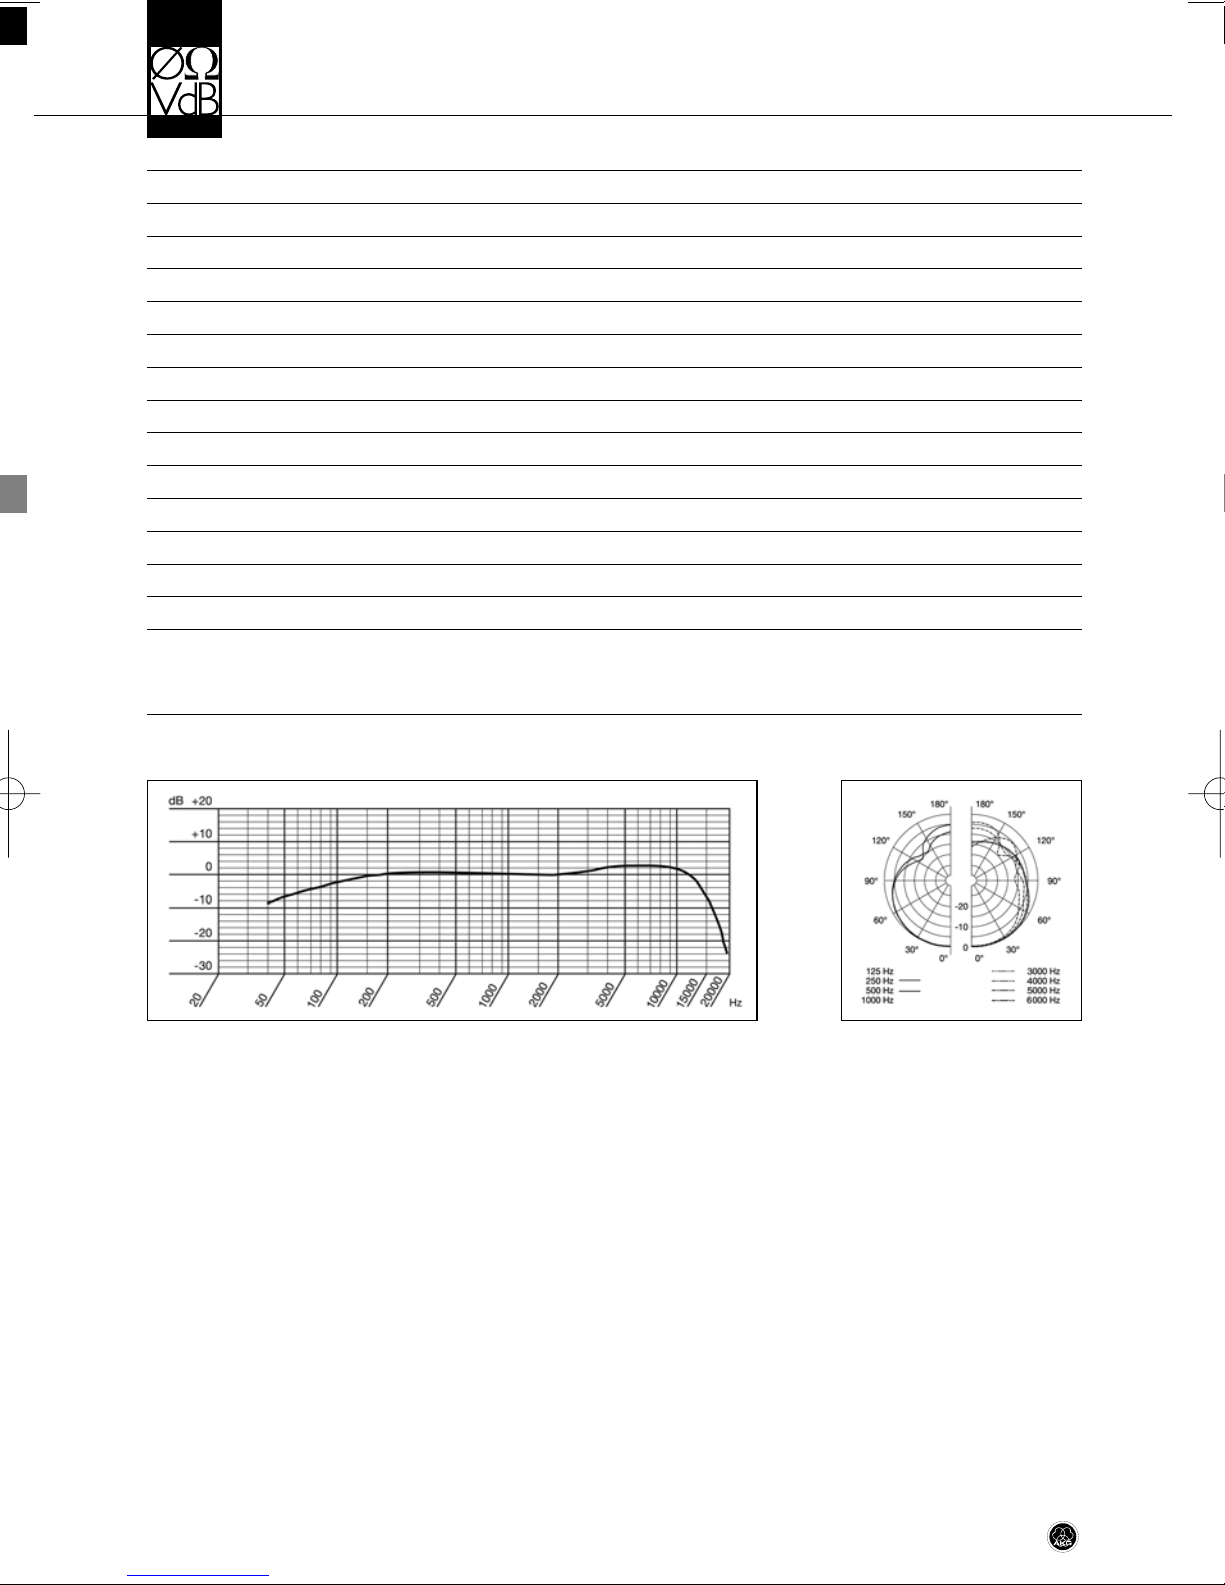
6 Technische Daten ............................................................................................10
C 747 V112
BDA_C747_D030901_Hex:Layout 1 03/26/2009 10:04 Seite 2 (Schwarz/Black Auszug)

Willkommen!
Vielen Dank, dass Sie sich für ein Produkt aus dem Hause AKG entschieden ha-
ben. Bitte lesen Sie die Bedienungsanleitung, insbesondere das Kapitel
1 Sicherheit und Umwelt, aufmerksam durch, bevor Sie das Gerät be-
nützen, und bewahren Sie die Bedienungsanleitung sorgfältig auf, damit Sie je-
derzeit nachschlagen können.Wir wünschen Ihnen viel Spaß und Erfolg!
1 Sicherheit und Umwelt
1.1 Sicherheit
1.2 Umwelt
L
• Überprüfen Sie bitte, ob das Gerät, an das Sie das Mikrofon an-
schließen möchten, den gültigen Sicherheitsbestimmungen entspricht
und mit einer Sicherheitserdung versehen ist.
• Wenn Sie das Gerät verschrotten, trennen Sie Gehäuse, Elektronik und
Kabel und entsorgen Sie alle Komponenten gemäß den dafür geltenden
Entsorgungsvorschriften.
• Die Verpackung ist wiederverwertbar. Entsorgen Sie die Verpackung in
einem dafür vorgesehenen Sammelsystem.
C 747 V11 3
BDA_C747_D030901_Hex:Layout 1 03/26/2009 10:04 Seite 3 (Schwarz/Black Auszug)

• Mikrofon C 747 V11
• Mikrofon-Halteklammer H 47
• Schwanenhals MSH 70 (140 mm)
• Stativanschluss SA 47
• Gewindeadapter SHZ 80
• Schaumstoff-Windschutz
• Optionales Zubehör finden Sie im aktuellen AKG-Katalog/Folder oder auf
www.akg.com. Ihr Händler berät Sie gerne.
Das C 747 V11 ist ein Miniatur-Stabmikrofon in Kondensatortechnik,das sich trotz
seiner geringen Abmessungen durch einen ausgeglichenen Frequenzverlauf und
eine frequenzunabhängige Richtwirkung auszeichnet.
Das vor der Kapsel angeordnete, akustisch besonders abgestimmte Rohr ermög-
licht ein für diesen Mikrofondurchmesser ungewöhnlich homogenes Übertra-
gungsverhalten bis zu den tiefsten Frequenzen. Weiters wird eine hohe Empfind-
lichkeit, ein ausgezeichneter Signal/Rauschabstand und ein gleichmäßiger Bün-
delungsgrad des Mikrofons erreicht.
Das C 747 V11 hat eine hypernierenförmige Richtcharakteristik, die sich beson-
ders bei der Anwendung als unauffälliges Stützmikrofon durch gute Kanaltren-
nung bewährt.
Das mitgelieferte Zubehör sowie die geringen Abmessungen des Mikrofons erlau-
ben eine gute Anpassung an unterschiedliche Anwendungen.
Der Mikrofonausgang ist niederohmig und elektronisch symmetriert, um von
Phantomspeisequellen betrieben zu werden. Das Mikrofon kann an symmetrische
oder unsymmetrische Eingänge angeschlossen werden.
2.1 Lieferumfang
2.2 Optionales Zubehör
2.3 Mikrofon
2 Beschreibung
C 747 V114
BDA_C747_D030901_Hex:Layout 1 03/26/2009 10:04 Seite 4 (Schwarz/Black Auszug)

Das C 747 V11 ist ein Kondensatormikrofon und benötigt daher eine Stromversor-
gung. Das Mikrofon besitzt einen symmetrischen Ausgang mit 3-poligem XLR-
Stecker:
Stift 1 = Masse
Stift 2 = Tonader (inphase)
Stift 3 = Tonader (return)
Sie können das Mikrofon an symmetrische Mikrofoneingänge mit oder ohne
Phantomspeisung anschließen. Die Phantomspeisegeräte von AKG erlauben Ih-
nen, das Mikrofon auch an unsymmetrische Eingänge anzuschließen.
1. Schließen Sie das Mikrofon mit einem XLR-Mikrofonkabel an einen symmetri-
schen XLR-Mikrofoneingang mit Phantomspeisung an.
2. Schalten Sie die Phantomspeisung ein. (Lesen Sie dazu in der Bedienungsan-
leitung des jeweiligen Gerätes nach.)
• Wenn Ihr Mischpult keine Phantomspeisung besitzt,schalten Sie zwischen Mi-
krofon und Mischpulteingang ein AKG-Phantomspeisegerät B 18 (optional).
Das Phantomspeisegerät B 18 von AKG können Sie auch an einen unsymmetri-
schen Eingang anschließen.
•
Lesen Sie dazu in der Bedienungsanleitung des Phantomspeisegeräts B 18 nach.
3.1 Allgemeines
Siehe Kapitel 3.2 und 3.3.
3.2 Symmetrischer
Eingang
mit Phantomspeisung
Abb. 1:Anschluss an
symmetrischen Eingang
Siehe Abb. 1.
3.3 Symmetrischer
Eingang
ohne Phantomspeisung
Siehe Abb. 1 oben.
3.4 Unsymmetrischer
Eingang
Abb. 2:Anschluss an
unsymmetrischen Eingang
Siehe Abb. 2.
3 Anschluss
3.2
3.3
C 747 V11
C 747 V11
B 18
C 747 V11 B 18
C 747 V11 5
BDA_C747_D030901_Hex:Layout 1 03/26/2009 10:04 Seite 5 (Schwarz/Black Auszug)

4 Anwendung
4.1 Befestigung
Hinweis:
Abb. 3: Mikrofon an
Tischplatte anklemmen
Siehe Abb. 3 und 4.
4.1.1 Querbefestigung
des Schwanenhalses
Abb. 5: Querbefestigung
des Schwanenhalses an
der Klammer SA 80
Siehe Abb. 5a.
Sämtliche Teile des Befestigungs-Sets sind mit 3/8"-Gewinden versehen. Daher
können Sie sowohl die Halteklammer H 47 als auch den Schwanenhals MSH 70
an allen gängigen Boden- und Tischstativen montieren.
• Zur Montage an 5/8"-Gewindeanschlüssen verwenden Sie bitte ein handels-
übliches Reduzierstück.
• Mit der Klammer SA 80 können Sie das C 747 V11 an Tischplatten, Mikrofon-
stative, Trommel-, Becken- und Notenständer sowie an Kulissen jeder Art bis
zu 20 mm Dicke bzw. Durchmesser anklemmen.
1. Lösen Sie die Verbindungsschraube (1) mit einem Schraubenzieher oder einer
Münze.
C 747 V116
ab
1
2
3
4
Abb. 4: Mikrofon an Stativ anklemmen
MSH 70
H 47
SA 80
H 47
SA 80
SHZ 80
MSH 70
BDA_C747_D030901_Hex:Layout 1 03/26/2009 10:04 Seite 6 (Schwarz/Black Auszug)

4 Anwendung
Siehe Abb. 5b (S. 6).
4.2 Sprache
Abb. 6: Mikrofon
auf Tischstativ montiert
Siehe Abb. 6.
Abb. 7: Mikrofon
an Tischplatte geklemmt
Siehe Abb. 8.
2. Stecken Sie den Gewindeadapter SHZ 80 (2) durch das Befestigungsloch an
der Klammer SA 80 (3).
3. Schrauben Sie den Schwanenhals (4) auf.
Auf Grund seiner geringen Abmessungen und leichten Präsenzanhebung eignet
sich das C 747 V11 hervorragend für Sprachübertragung in Konferenz- und Diskus-
sionssituationen sowie als Sprechermikrofon im Rundfunk-,TV- und Tonstudio.
1. Montieren Sie das Mikrofon auf ein Tischstativ, z.B. ST 46 (optional).
2. Stellen Sie das Mikrofon ca. 30 cm vor dem/der Sprecher/in auf.
• Siehe Abb. 7: Sie können das Mi-
krofon auch mit der Klammer SA 80
an die Tischkante klemmen.
1. Sie können das Mikrofon auch mittels Stativanschluss SA 47 auf ein Tisch-
stativ montieren.
2. Stellen Sie das Mikrofon ca. 30 cm vor dem/der Sprecher/in auf.
C 747 V11 7
Abb. 8: Mikrofon direkt auf Tischstativ montiert
MSH 70 H 47
SA 47 SA 80
H 47
ST 46
ST 46
MSH 70
H 47
BDA_C747_D030901_Hex:Layout 1 03/26/2009 10:04 Seite 7 (Schwarz/Black Auszug)

4 Anwendung
4.3 Snare Drum
Abb. 9: Mikrofonposition
für Snare Drum
4.4 Saxophon
Abb. 10: Mikrofonposition
für Saxophon
Siehe Abb. 10a.
Siehe Abb. 10b.
4.5 Akustische Gitarre
Abb. 11: Empfohlene
Mikrofonposition
für akustische Gitarre
Siehe Abb. 4 (S. 6) und 9:
1. Klemmen Sie das Mikrofon an einen
Beckenständer an.
2. Sie können den Klang variieren, in-
dem Sie die Mikrofonposition verän-
dern.
Das Saxophon strahlt alle Frequenzen innerhalb des 3-dB-Bereichs durch den
Schallbecher ab.
1. Stellen Sie das Mikrofon oberhalb des Schallbechers auf.
2. Richten Sie das Mikrofon etwa auf die Mitte des Instruments aus.
• Wenn Sie weniger Klappengeräusch übertragen möchten, vergrößern Sie den
Mikrofonabstand und/oder richten Sie das Mikrofon auf den Außenrand des
Schallbechers aus.
Akustische Gitarren (sowohl mit Nylon-
als auch mit Stahlbesaitung) sind relativ
leise Instrumente. Der Klangcharakter
hängt von den verwendeten Saiten, der
Holzart, dem Lack und der Spielweise
ab.
Siehe Abb. 11:
• Am sichersten erfassen Sie das ge-
samte Klangspektrum einer klassi-
schen Gitarre, indem Sie das Mikro-
fon auf einen Punkt in der Nähe des
C 747 V118
ab
BDA_C747_D030901_Hex:Layout 1 03/26/2009 10:04 Seite 8 (Schwarz/Black Auszug)

4 Anwendung
“Westerngitarre”:
4.6 Stützmikrofon
Stegs ausrichten. Dort sind die Obertöne, die den spezifischen Klang des In-
struments bestimmen, am lautesten, da sie über den Steg durch die Decke
verstärkt werden.
Die mit Stahlsaiten bespannte "Westerngitarre" ist größer und hat ein helleres,
beim Spiel mit Plektron besonders obertonreiches Klangspektrum.
• Für eine ausgewogene Wiedergabe (auf der Bühne und im Studio) richten Sie
das Mikrofon aus einem Abstand von ca. 20 cm auf das Schallloch aus.
In sehr ruhigen Studios sind auch größere Mikrofonabstände möglich.
Bei Orchesteraufnahmen ist es oft notwendig, leise Instrumente oder Soloinstru-
mente mit zusätzlichen Stützmikrofonen im Nahbereich abzunehmen.
Dank seiner relativ engen Hypernierencharakteristik bietet das C 747 V11 eine
hohe akustische Trennung. Deshalb und auch wegen seiner leichten Präsenzan-
hebung eignet sich das C 747 V11 hervorragend als Stützmikrofon.
• Stellen Sie das C 747 V11 genau so auf wie ein übliches Stützmikrofon.
• Reinigen Sie das Gehäuse des Mikrofons mit einem mit Wasser befeuchteten
Tuch.
C 747 V11 9
5 Reinigung
BDA_C747_D030901_Hex:Layout 1 03/26/2009 10:04 Seite 9 (Schwarz/Black Auszug)

Arbeitsweise: Kondensatorwandler (selbstpolarisiert)
Richtcharakteristik: Hyperniere
Übertragungsbereich: 30 bis 18.000 Hz ±3 dB von Sollkurve
Empfindlichkeit bei 1000 Hz: 8,5 mV/Pa / -42 dBV bez. auf 1 V/Pa
Grenzschalldruck bei 1000 Hz für k = 1%: 93 Pa / 133 dB SPL
Ersatzgeräuschpegel nach IEC 60268-4: 32 dB
Äquivalentschalldruckpegel nach IEC 60268-4 (A-bew.): 21 dB-A
Geräuschpegelabstand bez. auf 1 Pa (A-bew.): 73 dB
Elektrische Impedanz: ≤ 400 Ohm
Empfohlene Lastimpedanz: ≥ 1000 Ohm
Speisespannung: 9 - 52 Volt Phantomspeisung nach IEC 61938
Stromaufnahme: ≤ 2 mA
Steckerbeschaltung: 3-poliger XLR-Stecker
Äußere Abmessungen: 9 x 137 mm (ø x L)
Gewicht: 25 g netto (ohne Kabel und Stecker)
Dieses Produkt entspricht den in der Konformitätserklärung angegebenen Normen. Sie können die Konformi-
Frequenzkurve Polardiagramm
6 Technische Daten
C 747 V1110
BDA_C747_D030901_Hex:Layout 1 03/26/2009 10:04 Seite 10 (Schwarz/Black Auszug)

C 747 V11 11
BDA_C747_D030901_Hex:Layout 1 03/26/2009 10:04 Seite 11 (Schwarz/Black Auszug)

Table of Contents
Page
Welcome!...............................................................................................................13
1 Safety and Environment ..................................................................................13
1.1 Safety .........................................................................................................13
1.2 Environment ...............................................................................................13
2 Description ......................................................................................................14
2.1 Packing List................................................................................................14
2.2 Optional Accessories ...................................................................................14
2.3 Microphone ................................................................................................14
3 Interfacing.......................................................................................................15
3.1 General ......................................................................................................15
3.2 Balanced Input with Phantom Power .............................................................15
3.3 Balanced Input with No Phantom Power ........................................................15
3.4 Unbalanced Input ........................................................................................15
4 Using the Microphone......................................................................................16
4.1 Mounting....................................................................................................16
4.1.1 Mounting the Gooseneck Crosswise.....................................................16
4,2 Speech.......................................................................................................17
4.3 Snare Drum ................................................................................................18
4.4 Saxophone .................................................................................................18
4.5 Acoustic Guitar............................................................................................18
4.6 Spot Miking ................................................................................................19
5 Cleaning ...........................................................................................................19
6 Specifications....................................................................................................20
C 747 V1112
BDA_C747_D030901_Hex:Layout 1 03/26/2009 10:04 Seite 12 (Schwarz/Black Auszug)

Welcome!!
Thank you for purchasing an AKG product. This Manual contains important in-
structions for setting up and operating your equipment. Please take a few minutes
to read the instructions below, particularly section 1 Safety and Environ-
ment, carefully before operating the equipment. Please keep the Manual for
future reference. Have fun and impress your audience!
1 Safety and Environment
1.1 Safety
1.2 Environment
L
• Please make sure that the piece of equipment your microphone will be
connected to fulfills the safety regulations in force in your country and
is fitted with a ground lead.
• When scrapping the equipment, separate the case, circuit boards, and
cables, and dispose of all components in accordance with local waste
disposal rules.
• The packaging of the equipment is recyclabe. To dispose of the pack-
aging, make sure to use a collection/recycling system provided for that
purpose and observe local legislation relating to waste disposal and re-
cycling.
C 747 V11 13
BDA_C747_D030901_Hex:Layout 1 03/26/2009 10:04 Seite 13 (Schwarz/Black Auszug)

2 Description
2.1 Packing List
2.2 Optional Accessories
2.3 Microphone
•C 747 V11 microphone
•H 47 microphone clamp
•MSH 70 gooseneck (5.5 in. / 140 mm)
•SA 47 stand adapter
•SA 80 clamp
•SHZ 80 screw link
• Foam windscreen
• For optional accessories, refer to the current AKG catalog or folder, or visit
www.akg.com.Your dealer will be glad to help.
The C 747 V11 is a pencil-type microphone containing a condenser capsule of
very small dimensions. Despite its small size, the microphone provides a well-bal-
anced frequency response and frequency independent polar pattern.
The acoustically tuned interference tube in front of the capsule ensures a smooth
low-end response rarely found in any microphone this small in diameter. This de-
sign also provides high sensitivity, an excellent signal/noise ratio, and a consistent
directivity factor.
Its hypercardioid polar response ensures excellent separation, making the C 747
V11 an ideal spot microphone.
The supplied accessories and its small size enable the microphone to be used in a
variety of miking situations.
The microphone features a low-impedance, electronically balanced output and is
designed for standard phantom powering.You can connect the microphone to bal-
anced or unbalanced inputs.
C 747 V1114
BDA_C747_D030901_Hex:Layout 1 03/26/2009 10:04 Seite 14 (Schwarz/Black Auszug)

3 Interfacing
The C 747 V11 is a condenser microphone and therefore needs a power supply.
The microphone provides a balanced output on a 3-pin male XLR connector:
Pin 1: ground
Pin 2: hot
Pin 3: return
You can connect the microphone to balanced microphone inputs with or without
phantom power. AKG phantom power supplies allow you to connect the micro-
phone to unbalanced inputs as well.
1. Use an XLR cable to connect the microphone to a balanced XLR input with
phantom power.
2. Switch the phantom power on. (Refer to the instruction manual of the unit to
which you connected your C 747 V11.)
• If your mixer provides no phantom power, connect an optional AKG B 18 phan-
tom power supply between the microphone and the mixer.
You may connect the AKG B 18 phantom power supply to an unbalanced input as
well.
• Refer to the instruction manual of the B 18 phantom power supply.
C 747 V11 15
3.2
3.3
C 747 V11
C 747 V11
B 18
3.1 General
Refer to sections
3.2 and 3.3 below.
3.2 Balanced Input
with Phantom Power
Fig. 1: Connecting to
a balanced input.
Refer to fig. 1.
3.3 Balanced Input
with No Phantom Power
Refer to fig. 1 above.
3.4 Unbalanced Input
Fig. 2: Connecting to
an unbalanced input.
Refer to fig. 2 above.
C 747 V11 B 18
BDA_C747_D030901_Hex:Layout 1 03/26/2009 10:04 Seite 15 (Schwarz/Black Auszug)

4 Using the Microphone
All supplied mounting accessories have 3/8" inside and/or outside threads, so you
can screw the H 47 mic clamp as well as the MSH 70 gooseneck on to any stan-
dard floor or table stand.
• To fix any of the supplied mounting accessories to a 5/8" thread, use a com-
mercial 3/8" to 5/8" thread adapter.
• Use the SA 80 to clamp the microphone on a desktop, microphone stand, flats,
or other parts of a stage set up to 0.8 in./20 mm in thickness or diameter.
1. Use a screwdriver or coin to remove the connecting screw (1).
2. Insert the SHZ 80 screw link (2) into the hole in the fin (3).
3. Screw the gooseneck (4) on.
C 747 V1116
4.1 Mounting
Note:
Fig. 3: Clamping the mi-
crophone on a desktop.
Refer to figs. 3 and 4.
4.1.1 Mounting the
Gooseneck Crosswise
Fig. 5: Mounting the
gooseneck crosswise
on the SA 80 clamp.
Refer to fig. 5a.
Refer to fig. 5b.
Fig. 4: Clamping the microphone on a floor stand.
MSH 70
H 47
SA 80
H 47
SA 80
SHZ 80
MSH 70
ab
1
2
3
4
BDA_C747_D030901_Hex:Layout 1 03/26/2009 10:04 Seite 16 (Schwarz/Black Auszug)

4 Using the Microphone
4.2 Speech
Fig. 6: Mounting the micro-
phone on a table stand.
Refer to fig. 6.
Fig. 7: Clamping the
microphone on a desktop.
Refer to fig. 8.
Due to its reduced size and slight presence rise the C 747 V11 is an excellent
choice for speech miking in conference and discussion situations as well as radio,
TV and recording studios.
1. Mount the microphone on a table stand, e.g., an ST 46 (optional).
2. Place the microphone about 1 foot/30 cm in front of the talker.
• Refer to fig. 7: Alternatively, you can
clamp the microphone to the desk-
top using the SA 80.
1. You can use the SA 47 stand adapter to mount the microphone on a table
stand.
2. Place the microphone about 1 foot/30 cm in front of the talker.
C 747 V11 17
ST 46
MSH 70
H 47
Fig. 8: Mounting the microphone on a table stand.
MSH 70 H 47
SA 47 SA 80
H 47
ST 46
BDA_C747_D030901_Hex:Layout 1 03/26/2009 10:04 Seite 17 (Schwarz/Black Auszug)

4 Using the Microphone
C 747 V1118
Refer to figs. 4 (p. 16) and 9:
1. Clamp the microphone on a cymbal
stand.
2. Experiment with microphone place-
ment to obtain the desired snare
drum sound.
The saxophone radiates all of its frequencies within the 3-dB band from the bell.
1. Place the microphone above the bell.
2. Point the microphone roughly at the middle of the instrument.
• If you want less key click noise, move the microphone further away from the in-
strument and/or aim it al the outer rim of the bell.
Nylon and steel strung guitars are both
subtle instruments. The strings, wood,
lacquer, and playing style all affect the
tone and it's these delicate influences
that you should try to capture.
Refer to fig. 11:
•
To make sure you get the full spec-
trum of the classical guitar's tone,
aim the microphone at a point near
the bridge. That is where the over-
tones determining the instrument's
specific timbre are at their loudest,
reinforced by the vibration of the top.
4.3 Snare Drum
Fig. 9: Microphone place-
ment for a snare drum.
4.4 Saxophone
Fig. 10: Microphone
positions for a saxophone.
Refer to fig. 10a.
Refer to fig. 10b.
4.5 Acoustic Guitar
Fig. 11: Recommended
microphone position
for an acoustic guitar.
ab
BDA_C747_D030901_Hex:Layout 1 03/26/2009 10:04 Seite 18 (Schwarz/Black Auszug)

4 Using the Microphone
Steel strung guitar:
4.6 Spot Miking
The steel strung guitar is bigger and sounds brighter, carrying a richer supply of
overtones, especially when used with a plectrum.
• To get good results both in the studio and on stage,point the microphone at the
soundhole from approx. 8 in./20 cm.
In a very quiet studio you may even try far miking.
When recording orchestral music, you may often have to mic up quiet and/or solo
instruments with extra near-field ("spot") microphones.
Being a relatively narrow hypercardioid, the C 747 V11 provides a high amount of
separation.This feature in conjunction with its mild presence rise makes the C 747
V11 an excellent spot microphone.
• Place the C 747 V11 where you would place a conventional spot microphone.
• Use a soft cloth moistened with water to clean the microphone body.
C 747 V11 19
5 Cleaning
BDA_C747_D030901_Hex:Layout 1 03/26/2009 10:04 Seite 19 (Schwarz/Black Auszug)

6 Specifications
Type: condenser (self-polarized)
Polar pattern: hypercardioid
Frequency range: 30 Hz to 18 kHz ±3 dB from published trace
Sensitivity at 1 kHz: 8.5 mV/Pa / -42 dBV re 1 V/Pa
Max. SPL for 1% THD: 93 Pa /133 dB SPL
Equivalent noise level to IEC 60268-4: 32 dB
Equivalent noise level to IEC 60268-4 (A-weighted): 21 dB-A
Signal/noise level re 1 Pa (A-weighted): 73 dB
Impedance: ≤ 400 ohms
Recommended load impedance: ≥ 1000 ohms
Powering: 9 to 52 V phantom power to IEC 61938
Current consumption: ≤ 2 mA
Connector: 3-pin XLR
Size: 3/8 (dia.) x 5.4 in. / 9 (ø) x 137 mm
Net weight: 0.9 oz. / 25 g (without cable and connector)
This product conforms to the standards listed in the Declaration of Conformity. To order a free copy of the Dec-
Frequency Response Polar Diagram
C 747 V1120
BDA_C747_D030901_Hex:Layout 1 03/26/2009 10:04 Seite 20 (Schwarz/Black Auszug)
Table of contents
Languages:
Other AKG Microphone manuals