Alcatel-Lucent Enterprise OpenTouch 8244 DECT User manual

8244 DECT Handset
OpenTouch™ Suite for MLE
User Manual
8AL90387ENAAed0a – 1952

8AL90387ENAAed0a
2 /60
This document describes the services offered by the 8244 DECT Handset connected to an OmniPCX
Enterprise system.
Your phone can be connected to an IBS or an IP-Dect radio base station depending on the company
telephone system. Some features depend on the type of radio base station you are connected to. The main
document describes features when connected to an IBS radio base station. A specific chapter is used to
describe features when connected to an IP-Dect radio base station.
Operating conditions
This approved DECT telephone is intended to be used with an Alcatel-Lucent cordless PABX. The following
conditions must be respected, notably concerning the use of radioelectric frequencies:
• Changes or modifications to the equipment not expressly approved by the party responsible for
compliance could void the user's authority to operate the equipment.
• To limit the risk of interference, people with pacemakers must keep the wireless telephone away from
their equipment (minimum distance of 15 cm/6 inches).
• It is recommended to follow the standard acceptance procedures before using this equipment in
human safety critical areas (hospitals...).
• DECT equipment can only be used to establish links between fixed points if these links are temporary.
• The conditions of access to a DECT equipment telepoint network shall be stipulated by contract with
the operator of the authorized telepoint network concerned.
• Do not expose your telephone to severe conditions (rain, sea air, dust, etc.).
• Switch off the telephone before changing the battery.
• You must not switch on or use your telephone near gas or inflammable liquids.
• The headset includes magnetic elements that may attract sharp metallic objects.
• There is a danger of explosion if the battery is replaced incorrectly. Use only recommended battery:
ZHONGSHAN TIANMAO BATTERY Co. Ltd. BP1709/A - Li-ion 3.7V 1100mAh 4.1Wh.
• The mains power socket used must be close to the charger/holder and easily accessible, so that it
can be used as an 'on/off' facility.
• Charge the battery for about 6 hours before initial use.
• You can charge the device by connecting it to a USB 2.0 port (type A).
• To prevent possible hearing damage, do not listen at high volume levels for long periods...
The labels and icons presented in this document are not contractually binding and may be modified without
prior warning. The labels and icons displayed on your phone depend on the system to which you are
connected and may differ from those specified in this document.

8AL90387ENAAed0a
3 /60
1Getting to know your telephone 6
1.1 Phone components 6
1.2 Technical details of the phone 6
1.3 Technical details of the charger 7
1.4 Phone description 8
1.5 Status icons 10
1.6 MENU icons 11
1.7 Call icons 12
1.8 Accessing the MENU and navigating 13
2Getting started 14
2.1 First start 14
2.2 Installing the battery in the telephone 15
2.2.1 Place or remove the battery in the telephone 15
2.3 Charging your telephone battery 16
2.3.1 Charging the battery on a single charger 16
2.3.2 Charging the battery on a dual charger 16
2.3.3 LED 17
2.3.4 Autonomy of your telephone 17
2.4 Switching on your telephone 17
2.5 Switching off your telephone 17
3Using your telephone 18
3.1 Identify the terminal you are on 18
3.2 Messaging portal 18
3.3 Call log 19
3.4 Making a call 20
3.5 Calling from your personal directory 20
3.6 Calling your caller by name (company directory) 21
3.7 Receiving a call 21
3.8 Redialing 22
3.9 Requesting automatic callback if internal number is busy 22
3.10 Sending text message if internal number is busy 22
3.11 Speaking on the loudspeaker of a busy internal contact 23
4During a conversation 24
4.1 Make a second call 24
4.2 Receiving a second call 25
4.3 Switching between two calls (Broker call) 25
4.4 Transferring a call 25
4.5 Three-way conference with internal and/or external contacts (conference) 26
4.6 Placing an outside call on hold (parking) 26
4.7 Activate/deactivate voice frequency 27
5Sharing 28
5.1 Answering the general bell 28
5.2 Call pick-up 28
5.3 Hunting groups 29
5.3.1 Hunting group call 29
5.3.2 Temporary exit from your hunting group / Return into your group 29
5.4 Sending a text message to an internal contact 30
5.5 Send a voice message copy 30
5.6 Sending a recorded message to a number or a distribution list 31
6Keep in touch 32
6.1 Forwarding calls to another number (immediate forward) 32
6.2 Different types of diversions / Example of diversion on busy 32
6.2.1 Different types of diversions 32
6.2.2 Example of diversion on busy 33

8AL90387ENAAed0a
4 /60
6.3 Diverting calls to your voice mailbox 33
6.4 Consulting your voice mailbox 33
6.5 Display an absence message 34
6.6Program your associate number 34
6.7 Define an overflow number 35
6.8 Cancelling all forwards 36
6.9 Consulting text messages 36
7Programming your telephone 37
7.1 Identify the terminal you are on 37
7.2 Initializing your voice mailbox 37
7.3 Change your voice mailbox password 38
7.4 Adjusting the audio functions 38
7.4.1 Choose the tune 38
7.4.2 Adjusting the ringer volume 38
7.4.3 You can adjust the buzzer/ringer mode according to your needs 39
7.5 Activating headset mode 39
7.6 Adjusting your telephone functions 39
7.7 Selecting language 40
7.8 Programming your personal directory 41
7.9 Modifying a record in the personal directory 41
7.10 Erase a record from the personal directory 42
7.11 Programming an appointment reminder 42
7.12 Locking your telephone 43
7.13 Modifying your personal code 44
8Registering the telephone 45
8.1 Registering the telephone on a system for the first time 45
8.2 Registering the telephone on other systems 46
8.2.1 To make a new registration, when the telephone has already been registered on one or more
systems, proceed as follows: 46
8.2.2 Selecting your telephone system 47
9Using the telephone in GAP mode 48
9.1 Getting to know your telephone 49
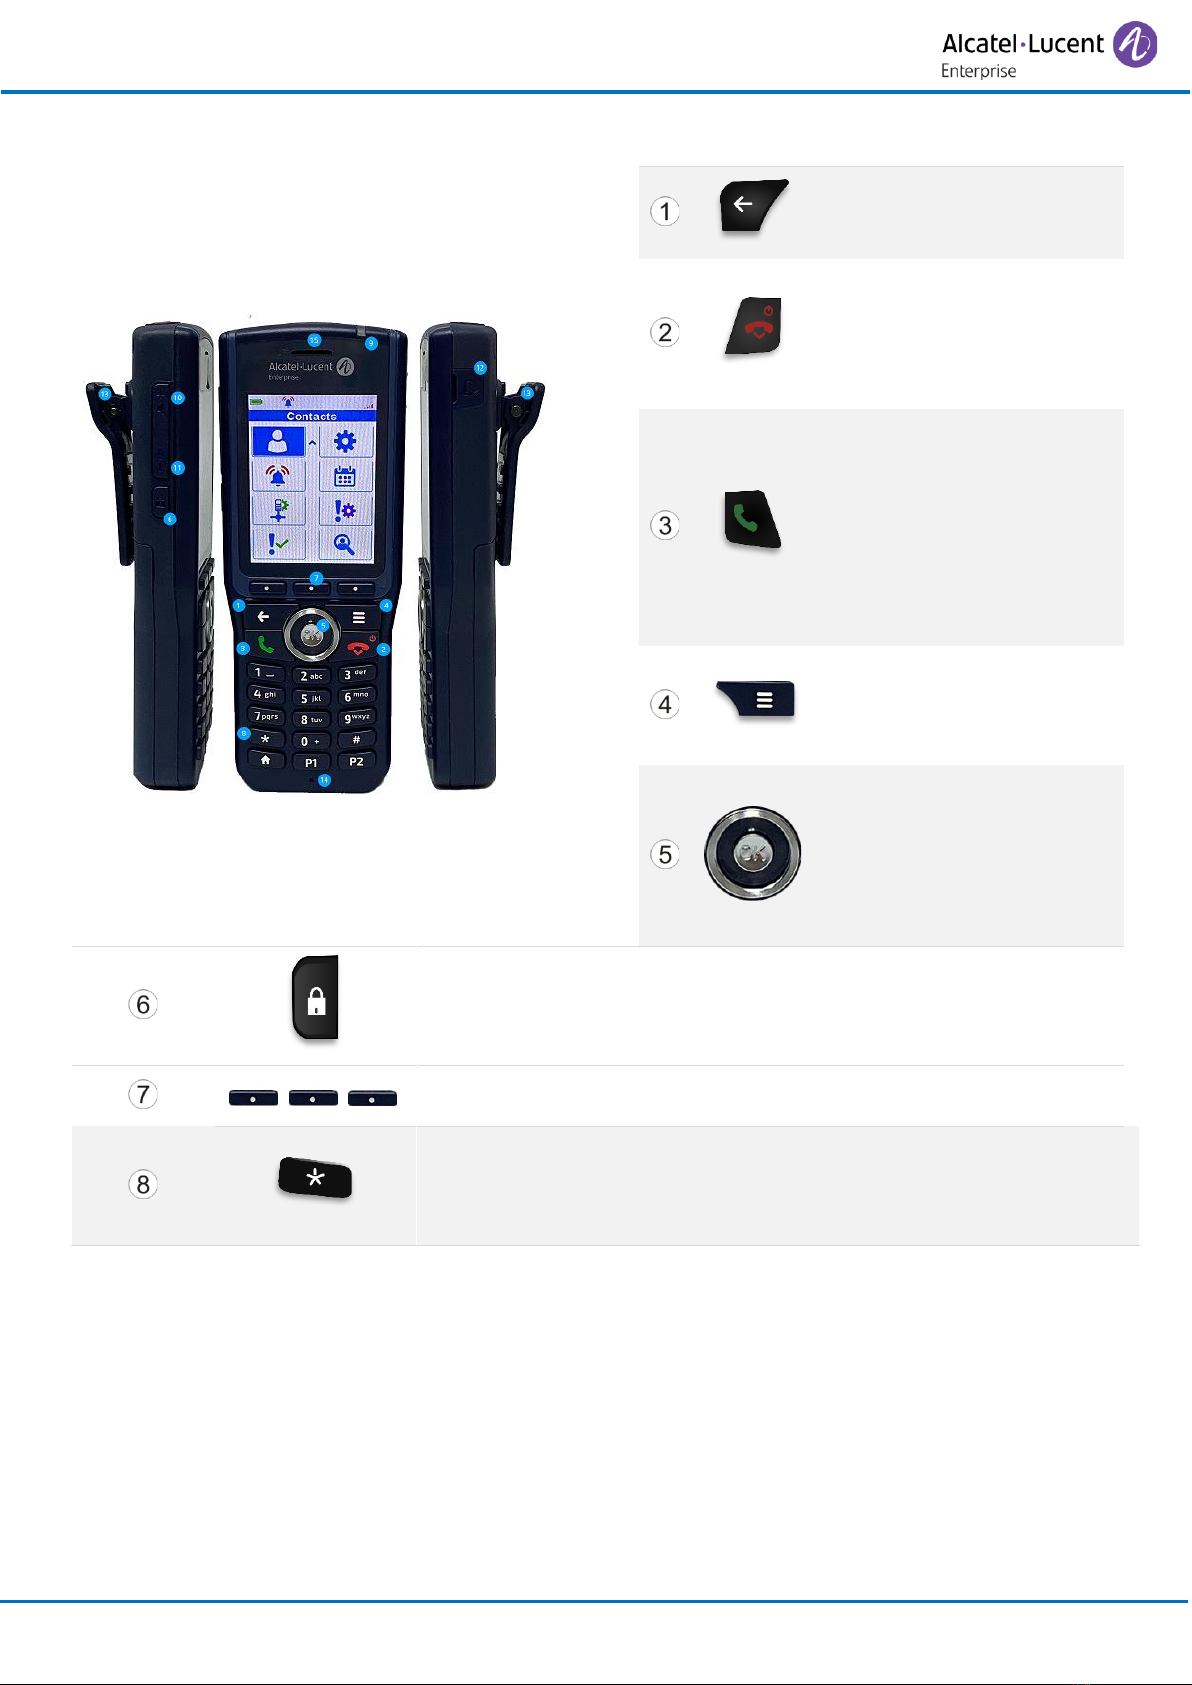
9.1.1 Phone description 49
9.1.2 MENU icons 50
9.1.3 Call icons 50
9.1.4 Accessing the MENU and navigating 51
9.2 Making a call 51
9.3 Receiving a call 52
9.4 Calling from your personal directory 52
9.5 Redialing the last number dialed (redial) 52
9.6 Call log 53
9.6.1 Manage the call log 53
9.7 Sending DTMF signals 54
9.8 Sending a calibrated cut-off 54
9.9 Programming your personal directory 54
9.9.1 Add new contact 54
9.9.2 Modify a contact 55
9.9.3 Deleting a card 55
9.10 Customizing and adjusting your telephone 56
9.10.1 Choosing your melody 56
9.10.2 Adjusting the ringer volume 56
9.10.3 Selecting language 56
9.10.4 Other features 57
10 List of accessories 58
10.1 Belt clip 58

8AL90387ENAAed0a
5 /60
10.2 Chargers 58
10.2.1 How to dock your phone on the desk support 59
10.3 Power supply (Optional) 59
10.4 Presentation of the battery pack 60
10.4.1 Autonomy of your telephone 60
10.4.2 Initial charge: 60
10.4.3 Battery charge level 60
10.5 Headphone / external microphone 60
10.6 Cleaning your telephone 60
10.7 Transporting and protecting your telephone 60
11 Declaration of compliance 64
Quick guide 61

8AL90387ENAAed0a
6 /60
1 Getting to know your telephone
1.1 Phone components
The phone has a few components, illustrated on the image below. Please make sure all of them are
present in the unit’s package.
1.2 Technical details of the phone
It is a ruggedized phone with a drop height of 2.0 meters. The size of the unit allows the user to simply
hold and operate the phone with one hand.

8AL90387ENAAed0a
7 /60
1.3 Technical details of the charger
The charger of the phone has an advanced design. It can fit to any desk, due to it’s ideal measurments.
For further details, please refer to subchapter 2.3 and 10.2.

8AL90387ENAAed0a
8 /60
1.4 Phone description
• Return to previous menu.
• Erase a character.
• Delete an entire field.
• Switch off ringer.
• Hang up.
• Long press: Switch on
the phone / Switch off the
phone.
• Answer the call.
• Long press (feature
depending on the
system): redial last
number or access the
redial list.
• Switching between two
calls (Broker call).
• Short press: Access
MENU.
• Long press: Back to
homepage.
• Access MENU.
• Confirm.
• Navigate.
• Access to personal speed
dial (Down navigation
key).
• Short press: Press on this key to light up the screen when the
phone is in idle state.
• Long press: Lock/unlock keypad.
• Three softkeys: Short press. Their function is indicated on the
display above each softkey.
• Long press (Features depending on the system): Access to
personal speed dial / Access the DTMF feature during a
conversation.
GAP mode: When you are on a call, you can initiate a second call.

8AL90387ENAAed0a
9 /60
LED
• Green steady: the phone is on the charger and the battery is fully
charged.
• Red steady: the phone is on the charger and the battery is
charging.
• Green steady: the phone is on the charger and the battery is fully
charged.
• Slow orange flashing: Telephonic event such as unread
message, missed call, etc.
• Rapid orange flashing: Incoming call.
• Slow Red flashing: Out of coverage.
• Rapid red flashing: low battery warning (Low battery is signaled
when battery level reaches 10%). Put the handset on it's charger.
• Short press: Increase the volume of ring tone during an incoming call (4 steps) or
increase volume of loudspeaker during a conversation (8 steps).
• Long press in conversation: Activate/deactivate the loudspeaker.
• Short press: Decrease the volume of ring tone during an incoming call (4 steps) or
decrease volume of loudspeaker during a conversation (8 steps).
• Long press during communication: Activate/deactivate the mute feature.
• 3.5 mm, 4 pole jack (TRRS standards: CTIA).
• Clip to hook your phone on your belt. You can remove the clip and instead use the
cover that is provided in the phone package.
• Microphone.
• Alarm key (Panic button)
Jack connector - CTIA standards
12
A
Microphone
B
Ground
C
Audio (right)
D
Audio (left)

8AL90387ENAAed0a
10 /60
1.5 Status icons
The status icons are displayed on the welcome screen and indicate the status of the telephone.
Battery charge level ( > > > ).
In charge (Flashing icon).
New messages, callback request.
Missed calls.
Call diversion activated.
Vibrate mode active.
Ringer active.
Ringer disabled.
Radio reception quality - Normal Mode.
Radio reception quality - 50 mW power.
Loudspeaker on (in conversation).
Mute on (in conversation).
Economy mode activated and used (green).
Economy mode activated (gray).
You can obtain details on the status icons from the tooltips that appear on the welcome screen
when you use the navigator:

8AL90387ENAAed0a
11 /60
1.6 MENU icons
The MENU is accessible from the welcome screen by pressing the Menu key.
You can use the ‘OK’ key to access menu if no event is displayed.
It provides access to all the functions available on your system. All icons are described in their unselected
state. When selected, the icons are displayed in purple.
Contacts:
Manage your personal directory and access the company directory.
Dialed:
Call back one of the last numbers dialed.
Forward:
Divert your calls to another number.
Messages:
Consult and send voice and text messages.
Settings:
Access the general settings of the phone (key sound, economy mode, charger warning).
Services:
Access the services configuration of the handset (associate, overflow, password, name, number,
etc.).
Language:
Choice of language.
Ring:
Ringing setting.
Alarms:
Program a call-back time.
Call log:
Access the log of all incoming and outgoing calls.
Lock:
Lock/unlock the set.
System:
Installation

8AL90387ENAAed0a
12 /60
1.7 Call icons
Making a call.
Receiving a call.
Call on hold.
Sending text message if internal number is busy.
Reading messages.
Accessing the directories.
Transferring a call.
Switching to DTMF signals.
Setting up a conference.
Immediate forwarding.
Forwarding calls to your voice message service.
Conditional forwarding.
Cancelling forward.
Absence message.
Parking an external communication.
Call duration and cost.
Additional options (Features depending on the system).
Programming.
In the event of a multiple call, the icons have symbols (such as numbers) to distinguish between the
different callers.
Example: first call is on hold, second call is ongoing / .

8AL90387ENAAed0a
13 /60
1.8 Accessing the MENU and navigating
Access the menu.
Press the Access menu key.
Select a function in the MENU.
Use the navigator keys and press the
OK key to select a function.
Navigating within a function.
You can move vertically along the
various labels within the function
Press the OK key to validate your
choice.
OR
You can move horizontally along the
various icons within the function
Press the OK key to validate your
choice.
You can use the ‘OK’ key to access menu if no event is displayed.

8AL90387ENAAed0a
14 /60
2 Getting started
In order to have a fully operational 8244 DECT Handset, make sure that you have the following items: the
battery, the AC/DC adapter, the power supply and the USB cable.
2.1 First start
When you receive you phone you have to connect the battery.
If the belt clip is installed, you must lift it up and maintain it in this
position during the battery installation or replacement.
Unlock the cover.
Lift up the cover.
Remove the protective tab to connect the battery.
Place back the cover and make sure is correctly positioned.

8AL90387ENAAed0a
15 /60
2.2 Installing the battery in the telephone
2.2.1 Place or remove the battery in the telephone
If the belt clip is installed, you must lift it up and maintain it in this
position during the battery installation or replacement.
unlock the cover.
To place the battery:
• Position the battery 'connectors ' side as shown in the drawing
(A).
• Terminate the installation of the battery in its compartment by
pressing as shown in the drawing (B).
To remove the battery: lift the battery outside the compartment.
Place back the cover and make sure is correctly positioned.
A
B
B

8AL90387ENAAed0a
16 /60
2.3 Charging your telephone battery
Your phone is provided with a desk support for charging it.
2.3.1 Charging the battery on a single charger
Place the handset front forward into the support as shown in the picture. Plug the USB cable into the
AC/DC adaptor. Plug the AC/DC adaptor into the mains power supply.
The AC/DC adaptor is not provided with the set. Please contact your provider for a recommended AC/DC
adaptator.
Depending on the configuration of the handset, a beep is emitted when charging begins. The battery status
icon flashes and the led lights up.
• Green steady: the phone is on the charger and the battery is fully charged.
• Red steady: the phone is on the charger and the battery is charging.
You can configure how the handset behaves when it is installed on the charger using the settings menu.
Refer to the chapter on configuring your telephone: Adjusting your telephone functions.
2.3.2 Charging the battery on a dual charger
Place the handset front forward into the Dual Charger front slot. Place a spare Battery Pack in the back
slot, charging contacts down. Push down and forward the spare battery under the clip to keep it in charge
(A).
The AC/DC adaptor is not provided with the set. Please contact your provider for a recommended AC/DC
adaptator.
Depending on the configuration of the handset, a beep is emitted when charging begins. The battery status
icon flashes and the led of the handset lights up. If a spare cattery is in the charger a dedicated led on the
charger lights up.
• Green steady: the phone is on the charger and the battery is fully charged.
• Red steady: the phone is on the charger and the battery is charging.
To remove the spare battery, push it down and backward to unclip it.
You can configure how the handset behaves when it is installed on the charger using the settings menu.
Refer to the chapter on configuring your telephone: Adjusting your telephone functions.
A

8AL90387ENAAed0a
17 /60
2.3.3LED
• Green steady: the phone is on the charger and the battery is fully charged.
• Red steady: the phone is on the charger and the battery is charging.
Recharge your telephone battery regularly. The telephone can be on or off when recharging the battery. If
the telephone is to remain unused or out of its charger for several weeks, remove the battery and store it
separately.
The battery charging time is usually less than 3 hours. Charging time depends on the power source where
the cable USB is plugged (computer, AC/DC adapter, …).
The charging time for the spare battery is usually 6 hours.
2.3.4Autonomy of your telephone
On standby in the radio coverage zone
Up to 200 hours
In continuous conversation
Up to 20 hours
Switch off the telephone before changing the battery.
2.4 Switching on your telephone
• Press the switch on/off key (Long press).
• Your telephone is switched on.
If the display fails to light up or the battery icon is flashing, recharge the battery.
If the radio reception icon doesn't appear on the telephone display:
• Check that you're in an area covered (if you're not, move close to a radio base station).
• Check that the telephone is properly installed in the system (consult the PABX manager).
If the display indicates: 'Auto install ?', see paragraph 'Registering the telephone' or contact your installation
technician.
2.5 Switching off your telephone
• Press the switch on/off key (Long press).
• Select the switch off feature.
• Your telephone is switched off.

8AL90387ENAAed0a
18 /60
3 Using your telephone
3.1 Identify the terminal you are on
• Displays your telephone number (Long press).
3.2 Messaging portal
The messaging portal allows you to access and manage features such as the voice messages, text
messaging or missed calls.
When you have received a new event (new voice message, new text message or new missed
call) the message icon is displayed in the status bar. In case of a missed call, a blue arrow is
displayed in the status bar. The orange LED on your telephone flashes to indicate that you have
a new request. You are alerted by a special tone.
The event priority is (high to low): voice message, text message and missed call.
Select the icon to access the messaging portal directly.
Accessing the messaging portal
• Select the message icon in the status bar from the welcome screen by using the
left/right navigation keys. New events are automatically displayed.
OR.
• Access MENU.
• Messages
Access the messaging portal.
Accessing the features of the messaging portal
• Use the left/right navigation keys to select the desired tab.
• Call log: Consulting external missed calls.
Enter your password if required (Depending on the system configuration and your
preferences).
• Call log: Consulting internal missed calls.
Enter your password if required (Depending on the system configuration and your
preferences).
• Voice Mail: Access the voice mail.
Enter your password if required (Depending on the system configuration and your
preferences).
• Textmails: Access the text mail.
Enter your password if required (Depending on the system configuration and your
preferences).
• Access to callback requests.

8AL90387ENAAed0a
19 /60
• Use the up-down navigation keys to select an event and press OK to open it.
Unread events are in bold.
Actions available from the messaging portal
The actions you can perform when you access the messaging portal depend on the selected tab and the
state of the event (new or acknowledged).
• Use the up-down navigation keys to select the action and press OK
• Delete: Delete the selected entry.
• Delete all: Delete all events of the selected tab.
• Call back: Call the contact, originator of the event.
• Answer by text: Answer with a text message.
• Next: Display the following event.
• Back: Return to previous menu.
A text message is automatically deleted after you consult it. A missed call is automatocally deleted if you
call back the caller.
When consulting an event, you can delete the event once you have consulted it. However, you can choose
to delete all events in one go.
3.3 Call log
Quick access:
• Access MENU.
• Call log
• All calls.
• Incoming calls.
• Outgoing calls.
• Missed calls.

8AL90387ENAAed0a
20 /60
3.4 Making a call
• Dial.
• Send the call.
You are in communication:
• Hang up.
To make an external call, dial the outside line access code before dialing your contact number.
3.5 Calling from your personal directory
Quick access:
• Access MENU.
(In idle state)
• Contacts
• Personal Dir
• Validate access to the 'personal directory '.
• Select the name of the person you wish to call.
• Send the call.
Quick access: . The quick access is enabled if you have at less on contact in your personal directory.
Other manuals for OpenTouch 8244 DECT
1
Table of contents
Other Alcatel-Lucent Enterprise Handset manuals

Alcatel-Lucent Enterprise
Alcatel-Lucent Enterprise OpenTouch 8254 User manual

Alcatel-Lucent Enterprise
Alcatel-Lucent Enterprise OpenTouch 8244 DECT User manual

Alcatel-Lucent Enterprise
Alcatel-Lucent Enterprise 8214 User manual

Alcatel-Lucent Enterprise
Alcatel-Lucent Enterprise OpenTouch 8168s User manual

Alcatel-Lucent Enterprise
Alcatel-Lucent Enterprise OpenTouch 8234 User manual