Alink V100AP User manual

Quick Installation Guide
Pika-asennusohje
V100AP
Ver.1.0
In English pages 2 - 14
Suomeksi sivut 16 - 28

Package includes:
- VDSL2 modem - Quick installation guide
- Antenna - Phone cable
- Power supply - Network cable
Connection/explain of connectors
1. Connect phone cable from VDSL2 line to modem VDSL port.
2. Connect network cable from computer (network card), VOIP device (example ATA) and/or IPTV device to
modem LAN ports.
3 Reset button, where modem can be reset to factory defaults.
4. Connect power supply to modem Power port.
5. Turn power on using this switch.
Installation requirements:
-Place modem to horizontal and flat base
-Keep modem away from heating device
-Do not keep modem in dusty or wet place
2

Antenna connector
1. Connect external antenna to this SMA connector. You can use antenna provided with product or use other
external antenna to extend wireless coverage.
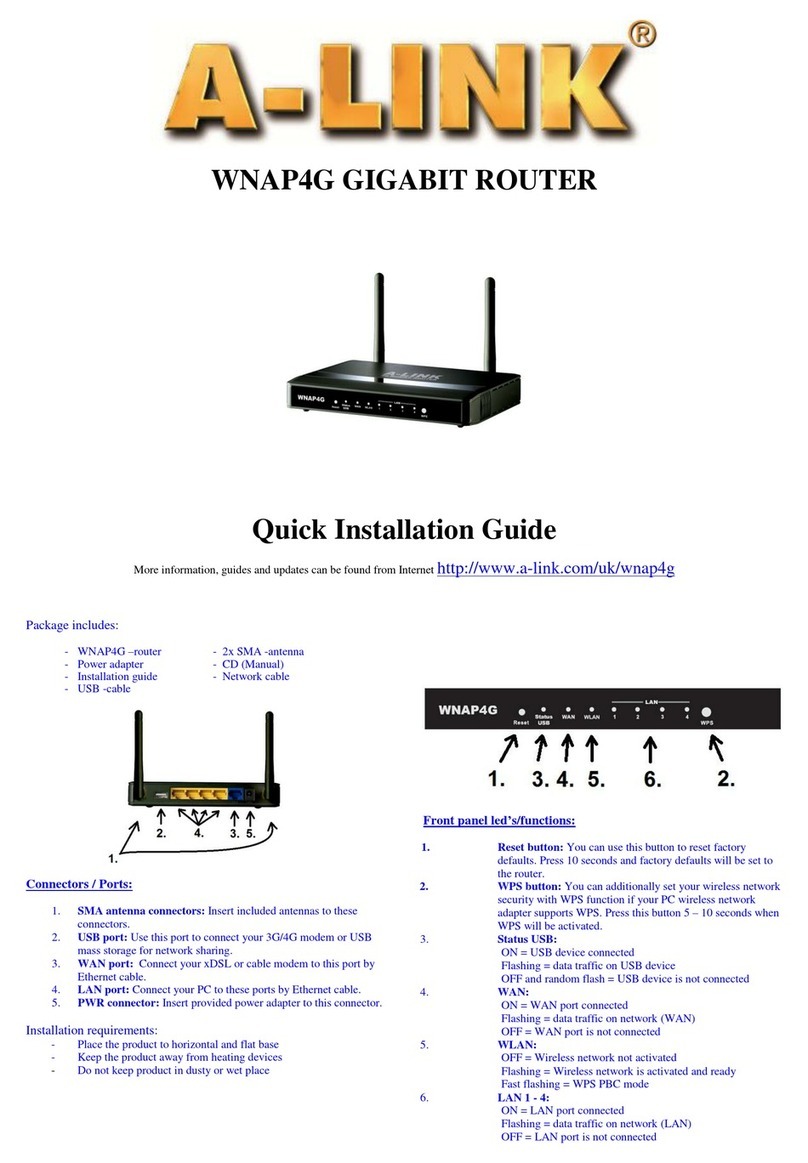
Frontpanel led’s/functions:
POWER: ONLINE:
- ON = power on - ON = Internet connection is activated
- OFF = power off - OFF = Internet connection is not activated
VDSL TX/RX: LAN1 – LAN4:
- ON = VDSL2 line connected - ON = network connection is activated
- OFF = no VDSL2 connection - OFF = network connection is not activated
- Flashing = data in VDSL2 line - Flashing = data in LAN
VDSL LINK: AP:
- ON = VDSL2 line connected - ON = WLAN AP activated
- Flashing = no VDSL2 connection / connecting - OFF = WLAN AP not active
- Flashing = data in WLAN
3

Contents:
Step 1. Network settings for Internet connection.
(This step has computer network settings needed for Internet connection)
Step 2. Failure analysis chart.
(If you face problems with modem, follow this chart)
Step 3. Activate wireless network
(This step show how wireless network can be activated)
Step 4. Setting up wireless network and security.
(This step advice how to take wireless connection with encryption in use)
Start installation:
Defaults in V100AP VDSL2 modem depend on your operator VDSL2 connection. Modify/check only your computer
network settings as in below step 1. and your Internet connection is ready to use.
If you want to use modem wireless connection, it is extremely important to add encryption to protect your wireless
connection as in step 4. ”Setting up wireless network and security” has been told. Wireless network is not active in
defaults. To take wireless network in use, follow settings as in step 3. and protect your wireless network as in step 4.
Supported browsers are Internet Explorer 5.x, Netscape 6.x or later.
Internet browser can not have any Proxy setting configured.
Reset to factory defaults:
Factory defaults can be reset when you press reset button back of the modem about 10 seconds when modem have
power on.
Note! Make sure before you connect your computer to modem, that you have firewall software installed and turned
on to your computer.
4

1. Network settings for Internet connection
(Modify/check these settings when you want to use your computer at Internet)
Windows 2000/XP
1. Go to Start -> Settings -> Network and Dial-Up Connections
2. Move mouse over Local Area Connection icon and press right hand button on mouse. Choose Properties
3. Choose Internet Protocol (TCP/IP) -> Press Properties
4. Choose Obtain an IP address automatically
5. When all necessary settings have been made, press OK.
6. In properties of Internet Protocol (TCP/IP), press OK.
7. Press OK in Network settings.
(If windows need to be restarted, press Yes)
8. Now your workstation is ready for Internet
Windows Vista
1. Go to Start -> Network.
2. Press Network and Sharing Center button and then press Manage network connections link.
3. Move mouse over Local Area Connection icon and press right hand button on mouse. Choose Properties
4. Choose Internet protocol version 4 (TCP/IPv4) -> Press Properties.
5. Choose Obtain an IP address automatically.
6. In properties of Internet Protocol (TCP/IP), press OK.
7. Press OK in Network settings.
8. Now your workstation is ready for Internet
Mac OS
1. Open AppleTalk -controller, choose Ethernet connection
2. Open TCP/IP -controller and modify these settings:
Connection = Ethernet
Definition = DHCP-server
3. Save settings. Now your workstation is ready for Internet
Linux RedHat 8.0
1. Open Start Here from desktop, go to System Settings and Network.
2. In Devices, double click mouse’s left hand button on top of your Network adapter and modify these settings:
Choose Automatically obtain IP address settings with: DHCP
Choose Automatically obtain DNS information from provider
3. Press Ok. Now your workstation is ready for Internet
5

2. Failure analysis chart (Use this when modem is in factory defaults)
Is the POWER led ON?
/ \
| Yes Are VDSL LINK led and VDSL TX/RX led ON continuously?
| / \
| | Yes Is the port led ON where computer connected? Port LAN1 – LAN4.
| | / \
| | | Yes Can you open Internet pages normally?
| | | / \
| | | | Yes VDSL2 modem is working now *.
| | | |
| | | No Check your computer network settings with instructions in this guide and
| | | / \ renew your computer IP addresses. Can you open Internet pages normally?
| | | | | (At Win2000/XP operating systems you can renew IP addresses in DOS prompt
| | | | | with following commands: ”ipconfig /release” and ”ipconfig /renew”)
| | | | |
| | | | Yes VDSL2 modem is working now *.
| | | |
| | | No You can try to reset the modem to factory defaults by pressing reset on back of the product
| | | / \ for example with pen when power is on. Can you open Internet pages normally?
| | | | |
| | | | Yes VDSL2 modem is working now *.
| | | |
| | | No Check connection from your ISP. Start this chart over *.
| | | If reset does not help, send modem to A-Link warranty **.
| | |
| | No 1. Make sure that network cable other end is connected to computer
| | network card and other end are connected to modem LAN port.
| | 2. Check that computer network card and cable are OK *.
| | 3. Send modem to A-Link warranty **.
| |
| No Check that phone cable is connected to VDSL2 line. Are VDSL leds ON now?
| / \
| | Yes Start this chart over *.
| |
| No 1. Check from your ISP that VDSL2 line does not have problems *.
| 2. Send modem to A-Link warranty **.
|
No 1. Is power supply connected to modem power port and power switched on *?
2. Send modem to A-Link warranty **.
*/ Other support issues and questions you can contact A-Link technical support:
0600-41020 (2,67 €/min + local network fee) or by E-mail : techsupport@a-link.com
**/ Warranty: A-Link warranty More information from http://www.a-link.com
P.O.BOX 3
FIN-02941 Espoo, Finland
6

3. Activate wireless network
(This step show how wireless network can be activated)
Note! If you can not access to the V100AP management web page http://10.0.0.2, you need to change IP address to
static from computer network settings as below. After all wireless settings have been configured; remember to change
computer network settings to get IP address automatically as in step 1. has been told.
Windows 2000/XP
1. Go to Start -> Settings -> Network and Dial-Up Connections.
2. Move mouse over Local Area Connection icon and press right hand button on mouse. Choose Properties.
3. Choose Internet Protocol (TCP/IP) -> Press Properties.
4. Choose Use the following IP address.
5. Add IP-address 10.0.0.1, subnet mask 255.255.255.0 and gateway 10.0.0.2
6. Leave Preferred DNS server and Alternate DNS server blank.
7. In properties of Internet Protocol (TCP/IP), press OK.
8. Press OK in Network settings.
(If windows need to be restarted, press Yes)
Windows Vista
1. Go to Start -> Network.
2. Press Network and Sharing Center button and then press Manage network connections link.
3. Move mouse over Local Area Connection icon and press right hand button on mouse. Choose Properties
4. Choose Internet protocol version 4 (TCP/IPv4) -> Press Properties.
5. Choose Use the following IP address.
6. Add IP-address 10.0.0.1, subnet mask 255.255.255.0 and gateway 10.0.0.2
7. Leave Preferred DNS server and Alternate DNS server blank.
8. In properties of Internet Protocol (TCP/IP), press OK.
9. Press OK in Network settings.
Mac OS
1. Open AppleTalk -controller, choose Ethernet connection.
2. Open TCP/IP -controller and modify these settings:
Connection = Ethernet : Definition = Manual
IP-address = 10.0.0.1
Subnet mask = 255.255.255.0
Gateway = 10.0.0.2
3. Save settings.
Linux RedHat 8.0
1. Open Start Here from desktop, go to System Settings and Network.
2. In Devices, double click mouse’s left hand button on top of your Network adapter.
3. Choose Statically set IP addresses and add following:
Address = 10.0.0.1
Subnet mask = 255.255.255.0
Default Gateway Address = 10.0.0.2
4. Press Ok.
7

1. Open Internet browser and type address http://10.0.0.2
2. Type password password and press Login.
3. In modem management page, choose ADVANCED
SETTINGS and WIRELESS menu. Put mark on
Enable and press SAVE SETTINGS button.
4. Settings will be saved in modem memory. Add wireless
network security settings with step 4.”Setup wireless
network and security” instructions.
8

4. Setting up wireless network and security
Important information about security!
Modem do not have WLAN active in default, but after activate WLAN, it do not have any
encryption security enabled. Default network name (SSID) is default. Read below
instructions carefully, to get your wireless network secured.
Repairing:
•Connect your computer to V100AP with network cable.
•Log in to VDSL2 modem web management.
•You can see more detail from page 10.
Basic security level:
•Add new network name for wireless network. Write down name below.
•Network name (SSID) = _____________________________________
•Take 128-bit WEP encryption in use. Write down encryption key below.
•Key = ________________________________________________
•You can see more details from page 10.
Advanced security level:
•Add new network name for wireless network and hide it. Write down name below.
•Network name (SSID) = _____________________________________
•Take WPA/WPA2 encryption in use. Write down encryption password below.
•Password = ______________________________________
•Take access control (MAC address filtering) in use.
•You can see more details from page 11.
Connecting your computer to secured wireless network:
•Add your computer to secured wireless network.
•You can see more details from pages 12 - 13.
More information about wireless network security
WLAN is as named wireless technology which transfers information using radio signal and it is
unsecured without any encryption and other security mechanisms. Anybody who are inside of
wireless range and have wireless LAN card can access to unsecured wireless network and
possible also to all computers connected to unsecured wireless network.
For this reason it is very important to take modems wireless network security settings in use
and deny and block all unexpected visitors. With hidden network name (SSID), WEP or
WPA/WPA2 encryption and MAC filtering you can get secured wireless network enough. More
details in page 13.
9

REPAIRING
1. Connect your computer to V100AP with network cable.
It is recommended to modify wireless network settings with network cable (RJ-45).
2. Log in to modem web management.
Open Internet browser and type address http://10.0.0.2
default password is password.
(If you can not access to address http://10.0.0.2 , check
computer network settings and browser proxy settings.)
BASIC SECURITY LEVEL
3. Modify wireless network settings.
Go to WIRELESS menu and choose
Channel/SSID/Security.
Change new name to wireless network
(SSID) and write down it to page 9.
Note! Network name can not contain any
special characters or spaces.
Choose WEP to Allowed Client Type.
Change below settings to WEP menu.
WEP Mode = 128-bit
Key Entry Method = Hex
Key Provisioning = Static
Default Key ID = 1
Key 1 = <Type ecryption key here>
Press Save Settings bottom-edge of the page.
Note! You should enter your own 26 characters long encryption key to Key 1 field which can contain
numbers 0-9 and letters a-f, example 11223344556677889900aabbcc. Write your encryption key to page 9
for future use with your computer.
You can remove network cable now. Wireless network will work right when WEP encryption key is entered
to computer wireless network settings. You can find instructions from pages 12 - 13.
10

ADVANCED SECURITY LEVEL
3. Modify wireless network settings.
Go to WIRELESS menu and choose
Channel/SSID/Security.
Change new name to wireless network (SSID)
and write it down to page 9.
Change SSID Broadcast to DISABLE
Note! Network name can not contain any
special characters or spaces.
Choose WPA/WPA2 to Allowed Client Type.
Change below settings to WPA/WPA2 menu.
Cypher suite = Mixed
Authentication = Pre-shared Key
Pre-shared key type = Passphrase (8~63 characters)
Pre-shared Key = < Type password here >
Press Save Settings bottom-edge of the page.
Note! Type Pre-shared Key about 8 - 63 characters long
password. Write your password to page 9for future use
with your computer.
In WIRELESS menu choose Access Control.
Choose Yes to Enable MAC Filtering. Choose Allow to
Access Rule for registered MAC addresses. Enter
wireless LAN card MAC addresses from all computers
which will access to this access point. (Wireless LAN card
MAC can be found ex. in Win2000/XP with IPCONFIG
/ALL command)
When you have added all MAC addresses, press Save
Settings bottom-edge of page.
Note! Check MAC addresses from your computer Wireless
LAN adapter on Wireless Network Connection. Do not
add modem MAC address to this list.
Note! You can also press Add currently associated MAC stations button, when all computers connected
wirelessly to AP will be added automatically to the access list.
You can remove network cable now. Wireless network will work right when WPA/WPA2 encryption
password is entered to computer wireless network settings. You can find instructions from pages 12 - 13.
11

Connecting your computer to secured wireless network
(Windows Vista)
In this example are shown how to make connection to secured wireless network using Windows Vista operating system
and Windows Vista WLAN AutoConfig tool. If you use other operating system or you have your wireless LAN card
own management software in use, you can contact A-Link technical support for further instructions, web site
http://www.a-link.com , phone 0600-41020 (2,67€/min + local network fee) or E-mail techsupport@a-link.com.
1. Open Network from Start menu. 2. Open Network and Sharing Center.
3. Press Connect to a network link. 4. Choose network name you have specified from list
andpressConnect button.
(If network is hidden, you can see Unnamed Network)
5. If network name is hidden, type it to 6. Type network password or encryption key
line Network Name. Press Next. to line Security key or passphrase.
(This step does not appear if network is not hidden) Press Connect.
12

7. Place mark over Save this network 8. Choose location for network. Location Home is
and Start this connection automatically recommended if you use your computer in LAN.
to save wireless settings. Press Close.
9. Press Close to accept all connection settings. 10. Now your wireless connection is ready in use.
TECHNICAL INFORMATION
Wireless network WLAN standard 802.11b (g) uses about 2.4 GHz frequency range, which is inclined for external
electric interference. Example microwaves and most of radars are using same frequency range. For this reason it is
possible to choose frequency or channel which works best for wireless network in wireless access point.
According the ETSI directive, mostly there are 13 different channels for use, which are partly overlapping each others.
In case you need to use more wireless networks in same space, you should set all different networks to not be same
channel with others. In case three different networks you should use channels 1, 7 and 13.
All spaces are individual also in perspective of build a single wireless network. All inner walls, windows, furniture and
electric interferences example transformers, machines, fluorescence tubes, etc, will weaken the signal. You can get best
possible wireless network only when testing different channels and different location.
13

Modem is in accordance with directive 1999/5/EY (CE).
V100AP EAN: 64 18949 01306 9
Product importer, repairs and technical support :
A-Link Europe Ltd, P.O.BOX 3, FI-02941 Espoo, Finland
Technical support : +358-600-41020 (2,67€ / min + local network fee)
All rights reserved
Copyright © 2008 A-link Europe Ltd 8h08T V100AP
14

Pika-asennusohje
V100AP
15

Pakkaus sisältää:
- VDSL2 –modeemi - Pika-asennusohje
- Antenni - Puhelinkaapeli
- Virtalähde - Verkkokaapeli
Liittimien kytkeminen/selitys
1. Yhdistä puhelinkaapeli VDSL2 -linjasta modeemin VDSL -porttiin.
2. Yhdistä verkkokaapeli tietokoneelta (verkkokortilta), VOIP -laitteelta (esim. ATA) ja/tai IPTV -laitteelta
modeemin LAN -portteihin.
3 Reset – painike, josta modeemin voi palauttaa tarvittaessa tehdasoletuksille.
4. Yhdistä virtalähde modeemin Power -liitäntään.
5. Kytke virta modeemiin tällä kytkimellä.
Asennusvaatimukset:
-Sijoita modeemi vaakatasoon tasaiselle alustalle
-Pidä modeemi kaukana lämpöä tuottavista laitteista
-Älä sijoita modeemia pölyiseen tai kosteaan paikkaan
16

Antenniliitäntä
1. Yhdistä ulkoinen antenni tähän SMA -liittimeen. Voit käyttää tuotteen mukana toimitettua antennia tai
jotain muuta ulkoista antennia laajentaaksesi langatonta kantavuutta.
Etupaneelin valot/toiminnot:
POWER: ONLINE:
- palaa = modeemissa on virta päällä - palaa = Internet -yhteys on aktiivinen
- pimeä = virtaa ei ole kytketty - pimeä = ei Internet -yhteyttä
VDSL TX/RX: LAN1 – LAN4:
- palaa = VDSL2 -linja yhdistetty - palaa = verkkoyhteys aktiivisena
- pimeä = ei VDSL2 -yhteyttä - pimeä = ei verkkoyhteyttä
- vilkkuu = data liikkuu VDSL2 -linjalla - vilkkuu = data liikkuu lähiverkossa
VDSL LINK: AP:
- palaa = VDSL2 -linja yhdistetty - palaa = WLAN AP aktiivisena
- vilkkuu = ei VDSL2 -yhteyttä / yhdistää - pimeä = WLAN AP pois päältä
- vilkkuu = data liikkuu langattomassa verkossa
17

Sisältö:
Kohta 1. Verkkoasetukset Internet -yhteyttä varten.
(Tässä kohdassa on tietokoneen verkkoasetukset Internet -yhteyttä varten)
Kohta 2. Vianmäärityskaavio.
(Jos modeemin kanssa tulee ongelmia, seuraa tätä kaaviota)
Kohta 3. Langattoman verkon käyttöönotto
(Tässä kohdassa neuvotaan kuinka langaton verkko otetaan käyttöön)
Kohta 4. Langattoman verkon käyttöönotto ja salaus.
(Tässä kohdassa neuvotaan miten salaus otetaan käyttöön langattomassa verkossa)
Asennuksen aloitus:
V100AP VDSL2 –modeemin oletusasetukset riippuvat operaattorisi VDSL2 -yhteydestä. Määritä/tarkista ainoastaan
tietokoneen verkkoasetukset alla olevan kohdan 1. mukaan ja Internet -yhteytesi on valmiina käyttöön.
Jos käytät modeemin langatonta yhteyttä, on erittäin tärkeää määrittää langaton yhteys suojatuksi Kohdan 4.
”Langattoman verkon käyttöönotto ja salaus” mukaan. Oletuksena langaton verkko on pois käytöstä. Katso kohta 2.
ottaaksesi langattoman verkon käyttöön ja suojaa langaton verkko kohdan 4. mukaan.
Tuetut selaimet ovat Internet Explorer 5.x, Netscape 6.x tai uudempi.
Internet selaimessa ei saa olla käytössä Proxy eli välityspalvelin toimintoa.
Tehdasasetusten palautus:
Tarvittaessa tehdasasetukset palautetaan painamalla reset -nappia noin 10 sekuntia, esimerkiksi kynällä, modeemin
takaa virran ollessa päällä.
Huom! Varmista ennen tietokoneen kytkemistä modeemiin, että tietokoneessa on palomuuri ohjelmisto asennettu/
kytketty päälle.
18

1. Verkkoasetukset Internet-yhteyttä varten
(Tässä kohdassa on tietokoneen verkkoasetukset Internet -yhteyttä varten)
Windows 2000/XP
1. Valitse Käynnistä -> Asetukset -> Verkko- ja Puhelinverkkoyhteydet.
2. Paina Lähiverkkoyhteys kuvakkeen päältä oikean puoleisella hiiren nappulalla ja valitse Ominaisuudet.
3. Valitse Internet-protokolla (TCP/IP) -> Paina Ominaisuudet.
4. Valitse Hae IP –osoite automaattisesti .
5. Kun tarvittavat tiedot on määritelty, paina OK.
6. Hyväksy Internet-protokolla (TCP/IP) ominaisuudet painamalla OK.
7. Hyväksy vielä Lähiverkkoyhteyden ominaisuudet OK:lla.
(Jos windows kysyy Käynnistetäänkö tietokone uudelleen, paina Kyllä)
8. Nyt työasema on valmis internet yhteyttä varten.
Windows Vista
1. Valitse Käynnistä -> Verkko.
2. Paina Verkko- ja jakamiskeskus painikkeesta ja paina Hallitse verkkoyhteyksiä linkistä.
3. Paina Lähiverkkoyhteys kuvakkeen päältä oikean puoleisella hiiren nappulalla ja valitse Ominaisuudet.
4. Valitse Internet protocol version 4 (TCP/IPv4) -> Paina Ominaisuudet.
5. Valitse Hae IP – osoite automaattisesti.
6. Hyväksy Internet-protokolla (TCP/IP) ominaisuudet painamalla OK.
7. Hyväksy vielä Lähiverkkoyhteyden ominaisuudet OK:lla.
8. Nyt työasema on valmis internet yhteyttä varten.
Mac OS
1. Avaa AppleTalk -säädin, valitse kytkennäksi Ethernet.
2. Avaa TCP/IP -säädin ja tee seuraavat asetukset:
- Kytkentä = Ethernet
- Määrittelytapa = DHCP-palvelin
3. Tallenna. Nyt työasema on valmis internet yhteyttä varten.
Linux RedHat 8.0
1. Avaa Start Here työpöydältä, avaa System Settings ja Network.
2. Kaksois- klikkaa Devices välilehdeltä verkkosovitinta jota käytät ja tee seuraavat asetukset:
- Valitse Automatically obtain IP address settings with: DHCP
- Valitse Automatically obtain DNS information from provider
3. Paina Ok. Nyt työasema on valmis internet yhteyttä varten.
19

2. Vianmäärityskaavio (Kun modeemi on tehdasoletuksilla)
Palaako POWER -valo VDSL2 -modeemissa?
/ \
| Kyllä Palaako VDSL LINK ja VDSL TX/RX -valot yhtäjaksoisesti?
| / \
| | Kyllä Palaako valo portissa johon työasema on kytketty? Portit LAN1 – LAN4.
| | / \
| | | Kyllä Avautuvatko Internet -sivut normaalisti?
| | | / \
| | | | Kyllä VDSL2 -modeemi on toimintakunnossa *.
| | | |
| | | Ei Tarkista työaseman verkkoasetukset asennusohjeen mukaisesti ja
| | | / \ Uudista tietokoneesi IP -osoitteet. Avautuvatko Internet – sivut?
| | | | | (Win2000/XP käyttöjärjestelmissä IP –osoitteen voi uudistaa komentokehotteella
| | | | | seuraavilla komennoilla: ”ipconfig /release” ja ”ipconfig /renew”)
| | | | |
| | | | Kyllä VDSL2 -modeemi on toimintakunnossa *.
| | | |
| | | Ei Voit yrittää palauttaa tehdasasetukset painamalla laitteen takana olevasta pienestä reiästä
| | | / \ esim. kynällä virran ollessa päällä. Avautuvatko Internet – sivut?
| | | | |
| | | | Kyllä VDSL2 -modeemi on toimintakunnossa *.
| | | |
| | | Ei Tarkista yhteyden toimivuus palveluntarjoajalta. Aloita kaavion tarkastus alusta *.
| | | Jos tämä ei auta, lähetä laite A-Link takuuhuoltoon **.
| | |
| | Ei 1. Tarkista, että verkkokaapelin toinen pää on liitetty työaseman
| | verkkokorttiin ja toinen pää reitittimen LAN -porttiin.
| | 2. Varmista verkkokortin ja -kaapelin toimivuus *.
| | 3. Lähetä tuote A-Link takuuhuoltoon **.
| |
| Ei Tarkista, että puhelinkaapeli on kytketty VDSL2 –linjaan. Palaako VDSL -valot nyt?
| / \
| | Kyllä Aloita kaavion tarkastus alusta.
| |
| Ei 1. Tarkista palveluntarjoajalta linjan toimivuus *.
| 2. Lähetä laite A-Link takuuhuoltoon **.
|
Ei 1. Onko virtalähde kytketty laitteen Power – liittimeen ja virta kytketty päälle *?
2. Lähetä laite A-Link takuuhuoltoon **.
*/ Muissa tukiasioissa ja kysymyksissä ota yhteys A-Link tekniseen tukeen:
**/ Takuuhuolto: A-Link takuuhuolto Lisätietoja http://www.a-link.com
PL3
02941 Espoo
20
Table of contents
Languages:
Other Alink Network Router manuals