All Traffic Solutions StatTrak-E User manual

ATS | Chantilly, VA | USA | Tel: 1-866-366-6602 | Email: [email protected] | Web: www.alltrafficsolutions.com
Copyright © 2024 |
StatTrak-E Quick Start Guide, TraffiCloud Subscriber Edition
, ver. 1.01 | 4800268 | All rights reserved.
STATTRAK-E QUICK START GUIDE,
TRAFFICLOUD SUBSCRIBER EDITION
The
StatTrak-E by All Traffic Solutions
is a discreet, wireless traffic data collection device that provides
law enforcement authorities and traffic engineers with detailed statistics and reports on vehicle counts and
speeds by class of vehicle (small, medium, and large). StatTrak-E captures trafficdata simultaneously for
the same or opposite directions.For roadside installations, StatTrak-E captures trafficdata simultaneously
for up to two lanes of traffic, moving in the same or opposite directions, and for median installations
captures up to four lanes bidirectionally. For TraffiCloud subscribers, data uploads automatically to the
cloud.
Initial StatTrak-E setup
Once you receive your StatTrak-E, you'll need to perform the following initial setup:
Step 1:Charging the StatTrak-E
on the next page
Step 2:Signing in to TraffiCloud for the first time
on page3
Step 3:Choosing a Site for your StatTrak-E
on page3
Step 4:Mounting a solar panel
on page6
Step 5:Installing the mounting brackets
on page7
Step 6:Mounting and aiming the StatTrak-E
on page8
Step 7:Connecting a solar panel to the StatTrak-E
on page10
Step 8:Powering on the StatTrak-E
on page11
Step 9:Setting up the StatTrak-E mobile app
on page11
Step 10:Confirming your installation
on page14
After deployment, please see:
Replacing StatTrak-E batteries
on page15
Check the package contents
Upon receiving your new StatTrak-E, check to ensure that you have all of the items ordered. If you notice any damaged or missing
items, contact All Traffic Solutions Technical Customer Support immediately. Here's a summary of what's typically included with
your StatTrak-E. Also check your packing slip for precise details of your order.
What's included What you'll need
The StatTrak-E can accommodate up to two 12.8V, 11.5Ah rechargeable lithium batteries
and includes a smart battery charger, two adapters, and keys for the ON/OFFswitch. If you
purchased a solar panel, only one battery is included.
A sheltered workspace and
electrical power supply.
A main pole bracket, three stainless steel banding straps, and a custom security bit. See
Step 5:Installing the mounting brackets
on page7.
A nut driver and power
screwdriver or drill.
Six 3/4-in. long x 1/4-in. diameter (7.6-cm x 2.5 cm)-20 size bolts, with 7/16-in. (11mm)
nuts and washers.
Two wrenches or nut drivers with
7/16-in. (11mm) sockets.
An angle bracket, two bolts with washers, a Torx T-30 security bit with 1/4-in. (6 mm) shank,
and two pole adapters for roadside use with Telespar-type poles.
An Android mobile device and the
StatTrak-E app (not required for
basic roadside setup).

STEP 1:CHARGING THE STATTRAK-E
Use this step for initial charging or recharging of the StatTrak-E. After you receive the StatTrak-E, in your shop or workplace,
connect the charger to the StatTrak-E through the charger port, as described below. If your StatTrak-E includes a solar panel, you'll
need to mount and connect it in
Step 4:Mounting a solar panel
on page6 and
Step 7:Connecting a solar panel to the StatTrak-E
on page10.
Dual-use charging port
The StatTrak-E features a dual-use IP68 waterproof charging port, which delivers power to the device from a solar panel (if
equipped) and serves as an AC charging port. You'll use the charging port in this step for initial charging.
Under safety regulations, the StatTrak-E cannot be shipped with fully charged batteries. Therefore, All Traffic Solutions strongly
recommends that you charge the StatTrak-E fully before initial use. The supplied smart battery charger is equipped with a charge
indicator that shows when the StatTrak-E is fully charged and ready for use.
Do not remove the StatTrak-E battery (or batteries) for charging. The device is shipped with the power turned off. Do not turn it on
during charging. You'll only need to turn it on to test during pole mounting. See
Step 6:Mounting and aiming the StatTrak-E
on
page8.
WARNING:RISKOFELECTRIC SHOCK OR EQUIPMENTDAMAGE The battery charger is designed for use in
protected environments only and must not be left unattended during charging. Keep the charger and batteries free of
moisture and away from flammable or explosive goods. Place the charger on a flat, non-flammable surface in a well-
ventilated environment. Do not cover the charger when charging and ensure that ambient room temperatures do not
exceed 104°F (40°C). Turn off the power supply before you connect or disconnect the charger and batteries. Do not
modify the charger, accessories, or connectors as this may cause a short circuit, fire, or over-heating. All Traffic
Solutions is not liable for any damages caused by such changes. Failure to follow these guidelines could result in
electric shock or damage StatTrak-E, rendering your warranty null and void.
To charge the StatTrak-E:
A. Place the StatTrak-E on a smooth, non-flammable work surface sheltered from precipitation or other moisture and with
access to an AC power outlet.
B. Make sure the StatTrak-E is turned off. See
Step 8:Powering on the StatTrak-E
on page11.
C. Connect the supplied smart battery charger to the bottom port of the StatTrak-E as follows:
i. Unscrew and remove the small cap from the charger connector port.
ii. Align the IP68 charger cable adapter with the dual-use solar power and battery charging port (shown below), and
insert it into the port.
iii. Twist to tighten the cable adapter onto the port.
Depending on the model of your charger, the LED or charging gauge turns green or shows 100% when charging is
complete.
TIP:Follow the steps above if you need to recharge the StatTrak-E after a deployment. If you need to replace batteries,
please see
Replacing StatTrak-E batteries
on page15.
ATS | Chantilly, VA | USA | Tel: 1-866-366-6602 | Email: [email protected] | Web: www.alltrafficsolutions.com
Copyright © 2024 |
StatTrak-E Quick Start Guide, TraffiCloud Subscriber Edition
, ver. 1.01 | 4800268 | All rights reserved.
Step 1:Charging the StatTrak-E Page 2 All Traffic Solutions

STEP 2:SIGNING IN TO TRAFFICLOUD FOR THE FIRST TIME
Sign in to TraffiCloud so that you can create a Site and run traffic reports. When you purchase your StatTrak-E, you'll need to
provide All Traffic Solutions with the company email addresses of your planned users, and then we'll send them a Welcome email
with a temporary password and a link to TraffiCloud. Make sure your account administrator has set up a user account for you.
What you'll need
lLogin credentials for TraffiCloud
lA computer or mobile device with Internet access
To sign in to TraffiCloud:
A. In the Welcome email from All Traffic Solutions, click the Join All Traffic Solutions <
your
account name
>Account link, or click here:
https://portal.trafficloud.com/login
If you can't locate your Welcome email, check with your account administrator or contact
ATS Technical Customer Support for a new temporary password.
B. In the Sign In >Email box, enter your account email address and temporary password.
C. Click the Sign me in button. You'll then be prompted to create a new password.
i. In the Old Password box, enter the temporary password (you can copy and paste
it, just make sure no trailing space is added).
ii. In the New Password and Confirm Password boxes, enter a new password.
Passwords must have a minimum of eight characters, and we recommend
including at least one special character, number, uppercase letter, and lowercase
letter. Password rules can be defined by your TraffiCloud administrator. You can also let your Web browser suggest
and save a secure password.
iii. Click the Change Password button.
The TraffiCloud Dashboard page opens and confirms that you have successfully changed your password. You can
reset your password as needed using Change Password on the TraffiCloud User menu.
STEP 3:CHOOSING A SITE FOR YOUR STATTRAK-E
To set up a location for your StatTrak-E in TraffiCloud, please follow the guidelines and steps in these topics:
»
Creating a Site in TraffiCloud
below.
»
Selecting a physical location for the StatTrak-E
on page6.
Creating a Site in TraffiCloud
To generate reports you'll need to create at least one Site for each StatTrak-E and then assign your device to it. Sites are the key
to generating traffic reports, because TraffiCloud organizes traffic data for reports by Site. You can perform these steps before
(recommended) or after you install a device at a physical location.
What you'll need
»TraffiCloud access, a computer or mobile device with Internet access, and an authorized StatTrak-E.
To create a Site in TraffiCloud:
A. Sign in to TraffiCloud. See
Step 2:Signing in to TraffiCloud for the first time
above.
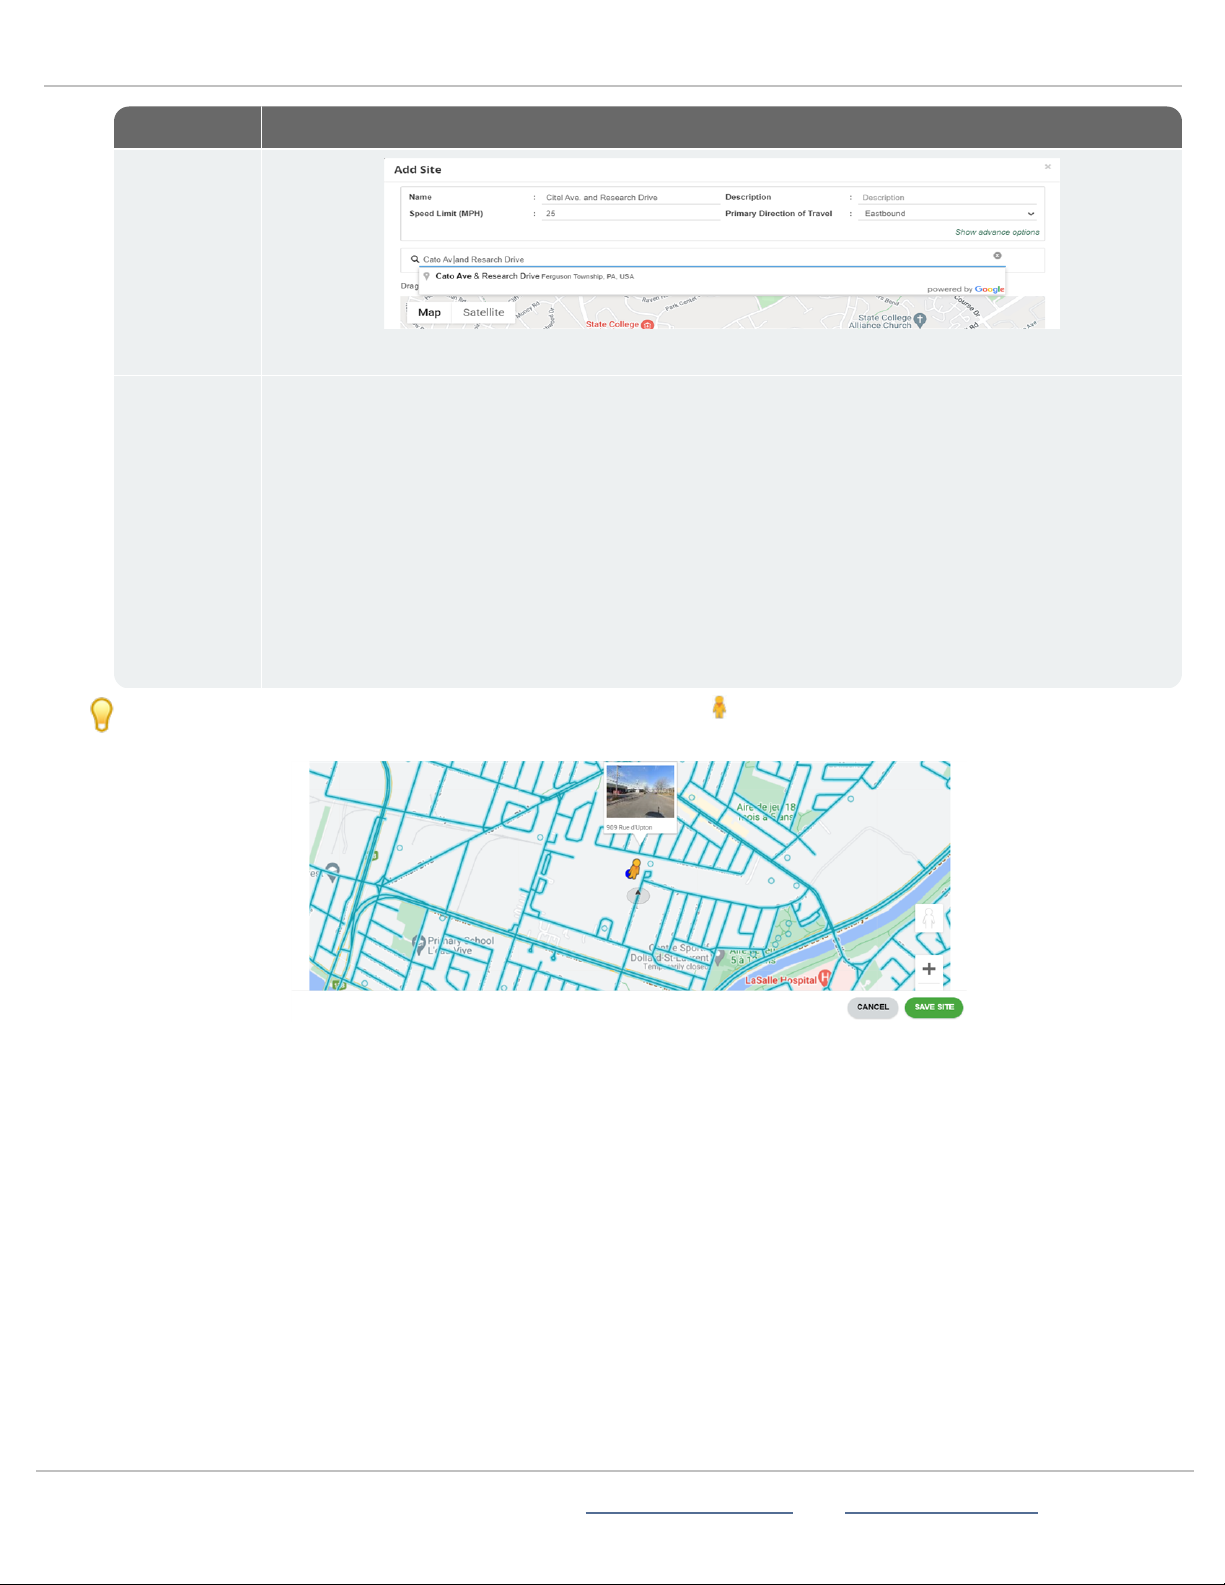
B. On the navigation menu, click Sites and then click the Plus sign under the map.
ATS | Chantilly, VA | USA | Tel: 1-866-366-6602 | Email: [email protected] | Web: www.alltrafficsolutions.com
Copyright © 2024 |
StatTrak-E Quick Start Guide, TraffiCloud Subscriber Edition
, ver. 1.01 | 4800268 | All rights reserved.
Step 2:Signing in to TraffiCloud for the first time Page 3 All Traffic Solutions

The Add Site window opens.
C. Enter the Site settings. Here are a few detailed descriptions of the fields and what you can do:
Setting What you can do
Name Enter a Site name that will identify the location for the StatTrak-E in the Sites list. For example,
Whitehall Road.
Description Optionally, enter a description for the Site.
Speed Limit Enter the speed limit for the Site.
Primary
Direction of
Travel
Select the primary direction of travel, where vehicles will be approaching the front of the device:North,
South,East, or West. If the street direction is between two primary directions, choose the closest one.
Shield signs do not detect bidirectional traffic.
NOTE:Once you have report data for a Site, it's best not to change the direction of travel.
Instead, create a new Site for that direction.
Address Enter an address for the Site using one of the following methods. The blue dot represents the Site for
your StatTrak-E on the map.
»In the address search box, enter the address or intersection where the StatTrak-E will be located.
The address field displays pattern matches for the address as you type. Select the address from
the list. You can also copy and paste an address from your address book.
ATS | Chantilly, VA | USA | Tel: 1-866-366-6602 | Email: [email protected] | Web: www.alltrafficsolutions.com
Copyright © 2024 |
StatTrak-E Quick Start Guide, TraffiCloud Subscriber Edition
, ver. 1.01 | 4800268 | All rights reserved.
Step 3:Choosing a Site for your StatTrak-E Page 4 All Traffic Solutions

Setting What you can do
or
Zoom the map until you can see street names. To zoom in,
Do any of these:
»Roll the middle mouse button forward,
»Use the + sign on the bottom right corner of the map, or
»Click the keyboard + key. See the Keyboard Shortcuts at the bottom-right corner of the map as
well.
»As you zoom, click and hold the mouse button on the map to drag and reposition your view of the
blue dot or status marker.
Drag the blue dot to the planned location. The goal is to move the dot to within 100 feet of the Site
address.
TIP:You can also use Google Satellite view or drag the Pegman onto the map to switch to Street view. Drag the
Pegman to the blue dot and release the mouse button when you see the street view popup.
D. Click the Save Site button. Your Site will appear in the Sites list in the main window. By default, only active Sites show in
the list. Click Show Hidden to show all Sites, including active and hidden Sites.
Repeat these steps for multiple Sites
If you'll be using a StatTrak-E at multiple Sites, you can repeat the above steps for those Sites or add them later.
ATS | Chantilly, VA | USA | Tel: 1-866-366-6602 | Email: [email protected] | Web: www.alltrafficsolutions.com
Copyright © 2024 |
StatTrak-E Quick Start Guide, TraffiCloud Subscriber Edition
, ver. 1.01 | 4800268 | All rights reserved.
Step 3:Choosing a Site for your StatTrak-E Page 5 All Traffic Solutions

Selecting a physical location for the StatTrak-E
The site you select for the StatTrak-E will vary with your requirements, however you should generally adhere to the following
guidelines:
Guideline What to do
Choose a flat
location,
adjacent to the
roadway
Choose a location on a flat straight road section, directly adjacent to the roadway, where the
line of sight from the StatTrak-E to the vehicles being counted will be uninterrupted by other
traffic lanes, or parked vehicles or sidewalks. Consider how the location may develop with time,
such as trees or other new structures that may block the StatTrak-E or solar panel.
Choose the
distance from
intersections
Place the StatTrak-E at least 100 ft. (30 m)away from any intersection (avoid locations near
stop signs or traffic lights).
Choose the
distance from
the roadway
Ideally, place the StatTrak-E within 12 ft. (3.7 m)of the roadway.
Set the
mounting
height
Attach the StatTrak-E to the pole at a height anywhere from 5ft.6in. at the bottom of the
enclosure to 8 ft. (between 1.7 m and 2.5 m) at the top of the enclosure.
Choose your
pole type
You can secure the pole bracket to any type of pole using banding straps, lag screws, or nuts
and bolts. The included banding straps are sized to mount the StatTrak-E either to a 2-in. (5-
cm) Telespar-type pole, a 4-in.- to 5-in.- (10-cm to 13-cm)diameter round metal pole, or a 4-
in.x4-in. (10cm x 10cm)wooden pole. For larger poles, you'll need longer banding straps,
available from hardware stores.
Avoid stop-
and-go traffic
Avoid locations with frequent tailgating or stopped traffic, as data accuracy is significantly
impacted by these traffic conditions.
Use a stable
structure
Mount the StatTrak-E on a stable and firm structure. Avoid structures that are likely to be
affected by wind or rain.
STEP 4:MOUNTING A SOLAR PANEL
Solar charging is typically strong enough to keep the StatTrak-E battery adequately charged, but battery charge levels can be
compromised by lack of direct sunlight — from cloudy or hazy conditions to excessive shade, to snow, leaves, pollen, or dust
buildup on the panel. To avoid the need for recharging, locate the panel where you know there will be good sunlight and keep the
panel clean. If you do need to recharge the StatTrak-E after deployment, use the instructions in
Replacing StatTrak-E batteries
on
page15 to ensure optimum battery charge levels, recharging, and storage.
If your purchase does include a solar panel, mount it high on the pole
out of easy reach of vandals, optimally 10ft. to 12ft. (3m to
3.7m)above the road surface. Use the supplied solar panel bracket
and follow the instructions included in the bracket packaging.
The two-part bracket allows for full adjustment to best position the
panel towards the Sun. If your site will be in the northern hemisphere,
it's optimal to position your solar panel towards due Solar South (not
magnetic South), and if your site will be in the southern hemisphere,
it's optimal to position your solar panel towards due Solar North (not
magnetic North).
Regardless of whether you are in the northern or southern hemisphere, Solar North/South is the position of the Sun in the sky at
exactly the midpoint between sunrise and sunset.
ATS | Chantilly, VA | USA | Tel: 1-866-366-6602 | Email: [email protected] | Web: www.alltrafficsolutions.com
Copyright © 2024 |
StatTrak-E Quick Start Guide, TraffiCloud Subscriber Edition
, ver. 1.01 | 4800268 | All rights reserved.
Step 4:Mounting a solar panel Page 6 All Traffic Solutions

The solar panel should be angled 15 degrees above the latitude of the installation site. For example, if the latitude of the
installation site is 45degrees then the solar panel should be installed at an angle 60degrees down from horizontal, as shown.
You can easily obtain the latitude of the installation site from mapping apps or websites, such as by doing an Internet search for
"latitude your_city" where your_city is the name of the city or region where the panel is being installed.
NOTE:For details about assembly and mounting of the solar panel and bracket, refer to the installation document
included with them. See also
Step 7:Connecting a solar panel to the StatTrak-E
on page10.
STEP 5:INSTALLING THE MOUNTING BRACKETS
The StatTrak-E comes with a pole mounting bracket that enables you to mount the device securely to virtually any type of pole.
To attach the pole bracket to the StatTrak-E (first-time setup only):
lAttach the bracket to the back side of the StatTrak-E using the included hardware:
i. Place the StatTrak-E face down on a workbench or other smooth, flat surface.
ii. Place the pole bracket back to back with the StatTrak-E, aligning the top end of the bracket with the top back side of
the StatTrak-E. The top end of the bracket has the threaded bolt fittings for attaching the angle bracket, as shown.
The top of the StatTrak-E has the round antenna and the bottom has the key slot and charger port.
iii. Install the bolts into each of the four bottom, corner holes on the StatTrak-E and the pole bracket, also as shown.
If you'll be installing the StatTrak-E on a Telespar-type pole:
For installations on Telespar-type square poles at the roadside, which require angling the device at 45 degrees to the flow of
traffic, you'll need to install the two included pole adapters as follows:
A. Plug the larger adapter into the angle bracket by aligning it to the round middle slot and the inner banding strap slots and
pressing it into place, as shown.
B. Slide the metal pole adapter clip onto the bottom notch in the back of the pole bracket, as shown here:
Insert the banding straps for pole mounting the StatTrak-E:
A. Thread a stainless steel banding strap through the mounting slots on the pole bracket. Ideally, make sure the small buckle
on the strap is positioned to secure the loose end of the strap (as shown below right).
ATS | Chantilly, VA | USA | Tel: 1-866-366-6602 | Email: [email protected] | Web: www.alltrafficsolutions.com
Copyright © 2024 |
StatTrak-E Quick Start Guide, TraffiCloud Subscriber Edition
, ver. 1.01 | 4800268 | All rights reserved.
Step 5:Installing the mounting brackets Page 7 All Traffic Solutions

B. Squeeze the second stainless steel banding strap into a narrow loop (as shown below middle)and thread it through the
mounting slots on the angle bracket, being careful not to pinch your finger between the bracket and the banding strap.
C. Do one of the following:
lFor 4-in. (10 cm)poles, thread one of the longer banding straps through the inner bracket slots of the angle bracket
and the other longer banding strap through the bottom slots of the pole bracket. You won't need the shorter strap.
lFor 2-in. (5cm)Telespar-style poles, thread the shorter banding strap through the outer slots of the angle bracket and
thread the longer banding strap through the bottom of the pole bracket, as shown.
To set the downward mounting angle:
lInstall the angle bracket onto the pole bracket, making sure to place the
bracket so that the angle numbers are facing up:
i. For roadside installations, install and tighten the angle bracket
into the 17-degree slot.
ii. For median installations, install and tighten the angle bracket into
the 12-degree slot.
iii. Thread the bolts and washers into the threaded fittings and tighten
them with a wrench.
STEP 6:MOUNTING AND AIMING THE STATTRAK-E
Use the steps in this section for help with median setup. Like speed-enabled radar signs, the StatTrak-E must be located in close
proximity to the traffic being monitored, directly facing the traffic in close proximity to the traffic being monitored, directly facing the
traffic for median installations, or facing the roadway at a 45-degree angle for roadside installations.
Positioning the StatTrak-E
To optimize accuracy of the data capture, position the StatTrak-E on the median at the roadside or on the median so that the
device has an unobstructed line of sight to the traffic lanes you want to measure and detects vehicles when they're about 100 ft. (30
m)feet away. The green LEDon the base of the StatTrak-E flashes when it detects a vehicle.
Installing the StatTrak-E on a pole
»Place the StatTrak-E on your selected pole at the planned horizontal angle to the traffic and a height between 5 ft. 6 in. and 8ft.
(1.7 m and 2.5 m). Then, tighten the included banding straps to the pole with a nut driver and power tool.
To install the StatTrak-E on a Telespar-style pole:
»Make sure you install the pole bracket and angle bracket adapters (roadside installations only)as shown on the previous page.
»Set the required horizontal angle to the traffic (directly facing the traffic for median installations) (directly facing the traffic for
median installations or angled at 45 degrees for roadside installations).
ATS | Chantilly, VA | USA | Tel: 1-866-366-6602 | Email: [email protected] | Web: www.alltrafficsolutions.com
Copyright © 2024 |
StatTrak-E Quick Start Guide, TraffiCloud Subscriber Edition
, ver. 1.01 | 4800268 | All rights reserved.
Step 6:Mounting and aiming the StatTrak-E Page 8 All Traffic Solutions

Step 6a:Positioning for roadside installations
Use one of the following approaches to set up roadside monitoring. For two-lane traffic moving in the same direction:
For bidirectional traffic:
If you use a smaller horizontal angle than 45 degrees (more directly facing the traffic), speed data will be improved, but vehicle
counts will not be as accurate.
These steps apply equally for two-lane traffic moving in the same direction or bidirectionally.
To monitor two lanes of moving traffic:
A. Install the StatTrak-E closest to the incoming lane of traffic, as shown above.
B. Position the device at a 45-degree angle to the traffic.
C. Recheck the downward angle you set on the previous page to ensure it's at 17 degrees.
Step 6b:Positioning for median installations
Positioning for median installations
For median installations, you'll need to check the lane measurements and use the steps below.
WARNING:RISK OF INJURY OR FATALITY. Exercise caution and follow local traffic regulations when entering
roadways. If necessary, estimate the lane measurements.
Lane measurements
If safe to do so, check the following lane measurements at the installation site to ensure that they correspond with the defaults set
in the StatTrak-E mobile app (see
Using the mobile app
on page12). If it's not safe to enter the roadway, do your best to estimate
the lane measurements.
Lane measurement Default value
Distance to the middle of the first lane 13 ft. (3.6 m)
Distance to the middle of the second lane 23 ft. (7 m)
Lane width 13 ft. (3.6 m)
ATS | Chantilly, VA | USA | Tel: 1-866-366-6602 | Email: [email protected] | Web: www.alltrafficsolutions.com
Copyright © 2024 |
StatTrak-E Quick Start Guide, TraffiCloud Subscriber Edition
, ver. 1.01 | 4800268 | All rights reserved.
Step 6:Mounting and aiming the StatTrak-E Page 9 All Traffic Solutions

To set up monitoring for four lanes, bidirectionally:
Use the following setup to monitor four lanes of traffic, with two lanes moving in one direction and the other two lanes moving in the
opposite direction. For median installations, traffic must be moving in opposite directions, as shown below.
A. Install the StatTrak-E on a pole on the median of the road.
B. Position the device directly facing either direction of traffic, parallel to the roadway (a 0-degree angle).
C. Recheck the downward angle you set on page8 to ensure it's at 12 degrees.
Here is an example StatTrak-E median placement, covering four lanes, with two lanes outgoing and two lanes incoming.
STEP 7:CONNECTING A SOLAR PANEL TO THE STATTRAK-E
CAUTION:Before doing any maintenance on a StatTrak-E, it is critical that you first turn off the power. This will
prevent the risk of minor electrical shock and damage to electrical components. Also, you should always
disconnect the solar panel beforehand if ever you need to change the batteries. See
Replacing StatTrak-E
batteries
on page15.
Use the instructions in this section to connect the StatTrak-E to the optional solar panel.
The solar panel and the StatTrak-E come with IP68 electrical cable connectors for waterproof connection, as shown. The solar
panel and smart battery charger use the same port on the bottom of the StatTrak-E.
To connect the solar panel to the StatTrak-E:
A. Insert the solar panel connector into the StatTrak-E power connectors.
B. Twist to tighten the waterproof IP68 electrical cable connector onto the port, as shown.
ATS | Chantilly, VA | USA | Tel: 1-866-366-6602 | Email: [email protected] | Web: www.alltrafficsolutions.com
Copyright © 2024 |
StatTrak-E Quick Start Guide, TraffiCloud Subscriber Edition
, ver. 1.01 | 4800268 | All rights reserved.
Step 7:Connecting a solar panel to the StatTrak-E Page 10 All Traffic Solutions

STEP 8:POWERING ON THE STATTRAK-E
Here's how to power on the StatTrak-E once you're ready start collecting traffic data.
To power on the StatTrak-E:
A. Turn the key on the bottom of the StatTrak-E enclosure one quarter turn
clockwise to the ON position, as shown. After about 30 seconds, the green
status light on the bottom of the enclosure flashes green to indicate that the
device is powered on. The LED turns off after that, and flashes only when traffic
is detected or if you cycle the power on and off.
B. Remove the keys and keep them in a secure location.
NOTE:To conserve battery life, power down the StatTrak-E when not in use. Turn the key to the OFFposition.
STEP 9:SETTING UP THE STATTRAK-E MOBILE APP
Once the StatTrak-E is installed at your monitoring site, use this section to test and configure it using the StatTrak-E mobile app.
NOTE:Using the app is NOTrequired for roadside installations, but provides useful information such as real time
readings
To achieve higher accuracy for median installations, you must set up and use the StatTrak-E mobile app to enter lane
measurements and distance to each lane, among other settings. Advanced radar settings are also useful in some
installations.
What you'll need
»An Android mobile device with the StatTrak-E mobile app and with Bluetooth enabled.To download the
app, go to the Google Play Store on your Android device, find StatTrak-E and click Install.You can use
the following direct link or use the QR code shown at right:
http://bit.ly/3nbmylL
»An authorized StatTrak-E and TraffiCloud account and password.
»Close range access to your StatTrak-E.
To log in to StatTrak-E:
A. On your mobile device, open the StatTrak-E mobile app and tap the menu button at the top left of the splash screen, as
shown.
ATS | Chantilly, VA | USA | Tel: 1-866-366-6602 | Email: [email protected] | Web: www.alltrafficsolutions.com
Copyright © 2024 |
StatTrak-E Quick Start Guide, TraffiCloud Subscriber Edition
, ver. 1.01 | 4800268 | All rights reserved.
Step 8:Powering on the StatTrak-E Page 11 All Traffic Solutions

B. Tap Log In, enter the app credentials provided by your administrator, then tap Continue.
C. Tap the menu button > Authorized Devices >Update.
To connect your mobile device to your StatTrak-E:
NOTE:Only one Bluetooth connection is allowed at a time.
A. Open the StatTrak-E mobile app and in the app splash screen tap Search for Device. The Nearby Devices Detected page
opens, showing the MAC addresses of detected and available devices.
B. If no devices are available, tap the Refresh icon .
C. Tap Allow if your mobile device asks you if you want to give permission to the app to use your location.
D. Tap the MAC address of your StatTrak-E (the last four characters are unique). A connection page
opens.
E. Tap Connect . The Connected to page opens, showing the connection details, including the
MACaddress of the StatTrak-E, as well as its Serial Number,Firmware Version,Network Strength,
Battery Status, and Directional Mode (bidirectional).
F. Tap Disconnect when you're ready to end your session.
Using the mobile app
With the StatTrak-E mobile app, you can do the following:
»Enter the lane dimensions you recorded in
Step 6:Mounting and aiming the StatTrak-E
on page8. The default dimensions are
based on standard lane sizes, but it's important to update them for radar precision.
»View real time radar readings.
»Download, upload, and erase app data (necessary for local Bluetooth access users only).
»View the default radar settings. For most median installations, the default radar settings are all you need, in which case you
can leave them as is. However, in some special traffic scenarios such as if the road in front of the StatTrak-E is curved, it may
be necessary to decrease the signal level.
»Synchronize the date and time between your mobile device and StatTrak-E.
To view and configure StatTrak-E settings:
A. Tap the menu button at the top left of the splash screen. The menu page opens (see
To log in to StatTrak-E:
on the
previous page).
B. Tap Date and Time, and then tap the Sync button to synchronize the date and time of StatTrak-E with your mobile device.
This is necessary the first time you use StatTrak-E or if it's been turned off for a long time.
ATS | Chantilly, VA | USA | Tel: 1-866-366-6602 | Email: [email protected] | Web: www.alltrafficsolutions.com
Copyright © 2024 |
StatTrak-E Quick Start Guide, TraffiCloud Subscriber Edition
, ver. 1.01 | 4800268 | All rights reserved.
Step 9:Setting up the StatTrak-E mobile app Page 12 All Traffic Solutions

C. From the main menu page, you can view or adjust the app settings, as shown in the following table:
Feature What you can do
Radar Settings
Direction
Set the app to the direction of the traffic you plan to monitor.
For median installations:
lBidirectional
For roadside installations:
lIncoming, Outgoing, or Bidirectional (the default)
Type Sets the type of traffic measurement you'll be using.
For median installations:
Four lanes, installation in the middle of the road.
For roadside installations:
lOne/two lanes incoming,
lOne/two lanes, outgoing,
lFirst lane is incoming and second lane is outgoing (the default),
lFirst lane is outgoing and second lane is incoming.
Distance to the
middle of the
first lane
Enter the distance to the middle of the first
lane (in feet or meters, depending on your
account settings). The default value is 13ft.
(4m).
Distance to the
middle of the
second lane
Enter the distance to the middle of the second
lane. The default value is 23 ft. (7m).
Lane width Enter the lane width. The default value is13ft.
(4m).
Horizontal
angle to the
road (degrees)
Enter the horizontal angle to the road, in degrees. The default value is zerodegrees for median
installationszerodegrees for median installations and 45degrees for roadside installations.
Advanced settings
Traffic
volume/burst
Set the radar sensitivity to adjust for capacity of vehicles and congestion, such as sudden
volume increases and vehicles passing simultaneously. The range is from two, where two small
vehicles may be interpreted as one larger vehicle, to 10, where small vehicles will be correctly
identified but long vehicles may be over-counted. The default setting is six.
Radar
sensitivity in
percent
Set the radar sensitivity, ranging from least to most sensitive. Radar sensitivity is used to tune
the radar system to detect harder to detect vehicles with lower reflectivity, or that are smaller or
farther away. If you set the sensitivity value higher, the radar can detect weaker signals from
smaller or less reflective objects. The range is from one percent to 100 percent. The default
setting is 60 percent.
ATS | Chantilly, VA | USA | Tel: 1-866-366-6602 | Email: [email protected] | Web: www.alltrafficsolutions.com
Copyright © 2024 |
StatTrak-E Quick Start Guide, TraffiCloud Subscriber Edition
, ver. 1.01 | 4800268 | All rights reserved.
Step 9:Setting up the StatTrak-E mobile app Page 13 All Traffic Solutions

Feature What you can do
Radar
amplification
factor
Radar amplification, when applied to received radar signals, enhances the signal, which can
improve vehicle detection when further away or in heavy weather conditions. The range is from
one to seven. A setting of one applies minimum amplification, so the radar will primarily detect
large vehicles and may skip smaller ones. A setting of seven applies maximum amplification and
in addition to detecting large vehicles, will better detect smaller vehicles. The default setting is
seven.
Statistics
speed
Enable the system to calculate and display vehicle speeds and defines the range of speeds to
be recorded. The default range is from three mph to 100 mph (five to 160 km/h).
You can also perform the following functions with the mobile app:
Feature What you can do
Date and Time Tap Date and Time, and then tap the Sync button to synchronize the date and time of
StatTrak-E with your mobile device. This is necessary the first time you use StatTrak-E or if it's
been turned off for a long time.
You can also use Date and Time to stage your device for use in another time zone.
Real Time
Readings
Display incoming and outgoing traffic volume and speeds, by date and
time. Only the last three vehicles detected are shown with full data (date,
time, and speed). Flash speed represents how frequently the display
updates, in seconds. Click the radio button and enter a number to change
it. Click Clear Count to clear the readings.
Note:If you have a TraffiCloud subscription, your StatTrak-E also includes a modem, and automatically
uploads your data.
Download and
Erase Data
Display the data downloaded to your mobile device by date. Click Download and Erase to
download data to your device and erase it from the app.
Erase Data Click to erase all existing traffic data downloaded to the StatTrak-E.
Upload Data Click to upload StatTrak-E traffic data from your mobile device to TraffiCloud.
STEP 10:CONFIRMING YOUR INSTALLATION
Use either of the following methods to confirm that the StatTrak-E is working:
First, make sure the device is powered on. See
Step 8:Powering on the StatTrak-E
on page11.
»Check the green LEDat the base of the StatTrak-E. The LEDflashes 30seconds after you turn on the device and whenever it
detects a passing vehicle.
»Check for Real Time Readings in the StatTrak-E mobile app. See
Using the mobile app
on page12.
At this point, your work is complete until the StatTrak-E finishes collecting your traffic data. All Traffic Solutions recommends
conducting traffic studies for at least two weeks. The data uploads automatically to TraffiCloud.
ATS | Chantilly, VA | USA | Tel: 1-866-366-6602 | Email: [email protected] | Web: www.alltrafficsolutions.com
Copyright © 2024 |
StatTrak-E Quick Start Guide, TraffiCloud Subscriber Edition
, ver. 1.01 | 4800268 | All rights reserved.
Step 10:Confirming your installation Page 14 All Traffic Solutions

REPLACING STATTRAK-E BATTERIES
Use this procedure to replace StatTrak-E batteries. No electrical certification is required to complete this procedure.
If you purchased a solar panel with the StatTrak-E, only one battery is included.
CAUTION:Before doing any maintenance on a StatTrak-E, it is critical that you first turn off the power. This will
reduce the risk of damage to electrical components or minor electrical shock.
To avoid overloading StatTrak-E circuit boards with electricity from the solar panel (if equipped), ALWAYS
disconnect the solar panel before changing batteries.
What you'll need
»One or two fully charged lithium iron phosphate batteries supplied by All Traffic
Solutions. Batteries from other vendors are not supported.
»A Torx T-30 security bit (included with your original shipment), a nut driver, and
power screwdriver or drill.
»The smart charger and adapters included with your new battery purchase.
To charge a new battery or batteries:
WARNING:RISKOFELECTRIC SHOCK OR EQUIPMENTDAMAGE The battery charger is designed for use in
protected environments only and must not be left unattended during charging. Keep the charger and batteries free of
moisture and away from flammable or explosive goods. Place the charger on a flat, non-flammable surface in a well-
ventilated environment. Do not cover the charger when charging and ensure that ambient room temperatures do not
exceed 104°F (40°C). Turn off the power supply before you connect or disconnect the charger and batteries. Do not
modify the charger, accessories, or connectors as this may cause a short circuit, fire, or over-heating. All Traffic
Solutions is not liable for any damages caused by such changes. Failure to follow these guidelines could result in
electric shock or damage StatTrak-E, rendering your warranty null and void.
A. Unpack the battery or batteries, smart charger, and adapters and place them on a smooth, non-flammable work surface
sheltered from precipitation or any other moisture. See the warning above for safety guidelines.If you are simply recharging
one or two previously installed batteries, skip this step and see
Step 1:Charging the StatTrak-E
on page2.
B. Connect the power cable to the charger.
C. Connect one of the two adapters to the charger power cable.
D. Connect the charger to one of the new batteries (or battery if you have a solar
panel, as shown at right).
E. Plug the charger into your AC power source.
Depending on the model of your charger, the LED or charging gauge turns green
or shows 100% when charging is complete.
F. Repeat the previous steps to charge the second battery if included.
G. Unplug the battery charger when you have completed charging the batteries.
CAUTION:Never connect a fully charged battery with a discharged battery.
To replace the StatTrak-E battery or batteries:
A. Place the StatTrak-E on a smooth, non-flammable work surface sheltered from precipitation
or any other moisture. See the "Warning:Risk of Electric Shock or Equipment Damage"
above for safety guidelines.
B. Turn off the StatTrak-E by inserting the security key and turning it 1/4 turn counter-
clockwise, to the OFF position. See
Step 8:Powering on the StatTrak-E
on page11.
ATS | Chantilly, VA | USA | Tel: 1-866-366-6602 | Email: [email protected] | Web: www.alltrafficsolutions.com
Copyright © 2024 |
StatTrak-E Quick Start Guide, TraffiCloud Subscriber Edition
, ver. 1.01 | 4800268 | All rights reserved.
Replacing StatTrak-E batteries Page 15 All Traffic Solutions

C. If your device has a solar panel, disconnect the IP68 connector.
D. Open the StatTrak-E enclosure by removing the two Torx security screws along the right side of the cover, using the
included Torx T-30 security bit and a nut driver.
E. Open the Velcro straps holding the battery or batteries in place.
F. Detach the battery connectors (shown at right)from the StatTrak-E to the battery or batteries and lift
them out of the enclosure one at a time.
G. Place the new battery or batteries inside the enclosure, positioning the battery harnesses at the top.
WARNING:Lithium batteries come with a protective outer wrap, which
should
never
be removed, as doing so damages the batteries and creates a potential
hazard. The lithium batteries supplied with the StatTrak-E are stable and safe
when handled and used properly. Do not bend the batteries or attempt to
puncture them with sharp objects as this could cause a fire or explosion.
H. Reconnect the battery connectors and then tightly reconnect the Velcro straps in a
cross-over pattern, as shown.
CAUTION:RISKOFDAMAGE TO EQUIPMENT Be sure to
tightly resecure the Velcro straps holding the batteries inside
the enclosure crossing over each other to avoid damage to
internal components by loose batteries.
LEDs on the StatTrak-E circuit boards light up when the device starts receiving power from the new battery or batteries. This
is normal, even when the power switch is turned off.
I. Close the StatTrak-E cover and fasten it tightly with the two security screws.
CAUTION:It is vitally important, whenever you close the StatTrak-E, that you tighten the enclosure screws securely
to avoid water infiltration, as this could damage the product and render your warranty null and void.
J. Reconnect the solar panel, if applicable. See
Step 7:Connecting a solar panel to the StatTrak-E
on page10.
K. Turn the power back on to begin monitoring traffic with the new battery or batteries in place. See
Step 8:Powering on the
StatTrak-E
on page11.
CONTACTING TECHNICAL SUPPORT
If you have questions or comments regarding this document or about configuring your StatTrak-E, please feel free to contact our
technical support center:
»By email: [email protected]
»By phone: 1-866-366-6602, Option 2
Standard hours (ET)
8:00 AM to 6:00 PM, M-F
Technical documentation and training
If you have a TraffiCloud subscription, please visit our ATS Start-Up Guides page for links to the most recent versions of our
technical documentation, including the
Getting Started with TraffiCloud
series. If you have local Bluetooth access only, please visit
the Technical Customer Support page.
Please contact Technical Customer Support to discuss your TraffiCloud training options. For online training resources, please visit
our TraffiCloud Training Videos Hub.
ATS | Chantilly, VA | USA | Tel: 1-866-366-6602 | Email: [email protected] | Web: www.alltrafficsolutions.com
Copyright © 2024 |
StatTrak-E Quick Start Guide, TraffiCloud Subscriber Edition
, ver. 1.01 | 4800268 | All rights reserved.
Contacting Technical Support Page 16 All Traffic Solutions
Other All Traffic Solutions Safety Equipment manuals
Popular Safety Equipment manuals by other brands

Viking
Viking PS10 Series manual

Checkmate
Checkmate ATOM XTREME SRL 32045 user manual

Survitec Group
Survitec Group Crewsaver OFFSHORE 290 Service manual

Crye Precision
Crye Precision LRB LEG LOOPS Operator's manual

Sordin
Sordin Sharp 84520-04-G-S manual

ISC
ISC Zip Trolley Series General Instructions for Use

Klein Tools
Klein Tools CN1972ARL Instructions for Proper Use, Assembly and Care

Kolpin Outdoors
Kolpin Outdoors 25-0400 Product instructions

MSA
MSA Advantage 4000 Series Maintenance and Repair

SKYLOTEC
SKYLOTEC Climbing Technology BE UP manual

A.HABERKORN
A.HABERKORN EDGER 6/12 INSTRUCTIONS FOR USE AND TEST MANUAL

Clas Ohlson
Clas Ohlson Ratchet Strap 40-7877 manual