All Traffic Solutions ATS 3 User manual

ATS 3 Trailer with Integrated Solar Option
Thank you for purchasing an ATS 3 Trailer with the Integrated Solar Option and the Single-
Arm Solar Panel Mounting Bracket. This guide will show you how to set up your new trailer
and Integrated Solar system. The trailer can be paired with a SpeedAlert18 Radar Message
Sign, InstAlert 18 Variable Message Sign, or Shield 12 or Shield 15 Radar Speed Sign. The
ATS 3 Trailer is compact and has a low tongue weight, making one-person deployment very
manageable. Power comes from our Integrated Solar Option, an integrated system of lithium batteries and solar
charging (see The Integrated Solar Option on the next page).
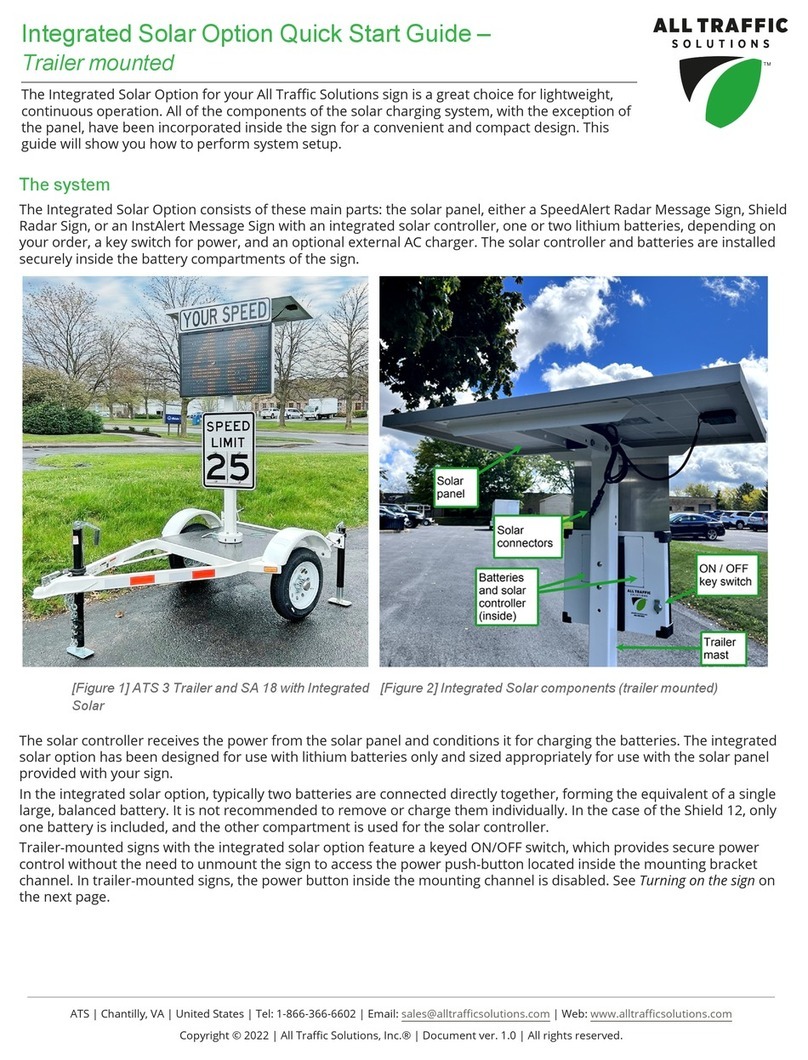
[Figure 1] ATS 3 Trailer and SA 18 with Integrated
Solar
[Figure 2] Integrated Solar components (trailer mounted)
Before you begin
If you have a TraffiCloud Web subscription, the first thing you'll need to do to get started using your signs with
TraffiCloud is to create at least one Site for each sign remotely, in advance, from your office. With TraffiCloud, you
configure a sign's Site for everything from speed to messaging (if equipped), reports, alerts and more. Sites are the
key to generating traffic reports, because TraffiCloud organizes traffic data for reports by Site. If necessary, you can
also perform these steps after you install a sign at a physical location. See "Creating a Site"in the Getting Started with
TraffiCloud Guide for your sign.
If you don't have a Web subscription, you can set up the sign while you are on location, using the onboard buttons
on the sign. You can also set up a Site with TraffiCloud Sign Manager for Windows, over a USB or Bluetooth
connection, and perform basic sign setup with the TraffiCloud Mobile app for Android over Bluetooth. See Step
4:Configure the sign manually (optional) on page9.
Viewing this document
This guide is best viewed in Adobe® Reader or Adobe Acrobat Pro, using the default two-page view , rather than
directly in a Web browser.
ATS | Chantilly, VA | United States | Tel: 1-866-366-6602 | Email: [email protected] | Web: www.alltrafficsolutions.com
Copyright © 2022 | All Traffic Solutions, Inc.® | Document ver.1.0 | All rights reserved.

ATS 3 Trailer with Integrated Solar Option p. 2
The Integrated Solar Option
All of the components of the solar charging system, with the exception of the solar panel, have been incorporated
inside the sign, for a convenient and compact design.
The solar controller and batteries are installed securely inside the battery compartments of the sign. The solar
controller receives power from the solar panel and conditions it for charging the batteries. The integrated solar
option has been designed for use with lithium batteries only and sized appropriately for use with the solar panel
provided with your sign.
Under normal use, the sign’s batteries should be fully maintained by the solar panel. However, if the batteries do
become depleted, it’s best to turn the sign off and leave it in full Sun until it’s recharged. Alternatively, you can use
the optional charger to recharge the batteries more quickly. See Step 6: If you need to recharge the sign on page12.
In the Integrated Solar Option, typically two batteries are connected directly together, forming the equivalent of a
single large, balanced battery. In the case of the Shield12, only one battery is included, and the other compartment
is used for the solar controller.
Check over the trailer
Upon receiving a new ATS 3 trailer, check to ensure that you have all of the items ordered. If you notice any damage
or missing items, contact ATS Technical Customer Support immediately.
What's included What you'll need
The ATS 3 trailer, includes the following:
»The mast and solar panel, including the joint bolt and shear nut, with
washer and lock washer, and a bottle of Vibra-Tite threadlocker,
»An ATS SpeedAlert18 Radar Message Sign, InstAlert 18 Variable Message
Sign, or Shield 12 or Shield 15 Radar Speed Sign (sold separately).
»An axle lock bar (padlock not included),
»This setup guide. All setup and quick start guides are also posted to the ATS
Technical Customer Support page and if you have a TraffiCloud
subscription, you can access additional guides on the ATS Start-Up page.
For complete details, consult the latest specification.
»A vehicle equipped with a
trailer hitch for towing. See
Towing checklist on the facing
page.
»A 15/16" (24 mm) wrench,
»A 1-1/8" (29 mm) wrench,
»A partner for trailer hookup
and to unfold the mast.
Step 1: Safe trailering guidelines
IMPORTANT:Carefully read and follow all instructions marked with warnings and read and follow
all of the instructions in this guide BEFORE you take your trailer on the road.
Warning symbols
WARNING: Warning symbols draw your attention to serious safety hazards, which can lead to injury, death,
or damage to equipment.
Swaying
WARNING: Swaying is a moderate back and forth movement of a trailer behind a tow vehicle and can lead to
dangerous whipping unless you slow down.
Whipping
WARNING: Whipping is the violent back and forth movement of a trailer behind a tow vehicle. Whipping can
be caused by excessive speed for the driving conditions, turbulence, over-steering, passing vehicles,
uneven roadways, or other issues. There is very little time to recover should whipping occur.
ATS | Chantilly, VA | United States | Tel: 1-866-366-6602 | Email: [email protected] | Web: www.alltrafficsolutions.com
Copyright © 2022 | All Traffic Solutions, Inc.® | Document ver.1.0 | All rights reserved.

p. 3 Towing checklist
Combination disturbance
WARNING: A combination disturbance is swaying or whipping of a trailer AND the tow vehicle (the
combination), caused by issues such as excessive speed for the driving conditions or load, turbulence,
over-steering, passing vehicles, uneven roadways, or other issues.
Flat tire
WARNING: In the event of a flat tire, DO NOT BRAKE. Take your foot off the gas pedal, slow down below 25
mph (40 kph), and drive to a safe location, where you can stop and change the tire. If necessary, you may
need to drive on the flat until you can stop safely.
Towing checklist
Go over the following checklist before you go on the road:
Checklist
item Ensure that
Your tow
vehicle
Ensure the following:
»the tow vehicle is equipped with a suitable trailer hitch and the vehicle is properly maintained.
Consult your vehicle manufacturer, an authorized repair facility, or hitch installation company.
»The vehicle has adequate towing capacity for the trailer, with a minimum load capacity of
500lbs (227kg).
»You consult the vehicle owner's manual about vehicle capacity and towing instructions
particular to the vehicle.
»Any modifications to the vehicle are approved for towing by an authorized dealer or inspector.
Trailer
hitch
Ensure that the trailer hitch includes:
»a standard hitch mount with bracket for the safety chains,
»a 2-inch (5-cm) ball,
»a 12 VDC wiring socket.
Ensure that the trailer hitch and ball are securely installed and suited to the tow vehicle.
Ensure that the coupler and ball are fastened together securely.
Safety
chains
Ensure that the safety chains are
»crossed over under the tongue and hitch,
»securely hooked to the tow vehicle, and
»not dragging on the pavement. See Lower the trailer onto the hitch on page7.
Electrical
harnesses
Ensure that the electrical harnesses are properly connected and the signal, tail, and brake lights
are working.
Tires Ensure that all tires on the tow vehicle and trailer are properly inflated. Consult the information on
the tire sidewalls and your vehicle's door decal for inflation pressures.
Sign Ensure that the mast, sign, and solar panel assembly are in the travel position, parallel to the road.
See Rotate the sign on page6.
Loading Ensure that you never load cargo on the bed of the trailer.
ATS | Chantilly, VA | United States | Tel: 1-866-366-6602 | Email: [email protected] | Web: www.alltrafficsolutions.com
Copyright © 2022 | All Traffic Solutions, Inc.® | Document ver.1.0 | All rights reserved.

ATS 3 Trailer with Integrated Solar Option p. 4
Safe driving practices
Use the following checklist for safe driving practices with a trailer:
Condition Best practice
Speed Slow down to avoid accidents and drive defensively. Drive slower than you would without a trailer.
The maximum recommended speed with a trailer is 55 mph (90 kph).
Anticipate stops and brake early.
Slow down for curves, road hazards, roadwork, and difficult weather conditions.
Don't assume you can speed with the trailer. Driving at high speeds can result in sway and
whipping if hazards are present.
Your towing vehicle and trailer combination is heavier than your vehicle alone. Allow extra distance
between your vehicle and vehicles ahead and allow extra distance for braking.
Assisted
driving
Avoid using cruise control or overdrive while towing a trailer.
What to
avoid
Never drink or consume drugs and drive.
Never text and drive.
Passing and
turning
Remember, your car and trailer combination is longer than your vehicle alone. Allow adequate
extra space when passing vehicles or making sharp turns, such as in parking lots or gas stations.
Be vigilant when passing or being passed by other vehicles. Passing vehicles can cause turbulence
leading to a combination disturbance.
For longer
trips
Inspect the vehicle and trailer connections at each stop.
Difficult
weather
conditions
In difficult weather conditions, adjust your driving for the conditions, allowing additional time and
space between vehicles.
Backing up If you need to back the trailer into position, practice beforehand, and have a partner assist you.
Backing up with a trailer is a skill that can take time to learn. See Tow the trailer to your location on
page8.
Reference: U-Haul Trailer User Instructions.
Step 2: First-time setup (if necessary)
Use the steps in this section for first-time setup if the trailer has been shipped to you. If the trailer has been delivered
by an ATSrepresentative, the mast should already be set upright, and you can skip to Step 3:Deploy the trailer and
message or speed sign on page6.
[Figure 3] Trailer folded view [Figure 4] Unfolding the trailer mast
ATS | Chantilly, VA | United States | Tel: 1-866-366-6602 | Email: [email protected] | Web: www.alltrafficsolutions.com
Copyright © 2022 | All Traffic Solutions, Inc.® | Document ver.1.0 | All rights reserved.

p. 5 Unfold the mast
Unfold the mast
A. Deploy all three jacks into position, supporting the trailer. The back jacks have spring-loaded latch pins that
you pull to release from the stowed position, and then rotate into the vertical position. All of the jacks spin up
and down with hand cranks.
WARNING: RISK OF CAPSIZING Before you unfold the mast, stabilize the trailer by rotating the jacks
to vertical and lowering them to the ground. Correct deployment of the jacks prevents the trailer
from flipping backwards, which could cause injury to personnel or damage to equipment.
B. Unfold the mast into the upright position, as shown in [Figure 4] on the previous page. Unfolding the mast is
best done with a partner.
C. Insert the bolt (shown in [Figure 5] below)into the cylinder on the mast joint to hold the mast upright. Once
unfolded and assembled, the hinge will be locked in that position. See [Figure 8] below.
[Figure 5] Breakaway nut and bolt set [Figure 6] Vibra-Tite
threadlocker
WARNING: Vibra-Tite threadlocker contains ethyl 2-cyanoacrylate, ethylene di(acetate), and Methoxy
Polyethylene Glycol 1000 Methacrylate, which pose slight to moderate risks to health or can cause fire.
Wear appropriate safety gear and avoid contact with the skin and eyes, inhalation, or exposure to open
flames or sparks (no smoking). Dispose of contents and the container in accordance with local, regional,
national, and international regulations. For details, see the Vibra-Tite ebsite.
D. Put the large washer and then the lock washer (shown above) on the end of the bolt.
E. Apply a few drops of the supplied Vibra-Tite threadlocker (shown in [Figure 6] above) to the bolt where the
breakaway nut will be tightened on.At 72 degrees F (22 C), initial curing time is 10-20 minutes and full curing
time is 24 hours.
F. Tighten the 5/8" breakaway nut onto the bolt using a 15/16" (24 mm) bolt wrench until the nut shears off.
WARNING: Do not remove the nuts and bolts in the hinge after assembly. Doing so will void the
warranty.
[Figure 7] Mast joint, unfolded [Figure 8] Mast joint, folded [Figure 9] Speed limit sign
ATS | Chantilly, VA | United States | Tel: 1-866-366-6602 | Email: [email protected] | Web: www.alltrafficsolutions.com
Copyright © 2022 | All Traffic Solutions, Inc.® | Document ver.1.0 | All rights reserved.

ATS 3 Trailer with Integrated Solar Option p. 6
Install the static speed limit sign (if applicable)
If you have the optional static speed limit sign (see [Figure 9] on the previous page), use the supplied nuts and bolts to
install it on the mast below the digital speed sign, and set the speed limit using the inter-changeable digits. The digits
range from 5 through 65 for customers in the United States.
Step 3: Deploy the trailer and message or speed sign
WARNING: RISK OF INJURY OR ACCIDENT Before you transport the trailer and sign after erecting the
mast, rotate the mast and sign into the "Travel Position", parallel to the direction of travel to avoid the risk
of accident and injury due to wind drag, whipping, or vehicle-trailer combination disturbance. See
To
rotate the sign:
on the facing page.
WARNING: RISK OF INJURY OR VEHICULAR DAMAGE Follow these instructions carefully, and always
ensure correct and safe trailer hookup and driving with your trailer. See Step 1: Safe trailering guidelines.
Rotate the sign
You'll need to rotate the sign in either of two circumstances:
lTo place the mast and sign assembly in the travel position (see [Figure 10] below), so that you can transport it
safely between locations after the mast and sign have been raised.
lTo angle the trailer correctly toward the traffic lane (see [Figure 11] below). In the case of hills, you can also use
the jacks to angle the sign up or down slightly.
[Figure 10] Travel position [Figure 11] Setting the sign angle
ATS | Chantilly, VA | United States | Tel: 1-866-366-6602 | Email: [email protected] | Web: www.alltrafficsolutions.com
Copyright © 2022 | All Traffic Solutions, Inc.® | Document ver.1.0 | All rights reserved.

p. 7 Move the trailer and vehicle into position for hookup
To rotate the sign:
A. Pull the spring-loaded latch pin (A)to
unlock the mast base.
B. Keeping the latch pin retracted, grasp
the mast rotation handle (B)and
rotate the mast and sign as required.
Do either of the following:
lRotate the sign for
transport: To reduce wind
resistance, rotate the mast,
sign, and solar panel assembly
sideways, into Travel Position,
parallel to the roadway(see
[Figure 10] on the previous
page). The holes around the
mast base are 30 degrees apart.
lRotate the sign to set the display angle: Use the same procedure to rotate the sign for optimum
display towards traffic (see [Figure 11] on the previous page).
C. Release the latch pin into the new hole to lock the mast in
position.
Move the trailer and vehicle into position for hookup
A. Move the trailer into position on a flat surface so that you can
back your vehicle up to it. Using leverage, the trailer is easy to
move around by hand on flat surfaces.
B. On the front jack (A),as shown at right, turn the handle to lift
the trailer until the coupler (B) is above the height of the hitch
ball (C).
C. Back the vehicle up to the trailer so that the hitch ball (C)is
just in front of the coupler (B). Have a partner guide you or
use a backup camera if it provides a clear view . When your
vehicle is in position, turn off the engine.
Lower the trailer onto the hitch
A. Spin the front jack (A)down to lower the coupler (B) onto the
hitch ball, as shown in this section.
B. Close the tongue latch (D)over the ball.
C. Important:Ensure that the ball clamp (E) is securely
wrapped around the ball. If necessary, release the tongue
latch and reposition the tongue on the hitch ball, or adjust the ball clamp with a wrench.
ATS | Chantilly, VA | United States | Tel: 1-866-366-6602 | Email: [email protected] | Web: www.alltrafficsolutions.com
Copyright © 2022 | All Traffic Solutions, Inc.® | Document ver.1.0 | All rights reserved.

ATS 3 Trailer with Integrated Solar Option p. 8
D. Optionally, lock the latch with a padlock (not included).
E. Crank the jack (A) back up all the way before towing.
F. Attach the trailer safety chains (F) to the hitch frame, crossing
them under the tongue, and looping the S-hooks back onto the
chain. Leave enough slack in the chains to allow for cornering,
but make sure they don't drag on the pavement.
WARNING: Pay close attention to safety chain
hookup and do not tow the trailer without the
safety chains attached.
If the trailer tongue becomes detached from the
hitch ball while you are driving, the safety
chains can prevent a serious accident by
supporting the tongue and keeping the trailer
attached to your vehicle temporarily until you
can come to an emergency stop.
G. Connect the wiring harnesses (G).
H. Working with a partner, check to ensure that the signal, taillights, and brake lights are functioning properly.
I. Inspect the hitch connections to ensure that the hookup is complete, and then proceed to the next step. Once
all preparations are completed, you are ready to take to the road.
Tow the trailer to your location
WARNING: RISK OF ACCIDENT, INJURY OR DEATH. Do not obstruct the roadway: Always choose a
location for the trailer that is far enough away from moving vehicles so as not to interfere with or distract
passing traffic. When possible, the trailer should be placed off the shoulder, behind barriers or behind
traffic cones.
A. Tow the trailer to your chosen location, ensuring that the surface is stable.
NOTE: It's best to set up the TraffiCloud Site for your sign in advance. See Before you begin on
page1.
B. If you need to back up:Hold one hand on the bottom of the steering wheel, and to turn the trailer to the left,
move your hand on the steering wheel to the left. To turn the trailer right, move your hand on the steering
wheel to the right. If the trailer turns the wrong way, pull ahead until the vehicle and trailer are in a straight
line and start again.
C. Once the trailer is in the desired position, you're ready to disconnect the trailer from the tow vehicle.
Unhitch the trailer
Use these instructions to unhitch the trailer, so that you can safely leave it at the roadside.
To disconnect the trailer:
A. Disconnect the wiring harness.
B. Disconnect the safety chains and hook them back onto the trailer.
C. Open the tongue latch (D), as shown on the previous page.
D. Using the front jack or by hand, lift the trailer off the hitch ball.
E. Move the tow vehicle away from the trailer.
F. Let the front jack back down to the desired position and fold down the handle again.
ATS | Chantilly, VA | United States | Tel: 1-866-366-6602 | Email: [email protected] | Web: www.alltrafficsolutions.com
Copyright © 2022 | All Traffic Solutions, Inc.® | Document ver.1.0 | All rights reserved.

p. 9 Position the trailer and turn the sign on
Position the trailer and turn the sign on
A. To enhance accuracy and visibility, position the trailer so that the sign will be visible to motorists, yet the
trailer is off the shoulder (see Tow the trailer to your location on the previous page). You can also adjust the
angle of the mast and sign separately (see Rotate the sign on page6).
B. Lower all three jacks until the trailer is stable and level on the ground. You can raise the tires off
the ground. Use a level if necessary.
i. For the jacks on the rear of the trailer, pull the spring pins to release them.
ii. Rotate the back jacks to vertical. You'll hear a click as they lock into place.
iii. For each jack, rotate the handle to lower the foot until it's supporting the trailer securely.
Fold the jack handles back down for storage.
C. Use the key switch on the back of the sign to turn it on. Lift up the cover and turn the barrel-
style key to the ON position.
The sign will go through start-up and self-check sequences. Once the self-check is complete, the
sign is fully operational. A green LED on the top-left corner flashes every 10 seconds to indicate
when the sign is powered on.
Step 4: Configure the sign manually (optional)
NOTE: TraffiCloud subscribers should skip this step, and instead configure the sign in advance,
assigning a Site and setting the sign display options. See the Getting Started with TraffiCloud
guide for your sign.
If you will NOTbe using a TraffiCloud Web subscription or the TraffiCloud Mobile app for Android over Bluetooth
app to configure your sign, alternatively, you can use the sign Speed Limit and Display Mode buttons, and
TraffiCloud Sign Manager for Windows, over a USBor Bluetooth connection.
To configure the sign manually:
A. Set the speed limit by pressing the Speed Limit button until the desired value displays. The first
press displays the current speed limit.
B. Verify or set the display mode on the sign. The default is Constant for the Shield and Single
Message Mode for message-enabled signs.
C. To change the mode, press the Display Mode (or Display Settings) button until the desired
mode displays on the sign. For details about display modes, see the applicable figures and table
below for your sign.
NOTE: To reduce the risk of tampering, the buttons deactivate five minutes after you power on the sign.
To reactivate them, turn the ON/OFF key switch on and off.
SpeedAlert and InstAlertDisplay Modes
As mentioned, optionally you can use the sign's onboard buttons to configure speed limit and display options. Here
are the Display Modes available with the SpeedAlert and InstAlert:
ATS | Chantilly, VA | United States | Tel: 1-866-366-6602 | Email: [email protected] | Web: www.alltrafficsolutions.com
Copyright © 2022 | All Traffic Solutions, Inc.® | Document ver.1.0 | All rights reserved.

ATS 3 Trailer with Integrated Solar Option p. 10
Display
Mode Description
MSG
MODE
Single Message mode: Selects from the messages saved in the sign to display.
ALL
MSGS
All Messages mode: Displays all of the messages saved in the sign in sequence.
DEP
MSG
Dependent Messages mode
For SpeedAlerts, displays a series of messages, with the content depending on how fast the
approaching vehicle is traveling.
For InstAlerts, can be used as a timer, to display different messages based on the value of the
internal timer. Often used for New Year's countdowns or casual race information. The timer is
controlled with TraffiCloud Sign Manager.
SPEED
DISP
Speed Display mode(SpeedAlerts only):Displays the speeds of the approaching vehicle.
DISPLAY
OFF
Display Off mode:Turns off but the display but the sign is still active and gathering sign status for
InstAlerts, and traffic and other data for SpeedAlerts, if subscribed. Also, referred to as "stealth
mode".
SP LMT
SIGN
Speed Limit Sign mode: Sets the Speed Limit to display.
Shield Display Modes
Here are the sign modes available with the Shield if you use the Display Mode button on the sign:
Shield
modes Description
c Constant: The Shield continuously displays vehicle speeds as each vehicle passes, changing the speed
display as the vehicle speed changes. Constant is the default (recommended) setting.
cS Constant with strobe: The same as constant, however vehicles exceeding the Speed Limit set in the
sign by 1mph (orkph) trigger the Violator Alert strobe (if equipped). TraffiCloud subscribers typically
set the strobe option to 10-15 mph above the Speed Limit set in the sign.
b Blinking: The Shield blinks slowly, displaying changing speeds as the vehicle passes. TraffiCloud
subscribers typically set the blink option to 10mph above the Speed Limit set in the sign.
bS Blinking with strobe: The Shield blinks constantly, and the Violator Alert strobe (if equipped) flashes
when the sign detects a vehicle exceeding the Speed Limit by 1mph (orkph). TraffiCloud subscribers
can set the blinking and strobe options separately, with blinking typically set at 10 mph above the
speed limit, and the strobe at 10-15 mph above the Speed Limit set in the sign.
dE Demo: The Shield displays a simulation of vehicle approach speeds, from higher to lower, temporarily
ignoring actual traffic readings.
ATS | Chantilly, VA | United States | Tel: 1-866-366-6602 | Email: [email protected] | Web: www.alltrafficsolutions.com
Copyright © 2022 | All Traffic Solutions, Inc.® | Document ver.1.0 | All rights reserved.

p. 11 Step 5:Secure the trailer
Shield
modes Description
oF Display Off: The Shield collects traffic and status data, but the display is turned off. This mode, also
referred to as "stealth mode", is recommended for performing traffic studies at a Site.
Step 5: Secure the trailer
Use the axle lock bar and a padlock (not included)to prevent theft as well as rolling out of position.
[Figure 12] The axle lock bar installed
To secure the trailer:
A. Remove the axle lock bar from the back of the trailer.
[Figure 13] Axle lock bar stowed [Figure 14] Axle padlock (not included)
B. Thread the axle lock bar through the trailer wheels (as shown in [Figure 12] above).
C. Thread the padlockthrough the holes at the end of the axle lock bar (as shown in [Figure 16] below) and lock it.
[Figure 15] The axle lock bar - T-bar end [Figure 16] The axle lock bar - locking end
ATS | Chantilly, VA | United States | Tel: 1-866-366-6602 | Email: [email protected] | Web: www.alltrafficsolutions.com
Copyright © 2022 | All Traffic Solutions, Inc.® | Document ver.1.0 | All rights reserved.

ATS 3 Trailer with Integrated Solar Option p. 12
Step 6: If you need to recharge the sign
If you purchased the optional charger (see [Figure 17] below) with the Integrated Solar Option, take the trailer or sign
into a protected environment, plug the charger into a standard 120-VAC outlet, and connect the charging end to the
sign’s solar connector cable.
WARNING: RISK OF ELECTRIC SHOCK AND EQUIPMENT DAMAGE. The charger is not intended for
outdoor use. Only charge the system in a protected environment, such as a garage.
WARNING: RISK OF FIRE. Do NOT attempt to individually charge the paired batteries included with the
Integrated Solar Option. You should never mix unequally charged batteries in the same system.
[Figure 17] Battery charger and integrated solar adapter
The charger may take a couple of minutes to recognize the batteries, due to the presence of the solar controller. Do
not be alarmed if it does not start charging right away.
Depending on the size of the batteries it may take up to 24 hours to fully charge the batteries.
Getting help
We are here to help! If you have any concerns while using your new system, please feel free to call our customer
success specialists at 1-800-366-6602, option 2, or email us at support@altrafficsolutions.com. For documentation
for your ATS Trailer and signs, if you have a TraffiCloud subscription, go to the ATS Start-Up Guides page. For non-
subscribers, go to All Traffic Solutions Technical Customer Support.
ATS | Chantilly, VA | United States | Tel: 1-866-366-6602 | Email: [email protected] | Web: www.alltrafficsolutions.com
Copyright © 2022 | All Traffic Solutions, Inc.® | Document ver.1.0 | All rights reserved.
Other manuals for ATS 3
2
Table of contents
Other All Traffic Solutions Safety Equipment manuals
Popular Safety Equipment manuals by other brands

Safety Link
Safety Link TempLink 3000 installation manual

Honeywell
Honeywell Howard Leight VERISHIELD VS 321 User instructions

Kentek
Kentek XVT KJJ-8601A instructions

Falltech
Falltech DuraTech Max Web Single User instruction manual

Inxpect
Inxpect LBK System installation instructions

Toya
Toya VOREL 74441 Original instructions