manuals.online logo
Brands
  1. Home
  2. •
  3. Brands
  4. •
  5. Alpha
  6. •
  7. Power Supply
  8. •
  9. Alpha FlexPoint 1208-F User manual

Alpha FlexPoint 1208-F User manual

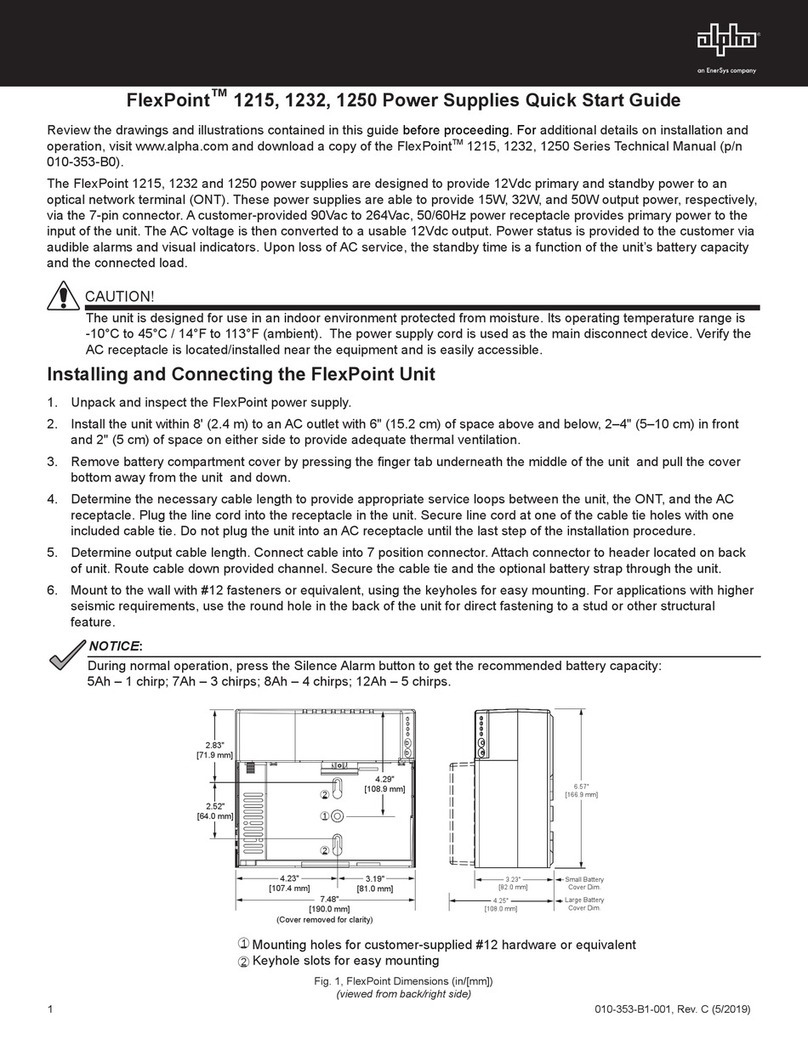
7.48"
[190.0 mm]
3.19"
[81.0 mm]
4.23"
[107.4 mm]
6.57"
[166.9 mm]
2.52"
[64.0 mm]
2.83"
[71.9 mm]
4.29"
[108.9 mm]
3.23"
[82.0 mm]
(Cover removed for clarity)
FlexPoint™1208-F Quick Start Guide
FTTx UPS System for ONTs
Fig. 1, System Block Diagram
Review the drawings and illustrations contained in this guide before proceeding. For additional details on installation
and operation, visit www.alpha.com and download a copy of the FlexPointTM 1208-F Series Technical Manual
(p/n 010-353-B0).
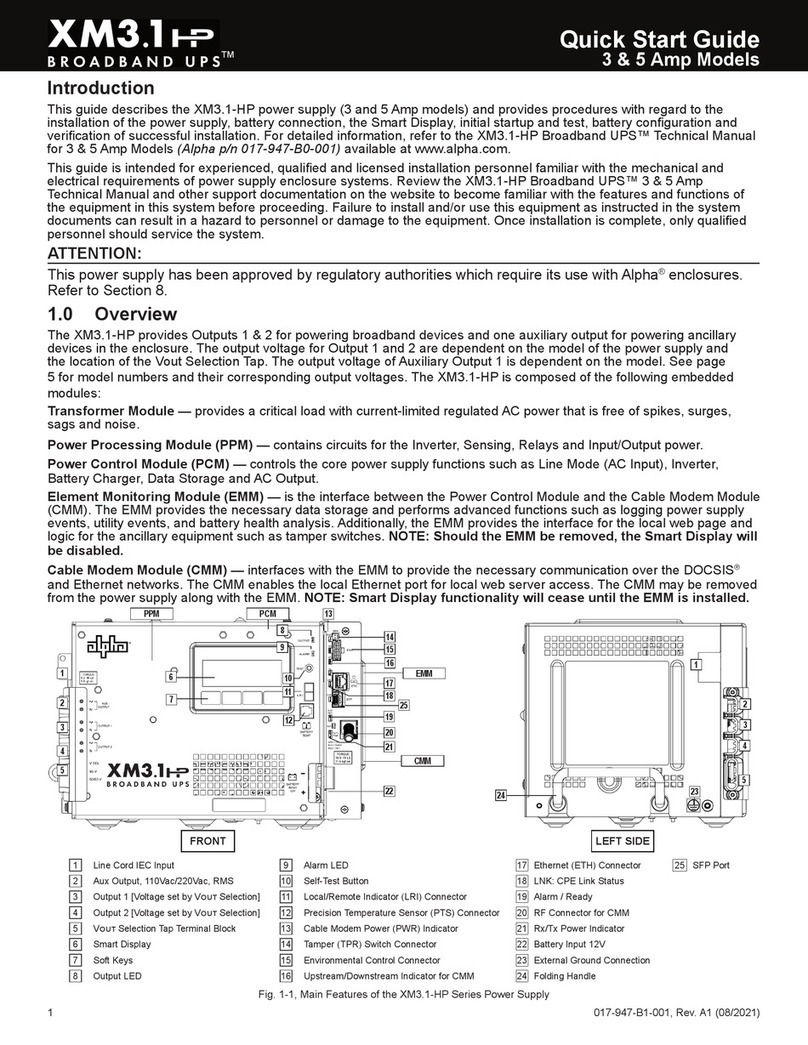
The FlexPoint 1208-F unit is an RFoG power supply providing 12Vdc primary and standby power. A customer-
provided 90Vac to 264Vac, 50/60Hz power receptacle provides primary power to the input of the unit. The AC
voltage is then converted to a usable 12Vdc output. Backup power is provided by batteries that are long life, easy
to replace, purchase, and install. Power status is provided to the customer via audible alarms and visual indicators.
Upon loss of AC service, the duration of standby power is determined by the battery installed in the unit.
1. Unpack and inspect the FlexPoint power supply.
2. Install the unit within 8' (2.4 m) to an AC outlet with 6" (15.2 cm) of space above and below, 2–4" (5–10 cm)
in front and 2" (5 cm) of space on either side to provide adequate thermal ventilation.
3. Remove battery compartment cover by pressing the nger tab underneath the middle of the unit and pull
the cover bottom away from the unit and down.
4. Determine the necessary cable length to provide appropriate service loops between the unit, the ONT, and
the AC receptacle. Plug the line cord into the receptacle in the unit. Secure line cord at one of the cable
tie holes with one included cable tie. Do not plug the unit into an AC receptacle until the last step of the
installation procedure.
5. Connect Coax cable to F-type connector, torque to between 4.1 in-lbs and 6.1 in-lbs, and secure in cable
dressing holes. Secure output cable at one of the cable tie holes with one of the included cable ties.
6. Mount to the wall with #12 fasteners or equivalent, using the keyholes for easy mounting. For applications
with higher seismic requirements, use the round hole in the back of the unit for direct fastening to a stud or
other structural feature.
Installing and Connecting the FlexPoint Unit
• The unit is designed for use in an indoor environment protected from rain and snow. Its
operating temperature range is -10°C to 45°C / 14°F to 113°F (ambient).
• The power supply cord is used as the main disconnect device. Verify the AC receptacle is
located/installed near the equipment and is easily accessible.
CAUTION!
1
ONT
Line Cord Up to 8',
(2.4 meters)
Network
Area
Customer
Area
FlexPoint 1208-F
Coaxial Cable w/ F-Type Connector
FlexPoint: Up to 50' (~15.25 meters)
AUX
SILENCE
ALARM
DCSTART
Alpha Technologies 3767 Alpha Way Bellingham, WA 98226 USA Tel: +1 360 647 2360 Fax: +1 360 671 4936 www.alpha.com
Alpha Technologies Ltd. 7700 Riverfront Gate Burnaby, BC, V5J 5M4 CANADA Tel: +1 604 436 5900 Fax: +1 604 436 1233
Due to continuing product improvements, Alpha reserves the right to change specications without notice. Copyright 2014 Alpha Technologies, Inc. All rights reserved.
Alpha is a registered trademark of Alpha Technologies. 010-353-B8-001 Rev. A1
Fig. 2, FlexPoint Dimensions (in/[mm])
(viewed from back/right side)
Fig. 3, FlexPoint AC/Output Power Connector Locations
Mounting holes for customer-supplied #12 hardware or equivalent
Keyhole slots for easy mounting
Cable Dressing Holes
1
2
Always mount unit vertically as shown in Fig. 2.
NOTICE:
Table 1, FlexPoint Battery Options Table
2
2
1
Battery Options
Part Description
AX-STDBAT-5 Battery 5.1Ah AGM, 1-year Warranty
AX-STDBAT-7 Battery 7.2Ah AGM, 1-year Warranty
AX-LONGBAT-7 Battery 7.2Ah AGM, 3-year Warranty
AX-LONGBAT-8 Battery 8Ah AGM, 3-year Warranty
Coaxial Connector
AC Connector
During normal operation, press the Silence Alarm button to get the recommended battery capacity:
5Ah – 1 chirp; 7Ah – 3 chirps; 8Ah – 4 chirps.
NOTICE:
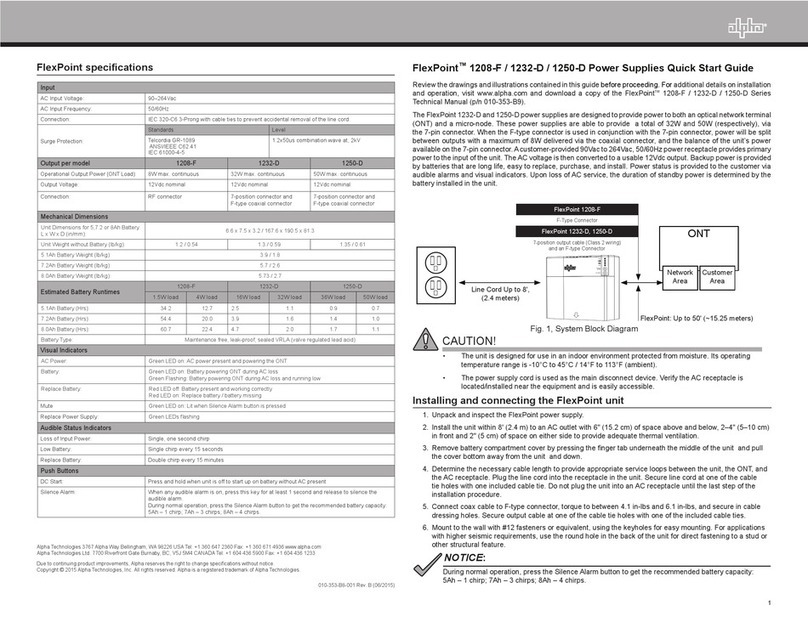
Battery Installation / Battery Replacement Procedure
1. Press nger tab to release battery cover and connect the wire harness to the battery.
2. Install the battery into the compartment ensuring the battery retaining clip secures the battery (for
batteries up to 8Ah).
3. Replace the battery cover.
4. Plug the unit into AC power. The green AC PRESENT LED should illuminate.
5. Verify proper function by unplugging the AC line cord from the AC receptacle. Within approximately 30
seconds the alarm should sound for 1 second (it may take longer to trigger this alarm if the load is very
light or not connected). AC mode LED (Green) will display then turn off and the ON-BATTERY LED
(Green) will illuminate.
6. Reconnect the unit to an AC receptacle (if no AC power is present and if the battery is installed, press DC
start button for 2 seconds). The unit is ready to be placed into service.
Risk of explosion if battery is replaced by an incorrect type. Recycle spent batteries in
accordance with local regulations.
WARNING!
FlexPoint Audible Alarms/Visual Indicators
010-353-B8-001 Rev. A1
Table 2, FlexPoint Battery Options Table
AUX
SILENT
ALARM
DCSTART
AUX
SILENT
ALARM
DCSTART
AUX
SILENCE
ALARM
DCSTART
AUX
SILENCE
ALARM
DCSTART
AUX
SILENCE
ALARM
DCSTART
AUX
SILENCE
ALARM
DCSTART
AUX
SILENCE
ALARM
DCSTART
AUX
SILENCE
ALARM
DCSTART
AUX
SILENCE
ALARM
DCSTART
AUX
SILENCE
ALARM
DCSTART
AUX
SILENCE
ALARM
DCSTART
AUX
SILENCE
ALARM
DCSTART
AUX
SILENCE
ALARM
DCSTART
AUX
SILENCE
ALARM
DCSTART
2
FlexPoint Specications
Models and Power Line Cords
FP1208-F-5A: 120Vac 3-Conductor NEMA 5-15 power cord (875-698-19)
FP1208-F-5B: 240Vac 3-Conductor Schuko input power cord (876-042-19)
FP1208-F-5C: 240Vac 3-Conductor United Kingdom input power cord (876-046-19)
FP1208-F-5D: 240Vac 3-Conductor Australia/New Zealand input power cord (876-043-19)
FP1208-F-5E: 250Vac 3-Conductor Brazilian 14136 input power cord (876-044-19)
Input
AC Input Voltage: 90–264Vac
AC Input Frequency: 50/60Hz
Connection: IEC 320-C6 3-Prong with cable ties to prevent accidental removal of the line cord.
Surge Protection:
Standards Level
Telcordia GR-1089
ANSI/IEEE C62.41
IEC 61000-4-5
1.2x50us combination wave at, 2kV
Output
Operational Output Power (ONT Load): 15W max. continuous
Output Voltage: 12Vdc nominal
Connection: RF connector
Mechanical Dimensions
Unit Dimensions for 5,7.2 or 8Ah Battery
L x W x D (in/mm): 6.6 x 7.5 x 3.2 / 167.6 x 190.5 x 81.3
Unit Weight without Battery (lb/kg): 1.2 / 0.54
5.1Ah Battery Weight (lb/kg): 3.9 / 1.8
7.2Ah Battery Weight (lb/kg): 5.7 / 2.6
8.0Ah Battery Weight (lb/kg): 5.73 / 2.7
Estimated Battery Runtimes 1.5W Load 4W Load
5.1Ah Battery (Hrs): 34.2 12.7
7.2Ah Battery (Hrs): 54.4 20.0
8.0Ah Battery (Hrs): 60.7 22.4
Battery Type: Maintenance free, leak-proof, sealed VRLA (valve regulated lead acid)
Visual Indicators
AC Power: Green LED on: AC power present and powering the ONT
Battery: Green LED on: Battery powering ONT during AC loss
Green Flashing: Battery powering ONT during AC loss and running low
Replace Battery: Red LED off: Battery present and working correctly
Red LED on: Replace battery / battery missing
Mute Green LED on: Lit when Silence Alarm button is pressed
Replace Power Supply: Green LEDs ashing
Audible Status Indicators
Loss of Input Power: Single, one second chirp
Low Battery: Single chirp every 15 second
Replace Battery: Double chirp every fteen minutes
Push Buttons
DC Start: Press and hold when unit is off to start up on battery without AC present
Silence Alarm: When any audible alarm is on, press this key for at least 1 second and release to silence the
audible alarm until exits the alarm state.
During normal operation, press the Silence Alarm button to get the recommended battery capacity:
5Ah – 1 chirp; 7Ah – 3 chirps; 8Ah – 4 chirps.
Condition Status LED Audible Alarm Description
AC PRESENT LED (GREEN)
steady ON N/A Condition normal; AC powers load, charges battery.
ON BATTERY LED (GREEN)
steady ON
1 second beep on loss
of AC Input fails; battery powers load.
LOW BATTERY LED (GREEN)
ashing
1 beep every 15
seconds
Alarm is triggered when AC fails and battery is
running low (<11.7 V).
REPLACE
POWER SUPPLY
LEDs (GREEN)
ashing N/A If both GREEN LEDs are ashing, the power supply
needs to be replaced.
REPLACE BATT LED (RED)
steady ON
2 beeps, every
15 minutes
The unit automatically initiates a battery test every
180 days. If the unit fails the test, this alarm is
triggered.
BATT MISSING LED (RED)
steady ON N/A The alarm is triggered when the battery is not
installed or not connected.
MUTE LED (GREEN)
steady ON N/A Green LED is lit when Silence Alarm button is pressed
and an audible alarm is active.

Other Alpha Power Supply manuals

Alpha BROADBAND UPS XM3.1-HP User manual

Alpha

Alpha BROADBAND UPS XM3.1-HP User manual

Alpha APP60S User manual

Alpha

Alpha APP60S User manual

Alpha DOCSIS DM31 User manual

Alpha

Alpha DOCSIS DM31 User manual

Alpha HDN 300 User manual

Alpha

Alpha HDN 300 User manual

Alpha LECTRO Mini-Mite Ferro User manual

Alpha

Alpha LECTRO Mini-Mite Ferro User manual

Alpha NPS-W1 User manual

Alpha

Alpha NPS-W1 User manual

Alpha APX2-G Series User manual

Alpha

Alpha APX2-G Series User manual

Alpha FlexPoint 1215 User manual

Alpha

Alpha FlexPoint 1215 User manual

Alpha Node User manual

Alpha

Alpha Node User manual

Alpha Micro User manual

Alpha

Alpha Micro User manual

Alpha APP 9005C User manual

Alpha

Alpha APP 9005C User manual

Alpha FlexNet MPS48-7C User manual

Alpha

Alpha FlexNet MPS48-7C User manual

Alpha FlexNet MPS48-7C User manual

Alpha

Alpha FlexNet MPS48-7C User manual

Alpha CXPS-C Quick start guide

Alpha

Alpha CXPS-C Quick start guide

Alpha FlexPoint Series User manual

Alpha

Alpha FlexPoint Series User manual

Alpha Lectro 60V User manual

Alpha

Alpha Lectro 60V User manual

Alpha FlexPoint 1208-F User manual

Alpha

Alpha FlexPoint 1208-F User manual

Popular Power Supply manuals by other brands

Vanderbilt SPCP332 quick start guide

Vanderbilt

Vanderbilt SPCP332 quick start guide

Communica PSU CCTV 12VDC 3,5A quick start guide

Communica

Communica PSU CCTV 12VDC 3,5A quick start guide

Akyga AK-ND-14 user manual

Akyga

Akyga AK-ND-14 user manual

Spellman SL2KW SERIES instruction manual

Spellman

Spellman SL2KW SERIES instruction manual

CARLO GAVAZZI SPDC 120W operating instructions

CARLO GAVAZZI

CARLO GAVAZZI SPDC 120W operating instructions

Pulsar PSP48005 Installation

Pulsar

Pulsar PSP48005 Installation

Tecnoware UPS ERA PLUS STRIP 800 user manual

Tecnoware

Tecnoware UPS ERA PLUS STRIP 800 user manual

Puls FPT500.245-034-106 installation manual

Puls

Puls FPT500.245-034-106 installation manual

Thermal Dynamics CE CutMaster 100 operating manual

Thermal Dynamics

Thermal Dynamics CE CutMaster 100 operating manual

Powell 3-135/400-3W user guide

Powell

Powell 3-135/400-3W user guide

Datel DMS-PS-CM Series Brochure & specs

Datel

Datel DMS-PS-CM Series Brochure & specs

Vimar LINEA 30298.60x manual

Vimar

Vimar LINEA 30298.60x manual

Schaudt EBL 101 D instruction manual

Schaudt

Schaudt EBL 101 D instruction manual

RHINO PSS12-100 installation instructions

RHINO

RHINO PSS12-100 installation instructions

iMuto SMART POWER AS-E2C manual

iMuto

iMuto SMART POWER AS-E2C manual

shelyak PF0082 user manual

shelyak

shelyak PF0082 user manual

Chargery Power A30 manual

Chargery Power

Chargery Power A30 manual

Ratoc Systems Converter user guide

Ratoc Systems

Ratoc Systems Converter user guide

manuals.online logo
manuals.online logoBrands
  • About & Mission
  • Contact us
  • Privacy Policy
  • Terms and Conditions

Copyright 2025 Manuals.Online. All Rights Reserved.