Alpina SEATTLE AJ145-S User manual

UK: Electric heater with replace effect
DE: Elektroheizung mit Kaminfeuer-Effekt
FR: Radiateur électrique - effet cheminée
NL: Elektrische kachel met haardeffect
IT: Stufa elettrica con effetto caminetto
ES: Chimenea eléctrica con efecto llama
Model: AJ145-S
SEATTLE
UK: This product is only suitable for well insulated spaces or occasional use.
DE: Dieses Produkt ist nur für gut isolierte Räume oder gelegentlichen Gebrauch geeignet.
FR:Ce produit est uniquement adapté aux espaces bien isolés ou pour une utilisation occasionnelle.
NL: Dit product is alleen geschikt voor goed geïsoleerde ruimtes of incidenteel gebruik.
IT: Questo prodotto è adatto unicamente a spazi adeguatamente isolati o a utilizzi occasionali.
ES: Este producto solo es adecuado para espacios bien aislados o uso esporádico.
ITEM: 871125217849
A.I.&E. Adriaan Mulderweg 9-11
5657 EM Eindhoven, The Netherlands
Edco UK Ltd, 1st Floor Two Chamberlain Square
B3 3AX, Birmingham, UK
Instrucon manual
Bedienungsanleitung
Manuel d’ulisaon
Gebruiksaanwijzing
Manuale di istruzioni
Manual de instrucciones
Points de collecte sur www quefairedemesdechets.fr
Cet appareil,
ses accessoires,
piles et cordons
se recyclent
À DÉPOSER
EN MAGASIN À DÉPOSER
EN DÉCHÈTERIE
OU
FRFR

AElectric heater with replace effect AJ145-S
USER MANUAL
The following pictograms are used in this operating manual / on the unit:
Read the operating manual! Danger to life and of accidents for
toddlers and children!
Observe warning and safety
instructions! Warning! Do not cover.
Beware of electric shock! Danger
to life! Wear protective gloves!
Watt (actual power) Volt (alternating current)
Dispose of packaging and product
in an environmentally friendly
manner!
Introduction
Unfold the page with the illustrations and become acquainted with
the functions of the unit before putting it into operation for the rst
time. In order to do so, please read the following operating and safety
instructions. Only use the unit as described and for the indicated range
of operation. Keep these instructions in a safe place. Please also hand
over all documents to third parties when passing on the unit.
Intended use
The unit is intended to be wall-mounted and to generate hot air in
closed, dry rooms.
The unit is intended for wall mounting. The electric ame simulator
conveys a log re atmosphere. Other types of use or modications
of the unit are not regarded as intended and pose serious danger of
accidents. The manufacturer is not liable for any damages caused by
any use other than for the intended purpose. The unit is designed for
use in private households and not suitable for industrial purposes.

Technical specications
Nominal voltage: 220-240 V
Rated power: 1800-2000 W
Illumination: 9W LED
Dimensions: 94 x 12 x 48 cm (w x d x h)
Weight: approx. 12 kg
Scope of delivery
Immediately after unpacking please check that the delivery is complete
and all product parts are in good condition.
1 Electric wall heater
1 Remote control
3 Screws
3 Plugs
1 Safety bracket
1 Operating instructions
Decoration stones
Introduction / Safety Instructions
Description of parts
1. Ventilation slots
2. Safety bracket
3. Glass panel
4. Power cord and plug
5. ON/OFF switch
6. Control panel
7. Remote control
8. Digital display unit
9. Function indicator
10. Power ON/OFF button
11. Flame control button
12. Thermostat button
13. Timer button
14. Week timer
15. Week timer adjustment
Safety Instructions
WARNING! Do not cover!

WARNING! Please read all safety instructions.
Failure to adhere to the safety instructions can cause electric shock,
re and/or serious injuries
SAVE ALL SAFETY INSTRUCTIONS FOR FUTURE REFERENCE!
WARNING! DANGER OF DEATH OR SERIOUS INJURY TO
TODDLERS AND CHILDREN!
Never leave children unattended with the packaging material or the
unit. Packaging material poses a danger of suffocation and there is a
danger of death by electric shock. Children often underestimate the
dangers of electrical devices. Always keep children away from the unit.
This unit is not intended to be used by persons (including children)
with limited physical, sensory or mental capabilities or lack of
experience and/or knowledge unless they are supervised by a person
responsible for their safety or have been given instructions from such
a person on how the unit should be operated.
Avoid danger to life by electric shock
• Do not operate the unit with a damaged power line or damaged
power plug.
ATTENTION! Damaged power lines represent danger to life by
electric shock.
• Check the power lines regularly for damages and aging.
If the power line is damaged, it must be re placed by the
manufacturer, his / her representative or a similarly qualied
person in order to avoid safety hazards.
• Protect the power line against sharp edges, mechanical strain
and hot surfaces.
• Only operate the unit with an earthed outlet.
• Do not operate the unit outdoors. Make sure that the power line
never gets wet or damp during operation.
• Do not switch on the unit if you notice visible damages (e.g.
tears or cracks) or if you assume that the unit is damaged (e.g.
after having fallen down).
• Never operate the unit in the immediate vicinity of a bathtub,
shower or wash basin or a pool.
• In the case of disturbances immediately pull the power plug out
of the outlet.
• Only let an electrical technician conduct repairs on illuminants
or their replacement.
• Pull the power plug out of the outlet when you are not using the

electric replace insert for a longer period of time.
• Children should be supervised to ensure that they do not play
with the appliance.
• This appliance can be used by children aged from 8 years and
above and persons with reduced physical, sensory or mental
capabilities or lack of experience and knowledge if they have
been given supervision or instruction concerning use of the
appliance in a safe way and understand the hazards involved.
Children shall not play with the appliance. Cleaning and user
maintenance shall not be made by children without supervision.
• Children of less than 3 years should be kept away unless
continuously supervised.
• CAUTION--Some parts of this product can become very hot
and cause burns. Particular attention has to be given where
children and vulnerable people are present.
• Do not install the appliance immediately below a socket-outlet.
• Do not use this heater in the immediate surroundings of a bath,
a shower or a swimming pool.
Safety Instructions/ Before operation
Avoid injuries and damages of the electric unit
• ATTENTION! Never leave the electric wall heater unattended
when it is in operation. There is a risk of injury in the case of
non-observance.
• Prevent the power line from becoming a trip hazard. Therefore,
always run it away from the unit from the back.
• Wear protective gloves for all maintenance work on the unit.
The edges of the electric wall heater are very sharp!
• Make sure that children or pets are not endangered by the
operation of the unit.
• ATTENTION! Never operate the unit using external switchgear
such as a time switch for example. Never connect the unit to
an electric circuit which is regularly switched on and off by a
mechanism. Injuries as well as damage to the product could
result.
• Disconnect the power supply by pulling the power plug out of
the outlet. Never pull on the power line.
• Always install the product on a at, dry surface.
• Do not install or operate the unit in vehicles.
• Pull the power plug before moving the unit to a different
location.
• Pull the power plug before you clean the unit.

• Store the unit in a dry, dust- and vibration-free place. Avoid
damage to the unit.
Avoid danger to life by environmental effects
WARNING! Please make sure that the unit is not covered with towels,
curtains or similar objects. Otherwise there is danger of overheating.
Therefore, always pay attention that the ventilation slots 1 are kept
clear.
•Do not operate the unit in rooms in which dampness can develop or
in which it can come in contact with water.
•Do not install the unit directly beneath a wall outlet.
WARNING: in order to avoid overheating, do not cover the heater.
Before operation
ATTENTION! Do not place the unit directly beneath a wall outlet. In
the case of non-observance danger of injury and / or damage to the
unit can result.
ATTENTION! Please pay attention that you do not pinch the power
line and protect it against sharp edges. Damaged power lines increase
the risk of an electric shock.
Note: Make sure that the electric wall heater is correctly installed. In
case of any doubt, please contact a specialist.
Instructions: Please keep in mind that the power cord must also
remain accessible after installation of the electric replace.
The product has to be installed on a at surface with 3 screws. Ensure
that the wall is suitable for mounting the product with the supplied
screws/plugs (the product is supported by 2 screws only. The bottom
screw is meant for securing the product.). When looking for a suitable
location for installing the electric wall heater, take all safety instructions
into account. The product has to be mounted level.
At least 60cm of free space is required at the top of the product and at
least 20cm of free space at left, right and bottom side.
• Drill the holes (Ø7mm) in the wall according to picture C.
• Put the plugs in the holes and x the two upper screws.
• Mount the heater to the wall by means of the two upper screws.
• Mount the safety bracket on the back side of the product.
• Tighten the bottom screw.
• Put the decoration stones on the brim on the front side of the

product.
• Mount the glass by using the four pins at the sides of the
product.
• Insert the power plug 4 into an earthed outlet.
Note: Please observe that the power plug must still be able to be
reached after installation of the electric replace insert.
Operation
The voltage of the power source must comply with the specications
on the name plate of the heater. Devices marked with 230 V can also
be operated with 220 V. Before operation it is imperative to make sure
that the installation location corresponds to the requirements of the
safety instructions.
Note: When the heater is turned on for the rst time, a slight, harmless
odour can develop. This odour develops due to the heating up of the
inner heating elements. Provide sufcient ventilation.
This product equipped open window detection function, when the
products detected the room temperature decreased over 3 comparing
to the temperature set within 0.5 hour, the unit will stop providing the
heat and the display screen will show “00”.
USING THE MANUAL AND REMOTE CONTROLS
Note:
Before using the replace please make sure set the toggle switch(5)
to the position I. Set the toggle switch(5) to the position 0 if you would
like to turn off the unit. On the top-right side plate of the electric
replace is the control panel(6). This panel contains the buttons to
properly operate the electric replace. The buttons on the control
panel on the side of the electric
replace and the remote control function in the same way. The remote
control has an effective range of up to 13 feet.

1. Ventilation slots
2. Safety bracket
3. 3Glass panel
4. Power cord and plug
5. ON/OFF switch
6. Control panel
7. Remote control
8. Digital display unit
9. Function indicator
10.Power ON/OFF buton
11. Flame control button
12.Thermostat button
13.Timer button
14.Week timer
15.Week timer adjustment
USING THE POWER ON/OFF BUTTON
Pressing the Power on/off button(10) once to turns the unit on.
Pressing the Power on/off button(10) again will tum the unit off.
If you nd that none of the other buttons appear to work, check to
make sure that the Power on/off button(10) is turned on.
USING THE FLAME CONTROL BUTTON
Pressing the ame control button (11) to turn on the ame effect.
To press the ame control button (11) to adjust the ame brightness,
there are 3 levels of ame brightness, L3-L2-L 1-L3.

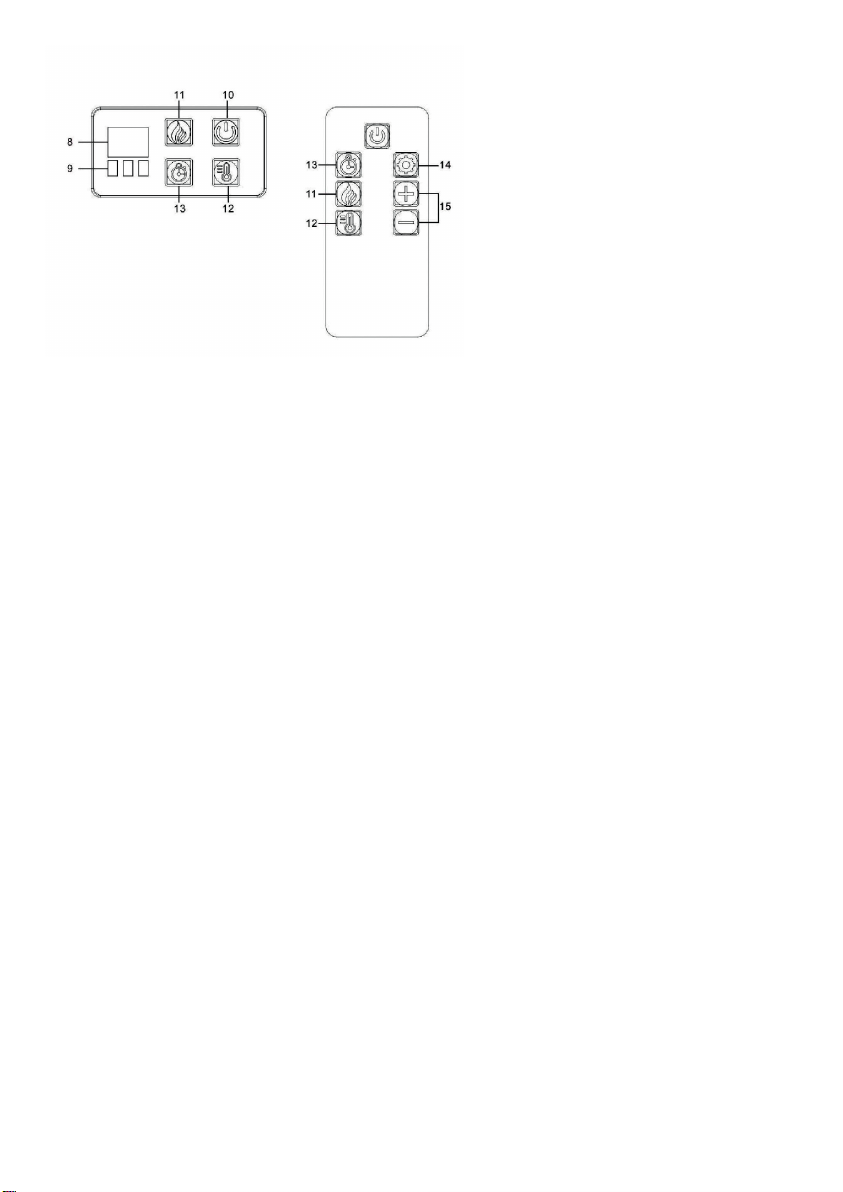
USING THE THERMOSTAT CONTROL BUTTON
Pressing the thermostat control button(12) to tum on the heating
function.Pressing the thermostat control button(12) again to tum on the
heating function. Continue to press the thermostat button(12) to cycle
through the different heat settings, 17C-18.C-19C-..... -26C-27”C-
ON- OFF. To display the temperature setting in either Fahrenheit or
Celsius, press the thermostat button (12) of control panel once, then
press and hold the power on/off button (11) of the control panel for 5
seconds. The display will switch between Fahrenheit or Celsius.
USING THE TIMER CONTROL BUTTON
Pressing the timer control button (13) will set the timer. This interval
period is shown in the display (8) on the control panel on the side of
the electric replace. There are total 8 levels timer settings, from 0.5hr
- 1 hr - 2hr - 3hr - 4hr - 5hr - 6hr - OFF.
USING THE WEEK TIMER CONTROL BUTTON
Note:
Besides a regular timer function, this unit also equipped with week
timer function, to setup the time when to turn on and off the heater
with desired temperature, one group each day and max. 7 days/
group available. if stop pressing any of those buttons for more than 5
seconds, will quite the week timer function and conrm the previous
setting.
Using the timer button(13) on control panel to setup the week
timer
Press and hold the timer button(13) on control panel for 5 seconds
to input current local time(01,02,03, … 21,22,23) by pressing ame
button(11) or thermostat control button(12), then press timer button(13)
again to conrm previous setup and the digital display will show “1d”
to start setup 1st group and re-press the timer button(13) once and
right after the digital display showing “--” to setup the UNIT-ON-TIMER
by pressing ame button(11) or thermostat control button(12), and
press timer button(13 again and after digital display showing “--”to
setup UNIT-OFF-TIMER by pressing ame button(11) or thermostat
control button(12), then press the timer button(13) once to conrm
the previous settings and after the digital display showing “--” to setup
the temperature desired; and repeat to setup 2d,3d, .. ,7d; to skip a
specied day/group, by continue pressing timer button(13) to select
and setup the timer function o the specied date desired.

Using the remote control to setup the week timer
Press the week timer button(14) 1st time to activate the function
and setup the current local time by pressing week timer adjustment
buttons(15) “+”/”-” and re-press the week timer button(14) and
display(B) will show”1d”, and press again the week timer button(14) to
enter the adjustment mode and the digital display showing “--”, then
press the week timer adjustment buttons(15) “+”/”-” to setup the time
to turn on and turn off the unit, and press the week button (14) 4th time
to setup the temperature.
Repeat the actions above to setup the time and temperature for other
groups and different days.
Maintenance and cleaning/Disposal/Information
Cleaning the frame
• In no case should aggressive or corrosive cleaning agents be
used. Otherwise damage to the pro duct could result.
• Clean the frame with a slightly dampened cloth.
• Clean the ventilation slots regularly and thoroughly 1 (e.g. with
a vacuum cleaner) so that no dust can accumulate.
• Clean the glass plate 3 with a damp cloth and if necessary with
a glass cleaner.
Cleaning the interior
ATTENTION! RISK OF INJURY! The edges of the electric wall heater
are very sharp. Therefore, please wear protective gloves during all
maintenance work.
ATTENTION! In no case should aggressive or corrosive cleaning
agents be used. Otherwise product damage could result.
ATTENTION! Please make sure that the glass plate 3 does not fall.
Otherwise damage to the product could result.
• Now clean the frame with a damp cloth and if necessary with a
mild cleaning agent.
• Clean the glass plate 3 with a damp cloth and if necessary with
glass cleaner.

Disposal
All the packaging and packaging material consists of environmentally
friendly materials. They can be disposed of in local containers.
This product does not use a standard bulb for its ame effect. The
appliance uses an electrically controlled LED system to create the
effect, therefore, no parts need to be replaced. There are no user-
seviceable parts in this appliance. Under no circumstances, should the
appliance be serviced by anyone other than a qualied electrician.
Information
You receive a 2-year warranty on this unit from the date of purchase.
The unit was carefully manufactured and diligently inspected before
being dispatched. Damage which is attributed to improper use as well
as wearing parts are not included in the warranty.
WARNING! Only let your units be repaired by qualied specialists
using only original spare parts. This ensures that the safety of your
unit is maintained.
WARNING! Always have the manufacturer of the unit or his/ her
customer service conduct the replacement of the power plug 4 or the
power line. This ensures that the safety of your unit is maintained
The lamps in this product are part of the ame effect system. They are
not suitable for household room illumination.

Declaration of conformity CE
EC Low Voltage Directive (2014/35 EU)
Electromagnetic Compatibility (2014/30/EU)
Name of the unit:
Electric heater with replace effect AJ145-S
For models with remote control:
The maximum range of use is 5 meters. The buttons on the remote
control have the same function as switches on the heater. Warning: it
takes time for the receiver to respond to the transmitter. Do not press
the buttons more than once within two seconds for correct operation.

Table for information requirements for electric local
space heaters
P
Model identier(s): AJ145-S
Item Symbol Value Unit Item Unit
Heat output Type of heat input, for electric local space
heaters only (select one)
Nominal heat output Pnom 2,0 kW Manual heat charge control
with integrated thermostat
[no]
Minimum heat output (in-
dicative)
Pmin N/A kW Manual heat charge control
with room and/or outdoor
temperature feedback
[no]
Maximum continuous heat
output
Pmax 2,0 kW Electronic heat charge con-
trol with room and/or outdoor
temperature feedback
[no]
Auxiliary electricity consumption Fan assisted heat output [no]
At nominal heat output elmax N/A kW Type of heat output/room temperature
control (select one)
At minimum heat output elmin N/A kW Single stage heat output and
no room temperature control
[no]
In standby mode elSB 0,41 W Two or more manual stages,
no room temperature control
[no]
With mechanic thermostat
room temperature control
[no]
With electronic room temper-
ature control
[no]
Electronic room temperature
control plus day timer
[no]
Electronic room temperature
control plus week timer
[yes]
Other control options (multiple selections
possible)
Room temperature control,
with presence detection
[no]
Room temperature control,
with open window detection
[yes]
With distance control option [no]
With adaptive start control [no]
With working time limitation [no]
With black bulb sensor [no]
Contact details: Adriaan Mulderweg 9–11, 5657 EM Eindhoven, the Netherlands
Remark:
For electric local space heaters, the measured seasonal space heating energy efciency ηs cannot be
worse than the declared value at the nominal heat output of the unit.

B Elektroheizung mit Kaminfeuer-Effekt AJ145-S
BEDIENUNGSANLEITUNG
In dieser Bedienungsanleitung für das Gerät werden folgende Symbol verwendet:
Bedienungsanleitung lesen!
Lebensgefahr und Gefahr
schwerer Verletzungen für
Kleinkinder und Kinder!
Alle Warnungen und
Sicherheitshinweise beachten
Warnung! Das Heizgerät nicht
abdecken!
Achtung Stromschlaggefahr! Schutzhandschuhe tragen!
Watt (Leistung) Volt (Wechselstrom)
Entsorgen Sie die Verpackung und
das Gerät gemäß den geltenden
Recycling-Vorschriften!
Einführung
Schlagen Sie die Seite mit den Abbildungen auf und machen Sie sich
mit den Funktionen des Geräts vertraut,
bevor Sie es zum ersten Mal in Betrieb nehmen. Bitte lesen Sie hierfür
die folgenden
Bedienungs- und Sicherheitshinweise. Verwenden Sie das Gerät nur
wie beschrieben und nur für die
angegebenen Anwendungen. Bewahren Sie diese Anleitung an einem
sicheren Ort auf. Bitte geben Sie die Dokumentation
bei Weitergabe des Geräts an Dritte ebenfalls weiter.
Bestimmungsgemäße Verwendung
Das Gerät wird an der Wand montiert und erzeugt heiße Luft in
geschlossenen, trockenen Räumen.
Das Gerät ist für die Wandmontage ausgelegt. Der elektrische
Flammensimulator vermittelt eine Kaminfeuer-Atmosphäre. Eine
anderweitige Verwendung und Veränderungen am Gerät fallen
nicht unter die bestimmungsgemäße Verwendung und stellen eine
ernsthafte Unfallgefahr dar. Der Hersteller haftet nicht für Schäden,
die durch eine Verwendung für einen anderen als den vorgesehenen
Zweck verursacht werden. Das Gerät ist für den Einsatz im
Privatbereich bestimmt und ist nicht für industrielle Zwecke geeignet.

Technische Daten
Nennspannung: 220–240 V
Nennleistung: 1800-2000W
Lampen: 9 W LED
Abmessungen: 94×12×48 cm (B×T×H)
Gewicht: ca. 12 kg
Lieferumfang
Überprüfen Sie bitte sofort nach dem Auspacken, dass die Lieferung
vollständig ist und alle Teile des Geräts in ordnungsgemäßem Zustand
sind.
1 Elektrische Wandheizung
1 Fernbedienung
3 Schrauben
3 Stecker
1 Sicherheitsbügel
1 Bedienungsanleitung
Dekosteine
Einführung und Sicherheitshinweise
Beschreibung der Komponenten
1. Lüftungsschlitze
2. Sicherheitsbügel
3. Glasscheibe
4. Netzkabel und Stecker
5. Ein/Aus-Schalter
6. Bedienfeld
7. Fernbedienung
8. Digitales Display
9. Funktionsanzeige
10. Ein/Aus-Taste
11. Kaminfeuertaste
12. Thermostattaste
13. Timer-Taste
14. Wochen-Timer
15. Einstelltasten für Wochen-Timer
Sicherheitshinweise
Achtung! Nicht abdecken!

WARNUNG! Bitte lesen Sie alle Sicherheitshinweise.
Nichtbeachtung der Sicherheitshinweise kann zu Stromschlag, Brand
und/oder schweren Verletzungen führen.
BEWAHREN SIE DIESE ANLEITUNG FÜR DIE ZUKÜNFTIGE
REFERENZ AUF!
WARNUNG! LEBENSGEFAHR UND GEFAHR SCHWERER
VERLETZUNGEN FÜR KLEINKINDER UND KINDER!
Lassen Sie Kinder keinesfalls mit den Verpackungsmaterialien
oder dem Gerät unbeaufsichtigt. Bei Verpackungsmaterial besteht
Erstickungsgefahr, und es besteht Lebensgefahr durch Stromschlag.
Kinder unterschätzen häug die Gefahren im Zusammenhang mit
elektrischen Geräten. Halten Sie Kinder stets von dem Gerät fern.
Dieses Gerät ist nicht für Kinder und Personen mit eingeschränkten
physischen, sensorischen oder geistigen Fähigkeiten oder mangelnder
Erfahrung und Kenntnissen des Geräts geeignet, außer diese werden
beaufsichtigt oder haben von einer für ihre Sicherheit verantwortlichen
Person eine ausführliche Einweisung in die sichere Verwendung des
Geräts erhalten.
Vermeiden Sie Lebensgefahr durch Stromschlag
• Betreiben Sie das Gerät nicht mit einem beschädigten
Netzkabel oder Netzstecker.
ACHTUNG! Bei einem beschädigten Netzkabel kann es zu
Lebensgefahr durch einen elektrischen Schlag kommen.
• Überprüfen Sie das Netzkabel regelmäßig auf Schäden und
Anzeichen von Alterung. Falls das Netzkabel beschädigt ist,
muss dieses durch den Hersteller, dessen Kundendienst oder
eine ähnlich qualizierte Person ersetzt werden, um mögliche
Gefahren zu vermeiden.
• Schützen Sie das Netzkabel vor scharfen Kanten,
mechanischer Belastung und heißen Oberächen.
• Betreiben Sie das Gerät nur an einer geerdeten Steckdose.
• Betreiben Sie das Gerät nicht im Freien. Stellen Sie sicher,
dass das Netzkabel während des Betriebs nicht nass oder
feucht wird.
• Schalten Sie das Gerät nicht ein, wenn Sie sichtbare Schäden
(z. B. Risse oder Brüche] bemerkt haben oder wenn Sie
vermuten, dass das Gerät beschädigt ist (z. B. wenn es
heruntergefallen ist).

• Verwenden Sie das Gerät keinesfalls in unmittelbarer Nähe
einer Badewanne, einer Dusche, eines Waschbeckens oder
eines Schwimmbeckens.
• Ziehen Sie bei einer Störung sofort den Netzstecker aus der
Steckdose.
• Lassen Sie Reparaturen und Austausch von Leuchtmitteln nur
von einer Elektrofachkraft ausführen.
• Ziehen Sie den Netzstecker aus der Steckdose, wenn Sie den
elektrischen Kamin für längere Zeit nicht verwenden.
• Kinder müssen beaufsichtigt werden, um sicherzustellen, dass
sie nicht mit dem Gerät spielen.
• Kinder unter 3 Jahren fern halten, außer diese werden
kontinuierlich beaufsichtigt.
• Benutzen Sie diese Heizung nicht in der unmittelbaren
Umgebung eines Bades, einer Dusche oder eines
Schwimmbades.
ACHTUNG – Einige Teile dieses Produkts können sehr heiß werden
und Verbrennungen verursachen. Besondere Aufmerksamkeit ist
gegeben, wenn Kinder und gefährdete Personen anwesend sind.
Installieren Sie das Gerät nicht direkt unter einer Steckdose.
Sicherheitshinweise/Vor der ersten Verwendung
Vermeiden von Verletzungen und Schäden am Gerät
• ACHTUNG! Lassen Sie die elektrische Wandheizung
keinesfalls unbeaufsichtigt, wenn diese eingeschaltet ist.
Andernfalls kann Verletzungsgefahr entstehen.
• Stellen Sie sicher, dass das Netzkabel keine Stolpergefahr
darstellt. Verlegen Sie dieses immer weg von der Rückseite des
Geräts.
Tragen Sie bei allen Wartungsarbeiten am Gerät
Schutzhandschuhe. Die Kanten der elektrischen Wandheizung
sind sehr scharf!
• Stellen Sie sicher, dass Kinder und Haustiere durch den Betrieb
des Geräts nicht gefährdet werden.
• ACHTUNG! Betreiben Sie das Gerät nicht mit externen
Schaltanlagen wie einer Zeitschaltuhr. Schließen Sie das Gerät
keinesfalls an einen Schaltkreis an, der das Gerät über einen
Mechanismus regelmäßig ein- oder ausschaltet. Dies kann zu
Verletzungen sowie zu Schäden am Gerät führen.
• Trennen Sie die Stromversorgung, indem Sie den Netzstecker
aus der Steckdose ziehen. Ziehen Sie dabei keinesfalls am

Netzkabel.
• Installieren das Gerät immer auf einer achen und trockenen
Oberäche.
• Installieren oder betreiben Sie das Gerät nicht in Fahrzeugen.
• Ziehen Sie den Netzstecker aus der Steckdose, bevor Sie das
Gerät an einen anderen Ort bewegen.
• Ziehen Sie den Netzstecker aus der Steckdose, bevor Sie das
Gerät reinigen.
• Lagern Sie das Gerät an einem trockenen, staub- und
erschütterungsfreien Ort. Vermeiden Sie Schäden am Gerät.
Vermeiden von Lebensgefahr durch Einuss von
Umgebungsfaktoren
WARNUNG! Stellen Sie sicher, dass das Gerät nicht mit Handtüchern,
Vorhängen oder ähnlichen Gegenständen abgedeckt ist. Andernfalls
besteht die Gefahr einer Überhitzung. Achten Sie deshalb stets darauf,
dass die Lüftungsschlitze (1) frei sind.
• Betreiben Sie das Gerät nicht in Räumen, in denen sich
Feuchtigkeit entwickeln oder das Gerät mit Wasser in
Berührung kommen kann.
• Installieren Sie das Gerät nicht direkt unter einer Steckdose.
• ACHTUNG: um eine Überhitzung zu vermeiden, decken Sie die
Heizung niemals ab.
Vor der Verwendung
ACHTUNG! Platzieren Sie das Gerät nicht direkt unter
einer Steckdose. Nichtbeachtung der Anweisungen kann zu
Verletzungsgefahr und/oder Schäden am Gerät führen.
ACHTUNG! Achten Sie darauf, dass Sie das Netzkabel nicht
quetschen und schützen Sie es vor scharfen Kanten. Ein beschädigtes
Netzkabel erhöht die Gefahr eines Stromschlags.
Hinweis: Stellen Sie sicher, dass die elektrische Wandheizung
ordnungsgemäß installiert ist. Kontaktieren Sie im Zweifelsfall bitte
einen Fachmann.
Anleitung: Bitte denken Sie daran, dass der Netzstecker nach
Installation des elektrischen Kamins weiterhin zugänglich sein muss.
Das Gerät muss mit 3 Schrauben auf einer ebenen Oberäche
montiert werden. Stellen Sie sicher, dass die Wand für die Montage
des Geräts mit den mitgelieferten Schrauben/Dübeln geeignet ist.

(Das Gerät wird nur von 2 Schrauben gehalten. Die untere Schraube
dient der Sicherung des Geräts.) Beachten Sie bei der Wahl eines
geeigneten Orts für die Installation der elektrischen Wandheizung alle
Sicherheitshinweise. Das Gerät muss waagrecht montiert werden.
Es sind mindestens 60 cm Freiraum über dem Gerät und mindestens
20 cm links, rechts und unten erforderlich.
• Bohren Sie die Montagelöcher (Ø7 mm) gemäß Abbildung C in
die Wand.
• Stecken Sie die Dübel in die Löcher und bringen Sie die beiden
oberen Schrauben an.
• Montieren Sie die Heizung mit den beiden oberen Schrauben
an der Wand.
• Bringen Sie den Sicherheitsbügel auf der Rückseite des Geräts
an.
• Ziehen Sie die untere Schraube an.
• Legen Sie die Dekosteine auf den Vorsprung auf der
Vorderseite des Geräts.
• Montieren Sie das Glas mithilfe der vier Stifte an den Seiten
des Geräts.
• Stecken Sie den Netzstecker (4) in eine geerdete Steckdose.
Hinweis: Bitte stellen Sie sicher, dass der Netzstecker nach
Installation des elektrischen Kamins noch zugänglich ist.
Verwendung
Die Spannung der Stromquelle muss mit den Angaben auf dem
Typenschild des elektrischen Kamins übereinstimmen. Mit 230 V
gekennzeichnete Geräte können auch mit 220 V betrieben werden.
Vor der Verwendung muss unbedingt sichergestellt werden, dass der
Einbauort die Anforderungen in den Sicherheitshinweisen erfüllt.
Hinweis: Wenn der elektrische Kamin zum ersten Mal eingeschaltet
wird, kann ein leichter, harmloser Geruch auftreten. Dieser Geruch
entsteht durch das Erwärmen der internen Heizelemente. Sorgen Sie
für eine ausreichende Belüftung.
Dieses Gerät verfügt über eine Funktion zur Erkennung offener
Fenster. Wenn das Gerät erkennt, dass die Raumtemperatur im
Vergleich zur eingestellten Temperatur innerhalb von 0,5 Stunden um
mehr als 3 % gesunken ist, schaltet das Gerät die Heizung ab und auf
dem Display wird „00“ angezeigt.

Verwenden von Bedienelementen und Fernbedienung
Hinweis:
Bevor Sie den elektrischen Kamin benutzen, stellen Sie den
Kippschalter (5) bitte auf Position I. Stellen Sie den Kippschalter
(5) auf Position 0, wenn Sie das Gerät ausschalten möchten. Das
Bedienfeld (6) bendet sich an der oberen rechten Seitenplatte
des elektrischen Kamins. Dieses Bedienfeld enthält die Tasten zur
Bedienung des elektrischen Kamins. Die Tasten auf dem seitlichen
Bedienfeld des elektrischen Kamins und der Fernbedienung haben
dieselben Funktionen. Die Fernbedienung hat eine Reichweite von bis
zu 4 Metern.
1. Lüftungsschlitze
2. Sicherheitsbügel
3. Glasscheibe
4. Netzkabel und Stecker
5. Ein/Aus-Schalter
6. Bedienfeld
7. Fernbedienung
8. Digitales Display
9. Funktionsanzeige
10.Ein/Aus-Taste
11. Kaminfeuertaste
12.Thermostattaste
13.Timer-Taste
14.Wochen-Timer
15.Einstelltasten für Wochen-Timer
This manual suits for next models
1
Table of contents
Languages:
Other Alpina Electric Heater manuals
Popular Electric Heater manuals by other brands

ALPATEC
ALPATEC RC 18 E user manual

Paulin
Paulin 7500 Owner's manual & operating instructions

Thermor
Thermor Emotion digital DE 500 A 2000 W instruction manual

Somogyi Elektronic
Somogyi Elektronic home FK 3 instruction manual

Westinghouse
Westinghouse WHT401BR user manual

Rowenta
Rowenta DUALIO 029659 - 38/02 FR050 Instructions for use