Ampeon AMP-EE01 User manual

Ver1.91 2013-10-13
.

Ver1.91 2013-10-13
P r e f a c e
Thanks for choosing AMPEON’s high-performances metal and spark diverter AMP series. The
AMP series is manufactured with high-quality components and materials and incorporates the
latest microprocessor technology available. Jiangsu AMPEON continuously practices the design and
innovation of the product and provides excellent products with professional attitude. Furthermore,
it responds to the customers with professional service and benefits each other with the customers.
The manual is to be used for the installing, parameter setting, troubleshooting and daily
maintenance of spark diverter. In order to assure the proper installing and usage of the product,
please read this manual in detail before installing. Please keep this user manual at hand and
distribute to all users for reference.
Welcome to visit the website www.ampeon.cn.
ATTENTION!
1. First please carry out the delivery inspection and check whether there is damage caused by
transportation process.
2. After unpacking, please compare with the packing list and check the type, specification and
components of the product. If it does not conform to your order documents or if you have
any questions regarding the product, please contact to the dealer or the service office of
our company.
3. Jiangsu Ampeon Electronic Engineering Co., Ltd. provides services of the three guarantee
period 18 months from the delivery date.
4. Troubles due to lightening strike, water invasion and obvious artificial miss or damage etc.
are not in the range of repair guarantee.
5. Metal & spark diverter series products are important products of the fore-spinning
procedure in cotton spinning mill. But the users in cotton spinning mill should also take
integrated measures in fire protection equipments, selection of material, management
regulations etc. to assure the safety production.
CAUTION!
1. The power supply must first be shut off before the electric wiring.
2. Wiring, repairing & maintenance of the machine should be carried out by electric
professionals.
3. Do not carry out compression test toward the inner components because the semiconductor
units are easy to be broken down by the high voltage and are easy to damage.
4. The circuit board CMOS integrated circuit is apt to static electricity damage. So you should
take the static electricity prevention measure before touching the circuit board with hand.
5. As the machine is installed to the pipe in high place, installing personnel should take safety
measures. Suspending or bracket should be solid to prevent the machine from dropping
down.
6. Select safety area to install the equipment, prevent the high temperature & direct shinning
and avoid humidity and splashing of the water drops.

AMPEON AMP-Series
~1~
C o n t e n t s
A. Overview..........................................................................................................................................2
1、Use and structural features..................................................................................................... 2
2、Technical parameter................................................................................................................ 2
B. Electric wiring and installing........................................................................................................... 3
1、Installing.................................................................................................................................. 3
1.1 The installation of the connecting pipe of spark detectors..............................................3
1.2 The installation of the metal detector..............................................................................3
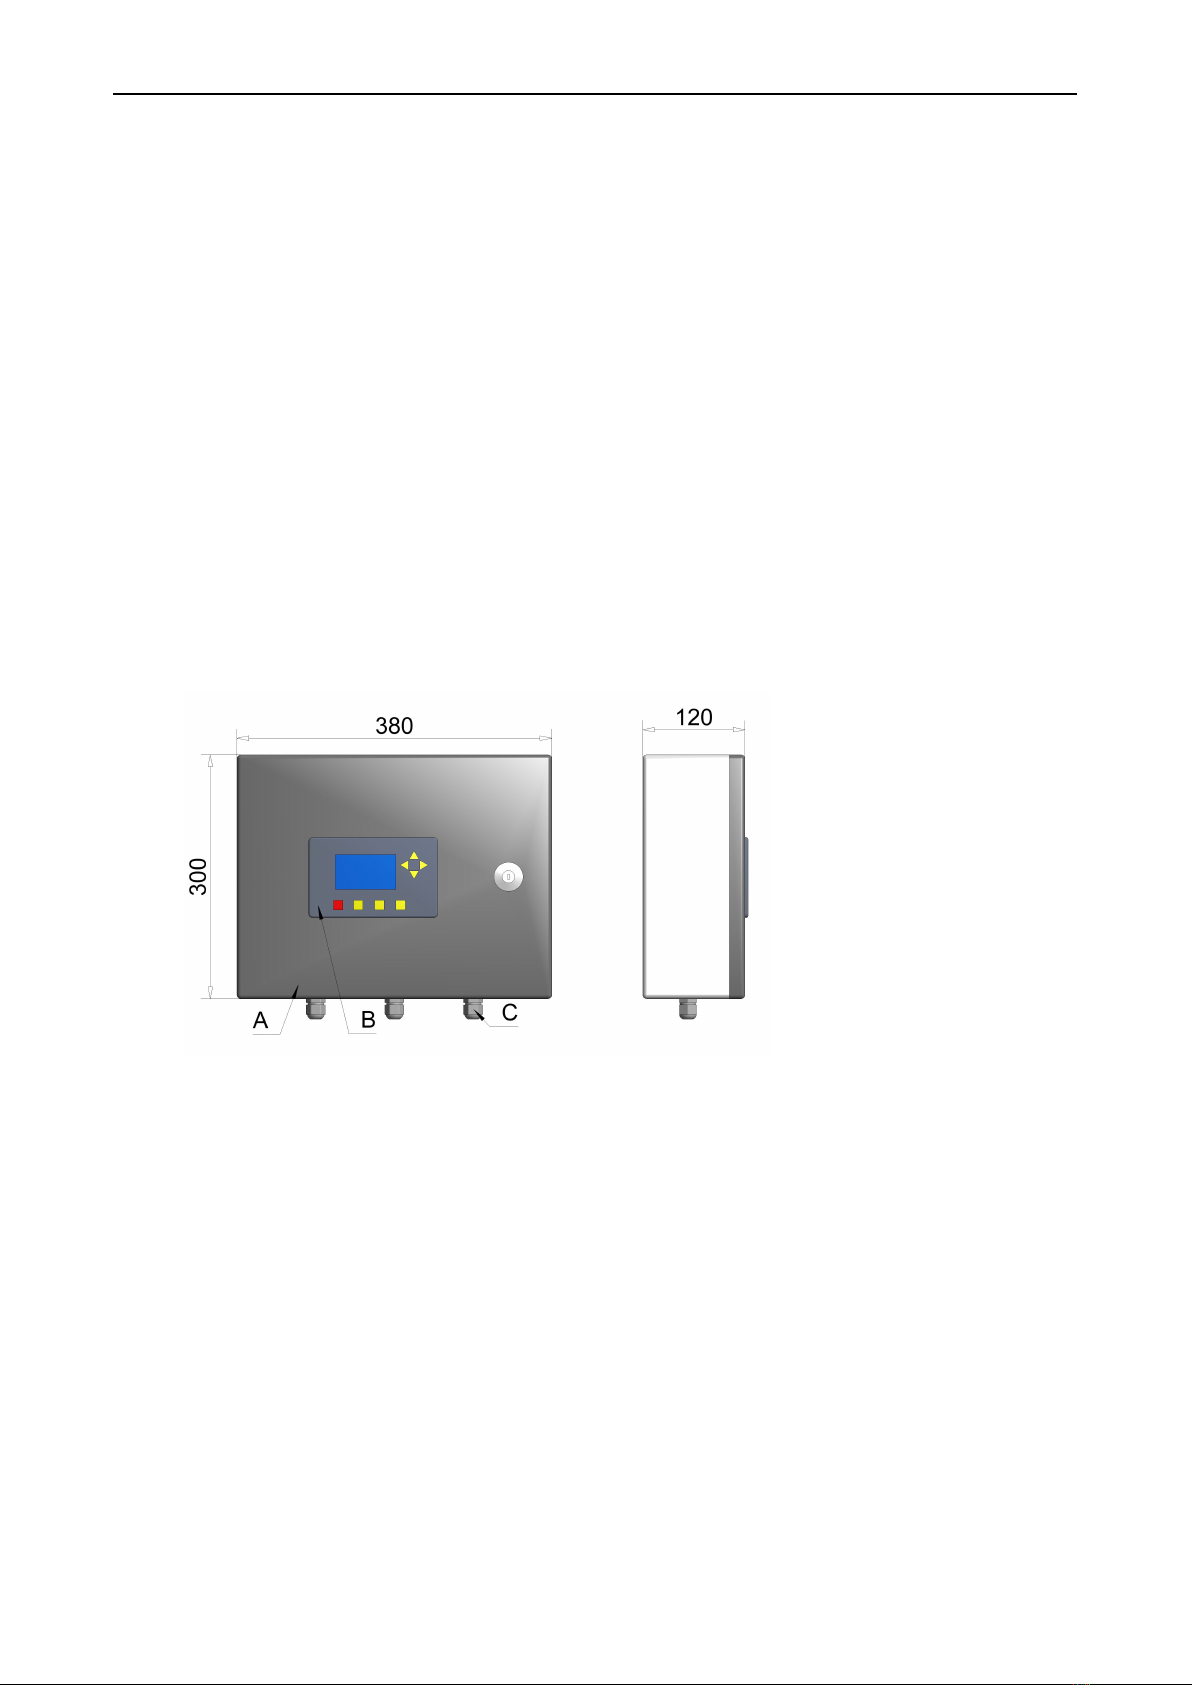
1.3 The installing of control box............................................................................................. 4
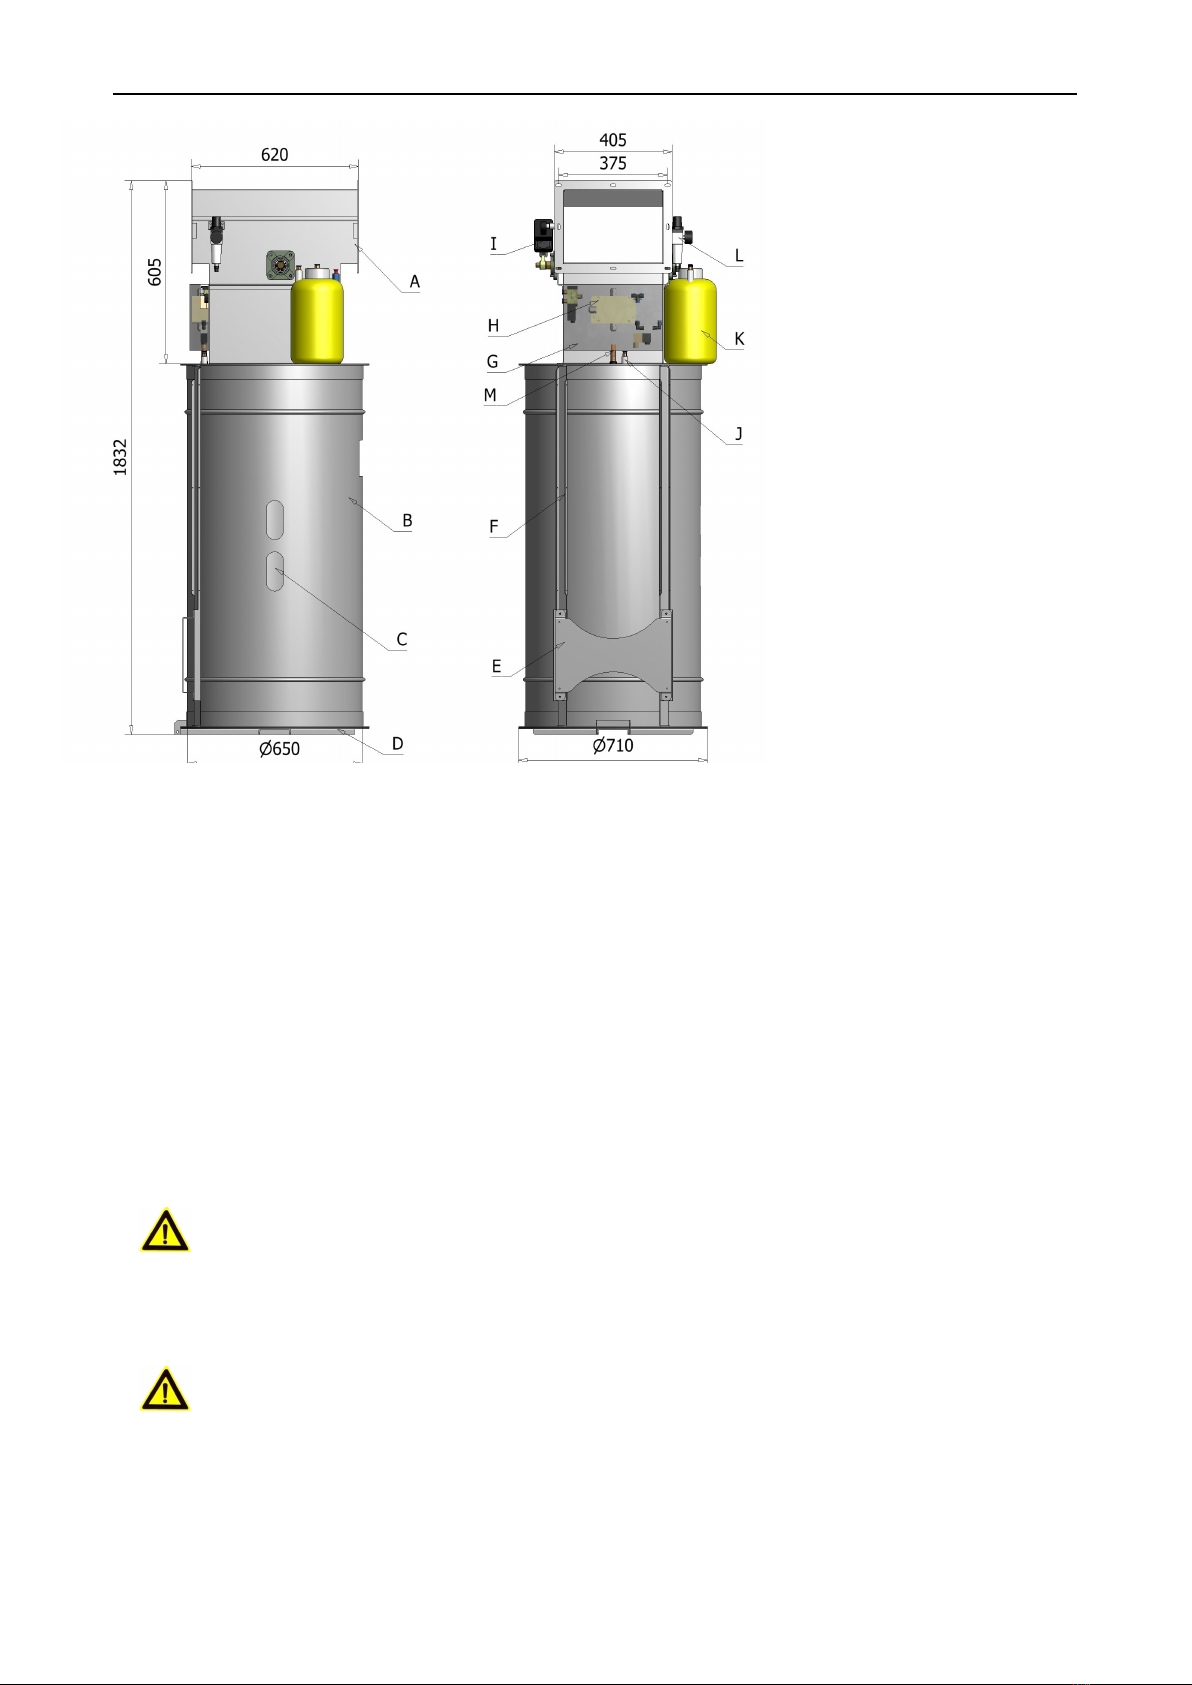
1.4 The installing of actuator unit.......................................................................................... 4
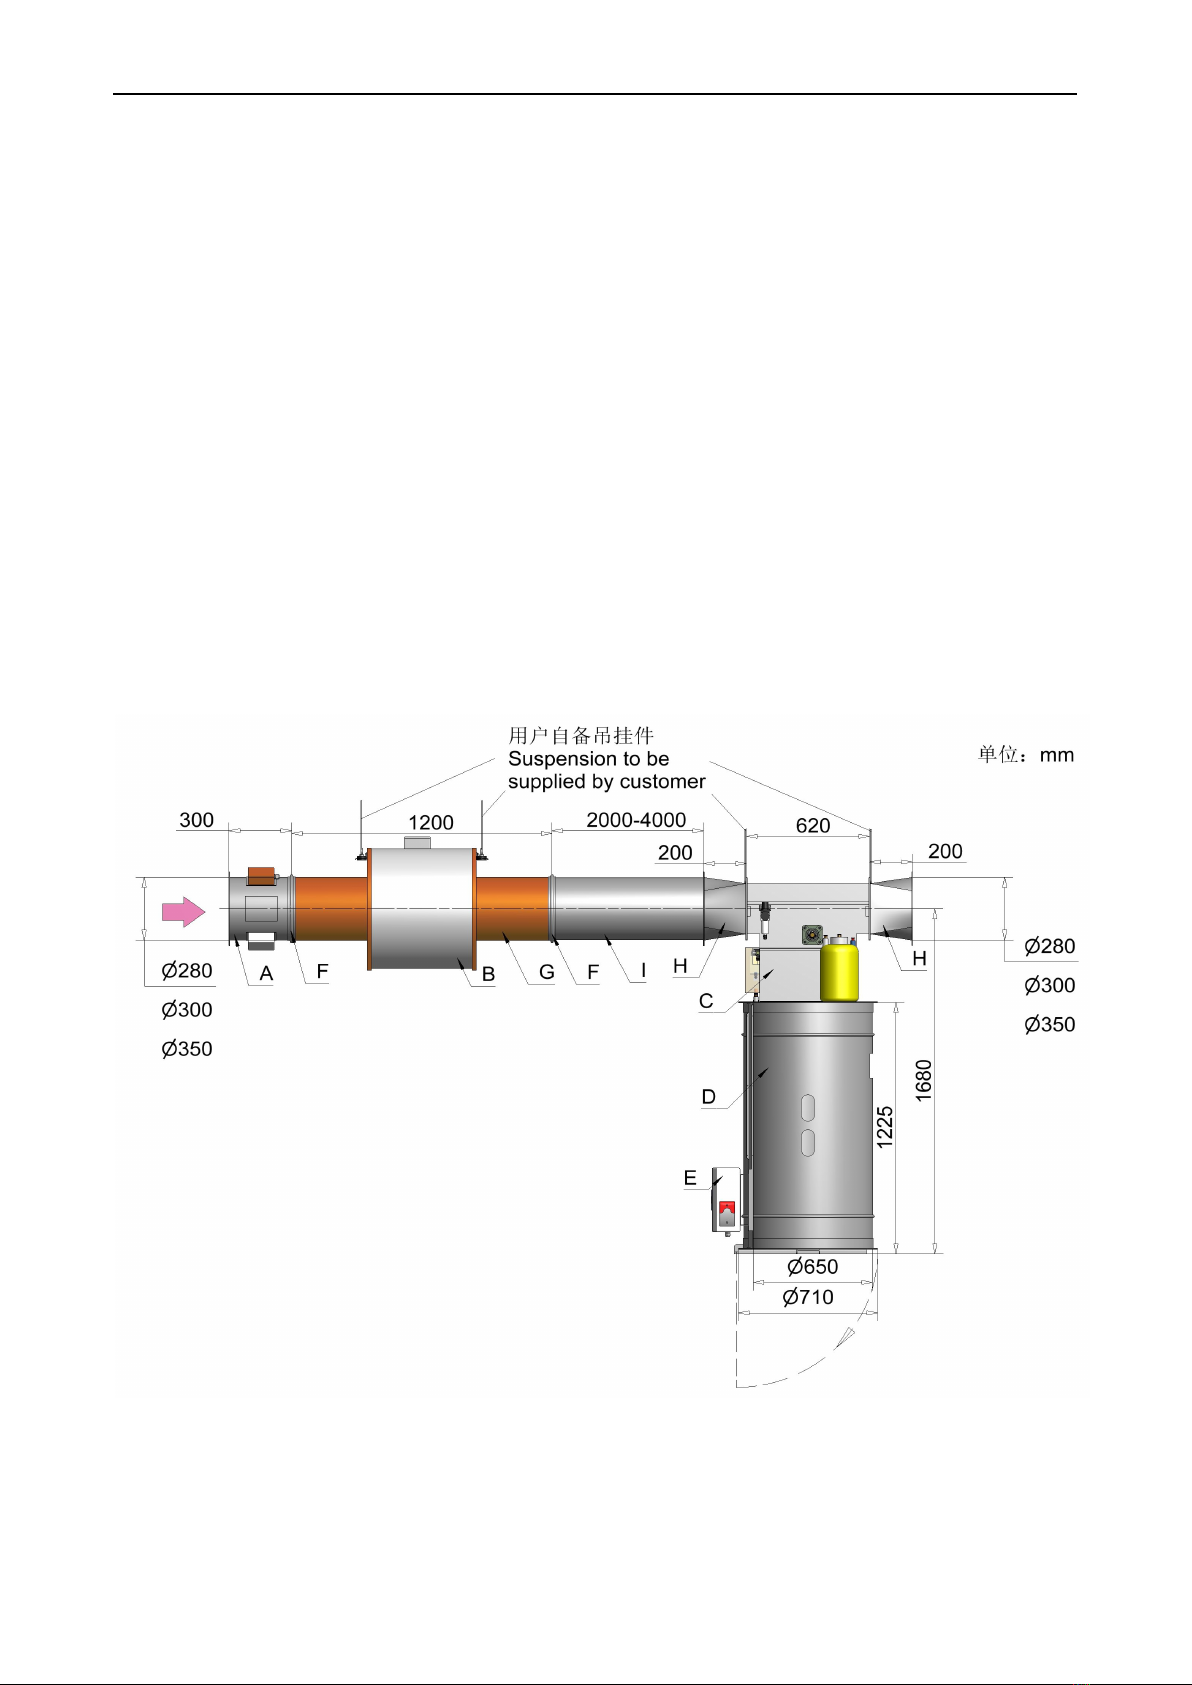
1.5 The standard installation.................................................................................................. 6
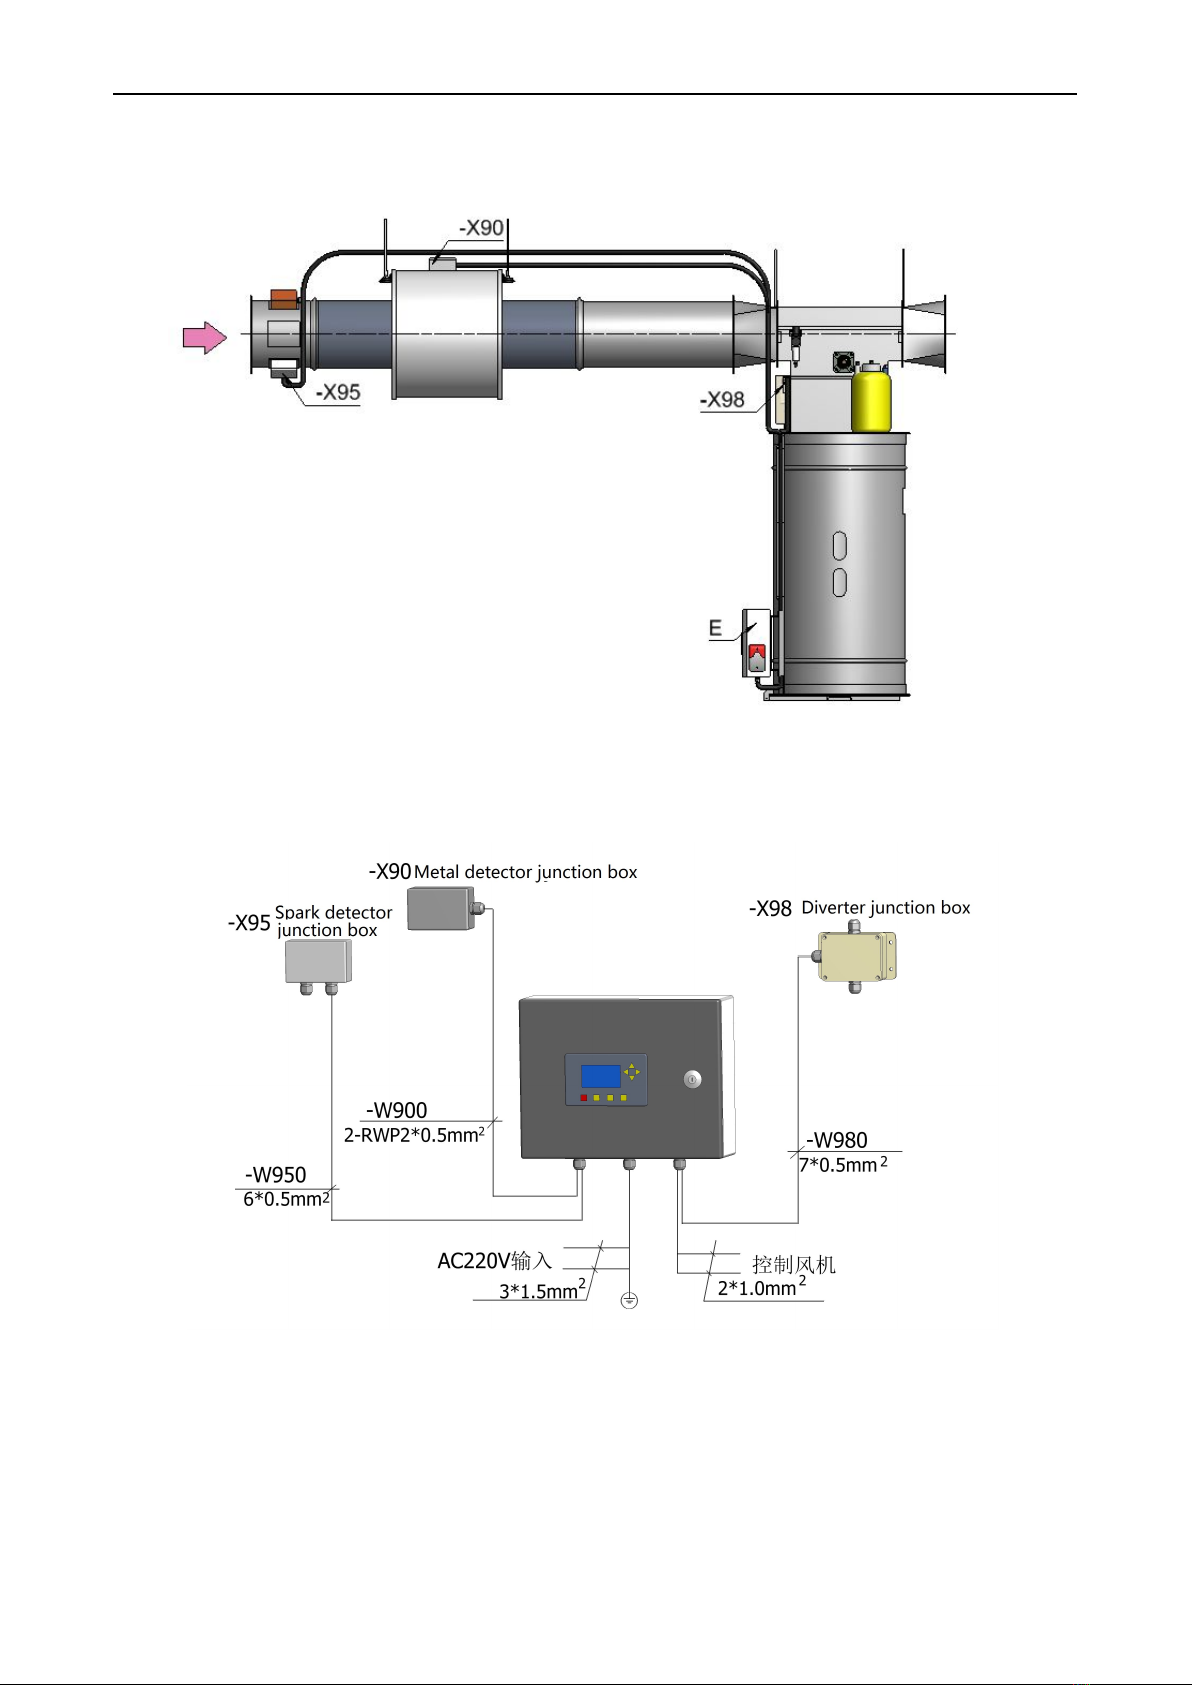
2.Electric wiring.......................................................................................................................... 7
2.1 Electric wring - J0 of the control box................................................................................ 8
2.2 Electric wring – J13 of the control box............................................................................. 9
2.3Electricwiringofthemainboard to themetaldetector........................................................... 9
2.4Electric wiring of the main board to the spark detectors............................................... 10
2.5 Electric wiring of the control box to the diverter...........................................................10
2.6 Earthing and safety.........................................................................................................11
C. Using of the control panel............................................................................................................. 11
1、The instruction of LCD Displayer and function of the control panel.....................................11
1.1 Explanation of the panel................................................................................................ 11
1.2 Explanation of the keys.................................................................................................. 13
2、Parameter setting.................................................................................................................. 14
2.1 Real time setting.............................................................................................................14
2.2 System setting................................................................................................................ 15
2.3 Function setting..............................................................................................................15
2.4 History............................................................................................................................ 17
2.5 Communication setting.................................................................................................. 18
3、Communication protocol.......................................................................................................18
3.1 10-bit character frame(for ASCII)..............................................................................18
3.2 Communication protocol ASCII mode:........................................................................... 18
3.3 Functions........................................................................................................................ 19
3.4 Address list..................................................................................................................... 19
D. Debugging and usage maintenance..............................................................................................20
1、Fire alarm simulation test......................................................................................................20
2、Metal diverting function test and adjustment...................................................................... 20
3、Maintenance and inspections............................................................................................... 21

AMPEON AMP-Series
~2~
A. Overview
1、Use and structural features
AMP-EE01 type Eagle Eyes Metal and Spark Diverter is the latest product of
Jiangsu Ampeon. It is manufactured whit high-quality components and materials and
incorporates the high speed microprocessor technology. It is installed on the pipe of
pneumatic transport systems for materials like fibers or tuft. It effectively detects
metallic particles and sparks, mixed or generated in the production process. So that
ensure the safety of blowing-carding production line in spinning mills or other fiber
processing production lines.
Features
Detects all kinds of metallic particles Ferrous and Non-Ferrous such as : Brass,
Stainless Steel, Copper, Aluminum.
Highly sensitive to infrared radiation emitted by fast moving small sparks in
pneumatic transport systems for textile fibers.
Intelligent identification of metals kinds, moving speed to ensure reliable
elimination.
Self-monitoring of actuator valve actuation time.
Automatic recording the real time when the fire alarm happens.
Automatic simulation and testing of spark detection system.
Water spray system is available.
Level sensor indicates when collection can is full.
RS-485 Serial interface, communicate on Mod-bus networks.
Easy installation.
Metal is diverted into collecting box and production is not interrupted.
Operates in both positive and negative pressure.
2、Technical parameter
1)Sensitivity Metal detection: Steel ball diameter more thanΦ3mm
Aluminum ball diameter more than Φ5mm
Spark detection: Spark diameter more thanΦ0.5mm spark
2)Response time: ≤200ms
3)Power supply: AC220V±10%,50HZ
4)Compressed air pressure range: 600~800KPa
5)Sound level of alarm: >60db
6)Power: <100VA
7)Requirement of the environment:
temperature -10℃—40℃, relative humidity(20-75)%RH

AMPEON AMP-Series
~3~
B. Electric wiring and installing
In order to reach the best performance of AMP-EE01 Eagle Eyes metal & spark
diverter, proper electric wiring and installing is the most important approach. Please
be sure to read this “User manual” carefully before installation. And the
installation environment and conditions for further correct measurement and
evaluation.
1、Installing
1.1 The installation of the connecting pipe of spark detectors
A)Spark detectors
B)-X95 junction box
C)Flange
D)Observation window
Figure 1:The connecting pipe of spark detectors
The connecting pipe of the spark detectors can be installed to the pipeline directly,
a side connected with the existing pipeline by flange, the other side connected with
the glass steel pipe by a clamp.
1.2 The installation of the metal detector
A)Metal detectors
B)-X90 junction box
C)Hoisting ring
D)Insulating washer
E)Hanging support
Figure 2: Parts and dimension of the metal detector

AMPEON AMP-Series
~4~
1) Metal detector can be hung up at the four hoisting rings by metal rods. Metal
detector should be installed firmly, to avoid incorrect detecting caused by the
vibrating.
2) Make sure the shielded cables for signal receiving and transferring between
the metal detector and control box is connected reliably ,then fix it without
vibrating . Connector cables are part of the sensor and have to be protected against
interferences.
3) Metal detector should keep a certain distance from the things that generate
the electromagnetic radiation such as electric motor, transformer and fluorescent
lamp etc. Furthermore, it should keep a certain distance from big moving metal
object. The cables with big current should be also kept a distance from the detector.
1.3 The installing of control box
A)Control box
B)Control panel
C)Cable Gland
Figure 3:Parts and External dimension of control box
Usually the control box is installed on the Support of the collecting box (Figure 4.E). Of
course you can also install control box on the nearby wall .
1.4 The installing of actuator unit
The actuator unit is composed of two parts: diverter and collecting box(refer to
Figure 4).The collecting box is installed under the diverter and be careful not to
reversely installed and assure that the collect valve (Figure 4:D) can act flexibly.

AMPEON AMP-Series
~5~
A) Diverter AE01
B) Collecting box
C) Observation window
D) Door
E) Support for installing the
control box
F) Wiring ducts
G) Diverter controller
H) -X98 junction box
I) Cylinder
J) Water spray nozzle
K) Water storage tank
L) Air filtration reducing
valve
M) Photoelectric switch
Figure 4: Parts and external dimension of actuator unit
The diverter is connected to the existing pipeline by square to round joint pipe
and installed with metal rods, and when installing, pay attention to the direction of
inlet and outlet. Because the diverter adopts the fast reaction pneumatic mechanism,
600~800kPa stable and clean compressed air must be provided.
The photoelectric switch is used to be a level sensor. It indicates when collection
box is nearly full.
When the displayer is show “The collecting box is full”, the collecting box must
be emptied immediately.
ATTENTION!
The collecting box should be installed to a proper site to avoid the diverted
material falling on the cotton bale or other machines, when the door of the
collecting box is opened.
ATTENTION!
When emptying the collecting box, the bottom of the diverter (especially the
movable flap) may not be touched! There is danger on injury due to sudden
movement parts.

AMPEON AMP-Series
~6~
1.5 The standard installation
Before installing the AMPEE01, you need to calculate the right distance between
the metal detector and the diverter. You can do this with the following formula.
Distance[m]= Transport velocity[m/s]*Reaction time[s]*Safety factor
The Distance is the metal detector to the diverter.
The Transport velocity is the material transport velocity in the pipeline.
The Reaction time is defined as the time taken by diverter to reach activated
position after receiving a switching impulse.
The range of the Safety factor is 1.2~1.3.
The ‘ I ’ in the following figure 5 is a piece of connection pipe, it should be
supplied by customer. The length of the pipe is normally from 2m to 4m,
corresponding to transport velocity from 10m/s to 25m/s;
A) S-02-300-Φ Pipe of spark detectors
B) M-03-374 Metal detector
C) HD-04-345 Diverter
D) B-05-600 Collecting box
E) MSD-01 Control box
F) F-08-NM Clamp hoop
G) NM-07-1200-Φ Glass steel pipe
H) K-06-374-Φ Square to circular pipe
I) Connection pipe to be supplied by user
Figure 5:Standard Installation of the AMPEE01

AMPEON AMP-Series
~7~
2.Electric wiring
-X95) Spark Detectors Junction Box
-X90) Metal Detector Junction Box
-X98) Diverter Junction Box
E) Control box MSD-01
Figure 6 a: Electric wiring of the standard installation
Figure 6 b: Electric wiring of the control box

AMPEON AMP-Series
~8~
Figure 7: Wiring terminals in the control box
Figure 8: Electric wiring of the power board
2.1 Electric wring - J0 of the control box
a) Terminal 1 and terminal 2 are the power input AC220V, terminal 3 is earthing.

AMPEON AMP-Series
~9~
ATTENTION!
We shall avoid the share of power supply with other equipments that may
produce interference radiation. We shall pay special attention to avoiding the
phenomenon that on the time of spark alarm stopping,the power supply of
instrument itself can’t be shut down for output of relay signal.
b) Terminal 4 ‘NC’ and terminal 5‘CM’ provide a couple of voltage-free normally
closed relay contacts ,that can be used to control the fan and other production
machinery. (Terminal 5 ‘CM ’ and terminal 6 ‘NO’ provide a couple of normally
opened relay contacts.)
Relay 1: This relay is activated when the fire alarm is activated.
Contact Load: U~ 250V Normal operation or Spark detected
I 5A power disconnected
c)Terminal 7 and 8 drive the electromagnetic valve of the diverter
2.2 Electric wring – J13 of the control box
a) Terminal 92 、terminal 93 and terminal 94 ,a voltage-free contact is provided
that can be use to monitor the function status of the machine. In the default
configuration Relay 2 is configured as a Ready Relay.
Relay 2: Ready relay (Recommended warning output)
You can use this switching signal to activate a warning device or to stop the
material flow through the conveying line.
Contact Load: U~ 125V Normal operation: Error or power
I 0.6A disconnected:
b) Terminal 95 and terminal 96 are connected to the Horn –strobe. Terminal 95 is
anode ,terminal 96 is cathode.
2.3Electric wiring ofthe main board to the metal detector
The -X90 wiring terminals in the metal detector junction box is connected to the
control box main board through 2 shielded cables, in which the wiring
terminals is connected to the transmitter cable (TX - cable) ;
The wiring terminals is connected to the receiver cable (RX - cable).

AMPEON AMP-Series
~10~
Figure 9: Electric wiring of the main board
2.4Electric wiring of the main board to the spark detectors
There are two spark detectors SD1 and SD2 connected in the spark detector
junction box - X95. The wiring terminals No.32 to No.37 on the main board in the
control box are connected to the terminals of the spark detector junction box - X95.
2.5 Electric wiring of the control box to the diverter
The J10 on the power board of the control box can be connected to the junction
box - X98 of the diverter. The No.83 and No.88 terminals on J10 is the DC voltage
output to drive the magnetic valve of the diverter .

AMPEON AMP-Series
~11~
Figure 10: Electric wiring of the control box to diverter
2.6 Earthing and safety
a) You should earth properly according to the safety standard of local
government. This equipment needs to be separately earthed. It is suggested that the
earthing wire be as short as possible and it is prohibited to earth it together with
other equipments.
b) While overhauling, please first shut down the power supply and interrupt the
compressed air supply. The temperature of the radiator is very high. So don’t touch
it to avoid burn.
c) After the fire alarm is activated, you should shut down the general power
supply of the procedure and then put out the fire.
d) The function test or maintenance work that needs climbing should be carried
out by more than two people.
C. Using of the control panel
1、The instruction of LCD Displayer and function of the control panel
1.1 Explanation of the panel
1)The main working page in normal operation

AMPEON AMP-Series
~12~
Figure 11: Diagram of control panel and main display
Display
Explanation
08/22/2010
16:35
The time now is 16:35 on Aug.22,Year 2010
Spark
The spark detectors
The flash will show ‘—’ to‘| ’,while the diverter is activating
Metal
8
The count of metal detector is ‘8’
【83%】
Thesensitivityparameter ofmetaldetectingis‘83%’
♬2
There are 2 fire alarm messages.
FUN→MENU
①Indicates you press the key ‘FUN’ to shift the main
menu page to parameter settings.
②‘Locked’ will be displayed after the keyboard locked.
Table 1:Instructions of the main page
The Operation LED should always light up during operation. It will not light up for
a while, when the metal is detected. If it does not light up, an error in the system.
When the instrument detect metal, there will be a presentation at the forth line
of the main page. e.g.: ‘←7.4m/s’, it means ‘the speed of the removing metal is
7.4m/s’.The speed here is just for reference and it is not the actual speed. Because
the size and the kinds of metal are different, compared with the actual speed, there
may be errors; The arrow symbols “←,→” show you which kind of the metal
detected(ferrous or non ferrous) .
2)The fire alarm page

AMPEON AMP-Series
~13~
After resetting the alarm by pressing the key , the fire alarm page will
return to the main page.
Figure 12: The fire alarm display
Display
Explanation
08/22/2010 09:
26
The spark detector alarmed at 9:26 on Aug.22, Year 2010.
spark
It means No. spark detector detected the spark
♬2 Fire!
The record of fire alarm is twice.
Table 2: Explanation on the fire alarm display
3) Pressing the key ‘FUN’ (press ‘FUN+▲’ under the state of key locked) to enter
into the Parameter setting menu , see Figure 13
·
Figure 13:Flow chat of switching the menu page
1.2 Explanation of the keys
1) Reset fire alarm key. After pressing the key, the alarm status will be
eliminated and the instrument returns to the normal working state.
2) Counter clear key. The key is used to clear the counter of metal

AMPEON AMP-Series
~14~
detector’s action.
3) Function key. The key is used to switch the menu page (refer Figure13).
If the keyboard is locked, you can enter the menu page by pressing
the ‘FUN’ and ‘▲’ keys simultaneously. .
4) Home key. After pressing the key, you will return to the main page.
5) Up key,Down key,Left key,Right key,These keys
have the functions of switching parameter settings and changing the data,and we
will call them ‘▲,▼,◄,►’ for short as follows.
2、Parameter setting
After pressing the key ‘FUN’ on the main menu page , you will turn to the menu
page of Parameter setting.
Figure 14: Parameter settings main menu
When the cursor is flashing in the‘1.
1.Real time set’ item, press the key ‘FUN’ to
enter into time settings, use the key ‘▲,▼’ to switch positions of the cursor. Press
the key ‘FUN’ entering into the page where the cursor stayed.
2.1 Real time setting
After you enter into the time setting menu page, press ‘◄, ►’ turning to switch
among the month, date, year, hour, minute. Through pressing the key ‘▲, ▼’, we
can change the value of the data. After finishing the setting of the time, press the
‘ESC’ key to return to the main page.
Figure 15: Time settings menu

AMPEON AMP-Series
~15~
2.2 System setting
After you enter into the system setting menu page , press the two keys ‘▲,
▼’can change for the up and down item shifting.
Figure 16a: System settings menu
Figure 16b: System settings menu
1) The cursor is flashing in the ‘ 1.
1. CHINESE 中 文 ’item, shows that we can
choose according to the language, press ‘◄ ,►’,then we can select the system's
language between Chinese and English.
2) The cursor is flashing in the ‘2.
2.key lock’ item, shows that we can lock the
keyboard now, pressing the key ‘◄,►’ to select ‘ON’ or ‘OFF’.
3)When the cursor is flashing in the ‘3.Auto RST’ item, shows that we can press
the key ‘◄,►’ to enable or disable the ‘Auto RST’. When the ‘Auto RST’ shows ‘ON’
(refer to Figure 16b), there will be an order as ‘RST time 00:00’ appeared at the
bottom of the page .You can use the key ‘▲,▼’ to shift the flashing items. Press "◄,
►" in a 24-hour time automatically reset time settings. If the automatic reset
function is enable, the metal count value will be reset to zero automatically at the
set time every day.
2.3 Function setting
After entering function setting menu, press ‘▲, ▼’can change for the up and
down item shifting.

AMPEON AMP-Series
~16~
Figure 17:Function setting menu
Parameter
Settings
Factory setting
1.Sensitivity
0-99 %
69%
2.Activate
0.00s-3.00s
0.00S
3.Reset
1.00s-3.00s
1.50S
Table 3: Function parameter value table
1)Sensitivity
①The metal detecting Sensitivity Parameter range is 0-99%,the lowest is 0 and
the highest is 99%. The percentage is higher, the sensor is more sensitive.
②You can set the ‘Sensitivity’ parameter according to the actual requirement.
The value in the range 40-65% can satisfy most of the users in spinning mills.
2)Activate
‘Activate’ parameter refers to the additional time by the software from detects
the metal is detected to the diverter is actuated. Use the key ‘◄, ►’ can set the
parameter. The setting precision of the activate parameter is 0.01S and the setting
range is 0.00S-3.00S. If press ‘◄, ►’for 3 seconds simultaneously, the data would
change continuously.
Warning:
The parameter is closely related to the length of connection pipe and the
Transport, so if it was set improperly, that might cause the diverter acts
incorrectly.
3)Reset
‘Reset’ parameter refers to the additional time by the software from the
activated position to the normal position of the movable flap. Use ‘◄, ►’ to set the
parameter of ‘Reset’, the range is 1.00S-3.00S and the setting precision is 0.01S.If
press ‘◄, ►’simultaneously for 3 seconds, the data would change continuously.
Warning:
If the parameter is set too low, maybe that material including the metal can not
be diverted, but if the parameter is set too high, more contaminated material

AMPEON AMP-Series
~17~
will be diverted.
4)Spark test
When the cursor flashes at ‘ 4.
4. Spark test’, press the key ‘FUN’ entering into the
spark testing page, then you can take the simulation test with the fire alarm function
of the machine.
Figure 18: Spark testing page
① When the cursor flashes in the item of spark SD1,press the key ‘►’,and then
the test lamp in the spark detector junction box will light up. If the spark SD1 worked
normally, the host machine should send out audible and visual alarm, at the same
time the diverter actuated and the Relay 1 is activated .They would reset
automatically 2-3seconds later.
②When the cursor flashes in the second item of Spark SD2,press ‘►’ key, and
the test lamp will be light up in the same way, then make spark test to Spark SD2.
③You can press the key ‘►’repeatedly to make sure that if SD1 &SD2 can be
worked normally, if you find something wrong with the spark detector or the
sensitivity is lower, you should mend it promptly.
2.4 History
In the menu setting, when the cursor flashes at ‘4.
4. History ’ item, you can press
the key ‘FUN’, then enter into the History inquiring page.
Read the recent records of metal detected and spark alarming.
Figure 19: History inquiry

AMPEON AMP-Series
~18~
1)120 ms, → 6.4 m/s ", this message tells you how long the diverter took to
move from the normal to the activated position and the metal transport velocity just
detected is 6.4 m/s . The arrow symbols “←,→” show you which kind of the
metal detected(ferrous or non ferrous)
2)08 / 21 / 2010 09 : 26 records the time of the latest fire alarm ,press the key
‘►’ , you can turn to the previous fire alarm history.
3)Press ‘ESC’ return to the main page.
2.5 Communication setting
There is a built-in RS-485 serial interface, marked J7 is located on the
main board (see figure 9).
When the cursor flashes in NO.5 ‘ 5.com set’ item in parameter setting menu,
you can enter into to the Communication setting page by press ‘FUN’,’▲’
simultaneously.
Figure 20 : Communication setting menu
1) Press ‘▲,▼’ can select the communication address which can be set from
No1 to No.15 .
2)RS-485 can be set up to communicate on Modbus networks, baud rate is
19200bit/s,and the communication protocol uses Modbus ASCII mode ,protocol <7,
N,2 >.
3、Communication protocol
3.1 10-bit character frame(for ASCII)
Start
bit
0
1
2
3
4
5
6
Stop
bit
Stop
bit
3.2 Communication protocol ASCII mode:
STX
Start character =’:’(3AH)
Address Hi
Communication address:
8-bit address consists of 2 ASCII codes
Address Lo
Function Hi
Command Code:
Table of contents
Other Ampeon Industrial Equipment manuals