Analog way VIO 4K User manual

VIO 4K - Ref. V701
QUICK START GUIDE
Thank you for choosing Analog Way and the VIO 4K. By following these simple steps, you will be able to set up and
use within minutes your brand new Video Processing Tool Box. Discover the VIO 4K capabilies and intuive interface
designed to meet all needs in terms of image processing and conversion.
• 1 x VIO 4K (V701)
• 1 x Power supply cord
• 1 x Ethernet cross cable (for device control)
• 1 x MCO 5 pin connector
• 1 x Web-based Remote Control Soware included and hosted on the device
• 1 x Rack mount kit (the parts are stowed in the packaging foam)
• 1 x User manual*
• 1 x Quick start guide*
* The User Manual and the Quick Start Guide are also available on www.analogway.com
You can quickly control and congure your new VIO 4K unit from the VIO 4K unit itself, via the front panel buons and
the front panel menu tree.
CAUTION!
Addional support such as
the rear rack or slide rails is
strongly recommended for all
mounng applicaons.
Go to our website to register your product(s)
and be noed about new rmware updates:
hp://bit.ly/AW-Register
• Rotate the front panel control knob and press the
ENTER and EXIT/MENU buons to navigate through
the menus and adjust your setup.
• Select the input to display on the output by choosing
the corresponding INPUT SELECTION buon, or use
BLACK to output to the screen background color.
1. Set up your outputs and outputs plugs
2. Set up your inputs and inputs plugs
3. Import frames and manage frame features
4. Set up the audio and manage A/V mapping
5. Access technical support informaon and device
control services
6. Create custom formats, manage transions, adjust
the screen background color …
7. Manage the device sengs and control funcons like
LAN and the Safe Input Select feature
8. Adjust the LED wall area of interest (AOI) and set up
the view
9. Save and load preset conguraons
10. Check your current VIO 4K conguraon
QUICK SETUP & OPERATION
WHAT’S IN THE BOX
Front panel menus on LCD display
10
1 2
67
3
49
58
• Switch ON the unit to access the front panel menu tree:

Scroll knob:
Navigate the menu tree
(menus, sengs and
status pages)
Slot for oponal audio card*:
XLR audio expansion interface
or Dante audio expansion interface
(Q2 2017)
Slot for oponal video card 1*:
supporng input and output
formats up to 4K@60Hz 4:4:4
Slot for oponal video card 2*:
supporng input and output formats
up to 4K@60Hz 4:4:4
Funcons:
Pan Zoom: Display the view sengs menu
Audio: Display the audio sengs menu
Test Paern: Display the test paern menu
Monitor: Access the front panel monitoring menu
Standby:
Set the device to standby
(or wake up the device when in
standby mode by holding the
buon for several seconds)
Line In:
Audio input plug
Headphone:
Prelisten to audio inputs
and outputs
USB:
Host: USB host
interface (USB key)
Device: USB device
interface (other USB)
Input 7/HDMI:
HDMI input up to
4K@30Hz 4:4:4
LCD display:
Navigate the menu
tree and monitor input
sources and outputs
Input selecon:
#1 to #9: Select the input to
display on the output
Black/Color: Output to black
(display no input)
Control:
Exit/Menu: Return to
previous menu or exit
without saving
Enter: Validate a menu or
conrm the new sengs
Power supply:
Internal, universal, automac,
100-240 VAC 3,2A 50/60Hz;
120W (UL, CSA, GS, CE),
AC Main switch with Fuse
(cartridge 5x20 4A Fast 250VAC) Inputs:
- DisplayPort up to 4K@30Hz
- HDMI up to 4K@30Hz
- Universal Analog
- Video Opcal SFP Module cage
- SDI and SDI loop-through
- DVI Dual-Link up to 2560x1600@60Hz
Outputs:
- DisplayPort up to 4K@30Hz
- HMDI up to 4K@30Hz
- Universal Analog
- Video Opcal SFP Module cage
- SDI (Compliant Level A & B)
- DVI Dual-Link up to 2560x1600@60Hz
- DVI, HDMI & HD15 output plugs
available as video loop-through
Genlock:
Genlock input connector
Tally:
- 2 x GPO
- 1 x ON/OFF
RS232 port:
Serial interface connector
for 3rd party controllers
Connecvity:
Ethernet: LAN interface connector
Device sync: Dual device synchronizaon
Shortcut:
Freeze: Freeze/unfreeze
the output
Quick Frame: Acvate
the Quick Frame funcon
CAUTION:
Avoid disconnecng the power source (AC input) unl
the unit is in standby mode. Failure to do so could
result in memory data corrupon.
* See the VIO 4K User Manual for more details
VIO 4K - REF. V701 /
FRONT & REAR PANELS DESCRIPTION

OPERATION OVERVIEW
AUDIO MANAGEMENT
VIEW SETTINGS
Set up the "View" of your inputs in the screen:
• Use Pan and Zoom to size and posion the view in your
screen.
• Apply a color Eect or enable a Flip movement on the view
of a live input.
• S a v e your view sengs and recall them later on any input
via the View Bank.
• Create presets of your input and view sengs to load them
readily at runme.
Audio in & out sengs:
Set up the audio independently of the video content:
• Manage up to 4 embedded channel pairs per input/output.
• Congure the auxiliary audio for each audio pair.
• Set up an audio prelist and prelisten to your content on the
headphone output.
A/V mapping:
Select an A/V mapping mode to map an audio stream to the
output (embedded audio by A/V mapping):
• Follow mapping mode: The audio content of the output will
follow the A/V mapping of the input selected at runme.
• Direct roung mode: The audio content of the output is
set once and for all, independently of the input selected at
runme.
Enter the OUTPUTS menu to set up your output(s).
Output format and rate:
• Choose the format and rate generaon mode and then adjust
the format sengs accordingly.
• Go to the CUSTOMIZE menu and create your own custom
format when the required format is not available in the list of
predened output formats.
Area of interest:
Adjust the acve area of your display in the output format.
Image correcons:
• Adjust the gamma correcon of your output image (especially
useful if seng up a LED Wall).
• Use the advanced color adjustments like color temperature,
brightness and contrast to truly ne-tune your output image.
• Enter the INPUTS menu to have an overview of all your inputs
and their status.
• Select AUTOSET ALL to launch the automac detecon of all
plugs of all inputs.
Input sengs:
• Select an input to set up the input individually.
• Enter the Plug Sengs menu to select the type of input signal
by plug, enable or disable HDCP negoaon on the sources
connected to the input plug, and manage the plug’s preferred
EDID formats.
• Select the Image Sengs menu to opmize the input image
signal and correct for the image aspect rao and size.
BUTTON COLOR USAGE
OUTPUT SETUP INPUT SETUP
Solid red: Acve input, funcon or shortcut
Solid green:
OFF:
Blinking:
Available input, funcon or shortcut
Not available input, funcon or shortcut
Device inializing
SOURCE CONTROL
• Freeze the output and Monitor inputs and outputs on the
front panel LCD display.
• Customize the Transion Type and the Transion Duraon to
smoothly transion between sources.
• Use Frames to transion through frame or acvate the Quick
Frame funcon to quickly display a frame on the output.
• Select the input to display on the output by choosing the
corresponding INPUT SELECTION buon.
TIP: Try to use nave resoluon of your screens/projectors to
avoid addional scaling.
TIP: Crop the image and use a display aspect rao to correct
for the image aspect rao aer crop.
TIP: Use Follow mapping mode to map audio streams and
input plugs and set up the A/V mapping of your inputs.
TIP: Enable the Safe Input Select front panel control to lock
the selecon of inputs without signal.

For more details on features, funcons and procedures, please refer to the VIO 4K User Manual or visit our website:
www.analogway.com Firmware v01.20 - 03/21/2017
140166 - V701-QSG
This Analog Way product has a 3 year warranty on parts and labor, back to factory. This warranty does not include faults resulng
from user negligence, special modicaons, electrical surges, abuse (drop/crush), and/or other unusual damage. In the unlikely
event of a malfuncon, please contact your local Analog Way oce for service.
The Web RCS remote control soware comes embedded into your VIO 4K unit and you simply need a web browser and a standard
LAN network (or an Ethernet over USB connecon) to connect.
Connecng to the Web RCS (LAN)*
To connect to the Web RCS of your VIO 4K using a standard LAN
network:
1. Connect your computer to the VIO 4K using the provided
Ethernet cable
2. On your computer, open a web browser that supports
Flash® player
3. In this web browser, enter the IP address of your VIO 4K
(displayed in the front panel LCD screen).
The Web RCS connecon should start.
Manual setup: If your computer is not set to DHCP (automac
IP detecon) mode, you need to setup LAN manually to be able
to connect:
(1) Set up your VIO 4K
1. Go to Control > Connecon > LAN Setup on the front panel
menu tree
2. Disable the Obtain IP via DHCP funconality
3. Edit the LAN sengs of your VIO 4K unit, for example:
• IP address: 192.168.2.140
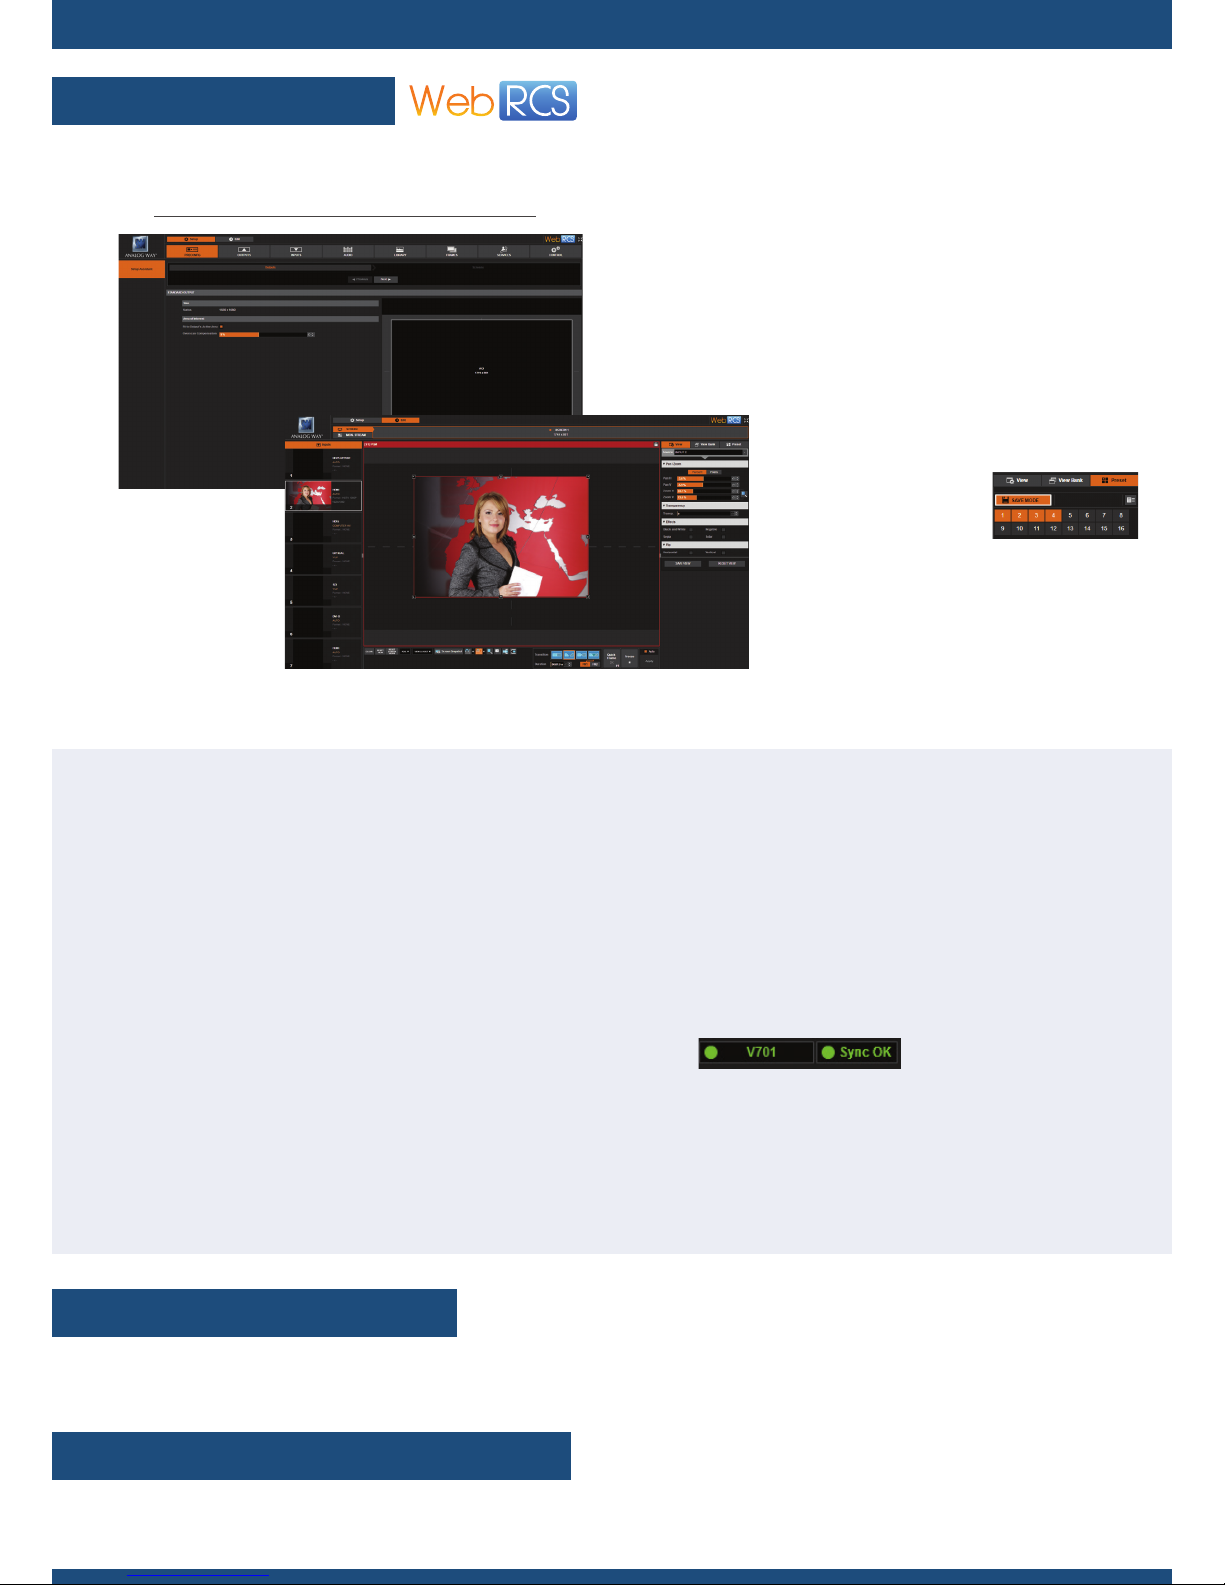
You can use the Web RCS interface to remotely control and congure your VIO 4K unit from a PC or tablet via LAN or via USB.
SETUP MENU
EDIT MENU
WARRANTY AND SERVICE
WEB RCS INTERFACE
GOING FURTHER WITH THE VIO 4K
• Set up your outputs and create
custom formats
• Set up your inputs and input plugs
• Set up the audio and manage A/V
mapping
• Import frames and manage frame
features
• Access technical support
informaon
• Manage the device sengs and
control funcons
Web RCS interface loaded into your web browser
Put everything together in the screen:
• Resize and posion the view
• Save and recall view sengs
• Save and recall presets
• Monitor input sources
• Select inputs
• Manage transions
• Freeze the output
• Display a Quick Frame
• ...
• Gateway: 192.168.2.160 • Netmask: 255.255.255.0
(2) Set up the LAN adaptor of your PC
1. Open your LAN adaptor sengs
2. Assign an IP address to your computer on the same network
and subnet as your VIO 4K, for example:
• IP address: 192.168.2.16 • Gateway: 192.168.2.150
• Netmask: 255.255.255.0
You should be able to connect now.
Once the connecon has been established, the Web RCS inter-
face will load into your web browser. The 2 icons at the boom
right corner of the screen indicate that the Web RCS is ready to
be used:
• V701: Turns green when connected
• Sync OK: Turns green when the Web RCS has nished syn-
chronizing
If you are having trouble synchronizing, try clearing the cache
and refreshing the page (CTRL+F5 shortcut on most browsers).
* Please see the User Manual for informaon on how to connect via USB.
4. Select Apply to save and apply the new sengs.
Other manuals for VIO 4K
2
Table of contents
Other Analog way Media Converter manuals

Analog way
Analog way VIO 4K User manual

Analog way
Analog way OTR401 User manual

Analog way
Analog way POWER 1024 User manual

Analog way
Analog way HD SCAN XTD920 User manual

Analog way
Analog way VIO 4K User manual

Analog way
Analog way SmartMatriX User manual

Analog way
Analog way EKS-4K User manual

Analog way
Analog way Digi Scan 1600 User manual

Analog way
Analog way QuickMatriX QMX150 User manual

Analog way
Analog way Alta ZEN100 User manual