Antari S-100II User manual

SILENT S-200/S-100II
I d e a l s n o w
Read and save these instructions
Bitte lesen Sie diese Anweisungen und bewahren Sie sie gut auf
Lisez et Gardez ces instructions

User Manual
Antari S-100II Snow Machine
& S-200 Silent Snow Machine
Introduction
Thank you for choosing an ANTARI Special Effects
Machine. You now own a rugged and powerful state-
of-the-art machine. Prior to use, we suggest that you
carefully read all of the instructions. By following
the suggestions found in this user manual, you can
look forward to the reliable and satisfactory
performance of your ANTARI Snow S-100II and S-
200 Silent Snow machine.
Please follow these operation, safety and
maintenance instructions to ensure a long and safe
life for both Snow Machines; the S-100II and the S-
200.
CAUTION
!Keep this device dry.
! For inside use only. Not designed for outside use.
! For the 110V models, use 3-prong grounded
electrical outlet only. Prior to use take care to
determine that the unit is installed at the rated
voltage.
!Always unplug your ANTARI Snow Machine before
filling its tank.
!Keep the snow machine upright.
!Turn off or unplug when not in use.
!This machine is not water- or splash-proof. If
moisture, water, or snow liquid gets inside the
housing, immediately unplug the unit and contact a
recommended service technician or your ANTARI
dealer before using it again.
1
I d e a l s n o w
DANGER OF ELECTRIC SHOCK!
Keep this device away from rain
and moisture!
Never open the housing!

! There are no user serviceable parts inside. Refer to
your ANTARI dealer or other qualified service
personnel.
!For adult use only. This machine must be installed
out of the reach of children. Never leave the unit
running unattended.
!Never aim the output nozzle directly at people.
!Locate the machine in a well-ventilated area. Never
cover the unit's vents. In order to guarantee
adequate ventilation, allow a free air space of at least
20 cm around the sides and top of the unit.
!Never add flammable liquids of any kind (oil, gas,
perfume) to the snow liquid.
Pay attention to all warning labels and instructions
printed on the exterior of your ANTARI S-100II and
S-200 Snow Machines.
!Use only the high-quality snow liquid that your
dealer recommends.
!Always make sure there is sufficient liquid in the
machine's liquid tank.
!If your ANTARI machine fails to work properly,
discontinue use immediately. Drain all liquid from
the tank, pack the unit securely (preferably in the
original packing material), and return it to your
ANTARI dealer for service.
Unpacking & Inspection
Open the shipping carton and verify that all
equipment necessary to operate the system has
arrived intact.
If any equipment is missing contact your ANTARI
dealer immediately.
The shipping carton should contain the following
Items:
1. Snow machine with power cable
2. SC-2 volume remote controler
2
DANGER OF BURNING!
Never touch the device during
the operation!
DANGER OF EXPLOSION!

3. Fluid tank
4. Hanging bracket
Before beginning your initial setup of either the
ANTARI S-100II Snow Machine or the ANTARI
S-200 Silent Snow machine, make sure that there is
no evident damage caused by transportation. In the
event that the unit's housing or cable is damaged, do
not plug it in and do not attempt to use it until after
contacting your ANTARI dealer for assistance.
Technical Specifications
Setup
Remove all packing materials from shipping box.
Check that all foam and plastic padding is removed,
especially in the nozzle area.
!Place the machine on a flat surface and remove the
liquid tank cap.
!Fill with ANTARI SL-5 Snow Liquid, ANTARI SL-
5A Premium Snow Liquid or other dealer-
recommended high-quality water-based snow or
foam fluid. Any other types of fluid can damage the
unit. When filled, place cap back on liquid tank.
!Firmly attach the 4-pin connector on the remote
control cable to the proper input on the rear of the
machine.
Model S-100II S-200
Power Supply AC100V/AC120V/AC230V/AC240V,50Hz-60Hz
Heater 600W
Output Volume 140ml/min
Tank Capacity 5liters
Fluid Consumption
Weight
Dimensions (LxWxH)
Remote Included
On-Board
600W
5liters
600 seconds/ liter
10 kg 10kg
505 x 276 x 227.5 mm 525x276x228 mm
SC-2 SC-2
10 meter Remote
extension EXT-6 EXT-6
DMX On-Board
Warm-up Time N/A N/A
650 seconds / liter
140ml / min
3

Installation
Both snow machines may be installed at floor level or
suspended overhead. When mounting the unit
overhead, it is important that the snow does not shoot
directly at anyone's face. Whatever installation method
you choose, do not allow the unit to have more than a 15
degree angle of inclination.
Important: Always monitor tank fluid level during
operation. Running a snow machine or a foam machine
without fluid can permanently damage the unit.
If you experience low output, mechanical noise or no
output at all, unplug immediately. Check fluid level,
the external fuse, remote connection, and power from
the wall. If all of the above appears to be O.K., plug the
unit in again. If snow does not come out after holding
the remote button down for 30 seconds, check the hose
attached to the tank to make sure there is fluid going
through the hose. If you are unable to determine the
cause of the problem, do not simply continue pushing the
remote button, as this may damage the uit. Reurn the
machine to your Antari dealer.
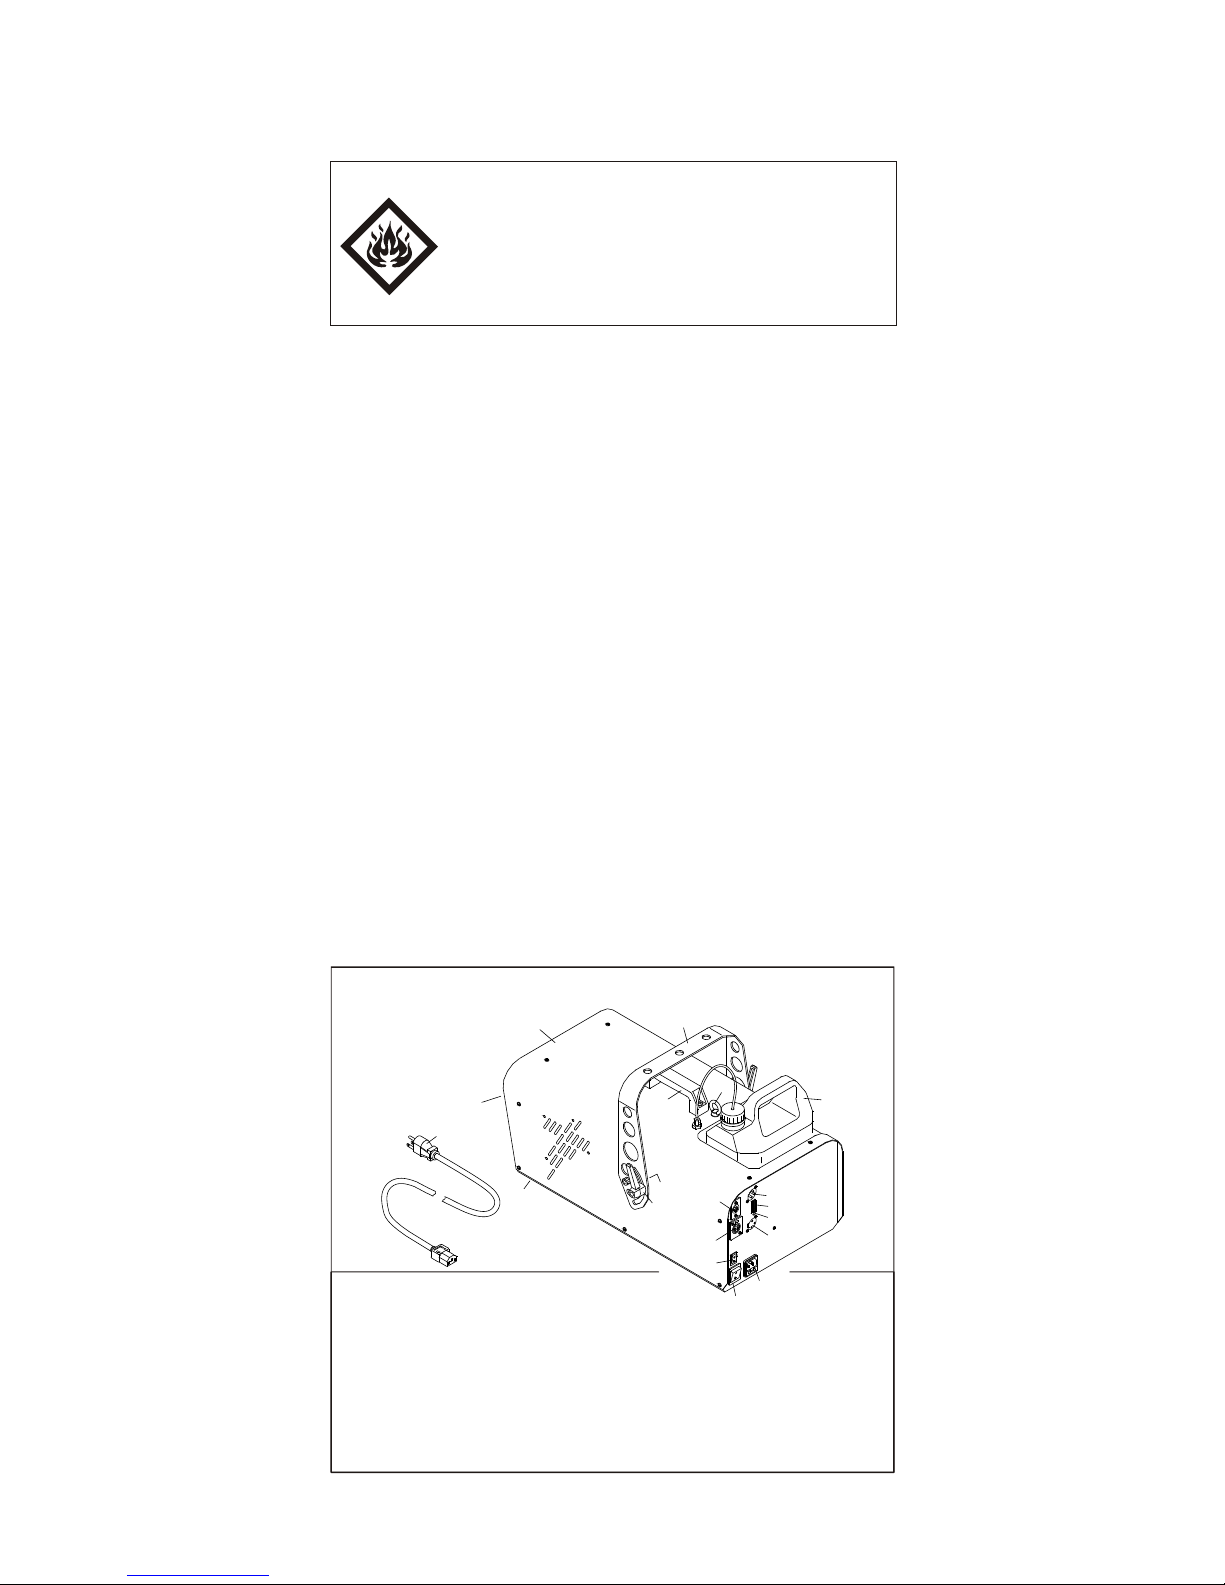
S-200 EXTERNAL VIEW
1
2
3
4
5
6
7
1. Housing
2. Escape Nozzle
3. Hanging Bracket
4. Handle
5. Safety Ring (M8 Screw)
6. Washer
7. Tightening Screw
8. Tank
9. Control Inlet Socket
( 3-pin XLR for DMX)
8
9
10
11
12
17
13
14
15
16
18
19
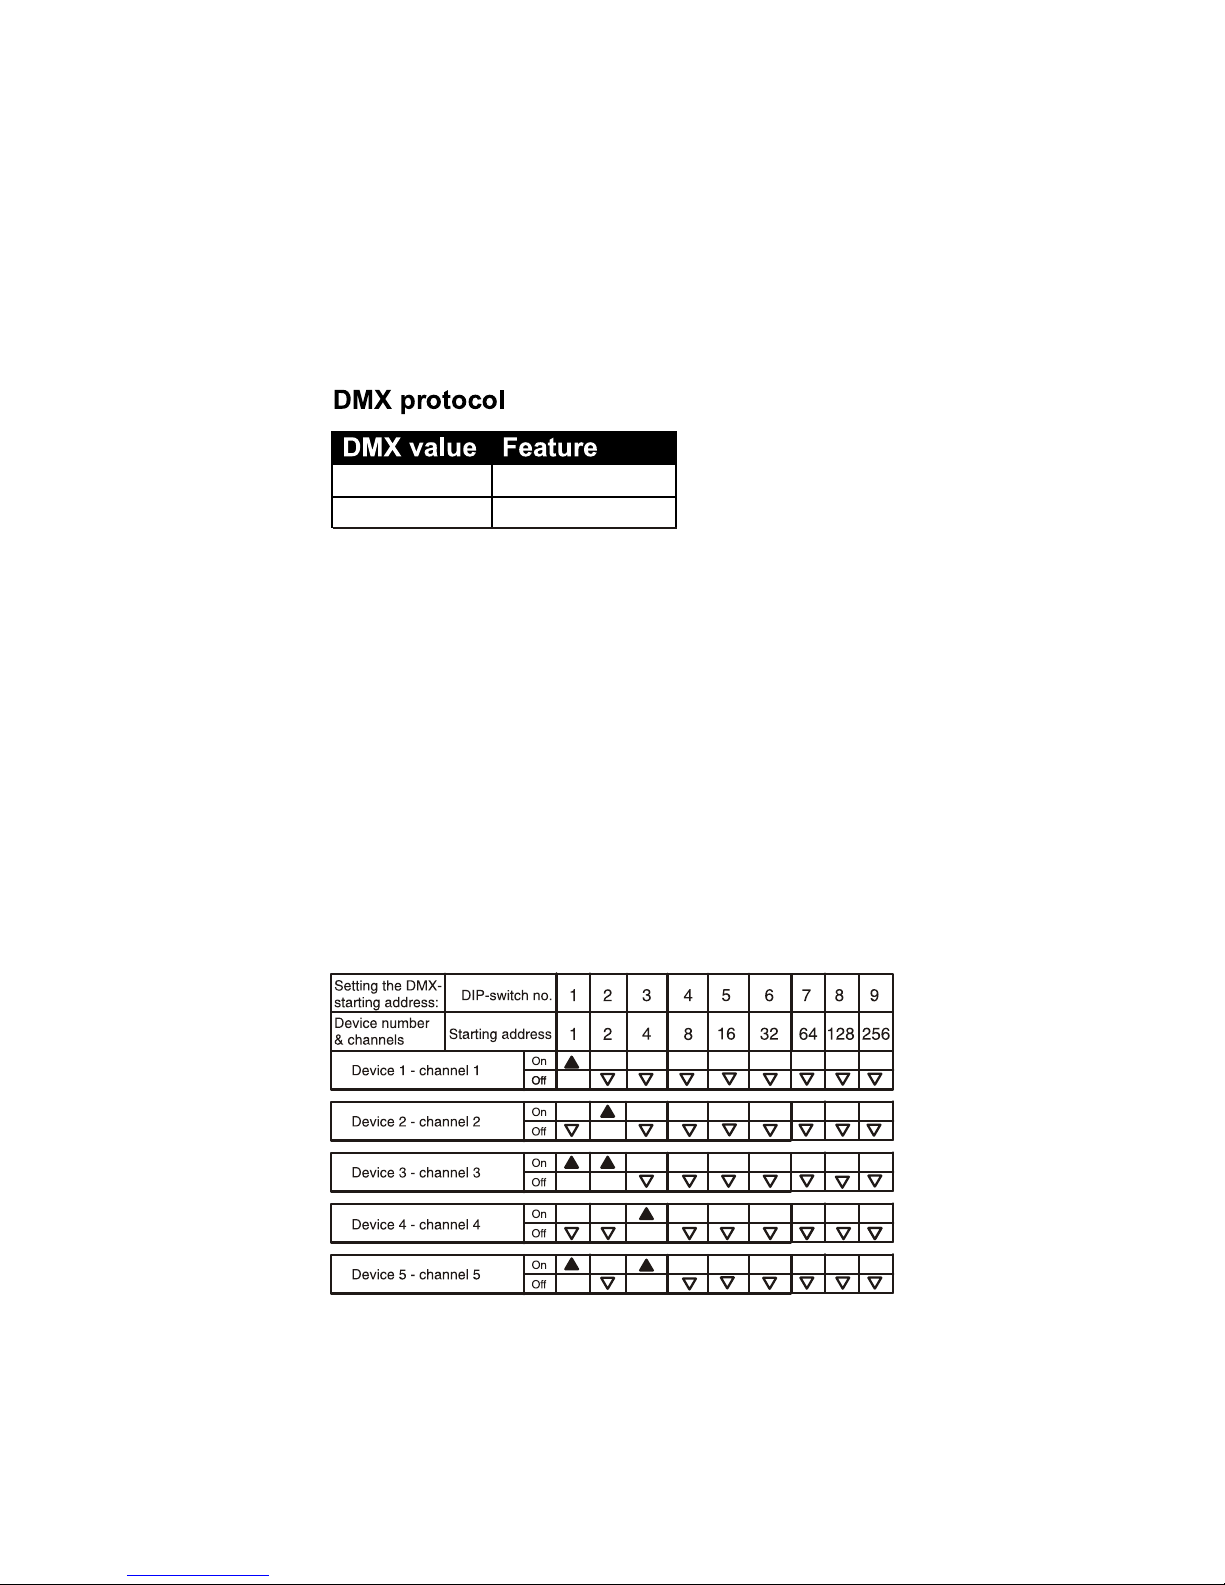
10. DMX DIP Switches
11. Indicator
12. Control Outlet Socket (3-pin XLR for DMX)
13. Control Inlet Socket (4-pin XLR for remote)
14. Control Outlet Socket(4-pin XLR for remote)
15. Rocker Switch/Volume
16. Rocker Switch/Power
17. Power Inlet Socket
18. Foot
19. Power Cord and Plug
4
DANGER OF FIRE!
When installing the device, makesure there
is no highly-inflammablematerial
(decoration articles, etc.)
Within a distance of min. 0.5 m.

Cable length: 10 m
Connector: 4-pin XLR
Functions: On/Off and Volume
Compatible with:
S-100II and S-200
Volulme Knob
Indicator/Red
4-pin XLR Rocker Switch
Snowing
Indicator/Green
Operation
emit snow, press
the appropriate button on the remote for the desired
length of time.
!Two indicators on the remote control indicate power
and operation status.
!Use the adjustable knob on the remote control to
regulate the volume of snow output.
**When the volume is low, it will produce smaller
snowflakes. When desired volume is increased, it
will Produce bigger snowflakes accordingly.
Remote Operation The units can be controlled by
either DMX or the SC-2 volume remote control. See
the appropriate topics below:
1. SC-2 Volume Remote Control
Connect the remote control's male 4-pin plug to the
machines' INPUT socket. When the machine is
turned on, you have control of ON/OFF Volume
functions of the S-100II or S-200 Snow Machine.
!Plug power cable into a grounded electrical outlet.
Turn power switch on rear of unit to
5
SC-2
Cable Length: 10 m
Connector: 4-pin XLR
Function: On/Off and Volume
Compatible with: S-100II/S-200
Volume Knob
Indicator/red
4-pin XLR Rocker Switch
Snowing
Indicator/green
Tank cap
Tank
Filter
PU Tube
Adaptor
with Nut
Assembling Tank & Filter
Please note that "adaptor with nut"
set must be tightly connected.
Assembling Hanging Bracket
Assemble 4 washers on both inner sides
of the hanging bracket with M8 screws
on outer sides as indicated.
Hanging Bracket
M8 Screw
Tightening
Screw
Washer

6
c) Addressing:
Each device occupies 1 channel. To ensure that the
control signals are properly directed to each device,
they require addressing. This is to be adjusted for
every single device by changing the DIP-switches as
set out In the table below.
The starting address is defined as the first channel
from which the device will respond to the
controller.Please make sure that you do not have any
overlapping channels in order to control each device
correctly and independently from any other fixture
on the DMX data link. If two, three or more devices
are addressed Similarly, they will work similarly.
Occupation of the DIP-switches:
Maintenance
1.Do not allow the snow or foam liquid to become
contaminated. Always replace the caps on the liquid
container and the snow machine liquid tank
immediately after filling.
2. DMX control
a) Connect the DMX cord to the DMX-IN socket on
the rear of the machine.
b) Test the system by activating the snow system's
selected DMX channel. When the channel value is
increased the snow machine should produce snow at a
steadily increasing rate. It will reach 100% once the
Channel is set to 255.
0-128
129-255
OFF
ON

2.Before storing away after each operation, rinse the
system with pure water and let it pump for at least 1or
two minutes. This step helps to ensure a longer life-
span of the motor
3.It is strongly recommended to regularly clean the
dust/residue around snow machines' vent holes (on
both sides of the machine). Simply use a small brush,
a toothbrush for example, and gently brush in the
direction from top to bottom. This step helps to
ensure that minimal debris will get into the machine
or causes clogging.
Snow Liquid
Depending on the desired effect, use either ANTARI
SL-5 Snow/Foam Liquid for normal snow or
ANTARI SL-5A Snow Liquid for fast-dissipating
snow.
Save these instructions.
7

8
I d e a l s n o w

9

10

11

12
1
2
3
4
5
6
7
8
9
10
11
12
13
14
15
18
19
S-200

13

14
On
Off
On
Off
On
Off
On
Off
On
Startadresse
Off
1 2 4816 32 64 128 256
DIP-Schalter
Nr. 1 2 3456789

Mode d'emploi
Antari S-100II/S-200 Machine Neige
Nous vous flicitons pour l’achat de votre nonvelle
machine neige d’ ANTARI.
Introduction
Nous vous remercions d'avoir choisi une machine à
neige d'ANTARI. Vous êtes en possession d'un produit
robuste et puissant. En vue d'utiliser correctement votre
nouvel appareil, veuillez lire attentivement ce mode
d'emploi. Si vous respectez les instructions suivantes,
vous profiterez d'une performance solide et
convaincante de votre machine à neige d'ANTARI pour
de nombreuses années.
Pour assurer la longévité et le bon fonctionnement de
votre machine à neige, veuillez lire attentivement les
instructions suivantes concernant le maniement, la
sécurité et l'entretien.
Instructions de sécurité
!Protéger de l'humidité.
!L'appareil a été conçu pour un emploi dans des locaux
clos. Ne pas utiliser à l'extérieur.
!Pour les modèles de 110V utilisez uniquement des
prises de courant à terre à 3 broches. Avant la première
mise en marche, assurez vous que l'appareil soit
branché à l'alimentation correcte.
!Débranchez l'appareil avant de remplir le réservoir.
Assurez vous d'installer la machine à neige toujours en
position droite.
!Eteignez l'appareil ou débranchez-le du secteur, quand
il est hors d'usage.
I d e a l s n o w
15

!Si de l'humidité, du liquide ou du liquide à neige devait
pénétrer à l'intérieur de l'appareil, débranchez
immédiatement l'appareil et contactez un technicien ou
votre revendeur d'ANTARI avant de le réutiliser.
!La machine n’est pas impermable. Si de l’humidit, du
liquide ou du liqide neige devait pentrer l’intrieur de
l’appareil, dbranchez immdiatement l’intrieur de
l’appareil, dbranchez immdiatement l’appareil et
contactez un technicien ou votre revendeurd’ ANTARI
avant de le rutiliser.
! L'appareil n'est prévu que pour un usage de personnes
adultes. Installez-le hors de l'atteinte des enfants. Ne
jamais faire marcher sans surveillance.
!Installez l'appareil à un endroit bien aéré. Ne jamais
couvrir les orifices d'aération. Pour garantir une
aération suffisante, laissez libre un espace de 20 cm
autour et au-dessus de l'appareil.
!Ne jamais entremêler des liquides enflammables à
composants gazeux ou huileux au liquide à neige.
Veuillez suivre toute instruction de sécurité appliquée
sur le boîtier de votre
Machine à Neige d'ANTARI
!Employez uniquement des liquides à neige de haute
qualité à base d'eau recommandés par votre revendeur.
!Faites attention qu'il y ait toujours suffisamment de
liquide à neige au réservoir.
!Si votre machine à neige ne devait plus travailler
correctement, éteignez immédiatement. Videz
complètement le réservoir, emballez soigneusement
l'appareil (au mieux dans son emballage d'origine) et
envoyez-le á votre revendeur d'ANTARI.
!Ne jamais braquer le bec de l'appareil directment sur
des personnes.
RISQUES D'EXPLOSION!
16

Déballage & Inspection
Ouvrez le carton extérieur et assurez vous que toutes les
pièces n'aient subi aucun dommage durant leur
transport. Assurez-vous que le carton d'expédition
contient le articles suivants:
1. S-100II ou S-200 Machine à Neige
2. SC-2 Télécommande
3. Réservoir de liquide
4. Lyre de fixation
En cas de livraison endommagée ou incomplète,
toujours contactez immédiatement votre revendeur
ANTARI.
Caractéristiques Techniques
!Enlevez tout matériau d'emballage. Assurez vous
d'avoir enlevé toute la mousse et le rembourrage en
plastique, sûrtout au bec de sortie de la machine.
!Placez la machine à neige sur une surface plane et
dévissez le couvercle du réservoir du liquide à neige.
!Faites attention à la marque de niveau maximal de
liquide au dos de la machine à neige.
!Remplissez le réservoir de liquide à neige d'ANTARI
ou d'un autre liquide à neige de haute qualité à base
d'eau. Refermez le réservoir.
Connectez le câble de la télécommande à la prise
Installation
17

Important: Observez toujours le niveau de liquide à
neige au réservoir. Un emploi sans liquide à neige peut
endommager la machine.
Si vous apercevez un débit trop faible, un bruit de la
pompe ou la manque totale de débit, débranchez
immédiatement votre machine. Vérifiez le niveau de
liquide, le fusible externe, la connection à la
télécommande et l'alimentation au secteur. Si tout
apparaît être correct, branchez de nouveau. S'il n'y a
aucune production de neige après que vous avez pressé le
bouton sur la télécommande pendant 30 secondes,
vérifiez si le liquide passe par le disperseur qui est
attaché au réservoir. Si vous n'arrivez pas á déterminer la
cause du problème, ne continuez pas à pressez le bouton
de la télécommande. Cela pourrait endommager votre
machine. Envoyez la machine à retour à votre revendeur
d'ANTARI.
S-200 Aperçue des parties
DANGER D'INCENDIE!
Assurez-vous lors du montag gu’il n’y
ait pas de matriau facilement
inflammable en contact avec le botier
(distance minimale 0,5 m)
1. Bote
2. Tuyre
3. Lyre de fixation
4. Bras
5. Oeillet de scurit (M8)
6. Rondelle
7. Vis de fixation
8. Rservoir de liquide
9. Entre DMX (3-ple XLR)
1
2
3
4
5
6
7
8
9
10
11
12
17
13
14
15
16
18
19
10. Interrupteurs
11. Indicateur
12. Sortie DMX (3-ple XLR)
13. Entre tlcommande (4-ple XLR)
14. Sortie tlcommande (4-ple XLR)
15. Contrle de Volume
16. Interrupteur ON/OFF
17. Alimentation
18. Pied
19. Cble d’alimentation
S-200
18

Maniement S-100II, S-200
!Branchez la fiche d'alimentation de la machine à
neige dans une prise de courant avec terre. Mettez le
commutateur d'alimentation à l'arrière de l'appareil
à "ON"
!Pour émettre de la neige, pressez le bouton
correspondant sur la télécommande aussi longtemps
que vous désirez la durée de débit.
!Deux lampes témoin sur la télécommande indiquent
la mise sous tension et la marche.
!Utilisez le potentiomètre sur la télécommande pour
régler le volume du débit de neige.
Télécommande SC-2
Connectez le câble avec fiche à 4 pôles de la
télécommande dans la douille d'entrée.
Contrôle par DMX-512
Vous pouvez commander le S-100II/S-200 via vôtre
contrôleur DMX. L'appareil occupe 1 canal de
contrôle.
Obturateur
Filtre
Tuyau
L'adapteur et l'écrou doivent
être connecter solidement.
Lyre de fixation
Vis M8
Vis de la
lyre
Rondelle
Volume
Indicateur/rouge
4-fach XLR
Indicateur/vert
Fixez les 4 rondelles avec les vis M8.
19
This manual suits for next models
1
Table of contents
Languages:
Other Antari Dj Equipment manuals

Antari
Antari W-101 User manual

Antari
Antari S-500XL User manual

Antari
Antari SW-300 User manual

Antari
Antari HZ-1000 User manual

Antari
Antari W-101 User manual

Antari
Antari SILENT S-200 User manual

Antari
Antari AF-3 User manual

Antari
Antari S Series II User manual

Antari
Antari F-5 Fazer User manual

Antari
Antari SW-250X User manual

Antari
Antari S-600 Yeti User manual

Antari
Antari IP-1500 User manual

Antari
Antari AF-5X User manual

Antari
Antari S-500 User manual

Antari
Antari S-100X User manual

Antari
Antari SW-300 User manual

Antari
Antari Silent 200 User manual

Antari
Antari S-500 User manual

Antari
Antari SW-250XK User manual

Antari
Antari B-200T User manual