manuals.online logo
Brands
  1. Home
  2. •
  3. Brands
  4. •
  5. antipanic
  6. •
  7. Door Lock
  8. •
  9. antipanic 200/70 User manual

antipanic 200/70 User manual

Ist. 200 Rev. 00-12
Reversibilità destra/sinistra
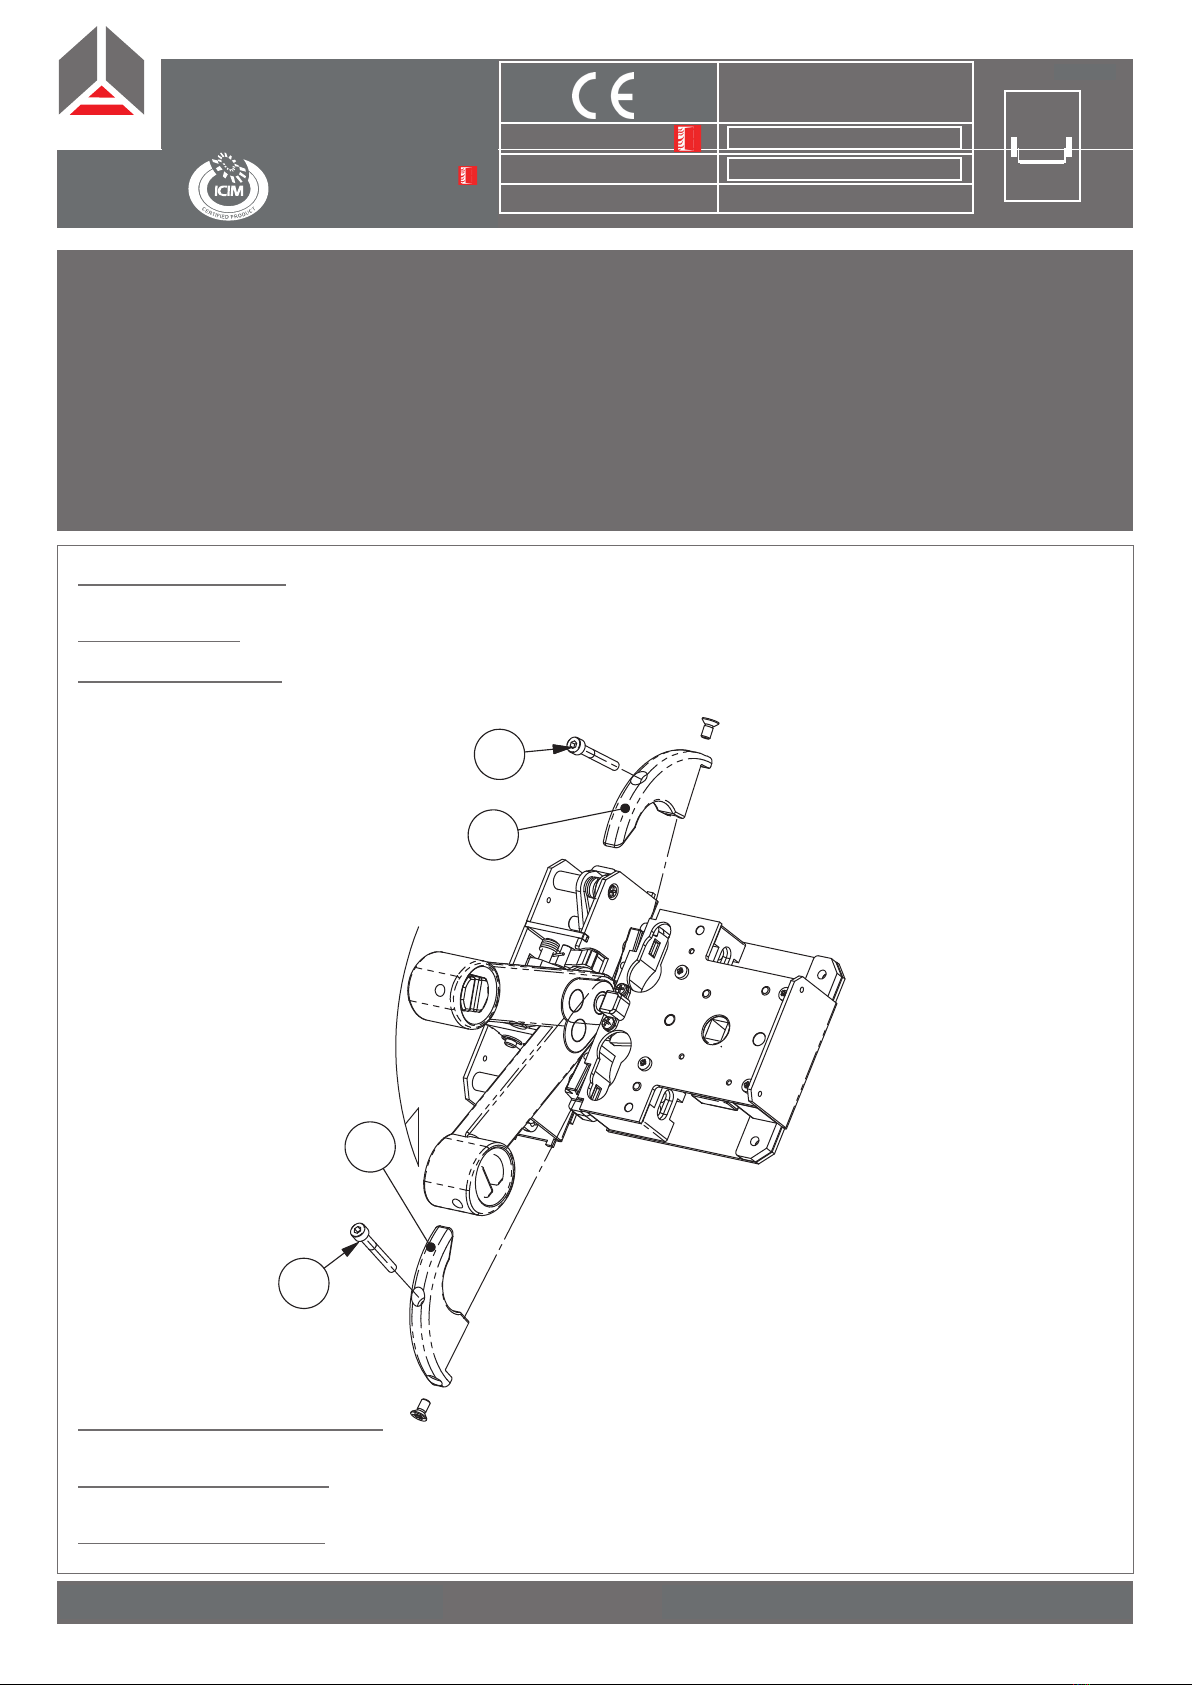
Ruotare il braccetto e posizionare il fermo A nella apposita sede a “coda di rondine” come raffigurato nel disegno.
Dopo aver posizionato il fermo A fissarlo con l’apposita vite B.
Left-right reversibility
Turn the bracket and position retainer A in the “dovetail” seat provided, as shown in the drawing. After positioning retainer A fasten it in place with screw B.
Réversibilité droite/gauche
Faire pivoter la tige et placer la fixation A dans le logement prévu à cet effet en queue d’aronde comme indiqué sur le dessin. Après avoir positionné
la fixation A, la fixer à l’aide de la vis B.
antipanic
200/70 - 200/80
antipanic s.r.l
Bologna - Italy
Vertauschbarkeit Rechts-/Linksanschlag
Die Halterung drehen und den Verschluss A in seinen “Schwalbenschwanzeinsatz” bringen, wie in der Zeichnung gezeigt. Wenn die Sperre A positioniert
ist, mit den zugehörigen Schraube B befestigen
Reversibilidade direita/esquerda
Rodar o braço e posicionar a trava A no local bifurcado, como mostra o desenho. Depois de ter posicionado a trava A, fixá-la com o parafuso B
Reversibilidad derecha/izquierda
Hacer girar al brazo y situar el tope A en el respectivo alojamiento de “cola de Milano” tal como se ilustra en el dibujo. Una vez colocado el tope A,
fijarlo mediante el tornillo B.
B
A
B
A
Le caratteristiche di sicurezza di questo prodotto sono di importanza fondamentale ai fini della sua conformità alla EN 1125. Non sono ammesse
modifiche di nessun tipo, fatta eccezione per quelle che sono descritte in queste istruzioni. Il tempo di resistenza al fuoco è 69 minuti per ogni
configurazione della porta.
The features of this panic exit device are of utmost importance for people’s safety. Therefore in no case may any changes be made to
the product.
Les caractéristiques de cette barre anti-panique sont très importantes pour la sécurité des personnes. Aucune modification du produit ne sera
admise. Le temps de résistance au feu est de 69 minutes pour toute configuration de la porte.
Die Merkmale dieses Paniktürverschlusses sind für die Sicherheit der Menschen von größter Wichtigkeit. Deshalb darf das Produkt auf keinen
Fall geändert werden.
Las características de esta cerradura antipánico son de la máxima importancia para la seguridad de las personas. Por lo tanto en ningún caso
está permitido introducir modificaciones en el producto.
As características dessa barra anti-pânico são muito importantes para a segurança das pessoas. Por isso, não é permitido realizar alguma
mofificação no produto.
The fire-resistance time is 69 minutes for every door configuration.
Die Feuerwiderstandszeit beträgt bei allen Türkonfigurationen 69 Minuten.
Tiempo de resistencia al fuego de 69 minutos para cada
configuración de la puerta.
O tempo de resistência ao fogo é de 69 minutos para qualquer configuração da porta.
EN 1125:2008
Rev.00/12
0425 - 0807 3 - 7 - 7 - B - 1 - 4 - 2 - 2 - A - A
3 - 7 - 7 - 0 - 1 - 4 - 2 - 2 - A - A
0425 - 1568
antipanic s.r.l -
Bologna - Italy - www.antipanic.it
Max 1500 mm.
Max >200 Kg.
-20°C/+100°C
Max 4000 mm.
Ist.200 Rev.A A
16
200/70 - 200/80
DoP AP016/0807
DoP AP017/1568
V2
R1G
V2
V2
GR1
1V
1V
V1
V1
V1
V1
V4
Lavorazioni sulla fascia
Opérations sur le devant
Trabajos en la banda
Work on the mid-rail
Bearbeitungen am Kämpfer
Preparação da faixa
Y = Cod. Art. 200/70 per serrature entrata 70 mm. - for 70 mm. backset - pour axe 70 mm.
für Dornmasse 70 mm. - para entrada 70 mm. - para entrada de 70 mm.
Y = Cod. Art. 200/80 per serrature entrata 80 mm. - for 80 mm. backset - pour axe 80 mm.
für Dornmasse 80 mm. - para entrada 80 mm. - para entrada de 80 mm.
Eseguite le lavorazioni sul profilo fissare il maniglione con le viti in dotazione V1. Fissare il tappo D con le apposite viti V3 al fermo E, posizionare il fermo E
nella apposita sede.
Perform the necessary machining operations on the profile, secure the exit device in place using screws V1. Fasten cap D to retainer E using screws V3,
position retainer E in the seat provided.
Procéder aux opération sur le profil et fixer la barre à l’aide des vis V1. Fixer le chapeau D à l’aide des vis V3 sur la fixation E, placer la fixation E dans le
logement prévu.
Nach der Bearbeitung des Profils die Griffstange mit den Schrauben V1
festschrauben. Den Deckel D mit den Scrauben V3 in den Anschlag E eindrehen und den Anschlag E in seinen Sitz einsetzen.
Una vez efectuados los trabajos en el perfil, fijar la cerradura antipánico mediante los tornillos V1. Fijar el tapón D con los tornillos V3 al tope E, e instalar el
tope E en su alojamiento.
Depois de preparar o perfil, fixar a barra anti-pânico com os parafusos V1. Fixar a tampa D com os parafusos V3 à trava E, posicionar a trava E no local
adequado.
Inserire la barra nell’apposita sede del braccetto.
Avvitare a fondo il grano GR.
Fit the horizontal bar into the seat provided in the bracket.
Screw in grup GR all the way.
Introduire la barre dans le logement de la tige prévu à cet effet.
Visser à fond le pion GR.
Die Druckstange in die Halterung einsetzen.
Den Stift GR ganz zuschrauben.
Instalar la barra en el respectivo alojamiento del brazo.
Enroscar a fondo la spiga GR.
Inserir a barra no local adequado do braço.
Apertar bem o pino GR.
200/70Cod. Art.
2
2
GR1
10
10
V1
6
6
V2
2
2
V3
V4
200/80
antipanic
antipanic s.r.l
Bologna - Italy
200/70 - 200/80
1
1
1
1
B
48
61
x
A
D
E
V3
2Ist.200 Rev.A
Cod. Art. 200/70 200/80
GR1 2
V1 10
V2 4
V3 2
B 1
V4 1
V5 2
V5

This manual suits for next models

1

Other antipanic Door Lock manuals

antipanic 1095 User manual

antipanic

antipanic 1095 User manual

antipanic 200 Series User manual

antipanic

antipanic 200 Series User manual

antipanic 1095TF User manual

antipanic

antipanic 1095TF User manual

Popular Door Lock manuals by other brands

Lloyd's LC-1243 quick guide

Lloyd's

Lloyd's LC-1243 quick guide

GEM GL600-F Specification sheet

GEM

GEM GL600-F Specification sheet

ilco 79M Series installation guide

ilco

ilco 79M Series installation guide

Prime-Line E-2311 installation instructions

Prime-Line

Prime-Line E-2311 installation instructions

Sylvan SL40E installation instructions

Sylvan

Sylvan SL40E installation instructions

Schlage BE469 installation instructions

Schlage

Schlage BE469 installation instructions

Häfele miniLock QUICK INFO

Häfele

Häfele miniLock QUICK INFO

LockState RemoteLock openEDGE RG Hardware installation

LockState

LockState RemoteLock openEDGE RG Hardware installation

Lenovo smart lock E2 user manual

Lenovo

Lenovo smart lock E2 user manual

Ingersoll-Rand SCHLAGE Stella installation instructions

Ingersoll-Rand

Ingersoll-Rand SCHLAGE Stella installation instructions

Assa Abloy Yale real Living Assure Lock SL Installation and programming instructions

Assa Abloy

Assa Abloy Yale real Living Assure Lock SL Installation and programming instructions

Assa Abloy RIXSON W73 installation instructions

Assa Abloy

Assa Abloy RIXSON W73 installation instructions

FSH FES7 installation manual

FSH

FSH FES7 installation manual

Kwikset OBSIDIAN Installation and user guide

Kwikset

Kwikset OBSIDIAN Installation and user guide

Weiser Powerbolt 2 How to perform

Weiser

Weiser Powerbolt 2 How to perform

Karcher Design holar ER BCL Series Assembly instructions

Karcher Design

Karcher Design holar ER BCL Series Assembly instructions

Assa Abloy Effeff 309 Installation and fitting instructions

Assa Abloy

Assa Abloy Effeff 309 Installation and fitting instructions

Kaba E-PLEX STANDARD Series user guide

Kaba

Kaba E-PLEX STANDARD Series user guide

manuals.online logo
manuals.online logoBrands
  • About & Mission
  • Contact us
  • Privacy Policy
  • Terms and Conditions

Copyright 2025 Manuals.Online. All Rights Reserved.