ВНИМАТЕЛЬНО ПРОЧИТАЙТЕ ИНСТРУКЦИИ, УКАЗАННЫЕ В СЛЕДУЮЩЕМ РУКОВОДСТВЕ
Следуйте только инструкциям в руководстве по уходу и техническому обслуживанию прибора.
ПРЕДУСТАНОВКА
Только для использования во внутреннем интерьере.
Зеркало должно быть установлено на расстоянии не менее 0.6 м от душевой кабины или ванны.
При монтаже зеркала не используйте кронштейны, не входящие в комплект.
Не монтируйте зеркало слишком близко к источникам тепла, таким как: радиаторы, печи или
другие подобные источники.
УСТАНОВКА
Для подключения электрических компонентов требуется поддержка квалифицированного
персонала с электротехническим опытом
При установке зеркал должны использоваться соответствующие инструменты.
На этапе установки необходимо уделять самое пристальное внимание риску поражения
электрическим током.
Рекомендуем установить биполярный выключатель для возможности отключения электрической
цепи.
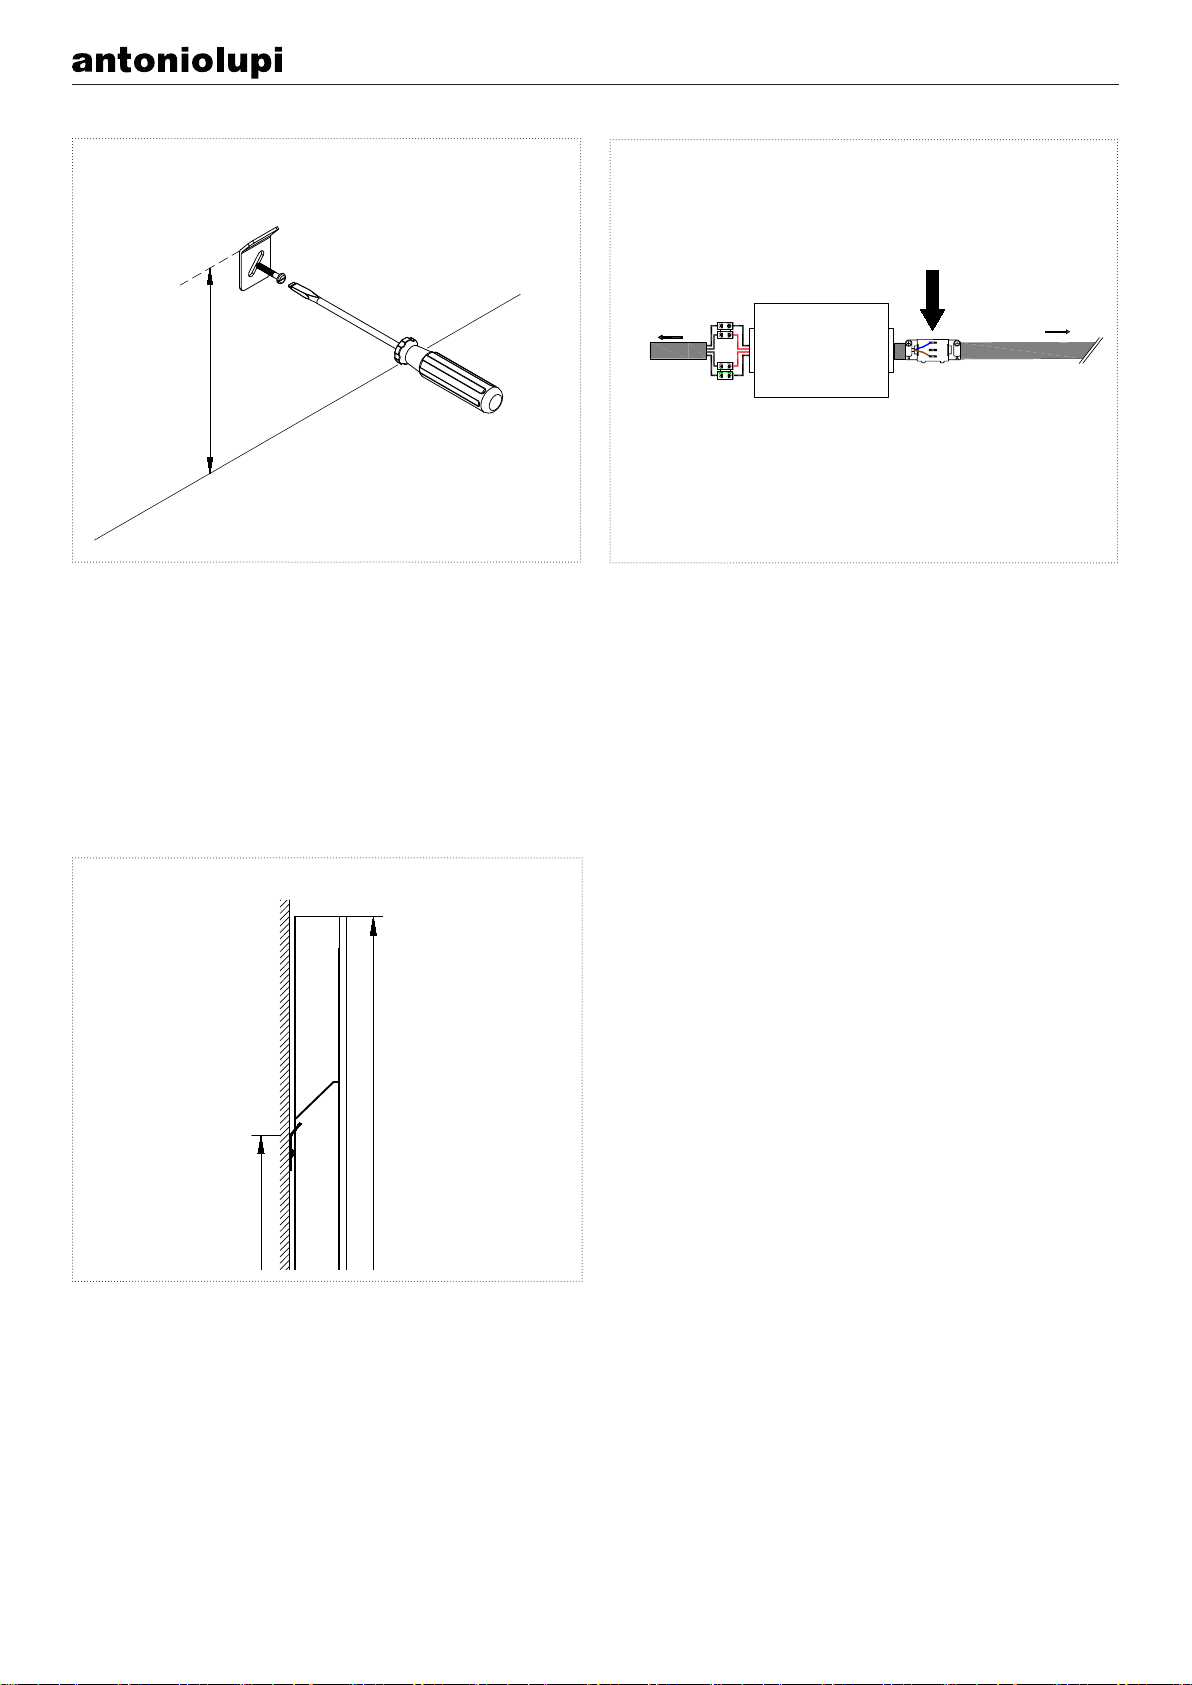
Выполните электрические подключения, как описано на схеме в данном руководстве.
ИСПОЛЬЗОВАНИЕ
Зеркало должно использоваться только в комплекте со всеми его элементами.
Не модифицируйте и не изменяйте изначальные настройки зеркала. Любое вмешательство может
поставить под угрозу вашу безопасность.
Не используйте зеркало или отдельные его части не по назначению.
ОБСЛУЖИВАНИЕ
При появлении любых признаков неисправности или некорректной работе изделия, просьба
немедленно связаться с Antonio Lupi Design S.p.A.
Любой комплектующий элемент зеркала необходимо незамедлительно заменить в случае его
повреждения.
Источник света, размещенный в зеркале, должен заменяться только производителем или
персоналом с аналогичной квалификацией.
ДЕМОНТАЖ И УТИЛИЗАЦИЯ
При демонтаже изделия требуется придерживаться необходимых мер предосторожности, чтобы
исключительно риск поражения электрическим током.
Демонтированное изделие следует утилизировать в соответствии с законодательными
требованиями по утилизации специальных отходов.
LEGGERE ATTENTAMENTE LE ISTRUZIONI INDICATE NEL SEGUENTE MANUALE
Attenersi esclusivamente alle indicazioni del manuale per la pulizia e la manutenzione dell’apparecchio.
POSA
Solo per uso interno
La posa della specchiera deve avvenire a una distanza non inferiore a 0.6m dalla cabina doccia o dalla vasca da
bagno.
Per la posa della specchiera non devono essere utilizzati sostegni dierenti da quelli inclusi nella fornitura.
Non installare la specchiera troppo vicino a sorgenti di calore tipo termosifoni, stufe o altre fonti di simile entità.
INSTALLAZIONE
Per i collegamenti delle parti elettriche è necessario il supporto di personale qualicato con esperienza elettrotec-
nica.
Nell’installazione della specchiera devono essere utilizzati utensili adeguati.
Nelle fasi di installazione è necessario prestare la massima attenzione al rischio di scossa elettrica.
Si consiglia l’installazione di un interruttore bipolare per consentire il sezionamento elettrico del circuito.
Realizzare i collegamenti elettrici come nello schema descrittivo nel presente manuale.
UTILIZZO
La specchiera deve essere usata solo se completo di tutti i suoi componenti.
Non modicare o alterare le condizioni originali della specchiera. Ogni manomissione può comprometterne la
sicurezza.
Non utilizzare la specchiera o le sue singole parti per scopi dierenti da quelli previsti.
MANUTENZIONE
A ogni evidenza di guasto o malfunzionamento rivolgersi immediatamente a Antonio Lupi Design S.p.A.
Tutti i componenti della specchiera devono essere prontamente sostituiti in caso di danneggiamento.
La sorgente luminosa contenuta in questo apparecchio deve essere sostituita solo dal costruttore da personale
altrettanto qualicato.
RIMOZIONE E SMALTIMENTO
Durante le operazioni di rimozione dell’apparecchio devono essere prese tutte le precauzioni necessarie a ovviare
il rischio di scossa elettrica.
L’apparecchiatura rimossa dovrà poi essere smaltita secondo tutte le prescrizioni di legge come riuti speciali.
READ CAREFULLY THE INSTRUCTIONS GIVEN IN THE FOLLOWING MANUAL
Keep rigorously to the indications given in the manual for proper maintenance of the product
POSITIONING
For internal use only
The position of the mirror must not be less than 0.6m from the shower enclosure or bathtub.
To hang the mirror do not use other supports than those supplied.
Do not install the mirror near heated sources like radiators, heaters or other similar sources.
INSTALLATION
To connect the electrical parts, the support of qualied personnel with electrotechnical experience is required.
When installing the mirror you must use adequate tools.
During installation it is necessary to pay close attention to the risk of electrical shock.
We recommend the installation of a bipolar switch to allow the electrical sectioning of the circuit.
Make the electrical connections as per the descriptive diagram in the present manual.
USE
The mirror must be used only if complete with all its elements.
Do not modify or alter the original conditions of the mirror. Any tampering can compromise its safety.
Do not use the mirror for other purposes than what it is intended for.
MAINTENANCE
For every sign of wear or malfunctoning call immediately the company Antonio Lupi Design S.p.A.
All components of the sink must be promptly replaced in the event of damage.
The light source contained in this product must be replaced only by the manufacturer or by equally qualied
personnel.
REMOVAL AND DISPOSAL
During the removal of the product, all necessary precautions must be taken to avoid the risk of electric shock.
The removed product must then be disposed of according to all legal requirements as special waste.
LISEZ ATTENTIVEMENT LES INSTRUCTIONS DU MANUEL SUIVANT.
Ne suivez que les instructions du manuel pour le nettoyage et l’entretien de l’appareil.
POSE
Pour usage interne uniquement.
Le miroir doit être installé à une distance d’au moins 0,6 m de la cabine de douche ou de la baignoire.
Pour l’installation du miroir, aucun support autre que ceux inclus dans la fourniture ne doit être utilisé.
N’installez pas le miroir trop près des sources de chaleur telles que les radiateurs, les poêles ou autres
sources similaires.
INSTALLATION
Pour les connexions des parties électriques, le soutien d’un personnel qualié ayant une expérience en
électrotechnique est requis.
Des outils appropriés doivent être utilisés lors de l’installation du miroir.
Lors de l’installation du miroir, la plus grande attention doit être portée au risque de choc électrique.
Nous recommandons l’installation d’un interrupteur bipolaire pour permettre la déconnexion électrique
du circuit.
Eectuez les connexions électriques comme dans le schéma descriptif de ce manuel.
UTILISATION
Le miroir ne doit être utilisé que s’il est complet avec tous ses composants.
Ne pas modier ou altérer l’état original du miroir. Toute altération peut compromettre sa sécurité.
N’utilisez pas le miroir ou ses parties individuelles à d’autres ns que celles prévues.
ENTRETIEN
Toute preuve de panne ou de dysfonctionnement doit être immédiatement communiquée à Antonio Lupi
Design S.p.A.
Tous les composants des rétroviseurs doivent être remplacés rapidement en cas de dommage.
La source lumineuse contenue dans cet appareil ne doit être remplacée que par le fabricant ou par un
personnel également qualié.
ENLÈVEMENT ET ÉLIMINATION
Lors de l’enlèvement de l’appareil, toutes les précautions nécessaires doivent être prises pour éviter le
risque de choc électrique.
L’équipement retiré doit ensuite être éliminé conformément à toutes les exigences légales en tant que
déchet spécial.
LEER CON CUIDADO LAS INSTRUCCIONES DEL SIGUIENTE MANUAL;
Observar sólo las instrucciones del manual para la limpieza y el mantenimiento del aparato;
MONTAJE
Sólo para uso interno.
El espejo tiene que colocarse a una distancia no inferior a 0.6 m de la cabina de ducha o de la bañera;
Para la instalación del espejo no se tienen que utilizar soportes diferentes de los suministrados;
No instalar el colgante demasiado cerca a fuentes de calor como radiadores, estufas u otras fuentes
similares;
INSTALACIÓN
Para la conexión de las partes eléctricas se requiere el apoyo de personal calicado con experiencia
electrotécnica;
Se deben utilizar herramientas adecuadas al instalar el colgante;
Al instalar el aparato, se debe prestar la mayor atención posible al riesgo de descarga eléctrica;
Recomendamos la instalación de un interruptor bipolar para permitir la desconexión eléctrica del
circuito;
Hacer las conexiones eléctricas como en el diagrama descriptivo de este manual.
USO
El espejo sólo debe usarse si está completo con todos sus componentes;
No modicar o alterar el estado original del espejo. Cualquier manipulación puede comprometer su
seguridad;
No utilizar el espejo o sus partes individuales para ningún otro propósito que los previstos.
MANTENIMIENTO
Para cualquier evidencia de fallo o mal funcionamiento contactar con Antonio Lupi Design S.p.A.
inmediatamente;
Todos los componentes del espejo deben ser reemplazados rápidamente en caso de daño;
La fuente de luz contenida en este aparato debe ser sustituida únicamente por el fabricante o por
personal igualmente calicado.
DESMONTAJE Y ELIMINACIÓN
Al desmontar el aparato, deben tomarse todas las precauciones necesarias para evitar el riesgo de una
descarga eléctrica;
El equipo desmontado debe ser desechado según todos los requisitos legales, como residuo especial.
LESEN SIE DIE ANWEISUNGEN IN DER FOLGENDEN ANLEITUNG SORGFÄLTIG DURCH
Befolgen Sie nur die Anweisungen im Manual für die Reinigung und Wartung des Geräts;
MONTAGE
Nur für den internen Gebrauch.
Der Spiegel muss in einem Abstand von mindestens 0,6 m von der Duschkabine oder Badewanne
installiert werden”.
Für die Installation des Spiegels müssen ausschließlich die vorhandenen Halterungen verwendet
werden.
Der Spiegel muss nicht zu nahe an Wärmequellen wie Heizkörpern, Öfen oder anderen ähnlichen
Quellen installiert werden.
INSTALLATION
Für die Anschlüsse der elektrischen Teile ist die Unterstützung von qualiziertem Personal mit elektrote-
chnischer Erfahrung erforderlich;
Bei der Installation des Spiegels müssen geeignete Werkzeuge verwendet werden;
Bei der Installation des Spiegels muss die größtmögliche Aufmerksamkeit auf das Risiko eines elektri-
schen Schlages gelegt werden;
Die Installation eines bipolaren Schalters ist empfehlenswert, um die elektrische Trennung des
Stromkreises zu ermöglichen;
Führen Sie die elektrischen Anschlüsse wie im beschreibenden Diagramm in dieser Anleitung aus;
VERWENDUNG
Der Spiegel darf nur dann verwendet werden, wenn es mit allen seinen Komponenten vollständig ist.
Den Originalzustand des Spiegels nicht modizieren oder verändern. Jede Manipulation kann seine
Sicherheit gefährden;
Verwenden Sie den Spiegel oder seine Einzelteile nicht für andere als die vorgesehenen Zwecke;
WARTUNG
Bei jeglichem Beweis für ein Versagen oder eine Fehlfunktion wenden Sie sich bitte unverzüglich an
Antonio Lupi Design S.p.A.;
Alle Komponenten des Geräts müssen im Falle einer Beschädigung umgehend ersetzt werden;
Die in diesem Gerät enthaltene Lichtquelle darf nur vom Hersteller oder von gleich qualiziertem
Personal ersetzt werden.
AUSBAU UND ENTSORGUNG
Beim Ausbau des Geräts müssen alle notwendigen Vorkehrungen getroen werden, um die Gefahr
eines elektrischen Schlags zu vermeiden;
Die ausgebauten Geräte müssen dann gemäß allen gesetzlichen Bestimmungen als Sondermüll
entsorgt werden;