manuals.online logo
Brands
  1. Home
  2. •
  3. Brands
  4. •
  5. Apitor
  6. •
  7. Educational Equipment
  8. •
  9. Apitor Robot S User manual

Apitor Robot S User manual

This manual suits for next models

3

Popular Educational Equipment manuals by other brands

DISCOVER talking pen user guide

DISCOVER

DISCOVER talking pen user guide

pitsco Smart Buddies 45895 quick start guide

pitsco

pitsco Smart Buddies 45895 quick start guide

RS 3.5 quick start guide

RS

RS 3.5 quick start guide

Quanser QNET 2.0 quick start guide

Quanser

Quanser QNET 2.0 quick start guide

CAE Healthcare METIman user guide

CAE Healthcare

CAE Healthcare METIman user guide

Turning Technologies Pulse quick start guide

Turning Technologies

Turning Technologies Pulse quick start guide

TruCorp AirSim user manual

TruCorp

TruCorp AirSim user manual

LION R.A.C.E. STATION user manual

LION

LION R.A.C.E. STATION user manual

jp.ik LEAPW505 user guide

jp.ik

jp.ik LEAPW505 user guide

laerdal ASL 5000 Lung Solution for SimMan Quick setup guide

laerdal

laerdal ASL 5000 Lung Solution for SimMan Quick setup guide

Rompa GYMTOP 20143 manual

Rompa

Rompa GYMTOP 20143 manual

ScienTECH 2261 Product tutorial

ScienTECH

ScienTECH 2261 Product tutorial

Quanser 6 DOF Hexapod Laboratory guide

Quanser

Quanser 6 DOF Hexapod Laboratory guide

Surefire Flying Model Rocket Kit How to use

Surefire

Surefire Flying Model Rocket Kit How to use

ACROME myCONTROL STEWART PRO user manual

ACROME

ACROME myCONTROL STEWART PRO user manual

SmartMan Baby Manikin manual

SmartMan

SmartMan Baby Manikin manual

Nasco Life/form LF03840U instruction manual

Nasco

Nasco Life/form LF03840U instruction manual

Pitsco Education BUILDERSPACES SPACEPORT Assembly instructions

Pitsco Education

Pitsco Education BUILDERSPACES SPACEPORT Assembly instructions

manuals.online logo
manuals.online logoBrands
  • About & Mission
  • Contact us
  • Privacy Policy
  • Terms and Conditions

Copyright 2025 Manuals.Online. All Rights Reserved.

APR041 AGES 7+
APR042 AGES 6+
[email protected]
Apitor Technology Co.,Ltd.
Battery Installation
Non-rechargeable batteries can not be charged.
Rechargeable batteries shouldbe charged under the
supervision of an adult.
Batteries with different models, old and new batteries
should not be mixed.
Exhausted batteries shouldbe removed from the product.
This product does not contain battery.
Rechargeable batteries are to be removed from the toy
before being charged.
Batteries are to be inserted with correct polarity.
The supply terminals are not to be short-circuited.
*Instructions for Battery Installation
Download and Install the App
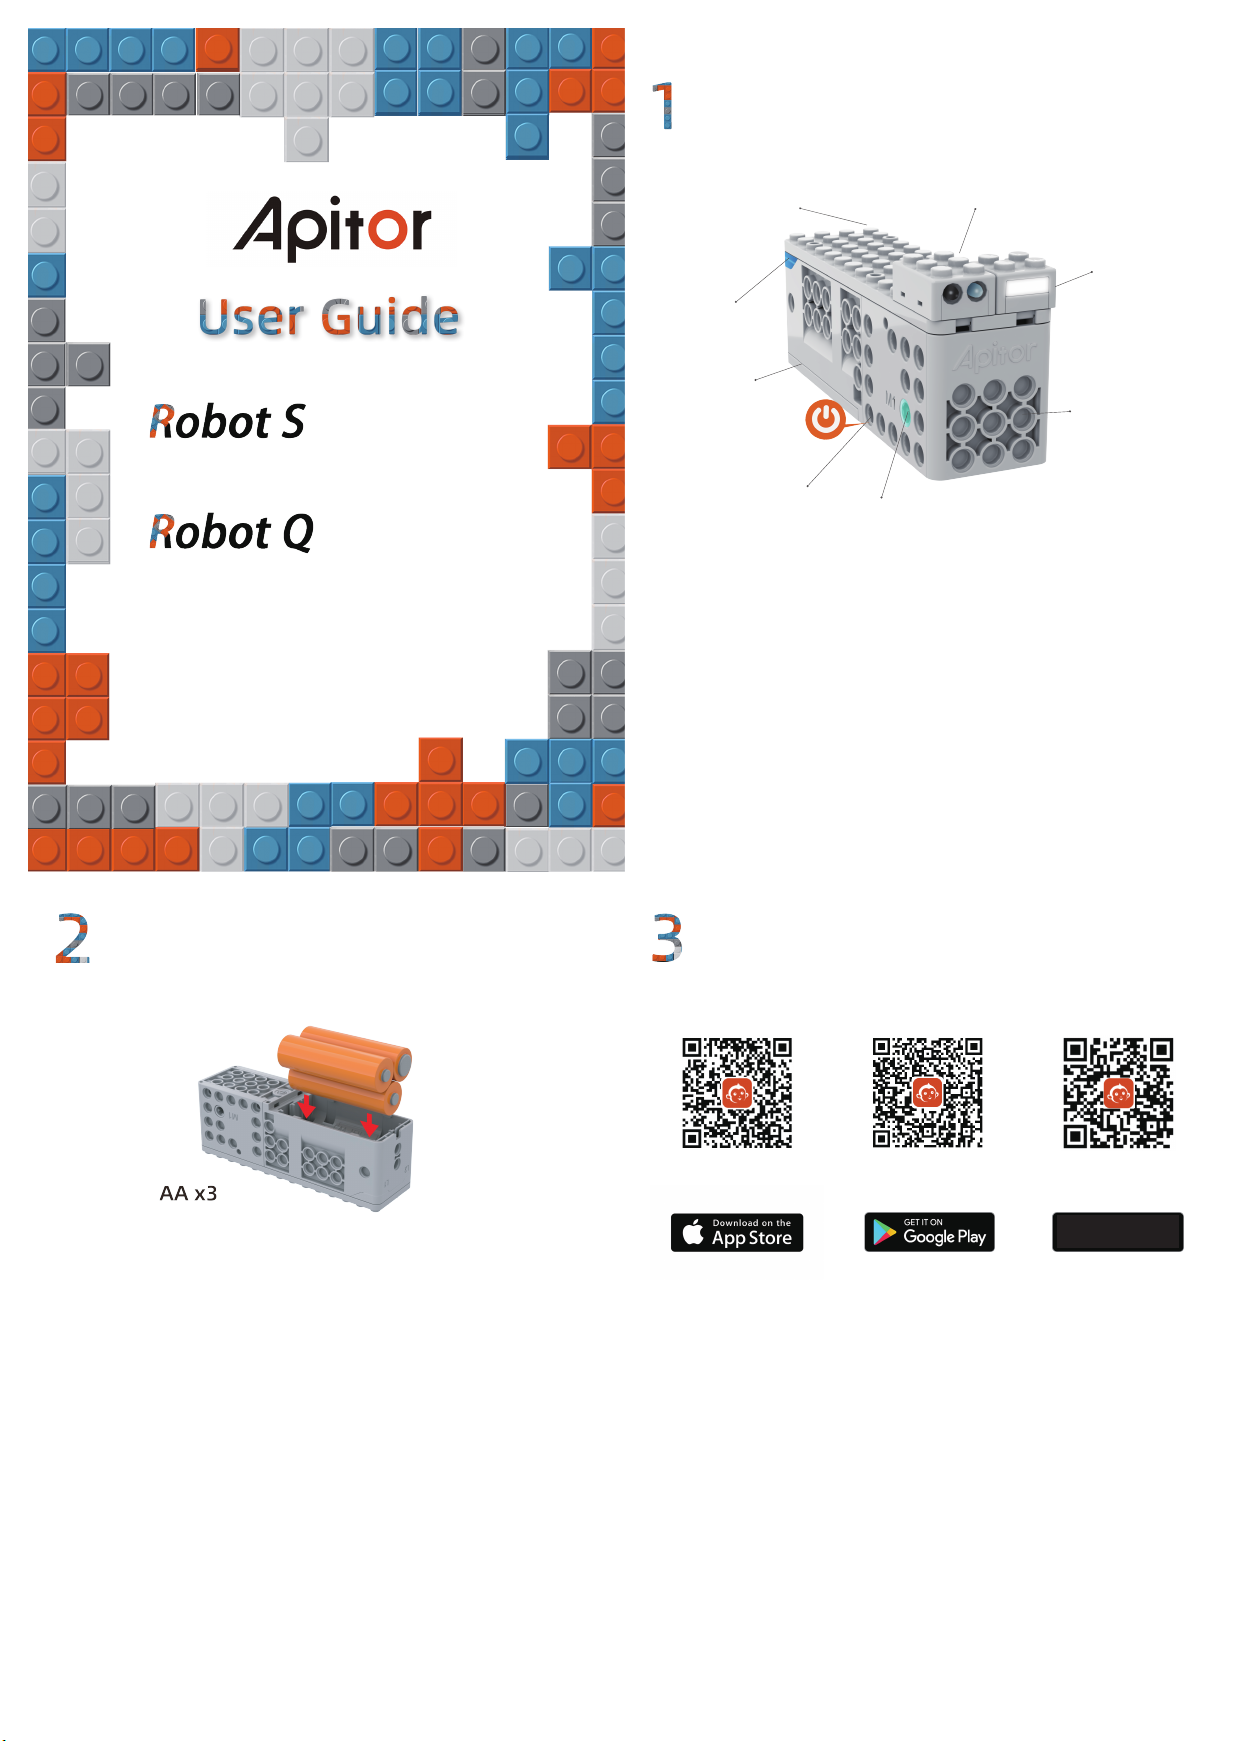
Control Module
Search "Apitor Kit" in Apple App Store and Google Play
to download the App, or scan the QR code to download.
When installing the App, please allow all permission
requests and enable “Location services”for Android
required by the Bluetooth protocol.
System requirements: Android 8 or higher, iOS 10 or
higher, Bluetooth 4 or higher.
The instruction manual must be retained since it
contains important information.
*
Hereby, Apitor Technology Co., Ltd. declares that the
radio equipment type APR041/APR042 is in compliance
with Directive 2014/53/EU. The full text of the EU
declaration of conformity is available at the following
internet address: www.apitor.com/conformity .
*
Bluetooth frequency: 2402-2480MHz, transmitting
power < 0dBm.
*
App and
Gyroscope RC
Multicolor
LED Lights
Battery Case
Power Switch
Motors
Compatible
with Other
Building Blocks
Color Sensor
Infrared Sensor
iOS Android Android
For Android Devices Without
Google Play
Connect to Apitor Robot
LED Status Indication
Please don’t connect to Apitor Robot directly from the Bluetooth connection page of your
tablet/smartphone. Please remember, always connect Apitor Robot from the"Apitor Kit" App.
*
Short press the power button
of the control module. The
every 1 second.
Enable your tablet/smartp-
hone's Bluetooth and bring
your tablet/smartphone clo-
se to the control module.
Open the "Apitor Kit" App,
click the pairing button,
follow a few steps, the
pairing will be completed
automatically.
Status of Use
B
Blue lights are always on.
R
seconds.
R
seconds.
B
5 times every 1 second, only once.
Bluetooth is not connected.
Bluetooth is connected.
P
Reset to factory defaults
Low battery indicator, need to
replace new batteries.
The use of power is too large and
the batteries need to be replaced
or the power usage needs to be
reduced.
R
LED Status Indication
After the control unit is powered on
During use, short press the power
button
While the control unit is powered
on, press and hold the power
button for 10 seconds
During the control unit is powered
on
During use