Electrical Information &
Installation Instructions
Contact:
orders@aquaamp.com
1108 Eldridge St, Clearwater, FL 33755
For further information visit www.aquaamp.com
The product must be installed according to the specified instructions. Failure to comply may result in personal injury, vessel/vehicle damage, and/or product failure. Installation by a
trained electrician is recommended by AquaAmp. Damage and/or injuries caused by improper installation are not covered by the warranty.
WARNING:
Only a 12V DC or 24V DC battery/power supply should be used with this device.
Before installing, the power supply must be turned off.
Between the battery/power supply and the product, an appropriate fuse or circuit breaker must be utilized.
Before turning on the electricity, double-check that all wiring is polarized correctly. High voltages may be included in this product. Do not alter the product in any way. This product is
not intended for use in potentially hazardous or flammable environments.
Do not install in a hazardous/flammable environment, such as engine rooms. Make sure the space behind the mounting point is clear of wires, fuel, and any other potentially hazardous
things before drilling any holes.
Ensure that any holes cut do not considerably degrade the surface's structure. If the product must be installed outside, it must be installed safely above the waterline and not in danger
of being submerged.
A metallic surface prevents the product from charging.
CAUTION:
The item is designed to charge Qi compatible devices only.
The cable must be kept in place and not obstruct mechanical systems.
There are no user-serviceable components in this product. In no way attempt to repair or modify the product.
The device's high friction top surface does not guarantee that it will not slip during strong acceleration and deceleration working situations.
A phone case thicker than 3mm may prevent the smartphone from charging.
The product may temporarily shut down if used in a hot environment or in direct sunlight; this is a safety feature of the electronics.
The IP rating is only valid if the instructions are followed correctly. Avoid mounting near heat-radiating appliances and in poorly ventilated spaces when choosing a placement.
EMC INSTALLATION GUIDELINES:
To ensure that electromagnetic interference between equipment is minimized, AquaAmp devices comply with Electromagnetic Compatibility (EMC) requirements.
To keep electromagnetic interference to a bare minimum, proper installation is essential.
WIRING:
When extending the wire from your battery/power source to the product, make sure there is a continuous supply of at least 10V. For any length of cable extension, we recommend an
18AWG (0.82mm2) wire gauge.
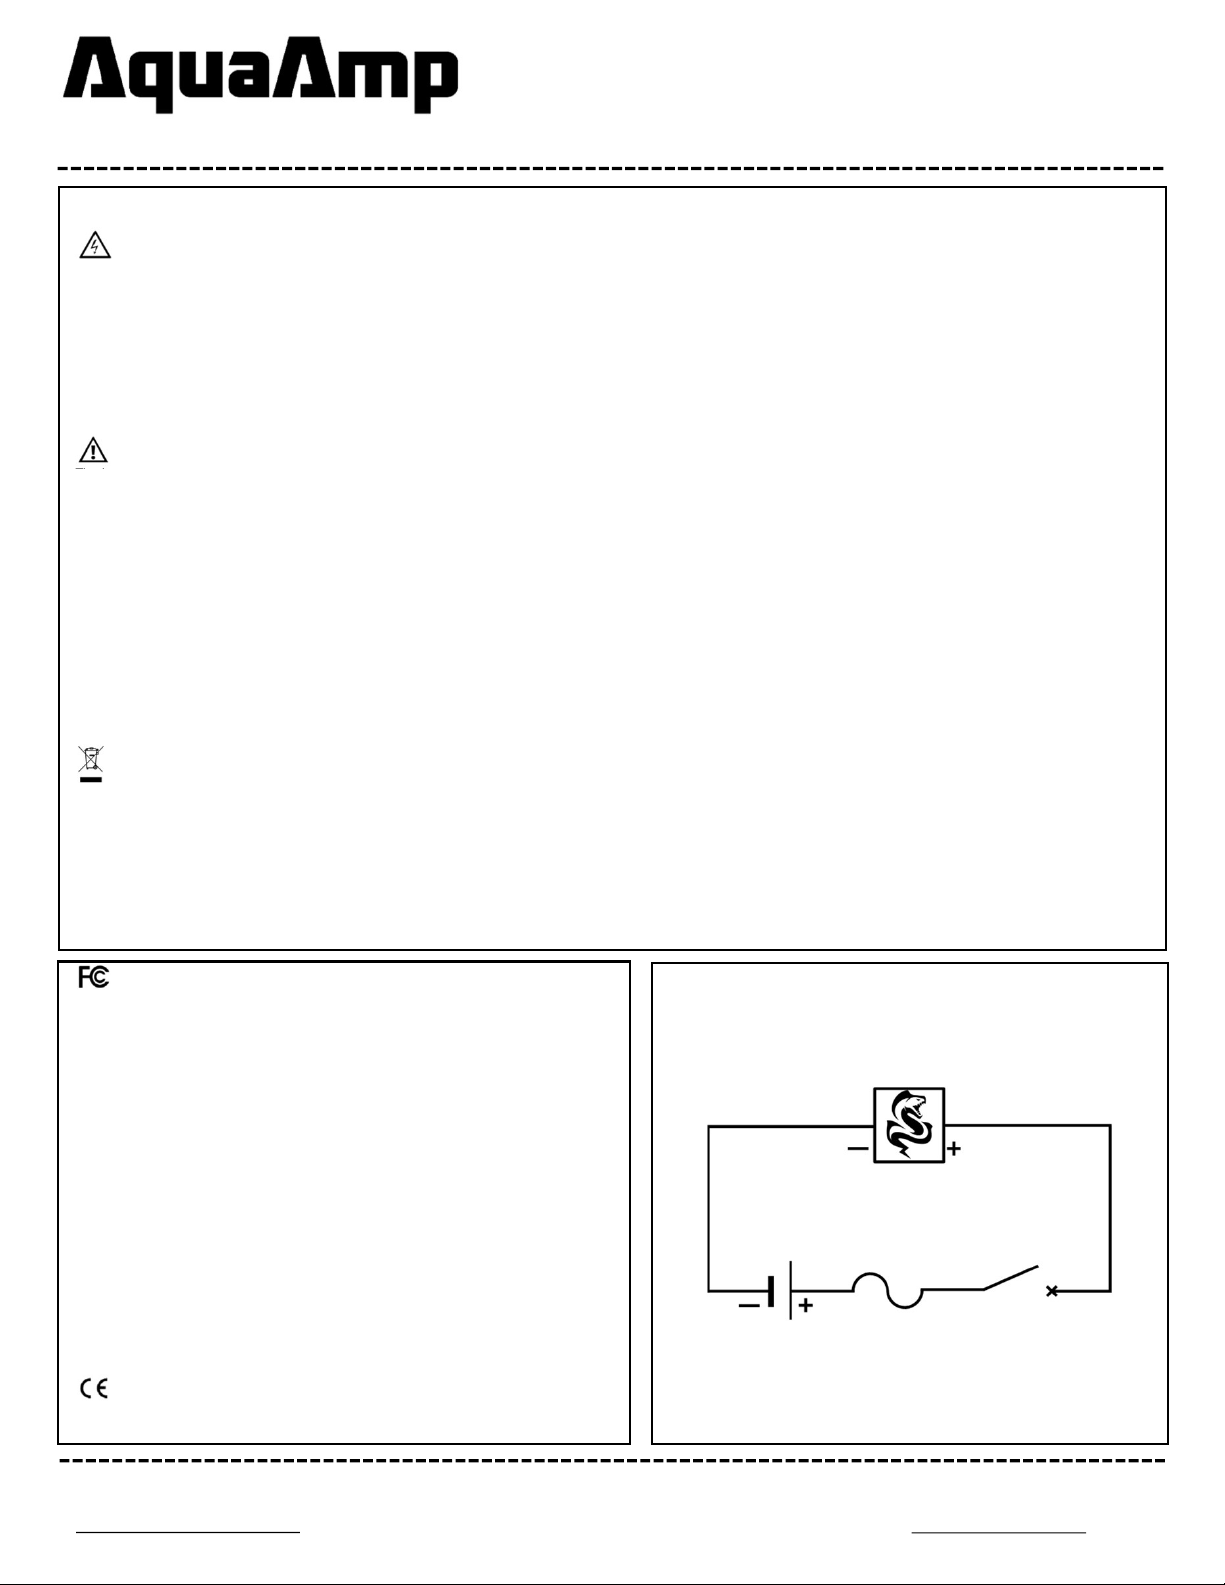
This diagram shows how the product should be linked to a 12V or 24V DC battery or power supply.
ENVIRONMENTAL PROTECTION:
Electrical trash should not be thrown out with household garbage. Please recycle wherever possible. For recycling advice, contact your local government or a merchant.
IMPORTANT:
AquaAmp LLC disclaims all liability for any injuries or other damages resulting from the use of their products in any situation.
WARRANTY:
The non-transferable 2-year warranty covers only this AquaAmp product and not any devices mounted in or on it. Users' devices are not covered by a guarantee, and they subject
them to known and unknown hazards at their own risk.
FCC WARNING:
This device complies with part 15 of the FCC Rules. Operation is subject to the following
two conditions:(1) This device may not cause harmful interference, and (2) this device must
accept any interference received, including interference that may cause undesired
operation.
Any changes or modifications not expressly approved by the party responsible for
compliance could void the user’s authority to operate the equipment.
This equipment has been tested and found to comply with the limits for a Class B digital
device, pursuant to part 15 of the FCC Rules. These limits are designed to provide
reasonable protection against harmful interference in a residential installation. This
equipment generates uses and can radiate radio frequency energy and, if not installed and
used in accordance with the instructions, may cause harmful interference to radio
communications. However, there is no guarantee that interference will not occur in a
particular installation. If this equipment does cause harmful interference to radio or
television reception, which can be determined by turning the equipment off and on, the user
is encouraged to try to correct the interference by one or more of the following measures:
– Reorient or relocate the receiving antenna.
– Increase the separation between the equipment and receiver.
– Connect the equipment into an outlet on a circuit different from that to which the receiver
is connected.
– Consult the dealer or an experienced radio/TV technician for help.
FCC RF exposure statement:
The equipment complies with FCC radiation exposure limits set forth for an uncontrolled
environment. This equipment should be installed and operated with a minimum distance
between 20cm of the radiator and your body. FCC ID: XXXX
AquaAmp LLC certifies that this product complies with the EMC CE-RED Directive
(2014/53/EU) and the EN 62368 standard. The CE compliance certificate can be accessed
at aquaamp.com.


