ARABLE MARK User manual

ARABLE MARK
QUICK START GUIDE
On your Mark, get set, go!

1Decision Agriculture
Our in-field weather and crop monitor collects over 40 dierent data streams.
On Your Mark What the Mark Measures
Precipitation
Rainfall measured to
within 0.2mm/hr
Surface Wetness for disease
risk monitoring
Dew detection
Radiation
Solar Radiation
PAR ≤ 6% daily total
Net Radiation ≤ 10% margin
of error
Plant Health
NDVI / MSAVI
Chlorophyll Index
Seven Band Spectrometer
The data from the device is sent to the cloud using a 3G cellular network. You can log into the Arable platform by going to
app.arable.com.If you do not know your organization name or customized organization URL, please reach out to
Evapotranspiration
Dynamic Kc
Canopy Temperature to
within +/- 0.5°C
Full Radiation Budget
≤ 4% margin of error
Weather
Temperature to
within +/- 0.75°C
Relative Humidity to
within +/- 3%
Pressure ≤ 0.1% margin of error
Harvest / Event Timing
Growing Degree Days
Chilling Hours
Frost Forecast
Integrations / Accessories
Flow Meter
Wind Speed & Direction
Soil Moisture Probes
Pressure Switch/Transducer
Connectivity
Cellular
US: Hologram, AT&T, T-Mobile,
Verizon & Local Carriers
International: Hologram

Crop management in one reliable device and software solution.
On Your Mark Getting Acquainted
2
Longwave Radiometer
and Infrared Temperature
Shortwave Radiometer and Spectrometer
Air Temperature/Humidity/Pressure
Charging Indicator Light
Solar Cells
LED Indicator Lights
Battery Check and Set Up Button
Shortwave Radiometer
and Spectrometer
Longwave Radiometer and
Infrared Temperature

3Decision Agriculture
Mark Placement Overview Pole Length Worksheet
The Mark’s optimal height is based on the crop you are monitoring.
Use our worksheet to help determine
the length of your pole.
Using our Mark Height Placement Guide on
the opposite page, write in the measurements
appropriate for your crop. Add the measurements
together for your total pole length.
NOTE: the Mark will be looking at a circular area below
it with a diameter that is twice its mounted height.
If you are installing a freestanding
pole, it should be:
12” in the ground + canopy height + recommended
height above the canopy = total pole length
If attaching to pre-existing infrastructure only add in
2-3’ and max crop height.
For example, you want to install a new pole among
plants with a canopy expected to grow to 18” and
planted in a 36”-wide row:
12” (underground portion)
+
18” Crop at full height
+
(36”/2=18”) Recommended above-canopy height
--------------
48” total pole length
2-3’ ABOVE CANOPY
+ MAX CROP HEIGHT
+ 12” BELOW SOIL LINE
= POLE LENGTH

Mark Placement Overview Height Placement Guide
Use this chart as a general guide for for placing the Mark at the correct height for your crop.
4
Crop Type
Low Vegetables & Row:
Blueberries, Strawberries,
Lettuce
High Vegetables & Row:
Corn, Wheat, Soy,
Tea, Cannabis
Wine Grapes
Orchards:
Nuts, Citrus, Coee
Recommended Height
Above Canopy
½ row width
1 ½ row width
The most important consideration
here is getting the full 70° angle
of the infrared temperature sensor
to hit the canopy. To achieve this,
the Mark should be placed above
the canopy at a height of about half
the width of the vine.
Same as Wine Grapes
Example
If row is 60”, then put at
30”, or 2 ½’
If row is 60”, then put at
90”, or 7 ½’
For a 2’ wide vine, put
it 1’ above the canopy.
Standard pole height is 7’
For a tree 6’ wide, put it 3’
above the canopy

5
Installation Guide For Short & Tall Crops
Tips on how to place your Mark in the field.
Decision Agriculture
Pick a Representative Spot & Check Cellular Reception
The Mark should be placed in a location that best represents crop conditions. Be attentive to local surroundings
such as tall trees that may cast shadows.
The Mark should be placed in a location with good cellular service. Generally, if you see two bars on your phone,
the Arable Mark will be able to connect to the server and send data to the cloud at regular intervals.
FOR SHORT CROPS (UNDER 4’)
Step 1.
Pole Placement
Drive the pole firmly into the ground so that it is
roughly level and will not slip in time. Make sure to
avoid any irrigation lines below the soil.
FOR TALL CROPS (4’ AND ABOVE)
Step 1.
Pole Placement
Place pole near trellis post. It will take a little
adjustment to get the pole flat along the post and
in between wires. Don’t fix it to the post just yet;
you will want to be able to tilt it towards yourself
to put the device on the top of the pole before
aixing it to the trellis post.
We also recommend creating a hole near the base
of the trellis post to bury part of the pole, using a
soil probe or hand spade. This gives it some added
stability.
NOTE: the Mark will be looking at a circular area
below it with a diameter that is twice its mounted
height.
H
2x H

6
Installation Guide For Short & Tall Crops
FOR ALL CROPS
Step 2.
Deploy Arable Mark by
Connecting it to the Mount
On the bottom of the device is an alignment ‘tick.’
Align this tick with the button on the vertical mount
and twist clockwise until until you hear a click.
Lights on the device will start blinking to indicate
that the deployment sequence has initiated. The
initiation sequence boots the system, runs a few
sensor tests, and connects to the Arable cloud server.
This may take 3 to 5 minutes. Please stay with the
device during this time.
When the initiation sequence is finished, all four
lights around the Arable logo will shine solid blue
and blink in unison a few times.
If any of the lights turn red:
If any of the lights during the initialization system
check turn red or shut o and don’t respond to a
quick press of the button, disconnect the device
from the mount, recheck the battery by pressing the
button on the top, and then try to deploy the device
again by reconnecting the mount to the device.
(Continued)
Installation Guide For Short & Tall Crops
Tips on how to place your Mark in the field.

Installation Guide For Short & Tall Crops
7
Tips on how to place your Mark in the field.
Decision Agriculture
If the lights are still red:
If after a couple of tries this does not seem to work,
use a paper clip to push the reset button, located
underneath the rubber flap on the bottom of the
device. Lift the rubber flap and you will find a small
circle on the upper righthand corner. Use the paper
clip to push the button for 3-5 seconds. Then wait
one minute and try again by reconnecting the device
to its mount.
If you redeploy and the light to the right of the
Arable ‘A’ logo is still red, the Mark has failed to reach
a server. You may want to try deploying in an area
with better cellular service.
If any other lights are red, there may be a problem
with your device. Please write down which light
turned red and contact support@arable.com.
If all lights have turned blue:
The deployment sequence is now complete.
Hot Tip:
If you missed the lights, simply press the button on
the top of the unit. If there were any errors during
deployment, one of the lights will turn red.

8
Tips on how to place your Mark in the field.
Installation Guide For Short & Tall Crops
Step 3.
Attach Mark to Pole
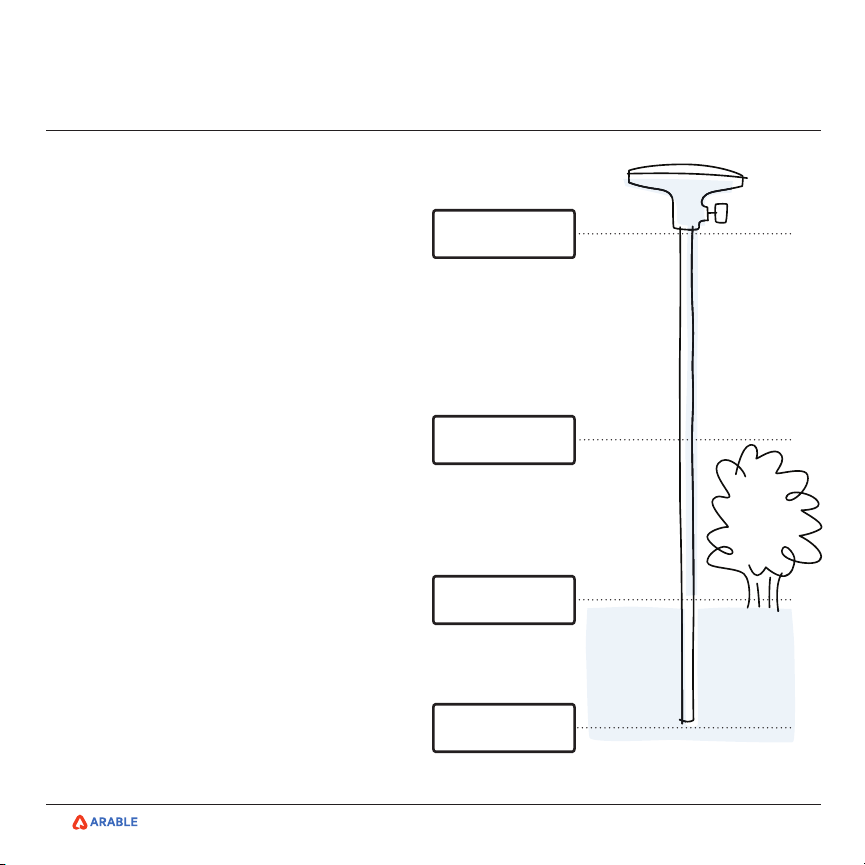
Attach the vertical mount to the top of the pole.
The knob on the mount should be pointed east if the
spectrometer positioning over the crop permits it. Do
not fully tighten the knob. For taller crops, secure
the pole to the trellis post using band clamps;
put one at the base and one at the top. Make sure
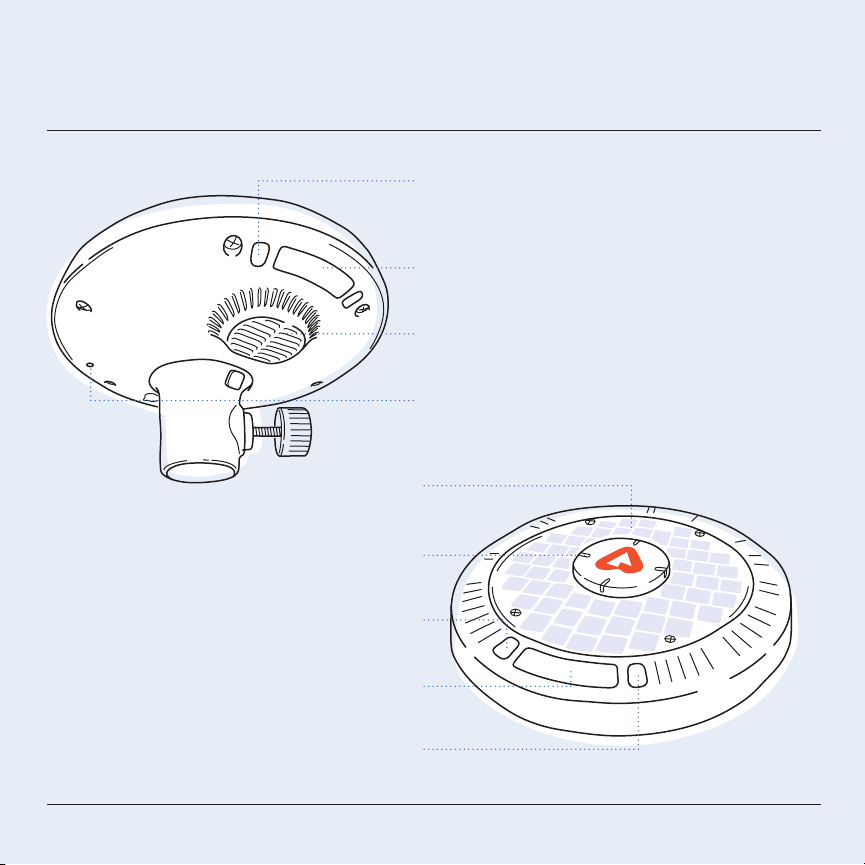
the lenses on the bottom of the device are over the
canopy, NOT the bare furrow. The device should be
positioned at the suggested height from the Mark
Height Placement Guide.
Step 4.
Check Level and Orientation
Press and hold down the button for a few seconds
until all lights blink blue twice; this is how the Mark
will go into leveling mode.
The Mark knows when it is level, but needs your
help getting there. If the device is not perfectly level,
only two or three LEDs will illuminate. The LED
that does not illuminate is the low side. Gently push
the device away from the low side until that LED
illuminates. A dierent LED may go dark. Repeat the
process until all 4 LEDs are illuminated. Once you
are successful, all four lights will be illuminated and
you may quickly press the button to go to the next
step. Devices need to be approximately level to
ensure accurate readings.

Installation Guide For Short & Tall Crops
Tips on how to place your Mark in the field.
9Decision Agriculture
Step 5.
Tighten Knob
Ensure the knob is fastened tightly after finalizing
orientation.
Step 6.
Install Arable Solar
See Instruction Booklet that came in the Arable Solar
box, or visit: http://bit.ly/arable-solar
All Done
Your Mark is now all set up! Wipe the surface of
any mud or debris that may be covering the clear
dome. You are now ready to log on to the Arable app
and see the weather and plant information for that
location. It may take up to 2 hours for the devices to
show in the app. You can select the new locations
from the list on the right side of the interface, and
give them a name or tags (such as the varietal).
Orientation Mode
Now the Mark will go into orientation mode.
For consistency across installation, we recommend
pointing the ‘A’ generally north. If the device
cannot be pointed north with the lower lenses
simultaneously positioned over the crop, ignore the
orientation step. It is of higher importance that the
lenses be over the crop. In orientation mode, the light
on top of the Arable ‘A’ logo will start blinking red.
The Mark wants the ‘A’ to point north.
Once it is perfectly aligned, the light will turn
solid blue.
N
S
WE
N

10
Contact Us
Our Customer Success team is standing
by to help!
Reach out at support@arable.com.
You can also log into your account at app.arable.com
and message our team through the help portal on
the lower right hand of the screen.
Legal Information
CAN ICES-3 (B)/NMB-3(B)
FCC Part 15 Class A
Note: This equipment has been tested and found to comply with
the limits for a Class A digital device, pursuant to part 15 of the FCC
Rules. These limits are designed to provide reasonable protection
against harmful interference in a residential installation. This
equipment generates, uses and can radiate radio frequency energy
and, if not installed and used in accordance with the instructions,
may cause harmful interference to radio communications. However,
there is no guarantee that interference will not occur in a particular
installation. If this equipment does cause harmful interference to
radio or television reception, which can be determined by turning
the equipment o and on, the user is encouraged to try to correct
the interference by one or more of the following measures:
—Reorient or relocate the receiving antenna.
—Increase the separation between the equipment and receiver.
—Connect the equipment into an outlet on a circuit dierent from
that to which the receiver is connected.
—Consult the dealer or an experienced radio/TV technician for help.
Get in touch.

Arable Labs, Inc.
www.arable.com
@ArableLabs
Other manuals for MARK
1
Table of contents
Other ARABLE Irrigation System manuals