Arcteq AQ 200 Series User manual

AQ-S214
Alarm and Indication IED
Instruction manual

Table of contents
6
6
6
8
9
10
10
10
11
11
11
12
13
23
25
29
30
30
31
38
38
44
49
51
55
56
56
60
63
63
63
63
64
65
67
69
69
69
70
70
70
73
73
76
76
78
80
82
83
84
86
86
89
89
89
89
1. Manual revision notes . . . . . . . . . . . . . . . . . . . . . . . . . . . . . . . . . . . . . . . . . . . . . . . . . . . . . . . . .
1.1. Version 2 revision notes . . . . . . . . . . . . . . . . . . . . . . . . . . . . . . . . . . . . . . . . . . . . . . . . . . . .
1.2. Version 1 revisionnotes . . . . . . . . . . . . . . . . . . . . . . . . . . . . . . . . . . . . . . . . . . . . . . . . . . . .
2. Abbreviations . . . . . . . . . . . . . . . . . . . . . . . . . . . . . . . . . . . . . . . . . . . . . . . . . . . . . . . . . . . . . . .
3. General . . . . . . . . . . . . . . . . . . . . . . . . . . . . . . . . . . . . . . . . . . . . . . . . . . . . . . . . . . . . . . . . . . . .
4. IED user interface . . . . . . . . . . . . . . . . . . . . . . . . . . . . . . . . . . . . . . . . . . . . . . . . . . . . . . . . . . .
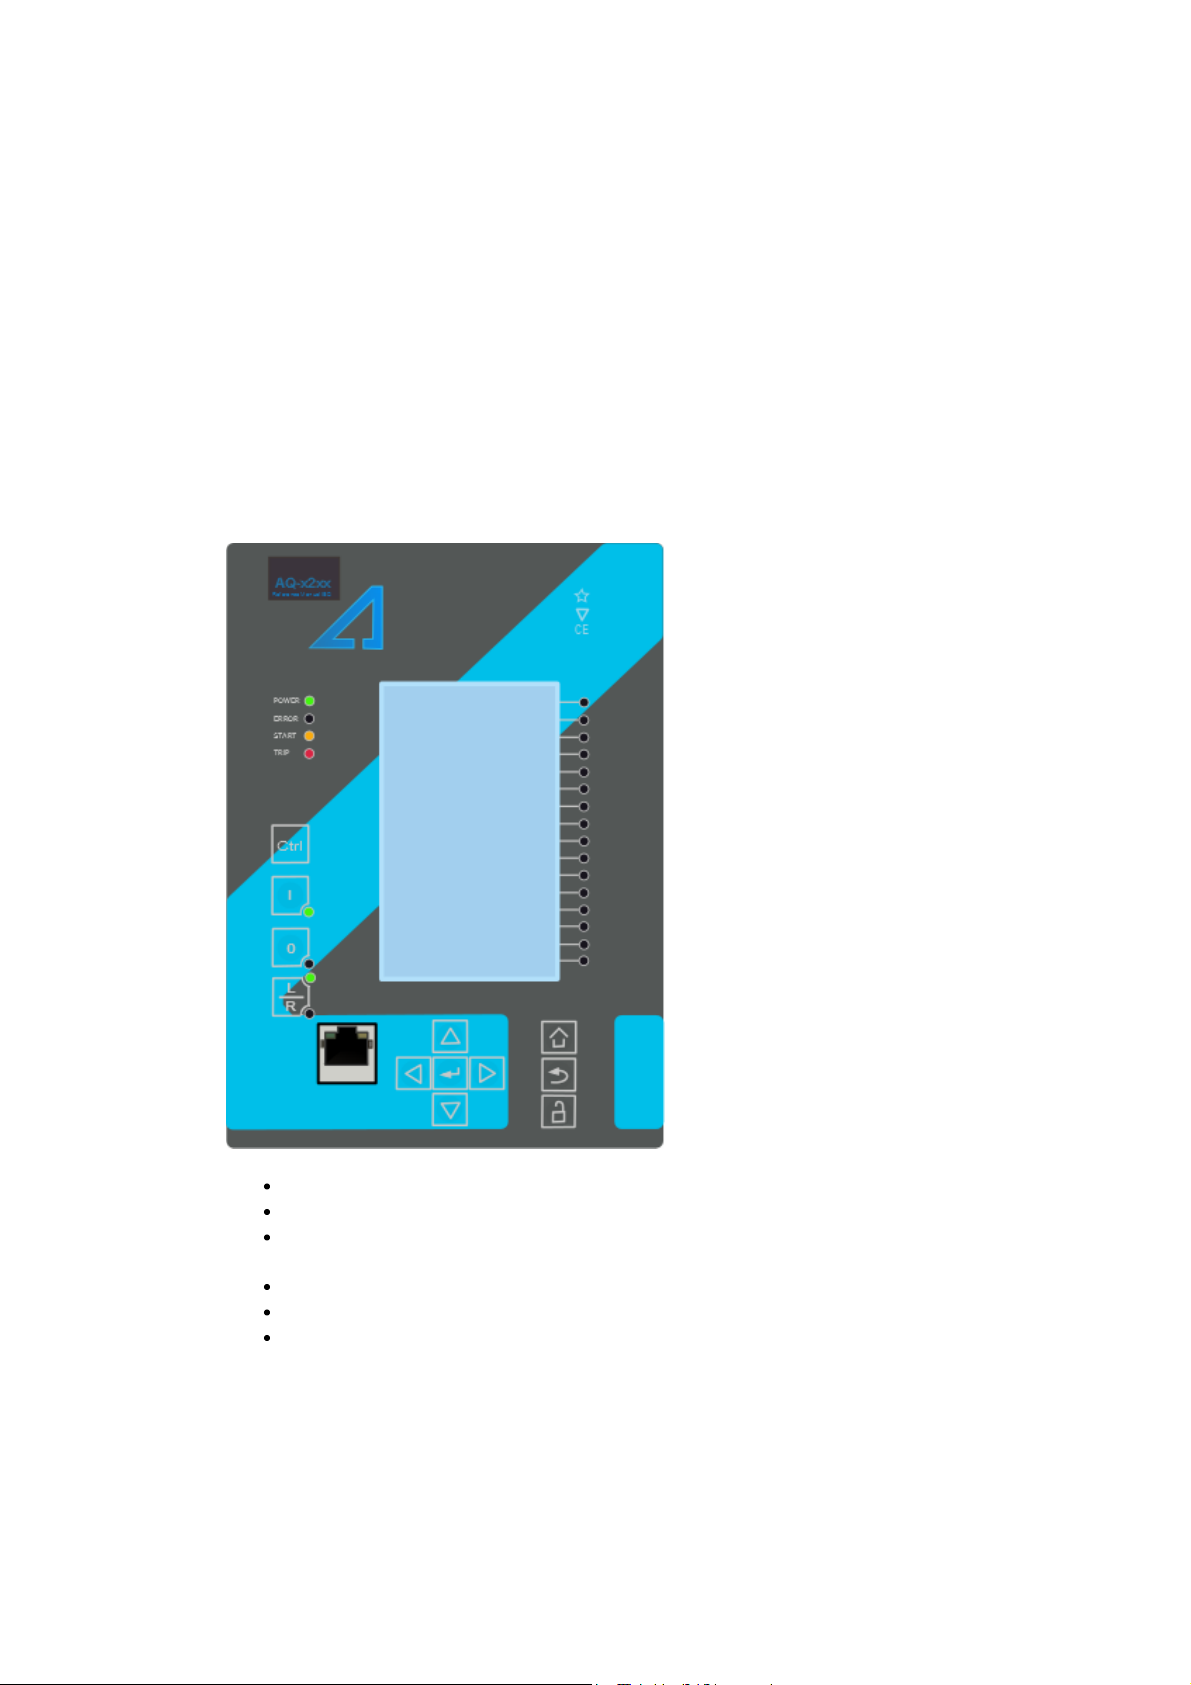
4.1. Panel structure . . . . . . . . . . . . . . . . . . . . . . . . . . . . . . . . . . . . . . . . . . . . . . . . . . . . . . . . . .
4.1.1. AQ 200 series local panel structure . . . . . . . . . . . . . . . . . . . . . . . . . . . . . . . . . . . . .
4.2. Mimic and main menu . . . . . . . . . . . . . . . . . . . . . . . . . . . . . . . . . . . . . . . . . . . . . . . . . . . .
4.2.1. Basic conguration . . . . . . . . . . . . . . . . . . . . . . . . . . . . . . . . . . . . . . . . . . . . . . . . .
4.2.2. Navigation in main conguration menus . . . . . . . . . . . . . . . . . . . . . . . . . . . . . . . . .
4.3. General menu . . . . . . . . . . . . . . . . . . . . . . . . . . . . . . . . . . . . . . . . . . . . . . . . . . . . . . . . . .
4.4. Control menu . . . . . . . . . . . . . . . . . . . . . . . . . . . . . . . . . . . . . . . . . . . . . . . . . . . . . . . . . . .
4.5. Communication menu . . . . . . . . . . . . . . . . . . . . . . . . . . . . . . . . . . . . . . . . . . . . . . . . . . . .
4.6. Monitoring menu . . . . . . . . . . . . . . . . . . . . . . . . . . . . . . . . . . . . . . . . . . . . . . . . . . . . . . . .
4.7. User level password conguration . . . . . . . . . . . . . . . . . . . . . . . . . . . . . . . . . . . . . . . . . . .
5. Functions . . . . . . . . . . . . . . . . . . . . . . . . . . . . . . . . . . . . . . . . . . . . . . . . . . . . . . . . . . . . . . . . .
5.1. General menu . . . . . . . . . . . . . . . . . . . . . . . . . . . . . . . . . . . . . . . . . . . . . . . . . . . . . . . . . .
5.2. Alarming function . . . . . . . . . . . . . . . . . . . . . . . . . . . . . . . . . . . . . . . . . . . . . . . . . . . . . . . .
5.3. Control functions . . . . . . . . . . . . . . . . . . . . . . . . . . . . . . . . . . . . . . . . . . . . . . . . . . . . . . . .
5.3.1. Setting group selection (SGS) . . . . . . . . . . . . . . . . . . . . . . . . . . . . . . . . . . . . . . . . .
5.3.2. Object control and monitoring (OBJ) . . . . . . . . . . . . . . . . . . . . . . . . . . . . . . . . . . . .
5.3.3. Indicator object monitoring (CIN) . . . . . . . . . . . . . . . . . . . . . . . . . . . . . . . . . . . . . . .
5.3.4. mA Output control . . . . . . . . . . . . . . . . . . . . . . . . . . . . . . . . . . . . . . . . . . . . . . . . . .
5.3.5. Programmable control switch . . . . . . . . . . . . . . . . . . . . . . . . . . . . . . . . . . . . . . . . .
5.4. Monitoring functions . . . . . . . . . . . . . . . . . . . . . . . . . . . . . . . . . . . . . . . . . . . . . . . . . . . . .
5.4.1. Measurement recorder . . . . . . . . . . . . . . . . . . . . . . . . . . . . . . . . . . . . . . . . . . . . . .
5.4.2. Measurement value recorder . . . . . . . . . . . . . . . . . . . . . . . . . . . . . . . . . . . . . . . . . .
6. System integration . . . . . . . . . . . . . . . . . . . . . . . . . . . . . . . . . . . . . . . . . . . . . . . . . . . . . . . . . .
6.1. Communication protocols . . . . . . . . . . . . . . . . . . . . . . . . . . . . . . . . . . . . . . . . . . . . . . . . .
6.1.1. NTP . . . . . . . . . . . . . . . . . . . . . . . . . . . . . . . . . . . . . . . . . . . . . . . . . . . . . . . . . . . . .
6.1.2. ModbusTCP and ModbusRTU . . . . . . . . . . . . . . . . . . . . . . . . . . . . . . . . . . . . . . . . .
6.1.3. ModbusIO . . . . . . . . . . . . . . . . . . . . . . . . . . . . . . . . . . . . . . . . . . . . . . . . . . . . . . . .
6.1.4. IEC 61850 . . . . . . . . . . . . . . . . . . . . . . . . . . . . . . . . . . . . . . . . . . . . . . . . . . . . . . . .
6.1.5. GOOSE . . . . . . . . . . . . . . . . . . . . . . . . . . . . . . . . . . . . . . . . . . . . . . . . . . . . . . . . . .
6.1.6. IEC 103 . . . . . . . . . . . . . . . . . . . . . . . . . . . . . . . . . . . . . . . . . . . . . . . . . . . . . . . . . .
6.1.7. DNP3 . . . . . . . . . . . . . . . . . . . . . . . . . . . . . . . . . . . . . . . . . . . . . . . . . . . . . . . . . . . .
6.1.8. IEC 101/104 . . . . . . . . . . . . . . . . . . . . . . . . . . . . . . . . . . . . . . . . . . . . . . . . . . . . . .
6.1.9. SPA protocol . . . . . . . . . . . . . . . . . . . . . . . . . . . . . . . . . . . . . . . . . . . . . . . . . . . . . .
6.2. General IO analog fault registers . . . . . . . . . . . . . . . . . . . . . . . . . . . . . . . . . . . . . . . . . . . .
6.3. Real time measurements to communication . . . . . . . . . . . . . . . . . . . . . . . . . . . . . . . . . . .
7. Applications and connection examples . . . . . . . . . . . . . . . . . . . . . . . . . . . . . . . . . . . . . . . . . . .
7.1. Connections AQ-S214 . . . . . . . . . . . . . . . . . . . . . . . . . . . . . . . . . . . . . . . . . . . . . . . . . . . .
8. Construction and installation . . . . . . . . . . . . . . . . . . . . . . . . . . . . . . . . . . . . . . . . . . . . . . . . . . .
8.1. Construction and installation . . . . . . . . . . . . . . . . . . . . . . . . . . . . . . . . . . . . . . . . . . . . . . .
8.2. CPU, IO and Power supply module . . . . . . . . . . . . . . . . . . . . . . . . . . . . . . . . . . . . . . . . . .
8.3. Binary input module (DI8) (option) . . . . . . . . . . . . . . . . . . . . . . . . . . . . . . . . . . . . . . . . . . .
8.4. Binary output module (DO5) (option) . . . . . . . . . . . . . . . . . . . . . . . . . . . . . . . . . . . . . . . . .
8.5. RTD & mA input module (option) . . . . . . . . . . . . . . . . . . . . . . . . . . . . . . . . . . . . . . . . . . . .
8.6. Serial RS232 communication module (option) . . . . . . . . . . . . . . . . . . . . . . . . . . . . . . . . . .
8.7. LC100 Ethernet communication module (option) . . . . . . . . . . . . . . . . . . . . . . . . . . . . . . . .
8.8. Installation dimensioning . . . . . . . . . . . . . . . . . . . . . . . . . . . . . . . . . . . . . . . . . . . . . . . . . .
9. Technical data . . . . . . . . . . . . . . . . . . . . . . . . . . . . . . . . . . . . . . . . . . . . . . . . . . . . . . . . . . . . . .
9.1. Hardware . . . . . . . . . . . . . . . . . . . . . . . . . . . . . . . . . . . . . . . . . . . . . . . . . . . . . . . . . . . . . .
9.1.1. CPU & Power supply . . . . . . . . . . . . . . . . . . . . . . . . . . . . . . . . . . . . . . . . . . . . . . . .
9.1.1.1. Auxiliary voltage . . . . . . . . . . . . . . . . . . . . . . . . . . . . . . . . . . . . . . . . . . . . .
AQ-S214
Instruction manual
Version: 2.00
1 © Arcteq Relays Ltd

89
90
91
91
91
92
92
92
93
93
93
93
93
93
94
94
96
98
9.1.1.2. CPU communication ports . . . . . . . . . . . . . . . . . . . . . . . . . . . . . . . . . . . . .
9.1.1.3. CPU Binary inputs . . . . . . . . . . . . . . . . . . . . . . . . . . . . . . . . . . . . . . . . . . .
9.1.1.4. CPU Binary outputs . . . . . . . . . . . . . . . . . . . . . . . . . . . . . . . . . . . . . . . . . .
9.1.2. Option cards . . . . . . . . . . . . . . . . . . . . . . . . . . . . . . . . . . . . . . . . . . . . . . . . . . . . . .
9.1.2.1. Binaryinput module . . . . . . . . . . . . . . . . . . . . . . . . . . . . . . . . . . . . . . . . . .
9.1.2.2. Binary output module . . . . . . . . . . . . . . . . . . . . . . . . . . . . . . . . . . . . . . . . .
9.1.2.3. RTD & mA input module . . . . . . . . . . . . . . . . . . . . . . . . . . . . . . . . . . . . . . .
9.1.2.4. RS232 & Serial ber communication module . . . . . . . . . . . . . . . . . . . . . . .
9.1.2.5. Double LC100Mb Ethernet module(Redundant) . . . . . . . . . . . . . . . . . . . .
9.1.3. Display . . . . . . . . . . . . . . . . . . . . . . . . . . . . . . . . . . . . . . . . . . . . . . . . . . . . . . . . . . .
9.2. Functions . . . . . . . . . . . . . . . . . . . . . . . . . . . . . . . . . . . . . . . . . . . . . . . . . . . . . . . . . . . . . .
9.2.1. Control functions . . . . . . . . . . . . . . . . . . . . . . . . . . . . . . . . . . . . . . . . . . . . . . . . . . .
9.2.1.1. Setting group selection . . . . . . . . . . . . . . . . . . . . . . . . . . . . . . . . . . . . . . . .
9.2.1.2. Object control (OBJ) . . . . . . . . . . . . . . . . . . . . . . . . . . . . . . . . . . . . . . . . .
9.2.2. Monitoring functions . . . . . . . . . . . . . . . . . . . . . . . . . . . . . . . . . . . . . . . . . . . . . . . .
9.3. Tests and environmental . . . . . . . . . . . . . . . . . . . . . . . . . . . . . . . . . . . . . . . . . . . . . . . . . .
10. Ordering information . . . . . . . . . . . . . . . . . . . . . . . . . . . . . . . . . . . . . . . . . . . . . . . . . . . . . . . .
11. Contact and reference information . . . . . . . . . . . . . . . . . . . . . . . . . . . . . . . . . . . . . . . . . . . . .
AQ-S214
Instruction manual
Version: 2.00
© Arcteq Relays Ltd 2

Disclaimer
Please read these instructions carefully before using the equipment or taking any other actions with
respect to the equipment. Only trained and qualied persons are allowed to perform installation,
operation, service or maintenance of the equipment. Such qualied persons have the responsibility to
take all appropriate measures, including e.g. use of authentication, encryption, anti-virus programs,
safe switching programs etc. necessary to ensure a safe and secure environment and usability of the
equipment. The warranty granted to the equipment remains in force only provided that the instructions
contained in this document have been strictly complied with.
Nothing contained in this document shall increase the liability or extend the warranty obligations of the
manufacturer Arcteq Relays Ltd. The manufacturer expressly disclaims any and all liability for any
damages and/or losses caused due to a failure to comply with the instructions contained herein or
caused by persons who do not full the aforementioned requirements. Furthermore, the manufacturer
shall not be liable for possible errors in this document.
Please note that you must always comply with applicable local legislation and regulations. The
manufacturer gives no warranties that the content of this document is in all respects in line with local
laws and regulations and assumes no liability for such possible deviations.
You are advised to notify the manufacturer in case you become aware of any errors in this document or
of defects in the equipment.
The manufacturer reserves the right to update or amend this document at any time.
AQ-S214
Instruction manual
Version: 2.00
3 © Arcteq Relays Ltd

Copyright
Copyright © Arcteq Relays Ltd. 2018. All rights reserved.
AQ-S214
Instruction manual
Version: 2.00
© Arcteq Relays Ltd 4

1. Manual revision notes
1.1. Version 2 revision notes
Revision 2.00
Date 6.6.2019
Changes
- New more consistent look.
- Improved descriptions generally in many chapters.
- Improved readability of a lot of drawings and images.
- Updated protections included included in every IED manual.
- Every protection IED type now has connection drawing, application example drawingwith function block diagram
and application example with wiring.
- Added General-menu description.
1.2. Version 1 revisionnotes
Revision 1.00
Date 30.1.2013
Changes - The rst revision for AQ-S214
Revision 1.01
Date 22.11.2013
Changes - Additions to HMI structure and binary input module chapters
Revision 1.02
Date 2.2.2015
Changes
- Added RTD&mA input module, Double LC 100Mb Ethernet card module and Serial RS232 & serial ber
module hardware descriptions
- Added object control and monitoring function description and technical data
Revision 1.03
Date 11.3.2015
Changes - Alarms-description revised
Revision 1.04
Date 30.8.2016
Changes - Added password set up guide (previously only in AQtivate user guide)
Revision 1.05
Date 10.2.2017
Changes - Added Programmable Control Switch and Indicator Object descriptions
- Order Code updated
Revision 1.06
Date 13.3.2017
Changes - Alarming function description revised. CTRL-button now clears all alarms.
Revision 1.07
Date 20.12.2017
Changes
- Event lists revised on several functions
- RTD&mA card description improvements
- Ring-lug CT card option description added
- Order code revised
AQ-S214
Instruction manual
Version: 2.00
5 © Arcteq Relays Ltd

Revision 1.08
Date 18.1.2019
Changes - Added HMI display technical data
AQ-S214
Instruction manual
Version: 2.00
© Arcteq Relays Ltd 6

2. Abbreviations
CB – Circuit breaker
CBFP – Circuit breaker failure protection
CT – Current transformer
CPU – Central processing unit
EMC – Electromagnetic compatibility
HMI – Human machine interface
HW – Hardware
IED – Intelligent electronic device
IO – Input output
LED – Light emitting diode
LV – Low voltage
MV – Medium voltage
NC – Normally closed
NO – Normally open
RMS – Root mean square
SF – System failure
TMS – Time multiplier setting
TRMS – True root mean square
VAC – Voltage alternating current
VDC – Voltage direct current
SW – Software
uP - Microprocessor
AQ-S214
Instruction manual
Version: 2.00
7 © Arcteq Relays Ltd

3. General
AQ-S214 Alarm and Indication IED is a member of the AQ-200 product line. The AQ-200 protection
product line in respect of hardware and software is a modular device. The hardware modules are
assembled and congured according to the application IO requirements and the software determines
the available functions. This manual describes the specic application of the AQ-S214 Alarm and
Indication IED.
The AQ-S214 Alarm and Indication IED may be applied as a substation alarm annunciator, substation
general I/O extension unit or in any other application requiring extended I/O capability. Local
indications are conveniently visualized through freely programmable alarm LED display and event list.
AQ-S214 can be connected to substation automation system using various standard protocols
including IEC 61850 substation communication standard.
AQ-S214 can be programmed using easy to use AQtivate 200 setting and conguration software.
AQ-S214
Instruction manual
Version: 2.00
© Arcteq Relays Ltd 8

4. IED user interface
4.1. Panel structure
AQ 200 series IED user interface section is divided into hardware- and software user interface
sections. Software interface is divided into local panel conguration and programming by using
AQtivate 200 freeware software suite.
4.1.1. AQ 200 series local panel structure
AQ 200 series IED have multiple LEDs, control buttons and local RJ-45 Ethernet port for conguration
on front as a default. On rear each unit is equipped with RS-485 serial interface and RJ-45 Ethernet
interface options as a standard. See list below.
Figure. 4.1.1. - 1. Local panel structure.
4 default LEDs: Power, Error, Start (congurable) and Trip (congurable).
16 freely congurable LEDs with programmable legend texts.
3 object control buttons: Choose the controllable object with Ctrl –button, control breaker with
0- and I push buttons.
L/R push button for switching between local and remote control modes.
7 Navigation buttons for IED local programming and a button for password activation.
RJ-45 Ethernet port for IED conguration.
Power LED is lit (green) when unit is powered on. Error LED is lit (red) when relay has an internal error
that affects the operation of the unit. This can be either a hardware or software error. Start LED
(yellow) and Trip LED (red) activation is user settable. Activation and color (green/yellow) of the 16
LEDs on the right side of the display are user settable.
AQ-S214
Instruction manual
Version: 2.00
9 © Arcteq Relays Ltd

4.2. Mimic and main menu
4.2.1. Basic conguration
Basic conguration
IED user interface is divided into 5 quick displays. The displays are Events, Favorites, Mimic, LEDs and
Clock. Default quick display is the mimic view and it is possible to glance through these menus by
pressing arrows left and right. Home button transfers the user between quick displays and 6 main
conguration menus. Main conguration menus are General, Protection, Control, Communication,
Measurements and Monitoring. It is switch between the main menus just by using all of the four arrow
keys.
Figure. 4.2.1. - 2. Basic navigation.
Moving around in the ve main quick displays is done by pressing navigation keys to left and
right.
Home buttontransfers the user between the quick displays and six main conguration menus.
Moving around in main conguration menus is done by pressing navigation buttons
up/down/left/rightand entering menu is conrmed by pressing enter in the middle of the arrow
keys.
Notice that name of the main menu appears to the bottom of the display while staying on top of
icon.
Cancel/backkey takes you one step back or holding it down for 3 seconds takes you back to
general –menu. Cancel key is also used for resetting user alarm LEDs.
Padlock buttontakes user to password menu where it is possible to enter different user levels
(user, operator, congurator and super user).
4.2.2. Navigation in main conguration menus
All the settings in this IED type have been divided into main conguration menus. Main conguration
menus are presented below. Available menus may vary according to IED type.
AQ-S214
Instruction manual
Version: 2.00
© Arcteq Relays Ltd 10

Figure. 4.2.2. - 3. Main conguration menus.
All the settings in IED type have been divided into four main conguration menus. Main conguration
menus are presented below.
Figure. 4.2.2. - 4. Main conguration menus.
4.3. General menu
Device info
Figure. 4.3. - 5. Device Info sub- menu.
Set name and location of the device.
Serial number and SW version of the IED.
Hardware conguration (order code).
Source for time synchronization, Internal or External (internal as default).
Enable stage forcing (disabled / enabled). When forcing is disabled after using every forced
output will restore. Forcing is done individually in info menu of each stage.
Language selection, all available languages here (English as default).
Clear devices events.
AQ-S214
Instruction manual
Version: 2.00
11 © Arcteq Relays Ltd

LCD contrast level and setting 0…255 (120 as default).
Reset latched signals
4.4. Control menu
Control menuincludes Controls Enabled sub-menu and sub-menus for different control functions like
Setting Groups, Objects, Control Functions and Device IO. Valid control functions vary according IED
type.
Figure. 4.4. - 6. Control menu view. Functions vary according IED type.
Controls enabled
Figure. 4.4. - 7. Controls Enabled sub- menu.
Activation
of different control functions is done in Controls Enabled –sub menu. Each control
function is disabled as standard. Active functions will appear below Control Functions –sub
menu.
Activated objects
will appear below
Objects
–sub menu. Each object is disabled as standard.
AQ-S214
Instruction manual
Version: 2.00
© Arcteq Relays Ltd 12

Setting groups
Figure. 4.4. - 8. Setting Groups menu displays all the information related to group changing.
Active setting group
displays the current active setting group 1…8.
It is possible to activate desired setting group by setting
Force SG
. While doing this Force SG
change has to be enabled.
In
Used setting groups
menus it is possible to activate setting groups between 1 and 1…8
(default only 1 group is active).
Select local control for different setting groups from
SG Local Select
. Digital inputs, Logical
inputs or outputs, stage starting- tripping- or blocking, RTDs and object status information can
be used.
Event masking for setting groups (masks are off as default). Only masked events appear to
event list. Events cannot be cleared.
Setting group 1 has the highest and group 8 the lowest priority. Setting groups can be controlled with
steady signal or pulses.
Figure. 4.4. - 9. Group changing with pulse control only or with pulses and static signal.
AQ-S214
Instruction manual
Version: 2.00
13 © Arcteq Relays Ltd

Objects
Figure. 4.4. - 10. Object controlling.
Each activated object is visible in
Objects
-menu. As default all objects are disabled. Each active object
has four setting menus, settings, application control, registers and events.
Figure. 4.4. - 11. Info menu indicates all the details listed below certain protection stage or function.
AQ-S214
Instruction manual
Version: 2.00
© Arcteq Relays Ltd 14

Control access may be set to Local- or Remote control (local as default). When local control is
enabled it is not possible to control object trough bus and vice versa.
Type name of the object. As default objects are named as Object1…5.
Select
type of the object
between grounding disconnector, motor controlled disconnector,
circuit breaker, and withdraw able circuit breaker (circuit breaker as default).
Object status
can be between Bad, Closed, Open and Intermediate. Intermediate is the phase
between open and closed where both status inputs are equal to zero (0). When both status
inputs of the object are one (1) the status of the object is Bad.
Object withdraw status
could be Bad, Cart In, Cart Out or Intermediate. Intermediate is the
phase between open and closed where both status inputs are equal to zero (0). When both
status inputs of the cart are one (1) the withdrawn status is Bad.
Additional status information
gives feedback from the object whether the opening and closing is
allowed or blocked, whether the object is ready or the synchronization status is ok.
Activate Use Synchrocheck
or
Use Object Ready.
Closing the object is forbidden if sides are
out of sync or object is not ready to be closed.
Settings
-menu also includes statistics for open- and closed requests. Stats can be cleared by
choosing
Clear statistics
→
Clear
.
Object has Open- and Close inputs and withdrawable object has In- and Out inputs. Object
Ready- and external Synchrocheck permission have status inputs as well. Digital inputs, Logical
inputs or outputs, stage starting- tripping- or blocking, RTDs and object status information can
be used to indicate the status.
Object open- and close signals of an object are connected to physical output relays.
Separate timeouts for objects are set in Settings menu. Synchronization wait- and Object Ready
wait timeouts are settable between 0.02…500.00 s (default 200ms, step 20ms). If time expires
the controlling of object fails. Same time settings apply with Maximum close- and open
command pulse lengths. Control Termination Timeout is set to 10 seconds as default. After the
set delay if the controlled object does not respond accordingly the procedure is terminated and
there will be fail message.
Access level for MIMIC control is selected between User, Operator, Congurator and Super
user. To control MIMIC the terms of user access level (password) has to be fullled. As default
the access level is set to Congurator.
For object local and remote controlling digital inputs can be used. Remote controlling via bus is
congured in protocol level.
AQ-S214
Instruction manual
Version: 2.00
15 © Arcteq Relays Ltd

Figure. 4.4. - 12. Object output- and block signal setting.
Object statuses can be connected directly to physical outputs in Signal Connections menu which is
sub-menu to APP CONTR menu. It is possible to connect to output relay or to start- trip- or user
congurable LED. Connection to outputs can be either latched |x| or non-latched x.
Object blocking is done in Blocking Input Control menu. Blocking can be done by using digital inputs,
logical inputs or outputs, stage start- trip- or blocked information or by using object status information.
AQ-S214
Instruction manual
Version: 2.00
© Arcteq Relays Ltd 16

Figure. 4.4. - 13. Object registers and events.
Control functions
Figure. 4.4. - 14. Stage navigation and modication.
Each enabled control function is listed below Control Functions menu. Every function includes same
sub-menus as protections stages including Info, Settings, Registers, IO and Events.
AQ-S214
Instruction manual
Version: 2.00
17 © Arcteq Relays Ltd

Device IO
Figure. 4.4. - 15. Device IO menu.
Device IO menu has sub-menus for Binary Inputs, Binary Outputs, LEDs, Logic signals and for
general Device IO matrix.
Binary inputs, Logic Outputs, protection stage status signals (start, trip & blocked etc.) and
object status signals can be connected to output relay or to start- trip- or user congurable
LEDs in Device IO matrix.
Figure. 4.4. - 16. IED Binary Inputs menu.
All settings related to binary inputs can be found under the Binary Inputs menu. Binary inputs Settings
menu includes polarity selection for the input (normal open or normal closed), activation (16…200
VAC/DC, step 0.1V) and release (10…200 VAC/DC, step 0.1V) threshold voltage for each available input
and activation delay (0…1800 s, step 1ms). Binary input statuses can be check from corresponding
menu.
AQ-S214
Instruction manual
Version: 2.00
© Arcteq Relays Ltd 18

Digital input activation and release threshold follows the measured peak value. Activation time of input
is between 5-10 milliseconds. Activation delay is congurable. Release time with DC is between 5-10
milliseconds. Release time with AC is less than 25 milliseconds.
Figure. 4.4. - 17. Binary Outputs menu.
Polarity of binary outputs is congured between normal open (NO) and normal closed (NC) in Binary
Outputs menu. As default polarity is normal open. Operation delay of output contact is around 5
milliseconds.
Description text for Binary output is congured in Binary Output Descriptions menu. Name change
affects to Matrixes and input –or output selection lists. Names have to be congured online or updated
to the IED via setting le.
NOTE! Normal closed signal goes to default position (normal open) in case the relay loses the auxiliary
voltage or during System full reset. Normally closed output signal does not open during
Communication- or protections reset.
AQ-S214
Instruction manual
Version: 2.00
19 © Arcteq Relays Ltd
Other manuals for AQ 200 Series
1
This manual suits for next models
3
Table of contents
Other Arcteq Security System manuals
Popular Security System manuals by other brands

Owl Home
Owl Home Owl Wired user guide

EDS
EDS EDA-T Series installation manual

ADEMCO
ADEMCO Vista-10P Installation and setup guide

PicC Electronics
PicC Electronics SMS ALERT 15 Alarm Plus user manual

TALITOR(FAR EAST) CO.
TALITOR(FAR EAST) CO. CW1103 user guide

FBII
FBII XL-4B Hookup and installation instructions