manuals.online logo
Brands
  1. Home
  2. •
  3. Brands
  4. •
  5. Ardi
  6. •
  7. Lock
  8. •
  9. Ardi BML16 User manual

Ardi BML16 User manual

STEP 1:
-Make sure your “Door and Frame” have been prepared all cutout for
Mortise lock. (Craftsman and special tolls are required)
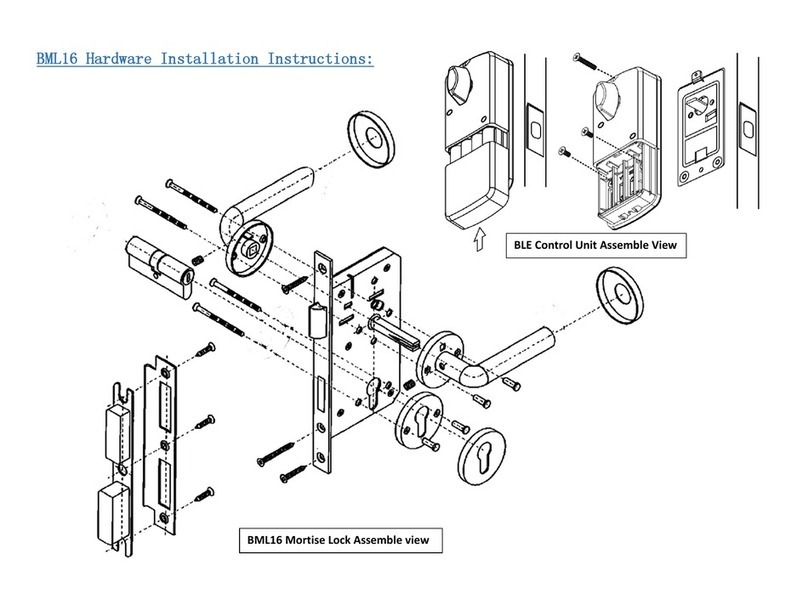
-Take out “BML16 Hardware Installation Instructions”.
-Read the instruction and identify all essential components and parts.
STEP 2:
-Insert “Lock Body” into the door cutout.
STEP 3:
-Insert two screws and use screwdriver to hold the lock body .
Do not use the power tool, we only need 90% tighten screw
to hold the lock body in fixed place.
Alignment note: After all components and parts put together,
We need to make sure the lever handles can retract / extend
“Latch Bolt” and BLE control unit can “Deadbolt”.
When BML16 is working properly, we will tighten all screws.
STEP 4:
-Open Cylinder Lock (Keys) box to locate the long screw for it.
STEP 5:
-Insert the “Cylinder Lock” into the “Lock Body”. Make sure the
“Key Way” face outdoor and “Tailpiece” face indoor.
STEP 6:
-Insert the long screw through Lock Body and carefully align
with “Cylinder Lock” to accept the long screw. Please use
screwdriver to hold the Cylinder Lock in place.
Do not use the power tool, we only need 90% tighten screw
to hold the Cylinder Lock in fixed place.
Alignment note: After all components and parts put together,
We need to make sure the lever handles can retract / extend
“Latch Bolt” and BLE control unit can “Deadbolt”. We will tighten
all screws.
STEP 7:
-Locate the “Cylinder Mounting Plate” and hex nuts with screws.
-Hex nuts have to insert into Mounting Plate and catch the long
screw for holding ”BLE control unit’s mounting plate” in place.
STEP 8:
-Depends on the door thickness, you may have to trim the
“Cylinder Lock’s mounting screw”.
Note: In the picture shows one of the screw has been trimmed.
How much do you have to trim?
You could inert original screws through “BLE control unit
Mounting Plate” and tighten it up, whatever it stuck out, you can
trim that amount off.
STEP 9: (Secure the BLE Control Unit’s Mounting Plate)
Note: Step 9 –Step 13 shows the procedure to secure mounting
plate.
Step 9 and Step 10 show work on indoor side.
Step 11 and Step 12 show work on outdoor side.
-Insert two screws through Mounting plate from indoor site
and hold both screws (or one screw at the time, but do not
tighten it).
-These two screws need to go through Lock Body two holes
next to the Cylinder Lock.
Mounting Holes
STEP 10:
-From indoor side and insert two screws through lock body and
make sure both screws can catch the hex nuts from the other
side.
STEP 11:
-From outdoor side, insert hex nut through Cylinder Lock
Mounting Plate.
STEP 12:
-From indoor side and push screw through Lock Body and
carefully align screw to catch hex nut and manually tighten few
threads.
-You have to insert both hex nuts into the plate and manually
tighten each nut.
-After both hex nut catch screws, you can use the screwdriver to
do 80% tighten.
Alignment note: During BLE Control Unit installation, you have to
align mounting plate center circle to Cylinder Lock Tailpiece.
STEP 13:
-Use the screwdriver to tighten 90% on both screws.
STEP 14:
-Locate the lever handles.
STEP 15:
-Insert “Spindle” through the Lock Body.
STEP 16:
-Apply lever handles to both side of the door.
STEP 17:
-Locate mounting screws for lever handle.
STEP 18:
-Insert hex nut into lever handle from outdoor side.
-Because screw has go through Lock Body, you can only use hole
patterns match those two holes.
-You have to push screw through from indoor side and catch by
this hex nut.
STEP 19:
-Push screw through the indoor side of the lever hole and Lock
Body hole to reach outside hex nut.
STEP 20: (Screw #1)
-From indoor side and push screw through Lock Body and
carefully align screw to catch hex nut and manually tighten few
threads.
-You have to insert both hex nuts into the plate and manually
tighten each nut.
-After both hex nut catch screws, you can use the screwdriver to
do 80% tighten.

Other manuals for BML16

1

Other Ardi Lock manuals

Ardi EZlock User manual

Ardi

Ardi EZlock User manual

Ardi BML16 User manual

Ardi

Ardi BML16 User manual

Ardi BKL16 User manual

Ardi

Ardi BKL16 User manual

Popular Lock manuals by other brands

Roto Eneo AF E601 Operation instructions

Roto

Roto Eneo AF E601 Operation instructions

Neptune 500 Series manual

Neptune

Neptune 500 Series manual

KHL KEM-S600M user guide

KHL

KHL KEM-S600M user guide

BEST ACCESS SYSTEMS 82T installation instructions

BEST ACCESS SYSTEMS

BEST ACCESS SYSTEMS 82T installation instructions

Nexia BE369 installation instructions

Nexia

Nexia BE369 installation instructions

Gianni Industries EB-262 specification

Gianni Industries

Gianni Industries EB-262 specification

Lista Code Lock User handbook

Lista

Lista Code Lock User handbook

National Cabinet Lock C8163 Dimensional drawing

National Cabinet Lock

National Cabinet Lock C8163 Dimensional drawing

JNF SKY SYSTEM IN.20.602 installation manual

JNF

JNF SKY SYSTEM IN.20.602 installation manual

Schlage B360 installation instructions

Schlage

Schlage B360 installation instructions

CODELOCKS CL300 instructions

CODELOCKS

CODELOCKS CL300 instructions

EVVA AirKey System manual

EVVA

EVVA AirKey System manual

August ASL-01 installation guide

August

August ASL-01 installation guide

schmersal AZM300Z-I2-ST1P2P-T-DU Instructions for assembly operation

schmersal

schmersal AZM300Z-I2-ST1P2P-T-DU Instructions for assembly operation

Gianni Industries 10003F Specification sheet

Gianni Industries

Gianni Industries 10003F Specification sheet

Ojmar OTS ADVANCE user manual

Ojmar

Ojmar OTS ADVANCE user manual

Neptune 500 Series manual

Neptune

Neptune 500 Series manual

COMPX Timberline CB-284 instruction sheet

COMPX

COMPX Timberline CB-284 instruction sheet

manuals.online logo
manuals.online logoBrands
  • About & Mission
  • Contact us
  • Privacy Policy
  • Terms and Conditions

Copyright 2025 Manuals.Online. All Rights Reserved.