Ardi EZlock User manual

1
EZlock User Manual with EZlock App
Introduction and Features:
EZlock, smart lock, is the most economical way to provide
secure and convenient control of your deadbolt door lock. You can
unlock the door by launching the Near Field Unlock Function;
triggering the Touch Unlock Function by specific touch method* or
simply accessing to the App for App Unlock. It allows you to grant
or revoke access to access to a third party’s smartphone by secure
QR Code or email. This virtual key cannot be duplicated or
transferred to other devices. Key Fob is included for non-
smartphone family members. The EZlock comes with advanced
and easy to install ‘deadbolt lock replacement kits’ and powerful
free ‘Mobile App’.
* Touch the Keyway (Center Key metal) and Key house (External
Metal) at same time.
In addition, you can assign a temporary authority for your
friends to visit your house without giving them the real physical
keys.
1. EZlock Smart Lock contains 40 sets of unique ID keys:

2
◢1 set of Owner eKey, which can assign 9 sets of Family
(member) eKeys and 24 sets of Guest (temporary) eKeys.
◢Owner eKey and Family eKeys are available permanently
and have unlimited usages. The Owner can grant / revoke
the authorization of all eKeys. For the Guest eKeys can be
assign / withdraw to weeks, hours and minutes by Owner.
◢Guest eKeys can be assigned with expiration dates via email
(for long distant) or QR Code (for face-to-face). Each eKey will
be deleted automatically from the EZlock system when it is
expired.
◢Six set of Key Fob, which does not have expiration dates
and working distance is around 5 meters. Key Fob is
Bluetooth Low Energy (BLE) tag, it need to be paired with
EZlock system with secure ID Code (Each package contains
only one key fob. Additional fobs are optional items).
2. There is a unique ID code for each EZlock eKey, which cannot
be duplicated or transferred. Each eKey can only be
registered once to the APP. Only Owner can issue a shared
eKey to all users (Family / Guest / Key Fob).
3. EZlock equips with the most advanced technology of “Lock
Replacement Set”for easy installation, the unique free APP as
well as safe and easy-to-use Key Fob.

3
How to setup:
In order to avoid errors and abnormal behaviors of the EZlock,
please read this installation instruction carefully. Being familiar
with all EZlock’s items name and settings steps will bring you a
better user experience.
※please use ‘EZlock deadbolt lock replacement kits’
instructions to complete EZlock Hardware installation.
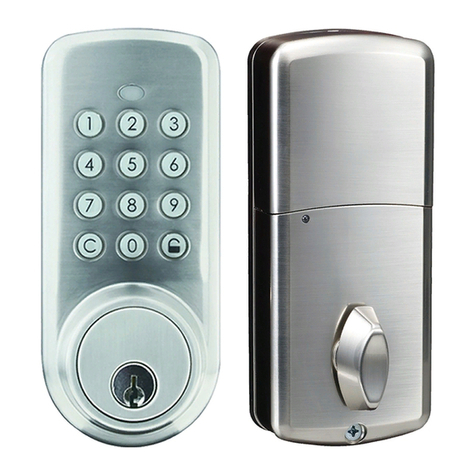
1.Understanding the external appearance of EZlock
Smart Lock
(Green / Red / Orange)
LED Indicator
Lock Turn-Piece
Rose Light Ring
Fig-1
(Green / Red / Blue)

4
2.Batteries Installation
The LED indicator will turn Orange for 10 seconds after
installing 4 batteries into the battery compartment of
the EZlock.
(Note: If EZlock has been paired before, the
LED will be turned off. You can follow hardware-reset
procedures to reset the device)
3.Understanding the colors of the Rose Light
Ring and the LED indicator of the EZlock.
◢ORANGE: In Registration Mode. (Only from ‘LED
indicator’for registration mode).
◢RED: Door is locked.
◢GREEN: Door is unlocked.
◢BLUE FLASHING* :Touch sensor detect
touching and perform BLE linking to your smart
devices.
* Used by touching unlock function, EZlock App
must run on the background and Bluetooth
connected together. EZlock should unlock/lock
within 3 -5 seconds after BLE connection has been
established. If BLE connection fail, please try it
again.

5
4.Download the APP
(youtube demo video link: Ardi EZlock Demo Videos)
The EZlock Mobile App is available from both the Apple
App Store and the Google Play Store. Simply download
the App and register the ‘Owner Key’ with the EZlock
Device to initiate the system. During the App installation,
please accept (iOS App) ‘Access Location’ (Fig-2) and
‘Access Notification’ (Fig-3) services option. (Android
App has similar terms, please “Allow” and “OK” the
request) Without these services, EZlock may not function
properly (or limited functions). Both iOS App and Android
App follow the UI guideline by the Apple and Google.
This user guide will use iOS style for illustration purpose
(in the Fig-4 example, the ‘Fig–4a’ is Android style).
Either App’s functions have the same or equivalent
name/symbol will behave the same as hardware vendors
(Android’s device) allow. On Android device we can only
test against major vendors. Full compatibilities and
performance may vary on each device.

6
Fig-2
Fig-3
Step 1
Fig-4
Fig-4a
Step 2: Congratulations! The App has been installed
successfully! Please refer to the following steps to operate.

7
Step 1
Access to the APP
Step 2
Click Lock then
5.Register Owner Key to the EZlock System.
Pre-requirement: EZlock has never been registered before.
(Indicator: When EZlock starts up, insert battery, and the
‘Orange LED / Registration Mode’ comes up first for 10
seconds)
The following as shown on screen presentation steps:

8
LED in Orange for in Registration Mode
Mode
Turn-Piece
Step 3
Follow the instruction pages
Step 4
Turn “Turn-Piece” to Registration mode or insert battery the first
time

9
Step 5
Tap “Ready” to complete registration.
The following text provides a more detailed explanation:
① The App will auto scan available EZlock locks in the vicinity.
Press ‘+’ to add the Lock to the App. This may take up to 30
seconds to complete this task (the ‘>’ will appear as shown on
Fig-5).
Tip:
If you have done the “EZlock hardware reset”, you have to
delete lock from App first for all known devices, this will prevent

10
Fig-5
Fig-6
1 (Update)
2 (Adjust)
previous devices try to pair with the EZlock by using the old
encrypted eKey. This can lockup the system from Registration.
② Lock Setting (Fig-6): Update the Name Field and/or adjust
Auto Lock period (0 –99 seconds, the default value is ‘00’ to
turn-off Auto-lock). New value will update to EZlock device after
‘Unlock/Lock’ action.
In order to get the correct Battery level, you
have to perform ‘Unlock/Lock’ at least twice.
Hint:
App may read the previous value the first time.
③ Go through the App’s steps to enter Registration Mode. You
should see the Orange color from the Front LED indicator.
④ If Owner registration is successful within 10 seconds; EZlock
Lock will beep once to complete registration.
Tip:
If registration fails the first time, please use Hardware Reset
procedure and start over again.

11
⑤ Select ‘Home’ option to test unlocks and lock function once.
⑥ Owner eKey registration is now complete.
Fig-7
Locked state
Scanning
Unlocked state
Step 1
Step 2

12
6.EZlock Mobile App’s icon / symbols (Fig-8):
◢Home- Top-level view. It shows EZlock Lock available status
and Door status. You can touch ‘Key Symbol’ to lock or unlock
the door. Always go ‘Home’ page to retrieve / write Command
and status from/to the ‘EZlock device’.
◢Lock- Top-level Lock view. It shows available Locks and
selection menu. Use ‘+’ to add a new Lock.
◢Key- Top-level Key view, it shows available key status and
selection menu. Use ‘Request Key’ to send the email to Owner
or ‘Scan QR Code’ for new key. Owner uses ‘Share Keys’ option
to send the ‘encrypted key code file’ or ‘generate QR code’ to
the requester.
◢Record- EZlock activities log. Only Owner Key can view this
log
◢Info- EZlock App’s version and options setting On/Off switch
(Fig-9). Tip:
For “Near Field” and “Touch Unlock option setting,
please test switch On/Off to make sure the Lock Device can
Fig-8

13
Step 1
Step 2
Fig-9
accept commands from your smart devices before use.
If you do not want use these features, please Switch Off.
7.Owner Key functions:
Home: Go to ‘Home’ page and wait for the auto scan results. To
unlock your door (indicated by a Red closed door, the lock state)
touch the symbol. When door is unlock, a Green unlocked door
symbol appears. To lock your door, touch the green symbol or
Auto-Lock timer countdown is reached, your door will
automatically lock.
Lock: Found available EZlock Locks and option. (Fig-5)
Lock Setting: Each lock detail setting option and battery status.
(Fig-6)
Shared Keys: New User has to download and use the App to

14
initiate the ‘Request Key’ function (Fig-10). For long distance
share ekey uses “By
Email Method”
. For “Face to Face” uses
“Scan QR Code Method
”. Only Owner can generate one time
use of new encrypted key code to new users.
Scan QR Code method (prefer way to share your eKey): QR
Code is popular and to use for smart phone equips with camera
function. ezLock App can generate QR Code to send eKey to
new user’s smart phone with ezLock App ( Android and iOS) .
This QR Code has only 5 Minutes Timer.
For security reason:
please do not share this QR Code image for more than one user.
After 5 minutes, it will automatic expired for usage.
Fig-10
Fig-10a

15
From Owner ezLock App:

16
From New Familys (Master/Family/Guest) ezLock App:

17
By Email Method: This method is designed for long distance
sharing ekey function. It is useful for temporary usages by
inviting the guest. New User (guest) has to initiate the request
by email
(provides unique smart phone “ID Code” to Owner)
and
owner can use this “ID Code” from the email and generate the
unique bonding code for this phone only and send the secure
“Lock Key” to the user. New User has to import ‘Lock Key’ to the
App. (Fig-11). Please refer to the next section “Add new EZlock
users: “Sharing eKey by email” for detail steps.

18
Key Info: The content shows the detail information of individual
eKey. Only the Guest eKeys are with expiration period. (Fig-12)
You are in control: With the Owner’s account and Mobile App,
you can use the top right icon to revoke any key from the
system.
Auto Lock setting: Adjust automatic door lock timer. You can turn
it off by set to ‘00’.
Your Physical Key is your lifesaver; please keep it in save place
for emergency usage.
Fig-11
Fig-12

19
How to use ‘EZlock Device’
1. To unlock / Lock
There are 5 different unlock methods: App Unlock / Touch
Unlock / Near Field Unlock / Key Fob Unlock / Physical Key
Unlock.
a. App Unlock
Select of the “HOME”:
◢RED color, means the door is locked state;
◢GREENcolor, means the door is unlocked state.
(Fig-13)
Whenever the door is being unlocked, the pre-set auto-lock
timer starts to countdown and the door will be locked again
automatically upon the timer expired.
Fig-13
Unlocked (Green)
Locked (Red)

20
b. Touch Unlock
The EZlock has a built-in touch
sensor, with your smartphone and
the
Mobile
App must run on the
background (provide authentication
to the EZLock Device)
. The distance
between EZlock and smartphone is less than 30 cm (12 inches).
When you come back from outside (approaching to the lock),
EZlock detects the BLE is enabled and connects to the
smartphone, EZlock enables ‘Touch Sensor’. You can use two
fingers to touch Keyway and Key house at same time
(as shown
on Fig-14)
to open the door at this moment. You can use ‘Touch
Unlock’ at any time, the EZlock will flash Blue light few time. This
message indicates the BLE link* is established and unlock/lock
door function will perform within 3 second for you.
Hint: *BLE link issue: Because Bluetooth use battery power,
smart phone will turn-off Bluetooth to conserve the energy.
EZlock App will try to wake your smart phone and ask OS to
enable BLE link. This will take few seconds to complete.
You
can remove the App from background to disable this function.
Fig-14
Table of contents
Other Ardi Lock manuals
Popular Lock manuals by other brands

Babypeta
Babypeta Stick'n'lock installation instructions

Simons Voss Technologies
Simons Voss Technologies SmartHandle AX manual

COMPX
COMPX Timberline CB-241 instruction sheet

AmazonBasics
AmazonBasics B07T2C3QNZ manual

Igloohome
Igloohome Padlock Lite SP3B user guide

Häfele
Häfele miniLock installation manual

Yale
Yale inTouch Installation and programming instructions

PROMIX
PROMIX Promix-SM132 Series operating manual

National Cabinet Lock
National Cabinet Lock C8112 Dimensional drawing

ZKTeco
ZKTeco L 6800 Installation instruction

Securam
Securam SafeLogic Xtreme Installation and operation instruction

Mesa
Mesa MF-Series operating manual