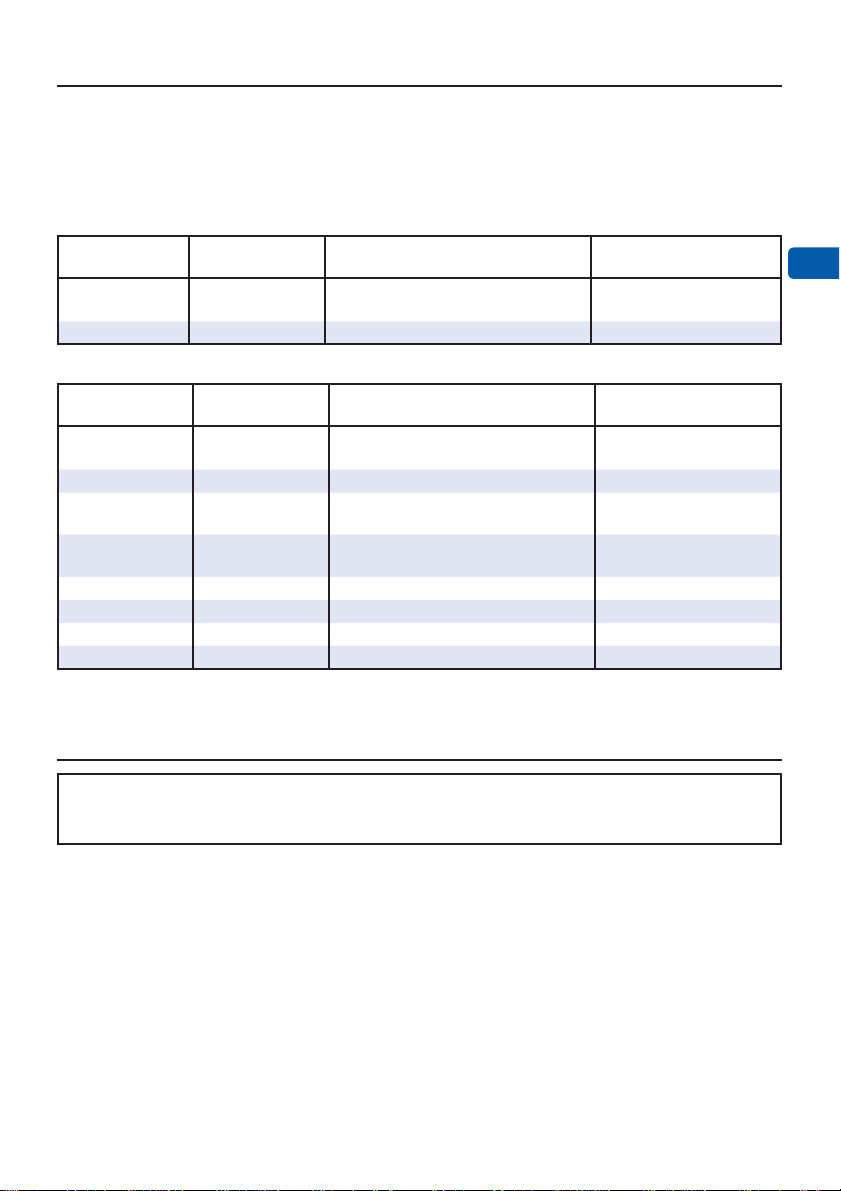
Arjo MAA2080M User manual

INSTRUCTIONS FOR USE
Amputee Slings
0
4.
S
A.
0
00
-
0
4
4E
NA
A
U
·
0
8
/
2
01
1
9

2
WARNING
To avoid injury, always read this Instructions for Use and accompanied documents
before using the product. Mandatory to read the Instructions for Use.
Design Policy and Copyright
® and ™ are trademarks belonging to the Arjo group of companies. © Arjo 2019.
As our policy is one of continuous improvement, we reserve the right to modify designs without prior notice. The
content of this publication may not be copied either whole or in part without the consent of Arjo.
Foreword
Thank you for purchasing Arjo equipment. Please read this Instructions For Use (IFU)
thoroughly!
Arjo will not be held responsible for any accidents, incidents or lack of performance that occur as a result of any
unauthorized modifi cation to its products.
Customer Support
If you require further information, please contact your local Arjo representative. The contact information is
located at the end of this IFU.
Defi nitions in this IFU
WARNING Means: Safety warning. Failure to understand and obey this warning may result in injury
to you or to others.
CAUTION Means: Failure to follow these instructions may cause damage to all or parts of the
system or equipment.
NOTE Means: This is important information for the correct use of this system or equipment.
Contents
Foreword .............................................................2
Customer Support...................................................2
De¿nitions in this IFU..............................................2
Intended Use.......................................................3
Patient/Resident Assessment .................................3
Expected Service Life .............................................3
Safety Instructions...............................................4
Safety Practises......................................................4
Parts Designation................................................5
Preparations........................................................5
Before First Use (6 steps).......................................5
Before Every Use (5 steps).....................................5
Select Sling Size..................................................6
Using the Arjo Measuring Tape (4 steps) (Accesso-
ry)............................................................................6
Sizing Without a Measuring Tape (2 steps).............6
Sling Selection.....................................................7
Sling Selection Based on Patient’sAmputee..........7
Transfer/Bathing......................................................7
Transfer/Transport...................................................7
Allowed Combinations.........................................7
Safe Working Load (SWL).......................................7
Clip Attachment & Detachment............................9
Attach the Clips (5 steps)........................................9
Detach the Clips (3 steps).......................................9
Loop Attachment & Detachment..........................9
Attach the Loops (5 Steps)......................................9
Detach the Loops (2 steps).....................................9
Applying the Sling..............................................10
In Bed (24 steps)...................................................10
In Chair/ Wheelchair (22 steps)............................. 11
On Floor (32 steps)...............................................12
Removing the Sling ...........................................13
In Bed (12 steps)...................................................13
In Chair/Wheelchair (13 steps)..............................14
Cleaning and Disinfection..................................15
Cleaning Instruction (7 steps) ...............................15
Cleaning Chemicals..............................................15
Disinfection............................................................15
Care and Preventive Maintenance....................16
Before and After Every Use...................................16
When Soiled or Stained and Between Patients ....16
Storage..................................................................16
Service and Maintenance......................................16
Technical Speci¿cations ....................................16
Troubleshooting.................................................17
Label on the Sling..............................................18
INSTRUCTIONS FOR USE
EN

3
Intended Use
The Amputee Sling is a product intended for assisted
transfer of single and double amputee patients/
residents with limited ability to move. The Amputee
Sling should be used together with Arjo lift devices in
accordance with the Allowed Combinations specifi ed
in the Instructions for Use (IFU).
Products made of Mesh material and the sling model
MAA2080M are intended to be used when bathing.
Sling models MAA2080M and MAA2050M are
suitable to be seated on for a period of time between
transfers.
Sling model MAA2091M enables toileting.
The Amputee Sling shall only be used by appropriately
trained caregivers with adequate knowledge of the care
environment, and in accordance with the instructions
outlined in the Instructions for Use.
The Amputee Sling is intended to be used in hospital
environments, nursing homes, other healthcare
facilities and home care.
The Amputee Sling should only be used for the
purpose specifi ed in this Instructions for Use. Any
other use is prohibited.
Patient/Resident Assessment
We recommend that facilities establish regular
assessment routines. Caregivers should assess each
patient/resident according to the following criteria
prior to use:
• Patient/resident sits in wheelchair
• Has no capacity to support herself/himself at all
• Cannot stand unsupported and is not able to bear
weight, not even partially
• Dependent on caregiver in most situations
• Physically demanding for caregiver
• Stimulation of remaining abilities is very important
Or, for a patient/resident who:
• Is passive
• Might be almost completely bed ridden
• Often stiff, contracted joints
• Totally dependent on the caregiver
• Physically demanding for caregiver
• Stimulation and activation is not a primary goal
Safe Working Load (SWL) for Amputee Sling:
• MAA2050M, MAA2080M: 190 kg (418 lbs);
• MAA2090M, MAA2091M, MAA4040M,
MAA4070M, MAA4080M, MLA7000,
MLA7000A, MAA7090M: 272 kg (600 lbs).
The right type and size of slings should be used after
proper assessment of each resident’s size, condition
and the type of lifting situation.
If the patient/resident does not meet these criteria an
alternative equipment/system shall be used.
Expected Service Life
The expected service life of Amputee Sling is the
maximum period of useful life. The expected life of
the sling is dependent on the actual use conditions.
Therefore, before use, always make sure that the
sling does not show signs of fraying, tearing or other
damage and that there is no damage (i.e. cracking,
bending, breaking). If any such damage is observed,
do not use the sling. If you have any doubts about sling
safety, as a precaution and to ensure safety, do not use
the sling.
The expected service life of the Amputee Slings:
• Service Time:
- 1.5 years for sling models MAA2080M and
MAA2050M;
- 2 years for slings made of all other materials;
• Shelf Time:
- 5 years.
EN

4
Safety Instructions
WARNING
To avoid injury, make sure that the patient is
not left unattended at any time.
WARNING
To avoid injury, always assess the patient
prior to use.
WARNING
To avoid falling, make sure that the user
weight is lower than the safe working load
for all products or accessories being used.
WARNING
To avoid injury, never let the patient smoke
when using the sling. The sling can catch
on fi re.
WARNING
To avoid injury, only store the equipment for
a short period of time. If stored longer than
stated in the IFU, it can cause weakness
and breakage in the material.
WARNING
To avoid injury, keep the equipment away
from sun/UV-light. Exposure to sun/UV-light
can weaken the material.
WARNING
These warnings are specifi c to the sling
models MAA2080M and MAA2050M:
Patients sat out in a chair are at an
increased risk of pressure injury
development, due to high interface
pressures concentrated over a small
surface area when compared to lying in
bed. An individualised skin and holistic
assessment of the patient should be
undertaken, before deciding on whether a
sling should be left under a patient for any
period of time.
If the decision is to have the patient sit
on the sling for any time period between
transfers then an appropriate care
plan must be established and should
include regular skin inspection, paying
particular attention to pressure points and
frequent repositioning intervals which
should be documented and based on the
individuals level of risk for pressure injury
development.
Consideration should also be given by
the clinician as to any specifi c pressure
relieving or redistribution surface that the
patient/resident is sitting on and make sure
that the sling is correctly positioned and
adjusted (removing loops and clips clear of
the seated patient) to make sure the sling
does not affect the effi cacy of the seat or
cushion.
Safety Practises
• At any time, if the patient becomes agitated, stop
transferring/transporting and safely lower the
patient.
• Patient with spasm can be lifted, but great care
should be taken to support the patient’s leg(s)/
limb(s).
EN

5
Parts Designation
Preparations
Before First Use (6 steps)
1. Check all parts of the sling, see section “Parts
Designation” on page 5. If any part is missing
or damaged - Do NOT use the sling.
2. Read this IFU thoroughly.
3. Check that the sling is clean.
4. Choose a designated area where the IFU should be
kept and easily accessible at all times.
5. Make sure to have a rescue plan ready in case of a
patient emergency.
6. For questions, contact your local Arjo
representative for support.
NOTE
Arjo recommends the name of the patient is
written on the sling care label to avoid cross
contamination between patients.
Before Every Use (5 steps)
1. Patient assessment must always determine the
methods used in everyday care, see “Intended
Use” on page 3.
WARNING
To avoid the patient from falling, make sure
to select the correct sling size according to
the IFU.
2. Check the allowed combinations against the sling,
spreader bar and lift, see “Allowed Combinations”
on page 7.
WARNING
To avoid injury, always make sure to inspect
the equipment prior to use.
3. Check all parts of the sling, see “Parts
Designation” on page 5. If any part is missing
or damaged - Do NOT use the sling. Check for:
• fraying
• loose stitching
• tears
• fabric holes
• soiled fabric
• damaged clips/loops
• unreadable or damaged label
WARNING
To prevent cross-contamination, always
follow the disinfection instructions in this
IFU.
4. Check that the sling is clean. If the sling is not
clean see”Cleaning and Disinfection” on page
15.
5. Before using the sling, read the lift IFU for transfer,
transport and bathing.
1. Sling label (located on the outside of the sling)
2. Stiffener pocket
3. Stiffener
4. Attachment clip (shoulder)
5. Leg strap
6. Attachment clip (leg)
7. Leg fl ap
8. Body section
9. Shoulder strap
10. Head section
11. Hook and loop fl ap
12. Attachment loop (shoulder)
13. Loop strap
14. Attachment loop (leg)
15. Pull handles
Example of slings. Not all models are represented.
12
4
3
5
8
6
7
9
10
11
12
13
14
15
1 1
EN

6
Fig. 1
Fig. 2
43 52 61 72.7 99.6 104.7 114.794.784.7
AB
COCCYX HEAD
cm
in
16,9 20.5 24 28.7 33.7 37.6 39.5 41.5 45.2
XXS XS S M L LL XL XXL
Select Sling Size
Using the Arjo Measuring Tape (4
steps) (Accessory)
The Arjo Measuring Tape is a sizing accessory only
intended as a guide and is an approximation. Patient
width and body proportions should also be considered
when selecting the correct size of Arjo sling.
1. If possible, the patient should be in a seated
position.
2. Place the point marked A on the measuring tape
over the patient’s coccyx/against seat (position A).
(See Fig. 1 ) and (See Fig. 2 )
3. Measure from coccyx/seat (position A) to the top
of the head (position B)(See Fig. 1 ).
4. The coloured area on the measuring tape that is
levelled with the top of the patient’s head indicates
the required sling size. If the sling size falls in
between two sizes, it is recommended to select the
smaller size. (See Fig. 2 )
Sizing Without a Measuring Tape
(2 steps)
1. Place the sling over the patient’s back.
2. Make sure the sling covers the patient from the top
of the head (position B) to the coccyx (position A).
(See Fig. 1 )
EN

7
Sling Selection
The patient’s physical disabilities, weight distribution and general physique needs to be taken into consideration
when selecting a sling.
Sling Selection Based on Patient’s Amputee
Double amputee over knee: Use a Double Amputee sling or Hammock Amputee.
One leg amputee: Use a Right/Left Amputee sling (depending on amputee) or Hammock Amputee.
Transfer/Bathing
Article number Safe Working
Load Product Description Size
MAA2080M 190 kg (418 lbs) Double Amputee Mesh (intended to
be seated on) S, M, L, LL
MAA7090M 272 kg (600 lbs) Double Amputee Mesh M, L, XL
Transfer/Transport
Article number Safe Working
Load Product Description Size
MAA2050M 190 kg (418 lbs) Double Amputee (intended to be
seated on) S, M, L, LL, XL
MAA2090M 272 kg (600 lbs) Double Amputee XS, S, M, L, LL, XL, XXL
MAA2091M 272 kg (600 lbs) Double Amputee Toilet with
Commode M, L, XL
MAA4040M 272 kg (600 lbs) Double Amputee with hook and loop
Àap M, L, XL
MAA4070M 272 kg (600 lbs) Right Amputee M, L, LL, XL
MAA4080M 272 kg (600 lbs) Left Amputee M, L, LL, XL
MLA7000 272 kg (600 lbs) Hammock Amputee S, M, L, XL
MLA7000A 272 kg (600 lbs) Hammock Amputee L
Article numbers with “A-suffix” (e.g. MLA7000A) has a BAA (Buy American Act) compliant country of origin.
Allowed Combinations
WARNING
To avoid injury, always follow the allowed combinations listed in this IFU. No other
combinations are allowed.
Safe Working Load (SWL)
Always follow the lowest SWL of the total system. E.g. the Maxi Twin Compact lift/spreader bar has a SWL of
160 kg (352 lbs) and the MAA2050M sling has a SWL of 190 kg (418 lbs). This means that the lift/spreader bar
has the lowest SWL. The patient is not allowed to weigh more than the lowest SWL.
EN

8
Lift Maxi Twin
Compact Maxi 500 Maxi Twin
SWL 160 kg
(352 lbs) 227 kg
(500 lbs) 182 kg (401 lbs)
Spreader Bar (DPS) Power Medium Manual Manual Medium Power
Sling SWL Size Size Size Size
MAA2050M 190 kg (418 lbs) S, M, L, LL, XL S, M, L, LL S, M, L, LL S, M, L, LL, XL
MAA2080M 190 kg (418 lbs) S, M, L, LL, XL S, M, L, LL S, M, L, LL S, M, L, LL
MAA2090M 272 kg (600 lbs) S, M, L, LL, XL S, M, L, LL S, M, L, LL S, M, L, LL, XL
MAA7090M 272 kg (600 lbs) M, L, XL M, L M, L M, L, XL
MAA2091M 272 kg (600 lbs) M, L, XL M, L M, L M, L, XL
MAA4040M 272 kg (600 lbs) M, L, XL M, L M, L M, L, XL
MAA4070M 272 kg (600 lbs) M, L, LL, XL M, L, LL M, L, LL M, L, LL, XL
MAA4080M 272 kg (600 lbs) M, L, LL, XL M, L, LL M, L, LL M, L, LL, XL
Lift Minstrel Maxi 500 Maxi Twin
SWL 190 kg
(418 lbs) 227 kg
(500 lbs) 182 kg (401 lbs)
Spreader Bar 4 point 2 point Loop 2 point Small 2 point
Medium 4 point
Large
Sling SWL Size Size Size Size Size
MLA7000 272 kg (600 lbs) M, L, XL S, M, L, XL S, M S, M,L, XL M, L, XL
MLA7000A 272 kg (600 lbs) L L - L L
Lift Maxi Move Maxi Sky 600
SWL 227 kg (500 lbs) 272 kg
(600 lbs)
Spreader Bar
(DPS)
Manual
Small Manual
Medium Power Medium Power Large Power
Medium
Sling SWL Size Size Size Size Size
MAA2050M 190 kg (418 lbs) S S, M, L, LL S, M, L, LL, XL L, LL, XL S, M, L, LL, XL
MAA2080M 190 kg (418 lbs) S S, M, L, LL S, M, L, LL L, LL S, M, L, LL
MAA2090M 272 kg (600 lbs) XS, S S, M, L, LL S, M, L, LL, XL L, LL, XL, XXL S, M, L, LL, XL
MAA7090M 272 kg (600 lbs) - M, L M, L, XL L, XL M, L, XL
MAA2091M 272 kg (600 lbs) - M, L M, L, XL L, XL M, L, XL
MAA4040M 272 kg (600 lbs) - M, L M, L, XL L, XL M, L, XL
MAA4070M 272 kg (600 lbs) - M, L, LL M, L, LL, XL L, LL, XL M, L, LL, XL
MAA4080M 272 kg (600 lbs) - M, L, LL M, L, LL, XL L, LL, XL M, L, LL, XL
Lift Maxi Move Maxi Sky
440 Maxi Sky
600
SWL 125 kg
(275 lbs) 227 kg (500 lbs) 200 kg
(440 lbs) 272 kg
(600 lbs)
Spreader Bar 2 point
Small 2 point
Medium 2 point
loop 4 point
loop Fix 2 point
Medium
Sling SWL Size Size Size Size Size Size
MLA7000 272 kg (600 lbs) S, M S, M, L, XL S, M, L, XL M, L, XL, S, M, L, XL S, M, L, XL
MLA7000A 272 kg (600 lbs) - L L L L L
EN

9
Clip Attachment & Detachment
NOTE
If available on your lift device, reposition the
spreader bar using the Dynamic Position
System (DPS) for easier clip attachment of the
sling. See lift IFU for instructions.
Attach the Clips (5 steps)
1. Place the clip on the spreader bar lug. (See Fig. 3 )
2. Pull the strap down.
3. Make sure the lug is locked at the top end of the
clip. (See Fig. 4 )
4. Make sure the strap is not squeezed in between the
clip and the spreader bar.
5. Make sure the straps are not twisted.
Detach the Clips (3 steps)
Make sure that the weight of the patient is taken up by
the receiving surface before removing the clip.
1. Pull the strap up. (See Fig. 5 )
2. Make sure the lug is unlocked at the bottom of the
clip.
3. Remove the clip.
Loop Attachment & Detachment
2 point spreader bar: First attach the shoulder
loops, then attach the leg loops.
4 point spreader bar: First attach the shoulder
loops in the front hooks. Then attach the leg loops in
the back hooks
WARNING
Do not cross the shoulder straps.
Attach the Loops (5 Steps)
WARNING
Use the same loop length (loop colour) for
the shoulder straps and the same length
(loop colour) for the leg straps.
1. Place the loop over the spring loaded latch (A).
(See Fig. 6 )
2. Pull the loop down to force the latch to open.
3. Make sure that the spring loaded latch closes
completely with the loop inside. (See Fig. 6 )
4. Make sure that the latch is moving freely.
5. Make sure loops and straps are not twisted.
NOTE
The loops lengths on the straps are used to
adjust the resident’s position and comfort.
• Loops closer to the shoulders;
More forward position
• Loops further away from the shoulders;
More reclined position
• Loops closer to the legs;
Raised leg(s)/limb(s)/bottom
• Loops further away from legs;
Lowered leg(s)/limb(s)/bottom
Detach the Loops (2 steps)
Make sure that the weight of the resident is taken up
by the receiving surface before removing the loop.
Method 1
1. Press the spring loaded latch open.
2. Remove the loop.
Method 2
1. Pull one side of the loop over the hook and spring
loaded latch.(See Fig. 7 )
2. Pull down the loop. (See Fig. 8)
Fig. 3 Fig. 4 Fig. 5 Fig. 6
A
EN

10
Applying the Sling
In Bed (24 steps)
It is recommended that all patients with double
amputees are transferred from a fl at surface.
For transfer/transport/bathing see respective lift IFU.
1. Place the lift nearby.
2. Apply bed brakes and adjust the height of the bed
to an ergonomic position, if possible.
3. The patient needs to lay down fl at on his/her back.
4. Check that the stiffeners are completely inside the
stiffener pockets, if any.
5. Fold the sling lengthwise along the centre line,
outside facing outside. The sling label is located on
the outside.
WARNING
To avoid injury during log roll, make sure
there is another caregiver present and/or
use the side rails on the opposite side of
the bed.
6. Log roll the patient. (Use local technique.) If log
roll is not possible, use an Arjo sliding sheet/tube
for placing the sling. See respective Sliding sheet/
tube IFU
7. Place the folded sling over the patient’s side. Make
sure that the centre line is aligned with the patient’s
spine, starting at the coccyx. Place the leg fl aps
towards the leg(s)/limb(s). (See Fig. 9 )
8. Fold down the top of the sling and tuck it under the
patient’s body.
9. Log roll the patient to the other side.
10. Pull out the remaining part of the sling from under
the patients body.
11. Return the patient to his/her back.
12. Place the leg fl aps underneath the patient’s leg(s)/
limb(s). If using a Hammock sling, there are no leg
straps just general straps.
13. If using a loop sling, cross the leg straps. Pull one
strap through the other. (See Fig. 10 )
14. Make sure that the: (See Fig. 11 )
• sling is centred and fl at without creases,
• sling’s head support covers the neck/head area,
• sling pieces are not twisted underneath the
patient and
• if a sling with commode is being used, make
sure the hole is positioned correctly.
WARNING
To avoid injury, make sure the patient’s
arms are placed inside of the sling.
15. Make sure the patient’s arms are inside the sling.
16. Place the lift next to the patient and apply the
brakes.
WARNING
To avoid injury to the patient, pay close
attention when lowering or adjusting the
spreader bar.
17. Attach the clips/loops.
18. Slightly lift the patient to create tension in the
sling. (See Fig. 12 )
WARNING
To avoid the patient from falling, make sure
that the sling attachments are attached
securely before and during the lifting
process.
Continue with the steps on the next page.
Fig. 7 Fig. 8 Fig. 9 Fig. 10 Fig. 11
EN

11
19. Make sure that:
• All clips/loops are securely attached
(See Fig. 4 ) and (See Fig. 6 )
• All straps are straight (not twisted)
• The patient lays comfortably in the sling.
20. If an adjustment is needed, lower the patient and
make sure that the weight of the patient is taken up
by the receiving surface before removing the clip/
loop.
21. If using a clip sling: adjust the spreader bars
Dynamic Positioning System (DPS), if needed. For
manual DPS, make sure that one caregiver holds
on to the DPS while the other caregiver operates
the lift.
22. If using loop sling: lower the patient down onto
the bed and adjust loop lengths.
23. Release the brakes on the lift.
24. Transfer, transport and bathe the patient according
to the lift IFU.
In Chair/ Wheelchair (22 steps)
NOTE
Do NOT use a Hammock Amputee or a Double
Amputee Sling with hook and loop flap in chair/
wheelchair. Apply these in bed.
It is recommended that all patients with double
amputees are transferred from a Àat surface.
1. Place the lift nearby.
2. Apply the brakes on the wheelchair.
3. Check that the stiffeners are completely inside the
stiffener pockets, if any.
4. Stand in front of the patient and lean the patient
forward.
5. Place the sling over the patient’s back and head
with the inside of the sling against the patient. The
sling label is located on the outside. If needed, use
an Arjo sliding sheet/tube for placing the sling. See
respective Sliding sheet/tube IFU.
6. Make sure to always be two caregivers present,
when using a sliding sheet for placement of a sling
under the patient’s bottom. See respective Sliding
sheet/tube IFU.
7. Make sure that the centre line is aligned with the
patient’s spine and coccyx.
8. Lean the patient back.
9. Place the leg fl ap(s) underneath the patient’s leg(s)/
limb(s). (See Fig. 13 )
10. If using a loop sling, cross the legs straps. Pull one
strap through the other. (See Fig. 10 )
11. Make sure that the:
• sling is centred and fl at without creases,
• sling’s head support covers the neck/head area,
• sling pieces are not twisted underneath the
patient and
• if a sling with commode is being used, make
sure the hole is positioned correct
WARNING
To avoid injury, make sure the patient’s
arms are placed inside of the sling.
12. Make sure the patient’s arms are inside the sling.
13. Place the lift in front of the patient. Open the lift
legs, if needed.
14. Apply the brakes on the lift.
WARNING
To avoid injury to the patient, pay close
attention when lowering or adjusting the
spreader bar.
15. Attach the clips/loops.
16. If using a clip sling, adjust the spreader bars DPS,
if needed. If using loop sling, lower the patient
back into the chair/wheelchair and adjust loop
lengths.
17. Slightly lift the patient to create tension in the
sling. (See Fig. 14 )
WARNING
To avoid the patient from falling, make sure
that the sling attachments are attached
securely before and during the lifting
process.
18. Make sure that:
• All clips/loops are securely attached
(See Fig. 4 ) and (See Fig. 6 )
• All straps are straight (not twisted)
• The patient lays comfortably in the sling.
Continue with the steps on the next page.
Fig. 12 Fig. 13 Fig. 14
EN

12
19. If an adjustment is needed, lower the patient and
make sure that the weight of the patient is taken up
by the receiving surface before removing the clip/
loop.
20. If using a clip sling with manual DPS spreader bar,
make sure that one caregiver holds on to the DPS
while the other caregiver operates the lift.
WARNING
Make sure straps are not caught by
wheelchair or lift castors.
21. Release the brakes on the lift.
22. Transfer/transport/bathe the patient according to
the lift IFU.
On Floor (32 steps)
1. Make a clinical assessment of the patient. Do not
use the sling if the patient has a head, neck, spine
or hip injury. Use the Scoop Stretcher instead. See
the Scoop Stretcher IFU.
2. Place a pillow under the patient’s head.
(See Fig. 15 )
3. Make sure the patient is in an area that is accessible
for the lift. If needed, use an Arjo sliding sheet/tube
for placement of the sling. See respective Sliding
sheet/tube IFU.
4. Check that the stiffeners are completely inside the
stiffener pockets, if any.
5. If the patient is able to sit up, continue to
next step. If not able to sit up, proceed to
step 9.
6. Patient able to sit up: Stand behind the patient
and help him/her to a seated position.
7. Place the sling over the patient’s back and head
with the inside of the sling against the patient. The
sling label is located on the outside.
8. Make sure that the centre line is aligned with the
patient’s spine, starting at the coccyx. Continue
to step 16.
9. Patient not able to sit up: Fold the sling
lengthwise along the centre line, outside facing
outside. The sling label is located on the outside.
10. Log roll the patient. (Use local technique)
(See Fig. 16 ) If log rolling is not possible, use an
Arjo sliding sheet/tube for placing the sling. See
respective Sliding sheet/tube IFU.
11. Place the folded sling over the patient’s side. Make
sure that the centre line is aligned with the patient’s
spine, starting at the coccyx. Place the leg fl aps/
straps towards the legs.
12. Fold down the top of the sling and tuck it under the
patient’s body.
13. Log roll the patient to the other side.
14. Pull out the remaining part of the sling from under
the patient’s body.
15. Return the patient to his/her back.
16. Make sure that the: (See Fig. 17 )
• sling is centred and fl at without creases,
• sling’s head support covers the neck/head area,
• sling pieces are not twisted underneath the
patient and
• if a sling with commode is being used, make
sure the hole is positioned correctly.
WARNING
To avoid injury, make sure the patient’s
arms are placed inside of the sling.
17. Make sure the patient’s arms are inside the sling.
18. Position the lift sideways with the lift legs wide
open. One caregiver needs to be close to the
patient’s head and the other caregiver needs to lift
up the patient’s leg(s)/limb(s).
19. Position one lift leg next to the patient’s head and
the other lift leg under the patient’s leg(s)/limb(s).
Make sure the spreader bar is positioned over the
patient’s shoulders. (See Fig. 18 )
20. Lower the spreader bar with the spreader bar DPS
in a reclined position.
21. Place the leg fl aps/straps underneath the patient’s
leg(s)/limb(s). If using a loop sling, cross the
legs straps. Pull one strap through the other.
(See Fig. 10 )
WARNING
To avoid injury to the patient, pay close
attention when lowering or adjusting the
spreader bar.
Continue with the steps on the next page.
Fig. 15 Fig. 16 Fig. 17 Fig. 18
EN

13
22. Attach the shoulder clips/loops.
23. Lift the patient’s head up slightly. Adjust the
spreader bar DPS/loop to a seated position. The
shorter the limb(s), the more the patient will tilt
backwards. If using a clip sling with manual DPS
spreader bar, make sure that one caregiver holds
on to the DPS while the other caregiver operates
the lift.
24. Move the lift/spreader bar closer to the patient’s
legs.
25. Apply the brakes on the lift.
26. Attach the leg clips/loops.
WARNING
To avoid the patient from falling, make sure
that the sling attachments are attached
securely before and during the lifting
process.
27. Make sure that all clips/loops are attached securely
and the patient lays comfortably in the sling. Adjust
if necessary.
28. While lifting the patient, make sure that:
• the spreader bar is in a seated position,
• one caregiver pays attention the patient’s head
and
• that the other caregiver holds up the patient’s
leg(s)/limb(s) to prevent them from hitting the
lift leg. (See Fig. 19 )
29. Remove the pillow.
30. Release the brakes on the lift.
31. Bring the lift legs together.
32. Transfer/transport the patient according to the IFU.
Removing the Sling
In Bed (12 steps)
1. Position the patient over the bed. (See Fig. 20 )
2. Apply bed brakes and adjust the height of the bed
to an ergonomic position, if possible.
3. Make sure the spreader bar is in a reclined position
or according the position of the bed.
WARNING
To avoid injury to the patient, pay close
attention when lowering or adjusting the
spreader bar.
4. Lower the patient onto the bed. Make sure that the
weight of the patient is taken up by the receiving
surface before removing the clip/loop.
5. Detach the sling.
6. Move the lift away from the patient.
7. Pull out the leg fl aps from under the patient’s
leg(s)/limb(s). (See Fig. 17 )
8. If using sling models MAA2080M and
MAA2050M, make sure to place the sling straps
along the side of the patient’s body. This prevents
the straps from getting caught in other objects.
WARNING
To avoid injury during log roll, make
sure there is another caregiver present
and/or use the side rails on the opposite
side of the bed.
9. Log roll the patient. (Use local technique) If log
rolling is not possible, use an Arjo sliding sheet/
tube for removing the sling. See respective Sliding
sheet/tube IFU.
10. Tuck the sling under the patient’s body.
(See Fig. 21 )
11. Log roll the patient to the other side and remove
the sling.
12. Return the patient to his/her back. Make sure the
patient is in a comfortable and secure position in
the bed.
Fig. 19 Fig. 20 Fig. 21
EN

14
In Chair/Wheelchair (13 steps)
1. Apply the brakes on the wheelchair.
2. Open up the chassis leg on the lift.
3. Position the patient over the chair/wheelchair.
(See Fig. 22 )
4. If using a loop sling: push the sling, not the
patient, towards the back of the chair/wheelchair
for better positioning.
If using a clip sling: use the DPS for
positioning.
5. Lower the patient into the chair/wheelchair.
6. Make sure that the patient’s lower back is
positioned all the way in against the chair/
wheelchair to avoid the patient from sliding out.
Also make sure that the weight of the patient is
taken up by the receiving surface before removing
the clip/loop.
WARNING
To avoid injury to the patient, pay close
attention when lowering or adjusting the
spreader bar.
7. Detach the sling.
8. Move the lift away from the patient
9. Pull out the leg fl aps from under the patient’s
leg(s)/limb(s) and place them backwards along the
patient’s side. (See Fig. 23 ).
10. If using sling models MAA2080M and
MAA2050M in a wheelchair, make sure to place
the sling straps along the side of the patient’s body.
This prevents the straps from getting caught in the
wheels of the wheelchair.
11. Stand in front of the patient and lean the patient
forward.
12. Pull out the sling. If needed, use an Arjo sliding
sheet/tube. See respective Sliding sheet/tube IFU.
13. Lean the patient back up to a comfortable and
secure position.
Fig. 22 Fig. 23
EN

15
Cleaning and Disinfection
WARNING
To prevent cross-contamination, always
follow the disinfection instructions in this
IFU.
WARNING
To avoid material damage and injury, clean
and disinfect according to this IFU.
• No other chemicals are allowed.
• Never clean with chlorine.
• Chlorine will deteriorate the surface of
the material.
WARNING
To avoid injury, always remove the sling
before disinfecting the lift.
All Amputee Slings should be cleaned when they are
soiled or stained and between patients.
Cleaning Instruction (7 steps)
1. Detach the sling from the lift.
2. Remove the stiffeners, if any, before washing.
3. Close all buckles and hook and loop attachment on
the slings and belts prior to washing.
4. Check the symbols on the product label for
cleaning recommendations.
5. Machine wash the sling at 70°C (158°F). In order
to obtain suffi cient level of disinfection, please
wash according to local hygiene legislation.
If allowed according to the product label, tumble
dry in low temperature, max 60°C (140°F).
6. Do NOT
• wash together with other items that have rough
surfaces or sharp objects.
• use any mechanical pressure, pressing or rolling
• use bleach
• use gas sterilization
• use autoclave
• dry clean
• ironing
• steam
7. Place the stiffeners if any, back in to the sling
before use.
Cleaning Chemicals
For all sling material use common commercial
detergent without optical brightener. No other
chemicals are allowed e.g. chlorine, softener, iodine
based disinfectants, bromine and ozone.
Disinfection
The only allowed disinfection is disinfection by
washing.
EN

16
Care and Preventive Maintenance
WARNING
To avoid injury to both patient and
caregiver, never modify the equipment or
use incompatible parts.
Before and After Every Use
Visually check all exposed parts
The caregiver shall inspect the sling before and after
every use. The complete sling should be checked for
all deviations listed below. If any of these deviations
are visible, replace the sling immediately.
• Fraying
• Loose stitching
• Tears
• Holes
• Discolouration or stains from bleaching
• Sling soiled or stained
• Label unreadable or damaged
When Soiled or Stained and Between
Patients
Clean/Disinfect
The caregiver should make sure that the sling is
cleaned according to “Cleaning and Disinfection” on
page 15, when it is soiled or stained and between
patients.
Storage
When not in use, the slings should be stored away
from direct sunlight where they are not subject to
unnecessary strain, stress or pressure, or to excessive
heat or humidity. The slings should be kept away from
sharp edges, corrosives or other things that could cause
damage on the sling.
Service and Maintenance
It is recommended that qualifi ed personnel inspect the
condition of the sling twice a year (every 6 month),
according to ISO 10535.
Technical Specifi cations
General
Safe working load (SWL) = Maximum total load See “Allowed Combinations” on page 7
Service life – Recommended period of use
Sling models MAA2080M and MAA2050M 1.5
years*
All other slings 2 years*
* Refer to “Expected Service Life” on page 3.
Shelf life – Maximum period of storing new
unpacked product 5 years
Model and Type See “Sling Selection” on page 7
Operating, Transport and Storage Environment
Temperature 0°C to +40°C (+32°F to +104°F) Operating and Storage
-25°C to +60°C (-13°F to +140°F) Transport
Humidity Max 15–70% at +20°C (68°F) Operating and Storage
Max 10–95% at +20°C (68°F) Transport
Recycling (The device should be recycled according to national regulations.)
Package The bag consists of soft plastic, recyclable to local
legislations.
Sling The sling consists of both plastics and textiles and is not
recyclable as an entity. If the parts are separated they
might be recyclable according to local legislation.
Parts and Accessories
Stiffeners GX21270, TBS102 and TBS103
Measuring tape MTA1000
EN

17
Troubleshooting
Problem Action
The patient is not positioned correctly in
the sling (e.g. one strap is shorter than the
other).
• Make sure the clip/loop straps are not twisted.
• Make sure the patient is seated on the inside of the
sling. The outside has a label for reference.
• Make sure the patient is centred in the sling.
The patient feels discomfort in the leg area
when seated in the sling. Make sure that there are no creases on the leg Àaps of
the sling.
The sling is dif¿cult to apply (e.g. during
log roll). Use an Arjo sliding sheet/tube according to instructions
in respective IFU.
There are dif¿culties applying the shoulder
clips/loops.
• Place the patient in a more seated position in the bed
or on the Àoor. Place a pillow behind the patient’s
neck/back, outside of the sling.
• Raise the back rest of the bed, if available.
• Make sure the clip strap is not caught between the lug
on the lift and the clip attachment.
• If possible, use the pull handles to place the sling in a
better position.
• Adjust the spreader bar to a more reclined position.
Pay attention to the patient’s head.
There are dif¿culties applying the leg clips/
loops.
• Bend the patient’s legs or place a pillow under the
patient’s knees. If the sling is applied on the Àoor,
place the patient’s legs on the caregiver’s knee.
• Make sure the clip strap is not caught between the lug
on the lift and the clip attachment.
• Adjust the spreader bar to a more seated position.
It is dif¿cult to use the sling in combination
with the lift and spreader bar.
Use the sling only in accordance with the combinations
described in section “Allowed Combinations” on page
7.
The position of the patient in the sling
should be more reclined or seated. Use the spreader bar or the loop lengths to adjust the
patient’s position.
The patient wishes to have extra support
for the neck. Place a pillow behind the patient’s neck, inside the sling.
The patient is not sitting balanced.
• If using a manual spreader bar, one caregiver must
always hold to the spreader bar during transfer/
transport.
• Adjust the spreader bar to a more seated position
since amputee patients tend to fall in a more reclined
position.
• If problem still occurs: Adjust the loop lengths.
EN

18
Label on the Sling
Care and Washing Symbols
Machine wash 70°C (158°F)
No bleaching allowed
No tumble drying allowed
Tumble drying
No Ironing allowed
No dry cleaning allowed
Certifi cates/Markings
CE marking in accordance with the
Medical Devices Directive 93/42/EEC.
The equipment has been tested and
ful¿ls all essential requirements.
Symbol for Clip and Loop
Use a clip spreader bar.
Use a loop spreader bar.
Article Number
REF
XXXXXX-X Article number with -X refers to
the sling size.
REF
XXXXXXX
If the article number is stated
without the size letter at the end,
it means the sling is a One Size.
Fibre Content
PES Polyester
PE Polyethylene
PU Polyurethane
PA Polyamide
Misc. Symbols
Safe Working Load (SWL)
Patient’s name symbol
Record symbol
Read the IFU before use
REF Article number
Manufacturing date and year
Manufacturer name and address
EN

AUSTRALIA
Arjo Australia Pty Ltd
78, Forsyth Street
O’Connor
AU-6163 Western Australia
Tel: +61 89337 4111
Free: +1 800 072 040
Fax: + 61 89337 9077
BELGIQUE / BELGIË
Arjo NV/SA
Evenbroekveld 16
BE-9420 ERPE-MERE
Tél/Tel: +32 (0) 53 60 73 80
Fax: +32 (0) 53 60 73 81
E-mail: [email protected]
BRASIL
Arjo Brasil Equipamentos Médicos Ltda
Rua Marina Ciufuli Zanfelice, 329 PB02
Galpão - Lapa
São Paulo – SP – Brasil
CEP: 05040-000
Phone: 55-11-3588-5088
E-mail: [email protected]
CANADA
Arjo Canada Inc.
90 Matheson Boulevard West
Suite 300
CA-MISSISSAUGA, ON, L5R 3R3
Tel/Tél: +1 905 238 7880
Free: +1 800 665 4831 Institutional
Free: +1 800 868 0441 Home Care
Fax: +1 905 238 7881
E-mail: [email protected]
ýESKÁ REPUBLIKA
Arjo Czech Republic s.r.o.
Na Strzi 1702/65
140 00 Praha
Czech Republic
Phone No: +420225092307
e-mail: [email protected]
DANMARK
Arjo A/S
Vassingerødvej 52
DK-3540 LYNGE
Tel: +45 49 13 84 86
Fax: +45 49 13 84 87
E-mail:
DEUTSCHLAND
Arjo GmbH
Peter-Sander-Strasse 10
DE-55252 MAINZ-KASTEL
Tel: +49 (0) 6134 186 0
Fax: +49 (0) 6134 186 160
E-mail: [email protected]
ESPAÑA
Arjo Ibérica S.L.
Parque Empresarial Rivas Futura, C/Marie
Curie 5
Edi¿cio Alfa Planta 6 o¿cina 6.1-.62
ES-28521 Rivas Vacia, MADRID
Tel: +34 93 583 11 20
Fax: +34 93 583 11 22
E-mail: [email protected]
FRANCE
Arjo SAS
2 Avenue Alcide de Gasperi
CS 70133
FR-59436 RONCQ CEDEX
Tél: +33 (0) 3 20 28 13 13
Fax: +33 (0) 3 20 28 13 14
E-mail: [email protected]
HONG KONG
Arjo Hong Kong Limited
Room 411-414, 4/F, Manhattan Centre,
8 Kwai Cheong Road, Kwai Chung, N.T.,
HONG KONG
Tel: +852 2960 7600
Fax: +852 2960 1711
ITALIA
Arjo Italia S.p.A.
Via Giacomo Peroni 400-402
IT-00131 ROMA
Tel: +39 (0) 6 87426211
Fax: +39 (0) 6 87426222
E-mail: Italy[email protected]
MIDDLE EAST
Arjo Middle East FZ-LLC
Of¿ce 908, 9th Floor,
HQ Building,North Tower,
Dubai Science Park,
Al Barsha South
P.O Box 11488, Dubai,
UnitedArab Emirates
Direct +971 487 48053
Fax +971 487 48072
Email: [email protected]
NEDERLAND
Arjo BV
Biezenwei 21
4004 MB TIEL
Postbus 6116
4000 HC TIEL
Tel: +31 (0) 344 64 08 00
Fax: +31 (0) 344 64 08 85
E-mail: [email protected]
NEW ZEALAND
Arjo Ltd
34 Vestey Drive
Mount Wellington
NZ-AUCKLAND 1060
Tel: +64 (0) 9 573 5344
Free Call: 0800 000 151
Fax: +64 (0) 9 573 5384
E-mail: [email protected]
NORGE
Arjo Norway AS
Olaf Helsets vei 5
N-0694 OSLO
Tel: +47 22 08 00 50
Faks: +47 22 08 00 51
E-mail: [email protected]
ÖSTERREICH
Arjo GmbH
Lemböckgasse 49 / Stiege A / 4.OG
A-1230 Wien
Tel: +43 1 8 66 56
Fax: +43 1 866 56 7000
POLSKA
Arjo Polska Sp. z o.o.
ul. Ks Piotra Wawrzyniaka 2
PL-62-052 KOMORNIKI (PoznaĔ)
Tel: +48 61 662 15 50
Fax: +48 61 662 15 90
E-mail: [email protected]
PORTUGAL
Arjo em Portugal
MAQUET Portugal, Lda.
(Distribudor Exclusivo)
Rua Poeta Bocage n.º 2 - 2G
PT-1600-233 Lisboa
Tel: +351 214 189 815
Fax: +351 214 177 413
E-mail: [email protected]
SUISSE / SCHWEIZ
Arjo AG
Fabrikstrasse 8
Postfach
CH-4614 HÄGENDORF
Tél/Tel: +41 (0) 61 337 97 77
Fax: +41 (0) 61 311 97 42
SUOMI
Arjo Scandinavia AB
Riihitontuntie 7 C
02200 Espoo
Finland
Puh: +358 9 6824 1260
SVERIGE
Arjo International HQ
Hans Michelsensgatan 10
SE-211 20 MALMÖ
Tel: +46 (0) 10 494 7760
Fax: +46 (0) 10 494 7761
E-mail: [email protected]
UNITED KINGDOM
Arjo UK and Ireland
Houghton Hall Park
Houghton Regis
UK-DUNSTABLE LU5 5XF
Tel: +44 (0) 1582 745 700
Fax: +44 (0) 1582 745 745
E-mail: [email protected]
USA
Arjo Inc.
2349 W Lake Street Suite 250
US-Addison, IL 60101
Tel: +1 630 307 2756
Free: +1 800 323 1245 Institutional
Free: +1 800 868 0441 Home Care
Fax: +1 630 307 6195
E-mail: [email protected]
-$3$1
$UMR-DSDQ..
㨀℻掌䂾◉壝ካ栏ₘₐ䥽䟹⚆ᇫዐኤኀ
አኌ䶻壝ካ栏ኰወ椝
榊崀᧶
Address page - REV 24: 04/2019
www.arjo.com

At Arjo, we are committed to improving the everyday lives of people affected by reduced mobility
and age-related health challenges.
With products and solutions that ensure ergonomic patient handling, personal hygiene,
disinfection, diagnostics, and the effective prevention of pressure ulcers and venous
thromboembolism, we help professionals across care environments to continually raise
the standard of safe and digni¿ed care. Everything we do, we do with people in mind.
ArjoHuntleigh AB
Hans Michelsensgatan 10
211 20 Malmö, Sweden
www.arjo.com
04.SA.00-4ENAU
Other manuals for MAA2080M
2
This manual suits for next models
9
Table of contents
Other Arjo Sling manuals

Arjo
Arjo MAA6000 User manual

Arjo
Arjo MLAAS2000 User manual

Arjo
Arjo MAA2040M User manual

Arjo
Arjo Stretcher Slings User manual

Arjo
Arjo TEM Series User manual

Arjo
Arjo 22003 User manual

Arjo
Arjo Sara 3000 User manual

Arjo
Arjo Bariatric Slings User manual

Arjo
Arjo SARA PLUS User manual

Arjo
Arjo MAA6000 User manual