Contrôleur LED CCT blanc
accordable ProLine
Avec télécommande RF
Modèle # 513125
Introduction
Ce contrôleur pour LED est conçu pour fonctionner avec des
produits LED blanc accordable à tension constante, tels que les
rubans LED ou les luminaires à LED dans une gamme de tension
de12-24 volts CC. Le récepteur fonctionne avec la télécommande
sans fil RF, qui permet à l’utilisateur de régler la luminosité
des LED et de sélectionner la température de couleur.
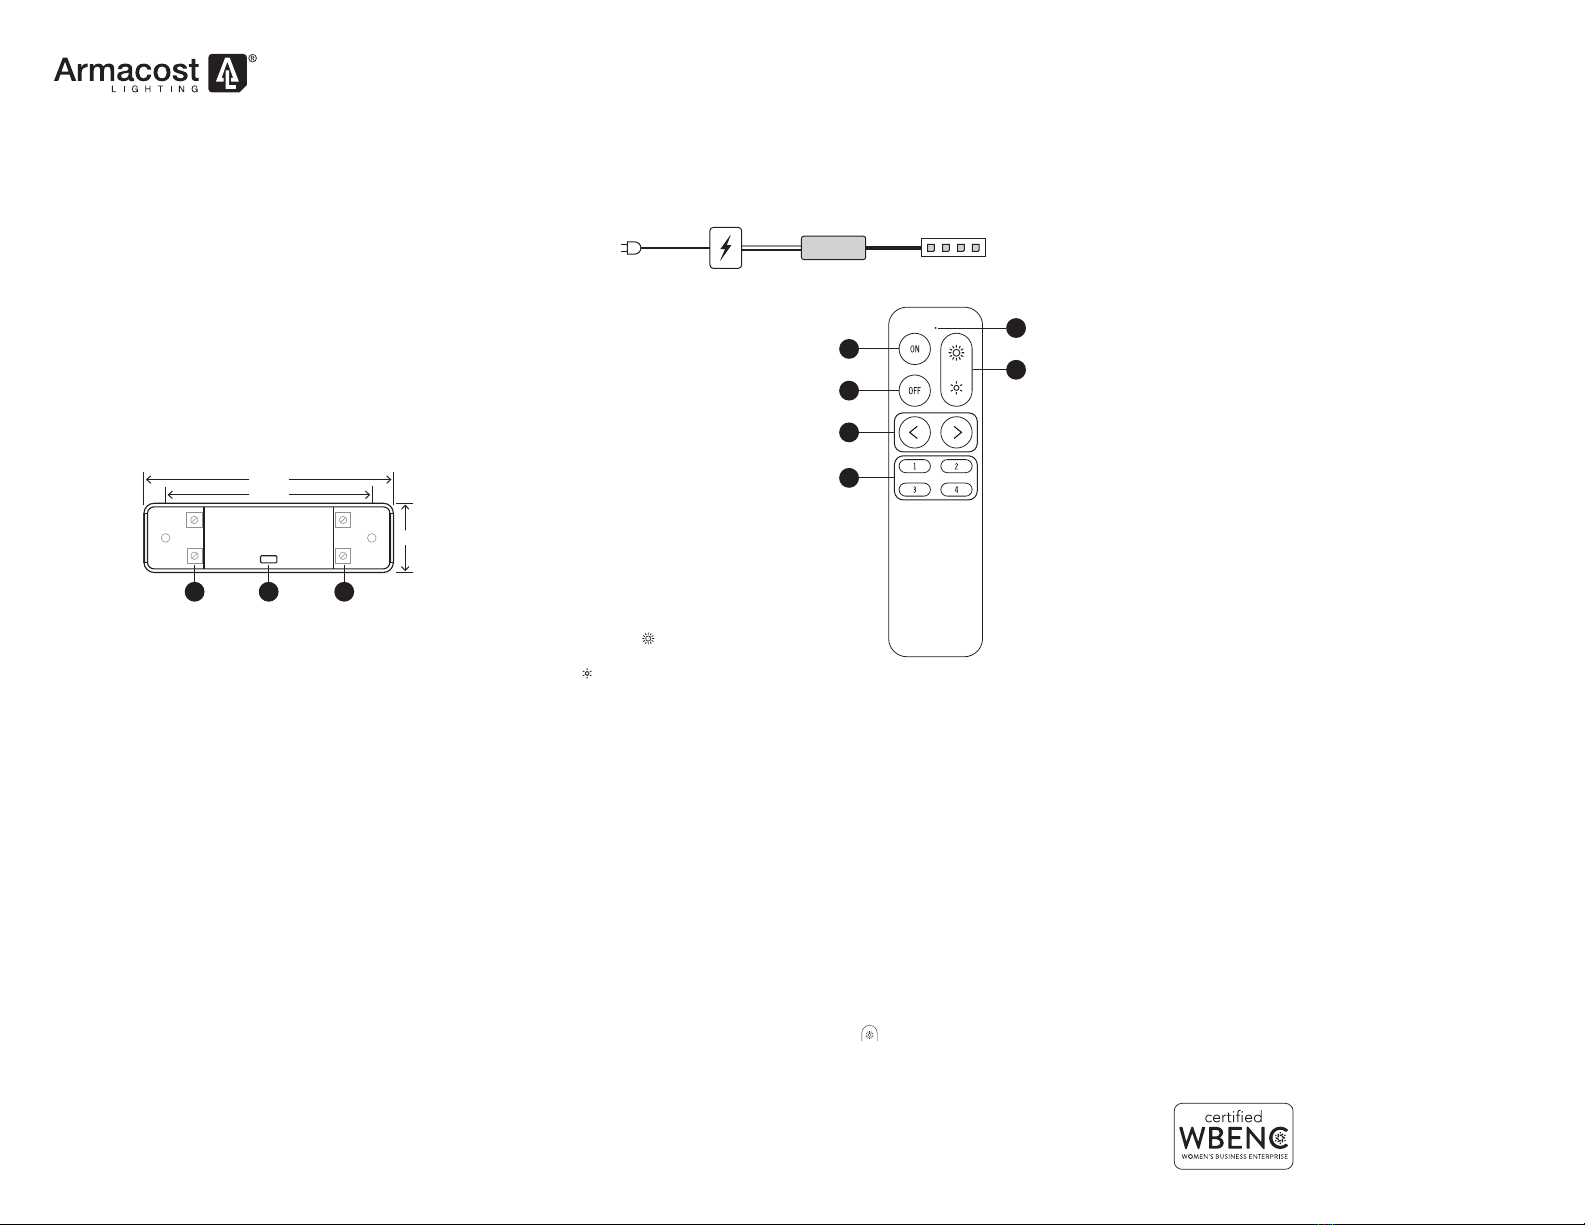
Récepteur et câblage
72mm
1. Entrée - de l’alimentation électrique
La plage de tension d’entrée et de sortie du contrôleur
est de 12-24 volts CC. Assurez-vous que la tension de
l’éclairage à LED est comprise dans cette plage et inférieure
à la puissance nominale de l’alimentation. Connectez les fils
d’entrée de l’alimentation au contrôleur comme indiqué par
les marques de polarité sur le contrôleur (+ à + et – à –).
2. Sortie - vers l’éclairage LED
Respectez la polarité indiquée sur le contrôleur lors de
la connexion à l’éclairage LED (+ à +, – à –).
Assurez-vous que la tension de l’éclairage LED est la
même que celle de l’alimentation électrique et que la
charge maximale ne dépasse pas celle du contrôleur.
ATTENTION : Le court-circuitage des câbles de sortie peut
causer des dommages permanents au contrôleur. Assurez-
vous que les câbles sont bien isolés les uns des autres.
3. Indicateur d’état du contrôleur
Ce voyant indique l’état du contrôleur comme suit :
Vert fixe : fonctionnement normal
Un seul clignotement vert : commande reçue
Long clignotement vert simple : bord du cycle de mode ou de couleur
Long clignotement jaune simple : atteindre la limite de luminosité
Clignotement rouge : protection contre la surcharge
Flash jaune : protection contre la surchauffe
Clignotement vert 3 fois : nouvelle télécommande couplée
4. Schéma de câblage
Connectez l’alimentation électrique à l’entrée du contrôleur et
la sortie du contrôleur à l’éclairage LED. La tension de sortie
de l’alimentation doit être la même que celle de l’éclairage
LED. Assurez-vous que tous les câbles d’alimentation sont
bien connectés et isolés avant de les mettre sous tension.
Contrôleur
de LED
en sortie
12–24V CC
12–24V CC 12–24V CC
Alimentation
Eclairage
LED
Télécommande
5. Sur
Appuyez pour allumer le contrôleur.
6. Arrêt
Appuyez pour éteindre le contrôleur.
Le contrôleur se souviendra de
l’état du contrôleur lorsqu’il est
éteint, et reviendra à cet état
lorsqu’il sera remis sous tension.
7. Sélection de couleur
Fait défiler les températures de couleur.
8. Favoris
Appuyez pour sélectionner
les couleurs prédéfinies.
9. Réglage de la luminosité
Appuyez sur pour augmenter la
luminosité de la LED et appuyez
sur pour la diminuer.
10. Indicateur de la télécommande
Lorsque vous appuyez sur les touches, le voyant clignote si la
télécommande fonctionne correctement. Si le voyant clignote
lentement lorsque vous appuyez sur les touches, la pile est faible
et doit être remplacée. Remplacez-la par une pile CR2032.
Fonctionnement de la télécommande
11. Utilisation de la télécommande
Retirez la languette plastique d’isolation de la pile avant de
l’utiliser. La télécommande sans fil RF fonctionne à travers les
murs et les portes. Ne l’installez pas dans un boîtier métallique.
12. Appairage avec une nouvelle télécommande
La télécommande et le récepteur sont déjà appairés, mais il est
possible d’appairer jusqu’à cinq télécommandes à un récepteur.
Pour appairer une nouvelle télécommande :
1. Débranchez l’alimentation du récepteur et attendez cinq secondes.
2. Rebranchez l’alimentation et dans les dix secondes, appuyez
simultanément sur les touches “ON” et jusqu’à ce que
le voyant de la télécommande clignote rapidement.
3. 13. Désappairage des télécommandes
Pour désappairer une télécommande, appairez la télécommande
que vous souhaitez continuer à utiliser avec le contrôleur et toutes
les autres télécommandes appairées seront désappairées.
Protection de la sécurité
Le contrôleur est doté d’une fonction qui l’empêche d’être endommagé
par un mauvais câblage, un courtcircuit de sortie, une surcharge ou
une surchauffe. Il s’arrêtera automatiquement dans ces conditions
extrêmes jusqu’à ce que des conditions de fonctionnement sûres
soient rétablies. Pour éviter les arrêts, assurez-vous que l’éclairage
LED installé est compatible avec une tension constante, qu’il se
situe dans la plage nominale du contrôleur et que les câbles sont
bien connectés et isolés. Installez également le contrôleur en tenant
compte d’une ventilation et d’une dissipation thermique adéquates.
Specifications
Mode de sortie......................................................Tension constante PWM
Tension de fonctionnement..................................................... 12–24V CC
Courant de sortie nominal....................................................... 1x10A
Niveaux de luminosité.......................................................................11
Fréquence PWM ......................................................................1KHz
Grade physique PWM ........................................................... 256 pas
Protection contre la surcharge .........................................................oui
Protection contre la surchauffe........................................................oui
Fréquence de la télécommande....................................... 433.92MHz
Portée de la télécommande .....................................jusqu’à 50 pieds/
.............................................................15m dans les zones ouvertes
Dimensions du contrôleur..........................3,43 X 0,95 X 0,59 pouce/
.............................................................................87 X 24 X 15mm
Dimensions de la télécommande ..................5,27 X 1,4 X 0,38 pouce/
...........................................................................134 X 36 X 95mm
Service client
Téléphone : 410-354-6000, du lundi au vendredi, de 9 h à 17 h, HE
Garantie
Garantie limitée d 3 ans. Ce produit est destiné à être utilisé dans
un endroit sec uniquement. Une installation inadéquate, une
alimentation inadéquate, un usage abusif ou un manquement à
l’utilisation prévue de cet appareil annulent la garantie. Une preuve
d’achat est requise pour tout retour. Vous avez des questions ?
6
7
8
5
9
10
armacostlighting.com
© 2022 Armacost Lighting.
Tous droits réservés.
221201


