Arrowquip THE MAJOR User manual

1-877-275-6075 | cs@arrowquip.com | operationarrowquip.com
THE MAJOR
HYDRAULIC CATTLE CHUTE
PRODUCT MANUAL
[ 3S - MAJ ]
OPERATION

CONTENTS
Safety Precautions 3
Risk Assessment 4
The Major Hydraulic Cattle Chute Assembly 5
Gas Power Pack 6
Electric Power Pack 7
Operating The Major Hydraulic Cattle Chute 8
Potential Pinch Points 9
Cold Start 10
Power Failure 10
Recommended Maintenance 11
Maintenance Safety 11
Regular Maintenance 11
Hydraulic Maintenance 13
Troubleshooting Guide 14
Squeeze Chute 14
Power Pack Troubleshooting 15
Issue: Gas Power Pack Issues 15
Issue: Pump is not building pressure 16
Issue: Issues with Electric Power Pack 16
10,000 Head Inspection Checklist 16
Warranty 21
Add-Ons Maintenance & safety Precautions 22
Sheeted Sternum Bar 22
Calf Restrainer Bar 23
Hydraulic Neck Extenders 25
Portable Wheel Kit 25
Wheel Maintenance 34

WARNINGS
DO NOT repair the chute or go into the chute when
hydraulics are in operation. This can result in injury
to the worker. Disconnect the power source before
performing any necessary repairs or inspection.
DO NOT ATTEMPT TO CONNECT THE ELECTRIC POWER
PACK IF YOU ARE NOT A CERTIFIED ELECTRICIAN. For
your safety, electric power packs must be connected
There are a number of pinch points to be aware of on
The Major, including the Head Gate, Tail Gate, Rump
Bar, Side Exit Door, and Fork Targets. Please exercise
caution when working with the equipment to avoid
injury to the operator and livestock.
HYDRAULIC LIFT AND WHEEL KIT WARNINGS & SAFETY
PRECAUTIONS
Wheel Kit Warning & Safety Precautions
-When chute is not attached to vehicle, lower front
hitch jack to the ground for safety.
-Always lower unit to the ground immediately when
transport is complete.
-
road use and after each wheel removal.

2 |SAFETY PRECAUTIONS
PLEASE FOLLOW ALL SAFETY INSTRUCTIONS PROVIDED IN THIS
MANUAL BEFORE OPERATION. ARROWQUIP DOES NOT ACCEPT
RESPONSIBILITY FOR ANY ACCIDENTS OR INJURY WHEN THIS
SAFETY MANUAL HAS NOT BEEN READ IN FULL AND KEPT WITH THE
PRODUCT AT ALL TIMES. OPERATORS OF THIS PRODUCT TAKE AND
ACCEPT RESPONSIBILITY FOR ANY HARM OR INJURY TO THE ANIMAL
OR OPERATOR WHEN IT PERTAINS TO HOW THE EQUIPMENT IS
USED AND MAINTAINED.
Please keep this manual for frequent reference and to pass on to new users or owners
SAFETY PRECAUTIONS
PLEASE FOLLOW ALL SAFETY PRECAUTIONS OUTLINED HEREIN. ANY
HARM TO THE ANIMAL OR INJURY TO THE OPERATOR WHICH OCCURS
DUE TO HOW THE PRODUCT IS OPERATED, OR RESULTING FROM A
LACK OF SAFETY PRECAUTIONS ARE THE SOLE RESPONSIBILITY OF
THE OPERATOR.
All farm machinery and equipment are potentially dangerous. Careless use of any
Arrowquip livestock equipment may cause injury or damage to persons, cattle, or
property. Arrowquip has taken precautions in the design and manufacturing of this
product to ensure that it is safe and user-friendly. Therefore, user must assume all
responsibility and risk associated with the possession and use of the equipment.
Ensure the operator understands the contents of this manual before using the cattle
squeeze chute.
1. DO NOT
2.
chute bolted to the concrete is strongly recommended.
3. DO NOT enter the vet cage until the animal is secured in the head gate and the
rump bar has been placed behind the animal so that the cow cannot back up.
4. DO NOT stand in front of the head gate while operator is moving the cattle through
the squeeze chute.
WARNING: READ BELOW BEFORE OPERATION.

RISK ASSESSMENT |3
5. DO NOT ALLOW CHILDREN UNDER THE AGE OF 18 NEAR AN OPERATING
MACHINE.
6. Follow safe cattle handling procedures in other areas of the yard so that cattle are
more docile in the chute.
7. DO NOT
and void warranty.
8. DO NOT ALLOW CHILDREN UNDER THE AGE OF 18 TO USE THE HYDRAULIC
EQUIPMENT.
9. DO NOT OPERATE HYDRAULICS WHILE OPERATORS ARE WORKING WITH THE
CATTLE IN THE CHUTE OR ARE TOUCHING THE CHUTE. REACHING OUT OR INTO
THE CHUTE WHILE HYDRAULICS ARE IN OPERATION CAN RESULT IN SERIOUS
INJURY.
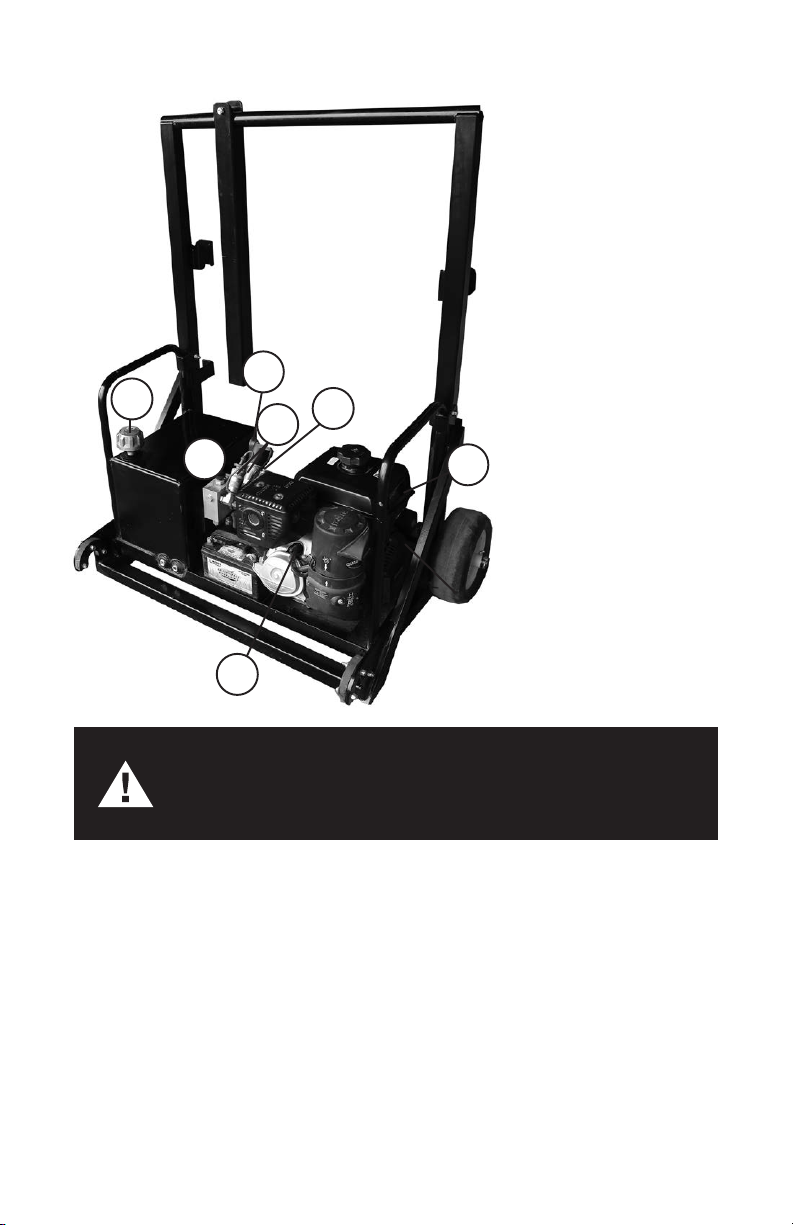
10. Please ensure that all hydraulic hoses and electrical leads are out of the way and
safely positioned before moving cattle or using the chute.
11. Keep a distance of more than an arm’s length from the hydraulic chute while
hydraulics are in operation.
12. When using the Emergency Side Exit, exercise caution. Improper placement of the
swing arm may result in injury to the operator or damage to the equipment.
13. When using V-Squeeze setting on small calves, be cautious with the amount of
pressure may cause leg/hoof damage.
14. Stay alert when using side exit doors and bottom swing-out gates on uneven
ground or V-Squeeze/A-Squeeze settings, as doors may open/close on their own.
15. When using the drop-down side access panels, ensure the latch is fully engaged to
prevent the panels from dropping when under pressure.
16. When closing doors, ensure latching pins move freely, so that they will fully engage
in the latch catches and function properly.
RISK ASSESSMENT
Conduct a risk assessment on procedures regarding the operation of an Arrowquip
hydraulic squeeze chute, establishing a safe work procedure.
1. Ensure all users of the equipment have been inducted and comply with safe
working procedures.
2.
3. Please ensure that there are no hydraulic hoses or large objects within or around
the chute where cattle and operator will be.
4. Please ensure that all hydraulics work properly before putting cattle through the
chute.

4 |THE MAJOR HYDRAULIC CATTLE CHUTE ASSEMBLY
5. Please make sure that all hydraulic hoses are properly secured to the power pack or
tractor hook up.
6.
that the adjustable side mechanism and the head gate are adjusting smoothly.
7. If hydraulics do not function properly when testing the equipment, DO NOT put
cattle through the chute.
8. Ensure that access gates are closed securely before running cattle through the
chute.
9. Some chemicals and medicines can damage powder coat. Take all precautions and wash
after use.
10. Make sure your chute has been cleared of ALL livestock after use.
THE MAJOR HYDRAULIC CATTLE
CHUTE ASSEMBLY
to the chute. However, it will be necessary to connect the hydraulic hoses to a tractor or
power pack. The following guide will assist you in properly setting up your chute for use.
SETTING UP THE MAJOR HYDRAULIC CATTLE CHUTE
1. Hydraulics are plug and play. Please ensure that the color code of the hoses
matches to the quick connects. Rule of thumb: red is pressure, black is tank.
2. When hooking up the hoses, ensure the couplers are engaged and the female
sleeve is snapped into place.
3. Engage oil recirculation by pulling up on the valve knob to warm oil before use.
4. Start motor by following starting procedure.
5. When shutting down, engage oil recirculation again and shut gas engine off.
DO NOT ATTEMPT TO CONNECT THE ELECTRIC POWER
PACK IF YOU ARE NOT A CERTIFIED ELECTRICIAN.

1
2
3
4
5
6
7
THE MAJOR HYDRAULIC CATTLE CHUTE ASSEMBLY |5
GAS POWER PACK
1. Recirculation Valve
2. Quick Connect Ports
3. Oil Filter
4. Oil Level Sight Glass
5. Breather Fill Cap
6. Engine Oil Plug
7. Starter Pull Cord
1. Open recirculation valve.
2. Open fuel shut off valve.
3. Ensure choke is fully engaged.
4. Pull starter handle to start engine.
5. Run engine on choke for 5-10 seconds.
6. Shut choke off completely.
7. Run engine with hydraulic oil recirculating for 5-10 minutes depending on ambient
temperature.
8. Open recirculation valve and chute is ready to operate.
DO NOT START GAS ENGINE WITHOUT CONNECTING
PRESSURE AND TANK HOSES TO UNIT. DAMAGE MAY
OCCUR IF RECIRCULATION VALVE IS NOT ENGAGED.

1
2
4
3
6 |THE MAJOR HYDRAULIC CATTLE CHUTE ASSEMBLY
1. Recirculation Valve
2. Oil Filter
3. Quick Connect Ports
4. Breather Fill Cap
ELECTRIC POWER PACK
electrician.
7.5HP STEALTH ELECTRIC POWER PACK
If you have any questions, contact Arrowquip Client Care at 1-877-275-6075.
MUST BE CONNECTED BY A CERTIFIED ELECTRICIAN.
CONTACT 1-877-275-6075 WITH ANY QUESTIONS.
DO NOT ATTEMPT TO CONNECT THE ELECTRIC POWER
PACKS IF YOU ARE NOT A CERTIFIED ELECTRICIAN.

OPERATING THE MAJOR HYDRAULIC CATTLE CHUTE |7
OPERATING THE MAJOR
HYDRAULIC CATTLE CHUTE
WORKING PROPERLY BEFORE OPERATING.
1. Ensure all access points are closed before the animal enters the chute.
2. Open tail gate for the animal to enter the squeeze chute enclosure.
3. Close tail gate.
DO NOT CONNECT MOTOR TO POWER SOURCE
WITHOUT CONNECTING PRESSURE AND TANK HOSES
TO UNIT. SEVERE DAMAGE MAY OCCUR.

8 |POTENTIAL PINCH POINTS
TIP FOR CATCHING CATTLE: ENSURE THE HEAD GATE IS
SECURED INTO THE HOLLOW OF THE ANIMALS NECK
TO ALLOW FOR PROPER OPERATION OF THE NECK
EXTENDERS.
4. Open head gate slightly more than the neck size of the animal to tempt the
animal to stick its head through the head gate. When neck of animal is in the
correct position, quickly close the head gate securely on the animal’s neck.
5. If required, side squeeze animal and engage head restraint (if equipped) to restrain
further movement.
6. If the animal applies excessive pulling pressure on head gate, it is recommended
to use the anti-backing bar behind cattle rump.
CONFIRM ANIMAL IS SECURELY HELD BEFORE CARRYING
OUT ANY HUSBANDRY WORK.
POTENTIAL PINCH POINTS
-Head Gate
-Tail Gate
-Rump Bar Access
-Side Exit Door
-Fork Targets

COLD START |9
COLD START
To cold start the unit it when it is not at operating temperature, follow the below
instructions.
1. With recirculation valve locked in the up position, the cold start allows the oil to
chute.
2. With recirculation valve locked in the down position, it is engaged to run the chute.
POWER FAILURE
If you should experience a loss of power while you have an animal in the chute, please
follow the instructions below:
1. Operate the hydraulic levers to release pressure in the hydraulic circuit and allow
2. With the levers engaged, pull on the Head Gate Door / Squeeze Panel to open the
door if necessary.
3. Check to make sure that the animal is free of any injury.
4. Release the animal from the chute.
5. Review the cause for power failure and troubleshoot to restore power.
6. See start-up procedure once power is restored.

10 |RECOMMENDED MAINTENANCE
RECOMMENDED MAINTENANCE
Before doing ANY work or troubleshooting on your hydraulic chute, contact Arrowquip
Client Care at 1-877-275-6075.
MAINTENANCE SAFETY
1. Ensure the area is clear of bystanders, especially children, when doing any
maintenance or repair on the hydraulic squeeze chute.
2. Keep all body parts, including hair, hands, feet, etc., away from the machine when
hydraulics are in operation.
3. Before carrying out any maintenance on the squeeze chute, please ensure there
are no livestock in the chute.
4. DO NOT repair the chute or go into the chute when hydraulics are in operation or
while power pack is running. This can result in injury to the worker. Disconnect the
power source before performing any necessary repairs or inspection.
REGULAR MAINTENANCE
✓Inspect the entire unit. Ensure all moving components are free of debris
and functioning properly. Use proper cleaning and troubleshooting steps, if
necessary.
✓Grease cylinders and zerks (8 total).

RECOMMENDED MAINTENANCE |11
✓Grease head gate linkage and cylinder (7x per head gate 14x total)
✓Lubricate slam latches and door hinges with WD-40 Dry Lube.
✓Check gate latches and striker plates for wear. Ensure gates are locking
securely.
✓Grease squeeze pivots (6x shown 12x total).

12 |RECOMMENDED MAINTENANCE
✓Clean the chute floor. Excess build-up of manure or dirt inside chute can
cause the squeeze and head gate to malfunction.
✓Check pivot mechanism pins for wear. Lubricate with WD-40 Dry Lube as
necessary.
✓Grease pivot point on neck extenders.
✓Grease head gate track (4x shown, 8x total).
✓Clean bottom head gate door track to prevent dirt-build-up.
HYDRAULIC MAINTENANCE
Oil Change
1. Replace oil every 6 months or 10,000 head of cattle, or
more frequently as necessary.
For chutes that see large numbers of cattle, replace
every 3 months.
Follow indicator on the power pack for
recommendation.
a. Use AW22 or HWI-22 oil.
DIRTY OIL OR OIL THAT HAS 0.05% OF WATER IN IT CAN
BE CATASTROPHIC FOR HYDRAULIC SYSTEMS. REPLACE
OIL FREQUENTLY TO PREVENT DAMAGE TO YOUR
HYDRAULIC JACKS AND KEEP THEM WORKING SAFELY
AND RELIABLY.

TROUBLESHOOTING GUIDE |13
Filter Change
-Zinga: AE10 Filter
-Wix: 51551
-Napa: 1551
-Baldwin: BT839-10
1.
2.
3.
gasket. DO NOT USE GREASE OR ANY OTHER LUBRICANT.
4.
5.
TROUBLESHOOTING GUIDE
Before doing ANY work or troubleshooting on your hydraulic chute, contact Arrowquip
Client Care at 1-877-275-6075.
SQUEEZE CHUTE
1. To ensure proper operation make sure chute is situated on level ground or base.
2. Make sure head gate door tracks are free of debris.
3.
squeeze and head gate to malfunction.
4. Lubricate slam latches and pivot points with WD-40 Dry Lube.
DO NOT ATTEMPT TO TROUBLESHOOT OR FIX ISSUES
WITH THE ELECTRIC POWER PACK UNLESS YOU ARE A
CERTIFIED ELECTRICIAN

14 |TROUBLESHOOTING GUIDE
POWER PACK TROUBLESHOOTING
ISSUE: GAS POWER PACK ISSUES
For detailed instructions on how to remedy these problems, refer to your Gas Power
Pack manual.
Possible Cause
Problem No Fuel Improper
Fuel
Dirt in
Fuel
Line
Dirty
Debris
Screen
Incorrect
Oil Level
Engine
Overloaded
Dirty Air
Cleaner
Faulty
Spark
Plug
Will Not Start • • • • • • •
Hard Starting • • • • • •
Stops Suddenly • • • • • • •
Lacks Power •••• • ••
Operates
Erratically • • • • • •
Knocks or Pings • • • •
Skips or Misres ••• ••
Backres • • • • •
Overheats • • • • • •
High Fuel
Consumption • • •

10,000 HEAD INSPECTION CHECKLIST |15
ISSUE: GAS POWER PACK START CORD IS DIFFICULT TO PULL
Reference Kohler Power Pack manual for further instructions.
ISSUE: PUMP IS NOT BUILDING PRESSURE
1. Disengage the recirculation valve.
2. Ensure hydraulic lines are properly connected.
3. Change power pack oil if it has not been done recently.
4. If all else fails, call Client Care 1-877-275-6075 for further assistance.
ISSUE: ISSUES WITH ELECTRIC POWER PACK
Contact your Electrician for assistance with any Power Pack issues.
For additional information, contact Arrowquip Client Care at 1-877-275-6075.
10,000 HEAD INSPECTION
CHECKLIST
Every 10,000 cattle or every 6 months, whichever comes sooner, review the following
parts on the chute to ensure there is no wear taking place.
1. Neck Extender Pin Connections
a. 12 connection points

16 |10,000 HEAD INSPECTION CHECKLIST
2. Torsion Bar Connections
a. 4 connection rotation points
3. Head Gate
a. Inspect roller glides on Head Gate Doors for wear
b. Inspect roller glides on the bottom of the Head Gate track for wear

10,000 HEAD INSPECTION CHECKLIST |17
4. Tail Gate
a. Inspect roller glides on Tail Gate Doors for wear
5. Top Squeeze Track
a. Inspect roller glides on Squeeze Track for wear
b. Inspect roller glides on the bottom of the Tail Gate track for wear

18 |10,000 HEAD INSPECTION CHECKLIST
b. Ensure bolts on the Squeeze Tower are tightened properly (24 total - 12
shown)
6. Head Gate Cushions
a.
animal
This manual suits for next models
1
Table of contents
Other Arrowquip Farm Equipment manuals

Arrowquip
Arrowquip Q-CATCH 86 Series User manual

Arrowquip
Arrowquip Q-POWER 107 Series User manual

Arrowquip
Arrowquip EASY FLOW CATTLE ALLEY User manual

Arrowquip
Arrowquip PORTABLE Q-CATCH 74 Series User manual

Arrowquip
Arrowquip EASY FLOW User manual

Arrowquip
Arrowquip Q-POWER 107 Series User manual

Arrowquip
Arrowquip Q-CATCH QC920 User manual

Arrowquip
Arrowquip Bud Flow User manual

Arrowquip
Arrowquip 1040 User manual

Arrowquip
Arrowquip Q-POWER 106 SERIES User manual