Artesia F-61 User manual

Artesia F-61
0
0046687
/
0
0046688
/
0
0046689
Version 11/2016
F
-
61
Digitalpiano
Bedienungsanleitung
/ User manual / Mode d
`e
mploi

Artesia F-61
1 Einleitung
Vielen Dank, dass Sie sich ür dieses ARTESIA Digitalpiano entschieden haben. Dieses Instrument hat 61
Tasten und ist ein ideales Einsteigerinstrument ür junge Musiker. Damit wird Ihr Kind jahrelang Freude am
Musizieren und Lernen haben. Um Ihr Instrument optimal nutzen zu können, lesen Sie bitte diese
Bedienungsanleitung sorg ältig durch und probieren Sie die verschiedenen Funktionen mit Ihrem Kind aus,
die wir Ihnen darin vorstellen. Wir wünschen Ihrem Kind viel Spaß mit seinem neuen Instrument und ho en,
dass es viele Jahre seine Freude daran haben.
2 Informationen zu Ihrer Sicherheit
Bitte lesen Sie den olgenden Abschnitt sorg ältig durch, bevor Sie das Instrument in Gebrauch nehmen!
Bitte bewahren Sie diese Bedienungsanleitung sorg ältig au .
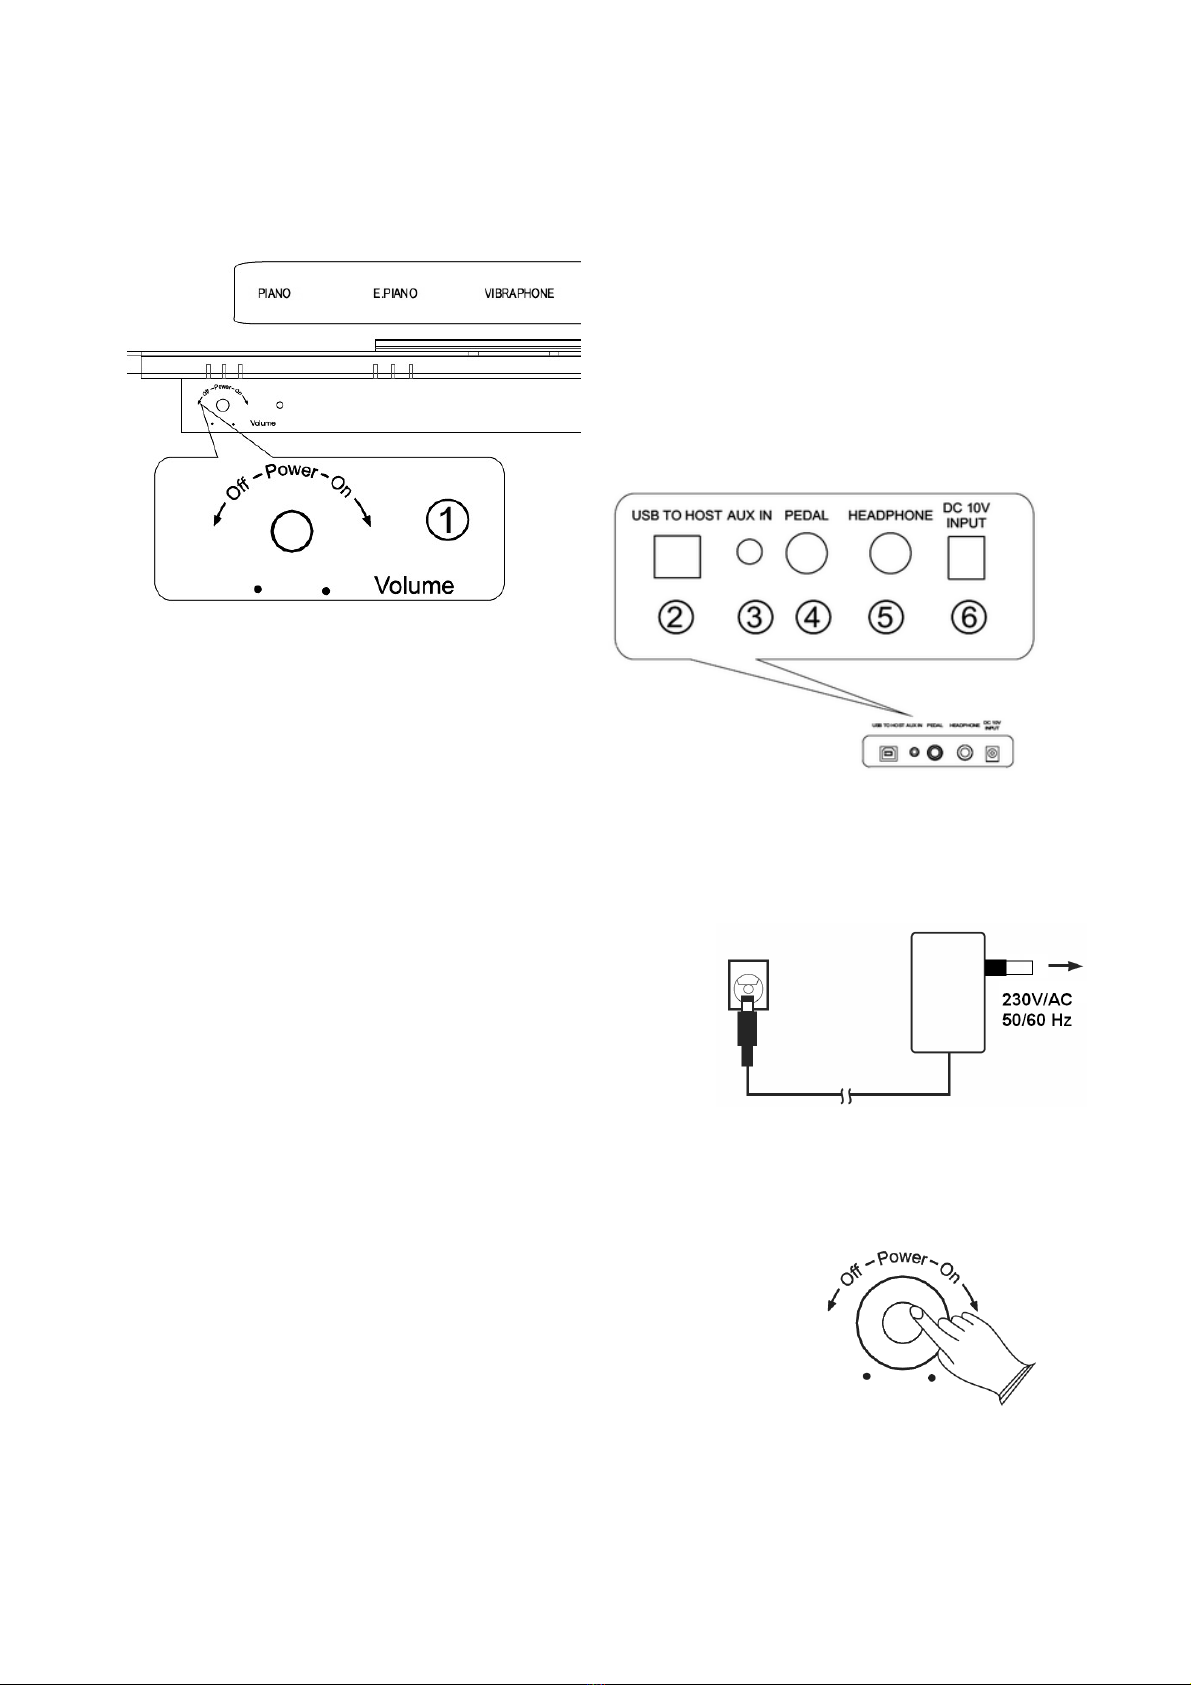
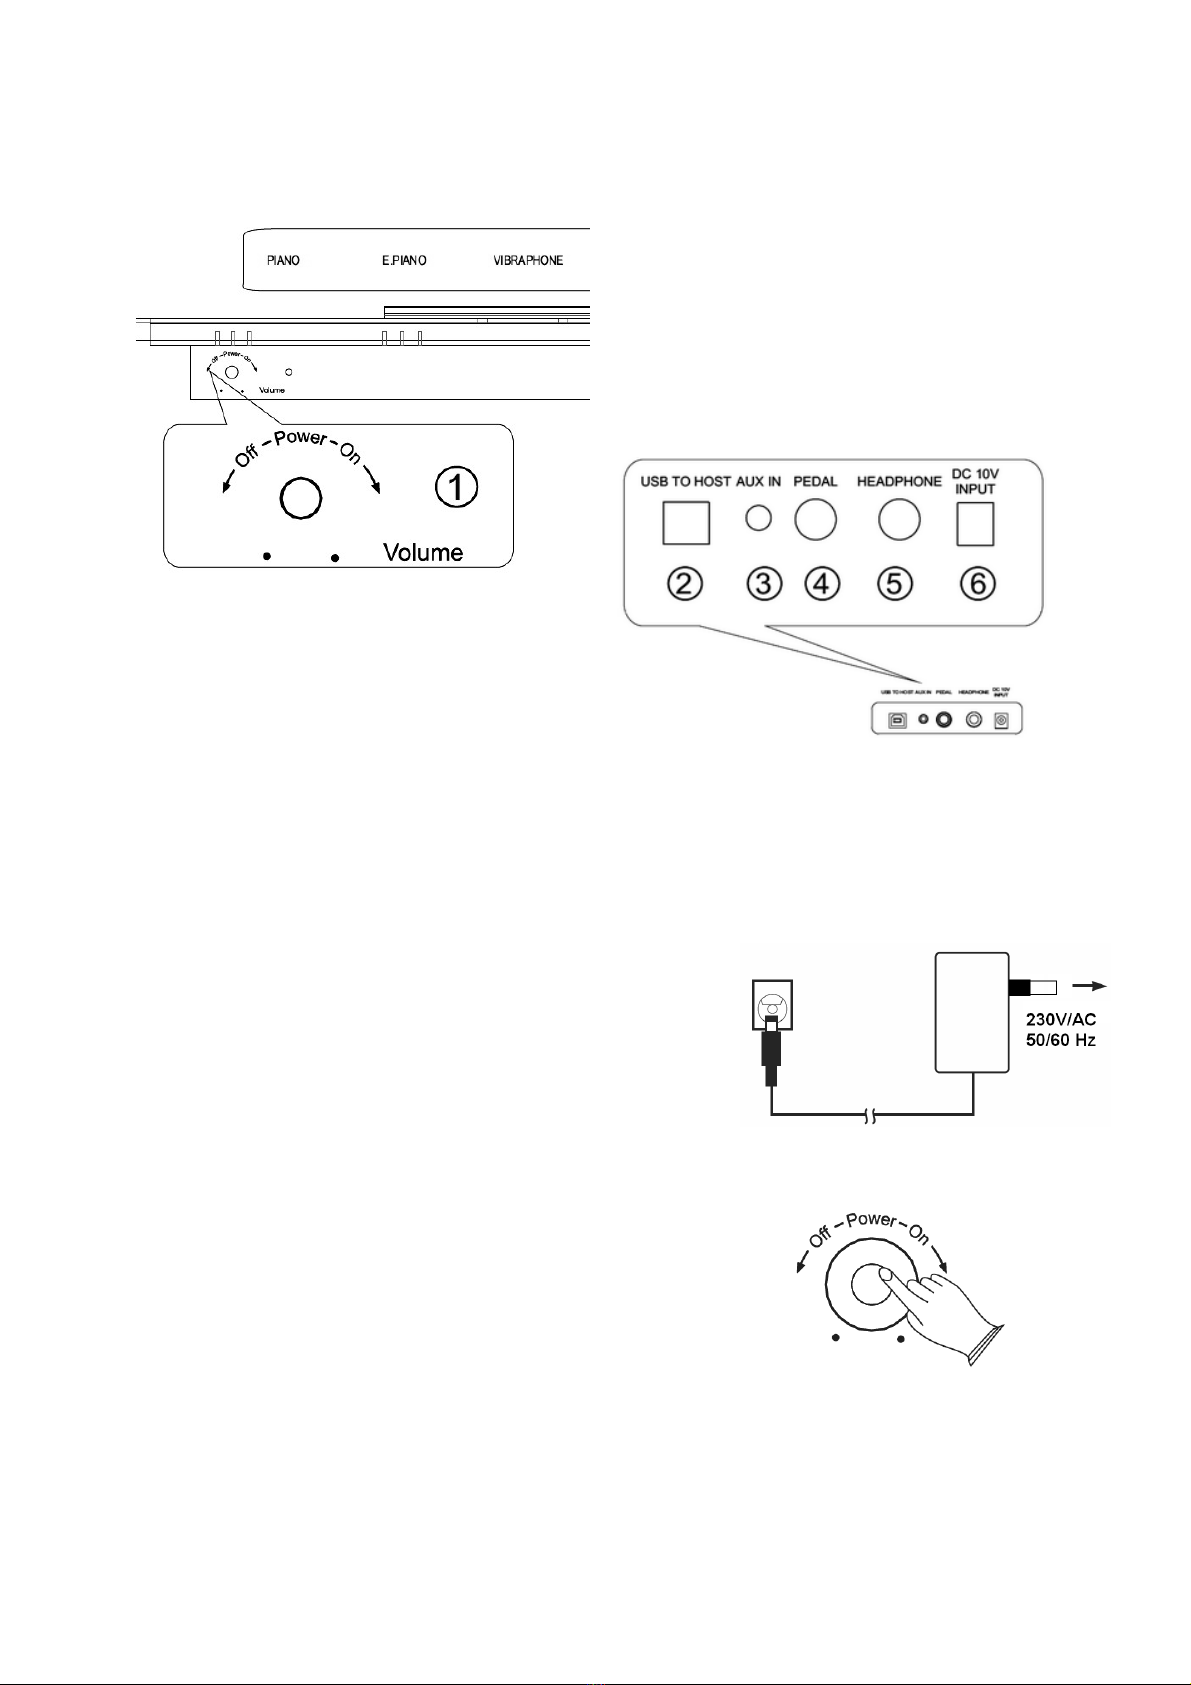
Stromversorgung
Bitte schließen Sie das mitgelie erte Netzkabel (gg . Netzteil) an einer Steckdose mit korrekter Spannung an.
Verbinden Sie das Gerät nicht mit einer Steckdose, deren Spannung ür das Gerät nicht geeignet ist. Trennen
Sie das Netzteil vom Strom, wenn Sie das Instrument nicht benutzen oder während eines Gewitters.
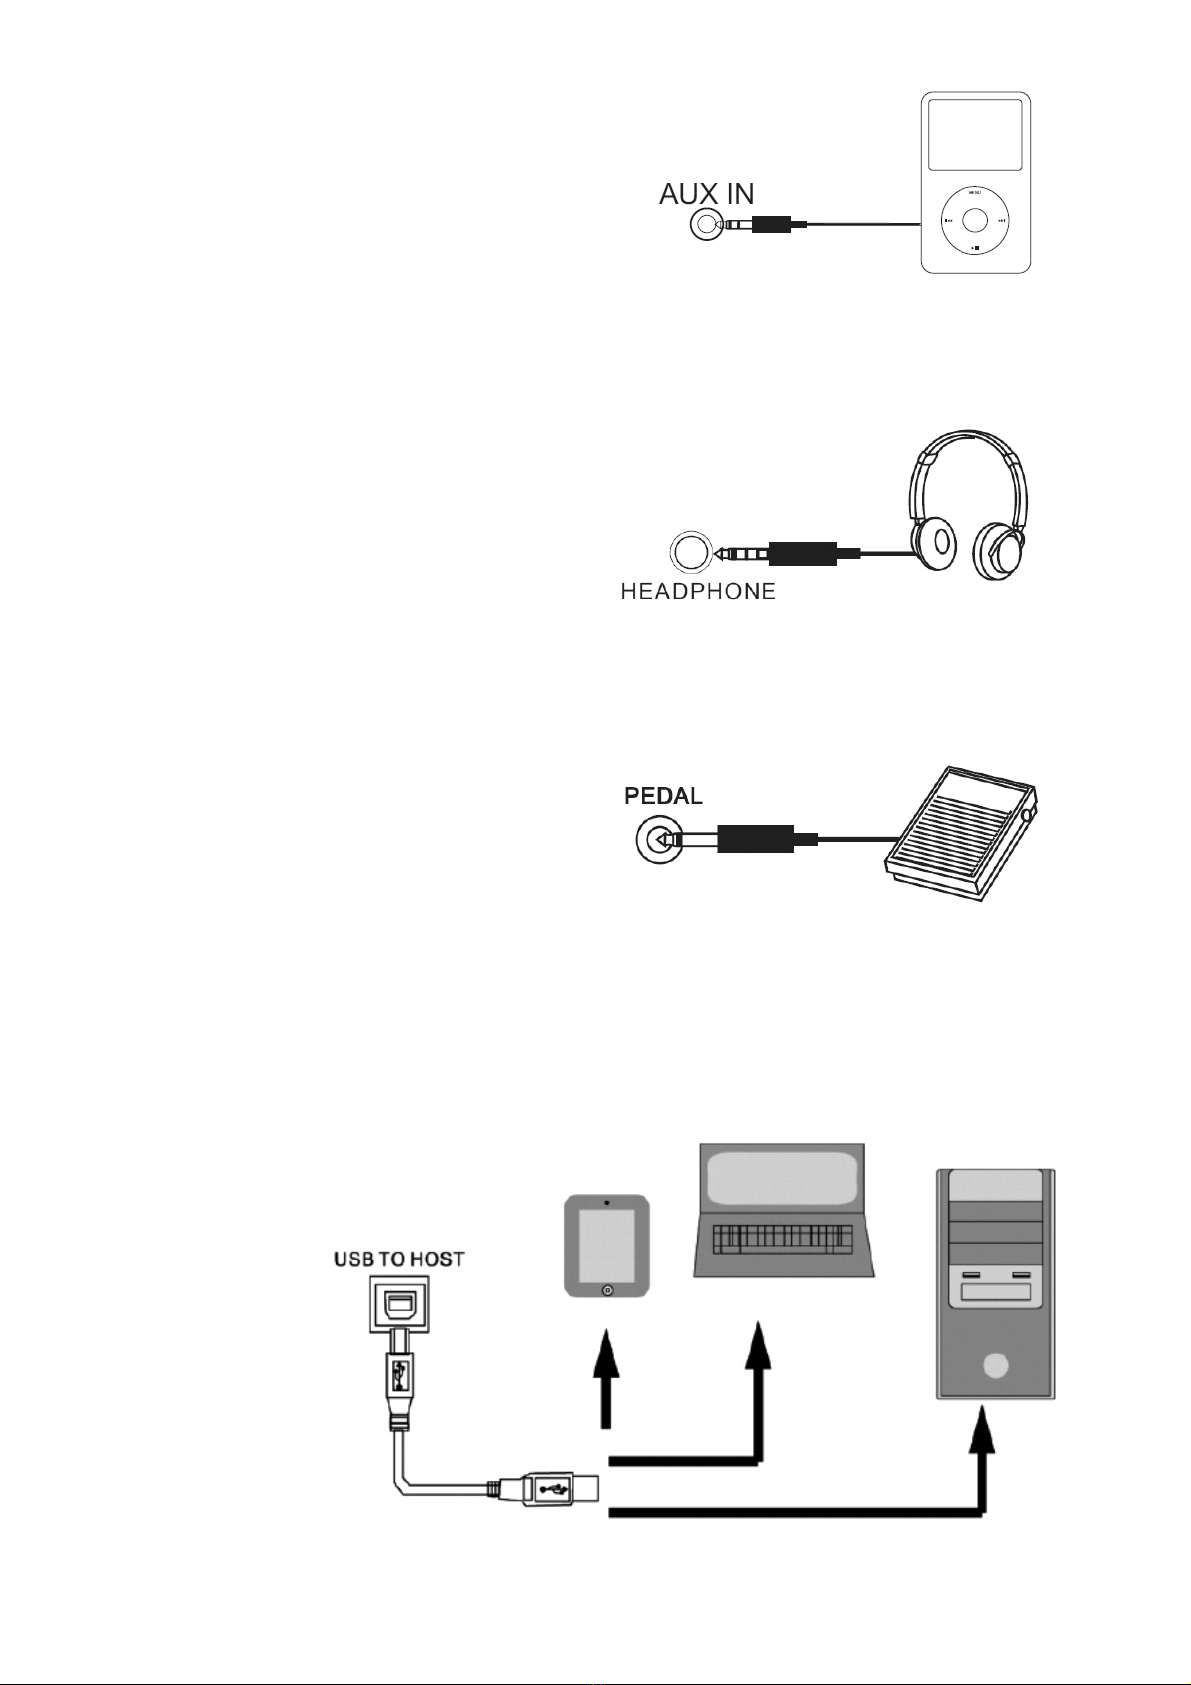
nschlüsse
Bevor Sie das Instrument mit anderen Geräten verbinden, schalten Sie bitte alle Geräte zuerst aus. Das
bewahrt die Geräte vor Schäden und hil t, Fehl unktionen zu vermeiden.
Umgebung
Setzen Sie das Gerät den olgenden Bedingungen bitte nicht aus, um Ver ormungen, Ver ärbungen oder
ernstha tere Schäden zu vermeiden:
- direktem Sonnenlicht
- extremen Temperaturen
- extremer Feuchtigkeit
- Staub oder Schmutz
- starken Vibrationen oder Erschütterungen
- magnetischen Feldern
Reinigung
Bitte reinigen Sie das Instrument ausschließlich mit einem weichen, trockenen Tuch. Benutzen Sie bitte keine
Farbverdünner, Lösungsmittel, Reinigungs lüssigkeiten oder chemisch imprägnierte Reinigungstücher.
Handhabung
Wenden Sie bitte keine übermäßige Gewalt beim Umgang mit Knöp en und Schaltern an und sorgen Sie
da ür, dass kein Papier, Metall oder sonstige Objekte in das Instrument gelangen können. Sollte es doch
passieren, trennen Sie das Gerät bitte so ort vom Stromkreis und bringen Sie es zum Fachhändler zur
Überprü ung. Ent ernen Sie bitte stets alle Kabelverbindungen, bevor Sie das Instrument bewegen.
Öffnen des Geräts
Das Gerät dar nur von autorisiertem Fachpersonal zu Reparaturzwecken geö net werden. Wenden sie sich
bitte an eine Fachwerkstatt oder den Händler bei welchem Sie das Gerät gekau t haben.
DEUTSCH

Artesia F-61
3 Bedienfeld und nschlüsse
1. An/Aus Schalter (Lautstärke)
2. USB TO HOST Buchse
3. AUX IN Buchse
4. E ektpedal Buchse
5. Kop hörer Buchse
6. Stromanschluss
Stromzufuhr
Ihr Instrument wird mit einem Netzteil betrieben. Stecken Sie das
Kabel von dem Netzteil in den Stromanschluss des Instrumentes
und anschließend in eine übliche Steckdose.
n/ us Schalter
Nachdem Sie Ihr Piano au gebaut und angeschlossen haben, drücken Sie den
An/Aus Knop um das Gerät anzuschalten.
Lautstärkeregler
Sie können die Lautstärke mit Hil e des Drehknop es (An/Aus Schalter bzw.
Lautstärkeregler) jederzeit, selbst während dem Spielen, verändern.

Artesia F-61
ux-In
Verbinden Sie ein beliebiges externes Sound-System
(z.B. MP3-Player, CD-Player, …) mit der Aux-In Buchse.
Sie können nun das Signal des externen Sound-
Systems, sowie die Töne Ihres Pianos vermischen.
Diese Funktion ist praktisch, wenn Sie z.B. zu Ihren
Lieblingssong mitspielen wollen.
Kopfhörer
Ein beliebiges Paar Stereo-Kop hörer kann an Ihr
Piano angeschlossen werden (Kop hörer-Buchse), um
z.B. in der Nacht spielen zu können. Nachdem Sie Ihre
Kop hörer angeschlossen haben werden die internen
Lautsprecher automatisch deaktiviert.
Pedal
Es kann ein Fußschalter an die Pedal-Buchse
angeschlossen werden. Dieses Pedal ist ein Dämp er
Pedal, welches die Sustain-Funktion steuert. Die
Sustain-Funktion lässt die Noten auch nachdem Sie
die Tasten losgelassen haben, weiter klingen.
USB to Host
Sie können auch ein Tablet, Laptop oder Desktop-Computer an Ihr Piano anschließen. Die Tastensignale
werden an den Computer übertragen. Dort muss eine geeignete So tware (z.B. Synthesizer, Tonerzeugung,
etc.) installiert sein. Diese So tware ist nicht im Lie erum ang enthalten

Artesia F-61
Klangauswahl
Drücken Sie die ersten drei Tasten (zwei weiße und eine
schwarze Taste) und drücken Sie anschließend eine der
weißen Tasten um zwischen den acht verschiedenen Klängen
(Stimmen) auswählen zu können.
Demo Song
Drücken Sie die ersten drei Tasten (zwei weiße und eine schwarze Taste) und drücken Sie anschließend die
letzte weiße Taste um in die Betriebsart Demo Song zu gelangen. Halten Sie die ersten 3 Tasten gedrückt und
mit der 6ten bis 20ten Taste können Sie einen Song (siehe unten) auswählen. Um die Betriebsart Demo-Song
zu verlassen, drücken Sie die ersten drei Tasten gleichzeitig und anschließend die letzte schwarze Taste
erneut.
nschlagsdynamik (Touch)
Drücken Sie die ersten drei Tasten (zwei weiße und eine schwarze Taste) und drücken Sie anschließend die
vorletzte weiße Taste. Die Touch-Funktion wird aktiviert. Um diese wieder zu deaktivieren drücken Sie die
ersten drei Tasten und drücken Sie anschließen die vorletzte weiße Taste (Voreinstellung:a n).

Artesia F-61
4 Montageanleitung
Entnehmen Sie den Pianoständer, sowie das Piano aus der Verpackung. Prü en Sie ob alle Teile wie
abgebildet vorhanden sind. Zum Au stellen suchen Sie eine ausreichend große und ebene Fläche.
Einzelteile Piano:
A: Schraube M4*12 18x
B: Be estigungswinkel groß 2x
C: Be estigungswinkel klein 4x
E: Schraube M4*25 4x
F: Schraube M6*20 4x
Einzelteile der Bank:
A: Verbindungsbolzen 8x
B: Einsetzmutter 8x
C: Plastikkappe 8x
Montage
Beginnen Sie mit dem Au bau des Unterbaus,
indem Sie die mitgelie erten Seitenteile mit der
Querstrebe be estigen. Montieren Sie hierzu die
Montagewinkel (B) und (C) gemäß der
Zeichnung. Benutzen Sie pro Winkel 3 Schrauben
(A) Ziehen Sie die Schrauben est an.
Kontrollieren Sie, ob die Winkel est sitzen.

Artesia F-61
Be estigen Sie die Querstrebe gemäß Zeichnung mit den
Schrauben (E) an den Be estigungswinkeln (B). Ziehen Sie
die Schrauben est an und überprü en Sie ob der
Unterbau stabil steht.
Setzen Sie das Piano au den Unterbau und
verbinden Sie Unterbau und Piano mit den
Arretierschrauben (F). Ziehen Sie die Schrauben
est an und überprü en Sie ob das Digitalpiano
stabil steht.
Montage der Bank
(1) Vorbereitung des Unterbaus:
Führen sie je zwei Einsetzmuttern (B) in die vor-
gesehenen Bohrungen der beiden Seitenteile.
Führen Sie 4 Verbindungsbolzen (A) in die
Bohrungen der Querstrebe ein. Führen Sie
Querstrebe und den ersten Fuß zusammen und
ziehen Sie den Verbindungsbolzen est.
Wiederholen Sie dies ür den zweiten Fuß.
(2) Au die gleiche Weise be estigen Sie den Sitz
au den Seitenteilen. Decken Sie alle Bohrlöcher
mit den Plastikkappen (C) ab.
Bevor Sie die Bank benutzen und sich oder Ihr Kind sich darauf setzt, überprüfen Sie noch einmal alle
Verbindungen auf Stabilität und ob die Bank sicher und ohne Wackeln steht.

Artesia F-61
1 Introduction
Thank you or purchasing the ARTESIA F-61 digital piano. For per ect operation and security, please read the
manual care ully and keep it or uture re erence.
2 Safety information
Read these instructions and keep them on a sa e place
Heed all warnings and ollow all instructions.
Do not use this keyboard near water, clean only with dry cloth.
Do not block any ventilation openings
Do not install near the heat sources such as radiators, heat registers, stoves, or other devices (including
ampli iers) that produce heat.
Protect the power cord rom being walked on or pinched particularly at and the point where they exit rom
the device.
Only use attachments/accessories speci ied by the manu acturer.
Use only with the cart, stand, tripod, bracket, or table speci ied by the manu acturer, or sold with the device.
When a cart is used, use caution when moving the cart/device combination to avoid plugs, convenience
receptacles injury rom tip-over.
Unplug the keyboard during lightning storms or when unused or a long period o time.
Re er all servicing to quali ied service sta . Servicing is required when the keyboard has been damaged in
any way, power-supply cord or plug is damaged, liquid has been spilled or objects have allen into the
keyboard, the device has been exposed to rain or moisture, does not operate normally, or has been
dropped.
Use only a dry and clean cloth or cleaning. Do not clean with water or chemical solvents.
Do not open the device. There is danger o electrical shock.
ENGLISH

Artesia F-61
3 Operation
1. Power On/O (VOLUME)
2. USB TO HOST Jack
3. Aux In Jack
4. Pedal Jack
5. Headphone Jack
6. DC 10V Input Jack
Power Supply
Your instrument will run rom a power adaptor. Plug the DC output
cable rom the power adaptor into the DC IN jack on the rear panel
o your instrument, then plug the power adaptor into a convenient
wall 230V/AC power socket.
Power on
With the piano assembled and plugged into a power outlet,
you can power on the piano by pressing the On/O switch.
Volume
You can adjust the volume by turning the Power On/O (VOLUME) knob at any time even while you are
playing.

Artesia F-61
ux In
Connect the external sound system to the AUX IN jack.
The audio signal rom the external sound system will be
mixed with the sound o your piano. This unction is
convenient when you want to play along with your
avorite songs.
Headphone
A standard pair o stereo headphones can be plugged
into the rear panel headphone jack or private practice
or late night playing. The internal speaker system is
automatically shut o when a pair o headphones is
plugged into the headphone jack.
Pedal
A oot switch can be plugged into the rear panel pedal
jack. The Pedal is a damper pedal controlling sustain
unction. To press the pedal you can sustain the notes
a ter the keys are released.
USB to Host
You may connect your tablet, laptop or desktop computer to your piano. This will allow the player to take
lessons or play music games rom the appropriate so tware or APP.

Artesia F-61
Voice Selecting
Hold the irst 3 keys (two white and one black) and then
press one o the corresponding white keys to select one o
the 8 di erent voices.
Demo Song
Hold the irst 3 keys (two white and one black) and then press the last white key to enter demo song mode.
The demo song will start to play. Press irst three keys and one o 6th to 20th keys to select the desired song.
To leave demo song mode, hold the irst 3 keys simultaneously and then press the last white key again.
Touch
Hold the irst 3 keys (two white and one black) and then press the last second white key. The Touch unction
will be turned on. To turn o the Touch unction, hold the irst 3 keys and then press the last second white
key again. De ault setting is: On

Artesia F-61
4 SSEMBLY GUIDE
Unpack the piano, stand and all parts out o the box. Please check i all parts are included like listed below.
Piano parts:
A: M4*12 18x
B: Bracket wide 2x
C: Bracket small 4x
E: Screws M4*25 (4x)
F: Screws M6*20 4x
Bench parts:
A: Locking nut 8x
B: Kernel screw 8x
C: Caps 16x
Piano ssembly
ttaching the stand:
Begin assembling the piano by attaching the
brackets to the crosspiece and the side parts:
Attach each bracket using three (A) screws.
Make sure that the (C) Brackets are acing the
top o the leg. Make sure the the (B) brackets
are acing the ront o the leg

Artesia F-61
ssembling the stand:
Begin assembling the piano by attaching the legs o the
stand to the crosspiece:
Insert 2 (E) bolts into each side o the crosspiece. Screw
bolts into the brackets on each leg, make sure that the
crosspiece and the eet are all acing toward you. Tighten
until the crosspiece is lush with the leg brackets, and the
legs are irmly attached.
Attach the piano body to the stand using our (F)
bolts. With help rom another person, li t the piano
onto the stand. Rest the piano on the stand and line
up the corresponding holes in the bottom o the
piano with the holes in the brackets on the leg.
Make sure that the piano and legs are acing the
same way. Tighten (F) bolts into each hole until the
piano sits lush on the legs and is irmly attached.
ssembly the bench:
The bench is assembled using kernel locking nuts.
Insert a kernel screw into the our holes in the
bottom o the seat, and two center holes in each
leg. Tighten with a screwdriver. Insert a locking nut
into each hole in the back panel. Insert the two
screws rom each leg and tighten the locking nut to
secure. Repeat this step to attach seat.
Finish assembly by covering the locking nuts with
plastic (C) covers
Check piano and seat for stability and proper assembly before using it.

Artesia F-61
1 Introduction
Nous vous remercions d'avoir opté pour ce piano numérique ARTESIA. Cet instrument dispose de 61 touches
et idéal pour le démarrage de jeunes musiciens. Votre en ant pro itera de l'apprentissage de la musique
durant de longues années. A in de pouvoir utiliser votre appareil de açon optimale, veuillez lire
attentivement ce mode d’emploi et essayer les di érentes onctions que nous vous présentons avec votre
en ant. Nous souhaitons beaucoup de plaisir à votre en ant avec son nouvel instrument et qu’il en pro ite
pendant longtemps.
2 Informations pour votre sécurité
Veuillez lire le paragraphe suivant attentivement avant d’utiliser votre instrument! Veuillez conserver
minutieusement ce mode d’emploi.
limentation du courant
Veuillez brancher l’instrument dans une prise de courant à la tension adaptée à l’aide du câble de réseau (ou
de l’adaptateur). Ne connectez pas l’appareil à une prise de courant dont la tension n’est pas appropriée
pour cet instrument. Veuillez retirer le câble d’alimentation du courant lorsque vous n’utilisez pas
l’instrument ou en cas d’orage.
Connexions
Avant de brancher l’instrument à d’autres appareils, veuillez éteindre tous les appareils. Cela protège les
appareils d’éventuels dommages et aide à éviter des dys onctionnements.
Environnement
N’exposez pas l’appareil aux conditions suivantes, a in d’éviter des dé ormations, des décolorations ou de
sérieux dommages: directement en plein soleil, à d’extrêmes températures, à une extrême humidité, à la
poussière ou la saleté, à de ortes vibrations ou secousses, à des champs magnétiques.
Nettoyage
Veuillez nettoyer l’instrument uniquement à l’aide d’un chi on doux et sec. N’utilisez pas de diluant, de
solvant, de détergent ou de lingettes imprégnées de produit chimique.
Utilisation
Veillez à ne pas être trop véhément lors de l’utilisation des boutons et interrupteurs, et à ne pas laisser
tomber de papier, de métal ou autre objet dans l’instrument. Si cela devait être le cas, veuillez
immédiatement retirer la prise de contact de l’appareil et rapporter l’instrument à un spécialiste a in qu’il le
véri ie. Veuillez enlever systématiquement tous les câbles de connexion avant de déplacer l’instrument.
Ouverture de l‘appareil
Seules des personnes compétentes autorisées peuvent ouvrir l’appareil a in de le réparer. Veuillez vous
adresser à un atelier pro essionnel ou au revendeur autorisé chez lequel vous avez ait votre achat.
FR NC IS

Artesia F-61
3 Panneau de contrôle et connexions
1. Interrupteur on/o (volume)
2. Prise USB TO HOST
3. AUX IN jack
4. Prise de pédale à e ets
5. Prise casque
6. Prise de courant
limentation du courant
Votre instrument onctionne à l’aide d’un bloc d’alimentation.
Branchez le câble du bloc d’alimentation dans la prise de courant
de l’instrument et en même temps dans une prise de courant
usuelle.
Interrupteur on/off (volume)
Après voir monté et branché votre piano, il est temps d’étudier votre
instrument en détails. Appuyez sur le bouton on/o pour allumer l’appareil.
Volume
A l’aide du bouton (interrupteur on/o ou volume), vous pouvez modi ier le
volume à tout moment, même en plein jeu.

Artesia F-61
ux in
Branchez un système de son quelconque externe sur la
prise aux in. Vous pouvez maintenant mélanger les sons
du système externe avec ceux de votre piano. C’est une
onction pratique lorsque vous désirez jouer en même
temps votre chanson pré érée.
Casque
Vous pouvez brancher une paire de casque stéréo à
votre piano (prise casque) a in de pouvoir par exemple
jouer en soirée ou la nuit. Une ois votre casque branché,
les haut-parleurs internes seront automatiquement
désactivés.
Pédale
Vous pouvez brancher une pédale à la prise prévue à cet
e et. C'est une pédale de sourdine contrôlant la
onction sustain et permettant de continuer de aire
vibrer les notes, même lorsque vous aurez relâché les
touches.
USB to host
Vous pouvez également connecter une tablette, un ordinateur portable ou un ordinateur de bureau à votre
piano. Ceci vous permet de vous entraîner ou de jouer di érents morceaux.

Artesia F-61
Choix des registres
En appuyant sur les trois premières touches (deux blanches
et une noire), puis sur une des deux touches blanches, alors
vous pourrez choisir entre huit registres di érents.
Chanson démo
En appuyant sur les trois premières touches (deux blanches et une noire), puis sur la dernière touche blanche, vous
enclencherez la chanson démo. En maintenant les trois premières touches en oncées et en appuyant une touche entre
la 6ème et la 20ème, vous pourrez choisir une chanson (voir ci-dessous). Pour arrêter la chanson démo, appuyez en même
temps sur les trois premières touches, puis sur la dernière touche noire.
Touch
En appuyant sur les trois premières touches (deux blanches et une noire), puis sur la dernière touche
blanche, vous désactiverez la onction « touch ». A in de la réactiver, appuyez sur les trois premières
touches, puis sur la dernière touche blanche

Artesia F-61
4 Notice de montage
Sortez le support de piano, ainsi que le piano, de l’emballage. Le carton d’envoi contient également: le
piano, un porte-partitions, une banquette de piano, deux pieds, un élément transversal.
rticles du piano:
A: Vis M4*12 18x
B: équerre de montage 2x
C: équerre de montage 4x
E: Vis M4*25 4x
F: Vis M6x20 4x
rticles de la banquette:
A: Boulon de connexion 8x
B: Écrou
C: Calotte 8x
Montage du support:
Commencez par le montage de la substructure en
ixant les pièces latérales livrées avec la traverse.
Installez les équerres de montage (B) et (C)
con ormément au dessin. Utilisez trois vis (A) pour
chaque angle. Serrez les vis ermement. Véri iez si
les équerres sont bien serrées

Artesia F-61
Maintenant ixez la traverse selon le dessin avec les vis (E)
aux équerres de ixation (B). Serrez les vis et véri iez si la
base est stable.
Montage du piano:
Posez le piano sur la base et raccordez les deux parties
avec les vis (F). Puis serrez les vis et véri iez si le piano
numérique est stable.
Montage de la banquette:
Implantez maintenant les boulons (B) aux percées
prévues des deux pièces latérales. Inaugurez les 4
chevilles (A) aux percées de la traverse. Fusionnez la
barre transversale et le premier pied et puis serrez la
cheville de connexion. Répétez la manœuvre pour
l’autre pied. Fixez le siège sur les parties latérales de la
même manière.
Vérifiez la stabilité et la force de la banque et le piano avant que vous ou votre
enfant de l`utilizer !

Artesia F-61
WEEE-Erklärung / Entsorgung
WEEE-Declaration / Disposal
WEEE-Déclaration / Élimination
Ihr Produkt wurde mit hochwertigen Materialien und Komponenten entwor en und hergestellt, die recycelbar sind und wieder
verwendet werden können. Dieses Symbol bedeutet, dass elektrische und elektronische Geräte am Ende ihrer Nutzungsdauer vom
Hausmüll getrennt entsorgt werden müssen. Bitte entsorgen Sie dieses Gerät bei Ihrer örtlichen kommunalen Sammelstelle oder im
Recycling Center. Bitte hel en Sie mit, die Umwelt, in der wir leben, zu erhalten.
Your product is designed and manu actured with materials and components o high quality, which are recyclable and can be reused.
The symbol means that your product should be disposed o separately rom household waste when it reaches its end o li e. Please
dispose o this equipment at your local collection point or recycling center. Please help to protect the environment in which we all
live
Votre produit a été conçu et abriqué avec des matériaux et composants de haute qualité, pouvant être recyclés et réutilisés. Ce symbole signi ie que
les appareils électriques et électroniques doivent être séparés des ordures ménagères au bout de leur durée de vie. Veuillez rapporter cet appareil
dans votre déchetterie communale locale ou dans un centre de recyclage. Veuillez nous aider à conserver l’environnement dans lequel nous vivons.
Technische Änderungen und Änderungen im Erscheinungsbild vorbehalten. Alle Angaben entsprechen dem Stand bei Drucklegung. Für die Richtigkeit
und Vollständigkeit der enthaltenen Beschreibungen, Abbildungen und Angaben übernimmt Musikhaus Kirstein GmbH keinerlei Gewähr. Abgebildete
Farben und Spezi ikationen können gering ügig vom Produkt abweichen. Musikhaus Kirstein GmbH - Produkte sind nur über autorisierte Händler
erhältlich. Distributoren und Händler sind keine Handlungsbevollmächtigten von Musikhaus Kirstein GmbH und haben keinerlei Be ugnis, die
Musikhaus Kirstein GmbH in irgendeiner Weise, sei es ausdrücklich oder durch schlüssiges Handeln, rechtlich zu binden. Diese Bedienungsanleitung
ist urheberrechtlich geschützt. Jede Vervielfältigung, bzw. jeder Nachdruck, auch auszugsweise, und jede Wiedergabe der Abbildungen, auch in
verändertem ustand, ist nur mit schriftlicher ustimmung der Firma Musikhaus Kirstein GmbH gestattet.
All speci ications and appearances are subject to change without notice. All in ormation was correct at time o printing. Musikhaus Kirstein GmbH
does not guarantee or the accuracy or completeness o any description, photograph or statement contained in this manual. Printed colors and
speci ications may vary slightly rom product. Products rom Musikhaus Kirstein GmbH are only sold through authorized dealer. Distributors and
dealers are not agents o Musikhaus Kirstein GmbH and have no authority to bind Musikhaus Kirstein GmbH legally in any way. This manual is
protected by copyright. Any copying or reprint, even in excerpts, is only allowed with written consent o Musikhaus Kirstein GmbH. The same applies
to reproduction or copying o images, even in altered orm.
Sous réserve de modi ications techniques ou de changement de photo d’apparition. Toutes les in ormations correspondent à l’état au moment de
l’impression. Musikhaus Kirstein GmbH ne garantit pas l’exactitude et l’exhaustivité des descriptions indiquées, des images et des in ormations. Les
couleurs des photos et les spéci ications peuvent légèrement dévier du produit. Les produits de Musikhaus Kirstein GmbH ne sont disponibles que
chez des revendeurs autorisés. Les distributeurs et les revendeurs ne sont en aucun cas des dirigeants de Musikhaus Kirstein GmbH. et n’ont aucun
droit de s’engager juridiquement avec Musikhaus Kirstein GmbH , que ce soit de manière expresse ou implicite. Ce mode d’emploi est protégé par le
droit d’auteur. Toute reproduction ou réimpression, ou tout autre procédé, et toute reproduction d’images, également modi iée, ne sont autorisées
qu’avec l’accord écrit de Musikhaus Kirstein GmbH.
Vertrieb / Distribution :
Musikhaus Kirstein GmbH
Bernbeurener Str. 11
86956 Schongau
Tele on: 0049-8861-909494-0
Tele ax: 0049-8861-909494-19
www.kirstein.de
DEUTSCH – ENGLISH - FR NC IS
Table of contents
Languages:
Other Artesia Musical Instrument manuals

Artesia
Artesia A-10 User manual

Artesia
Artesia DP-3+ User manual

Artesia
Artesia AP-100 User manual

Artesia
Artesia A-20 User manual

Artesia
Artesia PA-88H User manual

Artesia
Artesia A-61 User manual

Artesia
Artesia DP-3+ User manual

Artesia
Artesia AG-28 User manual

Artesia
Artesia AG-41 User manual

Artesia
Artesia AG-50 User manual