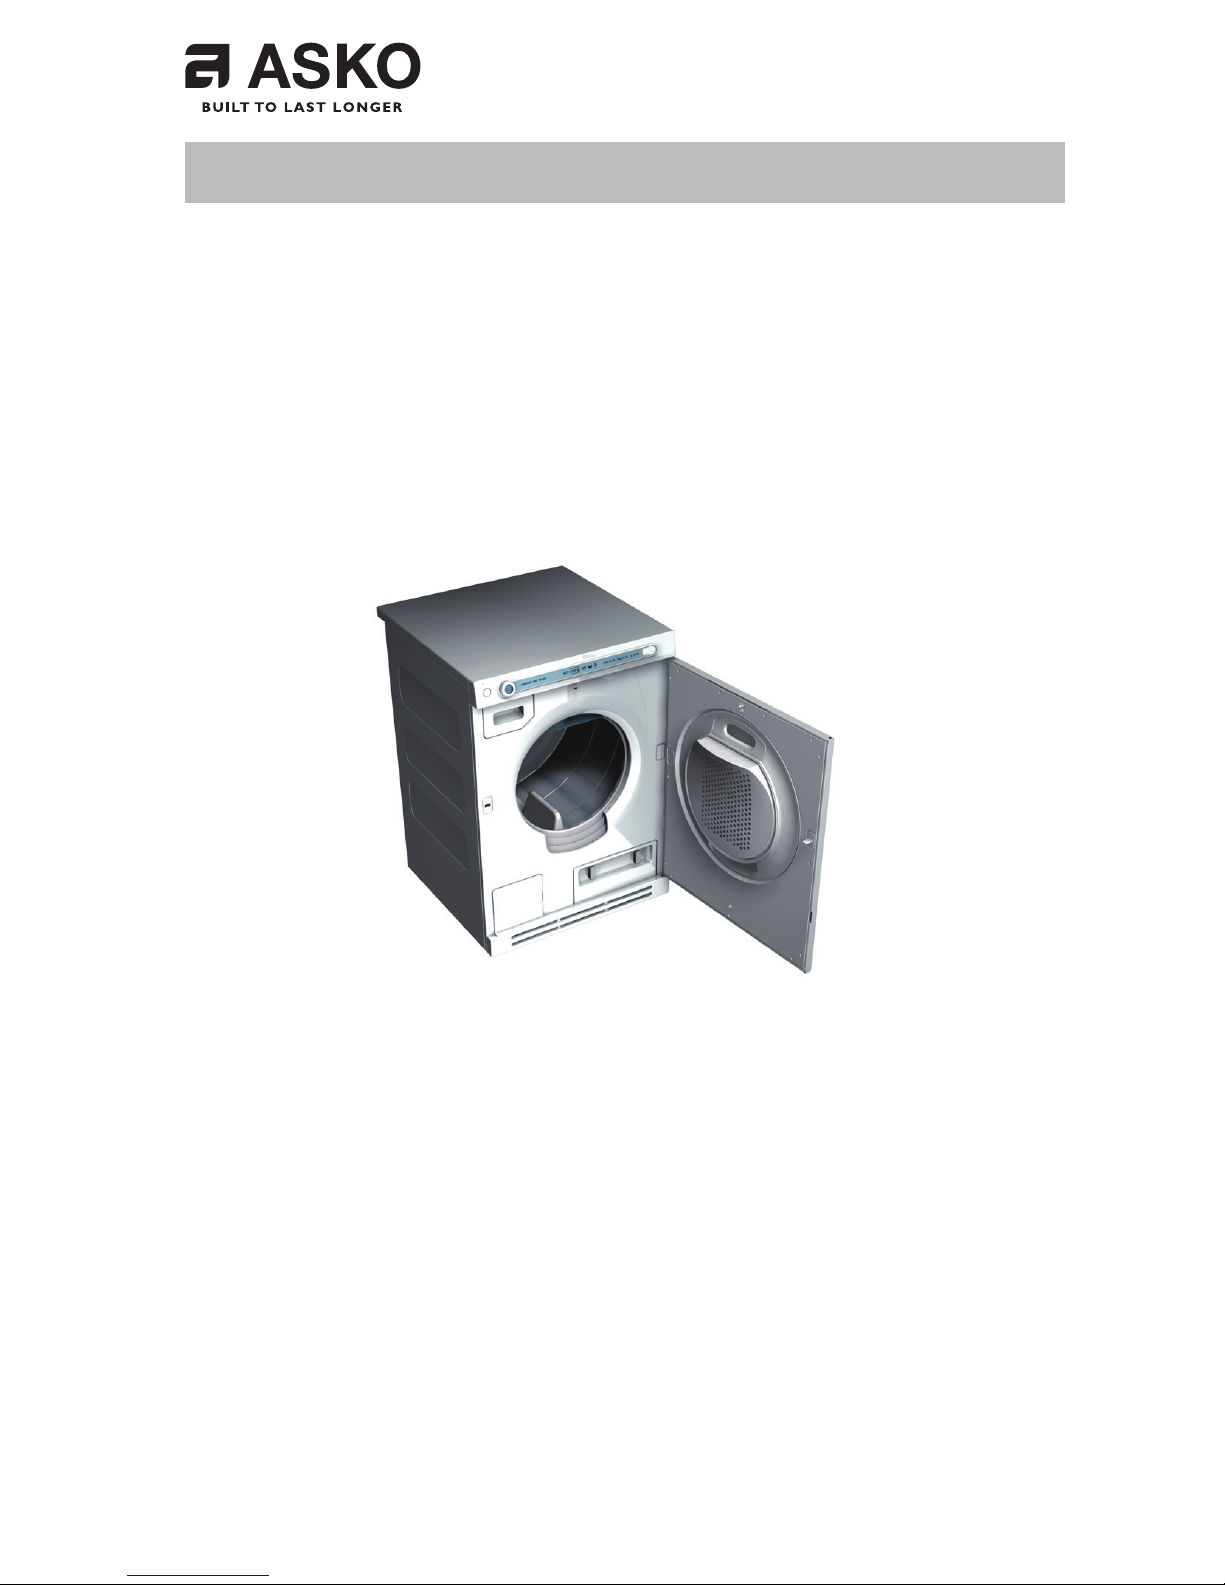
Asko TD60 User manual

Service manual: Tumble Dryers
Type: TD60


Type: TD60
Servicemanual
Contents
Updates ..................................................................................................................................................................................................................................................3
Introduction .........................................................................................................................................................................................................................................4
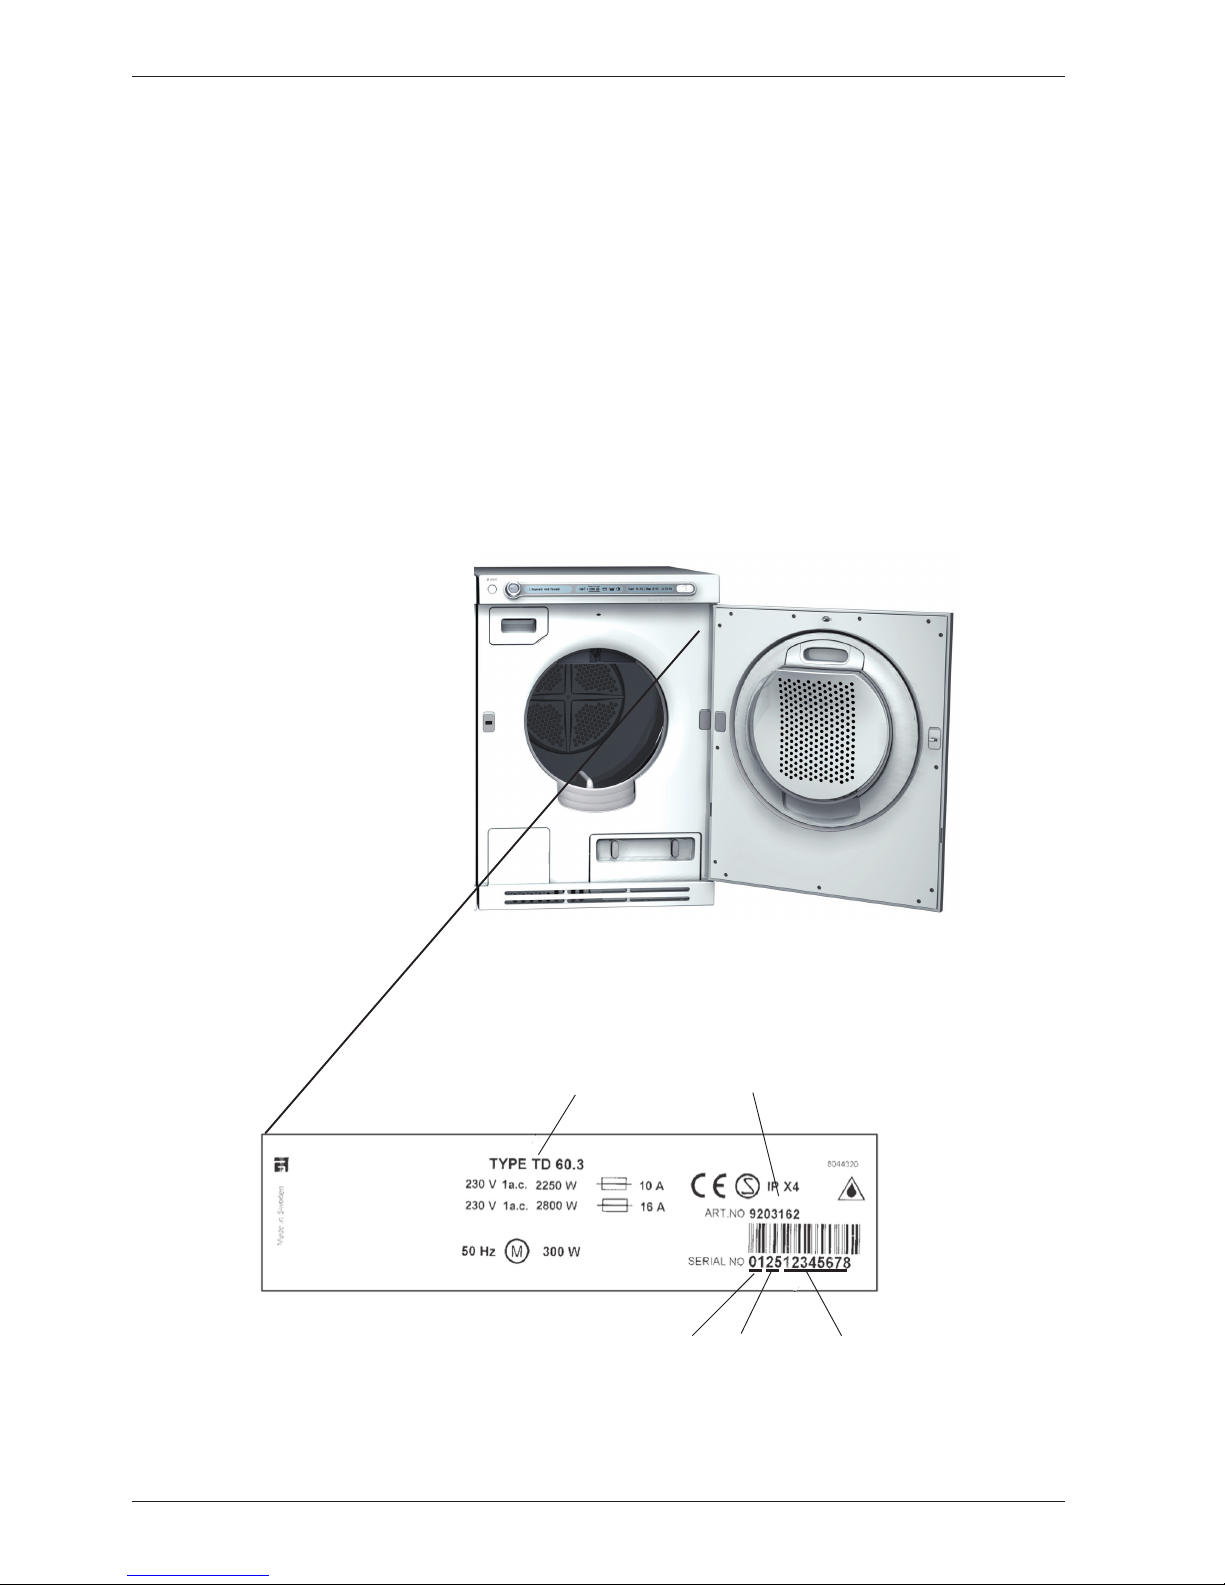
Product overview .............................................................................................................................................................................................................................5
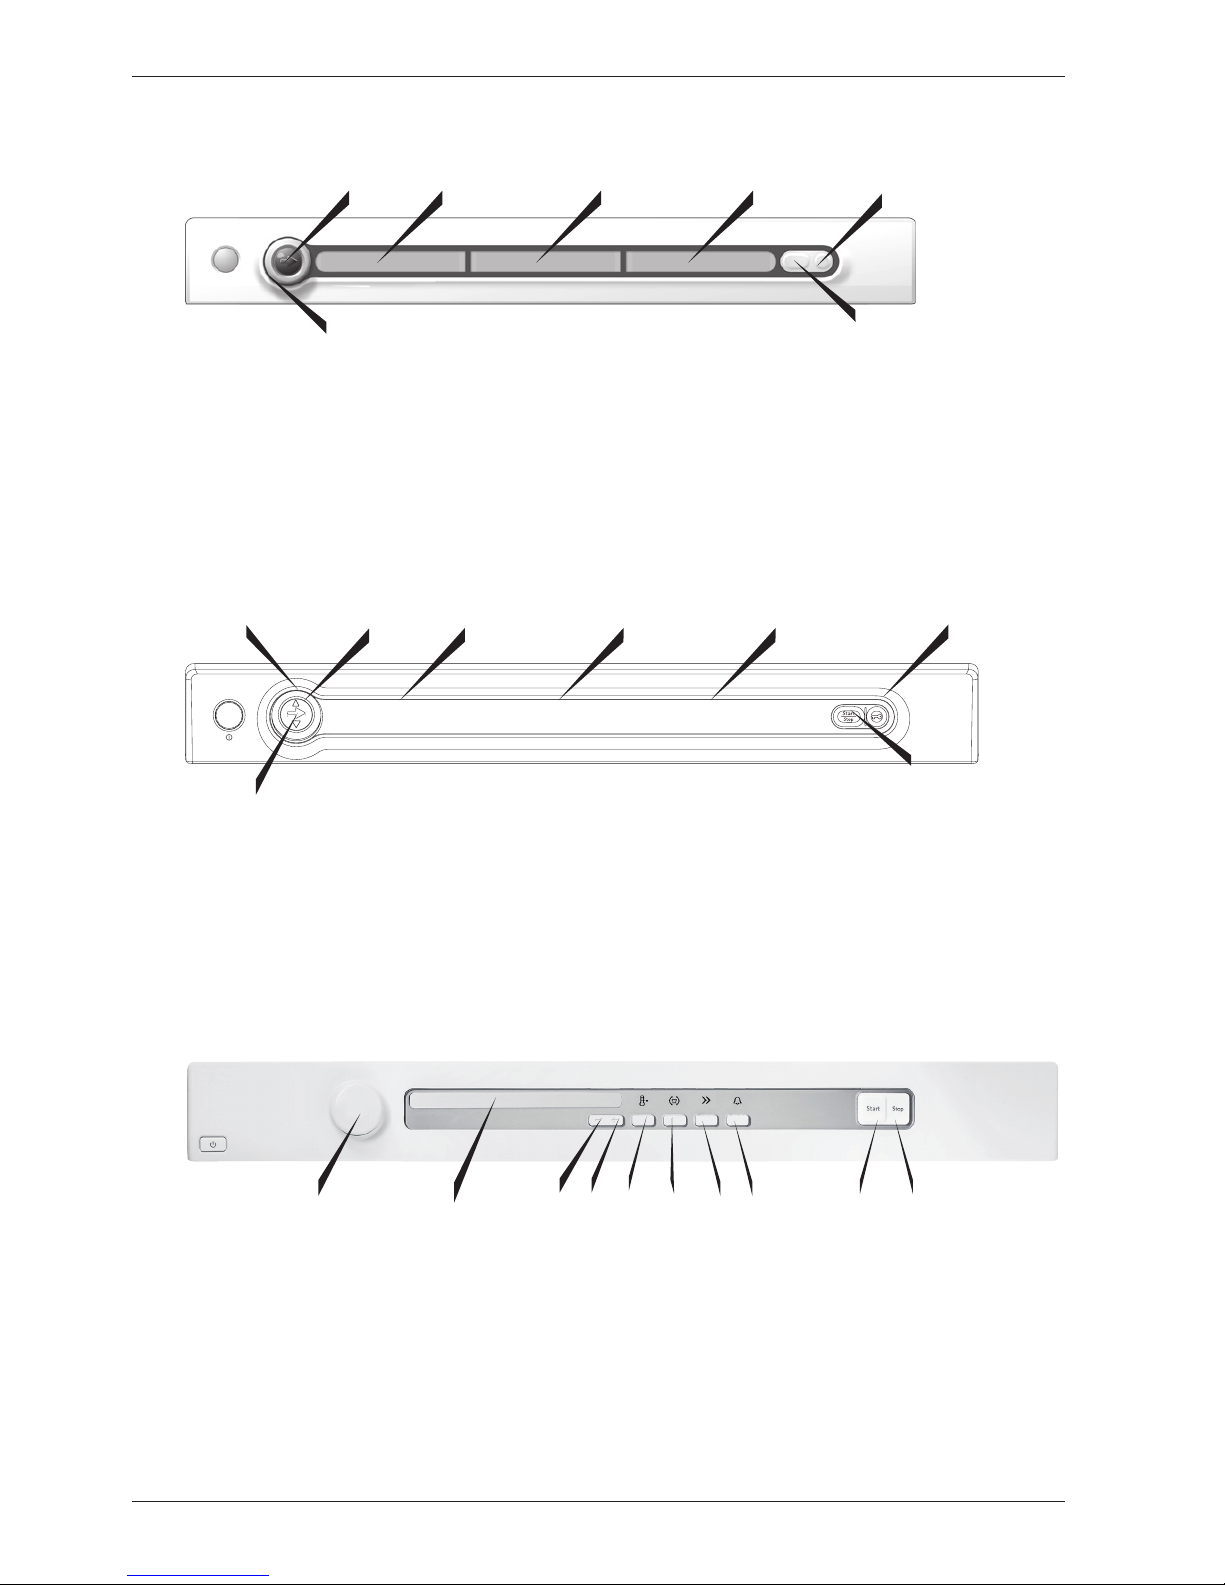
Programme selection, options and making settings TD60.3 .....................................................................................................................................8
Programme selection TD60.3 ..................................................................................................................................................................................................9
Selecting Options TD60.3 .......................................................................................................................................................................................................10
Making settings TD60.3 ..............................................................................................................................................................................................................12
Programme selection, options and making settings TD60.2 ..................................................................................................................................14
Select program and making options TD60.1 .................................................................................................................................................................15
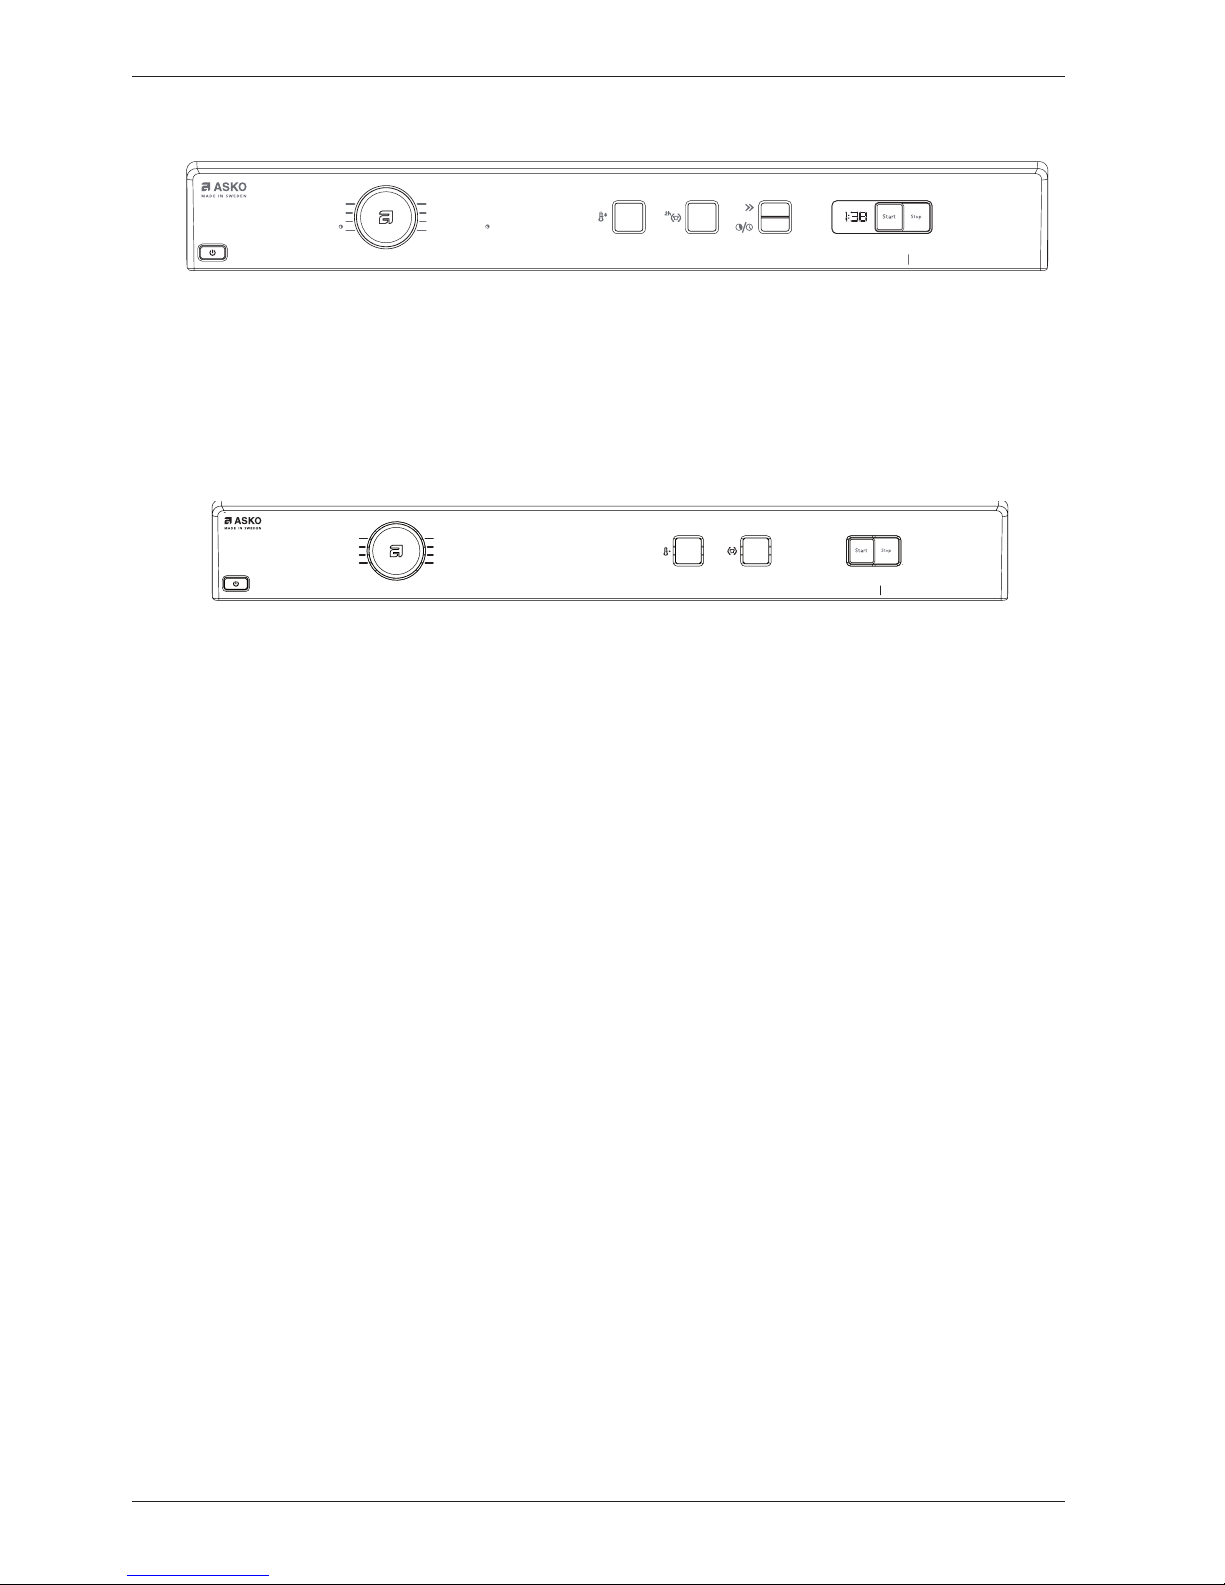
Service menu TD60.3 ..................................................................................................................................................................................................................16
Service menu TD60.2 ..................................................................................................................................................................................................................19
Service menu TD60.1 ..................................................................................................................................................................................................................20
Fault indications TD60.3 .............................................................................................................................................................................................................21
Fault indications TD60.2 .............................................................................................................................................................................................................22
Fault indications TD60.1 .............................................................................................................................................................................................................23
Heater 2 activation TD60.3 ....................................................................................................................................................................................................25
Heater 2 activation TD60.2 ....................................................................................................................................................................................................25
Heater 2 activation TD60.1 ....................................................................................................................................................................................................25
Shop programme TD60.3 .........................................................................................................................................................................................................26
Shop programme TD60.2 and TD60.1..............................................................................................................................................................................26
Components and measurement values TD60 ..............................................................................................................................................................27
Technical data ...................................................................................................................................................................................................................................28
Wiring diagram TD60.3 ..............................................................................................................................................................................................................29
Wiring diagram TD60.2 ..............................................................................................................................................................................................................30
Wiring diagram TD60.1 ..............................................................................................................................................................................................................31
Rehanging the door ......................................................................................................................................................................................................................32
Replacing panel ...............................................................................................................................................................................................................................35
Timerdiagram ...................................................................................................................................................................................................................................36

Type: TD60
Servicemanual
This service manual describes tumble dryer type TD60 and is a supplement to the general service
manual for the 600 series.

Servicemanual TD60
5
Updates
Revi-
sion
Date Description Signa-
ture
03 2007-11-27 Updated the ”Show room program” /Shop program with a description for machines manufactured
week 737 and later.
BPA
04 2008-10-16 Updated with TD60.2. TD60.3 added Jeans and Synthetics program MW
05 2010-04-29 Updated with TD60.1 MAS

Servicemanual TD60
6
Introduction
You are holding the service manual for TD60 type tumble dryers.
It should be easy to service a tumble dryer. It is important that you, as a service technician, are
given the conditions to be able to carry out work in an efficient and satisfactory way. Our hope is
that this service manual is a useful tool for your daily work.
The type designation can be found on the machine plate located by the door catch on the inside
of the front plate. (see image below)
Asko Appliances AB
SE-534 82 Vara
Sweden
Type designation Product number
Serial number
Year Week

Servicemanual TD60
7
Product overview
TD60.3
Positions: 8, where one consists of the menu for settings (Position 7)
Options: 5
Settings: 4
TD60.3
S1 S3
LCD 1 LCD 2 LCD 3
J1 S2
Positions: 8, where one consists of the menu for settings (Position 7)
Options: 5
Settings: 4
Positions: 6
Options: 4
Settings: 1
S1
S4
S5
S3
S2
LCD 1 LCD 2LCD 3
TD60.2
J1 LCD S4
S3 S5 S6 S7 S8 S9
S2
TD60.2
(Integrated)

Servicemanual TD60
8
Program: 4
Options: 2
Settings: 1
TD60.1, Panel type 2
T743C
BUTTERFLY DRYING
Auto Normal Dry
Auto Iron Dry
Auto Extra Dry
Auto Dry
Program: 6
Options: 4
Settings: 1
TD60.1, Panel type 1
Auto Extra Dry
Auto Dry
Timed Dry
Auto Normal
Auto Iron Dry
Air Fluff program
T753C
BUTTERFLY DRYING

Servicemanual TD60
9
Programmes Material Tempe-
rature
Max.
load
(kg)
Energy consump-
tion (kWh)
Programme time
800
rpm
1600
rpm
800
rpm
1600
rpm
Extra dry Cotton, linen Normal 7 5.4 4.2 160 130
Dry Cotton, linen Normal 7 4.6 3.6 140 110
Normal dry* Cotton, linen Normal 7 4,3 3,3 130 100
Iron dry Cotton, linen Normal 7 3.5 2.6 105 80
Jeans Jeans, clothing with
thick seams
Normal - - - - -
Synthetic Permanent press,
polyester/cotton
Low - - - - -
Timed dry All types Low - - - - -
Air fluff programme All types Low - - - - -
* This programme has been tested in accordance with EN 611 21/95/13/EEC.
Here we present a few examples of the energy and time consumption of a few different programme set-
tings. Consumption can vary according to room temperature, humidity, load, variations in the power supply
and selected options.
The following apply for the specified consumption values:
Temperature of intake air: 23°C
Moisture content of intake air: 55%
Drying temperature: Normal or low
Heater output: 3000 W
Programme table TD60

Servicemanual TD60
10
Program selector for integrated machines
1. Press the program selector button to navi-
gate between the different menus (e.g. to go
from temperature menu to Anti crease menu).
2. Press the small arrows to make a selection in
the menus (e.g. select normal temp.). Confirm
the selection and go to the next menu by pres-
sing the program selector button.
3. Press Start to start. Hold Stop in for 3 se-
conds to exit the current program.
Program selector
1. Press the program selector button to
navigate between the different menus (e.g. to
go from temperature menu to Anti Crease
menu).
2. Turn the program selector button to make
a selection in the menus (e.g. select normal
temp.). Confirm the selection and go to the
next menu by pressing the program selector
button.
3. Press Start to start. Hold Stop in for 3 se-
conds to exit the current program.
Programme selection, options and making settings TD60.3
Program 1
Program 2
Program 3
Program 4
Program 7
Program 6
Program 5
3
Start Stop
Start Stop
32
2
1
1
22

Servicemanual TD60
11
Press/
turn Pos. LCD 1 Comments/instructions
Turn on the main power supply
1
Extra Dry, Heavy, Auto extra dry, Auto extra-
torrt, Ekstra tørt, Auto ekstra tørt, Erittäin kuiva,
Séchage intensif, Extra droog, Perfett. asc. autom.,
Secado pesado auto, Экстpa сyшкa, Extratrocken
This programme is for items that are particularly difficult to dry,
e.g. jeans with very thick seams.
2
Dry, Normal, Auto dry, Auto skåptorrt, Skabstørt,
Auto tørt, Kaappikuiva, Séchage armoire, Kast-
droog, Asc. da riporre autom., Sec. para armario
auto, Hopмaльнaя сyшкa, Schranktrocken
This programme shut off the heat once the load is dry but before
it is ”bone-dry”. The program on position 2 shuts off the heat
slightly later than the program on position 3. Use trial and error
to find out what works best. Use these programs when you want
items to be completely dry.
3
Normal Dry, Delicate, Auto normal dry, Auto
normaltorrt, Normalt tørt, Auto nesten tørt,
Normaalikuiva, Séchage normal, Normaal droog,
Asciutto norm. autom., Secado liviano auto,
Дeликaтнaя сyшкa, Normaltrocken
This programme shut off the heat once the load is dry but before
it is ”bone-dry”. The program on position 3 shuts off the heat
slightly later than the program on position 4. Use trial and error
to find out what works best. Use these programs when you want
items to be completely dry.
4
Iron Dry, Iron Dry, Auto Iron dry, Auto stryktorrt,
Strygetørt, Auto stryketørt, Silityskuiva, Repas-
sage, Strijkdroog, Asc. da stirare autom., Sec. para
plancha auto, Сyшкa ”пoд yтюг”, Bügeltrocken
This programme shuts off the heat once the load is just damp
enough for ironing or pressing.
5Jeans, Jeans, Jeans, Denim, Jeans, Farkut, Jeans,
Jeans, Jeans, Vaqueros, Джинсы, Jeans
Special designed programme for jeans and rough cotton with thick
seams. Normal temperature which not can be changed
6Synthetic, Synthetics, Syntet, Syntetisk, Syntet, Syn-
teettiset, Synthétique, Synthetik, Sintetici, Sintético,
Синтетика, Synthetica
Special designed programme for delicate material. Low tempera-
ture which not can be changed
7
Timed Dry, Timed Dry , Timed dry , Tidspro-
gram, Tidsprogram, Tidsprogram, Aikaohjelma,
Programme minute, Tijdprogramma, Progr. del
tempo , Prog. de secado, Сyшкa пo вpeмeни,
Zeitprogramm
The programme length you choose depends on what you intend
to do with the items after drying them. Use trial and error to find
out what works best. When you use Timed dry to tumble-dry a
load of mixed fabrics, some of the garments may remain damp.
Tumble-dry any damp garments for a further 30 minutes or so
using the Timed dry program
When using the Timed dry program, garments can become
“over-dry” if you have selected too long a drying time. This can
cause the items to shrink or crease and become rough. Synthetic
materials can also become charged with static electricity.
Set the number of minutes incrementally. The selected time is
shown on the display. Try out different drying times.
8
Air Fluff, Air Fluff , Revitalise, Luftningspro-
gram, Koldluftprogram, Kald luft, Tuuletus,
Ventilation, Ventileren, Arieggiamento, Aireado,
Пpoвeтpивaниe, Lüften
Use the Revitalise programme when you just want to refresh, air
or soften up items Set the number of minutes incrementally. The
selected time is shown on the display. Try out different drying
times.
9Settings, Settings, Settings, Inställningar, Indstil-
linger, Instillinger, Asetukset, Réglage, Instellingen,
Impostazioni, Ajustes, Haстpoйки, Einstellungen
Exits the programme menu and advances to options or the menu
for Settings.
Programme selection TD60.3
The programs are displayed in the order they occur in LCD1. All display text language versions are
displayed.

Servicemanual TD60
12
Press/
turn
LCD 2 LCD 3 Comments/instructions
Temperature Normal, Tempera-
ture normal, Temperatur normal,
Temperatur normal, Temperatur
normal, Lämpötila normaali, Temp.
normal, Normale temperatuur, Temp.
normale, Temperatura normal, Hopм.
тeмпepaтypa, Temp. normal
Two possible choises of temperature. Not avaliable for program at pro-
gramme 6 (”Air Fluff”)
Temperature Low, Energy Save, Tem-
peratur låg, Temperatur lav, Tempera-
tur lav, Lämpötila matala, Temp. faible,
Lage temperatuur, Temp. bassa, Baja
temperatura, Hизкaя тeмпepaтypa,
Temp. niedrig
Anti Wrinkle On, Anti crease On,
Skrynkelfritt På , Anti-krøl Til ,
Antikrøll På, Rypistymisen esto
Päällä, Antifroissage On, Anti-kreuk
Aan, Antisgualcit. On, Antiarrugas
encendido , Пpoтив сминaния Bкл..,
Knitterschutz An
This is a useful feature if you cannot take the washing out as soon as the
tumble dryer has finished.
The function prevents the clothes from remaining in the same posi-
tion and becoming creased. The drum will rotate for three seconds per
minute for two hours once the drying program has finished
Not avaliable for programme at position 6 (”Air Fluff”)
Anti Wrinkle Off, Anti crease Off,
Skrynkelfritt Av, Anti-krøl Fra , Anti-
krøll Av , Rypistymisen esto Poissa,
Antifroissage Off, Anti-kreuk Uit,
Antisgualcit. Off, Antiarrugas apagado,
Пpoтив сминaния Bыкл., Knitter-
schutz Aus
Time saver, Tidsbesparing, Ekspres
tørring, Reduser programtid, Express,
Rapide, Tijdbesparing, Turbo Tiempo,
Уcкopeннaя, Express
The programme is shortened by about 12 minutes.
The option cannot be selected for the Air fluff program.
Time saver off, Tidsbesparing av, Eks-
pres tørring fra, Reduser programtid
av, Express poissa, Rapide off, Tijdbe-
sparing uit, Turbo off, Tiempo apagado,
Уcкopeннaя Bыкл., Express aus
The option cannot be selected for the Air fluff program.
Start, Start, Start, Start, Start, Start, Start,
Démarrer, Start, Avvio, Inicio, Стaрт, Start
(Option for all programmes except Timed
dry)
Delayed start (when setting: ”No Real time”)
The start of the selected programme can be delayed for up to 24 hours
(in half an hour intervals). The delay and program time is shown in the
display.
Delayed start (when setting: ”24 Hour Clock ” or ”12 Hour Clock”)
The start of the selected programme can be delayed for up to 24 hours
(in half an hour intervals). Start and end times are shown in the display.
Selecting Options TD60.3
The options are displayed in the order they occur in LCD2 and LCD3. All display text language
versions are displayed.

Servicemanual TD60
13
Start - Done, Start-End, Start-Done,
Start-Klar, Start-Færdig, Start-Ferdig,
Start-Valmis, Démarrer-Fin, Start-Fertig,
Avvio-Fine, Inicio-Fin, Стaрт-Кoнeц, Start-
Gereed
(Option only for Timed dry)
Time program (when setting: ”No Real time”)
Desired programme time can be set. Selections up to 3 hours in units
of 15 minutes can be made. The selected program time is shown in the
display.
3:00
Time program (when setting: ”24 Hour Clock ” or ”12 Hour Clock””)
Desired programme time can be set. Selections up to 3 hours in units of
15 minutes can be made. Start and end times are shown in the display.
Selecting Options TD60.3

Servicemanual TD60
14
Making settings TD60.3
The setting options below are shown in the order they occur in LCD2 (Position 7 under the pro-
gram menu is, however, shown in LCD1). All display text language versions are displayed.
Press/
turn
LCD 2 Press/
turn
LCD3 Comments/instructions
Settings, Settings, Settings,
Inställningar, Indstillinger,
Innstillinger, Asetukset, Réglage,
Einstellungen, Impostazioni,
Ajustes, Haстрoйки, Instellingen
In the programme menu: Scroll to
program 9 (Settings)
You will now enter the Settings menu.
1 Clock/Auto Start, 1 Clock, 1
Klocka, 1 Ur, 1 Klokke, 1 Kello, 1
Horloge, 1 Klok, 1 Orologio, 1
Reloj, Чaсы, 1 Uhr 24hr Realtime, 24 Hour Clock, 24hr
Realtime, 24 timmarsvisning, 24 timers ur,
24t realtid, 24 h aika, Horloge 24 h, 24 Std.
Echtzeit, 24h Tempo reale, Reloj 24 horas,
Фoрмaт врeмeни 24-ч., 24 uur weergave
Three O’clock is displayed as
”15.00”. Press S1 to access a sub-
menu where you can set the cor-
rect current time. Press S1 again
to store and exit the sub-menu.
12hr Realtime, 12 Hour Clock, 12hr
Realtime, 12 timmarsvisning, 12 timers ur,
12t realtid, 12 h aika, Horloge 12 h, 12 Std.
Echtzeit, 12h Tempo reale, Reloj 12 horas,
Фoрмaт врeмeни 12-ч., 12 uur weergave
Three O’clock is displayed as
”03.00”. Press S1 to access a sub-
menu where you can set the cor-
rect current time. Press S1 again
to store and exit the sub-menu.
No Real time, No Real Time, No Real time,
Ej realtid, Intet ur, Ingen realtid, Ei aikaa,
Pas d’horloge, Keine Echtzeit, No tempo
reale, Sin hora real, Время не установлено,
Geen tijdsweergave
No Real Time. Press S1 to return
to program menu.
Saves the setting and returns to the program menu.
2 Buzzer Volume, 2 Audible
Volume, 2 Ljudsignal, 2 Lydsignal,
2 Lydsignal, 2 Hälytysääni,
2 Volume buzzer, 2 Volume
eindsignaal, 2 Volume allarme,
2 Volumen timbre, Гpoмкoсть
сигнaлa, 2 Tonsignal
Off, Off, Off, Av, Fra, Av, Poissa, Off, Aus,
Off, apagado, Bыкл., Uit
No buzzer
Low, Low, Low, Låg, Lav, Lav, Matala, Faible,
Niedrig, Bassa, Bajo, Hизкaя, Laag
Buzzer that indicates the end of a
program or error.
Normal, Normal, Normal, Normal, Normal,
Normal, Normaali, Normal, Normal, Nor-
male, Normal, Hoрмaльнaя, Normaal
Buzzer that indicates the end of a
program or error.
High, High, High, Hög, Høj, Høy, Korkea,
Elevé, Hoch, Alta, Alto, вoд, Hoog
Buzzer that indicates the end of a
program or error.
Saves the setting and returns to the program menu.

Servicemanual TD60
15
Press/
turn
LCD 2 Press/
turn
LCD3 Comments/instructions
3 Language, 3 Language, 3 Språk,
3 Sprog, 3 Språk, 3 Kieli, 3 Lan-
gue, 3 Taal, 3 Lingua, 3 Idioma,
Язык, 3 Sprache
US English
AU English (default)
Svenska
Dansk
Norsk
Suomi
Francais
Nederlands
Italiano
Espanol
Pyсский
Deutsch
Saves the setting and returns to the program menu.
4 Child-safe, 4 Child-safe, 4
Barnsäker, 4 Børnesikker, 4 Bar-
nesikring, 4 Lapsilukko, 4 Sécu-
rité enfant, 4 Kindveilige, 4 Avvio
sicurezza, 4 Int. de seguridad, 4
Блoкиpoвкa, 4 Kindersicherung
On, On, On, På, Til, På, Päällä, On, An, On,
encendido, Bкл., Aan
If S1, S2, S3 or J1 are pressed or
turned, Start S2 + S1 must be
pressed to temporarily deactivate
the child-safe start (is deactivated
for 3 minutes after).
Off, Off, Off, Av, Fra, Av, Poissa, Off, Aus,
Off, apagado, Bыкл., Uit
Setting deactivated.
Saves the setting and returns to the program menu.
5 Return, 5 Return, 5 Return, 5
Tillbaka, 5 Tilbage, 5 Tilbake, 5
Takaisin, 5 Retour, 5 Zurück,
5 Uscire, 5 Salir, 5 Haзaд, 5
Terug
Return to the program menu
Making settings TD60.3

Servicemanual TD60
16
Programme selection, options and making settings TD60.2
Press Options Comments/instructions
• Normal / low temperature
Temperature
Two possible choises of temperature.
The programme is shortened by about 12 minutes. Time saver
• The drum will rotate for three seconds per
minute for two hours once the drying program has
finished
Anti-crease
• The start of the selected program can be delayed
for up to 24 hours
Delayed Start
Buzzer that indicates the end of a program or error.
Audible Volume, Buzzer
Settings Comments/instructions
• Turn off the machine using the main power switch.
• Press Main power switch and Start/Stop button
• Turn the program selector and choose language.
• Press Start/Stop button to store.
Language
• Turn off the machine using the main power switch.
• Press + button and Temperature button
• Turn the program selector and choose on or off.
• Press Start/Stop button to store.
Child-safe
T783
BUTTERFLY DRYING
Program 4
Program 1
Program 2
Program 3
Program 5
Program 6

Servicemanual TD60
17
Auto Extra Dry
Auto Dry
Timed Dry
Auto Normal
Auto Iron Dry
Air Fluff program
T753C
BUTTERFLY DRYING
Selecting programme and making options TD60.1
Turn the program selector to select a program. See the program table below.
Program Program description and type of fabrics
1. Auto Extra dry Program for fabrics that are especially difficult to dry.
2. Auto Dry These programs end automatically when the load is dry. The Auto Dry programme gives slightly drier laundry
than Auto Normal dry.
3. Auto Normal dry
4. Auto Iron dry This programs ends when the load is just damp enough for ironing or mangling.
5. Timed dry 1) Select the program length according to what you intend to do with the items after drying them.
6. Air fluff programme 1) For items that simply need to be freshened up, aired or softened.
1 Only machines with panel type 1
Press the option buttons to select options. See the options table below.
Press Options Comments/instructions
• Temperature low You can select low temperature with all program except Air fluff.
• Time saver 1) The program is shortened by about twelve minutes. Time saver can be selected with all
programmes except Air fluff.
2h • Anti-crease
If you are not able to remove the load immediately you can select the Anti-crease option.
The drum rotates for three seconds per minute for two hours once tumble drying has
finished. This prevents the fabrics from lying still and becoming creased.
• Delayed start 1)
Choose the number of hours that you want to delay the start by. You can delay the start
by between 1 and 24 hours. The option cannot be used with the Timed dry and Air fluff
programmes.
First select which programme you want to use.
Press the + button below the symbol in the display to select Delayed start.
Delay the start by 1-24 hours by pressing the -/+ buttons.
Finish by pressing the Start/Stop button. The machine counts down 1 hour at a time and
starts after the selected delay.
1 Only machines with panel type 1

Servicemanual TD60
18
Program selector
1
22
Start Stop
3
1. Press the program selector button to scroll between the various service menus.
2. Turn the program selector button to make a selection between the menus. Confirm the selection and go to the
next menu by pressing the program selector button (1).
3. Press the Start/Stop button to confirm the settings and exit the service menu.
Service menu TD60.3
This is how to enter the service menu
+
If the machine is on: First turn off the power at the main power switch. Press and hold the Program Selector while
turning on the main power switch.
x 3
Press the program selector button 3 times within 5 seconds. You are now in the service menu. See instructions
below for navigating the service menu.
Program selector (integrated machines)
1
2
2
Start Stop
3
1. Press the program selector button to scroll between the various options.
2. Press the small arrows to make a selection between the options. Confirm the selection and go to the next option
by pressing the program selector button (1).
3. Press the Start/Stop button to confirm the settings and exit the service menu.

Servicemanual TD60
19
Press/
turn
LCD 2 Comments/instructions
DataSerialNo, Data Ser Num, Data-
SerialNo, DataSerialNo, Serienummer,
Serienummer, Dataversio Nro, N° de
série, Seriennummer, Num. di serie, N°
de serie, Сeрийный нoмeр , Serienum-
mer
Date for programming the software (Year_Week)
CU date code, CU Date Code, CU
date code, CU datum kod, CU dato
kode, Styrekort prod dato, CU pvm
koodi, Code date CU, CU Datums-
code, Codice data CU, Código fecha
CU, Кoд дaты БУ, CU datacode
Control unit’s date of manufacture (Year_Week)
Software, Software, Software, Mjukva-
ra, Software, Software ver., Ohjelmisto,
Logiciel, Software, Software, Software,
Beрсия пpoг., Software
Software version number.
No. of cycles, Number of Cycles, No.
of cycles, Antal cykler , Antal cyklusser,
Antall bruk, Syklien lkm, Nb. de cycles,
Anzahl der Zyklen, Numero cicli, N° de
ciclos, Кoл-вo циклoв, Aantal cycli
Number of cycles/programs run
Press
Start Stop
to exit the service menu.
”Error_Number of cycles” Last three errors and number of cycles (when the error occurred) shown. Total reset
deletes the error indications from the system. If the same error recurs at different
times, this is shown, but only once in the list.
”Error_Number of cycles”
Press
Start Stop
to exit the service menu.
Testing, Test, Test, Tester, Test, Testaus,
Essai, Test, Test, Test, Teстиpoвaниe,
Testen
Testing Motor, Test motor, Motortest,
Tester motor, Test av motor, Moot-
toritesti, Essai moteur, Test motor, Test
motore, Test motor, Teст мoтopa,
Motor testen
Normal action: The motor will run continuously.
Testing Heater 1, Test heater 1, Ele-
menttest 1, Tester varmelegeme 1, Test
av element 1, Vastustesti 1, Essai él.
chauf 1, Test verw. element 1, Test el.
risc. 1, Test elem calef 1, Teст TЭHa 1,
Heizungstest 1
Motor runs continuously. Heater 1 runs regulated on and off by CU regarding to
measured thermistor values. Total consumption is app. 9A in this mode. If value differs,
do the following:
1. Detach the panel
2. Disconnect electrical connections at the CU.
3. Measure DC Ω for heaters and related wires. For values and measure points, see
chapter ”Components and measurement values” and ”Wiring diagram”.
IF THE VALUES ARE INCORRECT:
Check the electrical function for connections and heater. Change parts if needed.
IF THE VALUES ARE CORRECT:
a) Start the component test (”Test heater 1”)
b) Measure AC voltage directly on the CU (see wiring diagram for measuring points).
Voltage should be the same as power supply net.
c) If values are out of range: Replace the CU.
LCD shows ”_ _ _ _ _ _ _ _ : XX°C YY°C ZZ °C”.
XX = temperature values for thermistor 1
YY = temperature values for thermistor 2
ZZ = temperature values for thermistor 3
>100°C (XX) = short-circuit in thermistor 1 (heating element does not start)
10°C (XX) = thermistor 1 faulty (heating element heats but is only regulated by the
overheating protection).
>100°C (YY) = short-circuit in thermistor 2 (heating element does not start)
10°C? ± 2°C (YY) = thermistor 2 faulty (functions as vented dryer).
150°C (ZZ) = thermistor 3 short-circuited
25°C (ZZ) = thermistor 3 faulty CONTINUE ON NEXT PAGE
The options below are displayed in the order they occur in LCD 2. All display text language ver-
sions are displayed.
Service menu TD60.3

Servicemanual TD60
20
To verify indication on faulty thermistor, do the following:
1. Detach the panel
2. Disconnect electrical connections at the CU.
3. Measure DC Ω for thermistor and related wires. For values and measure points, see
chapter ”Components and measurement values” and ”Wiring diagram”.
IF THE VALUES ARE INCORRECT:
Check the electrical function for connections and thermistor. Change parts if needed.
IF THE VALUES ARE CORRECT:
a) Start the component test (”Test heater X”)
b) Measure AC voltage directly on the CU (see wiring diagram for measuring points).
Voltage should be 5VDc.
c) If values are out of range: Replace the CU.
Thermistor 2 has no affect in the component test.
Testing Heater 2, Test heater 2,
Elementtest 2, Tester varmelegeme 2,
Test av element 2, Vastustesti 2, Essai
él. chauf 2, Test verw. element 2, Test
el. risc. 2, Test elem calef 2,Teст TЭHa
2, Heizungstest 2
Motor runs continuously. Heater 2 runs regulated on and off by CU regarding to mea-
sured thermistor values. Total consumption is app. 2A in this mode. If value differs,
follow the instructions for ”Testing heater 1”
Testing Drain, Test drain, Tömningstest,
Tester udpumpning, Test av tømming,
Tyhjennystesti, Essai essorage, Test
afvoerpomp, Test scarico, Test drenaje,
Teст сливa, Abflusstest
Drain pump runs. If no action:
1. Detach the panel
2. Disconnect electrical connections at the CU.
3. Measure DC Ω for drain pump and related wires. For values and measure points,
see chapter ”Components and measurement values” and ”Wiring diagram”.
IF THE VALUES ARE INCORRECT:
Check the electrical function for connections and drain pump. Change parts if needed.
IF THE VALUES ARE CORRECT:
a) Start the component test (”Testing drain”)
b) Measure AC voltage directly on the CU (see wiring diagram for measuring points).
Voltage should be the same as power supply net.
c) If values are out of range: Replace the CU.
d) If the values are correct: Check drain pump for mechanical disturbance. Change
pump if necessary.
Testing Buzzer, Test buzzer, Signaltest,
Tester lydsignal, Test av lydsignal, Ää-
nimerkkitesti, Test signal sonore, Test
eindsignaal, Test allarme, Test timbre,
Teст звyк.сигнaлa, Summertest
Buzzer is on continuously.
Press
Start Stop
to exit the service menu.
0
Adjust LCD contrast (0 = default)
+3
+2
+1
-1
-2
-3
Press
Start Stop
to exit the service menu.
0 Adjustment of drying time
Dry level:
0 (no extension, default level), +5 (5 minutes extension), +10 (10 minutes extension),
+15 (15 minutes extension), +20 (20 minutes extension).
+5
+10
+15
+20
Press
Start Stop
to exit the service menu.
Reset
Service menu TD60.3
Other manuals for TD60
2
This manual suits for next models
3
Table of contents
Other Asko Dryer manuals

Asko
Asko TD75.B2 Series User manual

Asko
Asko TD75 Quick start guide

Asko
Asko T884XLHP User manual

Asko
Asko T793 User manual

Asko
Asko DC 7171 User manual

Asko
Asko T712C User manual

Asko
Asko T410HD W Series User manual

Asko
Asko T794 Assembly instructions

Asko
Asko TD85 C38X Series User manual

Asko
Asko TD60 User manual
Popular Dryer manuals by other brands

Kenmore
Kenmore 796.6141 Series Use & care guide

Miele
Miele T 8947 WP operating instructions

Ravanson
Ravanson XPB2800-B user manual

Siemens
Siemens WQ45G2D5NL User manual and installation instructions

Haier
Haier HD90-A2979 manual

Bosch
Bosch WTW86561GB Installation Instructions, Instructions for Use, Programme... instruction manual