AT&T Cingular Flip 3 User manual

USER
MANUAL
AT&TCingularFlip™3

Table of Contents
1
2
3
4
5
6
6
6
9
11
11
14
14
16
17
19
21
21
22
22
23
23
24
24
25
26
28
28
29
29
31
31
32
33
33
33
Getting started ........................................................................................
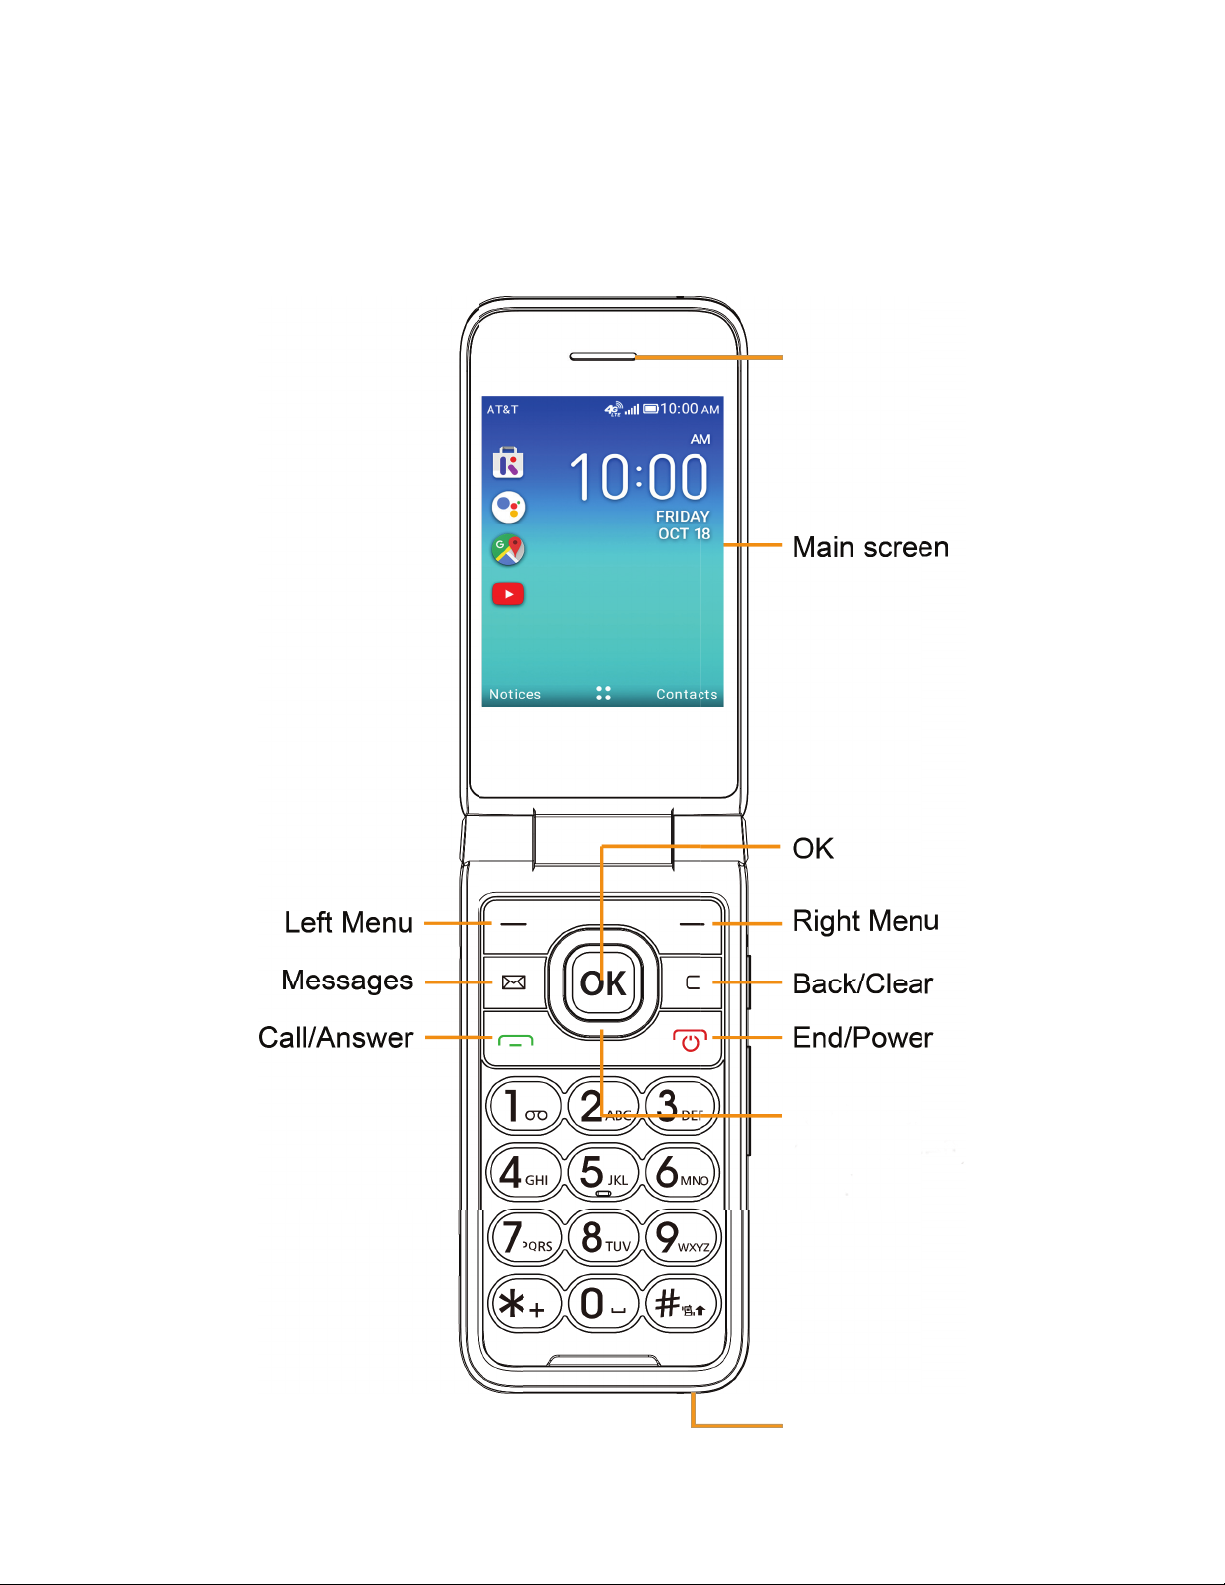
1.1 Keyboard layout and icon status ........................................................................
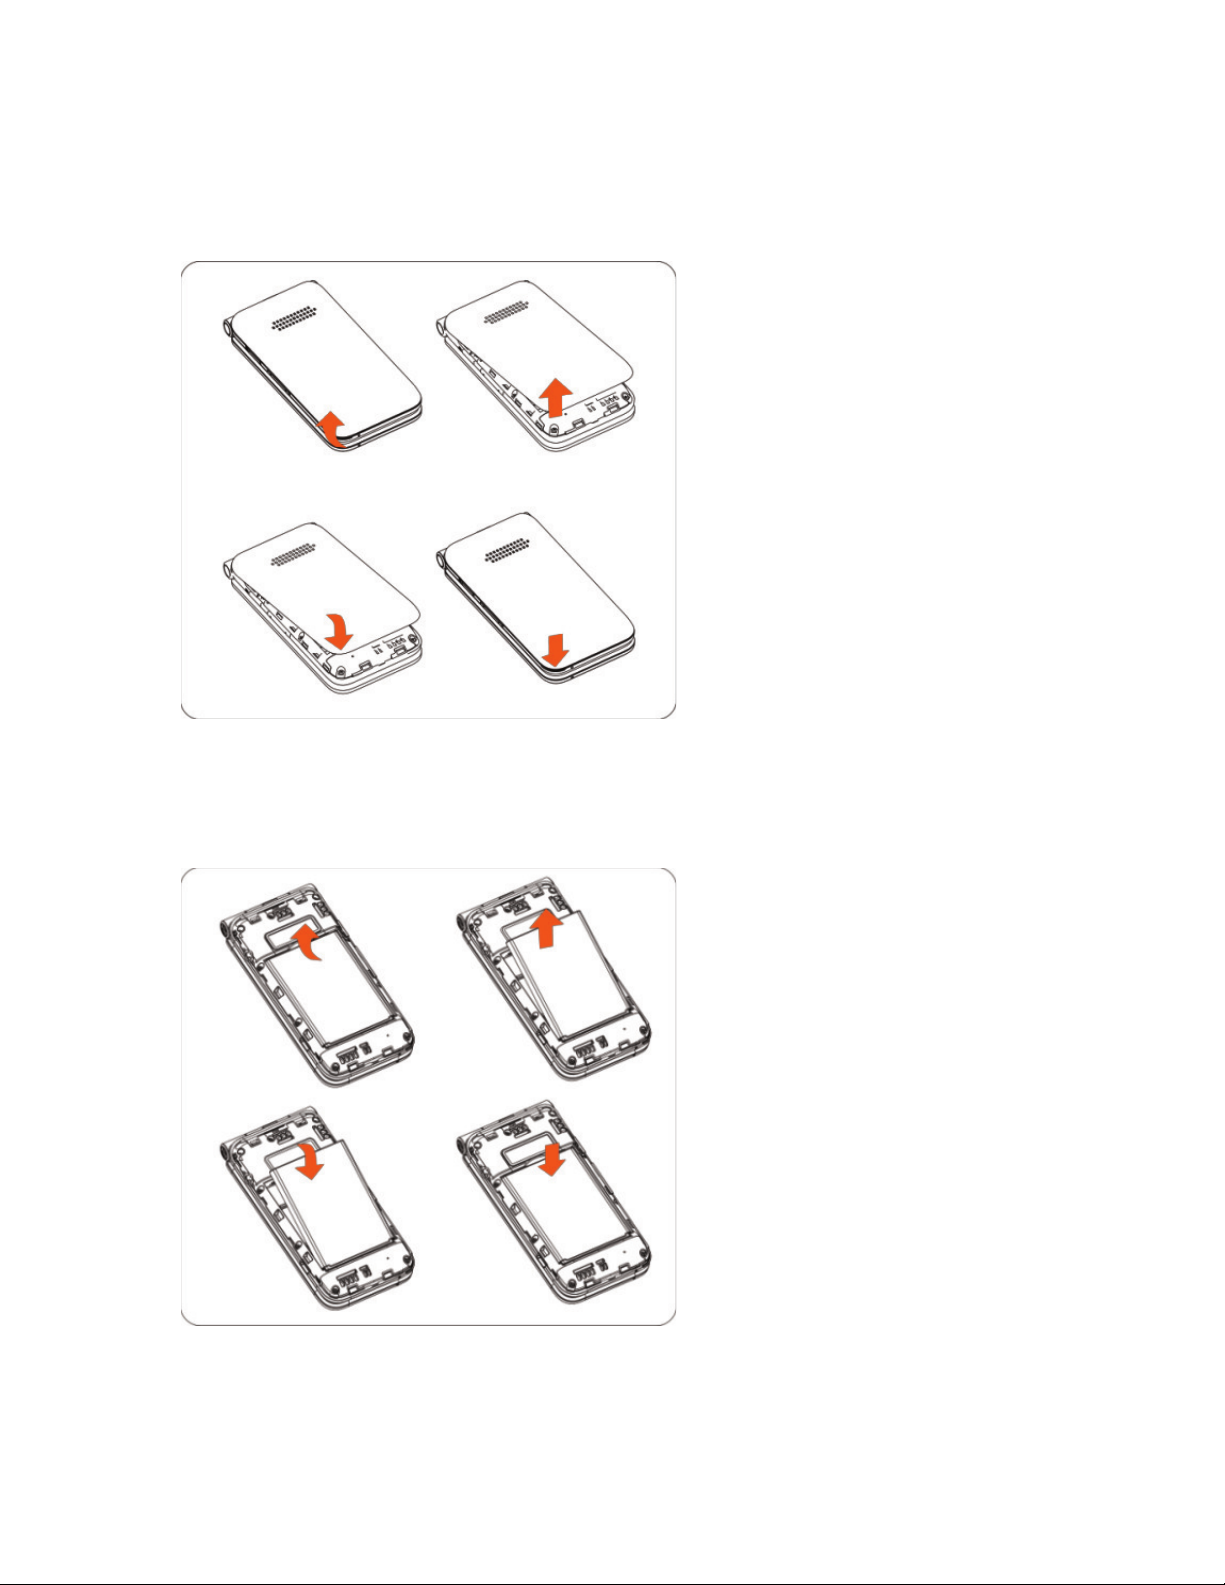
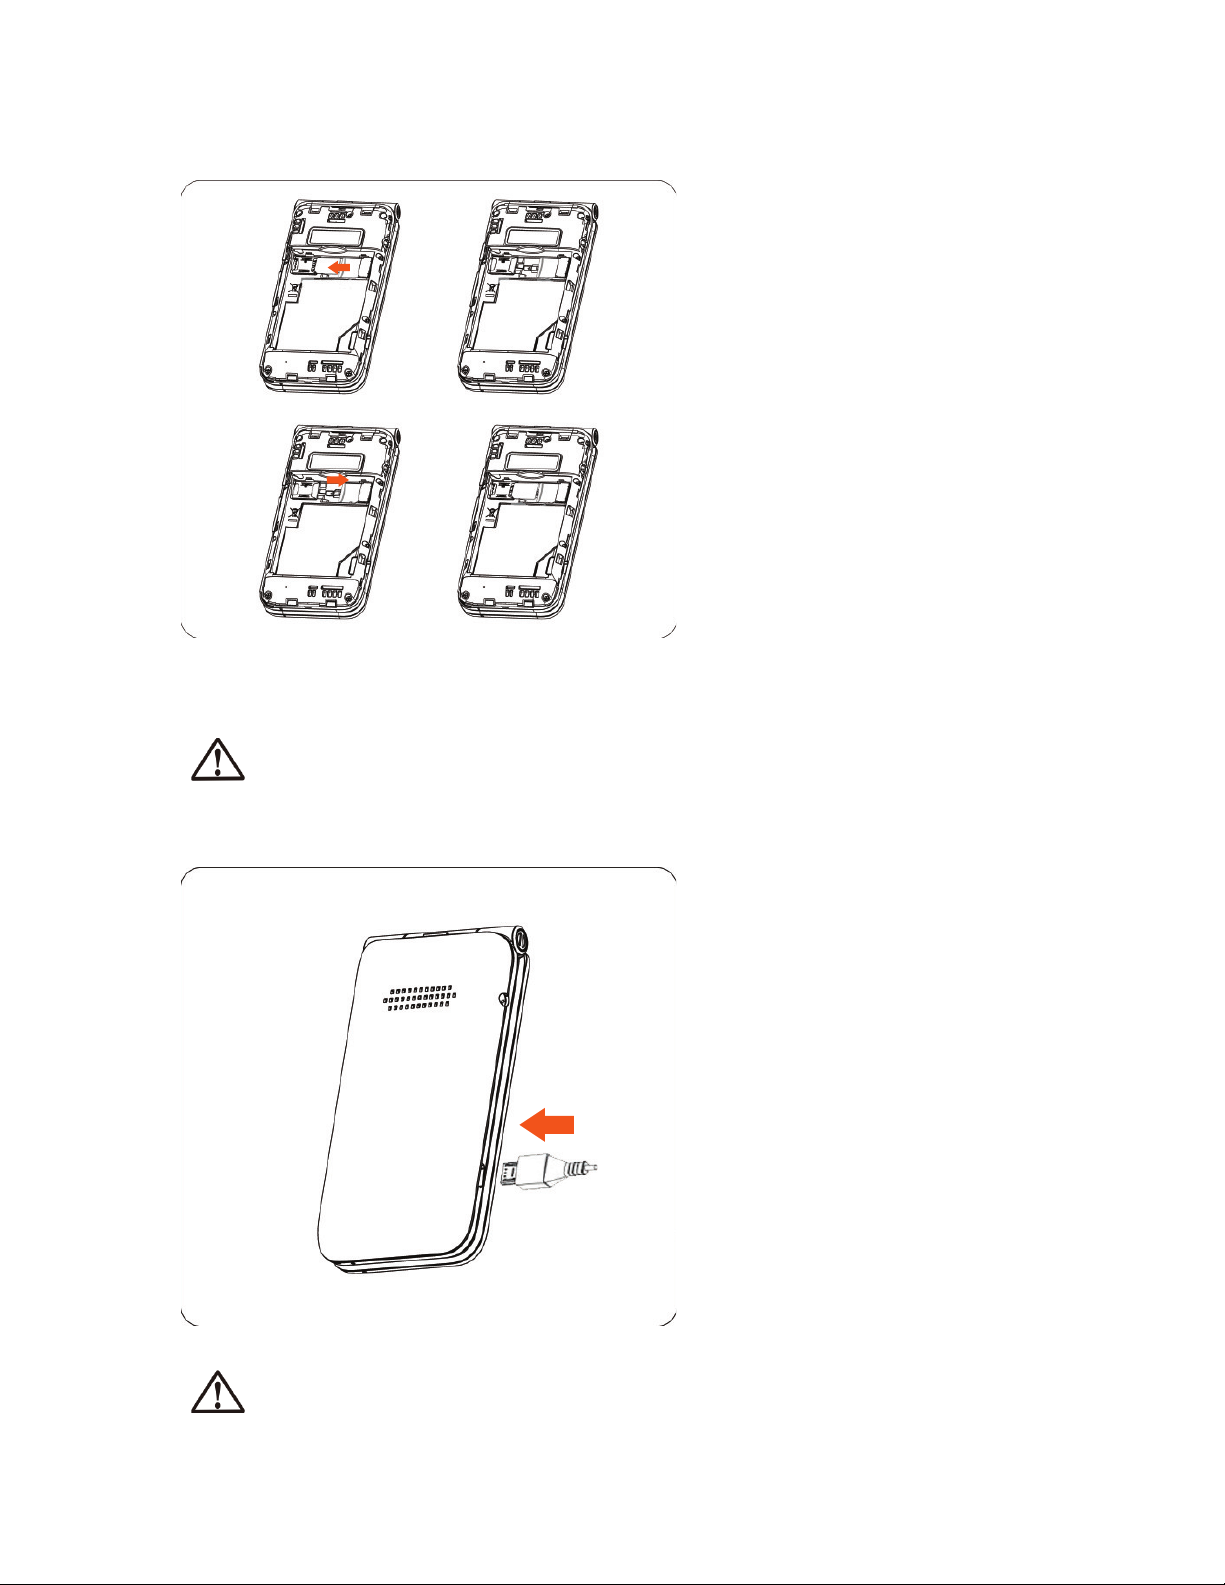
1.2 Set up your device ........................................................................................................
1.3 Power options .................................................................................................................
¬¸ÇÈÃÌÂÈÅûÂÁ¸¹ÂÅÇ»¸èÅÆÇǼÀ¸
Home Screen apps ..................................................................................
2.1 KaiStore ...............................................................................................................................
2.2 Google Assistant ..........................................................................................................
2.3 Google Maps ....................................................................................................................
2.4 YouTube .............................................................................................................................
Phone call ..................................................................................................
3.1 Make a phone call ..........................................................................................................
3.2 Answer or decline a call ............................................................................................
»¸¶¾ÌÂÈÅɼ¶¸À´¼¿
Contacts ....................................................................................................
4.1 Add a contact ...................................................................................................................
4.2 View contact details ...................................................................................................
4.3 Edit a contact ..................................................................................................................
4.4 Delete a contact ...........................................................................................................
4.5 Other options ..................................................................................................................
Messages ...................................................................................................
!¬¸Á·´Ç¸ËÇÀ¸ÆÆ´º¸
!··´Á´ÇÇ´¶»À¸ÁÇ
!»´Áº¸¼ÁÃÈÇÀ¸Ç»Â·ÆÊ»¸ÁǸËǼÁº
5.4 Other options .................................................................................................................
Email ...........................................................................................................
"¬¸ÇÈÃÌÂÈŸÀ´¼¿´¶¶ÂÈÁÇ
"ÂÀÃÂÆ¸´Á¸À´¼¿
"«¸Ã¿ÌÇ´Á¸À´¼¿
6.4 Other options .................................................................................................................
2

7
8
9
10
11
12
13
14
15
16
34
35
35
36
37
37
38
39
39
40
42
43
44
45
46
46
47
48
49
49
50
51
51
52
53
55
55
Camera .......................................................................................................
7.1 Take a photo .....................................................................................................................
#¯¼·¸ÂÀ·¸
7.3 Other options ..................................................................................................................
Gallery ........................................................................................................
8.1 Gallery options ................................................................................................................
8.2 Individual photo options ..........................................................................................
Video ...........................................................................................................
9.1 Play videos .........................................................................................................................
9.2 Other options ..................................................................................................................
Browser ......................................................................................................
10.1 Top sites ............................................................................................................................
10.2 History ...............................................................................................................................
10.3 Search or enter URL .................................................................................................
Clock ...........................................................................................................
¬¸Ç´Á´¿´ÅÀ
¬¸Ç´Ç¼À¸Å
11.3 Start a stopwatch .......................................................................................................
Music ...........................................................................................................
¥¼ÆÇ¸ÁÇÂÀÈÆ¼¶
··ÀÈÆ¼¶µÌ¿È¸ÇÂÂÇ»ÇÅ´Áƹ¸Å
Calendar .....................................................................................................
13.1 Create an event ............................................................................................................
Calculator ..................................................................................................
FM Radio ....................................................................................................
Settings .....................................................................................................
16.1 Network & connectivity ..........................................................................................
3

17
18
19
20
21
22
23
58
61
62
63
65
66
67
67
67
68
68
71
16.2 Personalization ............................................................................................................
16.3 Privacy & security .......................................................................................................
16.4 Storage .............................................................................................................................
16.5 Device .................................................................................................................................
16.6 Account .............................................................................................................................
Unit Converter .........................................................................................
File Manager .............................................................................................
Note ............................................................................................................
Recorder ....................................................................................................
¬ÂìʴŸÈ÷´Ç¸
Troubleshooting ......................................................................................
Warranty ....................................................................................................
4

»¼Æ·¸É¼¶¸À¸¸ÇÆ´Ãÿ¼¶´µ¿¸Á´Ç¼ÂÁ´¿¬«¿¼À¼ÇÆÂ¹"°¾º°»¸Á
carrying the device or using it while worn on your body, either use
´Á´ÃÃÅÂɸ·´¶¶¸ÆÆÂÅÌÆÈ¶»´Æ´»Â¿ÆÇ¸ÅÂÅÂÇ»¸ÅʼƸÀ´¼ÁÇ´¼Á´
·¼ÆÇ´Á¶¸Â¹!ÀÀ¹ÅÂÀÇ»¸µÂ·ÌǸÁÆÈŸ¶ÂÀÿ¼´Á¶¸Ê¼Ç»«
¸ËÃÂÆÈŸŸÄȼŸÀ¸ÁÇÆ§ÂǸǻ´ÇÇ»¸ÃÅ·ȶÇÀ´Ìµ¸
ÇÅ´ÁÆÀ¼ÇǼÁº¸É¸Á¼¹ÌÂȴŸÁÂÇÈÆ¼Áº¼Ç
ÂßɸÁÇÃÂÆÆ¼µ¿¸»¸´Å¼Áº·´À´º¸·ÂÁÂÇ¿¼ÆÇ¸Á´Ç»¼º»É¿ÈÀ¸
levels for long periods. Exercise caution when holding your device
near your ear while the loudspeaker is in use.
»¸·¸É¼¶¸¶ÂÁÇ´¼ÁÆÀ´ºÁ¸ÇÆÊ»¼¶»À´Ì¼ÁǸŹ¸Å¸Ê¼Ç»ÂÇ»¸Å
·¸É¼¶¸Æ´Á·¼Ç¸ÀÆÆÈ¶»´Æ¶Å¸·¼Ç¶´Å·ÆÃ´¶¸À´¾¸ÅÆ·¸èµÅ¼¿¿´ÇÂÅÆ
¸Ç¶©¿¸´Æ¸À´¼ÁÇ´¼Á´Ç¿¸´ÆÇ!ÀÀ¹ƸôŴǼÂÁµ¸Çʸ¸ÁÌÂÈÅ
ûÂÁ¸´Á·Ç»¸·¸É¼¶¸Æ¼Ç¸ÀÆÀ¸ÁǼÂÁ¸·´µÂɸ
5

1. Getting started
1.1 Keys and Icon status
Keyboard Layout
Mic
Speaker
Navigation Ring
(Up, Down, Left, Right)
6

Icon Function/Description
OK
• ©Å¸ÆÆÇ¶ÂÁèÅÀ´Æ¸¿¸¶Ç¼ÂÁ
• ÅÂÀÇ»¸¡ÂÀ¸Æ¶Å¸¸ÁÃÅ¸ÆÆÇ´¶¶¸ÆÆÇ»¸´ÃÃÀ¸ÁÈ
• Long press to launch the GoogleTM Assistant or activate speech-to-text
Navigation Ring
• ©Å¸ÆÆÈ÷ÂÊÁ¿¸ìÂÅżº»ÇÇÂÁ´É¼º´Ç¸
• UP: Shortcut settings
• DOWN:À´¼¿´ÃÃ
• LEFT: Use the navigation ring to scroll up and down to access the KaiStoreTM, Google
Assistant, Google Maps and YouTubeTM
• RIGHT: Google app
Messages
• Press to access the Messages app
Back/Clear
• ©Å¸ÆÆÇŸÇÈÅÁÇÂÇ»¸ÃŸɼÂÈÆÆ¶Å¸¸Á¶¿ÂƸ´·¼´¿ÂºµÂËŸ˼ÇÇ»¸ÂÃǼÂÁÆÀ¸ÁÈ
• ¢ÁÇÌüÁºÀ·¸ÃÅ¸ÆÆÇ·¸¿¸Ç¸´¶»´Å´¶Ç¸Å
Call/Answer
• ©Å¸ÆÆÇ·¼´¿´¶´¿¿ÂÅÇ´ÁÆÊ¸Å´Á¼Á¶ÂÀ¼Áº¶´¿¿
• ÅÂÀÇ»¸¡ÂÀ¸Æ¶Å¸¸ÁÃÅ¸ÆÆÇ´¶¶¸ÆÆÇ»¸¶´¿¿¿Âº
End/Power
• ©Å¸ÆÆÇ¸Á·´¶´¿¿ÂÅŸÇÈÅÁÇÂÇ»¸¡ÂÀ¸Æ¶Å¸¸Á
• ¥ÂÁºÃÅ¸ÆÆÇÂÃÂʸÅÂÁÂæÇ»¸·¸É¼¶¸
Camera Button
• ©Å¸ÆÆÇ´¶¶¸ÆÆÇ»¸´À¸Å´´ÃÃ
• ¢ÁÇ»¸´À¸Å´´ÃÃÃÅ¸ÆÆÇÂÇ´¾¸´Ã¼¶ÇÈŸÂÅÆÇ´ÅÇÆÇÂß¶ÂÅ·¼Áº´É¼·¸Â
• ©Å¸ÆÆ´Á·»Â¿·Ç»¸´À¸Å´´Á·¯Â¿ÈÀ¸·ÂÊÁµÈÇÇÂÁÆÆ¼ÀȿǴÁ¸ÂÈÆ¿ÌǶ´ÃÇÈŸ´
screenshot
Volume Button, Up and Down
• °»¼¿¸ÂÁ´¶´¿¿ÃÅ¸ÆÆ®ÃÂÊÁÇ´·½ÈÆÇÇ»¸¸´Åü¸¶¸ÂÅ»¸´·Æ¸ÇÉ¿ÈÀ¸
• °»¼¿¸¿¼ÆÇ¸Á¼ÁºÇÂÀÈÆ¼¶ÃÅ¸ÆÆ®ÃÂÊÁÇ´·½ÈÆÇÀ¸·¼´É¿ÈÀ¸
• ÅÂÀÇ»¸¡ÂÀ¸Æ¶Å¸¸ÁÃÅ¸ÆÆ®ÃÂÊÁÇ´·½ÈÆÇÇ»¸É¿ÈÀ¸Â¹Å¼ÁºÇÂÁ¸Æ´Á·´¿¸ÅÇÆ
• °¼Ç»´Á¼Á¶ÂÀ¼Áº¶´¿¿ÃÅ¸ÆÆ¸¼Ç»¸ÅµÈÇÇÂÁÇÂÀÈǸǻ¸Å¼ÁºÇÂÁ¸
Camera
Camera Key
External Screen
Volume
Headset Jack
Charging Port
7

Internal and External Display
Status Bar
Time
Date
Notifications
Status Bar
The status bar runs along the top of your screen and shows the phone's
ÆÇ´ÇÈÆÂÁÇ»¸Å¼º»ÇƼ·¸´Á·ÌÂÈÅÁ¸ÇÊž´Á·ÁÂǼ趴ǼÂÁ¼¶ÂÁÆÂÁÇ»¸¿¸ì
´ÇǸÅ̼ƴǹȿ¿¶»´Åº¸
Connected to Network
Å´À¼Áº
ÂÈÁÇ¸ÅÆ»ÂÊÆÁÈÀµ¸Å¹
ÂÇ»¸ÅÁÂǼ趴ǼÂÁÆ
Connected to Network
¹È¿¿Æ¼ºÁ´¿
¬¼¿¸ÁÇÀ·¸¼ÆÆ¸Ç
Device is set to vibrate only
°¼¼® is connected
¿È¸ÇÂÂÇ»® is active
´ÇǸÅ̼ƶÈÅŸÁÇ¿Ì
charging
Á´¿´ÅÀ¼ÆÆ¸Ç
¼Åÿ´Á¸À·¸¼ÆÂÁ
3G data is available
4G LTE is available
§¸ÊÀ¸ÆÆ´º¸¼Æ´É´¼¿´µ¿¸
§¸Ê¸À´¼¿¼Æ´É´¼¿´µ¿¸
Missed a call
Status/Notifications Bar
•Displays Status and
Notification indicators.
Time
Date
Contacts
•Lists all saved contacts,
press the Right Menu key
to access.
Apps (Applications) Menu
•Displays all apps, press the
OK key to access.
OK Key
•Press to access Apps
Menu or select the
option displayed.
Notices
•Displays all
Notifications,
press the Left
Menu key to
access.
8

1.2 Set up your device
Remove the back cover
«¸ÀÂɸǻ¸µ´ÇǸÅ̶Âɸŵ̺¸ÁÇ¿Ì
¿¼ì¼ÁºÈüÁÇ»¸·¼Å¸¶Ç¼ÂÁÆ»ÂÊÁ»¸Å¸
¼Æ´ÁÂǶ»¿Â¶´Ç¸·ÂÁÇ»¸µÂÇÇÂÀ¿¸ì
hand corner of the phone's back cover
Ç»¸¿Ã¿¼ì¼ÇÈÃ
Replace the back cover
Replace the back cover properly by
aligning it with the back of the device.
Make sure the speaker holes are
positioned at the top and press gently
until the back cover clicks into place on
all sides.
Remove the battery
¸Áǿ̿¼ìÇ»¸µ´ÇǸÅÌÈùÅÂÀÇ»¸
notch located at the center top of the
µ´ÇǸÅÌ´Á·Å¸ÀÂɸ¼Ç¹ÅÂÀÇ»¸Æ¿ÂÇ
Install the battery
Line up the gold contacts on the
battery with the gold connectors at the
µÂÇÇÂÀ¹ǻ¸µ´ÇǸÅÌÆ¿ÂÇ´Á·º¸ÁÇ¿Ì
push the battery down into the slot.
9

Insert a SIM or
microSDTM card
°¼Ç»Ç»¸µ´ÇǸÅÌŸÀÂɸ·»Â¿·Ç»¸Á¸Ê
¬¢¦Ê¼Ç»À¸Ç´¿¶ÂÁÇ´¶Çƹ´¶¼Áº
downward and the cut corner at the
¿Âʸſ¸ì¬¿¼·¸Ç»¸¶´Å·¼ÁÇÂÇ»¸¬¢¦
Æ¿ÂÇÂÁÇ»¸¿¸ìÂÅ´À¼¶Å¬¶´Å·Æ¿¼·¸
the card with gold contacts facing
·ÂÊÁÊ´Å·¼ÁÇÂÇ»¸À¼¶Å¬¶´Å·Æ¿ÂÇ
ÂÁÇ»¸Å¼º»Ç²ÂÈÅûÂÁ¸ÆÀ¸ÀÂÅ̼Æ
¸ËôÁ·´µ¿¸µÌÈÃÇÂʼǻ´
¶ÂÀôǼµ¿¸À¼¶Å¬¶´Å·ÆÂ¿·
separately).
Remove nano SIM or
microSDTM card
Push down on the plastic clip located at
Ç»¸¸·º¸Â¹Ç»¸¬¢¦ÂÅÀ¼¶Å¬¶´Å·
slot to allow the card to slide out of the
Æ¿ÂǬ¿¼·¸Ç»¸¬¢¦ÂÅÀ¼¶Å¬¶´Å·ÂÈÇ
of the slot.
Charge the battery
¢ÁƸÅÇÇ»¸ÆÀ´¿¿¸Å¸Á·Â¹Ç»¸¶»´Åº¸Å
into the device charging port and plug
the charger into an electrical outlet.
²ÂÈÅûÂÁ¸ÂÁ¿ÌÆÈÃÃÂÅÇÆ§´Á¬¢¦¶´Å·ÆÂÁÂÇ´ÇǸÀÃÇǼÁƸÅÇ´¦¼Á¼ÂŦ¼¶Å¬¢¦
¶´Å·ÂÅÌÂÈÀ´Ì·´À´º¸ÌÂÈÅûÂÁ¸
Ÿ·È¶¸ÃÂʸŶÂÁÆÈÀÃǼÂÁ´Á·¸Á¸ÅºÌÊ´ÆÇ¸·¼Æ¶ÂÁÁ¸¶ÇÌÂÈŶ»´Åº¸ÅÊ»¸ÁÇ»¸
battery is fully charged.
10

1.3
1.4
Power options
Power On
Press down on the Power button¹ÂÅ´Á¸ËǸÁ·¸·Ç¼À¸
ÈÁǼ¿Ç»¸Ã»ÂÁ¸ÃÂÊ¸ÅÆÂÁ»¸¡ÂÀ¸Æ¶Å¸¸Áʼ¿¿µ¸·¼ÆÃ¿´Ì¸·
If screen lock is set up, enter your passcode to access the
¡ÂÀ¸Æ¶Å¸¸Á
Note: If you don't know your passcode or if you have forgotten it, contact
your service provider. Do not store passcodes within your phone; instead
store passcodes in a location that is accessible without using your phone.
©ÂʸŨæ¨ÃǼÂÁÆ
Press and hold the Power button until the power
options display. You can select ©ÂʸŨæ, Restart or Clean
Up Memory, and press OKǶÂÁèÅÀ
¬¸ÇÈÃÌÂÈÅûÂÁ¸¹ÂÅÇ»¸èÅÆÇǼÀ¸
1. Press the Power button on your device for three
Ƹ¶ÂÁ·ÆÇÂÃÂʸżÇÂÁ´Á·Ç»¸Á¹Â¿¿ÂÊÇ»¸ÃÅÂÀÃÇÆÇÂÆ¸ÇÈÃ
your device. Use the Navigation ring to select your
preferred language and press OK .
g
g
g
g
g
g
11

2. Use the Navigation ringÇÂÆ¸¿¸¶Ç´°¼¼Á¸ÇÊž¼¹
´Ãÿ¼¶´µ¿¸²Âȶ´Á´¿ÆÂƾ¼ÃƸ¿¸¶Ç¼Áº´°¼¼Á¸ÇÊžµÌ
pressing Right Select to Skip. Press OK to select the
desired network and enter the password, if needed.
3.ì¸ÅŸ´·¼ÁºÇ»ÅÂȺ»Ç»¸¼ÁÇÅ·ȶǼÂÁ¹ǻ¸ÁǼ»¸ì
function, press OK to continue.
12

4. Press Right Select to AcceptÇ»¸¤´¼¨¬¥¼¶¸ÁƸ¸ÅÀÆ
and Privacy Policy, and then press Right Select to
¶ÂÁèÅÀ
5. The About KaiOS page will be displayed. Use the Navigation
ring and OK to select, and then press Right Select
ǶÂÁèÅÀ
13

Store
To access More appsÃÅ¸ÆÆ¿¸ìÂÁÇ»¸Navigation ring
¹ÅÂÀÇ»¸¡ÂÀ¸Æ¶Å¸¸Á´Á·Ç»¸ÁÃÅ¸ÆÆÈÃÂÅ·ÂÊÁÂÁÇ»¸
Navigation ring to select the app you want. Press OK
ǶÂÁèÅÀÌÂÈÅÆ¸¿¸¶Ç¼ÂÁ
2. More apps .....................................................................
2.1
Download an app from Store
1. ¥´ÈÁ¶»Ç»¸¤´¼¬ÇŸ´ÃõÌÃÅ¸ÆÆ¼Áº¿¸ìÂÁÇ»¸Navigation
ring ¹ÅÂÀÇ»¸¡ÂÀ¸Æ¶Å¸¸Á´Á·Ç»¸ÁÈÆ¸Ç»¸Navigation
ring to scroll up and select Store . Press OK to launch
the app.
2. Select the app that you want to download by using the
Navigation ring to browse through apps.
3. Press OK to enter the description page for the selected
app.
4. Press OK to start downloading and installing the selected
´ÃÃ©Å¸ÆÆOK again to pause the download.)
14
»¸¤´¼¬ÇŸÃÅÂɼ·¸Æ´Æ¸¿¸¶Ç¼ÂÁ¹ǻ¸ÊÂÅ¿·ÔÆÀÂÆÇÃÂÃÈ¿´Å´ÃÃÆ
ÆÈ¶»´Æ´¶¸µÂ¾TM, Google Maps, and TwitterTM. The KaiStore and
´¿¿Ç»¸´É´¼¿´µ¿¸´ÃÃÆ´Å¸ÂÃǼÀ¼Í¸·¹Âʏ´ÇÈŸûÂÁ¸Æ·¸É¼¶¸Æ
without touchscreens. They’re easy to install, use and update.
Ç»¸Á

ÂÊÁ¿Â´·¸·´ÃÃÆ¶´Áµ¸¹ÂÈÁ·¼ÁÇ»¸´ÃÃÀ¸ÁȮƸǻ¸Ç»¸
Navigation ring to select an app, and press OK to launch it.
Update an app in Store
1. In the Store app, select the app that you have already
downloaded and want to update by navigating with the
Navigation ring in the apps list. Apps that have been
·ÂÊÁ¿Â´·¸·Ê¼¿¿Æ»ÂÊ´¶»¸¶¾À´Å¾´ÇÇ»¸ÇÂÃżº»Ç¶ÂÅÁ¸Å¹
the app tile in the apps list.
2. Press Right Select to enter Options for the selected app.
3. Select Settings with the Navigation ring , and press
OK . Select Auto Update with the Navigation ring , and
press OK .
4. ¬¸¿¸¶ÇÇ»¸À·¸ÌÂÈÁ¸¸·´Á·ÃÅ¸ÆÆOK .
Uninstall an app
1. ÅÂÀÇ»¸¡ÂÀ¸Æ¶Å¸¸ÁÃÅ¸ÆÆOK Ç´¶¶¸ÆÆÇ»¸´ÃÃÀ¸ÁÈ
2.¬¸¿¸¶Ç´Á´ÃùÅÂÀÇ»¸´ÃÃÀ¸ÁÈÇ»´ÇÌÂÈ»´É¸´¿Å¸´·Ì
downloaded that you want to delete by using the Navigation
ring .
3. Press Right Select to enter Options.
4. Use the Navigation ring to select Uninstall, and press OK
to delete. If needed, press ¥¸ì¬¸¿¸¶Ç to cancel , or press
Right Select to continue.
Check Privacy Policy in Store
1. In Store , use the Navigation ring to select the app
for which you want to view the privacy policy.
2. Press Right Select to enter Options.
3. Select Privacy Policy with the Navigation ring .
4. Press OK to browse the Privacy Policy on the website.
Check Terms and Services in Store
1. In Store , use the Navigation ring to select the app
¹ÂÅÊ»¼¶»ÌÂÈÊ´ÁÇÇÂɼ¸ÊÇ»¸Ç¸ÅÀÆ´Á·Æ¸Åɼ¶¸Æ
15
vacy
,

Activate assistant
1. ÅÂÀÇ»¸¡ÂÀ¸Æ¶Å¸¸ÁÃÅ¸ÆÆ´Á·»Â¿·OK to launch
ÌÂÈź¿¸ÆÆ¼ÆÇ´ÁǨŹÅÂÀÇ»¸¡ÂÀ¸Æ¶Å¸¸ÁÃÅ¸ÆÆ¿¸ì
then up on the Navigation ring to select Google
Assistant and press OK to launch the app..
2. ¬Ã¸´¾ÌÂÈÅɼ¶¸¶ÂÀÀ´Á·ÂÈÇ¿ÂÈ·Google Assistant
will speak back to you and walk you through the next steps.
Assistant2.2
16
2. Press Right Select to enter Options.
3. Select Terms and Services with the Navigation ring .
4. Press OK ǵÅÂÊÆ¸Ç»¸¸ÅÀÆ´Á·¬¸Åɼ¶¸ÆÂÁÇ»¸Ê¸µÆ¼Ç¸
Request Help in Store
1. In Store , use the Navigation ring to select the app for
which you want to get help.
2. Press Right Select to enter Options.
3. Select Need Help? by using the Navigation ring .
4. Press OK ÇÂÆÈµÀ¼Ç´»¸¿ÃǼ¶¾¸ÇÂÁÇ»¸Ê¸µÆ¼Ç¸
Help
,
²ÂÈÅɼ¶¸´ÆÆ¼ÆÇ´ÁÇ´¿¿ÂÊÆÌÂÈÇÂÀ´¾¸¶´¿¿ÆÆ¸Á·À¸ÆÆ´º¸Æ
ÂøÁ´Á´ÃÃÂÅøŹÂÅÀÂÇ»¸Å¶ÂÀÀ´Á·Æ´¿¿Ê¼Ç»ÌÂÈÅɼ¶¸

Maps2.3
¬¸´Å¶»¹ÂÅ´¿Â¶´Ç¼ÂÁ´ÈÇÂÀ´Ç¼¶´¿¿Ì·¸Ç¸¶ÇÌÂÈſ¶´Ç¼ÂÁº¸Ç
·¼Å¸¶Ç¼ÂÁÆ´Á·ÀŸ
Setting up Maps
1.ÅÂÀÇ»¸¡ÂÀ¸Æ¶Å¸¸ÁÃÅ¸ÆÆ¿¸ìÂÁÇ»¸Navigation ring
to select Maps , and press OKǶÂÁèÅÀ
2.°»¸Á¿´ÈÁ¶»¼ÁºMaps¹ÂÅÇ»¸èÅÆÇǼÀ¸ÈƸǻ¸
Navigation ring and OKÇ´¿¿Âʿ¶´Ç¼ÂÁøÅÀ¼ÆÆ¼ÂÁÆ
This allows the app to detect your current location.
17
Switch language
1. In Google Assistant , press Right Select to access
language options.
2. Select your preferred language by using the Navigation
ring .
3. Press OK ǶÂÁèÅÀ
Try speaking:
• "What's the weather today?" to get the day's weather forecast.
• "Where's the nearest grocery store?" to get directions to the
nearest grocery store.
• "How many milliliters are in a tablespoon?" for an easy way to
convert units.
• "What else can you do?"¹ÂÅÀŸ¹ÈÁ¶Ç¼ÂÁÆ

Detect your location
1. In Maps , select Your location by using the Navigation
ring , and press OK .
2. If not already done, press Right Select to allow Maps
to ´¶¶¸ÆÆÌÂÈſ¶´Ç¼ÂÁÂÃǼÂÁ´¿
3. Press Right Select´º´¼ÁǶÂÁèÅÀOK .
4. Use the Navigation ring to highlight On, and press
Right Select to enable geolocation.
Get directions
1. In Maps , select Directions by using the Navigation
ring , press OK .
2. Type in an address or location category in the Destination
踿· or use the Navigation ring to select Choose on
map.
3. Type your starting address into the Starting point 踿·ÂÅ
use the Navigation ring to select Your location or
Choose on map as your starting location.
g
g
g
g
g
g
g
g
g
g
g
g
g
g
g
g
g
g
g
18

YouTube2.4
²ÂÈȵ¸¼ÆÇ»¸ÀÂÆÇÃÂÃÈ¿´Åɼ·¸ÂÆ»´Å¼ÁºÃ¿´Ç¹ÂÅÀ²Âȶ´Á
ɼ¸ÊŴǸƻ´Å¸¶Å¸´Ç¸Ã¿´Ì¿¼ÆÇÆÅ¸ÃÂÅǶÂÀÀ¸ÁÇÂÁɼ·¸ÂÆ´Á·
ÆÈµÆ¶Å¼µ¸ÇÂÂÇ»¸ÅÈÆ¸ÅÆ¢ÇÂæ¸Åƴʼ·¸É´Å¼¸Ç̹
ÈÆ¸Åº¸Á¸Å´Ç¸·´Á·¶ÂÅÃÂŴǸÀ¸·¼´É¼·¸ÂÆ
Launch YouTube
1. ÅÂÀÇ»¸¡ÂÀ¸Æ¶Å¸¸ÁÃÅ¸ÆÆ¿¸ì´Á·Ç»¸Á·ÂÊÁÂÁÇ»¸
Navigation ring to select YouTube .
2. Press OK to launch the app.
Search for a video
1. In YouTube , use the Navigation ring to activate
the search bar, and press OK ǸÁǸÅÇÌüÁºÀ·¸
2. In the search bar, type in the keywords that you want to
search, and press Right SelectǶÂÁèÅÀ
3. Use the Navigation ring to scroll through search
results, and press OK ǶÂÁèÅÀ´Æ¸¿¸¶Ç¼ÂÁ
19

View Trending videos
1. Use the Navigation ringÇÂÆ¸¿¸¶ÇÇ»¸ÃÅÂ迸¼¶ÂÁ´ÇÇ»¸
ÇÂÃżº»Ç¶ÂÅÁ¸Å¹ǻ¸´ÃûÂÀ¸Ã´º¸©Å¸ÆÆOK to
¶ÂÁèÅÀ
2. Use the Navigation ring to select Trending and press
OK ǶÂÁèÅÀ
Enter Library page
1. Use the Navigation ring ÇÂÆ¸¿¸¶ÇÇ»¸ÃÅÂ迸icon at the
ÇÂÃżº»Ç¶ÂÅÁ¸Å¹ǻ¸´ÃûÂÀ¸Ã´º¸©Å¸ÆÆOK to
¶ÂÁèÅÀ
2. Use the Navigation ring to select Library and press
OK ǶÂÁèÅÀ
Sign in to your account
1. Use the Navigation ringÇÂÆ¸¿¸¶ÇÇ»¸ÃÅÂ迸¼¶ÂÁ´Ç
Ç»¸ÇÂÃżº»Ç¶ÂÅÁ¸Å¹ǻ¸´ÃûÂÀ¸Ã´º¸©Å¸ÆÆOK
ǶÂÁèÅÀ
2. Use the Navigation ring to select Sign in and press
OK ǶÂÁèÅÀ
3. Enter your user ID and password, and press OK to sign
in.
20
Table of contents
Other AT&T Cell Phone manuals