manuals.online logo
Brands
  1. Home
  2. •
  3. Brands
  4. •
  5. AT&T
  6. •
  7. Network Hardware
  8. •
  9. AT&T SportsNet User manual

AT&T SportsNet User manual

AT&T SportsNet & ROOT SPORTS - XOS - Quick Start Guide
C. Power on the Laptop.
- In a web browser (Google Chrome), type the IP address ( https://192.0.2.2 )
and press Enter.
D. Enter the following credentials and click Log in:
- Login: xos
‐Password:xos-user
E. Select the Platform Configuration tile and click Launch.
F. Select the Network tab followed by the IP config tab.
G. You can change the IP parameters for the following ports
based on your IP plan or keep the default IP addresses:
- Management 01 port (GbE01 – Default: 192.168.1.200)
- Data GbE03 port (Default: 192.168.2.200)
H. Click Save.
I. Remove the USB-Ethernet adapter from the front panel of
the XOS.
J. Install the front bezel.
Contacting Harmonic:
ATT‐RSN‐[email protected]
ATT RSN SUPPORT Phone# (408) 490-6521
7 a.m. to 4 p.m. Pacific Time, Monday through Friday
1. Unpacking and Racking 2. Cabling
Quantity Description
1 XOSServer‐1UHPEDL360G10
2Powercable
4 MicroBNCtoBNCcable
1Frontbezel
1 Rackmountingkitfor1UHPEDL360G10
1 USBtoEthernetadapter
1 QuickStartGuide
A. Please use this list to ensure that your order is complete.
B. Remove the XOS and associated accessories from the
box.
C. Mount the XOS in the rack.
The XOS can be mounted in a 19" rack.
- Ensure that it is secured in the rack.
- Maintain air flow around the XOS.
- Do not place another device directly on the top of the XOS.
3. Configure IP addresses
A. Follow the diagram below to perform the XOS cabling.
A. Use the USB to Ethernet adapter to connect a laptop to the
USB port on the front panel as shown below:
B. Power on the XOS.
- Connect the power cord to the power supply on the rear panel.
- Connect the cable to the power source and turn on the power.
- Wait for the XOS to complete the boot process.
-
Make sure that the LEDs (x3 at the top-right) are green, as shown in the picture above.
- The Management and Data switches are not
pprovided by Harmonic
- The Management PC is recommended
If you don’t have a Management PC, keep the laptop
connected until you complete the configuration (Step 6).
XOS is shipped the with the latest software version. When XOS is under DMS
control, it will be configured from the central headend.
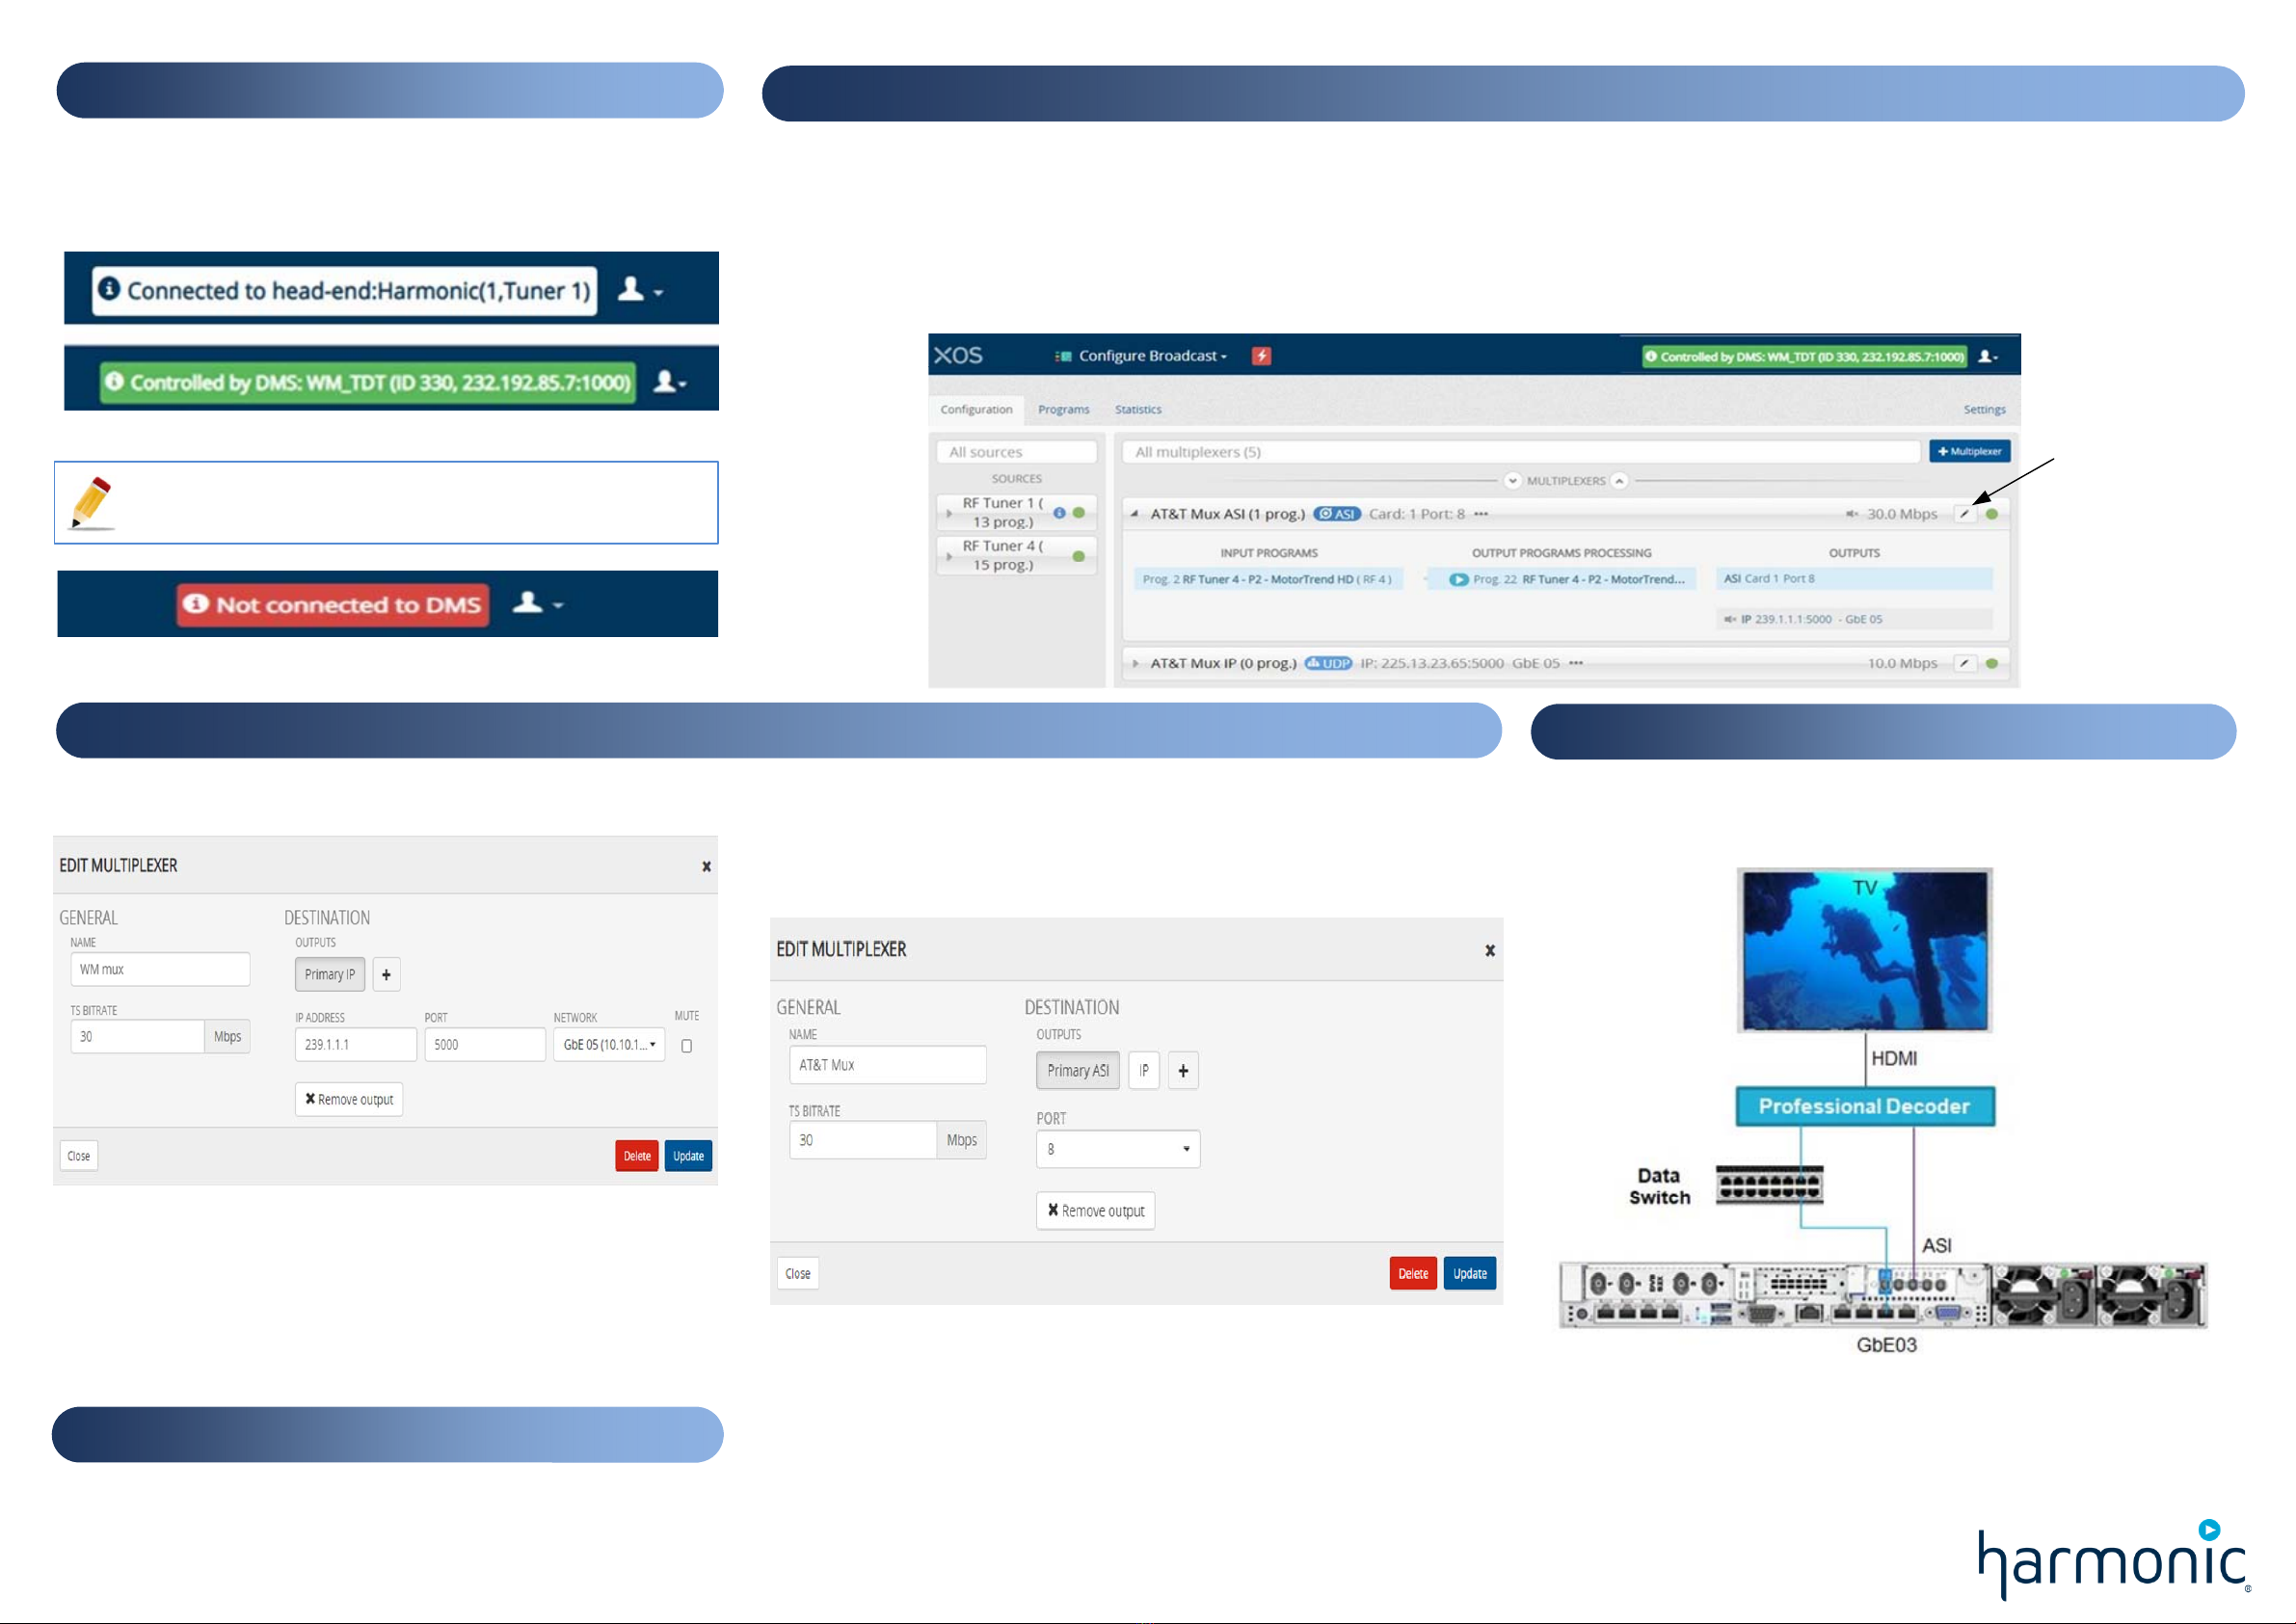
Once the configuration update complete, do the following:
A. Select the Configure Broadcast tile and click Launch.
The display will be similar to the picture bellow:
- The message at the top of the user interface (UI) specifies DMS is controlling the
XOS.
4. Checking the RF connection
6. Final steps for configuration
8. Documentation
Depending on the RF connection and the Distribution Management System
(DMS) configuration,either a Connected or a Controlled message will
appear at the top of the user interface:
5. Waiting for Upgrade & Configuration
7. Checking XOS outputs
A.
Assign a Multiplexer to an IP output.
1 – Click multiplexer Edit button (pen).
2 - Set the multicast IP Address according to your IP plan.
3 - Select the IP data port (typically GbE03).
4 - Set the UDP port number according to your IP plan.
5 - By default, the Primary IP output is muted. Clear the check box to
tttunmute the ouput.
6 - Click Update to commit your changes.
B.
If required, assign a Multiplexer to an ASI output.
1 - Click multiplexer Edit button (pen).
2 - Click
+ button.
3 - Select ASI.
4 - Enter the ASI port to be used.
5 - Click Update to commit your changes.
The full user guide and other documentation are available at:
https://www.harmonicinc.com/documentation/att-rsn/
A. Connect a professional-grade decoder to the XOS.
B. Connect the decoder to the HDMI port on the TV.
C. Power on the decoder and the TV.
- The presence of a Multiplexer from the ASI input is automatically detected by
the decoder.
- The first program appears,
- To receive a Multiplexer via the data switch, enter the same IP address you
entered in the XOS (See to Step 6. A. Assign a Multiplexer to an IP output).
Refer to the decoder documentation for additional information.
If a message appears in red, the connection is not yet established.
Please check your RF reception level and wiring.
- The left side of the UI shows the RF tuners and the number of associated
programs.
- The right side of the UI shows the Multiplexers outputs.
B.
Click on a multiplexer to expand the display for the list of
authorized programs.
To edit the
multiplexer

This manual suits for next models

1

Other AT&T Network Hardware manuals

AT&T 7400B Plus User manual

AT&T

AT&T 7400B Plus User manual

AT&T IPC-1600 User manual

AT&T

AT&T IPC-1600 User manual

AT&T activeARC Manual

AT&T

AT&T activeARC Manual

AT&T 7400B User manual

AT&T

AT&T 7400B User manual

AT&T Genie Mini C Technical Document

AT&T

AT&T Genie Mini C Technical Document

AT&T Genie 2 P Technical Document

AT&T

AT&T Genie 2 P Technical Document

AT&T IPDSL User manual

AT&T

AT&T IPDSL User manual

AT&T AC8200 User manual

AT&T

AT&T AC8200 User manual

Popular Network Hardware manuals by other brands

axing MIE 8-00N operating instructions

axing

axing MIE 8-00N operating instructions

Belkin P73213-A user manual

Belkin

Belkin P73213-A user manual

Calix GigaSpire BLAST u12 installation guide

Calix

Calix GigaSpire BLAST u12 installation guide

smartvue S9Q user guide

smartvue

smartvue S9Q user guide

Quectel SC200K Series instruction manual

Quectel

Quectel SC200K Series instruction manual

LST 55000-847 Specification sheet

LST

LST 55000-847 Specification sheet

DB Audio DS10 manual

DB Audio

DB Audio DS10 manual

Dahua DHI-NVR5432-EI user manual

Dahua

Dahua DHI-NVR5432-EI user manual

Ruijie RG-WS6512-L Hardware  installation and reference guide

Ruijie

Ruijie RG-WS6512-L Hardware installation and reference guide

Extron electronics PoleVault System PVT RGB CV MK installation guide

Extron electronics

Extron electronics PoleVault System PVT RGB CV MK installation guide

ETC Unison Echo DRd installation guide

ETC

ETC Unison Echo DRd installation guide

evertz 5600ACO instruction manual

evertz

evertz 5600ACO instruction manual

Starret DataSure Operator's manual

Starret

Starret DataSure Operator's manual

3Com 3CRWEASYG73 - 11g Wireless LAN Outdoor user guide

3Com

3Com 3CRWEASYG73 - 11g Wireless LAN Outdoor user guide

Delight Power Products Limited WB14 quick start guide

Delight Power Products Limited

Delight Power Products Limited WB14 quick start guide

Axis T8646 installation guide

Axis

Axis T8646 installation guide

Engage Black BlackVault HSM Configuration guide

Engage Black

Engage Black BlackVault HSM Configuration guide

Nortel Passport 8000 Series Installing and maintaining

Nortel

Nortel Passport 8000 Series Installing and maintaining

manuals.online logo
manuals.online logoBrands
  • About & Mission
  • Contact us
  • Privacy Policy
  • Terms and Conditions

Copyright 2025 Manuals.Online. All Rights Reserved.