AT&T 5870 User manual

5.8 GHz Cordless Telephone
5870 with Talking
Caller ID/Call Waiting
Please also read
Part 1 — Important
Product Information
User’s Manual
Part 2
© 2003 Advanced American Telephones. All Rights Reserved.
AT&T and the Globe Symbol are trademarks of AT&T Corp., licensed to Advanced American Telephones.
91-5431-10-00_ATT5870_R0JUN040 2/5/03 4:03 PM Page II

© 2003 Advanced American Telephones.
All Rights Reserved.
AT&T and the Globe Design are
trademarks of AT&T Corp., licensed to
Advanced American Telephones.
Printed in China. Issue 1AT&T 05/03
Visit us at www.telephones.att.com
91-5431-10-00_ATT5870_R0JUN040 2/5/03 4:03 PM Page III

CONTENTS
BEFORE YOU BEGIN ................ 1
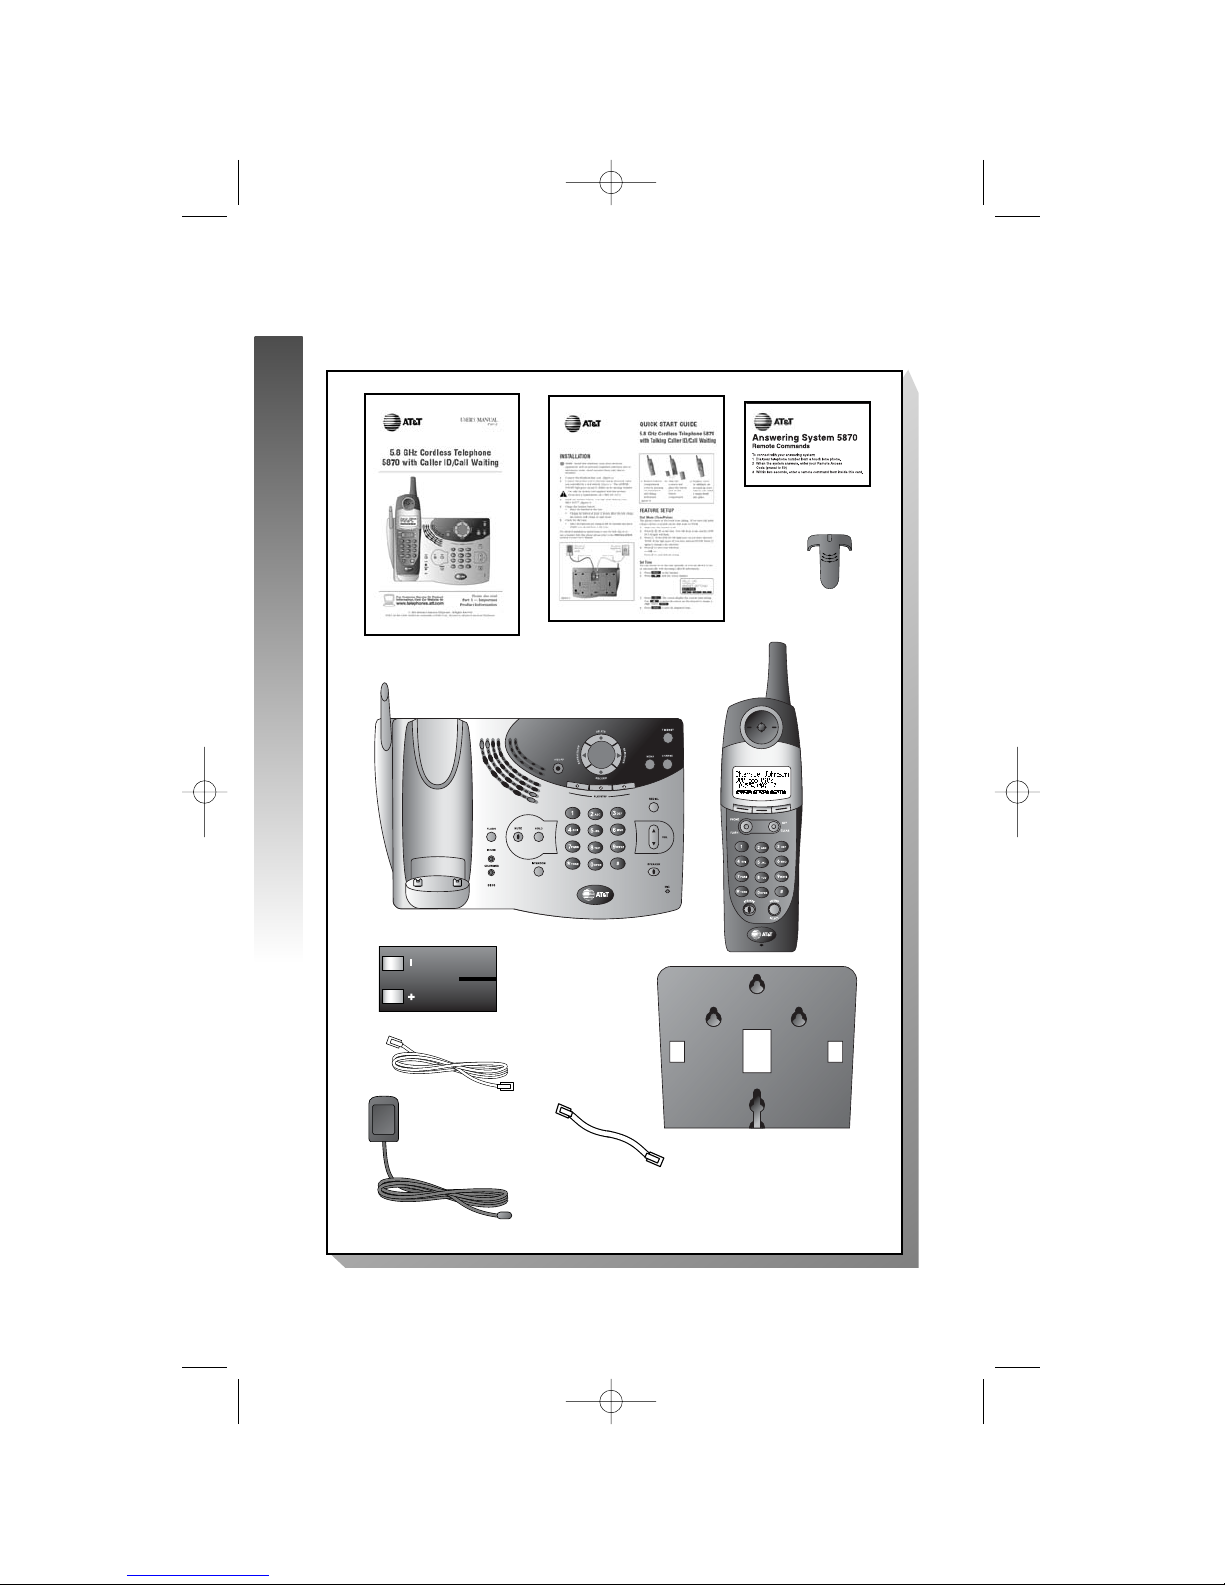
Parts List.................................................... 1
About Caller Identification
(Caller ID) ............................................ 2
About the Calls Log ............................... 2
About Adding Handsets......................... 2
INSTALLATION.........................3
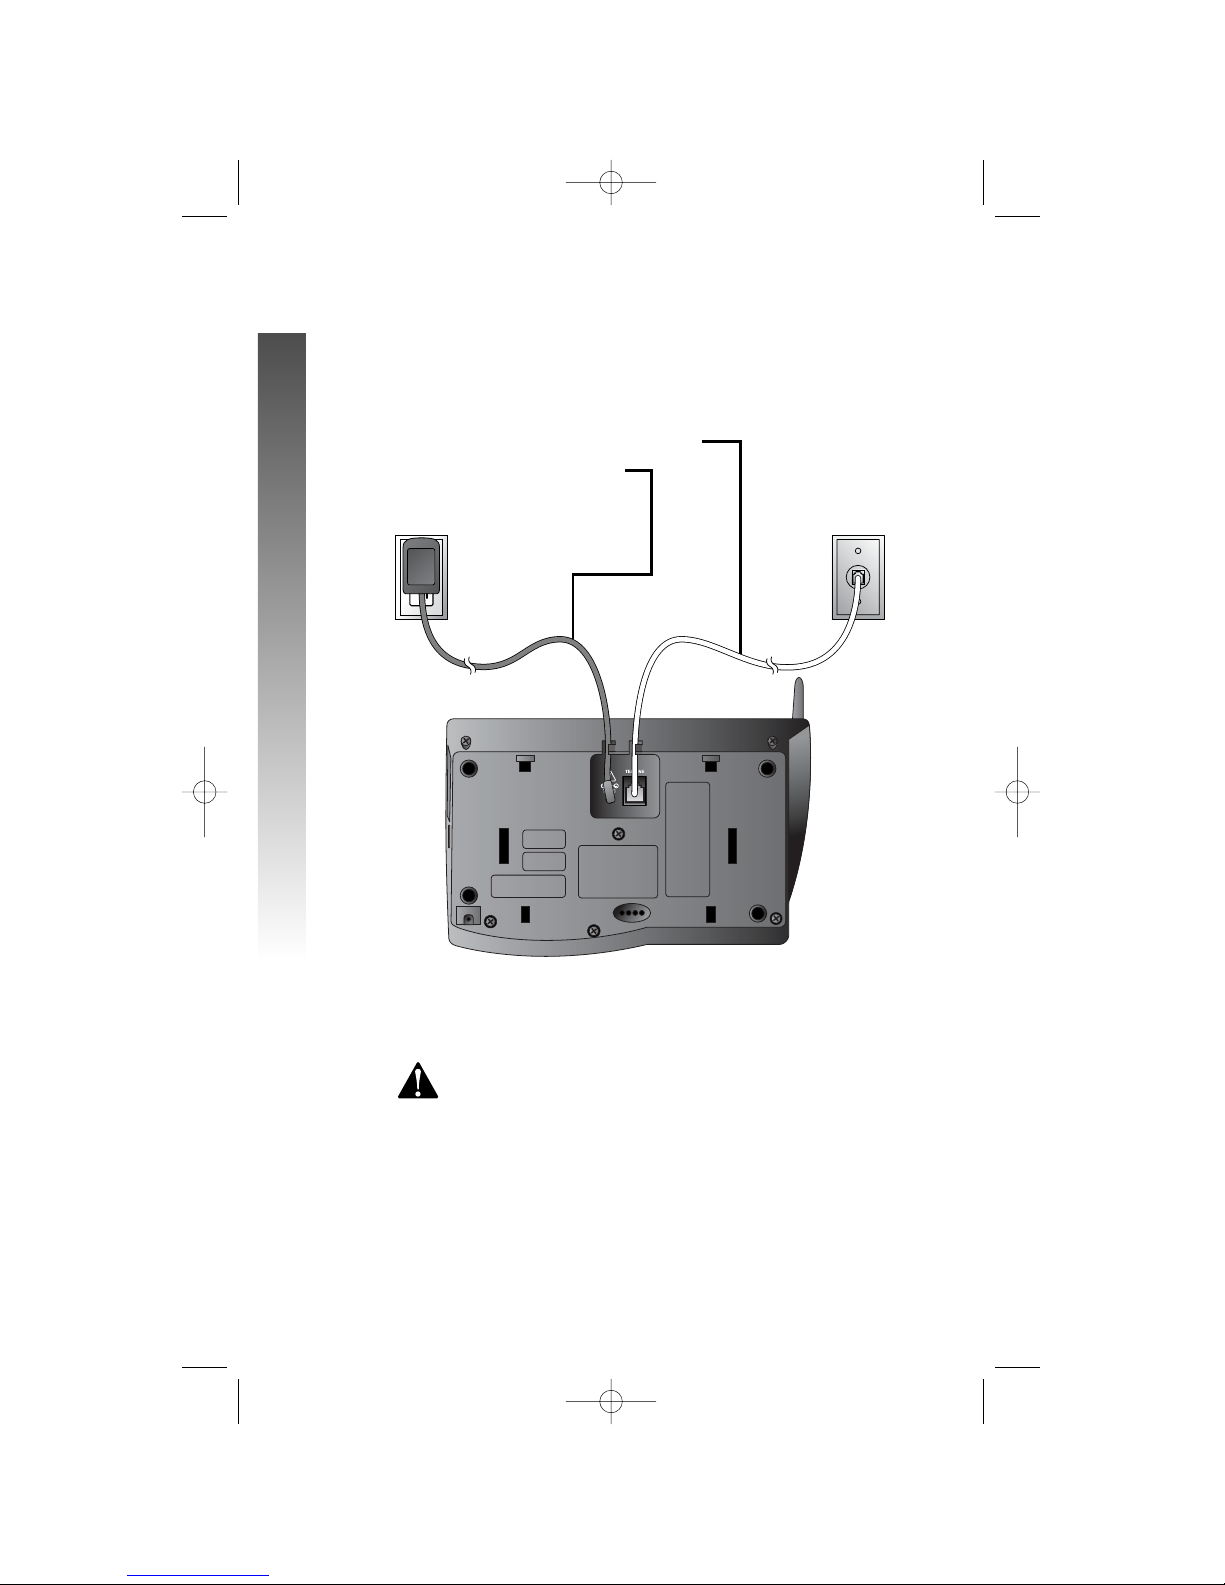
Ta ble/Desktop Installation..................... 3
About Handset Registration...................5
Register an Additional Handset
(Model 5800 Handset).............................5
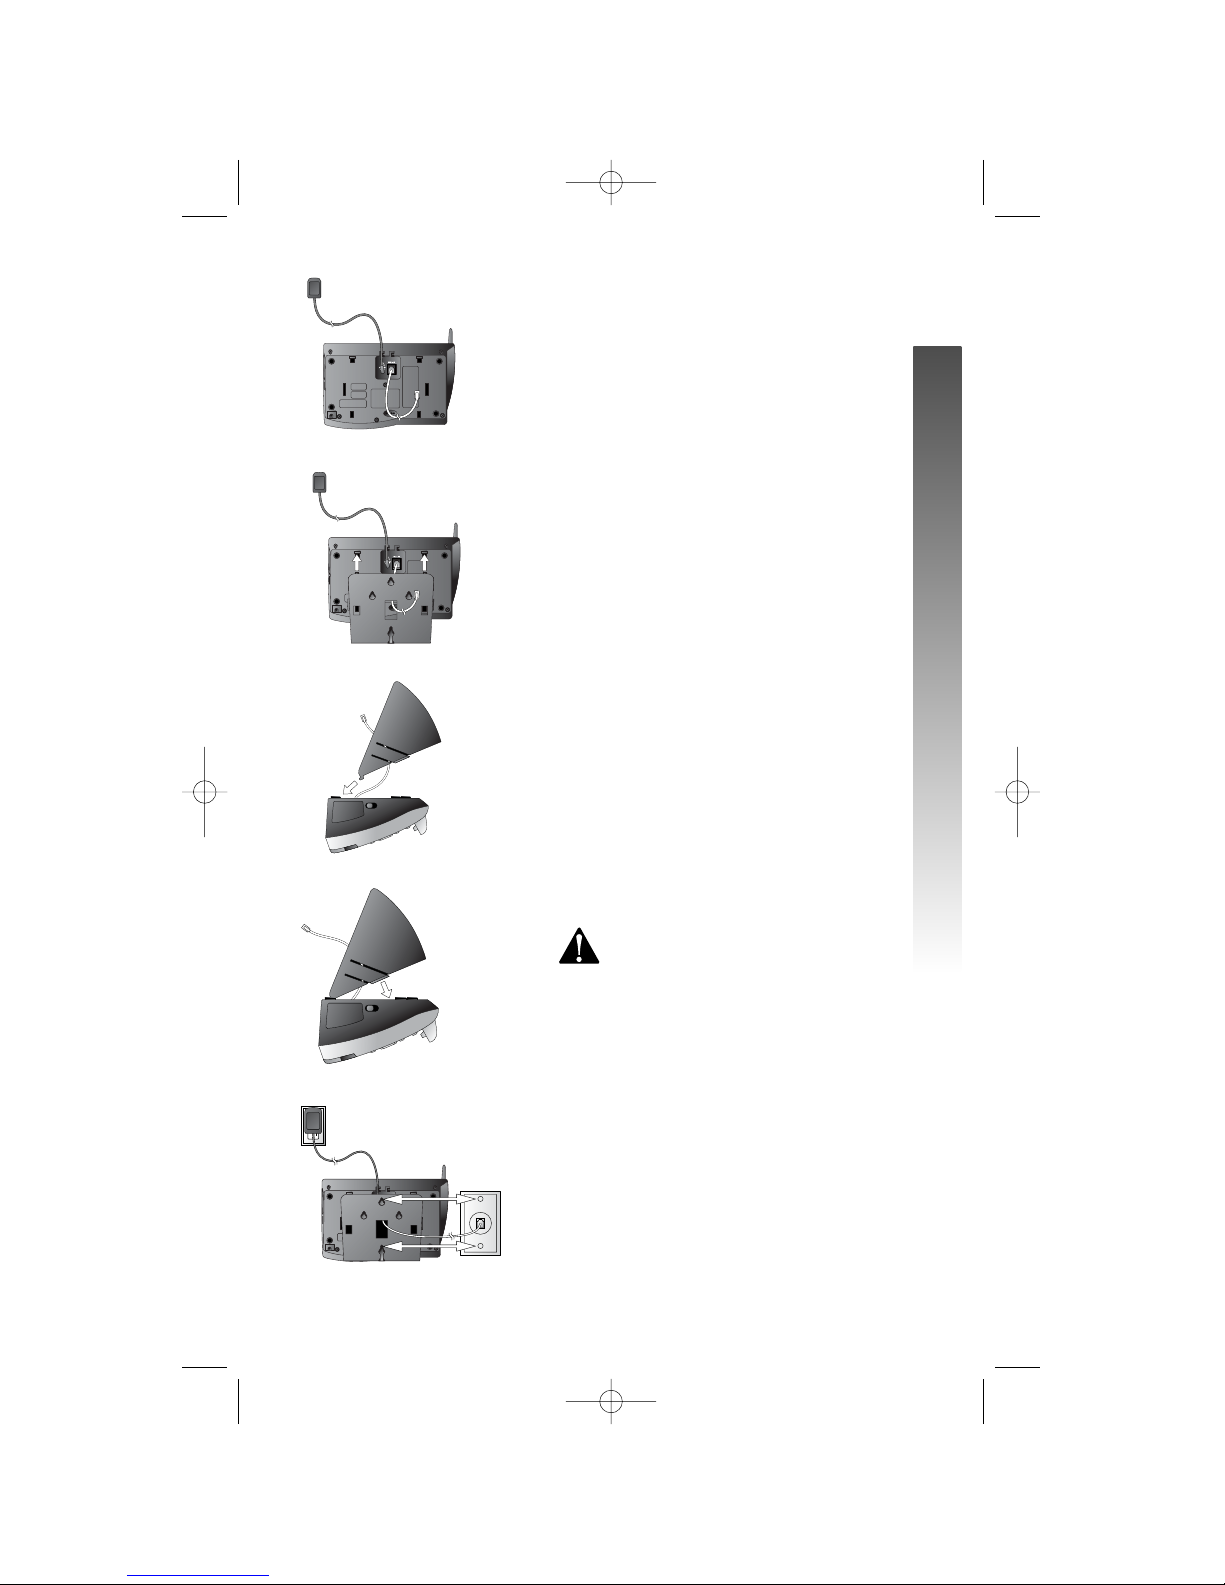
Wall Installation ....................................... 6
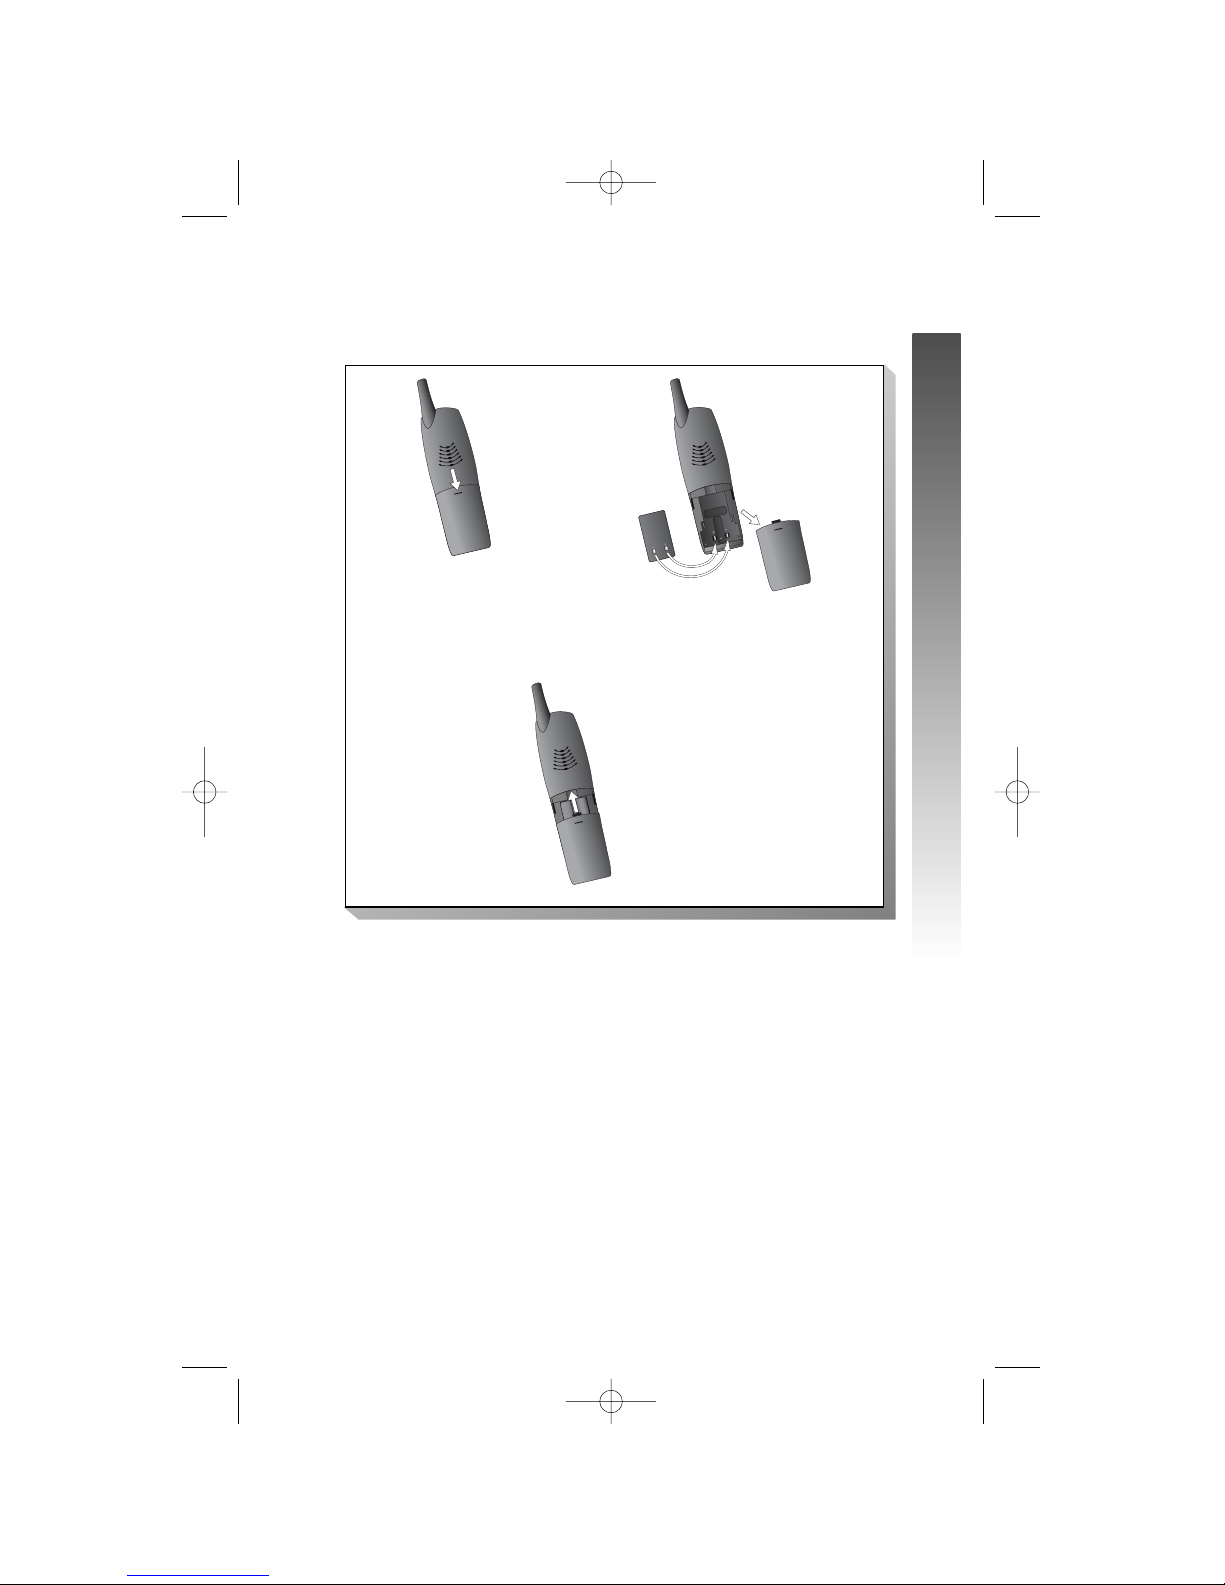
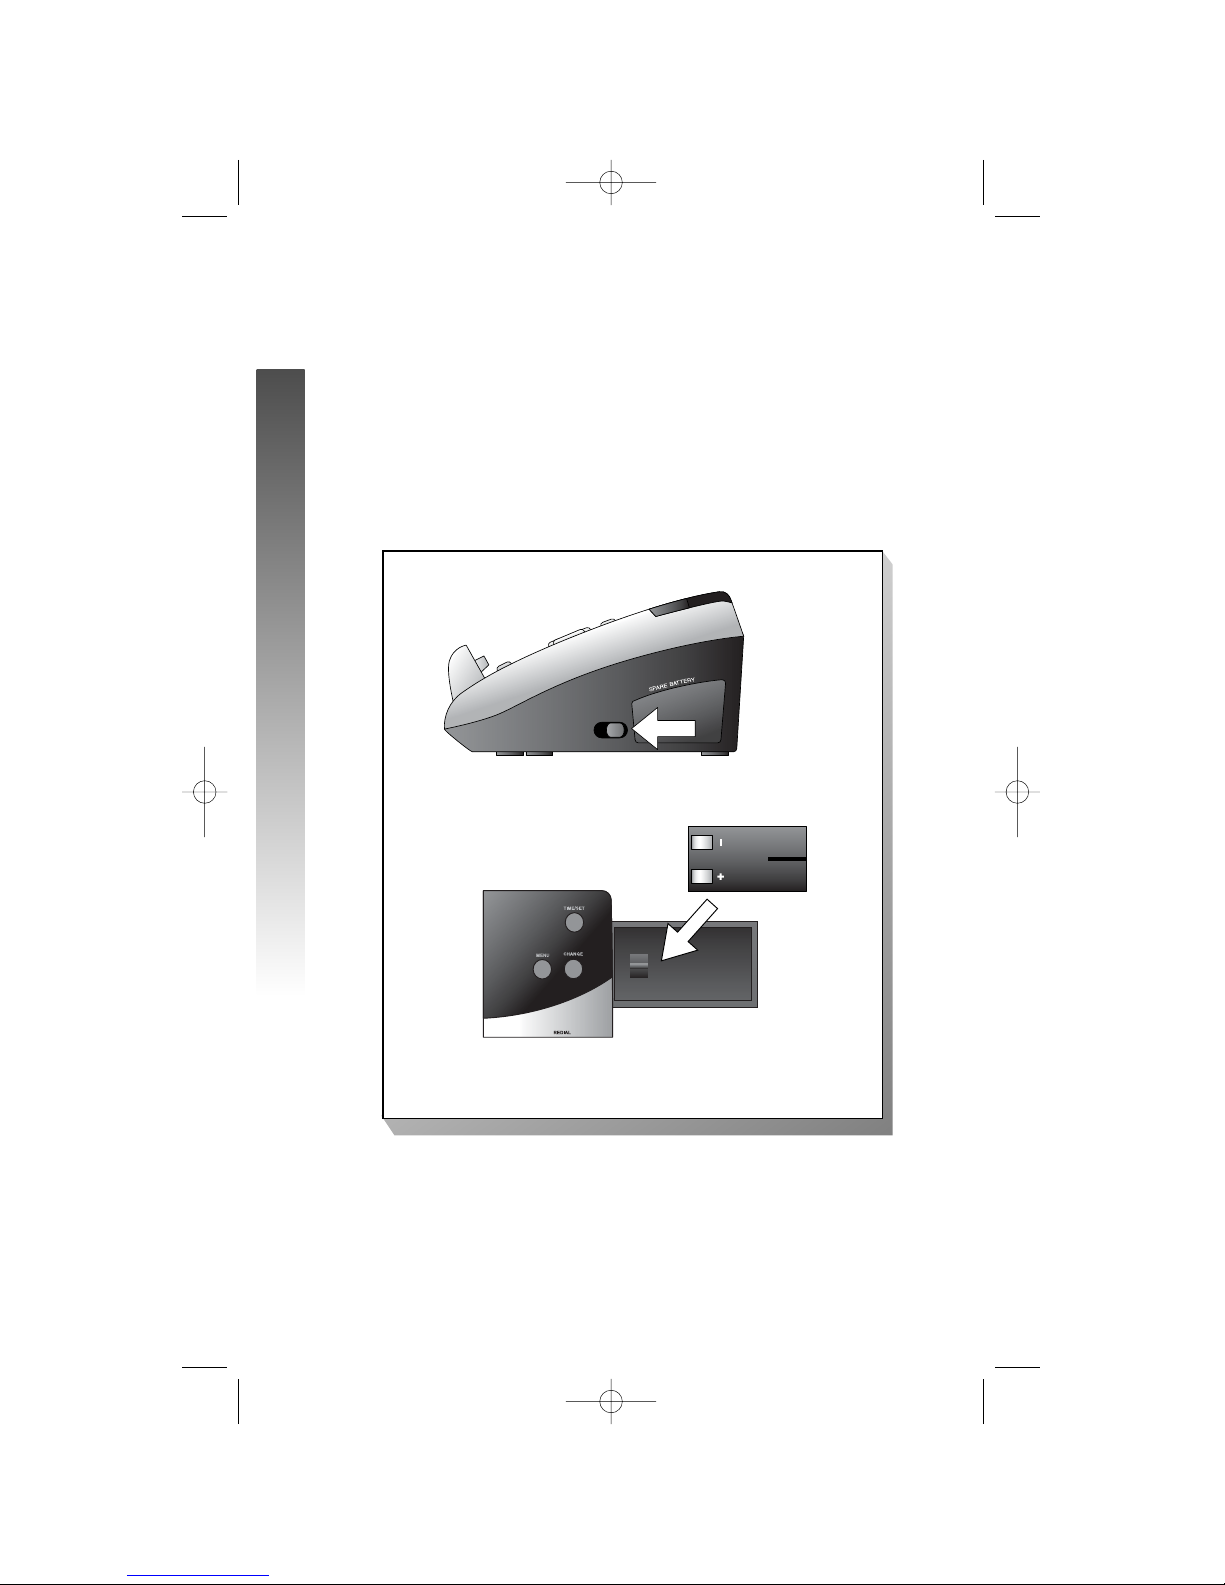
Spare Battery/
Power Failure Backup ........................ 7
Belt Clip..................................................... 8
Headset...................................................... 8
FEATURE SETUP – HANDSET 9
Feature Setup Menu................................ 9
Set Time..................................................... 9
Clock Mode............................................ 10
Sound Select........................................... 11
Ringer Volume ........................................ 12
Ringer Melody........................................ 13
Vibrate Control..................................... 14
Low Batt Tone........................................ 15
Range Tone.............................................. 16
Keypad Tone ........................................... 17
Set Contrast........................................... 18
Language Setting.................................... 19
FEATURE SETUP – BASE..... 20
Ringer Volume ........................................ 20
Ringer Melody........................................ 21
Dial Mode (Tone/Pulse)....................... 22
TELEPHONE OPERATION .. 23
Make a Call ............................................ 23
Answer a Call ........................................ 23
Volume..................................................... 24
Handset Speakerphone........................ 25
Redial ....................................................... 26
Flash/Call Waiting .................................. 27
Mute......................................................... 28
Hold ......................................................... 29
Temporary Tone Dialing ...................... 30
Display Screen Messages..................... 31
Handset Icons ........................................ 32
Base Lights.............................................. 33
Tones and What They Mean ............... 33
INTERCOM OPERATION..... 34
Intercom Calls ....................................... 34
Answering Intercom............................. 35
End Intercom ......................................... 35
To Answer an Incoming Call
while intercomming..........................35
Blind Call Transfer................................. 36
Announced Call Transfer..................... 36
Conference Calling ............................... 37
PHONE BOOK ....................... 38
Store a Number and Name in
Phone Book ....................................... 38
Keypad Characters.................................39
Dial a Number in Phone Book.......... 40
Edit a Number/Name in
Phone Book ....................................... 41
Delete a Number/Name in
Phone Book ....................................... 42
CALLER ID OPERATION...... 43
Setup Talking Caller ID ........................ 44
Record a New Talking Caller ID
Announcement.................................. 45
Edit Talking Caller ID
Announcement.................................. 46
Review, Play, Erase Talking
Caller ID Announcement................ 47
Review Calls Log................................... 48
Store Record in Phone book ............. 48
Display Dial..............................................49
Answering system operation
AT THE BASE ............................. 50
Audible Indicators................................. 50
Turn Answering system On/Off......... 50
Set the Clock ......................................... 50
About Mailboxes ................................... 51
About Announcements........................ 51
Record Your Announcement................52
Answering System Feature Setup.......53
Feature Summary ...................................54
Listen to, Save&Delete Messages........55
Adjust Playback Volume.........................56
Call Screening/Intercept........................56
Record a Memo......................................57
Message Window Display .....................58
Answering system operation
AT TOUCH TONE PHONE ............ 59
Connect with the
Answering System .............................. 59
Voice Menu............................................. 59
Remote Access Commands................ 60
BATTERIES ............................. 61
Battery Life............................................. 61
Battery Indicator................................... 61
Charge the Handset
Battery Pack ...................................... 61
Spare Battery/
Power Failure Backup ...................... 62
Replace the Handset Battery Pack ... 63
IN CASE OF DIFFICULTY .... 64
Phone....................................................... 65
Caller ID ................................................. 67
Answering System................................. 68
DEFAULT SETTINGS ............ 70
TECHNICAL SPECIFICATIONS 71
INDEX...................................... 72
CONTENTS
CONTENTS
91-5431-10-00_ATT5870_R0JUN040 2/5/03 4:03 PM Page V

BEFORE YOU BEGIN
BEFORE YOU BEGIN
Parts List
Your box should include:
1
BEFORE YOU BEGIN
NiMH
Battery
Pack
Power Cord
Long
Telephone
Line Cord
Handset
Base Unit
Wall Mounting Bracket
This User’s Manual Quick Start Guide
Belt Clip
Wallet Card
Short
Telephone
Line Cord
91-5431-10-00_ATT5870_R0JUN040 2/5/03 4:03 PM Page VI

About Caller Identification (Caller ID)
This product has a Caller ID with Call Waiting feature that works with
service from your local phone service provider.
Caller ID with Call Waiting lets you see who’s calling before you answer
the phone, even when you’re on another call.
You may need to change your phone service to use this feature.
Contact your phone service provider if:
•You have both Caller ID and Call Waiting, but as separate services
(you may need combined service)
•You have only Caller ID service, or only Call Waiting service
•You don’t subscribe to any Caller ID or Call Waiting services.
You can use this product with regular Caller ID service, and you can
use this product’s other features without subscribing to either Caller ID or
combined Caller ID with Call Waiting service.
There are fees for Caller ID services, and they may not be available in
all areas.
This product can provide information only if both you and the caller
are in areas offering Caller ID service, and if both telephone companies use
compatible equipment.
About the Calls Log
This phone assigns each incoming call a number from 1 to 50 at the
handset. The most recent call will have the lowest number. When the
memory is full, the oldest call information is deleted to make room for new
incoming call information. See CALLER ID OPERATION, beginning on page
43, for more details.
If you answer a call before call information appears on the screen, it will not
appear in the calls log.
About Adding Handsets
This product is compatible with the AT&T 5800 Expansion Handset. You
may add up to five additional 5800 units (purchased separately)
to this phone. Follow the instructions provided with the additional
handset(s) for installation and registration.
NOTE: Although you can register up to six handsets, only four can be
used at one time.
2
BEFORE YOU BEGIN
BEFORE YOU BEGIN
91-5431-10-00_ATT5870_R0JUN040 2/5/03 4:03 PM Page 1

INSTALLATION
INSTALLATION
Ta b le/Desktop Installation
NOTE: Install this telephone away from electronic equipment, such as
personal computers, television sets or microwave ovens. Avoid
excessive heat, cold, dust or moisture.
1Connect the telephone line cord.
2Connect the power cord.
The ON/OFF light goes on, and CL
flashes in the Message Window.
Use only the power cord supplied with this product.
If you need a replacement, call 1-800-222–3111.
3
INSTALLATION
Standard
electrical
outlet
Modular
telephone
jack
91-5431-10-00_ATT5870_R0JUN040 2/5/03 4:03 PM Page 2

INSTALLATION
INSTALLATION
3Install the handset battery.
Use only AT&T Battery 2401, SKU# 91077.
4Charge the handset battery.
•Place the handset in the base.
•Charge the battery at least 12 hours. After the first charge,
the battery will charge in eight hours.
5Check for dial tone.
•After the batteries are charged, lift the handset and press
P;You should hear a dial tone.
4
b) Align the contacts and place
the battery pack in the
battery compartment.
a) Remove battery
compartment cover by
pressing on the raised spot
and sliding downward.
c) Replace cover by sliding
it on its track up over
battery case until it
snaps firmly into place.
91-5431-10-00_ATT5870_R0JUN040 2/5/03 4:03 PM Page 3

INSTALLATION
INSTALLATION
5
About Handset Registration
1 The cordless handset that came with your system is automatically
registered as Handset 1.There is no need to re-register.
2 You may register up to a total of six Expansion Handsets to this
telepnone system.(Model 5800 handset sold separately).
3 Additional handsets will be assigned Handset 2, Handset 3, Handset 4,
Handset 5, and Handset 6.
4 When you install the handset battery pack, the handset will display
SEARCHING FOR BASE (if it’s registered) or ENTER BASE ID (If it has
not been registered).
Register an Additional Handset(Model 5800
Handset)
1 Make sure the handset battery pack has been charged for at least 12
hours and that the power cord is plugged into the base unit.
2 At the cordless handset, press the softkey under .
3 Enter the 15-digit Base Unit ID Code located on the underside of your
Model 5870 base.
4 Press the softkey under . The screen displays PLEASE WAIT!!
5 After about 45 seconds, the screen displays FOUND BASE. If the handset
displays BASE BUSY TRY LATER, the base is in use.Wait until the base is
in idle, then try the registration process again by repeating the step2~4
above.
OK
NEW
91-5431-10-00_ATT5870_R0JUN040 2/5/03 4:03 PM Page 4

Wall Installation
1Connect the power cord and
telephone line cord to the underside
of the base, as shown (figure a).
2Position the mounting bracket as
shown (figure b).
3Feed the short telephone line cord
through the hole in the center of the
mounting bracket (figure b), align the
bracket with the base, and slide into
the hole on the base as shown (figure
c).
4Lock the mounting bracket in place
(figure d).
5Plug the short telephone line cord
into a modular wall jack, and mount
the base on the wall (figure e).
a) Align holes on base with mounting
studs on wall jack.
b) Place power cord as shown.
c) Pull base down on mounting studs
until it locks into place.
6Plug the power cord into an electrical
outlet not controlled by a wall switch
(figure e).
The ON/OFF light goes on, and CL flashes
in the Message Window.
Use only the power cord supplied
with this product. If you need a
replacement, call 1-800-222–3111.
7Follow Steps 3–5 in “Table/Desktop
Installation.”
6
figure a
figure b
figure c
figure d
figure e
INSTALLATION
INSTALLATION
91-5431-10-00_ATT5870_R0JUN040 2/5/03 4:03 PM Page 5

INSTALLATION
INSTALLATION
Spare Battery/Power Failure Backup
You can buy a spare handset battery (AT&T Battery 2401, SKU# 91077, sold
separately) and keep it charged in the base at all times.
In the event of a power failure, a fully charged battery in the spare battery
compartment will allow you to make and receive calls from the cordless
handset only for up to 21
/2hours.
The spare battery will fully charge in 24 hours.
7
91-5431-10-00_ATT5870_R0JUN040 2/5/03 4:03 PM Page 6

8
Belt Clip
You may choose to use the optional belt clip with your handset.
Headset
You can use this telephone
hands-free when you install
any industry standard 2.5 mm
headset (purchased
separately). For best results
use an AT&T 2.5 mm headset.
Plug the headset into the jack
located on the left side of the
handset (under the small
rubber flap). Do not force the
connection, but make sure the
plug fits securely.
b) Press tabs
on belt clip
into slots
on back of
handset to
reattach.
a) Slide
down
into
grooves
to attach.
c) To remove,
lift one side
with your
thumbnail
and push
back.
INSTALLATION
INSTALLATION
91-5431-10-00_ATT5870_R0JUN040 2/5/03 4:03 PM Page 7

FEATURE SETUP – HANDSET
9
Feature Setup Menu
Press the softkey under to enter the Feature
Setup menu. Use or to choose
features, then select to save your choice.
NOTE: If you wait more than 20 seconds
without pressing a key, the handset returns to
the idle screen.
NOTE: If you receive an incoming call while in
feature setup, the phone automatically exits
the menu to let you take the call.
Set Time
You can choose to set the time manually, or you
can allow it to be set automatically with incoming Caller
ID information.
1Press .
2Press until the screen displays
3Press . The screen displays the
current time setting. Use to move
the cursor, and use the keypad to change a digit.
Press to select AM or PM.
4Press to save the displayed time.
SAVE
AM/PM
OK
INTERCOM
VOICE ANNOUNCE
HANDSET SETTINGS
MENU
OK
MENU
FEATURE SETUP – HANDSET
L
LL
LLL
LL
LL
L
LL
LL
SET TIME
▲OK ▼
91-5431-10-00_ATT5870_R0JUN040 2/5/03 4:03 PM Page 8

10
Clock Mode
You can choose to display the time when the phone
is idle, or you can turn this feature off. The default
setting is ON.
1Press .
2Press until the screen highlights
3Press . The screen displays
4Press or .
5Press to save the displayed setting.
OK
ONOFF
CLOCK ENABLE
ON
OK
VOICE ANNOUNCE
HANDSET SETTINGS
SET TIME
CLOCK MODE
MENU
FEATURE SETUP – HANDSET
CLOCK MODE
▲OK ▼
OFF OK ON
L
LL
LLL
LL
LL
L
LL
LL
FEATURE SETUP – HANDSET
91-5431-10-00_ATT5870_R0JUN040 2/5/03 4:03 PM Page 9

FEATURE SETUP – HANDSET
11
Sound Select
This telephone uses the latest acoustic receiver design,
providing you with four different sound quality settings.
During a call, you can adjust the quality of the sound.
Pressing repeatedly will cycle you through
four different responses.
NOTE: The mid-boost setting is hearing-aid
compatible.
BASS – Low frequency sounds enhanced.
MID – Mid-range sounds enhanced.
TREBLE – High frequency sounds enhanced.
NATURAL – No frequency enhancement.
NOTE: This feature is available only on the handset
earpiece, not on the speakerphone or optional
headset.
S
S
S
91-5431-10-00_ATT5870_R0JUN040 2/5/03 4:03 PM Page 10

Ringer Volume
Adjust the volume of the handset ringer. Setting the
volume so that no bars show on the graph turns the ringer
off.
1Press , then until the screen
highlights HANDSET SETTINGS.
2Press .
3Press when RINGER VOLUME is
highlighted. The screen displays
4Press or to hear samples of
ring volumes.
5Press to save the displayed setting.
NOTE: Ringer Volume and Vibrate settings are
independent. Adjusting Ringer Volume does not
affect Vibrate.
OK
RINGER
VOLUME
OK
OK
MENU
12
OK
FEATURE SETUP – HANDSET
L
LL
LLL
LL
LL
L
LL
LL
FEATURE SETUP – HANDSET
91-5431-10-00_ATT5870_R0JUN040 2/5/03 4:03 PM Page 11

FEATURE SETUP – HANDSET
13
Ringer Melody
The Ringer Melody sets which ringer you hear when you
have an outside call. The Ringer Melody default setting is
#01; there are eight Ringer Melody selections.
1Press , then until the screen
highlights handset settings.
2Press , then until the screen
highlights ringer melody.
3Press . The screen displays
4Press or to display desired
setting. A sample of the displayed setting is played
briefly.
If the ringer is off, no melodies will play when
select the melodies in step 4.
Adjust the volume of the handset ringer. Setting
the volume so that no bars show on the graph
turns the ringer off.
5Press to save the displayed setting. You
will hear a confirmation tone.
OK
RINGER #01
OK
OK
MENU
OK
L
LL
LLL
LL
LL
L
LL
LL
91-5431-10-00_ATT5870_R0JUN040 2/5/03 4:03 PM Page 12

14
Vibrate Control
When this feature is on, the handset vibrates when you
have an incoming call. The default setting is OFF.
1Press , then until the screen
highlights HANDSET SETTINGS.
2Press , then until the screen
highlights VIBRATE CONTROL.
3Press . The screen displays
4Press or .
5Press to save the displayed setting.
NOTE: Vibrate and Ringer Volume settings are
independent. Adjusting Vibrate does not affect
Ringer Volume.
OK
ONOFF
VIBRATE
OFF
OK
OK
MENU
L
LL
LLL
LL
LL
L
LL
LL
OFF OK ON
FEATURE SETUP – HANDSET
91-5431-10-00_ATT5870_R0JUN040 2/5/03 4:03 PM Page 13

FEATURE SETUP – HANDSET
15
Low Batt Tone
You can set the handset to sound a tone when battery
power is low, or you can turn the tone off. Default setting
is ON.
1Press , then until the screen
highlights handset settings.
2Press , then until the screen
highlights low batt tone.
3Press .The screen displays
4Press or .
5Press to save the displayed setting.
OK
ONOFF
LOW BATTERY TONE
ON
OK
OK
MENU
L
LL
LLL
LL
LL
L
LL
LL
OFF OK ON
91-5431-10-00_ATT5870_R0JUN040 2/5/03 4:03 PM Page 14

16
Range Tone
You can set the handset to sound a tone when you are
approaching the range limit, or you can turn this tone off.
The default setting is ON.
1Press , then until the screen
highlights HANDSET SETTINGS.
2Press , then until the screen
highlights RANGE TONE.
3Press .The screen displays
4Press or .
5Press to save the displayed setting.
OK
ONOFF
RANGE TONE
ON
OK
OK
MENU
OFF OK ON
L
LL
LLL
LL
LL
L
LL
LL
FEATURE SETUP – HANDSET
91-5431-10-00_ATT5870_R0JUN040 2/5/03 4:03 PM Page 15

FEATURE SETUP – HANDSET
17
Keypad Tone
When this feature is on, each key press makes a sound.
The default setting is ON.
1Press , then until the screen
highlights handset settings.
2Press , then until the screen
highlights keypad tone.
3Press .The screen displays
4Press or .
5Press to save the displayed setting.
OK
ONOFF
KEYPAD TONE
ON
OK
OK
MENU
OFF OK ON
L
LL
LLL
LL
LL
L
LL
LL
91-5431-10-00_ATT5870_R0JUN040 2/5/03 4:03 PM Page 16
Other manuals for 5870
1
Table of contents
Other AT&T Telephone manuals

AT&T
AT&T Trimline TR1909 User manual

AT&T
AT&T 2833 Series Guide

AT&T
AT&T 950 User manual

AT&T
AT&T 7401 Plus User manual

AT&T
AT&T BELL 540 Series Setup guide

AT&T
AT&T Merlin Legend MLX-20L User manual

AT&T
AT&T Plus User manual

AT&T
AT&T SB67108 - AT&T User manual

AT&T
AT&T CareLine SN1197 User manual

AT&T
AT&T SPIRIT 1224 Controller User manual