Atel AXIS V810A User manual

ATEL V810 Series
V810A Data User Manual
V6.1, January 3, 2023
1
V810A1 by ATEL User Guide
4G LTE Cat-4 Fixed Wireless Access Router
Model
LTE Bands
V810A
B2/4/5/12/13/14/66/71
User Guide in Spanish available on the ATEL product page at www.ATEL-USA.com.
Guía del usario en español disponible en la página del producto ATEL en www.ATEL-USA.com.
Models Covered:

ATEL V810 Series
V810A Data User Manual
V6.1, January 3, 2023
2
Contents
1.
Overview
...............................................................................................................................................3
LTE Netwo rk Bands per Mode l ......................................................................................................3
System Requirements.......................................................................................................................3
Components and Indicators............................................................................................................3
Power Management..........................................................................................................................4
2.
Getting Started
.....................................................................................................................................5
Install SIM Card ..................................................................................................................................5
Install the NiMH Battery Pack.........................................................................................................5
Backup Battery Tips..........................................................................................................................6
Installing the Optional Antennas (Sold Separately) ..................................................................6
Turning your V810A On/Off.............................................................................................................7
Connect your Computer to the V810A.........................................................................................8
Connecting to your V810A Hotspot Wi-Fi ...................................................................................8
3.
Accessing Your V810A Online Device Management Portal
.........................................................9
Online Portal Home Page.............................................................................................................. 10
Connected Devices.......................................................................................................................... 11
Data Usage......................................................................................................................................... 11
Messages........................................................................................................................................... 12
Settings............................................................................................................................................... 12
Wi-Fi Settings ........................................................................................................................... 13
LAN Settings............................................................................................................................. 14
Device Settings........................................................................................................................ 15
Advanced........................................................................................................................................... 16
Firewall Settings ...................................................................................................................... 16
About .................................................................................................................................................22
Logs ........................................................................................................................................... 22
Backup and Restore.............................................................................................................. 23
Remote Update ...................................................................................................................... 24
4.
Troubleshooting
................................................................................................................................ 25
Common Problems, FAQ’s and Solutions ................................................................................25
5.
Regulatory Statements
....................................................................................................................29
6. Safety Hazards ................................................................................................................................29
Limited Warranty:...................................................................................................................................... 31
ATEL V810 Series
V810A Data User Manual
V6.1, January 3, 2023
3
1.
Overview
LTE Network Bands per Model
Model
LTE Bands
V810A
B2/4/5/12/13/14/66/71
Note: Your device model number can be found on the device label.
System Requirements
The V810A provides business and data service. Connect to the internet using the V810A
Hotspot Wi-Fi function or Ethernet port connection. You must subscribe to an eligible
service plan with a wireless operator to use the V810A data functions.
Components and Indicators
!

ATEL V810 Series
V810A Data User Manual
V6.1, January 3, 2023
4
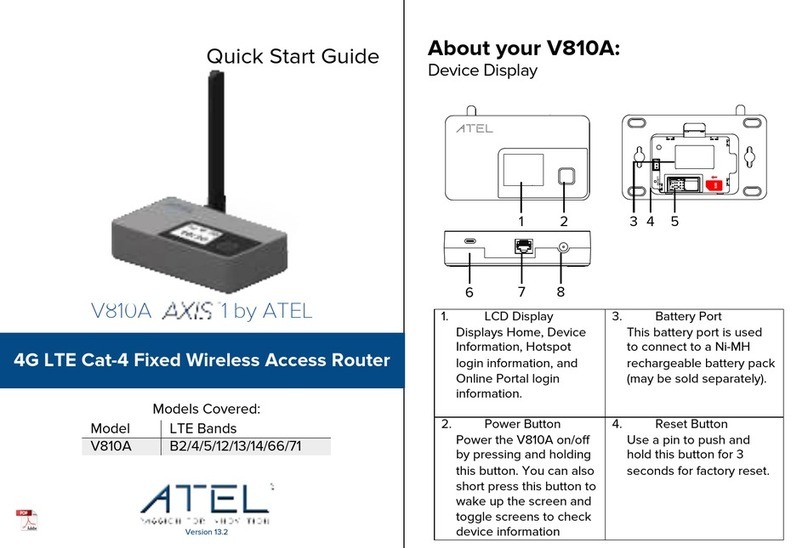
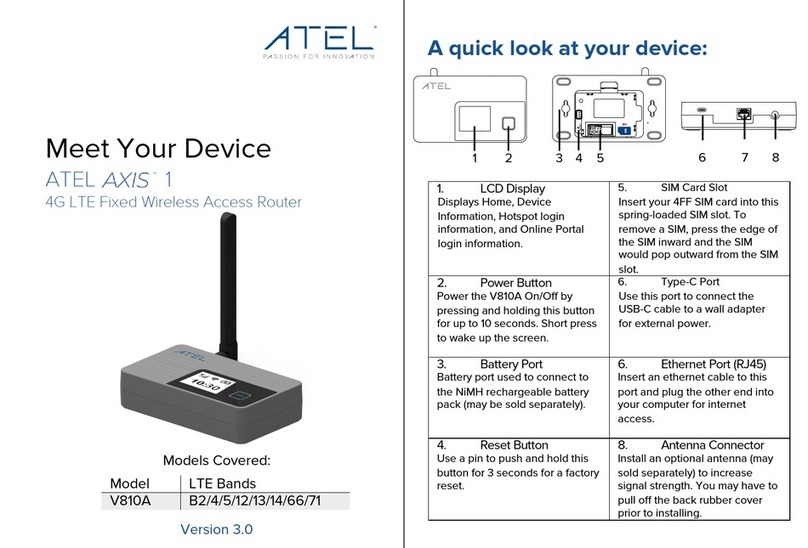
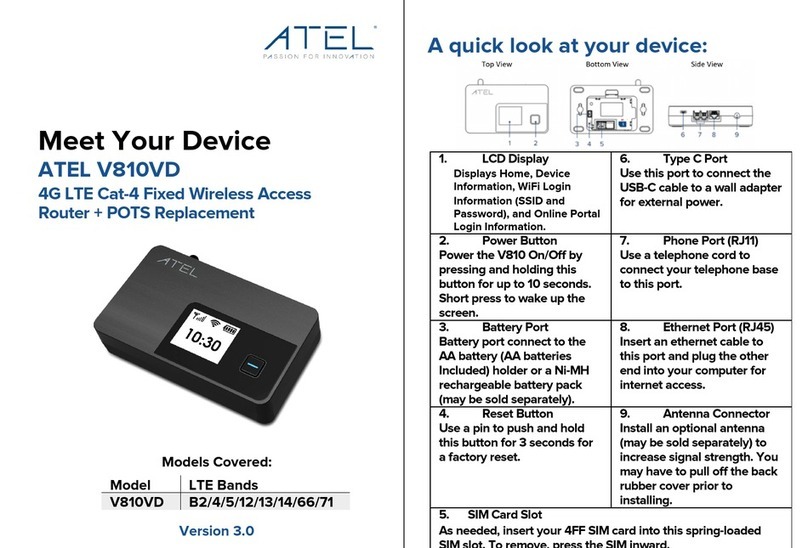
1. LCD Display
Displays different menus of V810A information such as Home, IMEI, Hotspot login info, and
Online Portal login info.
2. Power Button
Power the V810A on/off by pressing and holding this button (note that a long press is
required to boot up the device). You can also short press this button to wake up the screen
and check device information.
3. Battery Port
This battery port is used to connect to the Ni-MH rechargeable battery pack (battery pack
may be sold separately).
4. Reset Button
Use a pin to press and hold this button for factory reset.
5. SIM Card Slot
Insert your 4FF SIM card into this spring-loaded sim card slot. To rem o ve a s im, p ress the
edge of the sim inward and the sim would pop outward from the sim slot.
6. Type C Port
Insert your USB cable to this USB-C port and plug the other end into a wall adapter for
external power.
7. Ethernet Port (RJ45)
Insert an ethernet cable to this Port and plug the other end to your computer for internet
access.
8. Antenna Connector
Install an optional antenna (sold separately) to increase signal strength.
Power Management
Yo u r V 8 1 0 A comes with an AC wall adapter (a Ni-MH rechargeable battery pack is optional
and can be purchased separately through ATEL USA, if it is not included with your device).
For more information, visit www.ATEL-USA.com.
During a power outage or if the wall charger is unplugged, the V810A continues to run off
of the batteries to support Ethernet functions. Note that the Hotspot Wi-Fi function will only
be available if using the wall adapter or Ni-MH rechargeable battery pack.

ATEL V810 Series
V810A Data User Manual
V6.1, January 3, 2023
5
Refer to the table below for the V810A functions supported in different power modes.
2.
Getting Started
Install SIM Card
1. Remove the V810A back cover.
2. Install the SIM card into the spring-loaded SIM slot as the image shows. To remove
a SIM, press the edge of the SIM inward and the SIM will pop outward from the
SIM slot.
Install the NiMH Battery Pack
1. Remove the battery cover.
2. Properly align and install the NiMH battery (with three pin sockets).
Make sure to align the pin sockets correctly.
3. Put the NiMH battery in place as shown below.
4. Replace the back cover of the V810A and make sure it’s aligned with
the bottom of the device.
NOTE: The NiMH battery may be sold separately.

ATEL V810 Series
V810A Data User Manual
V6.1, January 3, 2023
6
Backup Battery Tips
Battery life depends on the network, signal strength, temperature, features, and accessories
you use. Generally, usage time on the NiMH battery pack is approximately (up to) two hours
and 40 minutes, and standby time is approximately 32 hours.
In battery-only mode, you can check the battery level by pressing the Power Key. The battery
level will be in the upper right corner of the screen.
Do not use sharp objects or excessive force or remove the battery, as this may damage the
V810A and the batteries and will void any warranties.
Never expose batteries to temperatures below -20°C (4°F) or above 60°C (140°F).
Installing the Optional Antennas (Sold Separately)
To in c re as e s ig n al s t re ng t h, y o u ca n i ns ta l l an o p ti ona l an t en n a.
1. Align the antenna with the antenna port and screw securely into place in a
clockwise direction.
2. Restart the V810A after the antenna is installed or removed.
Using optional accessories (antenna and battery pack) by ATEL is recommended,
more information available at ATEL website, https://www.atel-usa.com/.

ATEL V810 Series
V810A Data User Manual
V6.1, January 3, 2023
7
Turning your V810A On/Off
1. Connect your V810A to a wall adapter with a USB-C cable and plug the wall adapter to
the wall outlet.
2. To turn your V810A on, press and hold the Power Button.
3. To turn it off, press and hold the Power Button until you see the screen turn off.
WARNING! Please only use an approved USB adapter for the V810A. The use of other
incompatible adapters may cause damage to your device and void the warranty.
V810A LCD Display
On your V810A LCD Display, you may see one or more of the following icons:

ATEL V810 Series
V810A Data User Manual
V6.1, January 3, 2023
8
Connect your Computer to the V810A
The V810A provides 1 Ethernet port (RJ45). For internet access, plug an ethernet cable to
the Ethernet port of your V810A and connect it to the Ethernet port of your computer. Yo u
can connect your PC with the V810A using WIFI for wireless connection.
Connecting to your V810A Hotspot Wi-Fi
Yo u r V 8 1 0 A Hotspot Wi-Fi function supports up to 15 Wi-Fi connected devices. To con ne c t
to the Hotspot Wi-Fi,
1. Locate your Wi-Fi Network Name (SSID) / Password from your V810A LCD Display
or from the device label under the battery holder.
2. Open the Wi-Fi settings of your Wi-Fi capable devices.
3. Select the SSID of your V810A from the available Wi-Fi network list.
4. When prompted, enter the password of your V810A.
5. Once the connection is established, you are connected to the Internet.

ATEL V810 Series
V810A Data User Manual
V6.1, January 3, 2023
9
3.
Accessing Your V810A Online Device
Management Portal
The Online Device Management Portal is a web-based interface that interacts directly with
your V810A. Yo u can login to the Portal to view device status, change device settings, or
perform a manual software upgrade.
To ac c es s th e O nl i ne Po r t a l:
1. First connect your computer to the V810A Hotspot Wi-Fi and then enter
http://192.168.0.1 in the browser URL address bar. Note that you can also
connect your V810A to a computer with a USB-C or ethernet (RJ45) cable to
access the Online Portal.
2. The Online Portal login username is “admin”. The unique password can be
found in the LCD Display menu or the device label (under the battery holder).
This images below show the device label, LCD screen display, and Online Portal access for
your V810A. Pictures are for illustration purposes. Information varies based on your model.

ATEL V810 Series
V810A Data User Manual
V6.1, January 3, 2023
10
Online Portal Home Page
After successful login, you will see the Home Page displaying information about your V810A,
e.g. device IMEI and network status, along with a list of menu options on the left column.
• HOME
• CONNECTED DEVICES
• DATA USAGE
• MESSAGES
• SETTINGS
• ADVANCED
• ABOUT
Changing your Online Portal Password:
Yo u c a n c r e a t e y o u r o w n O n l i n e P o r t a l p a s s w o r d i n t h e Settings page. Once created, you
will be required to use the new password to sign in.
To ch a ng e yo u r Online Portal password:
1. Connect your device using the instructions for logging into the Online Portal, in the
beginning of this Section 4.
2. Open a web browser and enter http://192.168.0.1 into the URL address bar.
3. Go to Settings -> Device Settings -> Admin Password, input your current admin
password and setup your new password, then save the changes.

ATEL V810 Series
V810A Data User Manual
V6.1, January 3, 2023
11
Connected Devices
On this page, you can see Connected Devices, Blocked Devices and Change Max Wi-Fi
Connections.
• Connected Devices: This field lists the clients that are connected to your V810A.
• Change Max Connections: The default max connection is 15. Click this button and it
will take you to the Wi-Fi Settings where you can change the Max Wi-Fi Connections.
To bl o ck a d ev i ce, c ho o se a d e si r ed d ev i ce a n d cl ic k t he B l oc k bu t to n . Th e Wi -Fi
connection to the blocked device will be disconnected and the blocked device will
appear in the Blocked Devices list.
• Blocked Devices shows the devices that are blocked. Choose a blocked device and
click the Unblock button; the selected device will disappear from the “Blocked
Devices” list. It will show in the “Connected Devices” list again after it connects to your
V810A.
Data Usage
This page shows the estimated data usage which may not match your bill. Check with your
service provider for billable usage. If desired, choose Day of Month, Usage Limit and Click
Save Changes to save your settings.

ATEL V810 Series
V810A Data User Manual
V6.1, January 3, 2023
12
Messages
Messages page displays SMS messages sent to you by your Wireless Carrier.
The number of unread messages displays to the right of the message icon.
When a new message arrives, the message icon appears. A maximum of 30 messages
can be stored.
To vi ew a m e ss a ge, select a message from the Messages menu. To de l et e a s el ec t ed
message, click the trash bin icon to the right of the message date and timeline. To delete
all messages, click the Delete All Messages button.
Settings
The Settings page has the following menu options.
• Wi-Fi Setting
• LAN Settings
• Device Settings

ATEL V810 Series
V810A Data User Manual
V6.1, January 3, 2023
13
Wi-Fi Settings
These settings apply whenever the Wi-Fi is turned on. Changes made to these Wi-Fi
settings may require you to reconnect your Wi-Fi devices for the new settings to come into
effect.
l Wi-Fi On/Off:
Turn on to allow Wi-Fi devices to connect to this device. Wi-Fi devices will not connect to
this device if it is turned off.
l Wi-Fi Name (SSID):
To id e nt if y y ou r w i re l es s n e tw o rk , a n a me c a ll ed t h e SS I D (S e rv ic e S et I d en t i f ie r ) i s u se d .
Yo u c a n s e t a n a m e w i t h a m a x o f 3 2 c h a r a c t e r s . M a k e s u r e t h a t y o u r S S I D i s u n i q u e i f
there are other wireless networks operating in your area.
l Security:
Yo u c a n s e t t h e w i r e l e s s s e c u r i t y a n d e n c r y p t i o n t o p r e v e n t t h e r o u t e r f r o m u n a u t h o r i z e d
access and monitoring. The default security is WPA Personal/PSK. You can also set
Security as “None”, “WPA Personal/PSK”, “WPA2 Personal/PSK(AES)”, “WPA/WPA2 Mixed
Mode”.
l 802.11 Mode
The default is “802.11b/g/n(2.4GHz)”. You can also set it as 802.11a/ac (5GHz).

ATEL V810 Series
V810A Data User Manual
V6.1, January 3, 2023
14
l Channel:
The default “Channel” is “Automatic”. Yo u c a n s e t i t f r o m c h a n n e l 1 t o c h a n n e l 1 1 .
l Wi-Fi Options:
Wi-Fi Options include Broadcast Wi-Fi name (SSID), Wi-Fi Privacy Separation, and Max Wi-
Fi Connections.
l Broadcast Wi-Fi Name (SSID):
The wireless device can search and connect to the SSID after turning on “Broadcast Wi-Fi
name (SSID)”. The wireless client must input the SSID manually to connect to the SSID after
turning off “Broadcast Wi-Fi name (SSID)”.
l Wi-Fi Privacy Separation:
If turned on, connected devices cannot communicate with each other.
l Maximum Wi-Fi Connections:
The default maximum Wi-Fi connection is 15. You can set it to any number between 1 and
15.
LAN Settings
From the Online Portal, click Settings > LAN Settings to display the Hotspot WIFI.
Information shown in the following figure.

ATEL V810 Series
V810A Data User Manual
V6.1, January 3, 2023
15
l IP Address:
Enter the IP address of your V810A online management portal (factory default: 192.168.0.1).
l Subnet Mask:
An address code that determines the size of the network. Normally use 255.255.255.0 as
the subnet mask.
l MAC Address:
It is written to the device at the time of manufacture.
l DHCP Lease Time:
The Lease Time is the amount of time a network user will be allowed connection to the
router with their current dynamic IP address. Enter the amount of time in minutes and the
user will be "leased" this dynamic IP address. After the time is up, the user will be assigned
a new dynamic IP address automatically.
l Start DHCP Address Range at:
Specify an IP address for the DHCP server to start with when assigning IP addresses. The
default start address is 192.168.0.2.
l Reserve IP Address:
Yo u c a n r e s e r v e a n I P a d d r e s s s o t h a t i t i s a l w a y s a s s i g n e d t o t h e s a m e c o n n e c t e d d e v i c e .
Every reserved IP address must be within the range of IP addresses used by DHCP.
Device Settings
Device Preferences
l UPnP (Universal Plug and Play):
UPnP (which stands for Universal Plug and Play) is a feature that allows the devices on
your home network to discover each other and access certain services. If you don't use
applications that need port forwarding, such as peer-to-peer applications, game servers,
and many VoIP programs, you may be better off disabling UPnP entirely.
l Power Save:
If it’s set to ON, Wi-Fi Hotspot will be shut down when your V810A is not connected to a
wall adapter.
l Enable LCD Sleep
Set the time of the LCD screen to sleep automatically. The default is “After 30 seconds”,
you can set to 15 seconds, 2 minutes, and never turn off the screen.

ATEL V810 Series
V810A Data User Manual
V6.1, January 3, 2023
16
Admin Password
Admin Password:
The Admin Password is used to sign into this Online Portal. To change the password, you
must enter the current Admin Password. You will be locked out if an incorrect password is
used 5 times. If locked out, you will need to restart your V810A and enter the Online Portal
again.
Advanced
On this page, you can see Firewall Settings.
Firewall Settings
On this page, you can see four menus: Firewall, MAC Filter, Port Filtering and Port
Forwarding.

ATEL V810 Series
V810A Data User Manual
V6.1, January 3, 2023
17
Firewall
This page contains Firewall-related settings:
l VPN Passthrough
After being turned on, VPN Passthrough allows connected devices to establish a VPN
tunnel.
l IPv6 Transparent Mode
Transparent mode allows connected devices to be accessible from the Internet.
l DMZ (IPv4)
Enter the IP address of the connected device in the Destination IP address input field to
become the DMZ destination. After enabling the DMZ feature, all the applications of the
connected device will be visited.

ATEL V810 Series
V810A Data User Manual
V6.1, January 3, 2023
18
Mac Filter
The default “MAC Filter” status is “OFF”. If the MAC Filter is on and devices are listed in
MAC Address Filter list, then all of the listed devices will be able to connect to your V810A.
For any given device, the interaction of the MAC Filter with the “Block” feature on the
Connected Devices screen is shown in the following table.
Included in Block List
Included in MAC Filter
List
Connection
No
Ye s
Allowed
No
No
Not allowed
Ye s
Ye s
Not allowed
Ye s
No
Not allowed
The “Block” (Blacklist) feature is always available. After blocked, the blocked devices will
disconnect from the V810A.
Because enabling the MAC Filter could potentially disconnect all devices, the user needs
to populate the “MAC Address Filter” list first while the MAC Filter is OFF. Otherwise, when

ATEL V810 Series
V810A Data User Manual
V6.1, January 3, 2023
19
you click the “ON/OFF” button, it will prompt warning information as follows:
After changing the “MAC Filter” to “ON”, only the local “MAC Address Filter” listed devices
can connect to the V810A Axis 1, other devices will disconnect from the V810A.
Yo u c a n c l i c k the “Add Device” button to add de v i c e s . The added devices can connect the
V810A.

ATEL V810 Series
V810A Data User Manual
V6.1, January 3, 2023
20
Port Filtering
l Applications
The default applications have “Email (POP3, IMAP, SMTP)”, “FTP”, “HTTP”, “HTTPS” and
“Telnet”. If port filtering is on, only traffic from selected applications can access the Internet.
Note that DNS is always allowed.
l Custom Applications
Click “Add a Custom Application” to define your own applications, and then turn them on
or off as needed. To define an application, you need to know the outgoing ports used by
application.
Other manuals for AXIS V810A
5
Table of contents
Other Atel Network Router manuals

Atel
Atel W02 Arch+ Dimensions

Atel
Atel AXIS V810A Installation guide

Atel
Atel V810VD User manual

Atel
Atel AXIS V810A User manual

Atel
Atel WB550 Series User manual

Atel
Atel AXIS V810A User manual

Atel
Atel WB550 Series User manual

Atel
Atel AXIS V810A User manual

Atel
Atel Apex WB550 User manual

Atel
Atel Apex WB550 User manual