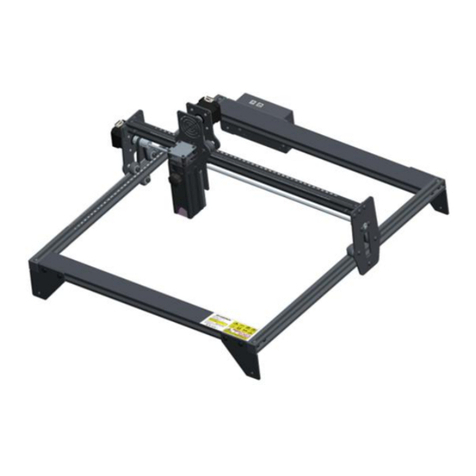
ATOMSTACK X7 Pro Series User manual

ATOMSTACK X7 Pro series L a s e r
En g r a v e r I n s t a llation M a n u a l
Version: V1.0
English
Deutsche
Français
note: (The picture is for reference only, the actual product shall prevail)

Before Using the laser engraving, please read this safety guide carefully, it mentions situations that require special attention and
includes warnings of unsafe practices that can cause damage to your property or even endanger your personal safety.
1. The product belongs to Class 4 laser products, the laser system itself must meet the requirements of IEC 60825-1 latest version,
otherwise the product is prohibited to be used.
2. Our laser engraver has a protective case that prevents people from laser radiation when in place.
3. If a protective housing is equipped with an access panel which provides "walk-in" access then:
a)means shall be provided so that any person inside the protective housing can prevent activation of a laser hazard that is equivalent to
Class 3B or Class 4.
b)There is a warning device so as to provide adequate warning of emission of laser radiation equivalent to Class 3R in the wavelength
range below 400 nm and above 700 nm, or of laser radiation equivalent to Class 3B or Class 4 to any person who might be within the
protective housing.
c)Where “walk-in” access during operation is intended or reasonably foreseeable, emission of laser radiation that is equivalent to Class
3B or Class 4 while someone is present inside the protective housing of a Class 1, Class 2, or Class 3R product shall be prevented by
engineering means.
NOTE Methods to prevent human from radiation when persons are inside the protective housing can include pressure sensitive floor
mats, infrared detectors, etc.
Part 1: Security Statment Before Installation

4. The laser itself has a protective cover, the protective cover is fastened by screws. When the laser is installed on the laser engraver, the
protective cover should be checked to be reliably locked, and can not be removed in the energized state.
5. The housing of the laser engraver have an interlock function. When the housing is opened or removed, the laser can be automatically
turned off.
6. The laser engraver have an emergency stop button, which can immediately stop the output of the laser when pressed under
unexpected circumstances.
7. The laser engraver have a reset button, which can resume work under the condition of confirming safety after lifting the interlock or
emergency stop.
8. Laser engraver use physical keys, dongle, password system and other ways to manage and control, and prevent personnel without
safety training from operating such equipment.
9. Set a warning mark on any window or channel that can actively observe or passively receive laser radiation on the laser engraving
machine.
10. If the laser burns the skin or eyes, please go to a nearby hospital for examination and treatment immediately.

Laser Light can hurt the human eyes and skin. Do not expose the eye or skin to laser light directly. This Laser product has an optical
lens and emits a collimated laser beam. The light emitted by the product, whether it is direct or reflected, is very harmful. Because it can
propagate a long distance while maintaining high optical density. When handling the product,you must wear appropriate
goggles(OD5+) to protect eyes from laser light including reflected and stray light. The reflected and stray light spilling into an
unintended area should be attenuated and/or absorbed.
2.1 Laser safety
We installed a laser shield on the laser, the shield can largely filter out the diffuse reflection of the laser spot. However, when using laser
engraving machine, it is recommended that you should wear laser protective glasses. Avoid skin exposure to type 4 laser beams,
especially at the closed distance.Teenagers must have parental supervision in the process of using it. Do not touch the laser engraving
module when the machine is activated.
2.2 Fire safety
Because cutting burns off the substrate, a high-intensity laser beam generates extremely high temperatures and a lot of heat.Certain
materials can catch fire during cutting, creating gases and fumes inside the equipment.A small flame usually appears here when a laser
beam hits the material.It will move with the laser and will not stay lit when the laser passes by. Do not leave the machine unattended
during the engraving process. After use, be sure to clean up the debris, debris and flammable materials in the laser cutting machine.
Always keep an available fire extinguisher nearby to ensure safety.When laser engraving machines are used, smoke, vapour, particles,
and potentially highly toxic materials (plastics and other combustible materials) are produced from the material.These fumes or air
pollutants can be hazardous to health.
Part 2:User Security Statement

2.3 Material safety
Do not engrave materials with unknown properties. Materials Recommended:Wood, bamboo, leather, plastic, fabric, paper, opaque
acrylic, glass.Materials not recommended:Metal, precious stones, transparent materials, reflective materials etc.
2.4 Use Safety
Use the engraver only in horizontal position and ensure that it has been securely fixed to prevent fires caused by accidental shifting or
dropping from the workbench during work.It is forbidden to point the laser to people, animals or any combustible object, whether it is
in working condition or not.
2.5 Powersafety
Topreventaccidentaldisasterssuchasfireandelectricshock,the LaserEngraverprovidesapoweradapterwitha groundwire.When
using the laser engraving machine, insert the power plug into a power socket with a ground wire withaground wirewhenusing
theLaserEngraver.
2.6 Environment safety
When installing engraving and cutting equipment, please make sure that the workplace must be cleaned up, and there should be no
flammable and explosive materials around the equipment. A metal plate must be placed under the bottom when engraving or cutting.

Part 3: Disclaimer and warning
Thisproductisnotatoyandisnotsuitableforpeopleunder15.Donotallowchildrentotouchthelaser
module.Pleasebecarefulwhenoperatinginsceneswithchildren.
Thisproductisalaser module,visithttp://www.atomstack3d.com/laserengraverdownloadto get the
complete"usermanual"andthelatestinstructionsandwarnings.ShenzhenAtomStackTechnologiesCo.,Ltd.(Atomstack)reservestherightto
updatethisDisclaimerandSafeOperationGuidelines.
Pleasebesuretoreadthisdocumentcarefullybeforeusingtheproducttounderstandyourlegalrights,responsibilitiesandsafetyinstructions;
Otherwise,itmaybringpropertyloss,safetyaccidentandhiddendangerofpersonalsafety.Onceyouusethisproduct,youshallbedeemedto
haveunderstood,andacceptedalltermsandcontentsofthisdocument.Userundertakestoberesponsibleforhisorheractionsandallconse
quencesarisingtherefrom.UseragreestousetheProductonlyforlegitimatepurposesandagreestotheentiretermsandcontentsofthisdocu
mentandanyrelevantpoliciesorguidelinesthatAtomStackmayestablish.
You understand and agree that AtomStack may not be able to provide you with the cause of the damage or accident and provide you with
AtomStack's after-sale service unless you provide the original engraving or cutting files, engraving software configuration parameters used,
operating system information, video of the engraving or cutting process, and operational steps prior to the occurrence of a problem or failure.
AtomStackisnotliableforanyandalllossesarisingfromtheuser'sfailuretousetheproductinaccordancewiththismanual,Without the
guidance of the company's technical personnel, users are prohibited from disassembling the machine by themselves. If this behavior occurs, the
loss caused by the user shall be borne by the user.
Atomstackhastheultimaterighttointerpretthedocument,subjecttolegalcompliance.Atomstackreservestherighttoupdate,modify,orter
minatetheTermswithoutpriornotice.

Logo side up
Screw:
M5*25
Gap side
outwarder
1
1
33
3
Y
X
2M5-6
2
S t e p 2
The guide rail passes through the middle of the 3
rollers. Loosen the distance between the upper and
lower guide wheels appropriately.
3
4
1
2
3 3
Tighten the T nut and cut off
the excess belt.
group 2
installation hole
slide block
torx handle
Alongside
Figure 3
Figure 4
Fasten
Screw
Figure 2
Figure 1
S t e p 3
S t e p 1
S t e p 4
Engraving or cutting scope
0~65mm
Engraving or cutting
scope 0~45mm
Engraving or cutting scope
0~85mm
Group 3rd
Group 2nd
Group 1st
P a r t 4 :I n s t a l l a t i o n S t e p s

YX
Y-axis
limiter
TIPS:How to determine the tightness of eccentric nuts?
Under the condition of ensuring that the bracket does not shake, you can lift one
end of the machine to an angle of 45 degrees with the horizontal plane, and release
the X-axis or Y-axis bracket from a high place. If the bracket can slide at a constant
speed to the end, the tightness is suitable.
S t e p 5
Use a wrench to
turn the eccentric
nut to adjust the
tightness of the
guide wheel and
the guide rail
Partial
enlarged
view
1
3
S t e p 6
S t e p 7
Installation Manual:
1. As shown in the picture, place the cutting pad under the
engraved/cut object
2. As shown in the figure, the cutting pad should be placed to
cover the working area as far as possible

Part 5:Control box
description
①
②③
④
⑤
⑥
1.Emergency stop switch:In case of emergencies, the machine will immediately stop working when you press it. When you
need to unlock it, turn the button clockwise to restart the engraver.
2.Power socket: DC 12V power supply.
3.USB interface: control the engraver on the computer with connecting to the computer through a USB cable.
4. Power switch: control the power on and off.
5. TF card slot: here to insert the TF card.
6. Reset switch: When an emergency occurs or the machine is stuck, press the reset button to restart the engraver.

Part 6:Instructions for use of the display
LaserGRBL exports nc
format, Lightburn exports
gc format
Insert SD card Click Cavre to
enter the SD card
file list
Press the power
button to enter the
home page of the
display
Select the file to be
engraved and move
the laser to the position
to be engraved
Laser fixed focus
method: use a fixed
focus lens below the
laser to determine the
focal length
Select the number of
times you want to
engrave/cut, start
engraving/cutting
Click the position
button to determine
the origin of the laser
Finish carving
Click the frame button
to confirm the
engraving range
Click the
button to start carving
During the engraving
process, the engraving
speed and energy can
be adjusted. If there is
an abnormal situation,
you can press the pause
or stop function key

Instructions for exporting nc and gc format files
1.Import the picture to be engraved or cutted into laserGRBL, after
setting the engraving speed and energy parameters etc., click File, and
select Quick Save
1.laserGRBL software
2.Select sd chuck as the save path, click Save to generate
nc file.
1.Import the picture to be engraved or cutted into
lightburn, after setting the engraving speed and energy
parameters etc., click Save Gcode.
2.lightburn software
2.Select TF chuck as the save path, click Save to generate
gc file.

Introduction to the contents of the home page, file list, and engraving
preparation page of the display
1、Before using the engraving machine, please insert the SD card into
the control box card slot along the dotted line. If the SD card is not
inserted, the engraving machine cannot be operated after entering the
operation display. When inserting the card, pay attention to the front
and back of the SD card. Insert the card into the card slot on the reverse
side (see the picture for correct insertion)
2、This is the boot interface, which has two major functions.
1.Click the engraving button to enter the engraving file list interface.
2.Click the setting button to enter the setting interface.
1
2
1
2
3
3、This is the engraving file list interface, which can perform file
name selection, page up and down, and return to the startup
interface.
1. Click the back button to return to the boot interface.
2. Select the corresponding file name to enter the engraving
preparation interface.
3. Click the left and right page buttons to turn the file name up
and down.
1
2
3
4
567
4、This is the engraving preparation interface, which can perform engraving start, X/Y axis
movement, center point, contour scanning, and positioning operations.
1. Click the back button to return to the engraving file list interface and the startup interface
2. Engraved file name display
3. Click the up, down, left and right arrow function buttons to move the Y axis and X axis, click the
arrow middle button to return to the zero position of the X/Y axis, "0.1, 1, 10" are the X/Y axis travel
distance values, select different values The travel distance of X/Y axis is also different. The maximum
engraving range is "X: 250, Y: 220". The coordinates will change with the movement of X/Y axis.
4. After clicking the engraving start button, the engraving times can be set. The engraving
machine executes the engraving action
5. Click the center point button to set the position of the laser center point
6. Click the contour scan button, the laser can automatically walk the engraving file size range
(Note: when the engraving file nc or .gc file is larger than 1M, the laser will automatically walk for a
long time, and it will take about 2-10 minutes).
7. After clicking the positioning button, click the confirm button to locate the starting point of the
laser

2、This is the interface during engraving. This interface can be paused, stopped, and the power
and speed can be adjusted. (Note: There is no return button in this interface. You can only stop
working and return to the engraving preparation interface. After the engraving is completed, it
will return to the engraving preparation interface. The head will move to the starting position of
the last engraving to facilitate repeated engraving of the unified file.
1.Click the "+/-" button to adjust the power and speed, "1%, 10%, 20%" is the percentage value
of the power and speed adjustment, select a different percentage value, and click the "+/-" button
value Also different.
2.Click the pause button to pause the laser engraving operation.
1. This is the setting interface of engraving times
Click "+/-" to set the number of times of engraving.
After setting, click the confirm button to enter the
engraving interface.
1
2
12
3. This is the pause engraving interface.
1.After clicking Pause, the laser will stop the engraving
action and the machine will stop running. Click the resume
engraving button to continue the engraving just now.
2.Click the stop button to end laser engraving and
printing.
4、This is the interface that pops up when you click to stop engraving.
After clicking the stop button, a confirmation window will pop up, click confirm
to stop engraving and printing, and the interface will return to the boot interface
Setting of engraving/cutting passes, introduction of page key functions in
engraving

9、This is the setting interface.
1.Click the back button to return to the boot interface
2.Click the key tone switch button to turn on/off the key
tone.
3.WiFi settings
4.Local information
10、This is the WiFi setting interface.
1.Click the back button to return to the setting interface and startup
interface
2.Click the reset button to refresh the search WiFi name
3.Click the WiFi setting button to search for the WiFi name. After clicking
the corresponding WiFi name, enter the password to connect to the WiFi
4.Click the left and right buttons to scroll up and down the WiFi name.
1
2
3
4
1
2
3
4
11、This is about the interface of this machine.
This interface displays the size of the device engraving,
firmware version, company website, and customer email
address.
12.This is the interface without SD card inserted,
Setting of engraving/cutting passes, introduction of page key functions in
engraving

Part 7:Web-side instructions
Select the WIFI you
want to connect to in
the WIFI interface in
the display settings
Connect the
same WIFI as
the display on
the PC
Click Go to
ESP3D Interface
to enter the
control page
The control page can
control the movement
of the laser, return to
zero, set the starting
point, and control the
laser switch
Enter the SD card page,
select the file to be
engraved or import the
file in the computer,
and move the laser to
the position to be
engraved
Click the button
to start carving
Open the browser
and enter the IP
address shown on
the display
Enter the page
and import the
index.html file
Laser fixed focus
method: use a
fixed focus lens
below the laser to
determine the focal
length
Click the contour
scan button to
confirm the
engraving range
Finish carving

2. The computer needs to be connected to the
same Wifi name, otherwise it will cause the
computer to fail to communicate with the engraver.
1. Open the Wifi page and select the WIFI you
would like to connect to. An IP address will appear
in the upper right corner of the screen when it is
connected.
3.Enter the IP address displayed on the touch screen in the
browser address bar, and click OK.
4. Click choose files and select the
configuration file.
The display screen and the computer are connected to the same WIFI, open the
browser and enter the IP address

5. Select the file named "index.html" and click Open 6. Click Upload and wait for about 5 seconds to complete the uploading
7.After the file uploading is completed, the Go to ESP3D
interface option will appear, click to enter the control
interface.
①
12
3
5
6 7
8
49
1. Menu bar, switch to different interfaces, the current interface is the control
interface
2. Display of current coordinates, engraving speed and energy
3. The arrow keys can control the laser to move forward, backward, left and right.
4. Adjust the speed and step length of the movement.
5. Return to zero, return to the origin.
6. Positioning key, take the current position as the starting point.
7. Turn on the laser.
8. Turn off the laser.
9. Console displays the program steps.
Upload the file, enter the web-side control page and the introduction of the
engraving page

1. SD card file interface
2. Refresh the page
3. Upload files, you can upload files in your computer
4. File list
5. Start engraving button
6. Contour scanning
7. Delete the current file
8. Progress bar
12
38
5 6 7
4
Click the contour scan, the window as shown in the figure will pop
up. Click Send if you would like to scan the contour, click Close to
cancel the patrol.
Introduction of SD card file page and introduction of uploading files for
engraving/cutting

Parameter configuration interface, you can modify some
parameters such as the maximum engraving speed,
engraving range, acceleration, etc.
Language selection interface, currently there
are two language options, English and Chinese.
1
2
1. About: there is the version number of the interface, you can
update the interface
2. Click the update button to enter the update interface
You can select the latest file to update. The current
interface version is displayed on the page. If there is an
exit page, please click Close.
Introduction to configuration parameter page and about page

Part 8:Software installation and use
1.Downloading LaerGRBL software
2.Installing LaerGRBL
3.Adding custom buttons
4.Connect laser engraving machine
5.Setting Engraving Parameters
6. Laser focus adjustment
7. Positioning
8. Start, Termination carving or cutting
9. LightBurn Installation Tutorial
This manual suits for next models
3
Table of contents
Other ATOMSTACK Engraver manuals

ATOMSTACK
ATOMSTACK MAKER AC1 User manual

ATOMSTACK
ATOMSTACK P7 Series User manual
ATOMSTACK
ATOMSTACK A5 User manual

ATOMSTACK
ATOMSTACK M100 User manual
ATOMSTACK
ATOMSTACK A5 M50 Pro User manual

ATOMSTACK
ATOMSTACK A 5 Pro User manual

ATOMSTACK
ATOMSTACK A6 PRO User manual

ATOMSTACK
ATOMSTACK A5 10W User manual

ATOMSTACK
ATOMSTACK X20 Pro User manual
ATOMSTACK
ATOMSTACK Befon A5 Pro Plus User manual