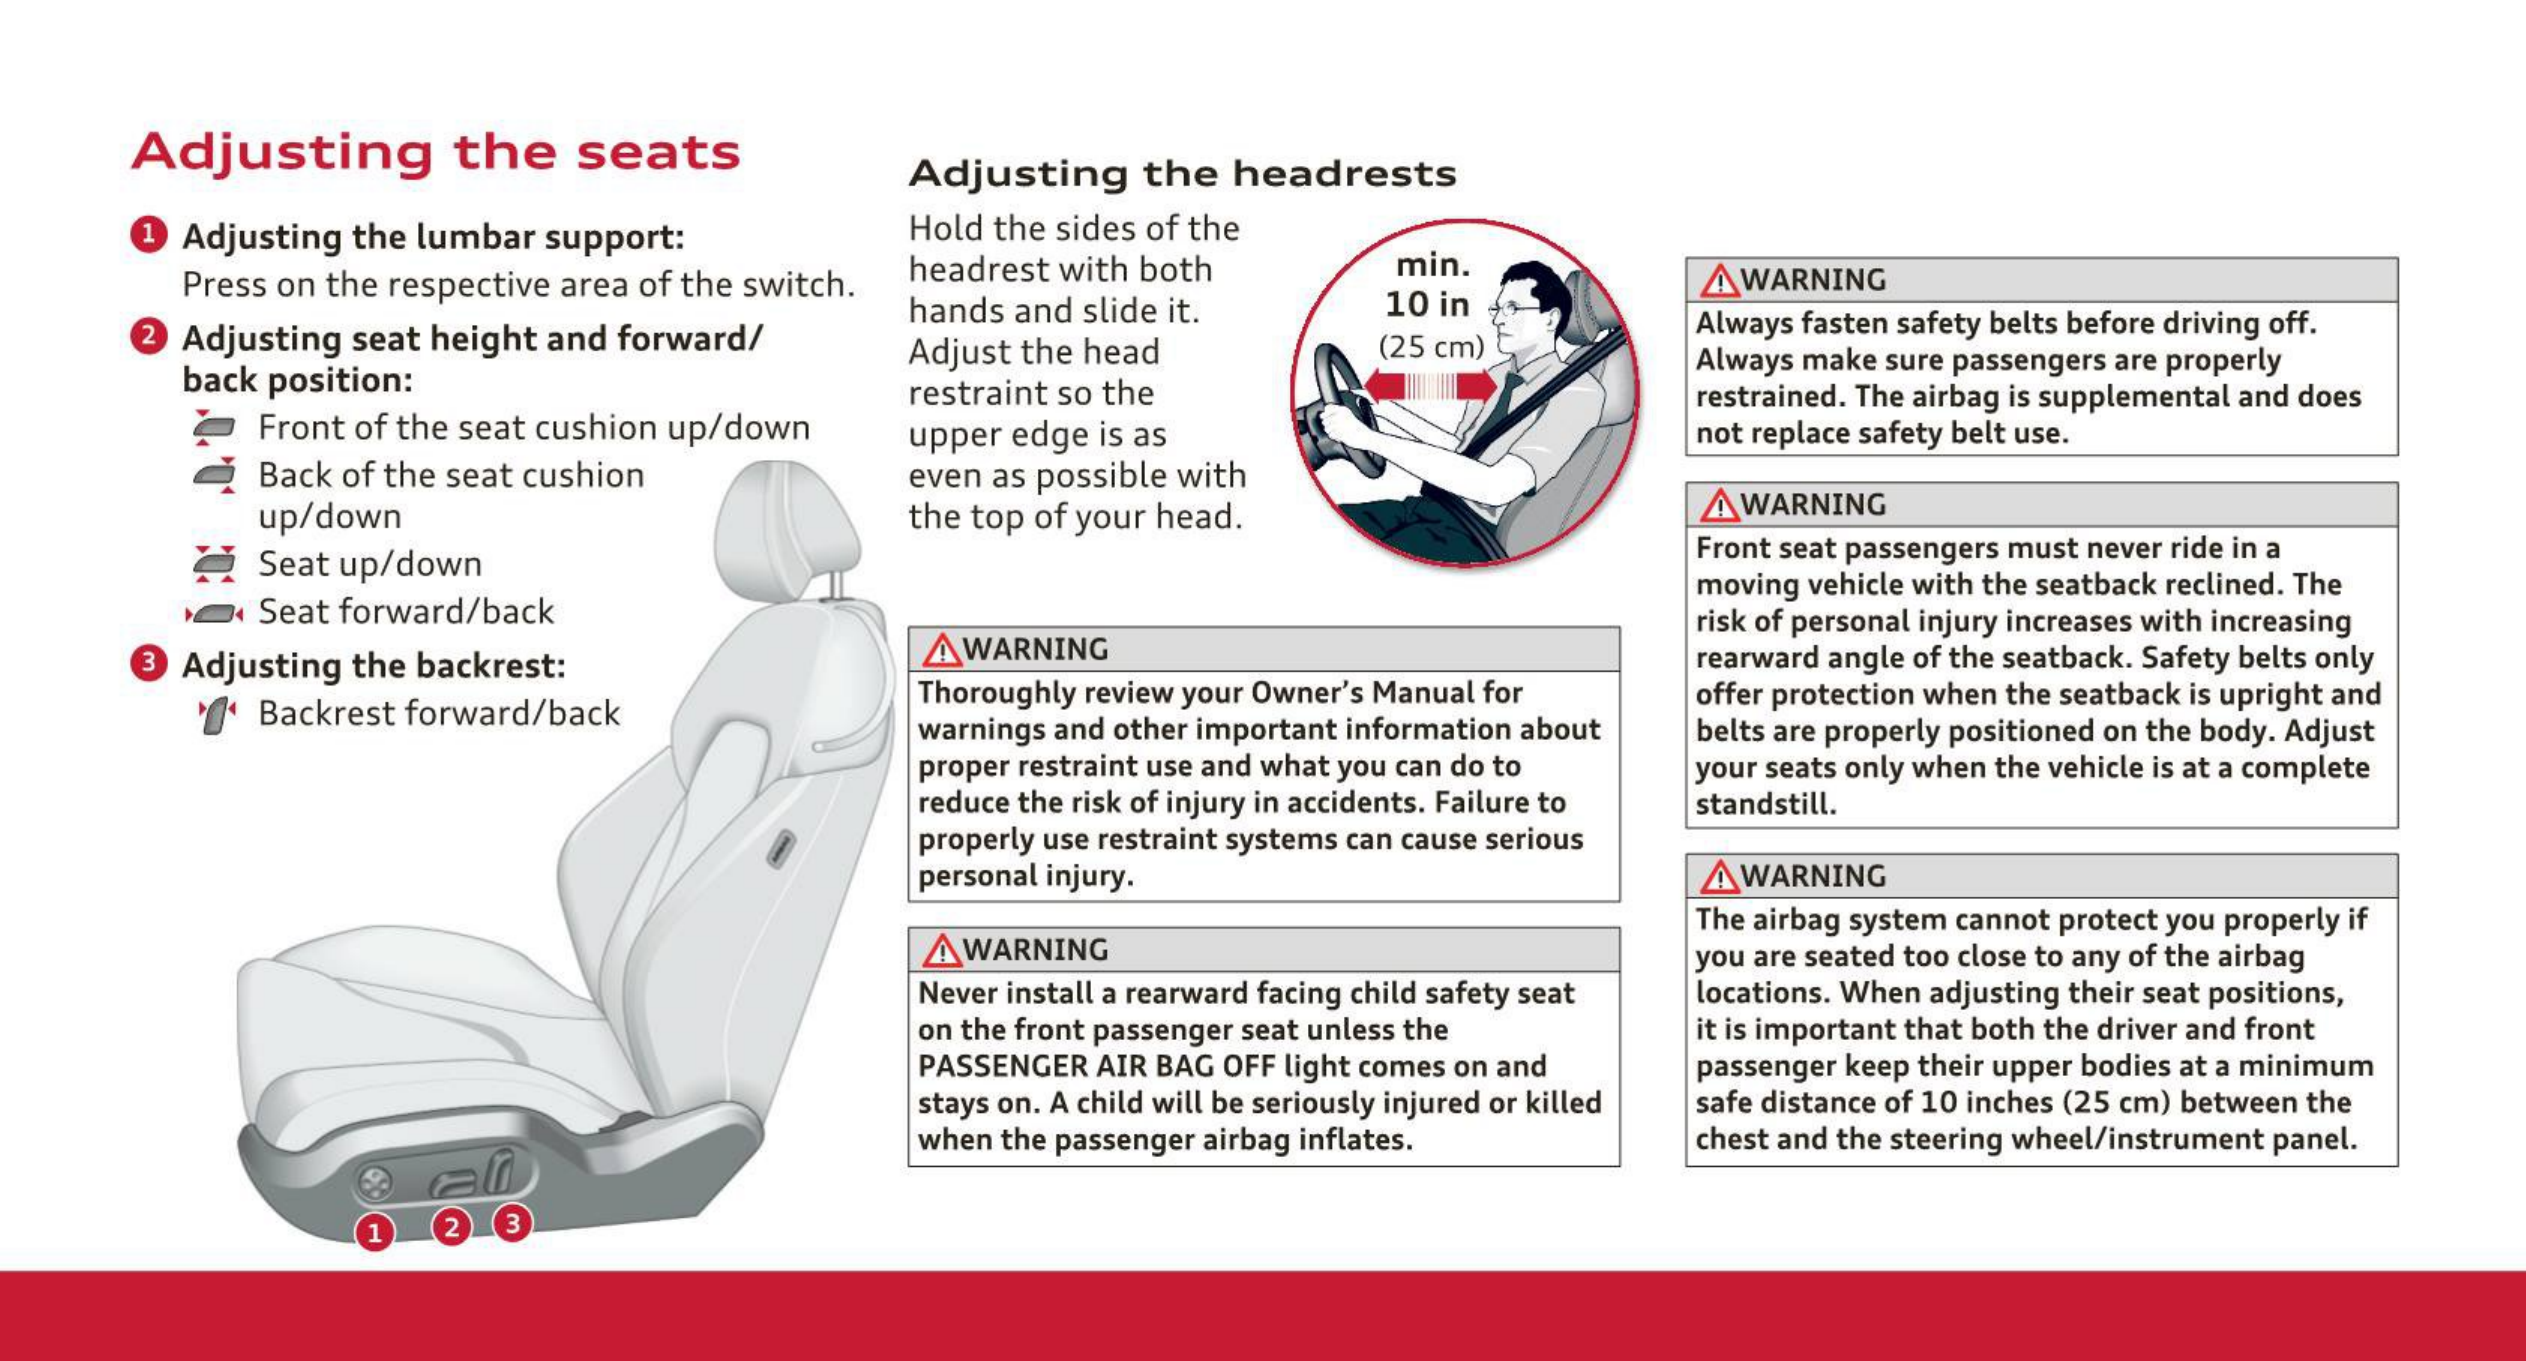
Audi TT 2011 User manual

.
--
2011 Audi TT• TTS Roadster
Quick Reference Guide Vorsprung durch
Tee
~~~~
{lID

This Quick Reference Guide provides you with a brief
overview of selected procedures and functions inyour
vehicle. It does not replace the Owner's Manual with
its important explanations and warnings.
Cockpit
0 Release buttons for:
ltfr-1Rear lid
[I;[) Fuel filler flap
0 Power windows
&_WARNING
Be careful when closing the windows .
Check to see that no one is in the way,
or serious personal injury could result .
0 Adjusting the exterior mirrors
Adjust the knob:
UiDLeft exterior mirror
am[)Heat ing the exterior mirror
(1ilJ Right exterior mirror
The mirror glass moves inthe
directio n that the knob is pressed.
0 Hood release
0 Data Link Connector for
On Board Diagnostics
(OBD II)
C, Door handle and central
locking switch
(I) locked
[m1Junlocked
G Light switch
G Instrument lighting
0 Cruisecontrol
fDMultifunction steering
wheel controls
~
Turn signal and high beam
lever
a>Instruments and indicator
lights
-
--
0 --
--
-- I
'
•
•
•
-
-
-
-
-
-
-

-
-
-
-
-
-
-
-
-
-
-
,,c:::s
G>Windshield wiper controls and
trip computer buttons
~
Steering wheel position adjuster
,& WARNING
The column should only be adjusted
when the vehicle is at a complete
standstill.
~
Ignition lock
~
Navigation system or
radio system
fllPassenger airbag indicator
light
~
Climate control system
~
Passenger's seat heating
~
Driver's seat heating
ti Selector lever
e Ashtray with cigarette
lighter
e [NJ Audi magnetic ride or
[l~Jj Sport mode
(I) Electronic stabilization
program
[/&1Emergency flashers
(j[) Rear spoiler
~
Convertible top
~
Wind deflector
~
Parking brake
Overview

Adjusting the seats
0 Adjusting the lumbar support:
Press on the respective area of the switch .
f) Adjusting seat height and forward/
back position:
p Front of the seat cushion up/down
d Back of the seat cushion r--
• up/down
~
Seat up/down
•L::::J• Seat forward/back
0 Adjusting the backrest:
•lJ• Backrest forward/back
Adjusting the headrests
Hold the sides of the
headrest with both
hands and slide it.
Adjust the head
restraint so the
upper edge is as
even as possible with
the top of your head.
& WARNING
J Thoroughly review your Owner's Manual for
warnings and other important information about
proper restraint use and what you can do to
reduce the risk of injury in accidents. Failure to
properly use restraint systems can cause serious
personal injury.
& WARNING
Never install a rearward facing child safety seat
on the front passenger seat unless the
PASSENGERAIRBAGOFFlight comes on and
stays on. Achild will be seriously injured or killed
when the passenger airbag inflates.
fA WARNING
Always fasten safety belts before driving off.
Always make sure passengers are properly
restrained. The airbag is supplemental and does
not replace safety belt use.
& WARNING
Front seat passengers must never ride in a
moving vehicle with the seatback reclined. The
risk of personal injury increases with increasing
rearward angle of the seatback. Safety belts only
offer protection when the seatback is upright and
belts are properly positioned on the body. Adjust
your seats only when the vehicle is at a complete
standstill.
& WARNING
The airbag system cannot protect you properly if
you are seated too close to any of the airbag
locations. When adjusting their seat positions,
it is important that both the driver and front
passenger keep their upper bodies at a minimum
safe distance of 10 inches (25 cm) between the
chest and the steering wheel/instrument panel.

Starting the engine
Switching the ignition on / starting the engine
Insert the key into the ignition lock.
Switching the ignition on: Turn the keyto
the e position.
Starting the engine:
Place the selector lever in the Por N
position, press the brake and turn the key
to the e position until the engine starts .
Stopping the engine : Turn the keyto the 0
position .
S tronic
Sel ector Lever positions
P Park
R Reverse
N Neutral (Idle)
D Drive
S Sport Releasing the selector lever lock
and engaging a gear: Switch
the ignition on, press the
brake pedal and press the
lock button on the selector
lever. Place the selector
lever inthe Dor S position to
drive forward.
tiptron ic:To shift manually,
move the selector lever to the right
out of the D position. The driver
informat ion system displays the
gears .
Shift ing up/ down: Press the selector
lever forward/back .
Introduction

Climate control
Left rotary switch: Tempe rature selection
Center rotary switch: Switch the climate
contro l switch on/off and regu late t he fan speed .
Right rotary switch: Air distri bution
~
Automatic mode
Set the des ired tempe rature and
press t he button .
~
Recirculation mode
Circula te and filt er the air inside the passenger
com partment
(][) Switch the air conditioning system on/off
~
Defrost the windshield/side windows
~
Rear window defroster
Audi magnetic ride
Two suspension systems in one vehicle
Standard driving mode: Suspension sett ing that em phas izes comfort.
Sport driving mode: Sporty sus pens ion settin g.
Press the ([• .J)or CI[) button to activate/deactiva te.

'
'
Rear spoiler
Inc rea sing driving stability
The downward force at the rear axle
is increased when the rear spoiler is
extended.
Automatic mode:
The rear spoiler extends at speeds
above approximately 75 mph
(120 km/h) and retracts at speeds
Manual mode:
Press the ~ button briefly to
extend the rear spoiler.
Press the ~ button again at
speeds between 10 mph (20 km/h)
and 75 mph (120 km/h) to retract
the rear spoiler.
Press and hold the ~ button at
speeds below 10 mph (20 km/h) to
retract the rear spoiler.
under somph (80 km/h) . & WARNING
,-==------------------<
Never drive at speeds higher than 85 mph
(140 km/ h) if the spoiler isnot deployed.
Automatic convertible top
Opening the convertibl e top
Switch the ignition on:
Pull and hold the ( , , ] switch until the
convertible top opens and the covers close
completely.
Closing the convertible top
Switch the ignition on:
Press and hold the [ , , ]switch unti l the
top has closed completely.

Cruise control
The CRUISE/ 0 indicator light appears in
the instrument cluster when the system is
switched on.
Switching on/off: Pull/press the lever 8 .
Storing the speed: Press the button 0 .
Changing the stored speed: Press the lever
up (faster) or down (slower).
Hill Descent Assist
In vehicles with automatic transmission, Hill Descent Assist helps
when driving down declines.
Activating: Move the selector lever to the D or S position and press
the brake pedal. The current speed is maintained as long as physical
and technical limits permit.
Deactivating: Press the accelerator pedal.
&, WARNING
Improper use of the cruise control can
cause collisions, other accidents and
serious personal injury. Always read
and heed the Warnings in the Owner's
Manual.

Fuel
The label on the inside
of the fuel filler flap
indicates the correct
fuel type.
Fuel filler flap
Opening: Pull the CID]button in the driver 's door.
Closing: Press the fue l filler flap in until it latches .
T ire pressures
The label with the correct tire pressures
is located on the driver's door pillar.
qz?
Engine oil
For the applicable oil
specifications, refer to
the Owner 's Manual.
Technology

Navigation system
Components
0 Driver information system
0 Multifunction steering wheel
Roll the left menu thumbwheel to mark a menu item in
the driver information system . Press the thumbwhee l to
confirm the menu item.
Press the MODE button to switch between the active
radio source, navigation system and telephone .
Roll the right menu thumbwheel to control the volume.
Press the right thumbwheel to repeat the last navigation
announcement. I

------------- -
~
\
r
I
'
'
e
8
8 Display
0 Function buttons
Press the des ired button (such as
FM<tAM)to act ivate that mode.
8 On/ Off knob
Switching on: Press briefly.
Adjusting the volume : Rotate.
Mut ing: Tap.
Switching off: Press and hold .
0 Control buttons
To call up one of the functions shown
in the four corners of the display, press
the corresponding contro l button that
is assigned to that corner of the display.
G Control knob
Marking a menu item in the display 8 :
Rotate the control knob .
Confirming the selection:
Press the control knob .
Operation
Operation is the same in all functions.
.&WARNING
Distraction causes
accidents:
-Never enter data
while driving!
-Obey traffic laws &
road signs!
-Refer to the
Owner's Manual!
0 Calling up menus in
the display corners:
Press the corres-
ponding button .
0 Marking:
Rotate the knob .
8 Confirming:
Press the knob.
Infotainment

C
0
·-
·-
"O
EO Press the FM<tAM function button.
ro
m
C
·-
s..
0
...,
Vl
0 Press the "Presets" control button.
8 Rotate the control knob and mark
"Store station <station name> ".
8 Rotate the control knob and mark the
desired station.
C, Press the control knob. The next free
memory preset is marked .
E) Press the control knob to confirm.
0 Rotate the control knob and mark the
desired preset .
8 Press the control knob to confirm.

C
0
·-
.,
ttJ
Cl
·-
>
ttJ
C
Cl O Press the NAVfunction button.
C
·-
C, Enter the remaining letters of the
destination using the same procedure
until the desired location name is
displayed.
8 Rotate the control knob and mark
"City/ZIP".
8 Press the control knob to confirm .
0 When you have entered the destination,
rotate the control knob and mark "OK".
E) Press the control knob to confirm.
~
1'·
lol
Itr:nlli,,4,.7IIPwwiW,;;:jl~Jilii,,;,1ii11~..:o
C, Rotate the control knob to mark the
first letter of the destination.
0 Press the control knob to confirm.
~
~
~
!iA~
[ V ]
Rim) ,j@jjJ)jfp lii\1'Gi0j QOOH j w=i«l
0 Mark the menu item
"Start route guidance".
~
Press the control knob to confirm.
The route is calculated.
Infotainment

Functions
Est ablishing a Bluetooth ™
cell phone connection
You can connect a Bluetooth™ capable cell
phone quickly to the navigation
system cell phone preparation .
• Switch on the ignition, the navigation
system and the cell phone.
• On the cell phone, se lect the menu
that searches for Bluetooth™ capable
devices (such as the cell phone
prepara t ion/hands-free set).
• On the cell phone, se lect "Audi UHV"and
confirm.
• Enter the PIN "1234" on the cell phone .
• Confirm the connection in your cell
phone too when requested.
Infotainment
Memory cards
Loading:
• Press the ~ button to open the
disp lay.
• Guide the memory card into the card
reade r slot as shown in the illustration
and press on the card until it clicks into
place.
Removing:
• Press the CR) button to open the
display.
• Press on the memory card. The card is
released and can be removed from the
card reader slot.

Foradditional information on indicator lights, refer to your vehicle Owner's Manual.
Audi magnetic ride
Dll Tire pressure too low
- (check immediate ly)
IiiElectron ic power contro l
• Convertible top
~
Electronic Stabilizat ion
la.I Program (ESP)
•
Electronic Stabilization
Program (ESP)
ll!':!'JIMalfunction Indicato r
- Lamp(USA)
Malfunction Indicato r
Lam p (CAN)
© 2010 AUDIAG
High beam
Turn signals/
Emerge ncyflasher
Cruise control activated
(USA)
Cruise control activated
(CAN)
Safety systems (USA)
Safety systems (CAN)
Generator
Safety belt
Parking brake (USA)
Parking brake (CAN)
.• Anti-lock brake system
' • (USA)
Anti-lock brake system
(CAN)
Electro-mechanica l
power assist
Electro-mechanic al
power assist
Lowfue l level
Check engine oil level
•
Engine oil senso r
malfunction
Et3Worn brake pads
J•jSpeed warning (USA)
IISpeed warning (CAN)
II Dynamic headligh t
range control defect ive
111Engine speed limitat ion
l!!l windsh ield washer fluid
liiil level low
Battery voltage too high
or too low
Defective light bulb
Defective brake light
(USA)
Defective brake light
(CAN)
Light/ra in sensor
defec tive
Adaptive Light defect ive
Brake malfunction (USA)
Brake malfunction
(CAN)
Cooling system
malfunct ion
Engine oil pressure
too low
Audi isconstantly improving the ir products. Modifications in fo rm, equipment, and technology are possible. No legal commitme nt is imp lied by the information, illustr ations, and descriptions in this Quick
Reference Guide. Reprinting, reproduct ion or translation, in whole or in part, is not perm itted without written perm ission from Audi of America, Inc. Reprinting, reproduct ion or translation, in whole or in part,
is not permitted without written permission from Audi of America, Inc. Subject to modification without notice. Concept and design: Pfriemer GmbH.
Indicator lights

Audi TT• TTSRoadster
Kurzanleitung
Nordamerika
Englisch 11.2010
112 .562 .818 .21 www.audi.com
This manual suits for next models
1
Table of contents
Other Audi Automobile manuals

Audi
Audi A4 User manual

Audi
Audi A3 Sportback User manual

Audi
Audi Q7 361 Assembly instructions

Audi
Audi S4 User manual

Audi
Audi Q7 2007 Instruction manual

Audi
Audi A8 User manual

Audi
Audi 2003 A4 Avant User manual

Audi
Audi R8 2010 User manual

Audi
Audi A4 2015 Operating instructions

Audi
Audi Q7 2007 Operating instructions

Audi
Audi Q7 Installation guide

Audi
Audi TT 2010 User manual

Audi
Audi A6 - GUIDE - 2001 User manual

Audi
Audi Q3 2015 - 2019 Reference manual

Audi
Audi R8 2009 User manual

Audi
Audi A5 SPORTBACK User manual

Audi
Audi TT Coupe '07 380 Assembly instructions

Audi
Audi TT Coupe 2017 User manual

Audi
Audi Q7 User manual

Audi
Audi S4 Assembly instructions