Audio Physic CLASSIC Compact User manual

Owner´s Manual
Bedienungsanleitung
CLASSIC Line
CLASSIC Line
CLASSIC Center
CLASSIC Compact
CLASSIC 10CLASSIC 20
CLASSIC 30

Inhaltsverzeichnis
Lieferumfang Seite 3
Begrüßung Seite 4
Allgemeine Tipps Seite 5
Auspacken und Zusammenbau CLASSIC 10 | CLASSIC 20 | CLASSIC 30 Seite 6
Auspacken und Zusammenbau CLASSIC Compact | CLASSIC Center Seite 6
Anschließen der Lautsprecher Seite 7
Aufstellen der Lautsprecher CLASSIC 10 | CLASSIC 20 | CLASSIC 30 Seite 8-9
Aufstellen der Lautsprecher CLASSIC Compact Seite 10-11
Aufstellen des CLASSIC Center Seite 12
Technische Spezikationen Seite 13
Contents
Included in the Delivery page 3
Welcome page 14
General Tips page 15
Unpacking and Assembly of the CLASSIC 10 | CLASSIC 20 | CLASSIC 30 page 16
Unpacking and Assembly of the CLASSIC Compact | CLASSIC Center page 17
Connecting the Loudspeakers page 17
Setting Up the CLASSIC 10 | CLASSIC 20 | CLASSIC 30 page 18-19
Positioning the CLASSIC 10 | CLASSIC 20 | CLASSIC 30 page 19
Setting Up the CLASSIC Compact Loudspeakers page 20-21
Positioning the CLASSIC Compact Loudspeakers page 21
Setting Up the CLASSIC Center Loudspeaker page 22
Technical Specications page 23
2
English | Deutsch CLASSIC Line
Einblick: Die transparente Darstellung
der CLASSIC 30 zeigt den komplexen,
strukturellen Aufbau des Gehäuses.
Insight: The transparent illustration of the
CLASSIC 30 demonstrates
the complex structural cabinet design.

Lieferumfang CLASSIC 10 | CLASSIC 20 | CLASSIC 30
Ihre neuen Lautsprecher werden in zwei getrennten Kartons geliefert. Ein Karton enthält neben einem Lautsprecher
und der Frontbespannung, Ihr „Willkommen in der Familie“-Paket mit dieser Anleitung, der Endkontroll-Urkunde und
dem Zubehör. Im zweiten Karton bendet sich neben dem Lautsprecher ebenfalls eine Frontbespannung.
Verpackung „A“ • „Welcome to the AUDIO PHYSIC Family-Pack“ mit Dosenlibelle zur Aufstellungsoptimierung
• 8x Spikes
• 8x Muttern
• 1x Frontblende ohne Stoffbespannung (montiert)
• 1x Frontblende mit Stoffbespannung
Verpackung „B“ • 1x Frontblende ohne Stoffbespannung (montiert)
• 1x Frontblende mit Stoffbespannung
Lieferumfang CLASSIC Compact | CLASSIC Center
Ihre neuen Lautsprecher werden in einem Karton geliefert. Der Karton enthält neben den/dem Lautsprecher/n und
den/der Frontbespannung/en Ihr „Willkommen in der Familie“-Paket mit dieser Anleitung, der Endkontroll-Urkunde
und dem Zubehör.
• „Welcome to the AUDIO PHYSIC Family-Pack“ mit Dosenlibelle zur Aufstellungsoptimierung
• 2x Frontblende ohne Stoffbespannung, montiert (CLASSIC Compact)
• 2x Frontblende mit Stoffbespannung (CLASSIC Compact)
• 1x Frontblende ohne Stoffbespannung, montiert (CLASSIC Center)
• 1x Frontblende mit Stoffbespannung (CLASSIC Center)
Included in the Delivery of the CLASSIC 10 | CLASSIC 20 | CLASSIC 30
Your new loudspeakers are delivered in two separate boxes. One box contains one loudspeaker and one front grille,
as well as your „Welcome to the Audio Physic Family“ package containing this Owner‘s Manual, the Final Inspection
Certicate and accessories. In the second box you will nd the other loudspeaker and one front grille.
Box “A“ • “Welcome to the AUDIO PHYSIC Family“ package and a spirit level to optimise setup
• 8x spikes
• 8x nuts
• 1x front panel without fabric (mounted)
• 1x front panel covered in fabric
Box “B“ • 1x front panel without fabric (mounted)
• 1x front panel covered in fabric
Included in the Delivery of the CLASSIC Compact | CLASSIC Center
Your new loudspeaker/s are delivered in one box. The box contains one loudspeaker/the loudspeakers and one front
grille/the front grilles, as well as your „Welcome to the Audio Physic Family“ package containing this Owner‘s Manu-
al, the Final Inspection Certicate and accessories.
• “Welcome to the AUDIO PHYSIC Family“ package and a spirit level to optimise setup
• 2 x front panel without fabric, mounted (CLASSIC Compact)
• 2 x front panel covered in fabric, mounted (CLASSIC Compact)
• 1 x front panel without fabric, mounted (CLASSIC Center)
• 1 x front panel covered in fabric, mounted (CLASSIC Center)
3
CLASSIC Line Deutsch | English

Willkommen
Sehr geehrter Musikfreund,
wir bedanken uns für Ihr Vertrauen in unsere Produkte und heißen Sie im Kreise der audiophilen Freunde von
AUDIO PHYSIC herzlich willkommen.
Sie haben sich für ein erstklassiges Produkt aus deutscher Entwicklung entschieden, dazu beglückwünschen wir
Sie und wünschen Ihnen viel Freude damit.
Damit wir Ihr Vertrauen verdienen, entstehen unsere Lautsprecher ausschließlich nach neuesten technischen Erkennt-
nissen, unter Verwendung erstklassiger Bauteile, und werden nach strengen Qualitätskriterien gefertigt. Kriterien, die
es uns erlauben dem Erstbesitzer ab dem Kaufdatum 10 Jahre Garantie auf unsere Lautsprecher zu gewähren (Sub-
wooferelektronik 2 Jahre, Chassis 10 Jahre), ein Vielfaches der gesetzlich vorgeschriebenen Gewährleistungsfristen.
Um diese Zusatzleistung zu erhalten, füllen Sie bitte die den Lautsprechern beiliegende Garantiekarte aus und senden
uns diese zusammen mit einer Kopie Ihres Kaufbeleges zu.Wir bestätigen Ihnen kurz darauf die 10-Jahres-Garantie
schriftlich.
Erst nach mehreren elektrischen und akustischen Prüfdurchgängen, die unsere Mitarbeiter der Qualitätssicherung
mit ihrer Unterschrift auf der beiliegenden Urkunde bestätigen, verlassen die Schallwandler sicher verpackt das Werk.
Diese Maßnahmen tragen dazu bei, dass Sie zuhause in den vollen Genuss der hohen Material-, Fertigungs- und
Klangqualität von AUDIO PHYSIC-Lautsprechern kommen.
Im Regelfall wird Ihnen der kompetente AUDIO PHYSIC-Fachhändler die Lautsprecher liefern und installieren. Sollten
Sie dies selbst tun wollen, helfen Ihnen die auf den folgenden Seiten beschriebenen Tipps und Schritte bei der siche-
ren Inbetriebnahme. Viel Spaß mit Ihren neuen CLASSIC-Lautsprechern.
4
Wort drauf: Für die geprüfte Qualität
unserer Lautsprecher bürgen wir an jedem
Modell mit unserem Namen.
English | Deutsch CLASSIC Line

5
Allgemeine Tipps
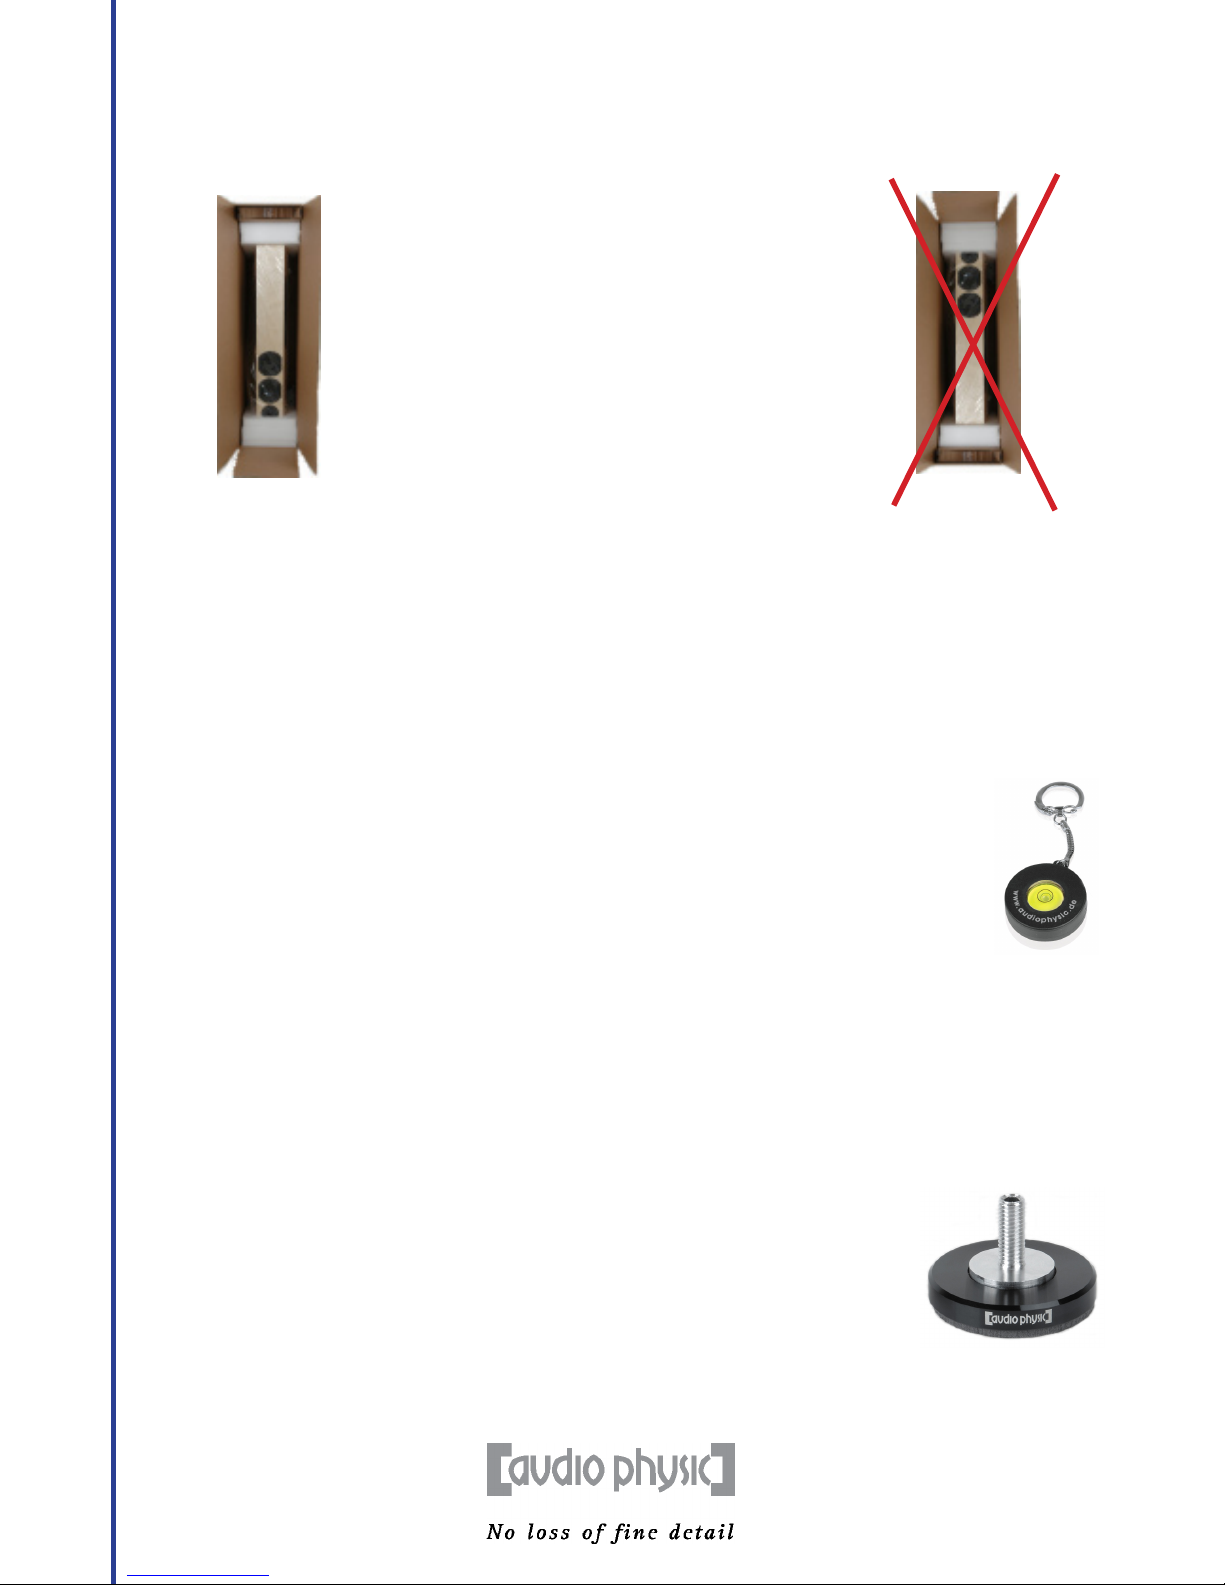
Je nach Größe und Gewicht der Lautsprecher, bietet es sich an, diese zu zweit auszupacken. Ideal ist es, bei den
Standlautsprechern die Kartons zu stellen und zwar so, dass sich die Boxenoberseite unten am Boden bendet
(die Kartons sind entsprechend gekennzeichnet) und Sie die Spikes einfach anbringen können. Die Spikes für beide
Lautsprecher benden sich in Ihrem „Welcome to the Family“-Paket. Die CLASSIC Compact und den CLASSIC Center
entnehmen Sie idealerweise dem liegenden Karton. Folgen Sie für die sichere und korrekte Installation den Hinweisen
im Kapitel „Auspacken und Zusammenbau“.
Die Lautsprecher sollten etwa Zimmertemperatur erreichen, bevor Sie sie mit der HiFi-Anlage verbinden, bzw. in Be-
trieb nehmen. Dieser Hinweis bezieht sich in erster Linie auf die Wintermonate, falls die Boxen zuvor in einem kalten
Raum gelagert wurden.
Pege
Unsere Lautsprecher sind mit hochwertigen Furnieren oder Hochglanzlacken beschichtet, je nach Ausführung besitzen
Teile des Korpus eine Glasoberäche. Chemische Reinigungsmittel sollten Sie meiden, diese können die Oberächen
angreifen und matt werden lassen. In aller Regel genügt ein feines, weiches, angefeuchtetes Tuch, um die Oberä-
chen zu reinigen. Sollte ein Reinigungsmittel nötig sein, feuchten Sie damit das Tuch an; tragen Sie das Mittel nicht
direkt auf die Oberäche auf. Am besten prüfen Sie die Verträglichkeit des Mittels an einer weniger sichtbaren Stelle
des Gehäuses. Die Chassis benötigen normalerweise keine Reinigung. Staubpartikel fallen im Betrieb schnell
ab. Sie können jedoch mit einem weichen Pinsel vorsichtig über die Chassis-Oberäche streichen. Sie sollten dabei
keinesfalls drücken. Bitte säubern Sie die Chassis nie mit Reinigungsmitteln. Setzen Sie die Boxen nicht direktem
Sonnenlicht aus. Eloxalächen reagieren empndlich auf Laugen wie auf UV-Licht und bleichen unter Umständen aus.
Die Chassis dieser AUDIO PHYSIC-Boxen-Serie verfügen über eine einzigartige Befestigungstechnik. Statt direkt mit
dem Korpus verschraubt zu werden, benden sich in den Montagebohrungen der Lautsprecher spezielle Neopren-
dübel. Beim Anziehen der Schrauben verankern sich diese sicher in der Bohrung und sorgen für eine dauerelastische,
resonanzmindernde Verbindung zwischen Chassis und Gehäuse. Es ist nicht nötig, diese Schrauben nachzuziehen.
Ein nachträgliches Festziehen kann die Dübel zerstören und führt zu einem schlechteren Klang.
Einspielen
Ihr volles Klangpotenzial erreichen die Lautsprecher erst nach einer gewissen Einspielzeit. Die Chassis werden von uns
vor der Montage im Werk eingespielt, daher genügen meist einige Stunden Spielzeit bei Zimmerlautstärke mit Musik,
die einen möglichst breiten Frequenzumfang besitzt wie beispielsweise Orchesterwerke. Es eignen sich auch Aufnah-
men mit „Weißem oder Rosa Rauschen“, wie sie auf vielen so genannter Test-CDs vorhanden sind – die Lautstärke
sollte hierbei zum Schutz der Lautsprecher keinesfalls hoch eingestellt werden.
Streufelder
Die Magneten der einzelnen Chassis erzeugen ein magnetisches Feld, das teilweise auch außerhalb der Lautsprecher
wirkt. Dieses Streufeld kann Geräte, insbesondere Fernseher und Monitore mit Bildröhren (nicht LCD- oder Plasma-
TVs), beeinussen. Es kommt möglicherweise zu Farbveränderungen im Bild. Wir empfehlen, etwa einen halben
Meter Abstand zu solchen Geräten (ebenso zu Magnetbändern, Videokassetten, Kreditkarten mit Magnetstreifen,
etc.) zu halten.
Transport
Wenn möglich, bewahren Sie die Verpackungen der Lautsprecher auf. So können Sie Ihre Boxen bei einem Umzug
sicher transportieren. Besitzen Sie die CLASSIC-Modelle in den Ausführungen „Glass High Gloss“, dürfen diese, um
Schäden zu vermeiden, nur sicher verpackt, stehend auf einer Transportpalette versendet werden.
CLASSIC Line Deutsch | English

Auspacken und Zusammenbau – CLASSIC 10 | CLASSIC 20 | CLASSIC 30
1. Stellen Sie die Kartons mit den Produktaufklebern nach oben auf den Fußboden. Öffnen Sie die
Verpackungen vorsichtig an den Klebestellen der Längsseiten, am besten mit einem Taschen- oder
Küchenmesser (Abbildungen ähnlich).
2. Entnehmen Sie die „Welcome to the Family-Mappe“ mit dem Zubehör.
3. Ziehen Sie die Lautsprecher, idealerweise zu zweit, mit den Schaumstoffpolstern aus dem stehenden Karton.
Achten Sie unbedingt darauf, dass Sie beim An- oder Umgreifen der Boxen nicht die Chassis berühren,
diese könnten dadurch irreparabel beschädigt werden.
4. Entfernen Sie nun das obere Schaumstoffpolster und streifen behutsam die Schutzfolie nach unten, sodass
Sie bequem die Spikes befestigen können.
5. Schrauben Sie die Kontermuttern auf die Spikes.
6. Drehen Sie die Lautsprecher nun um, am besten wieder zu zweit, sodass sie sicheren Kontakt zum Fußboden
bekommen. Achten Sie darauf, sich nicht an den Spitzen der Spikes zu verletzen.
7. Stellen Sie die Lautsprecher an den vorgesehen Platz und justieren die Spikes fein, damit die
Boxen nicht wackeln. Stehen die Lautsprecher nicht sicher und wippen, beeinusst das den
Klang nachhaltig. Wenn die Boxen im „Lot“ stehen, haben Sie die optimale Einstellung erreicht.
Die beiliegende Dosenlibelle hilft Ihnen bei der Feinjustage (die Luftblase muss inmitten des
inneren Kreises zur Ruhe kommen). Sichern Sie die Spikes mit den Kontermuttern. Ein etwa
handfestes Anziehen der Muttern genügt.
8. Von Werk sind die Modelle CLASSIC 10, CLASSIC 20 und CLASSIC 30 mit einer soliden Frontblende ohne
Stoffbespannung versehen. Diese Blende können Sie nach Ihrem persönlichen Geschmack gegen die beilie-
genden Blenden mit Frontbespannung austauschen. Dazu heben Sie die vorhandene Blende vorsichtig mit
den Fingern ab. Achten Sie darauf, dass Sie dabei die Chassis nicht berühren. Setzen Sie anschließend
die Blende mit Stoffbespannung auf und drücken diese sanft an, bis sie bündig mit dem Lautsprechergehäuse
abschließt. Klanglich sind keine Einbußen zu befürchten.
Wenn Sie den Klang in punkto Genauigkeit und Tiefenstaffelung noch einmal steigern
möchten, probieren Sie unsere hochwertigen VC-Füße (Abbildung rechts: VCF II M8) für
die Lautsprecher. Die „Vibration Control“-Füße sind nicht nur eine Alternative zu Spikes
auf hochwertigen Böden, sondern vermindern die Schwingungsübertragung zwischen
Lautsprecher und Fußboden. Das Ergebnis ist ein hörbares Plus an Feinzeichnung und
Abbildungstreue. Ihr AUDIO PHYSIC-Fachhändler berät Sie gerne.
Korrekt: Die Lautsprecherober-
seite sollte beim Auspacken nach
unten zeigen. Wenn Sie die Boxen
nun vorsichtig aus der Verpa-
ckung ziehen, haben Sie einfach
Zugriff auf die Boxenunterseite
und können leicht die Spikes
befestigen.
Falsch: Zeigt die Laut-
sprecheroberseite nach
oben, müssen Sie den
Lautsprecher nach dem
Entfernen der Verpa-
ckung erst wenden, um
die Spikes anzubringen.
6
English | Deutsch CLASSIC Line

Auspacken und Zusammenbau – CLASSIC Compact & CLASSIC Center
1. Legen Sie den Karton mit den Produktaufklebern nach vorne auf den Fußboden. Öffnen Sie die
Verpackungen vorsichtig an den Klebestellen der Längsseiten, am besten mit einem Taschen- oder
Küchenmesser.
2. Entnehmen Sie die „Welcome to the Family-Mappe“ mit dem Zubehör.
3. Ziehen Sie die/den Lautsprecher vorsichtig mit den Schaumstoffpolstern aus dem Karton. Achten Sie
unbedingt darauf, dass Sie beim An- oder Umgreifen der Boxen nicht die Chassis berühren, diese könnten
dadurch irreparabel beschädigt werden.
4. Entfernen Sie nun die Schaumstoffpolster und streifen behutsam die Schutzfolie nach unten.
5. Stellen Sie die/den Lautsprecher an den vorgesehen Platz. Die/der Lautsprecher sollte im „Lot“ stehen.
Die beiliegende Dosenlibelle hilft Ihnen bei der Feinjustage (die Luftblase muss inmitten des
inneren Kreises zur Ruhe kommen).
6. Von Werk sind die Modelle CLASSIC Compact und CLASSIC Center mit einer soliden Frontblende ohne
Stoffbespannung versehen. Diese Blende können Sie nach Ihrem persönlichen Geschmack gegen die beilie-
genden Blenden mit Frontbespannung austauschen. Dazu heben Sie die vorhandene Blende vorsichtig mit
den Fingern ab. Achten Sie darauf, dass Sie dabei die Chassis nicht berühren. Setzen Sie anschließend die
Blende mit Stoffbespannung auf und drücken diese sanft an, bis sie bündig mit dem Lautsprechergehäuse
abschließt. Klanglich sind keine Einbußen zu befürchten.
Anschließen der Lautsprecher
Ihre neuen Lautsprecher sind mit besonders hochwertigen Polklemmen
(Abbildung rechts) ausgestattet (nextgen by WBT). Diese Polklemmen
besitzen einen einzigartigen Mechanismus (Drehmoment-Indikator), der
Ihnen beim Anschließen von Kabeln mit Kabelschuhen eine Hilfestellung
bietet. Mehr dazu unter Punkt 2. Die Polklemmen nehmen Kabelschuhe
wie auch Bananenstecker sicher auf. Lose Kabellitzen oxidieren schnell und
eignen sich nicht für dauerhaft hohen Hörgenuss.
1. Bitte schalten Sie alle Geräte Ihrer HiFi-Anlage aus, bevor Sie mit
dem Anschließen der Lautsprecher beginnen.
2. Wenn Sie Lautsprecherkabel mit Kabelschuhen verwenden, drehen
Sie die Schraubklemmen nach links, bis Sie die Kabelschuhe bequem
in die seitlichen Öffnungen einführen können. Schieben Sie die
Kabelschuhe in die Öffnungen und drehen die Schraubkappen
nach rechts, bis Sie einen Knackton hören – das ist der Dreh-
moment-Indikator. Drehen Sie jetzt die Klemmen handfest an – in der Regel wenige „Klicke“ weiter. Sie
können die Klemmen zwar noch fester andrehen, doch erzielen Sie damit keine besseren Ergebnisse. Im
ungünstigsten Fall besteht die Gefahr, dass die Oberächenstruktur der Kabelschuhe Schaden nimmt.
3. Achten Sie beim Anschluss auf die korrekte Polarität. In aller Regel sind Lautsprecherkabel entsprechend
gekennzeichnet, entweder mittels einer durchgehenden Markierung auf dem Kabel an einem der beiden
Leiter oder über eine Kennzeichnung an den Kabelenden nach Plus „+“ und Minus „-“.
4. Schließen Sie nun die Kabel an Ihren Verstärker an und beachten bitte ebenso die Polarität.
Jetzt können Sie beginnen, Ihre neuen AUDIO PHYSIC Lautsprecher optimal auf den Hörplatz auszurichten.
Tipps hierzu nden Sie im folgenden Kapitel „Aufstellung“ und besonders ausführlich Hinweise auf der
AUDIO PHYSIC-Webseite.
7
CLASSIC Line Deutsch | English

8
English | Deutsch CLASSIC Line
Aufstellen der Lautsprecher CLASSIC 10 | CLASSIC 20 | CLASSIC 30
1. Ideal ist es, wenn Sie Ihre neuen Lautsprecher im Raum so positionieren, dass sie mit Ihrem Hörplatz ein
gedachtes, gleichschenkliges Dreieck bilden.
2. Der Abstand zwischen den Boxen sollte etwa das 0,8- bis 1,2-fache des Abstandes zum Hörplatz betragen.
Je näher Sie vor den Lautsprechern sitzen, umso direkter und trockener werden Sie den Klang empnden.
Mit zunehmender Entfernung wächst in aller Regel die Tiefenstaffelung, die Abbildung wirkt großzügiger.
3. Ideal stehen die Lautsprecher etwa 30 Zentimeter von den
umgebenden Wänden entfernt. Je größer der Abstand zur
Rückwand, desto präziser wird die Wiedergabe, besonders im
Bass. (Die Abbildungen zeigen exemplarisch die CLASSIC 10).
4. Je näher die Lautsprecher an die Rückwand (und/oder Seiten-
wand) kommen, umso kräftiger werden tiefe Frequenzen
breitbandig verstärkt – Bässe klingen voluminöser, Stimmen
körperbetont.
5. In einer Ecke verstärkt sich dieser Effekt noch einmal. Tiefe Töne
werden etwa 6 Dezibel (oder mehr) lauter. Experimentieren Sie
mit Ihnen bekannter Software, und Sie werden schnell die Po-
sition nden, die Ihrem Hörgeschmack am nächsten kommt.
Freie Aufstellung: Die Lautsprecher stehen gute
50 Zentimeter oder weiter von den umgebenden
Wänden entfernt. In dieser Position klingen Bässe
straff und Mitten besonders detailreich.
Wandnahe Aufstellung: Tiefe
Frequenzen werden durch die direkte Nähe zur
Wand verstärkt – um etwa +3 bis +6 Dezibel.
Aufstellung in den Raumecken: Tiefe
Töne werden deutlich lauter gegenüber dem darü-
ber liegenden Frequenzspektrum.
> 30 cm
> 50 cm
+ 3 bis + 6 dB Bassanhebung
≤ 20 cm
> 40 cm
> 6 dB Bassanhebung
≤ 20 cm
≤ 20 cm

6. Die Entfernung zu den Seitenwänden beeinusst, neben der Stärke der Basswiedergabe, insbesondere die
Ortung von Schallereignissen und damit die Abbildungspräzision. Mit größerem Abstand wird die Ortung
genauer, der Klang ausgeglichener. Sehr nahe an den Seitenwänden kommt es zu frühen Reexionen, die
neben einer geringeren Ortbarkeit auch zu einem tendenziell nervösen Klang führen. Vorhänge oder Regale
etc. an den Seiten reduzieren diesen Effekt.
7. Falls Sie Ihre CLASSIC-Lautsprecher rechts und links neben einem Schrank oder High-Board aufstellen, so
sollten die Fronten der Lautsprecher auf einer Ebene mit der Vorderseite des Schranks oder Boards stehen.
Sind die Lautsprecher gegenüber dem Möbel nach hinten versetzt, beeinusst das den Klang. Zum einen
kommt es, wie unter 6. genannt, zu frühen Reexionen an den Seitenwänden des Schranks aber unter Um-
ständen auch zu einer Störung der ungehinderten Schallabstrahlung.
Ausrichten der Lautsprecher CLASSIC 10 | CLASSIC 20 | CLASSIC 30
1. Stehen die Lautsprecher parallel zu den Seitenwänden, drehen Sie die Boxen nun so nach innen, dass eine
gedachte Linie vom Hochtöner jeder Box auf Ihren bevorzugten Hörplatz zeigt. Wenn Sie Musik gerne alleine
genießen, sollten sich die beiden gedachten Linien ausgehend von den Boxen an Ihrem Hörplatz „schneiden“.
So ergibt sich eine hervorragende Ortung und Raumabbildung. Hören Sie Musik eher zu mehreren, winkeln
Sie die Boxen stärker ein, sodass sich die gedachten Linien vor dem Hörplatz kreuzen.
2. Mögen Sie eine breitere Bühne und eine großzügigere Abbildung, winkeln Sie die Lautsprecher weniger ein,
sodass sich die gedachten Linien (blau) knapp hinter dem Hörplatz schneiden. Ab einem bestimmten Winkel
verliert die Abbildung in der Mitte zwischen den Boxen an Struktur und Präzision. Den genauen Punkt können
Sie einfach mit einer Mono-Aufnahme herausnden. Klingt die Stimme der Interpretin oder des Interpreten
wieder klar umrissen und kommt genau aus der Mitte, haben Sie die optimale Position gefunden.
Erster Schritt: Winkeln Sie die Boxen so an,
dass eine gedachte Linie von den Hochtönern
ausgehend auf Ihren Hörplatz zielt.
Zweiter Schritt: Experimentieren Sie mit dem
Winkel. Hier zählt auch Ihr Hörgeschmack.
Ideal eignen sich Mono-Aufnahmen, am bes-
ten wenig instrumentiert mit Stimme.
9
CLASSIC Line Deutsch | English

Aufstellen der Lautsprecher CLASSIC Compact
Grundsätzlich empfehlen wir Ihnen, die Lautsprecher auf passenden Standfüßen, wie beispielsweise
den AUDIO PHYSIC SHERPA II (Abbildung rechts) zu betreiben. Klanglich ist die Verwendung von
passenden Boxenfüßen dem Betrieb auf einem Regal in aller Regel deutlich überlegen. Zum einen
wird sichergestellt, dass sich die Hochtöner auf einer idealen Position (Höhe) zu Ihrem Hörplatz
benden. Das ist insbesondere für die räumliche Abbildung und die Klangneutralität wichtig. Zum
anderen werden Wechselwirkungen zwischen Lautsprecher und Auageächen wie Schrank- oder
Regalboden vermieden.
Wenn Sie die CLASSIC Compact auf einem Regal betreiben wollen, sollte zur Rückwand eine gute
Handbreit Abstand gewährleistet sein. Ideal ist, wenn die Front der Boxen bündig mit der Regalfront
abschließt. So werden frühe Reexionen unterbunden. Nutzen Sie die Lautsprecher in einem Regal
oder auf einem Side- oder Lowboard, empfehlen wir die Verwendung unserer VCF-Component-Füße,
um die Lautsprecher mechanisch vom Untergrund zu entkoppeln. Gerade Regalböden oder die
Oberächen von Schränken neigen, durch Schallenergie angeregt, zu Eigenschwingungen, die sich
im Umkehrschluss wieder auf den Lautsprecher übertragen können. Diese Mikroschwingungen
beeinträchtigen das Klangbild, besonders in den Mitten, die dann unsauber und ungenau klingen
können. Die AUDIO PHYSIC Vibration-Control-Füße unterbrechen diesen Wirkkreis. Das Ergebnis
ist ein hörbares Plus an Feinzeichnung und Abbildungstreue. Weiterer Vorteil der VCF-Component:
Kratzer an Schrank-oder Regaloberächen werden zuverlässig vermieden.
1. Positionieren Sie die CLASSIC Compact so, dass sich ihre Hochtöner in Bezug auf den Sitz-/Hörplatz auf
Ohrhöhe benden. Das gewährleistet eine originalgetreue Raumabbildung und tonale Balance.
2. Ideal ist es, wenn Sie Ihre neuen Lautsprecher im Raum so aufstellen, dass diese mit Ihrem Hörplatz ein
gedachtes, gleichschenkliges Dreieck bilden.
3. Der Abstand zwischen den Boxen sollte etwa das 0,8- bis 1,2-fache des Abstandes zum Hörplatz betragen.
Je näher Sie vor den Lautsprechern sitzen, umso direkter und trockener wird das Klangerleben. Mit zunehmender
Entfernung wirkt die Abbildung großzügiger, jedoch nimmt die Fokussierung ab. Je größer der Abstand zu
den Lautsprechern, umso deutlicher nehmen Sie die akustischen Einüsse des Raumes auf den Klang wahr.
4. Die CLASSIC Compact sind für eine wandnahe Aufstellung vorgesehen. Der Abstand sollte dabei etwa 20 bis
30 Zentimeter von der Rückwand und circa 40 Zentimeter von den Seitenwänden betragen. Eine freie
Aufstellung, mit größeren Abständen zu den umgebenden Wänden, ist je nach persönlichem Hörgeschmack
auch möglich. Der Klang wird mit dieser Aufstellung schlanker. Eine ideale Ergänzung zu den CLASSIC
Compact ist unser Subwoofer LUNA, mit dem die Tieftonwiedergabe deutlich nach unten erweitert wird.
Wandnahe Aufstellung:Die CLASSIC
Comapct sind so abgestimmt, dass sie
Bässe bis etwa 20 Zentimeter Wandnä-
he scharf konturiert wiedergeben. Mit
zunehmendem Abstand wird der Klang
schlanker und Bässe zurückhaltender.
10
English | Deutsch CLASSIC Line
≥ 20 cm
≥ 40 cm
lineare Wiedergabe

5. Eine Aufstellung der Lautsprecher in den Raumecken bringt eine breitbandige Anhebung unterer Frequenzen.
Diese können dabei über sechs Dezibel ansteigen. Testen Sie mit bassbetonter Musik einfach aus, wie Ihnen der
Klang in den Ecken gefällt. Empnden Sie Bässe aufgebläht und Stimmen unkonturiert, ziehen Sie die Boxen um
einige Zentimeter aus den Ecken, bis tiefe Töne klar konturiert und Stimmen körperhaft klingen.
Ausrichten der Lautsprecher CLASSIC Compact
1. Stehen die Lautsprecher parallel, drehen Sie die Boxen nun so nach innen, dass eine gedachte Linie vom Hochtöner
jeder Box auf Ihren bevorzugten Hörplatz zeigt. Wenn Sie Musik gerne alleine genießen, sollten sich die beiden
Linien an Ihrem Hörplatz „schneiden“. So ergibt sich eine hervorragende Ortung und Raumabbildung.
2. Mögen Sie eine breitere Bühne, winkeln Sie die Boxen weniger ein (blau). Ab einem bestimmten Winkel verliert
die Abbildung an Struktur. Den genauen Punkt können Sie mit einer Mono-Aufnahme herausnden. Klingen
Stimmen klar umrissen und kommen genau aus der Mitte, haben Sie die optimale Position gefunden.
Erster Schritt: Winkeln Sie die Boxen so an,
dass eine gedachte Linie von den Hochtönern
ausgehend auf Ihren Hörplatz zielt.
Zweiter Schritt: Experimentieren Sie mit dem
Winkel. Hier zählt auch Ihr Hörgeschmack.
Ideal eignen sich Mono-Aufnahmen, am bes-
ten wenig instrumentiert mit Stimme.
11
CLASSIC Line Deutsch | English
Bassverstärung
Aufstellung in den Raumecken: Tiefe
Töne werden lauter, das gesamte Klangbild
wirkt subjektiv voller und runder.
≥ 10 cm
ca. 15 cm

Aufstellen des CLASSIC Center
1. Die Rückseite des Lautsprechers sollte gut eine Handbreit von der Rückwand entfernt sein, damit die
angeschlossenen Kabel nicht geknickt werden. Eine noch nähere Aufstellung an einer Wand kann sich auch
akustisch nachteilig auswirken.
2. Der Center sollte möglichst mittig zwischen den Hauptlautsprechern stehen, auf jeden Fall direkt unterhalb
des Flat-TVs oder der Leinwand. Für eine optimale und homogene Wiedergabe, programmieren Sie bitte die
Entfernungen der einzelnen Lautsprecher zum Hörplatz, so exakt wie möglich, im Setup-Menü Ihres Surround-
Receivers ein. Nur so ist eine phasengenaue Reproduktion möglich.
Unser Klangpp für noch mehr Detailtreue
Wenn Sie den Klang Sie die CLASSIC Compact oder den CLASSIC Center in
einem Regal oder Sideboard platzieren, und die Klangqualität noch einmal
steigern möchten, sollten Sie unsere VC-unterstellfüße „VCF II Component“
(Abbildung rechts) ausprobieren. Die „Vibraon Control“-Füße vermindern
die Schwingungsübertragung zwischen Lautsprecher und Aufstelläche.
Regalböden oder Oberächen von Schränken neigen, durch Schallenergie angeregt,
zu Eigenschwingungen. Diese Mikroschwingungen beeinträchgen das Klangbild. Die Vibraon-Control-
Füße unterbrechen diesen Wirkkreis. Das Ergebnis ist ein hörbares Plus an Feinzeichnung und Abbildungs-
treue. Weiterer Vorteil der VCF-Component: Kratzer an Schrank- oder Regaloberächen werden sicher
vermieden. Ihr Fachhändler berät Sie gerne.
12
English | Deutsch CLASSIC Line
Unsere Empfeh-
lung: Wenn Sie
auch tiefste Töne
körperhaft und au-
thentisch erfahren
möchten, können
Sie die CLASSIC-
Modelle jeder-
zeit mit unserem
Aktivwoofer LUNA
ergänzen.

13
CLASSIC Line Deutsch | English
Technische Spezikationen CLASSIC 10 CLASSIC 20 CLASSIC 30
Höhe 105,5 cm 105,5 cm 105,5 cm
Breite 17,0 cm 17,0 cm 17,0 cm
Tiefe 24,0 cm 29,0 cm 41,0 cm
Breite x Tiefe 21,0 x 30,0 cm 21,0 x 35,0 cm 21,0 x 47,0
Gewicht ca. 16,5 kg ca. 18,5 kg ca. 27,0 kg
ca. 22,5 kg (Glass-Line) ca. 23,5 kg (Glass-Line) ca. 33,0 kg (Glass-Line)
Empf. Verstärkerleistung 20 - 120 W 25 - 150 W 25 - 180 W
Impedanz 4 Ohm 4 Ohm 4 Ohm
Frequenzgang 38 Hz - 30 kHz 34 Hz - 30 kHz 31 Hz - 30 kHz
Wirkungsgrad 89 dB 89 dB 89 dB
Lautsprechersysteme
Tiefton 1 x 150 mm 1 x 180 mm 2 x 180 mm
Tiefmittelton 1 x 150 mm – 1 x 150 mm
Mittelton – 1 x 150 mm 1 x 150 mm
Hochton 1 x 30 mm / SD 1 x 30 mm / SD 1 x 30 mm / SD
Technische Spezikationen CLASSIC Compact CLASSIC Center
Höhe 31,5 cm 17,0 cm
Breite 17,0 cm 45,5 cm
Tiefe 24,0 cm 24,0 cm
Gewicht ca. 6,5 kg ca. 8,5 kg
ca. 8,0 kg (Glass-Line) ca. 10,5 kg (Glass-Line)
Empf. Verstärkerleistung 20 - 100 W 20 - 100 W
Impedanz 8 Ohm 4 Ohm
Frequenzgang 50 Hz - 30 kHz 44 Hz - 30 kHz
Wirkungsgrad 86 dB 89 dB
Lautsprechersysteme
Tiefton – 1 x 150 mm
Tiefmittelton 1 x 150 mm –
Mittelton – 1 x 150 mm
Hochton 1 x 30 mm / SD 1 x 30 mm / SD
Weitere Tipps und Tricks zur Aufstellung nden Sie auf der Webseite www.audiophysic.de
im Bereich Technik.

14
English | Deutsch CLASSIC Line
Welcome
Dear music lover,
We would like to thank you for putting your trust in our products and welcome you to the family of audiophile
friends of AUDIO PHYSIC.
You have chosen a top-class product that has been developed in Germany. We would like to congratulate you on
this choice and wish you a lot of fun and enjoyment with your product.
In order to earn your trust, we only use the latest technical expertise and top-quality components when manufacturing
our loudspeakers and we produce them in accordance with strict quality criteria. These criteria enable us to provide
original owners with a 10 year warranty for our loudspeakers (2 years for the subwoofer electronics and 10 years for
the drivers), starting on the date of purchase of the product by the original owner, which is far longer than the legally
prescribed warranty periods. In order to secure this additional service, please ll out the warranty card enclosed with
your loudspeakers and send this and a copy of your proof of purchase to your national AUDIO PHYSIC distributor. He
will send you written conrmation of your 10 year warranty shortly after receiving these documents.
Only after several electronic and acoustic test runs, which our quality assurance staff conrm by signing the enclosed
certicate, are our loudspeakers allowed to leave the factory in secure packaging.These measures help to ensure that
you can enjoy the full experience of the high-quality materials, production and sound of AUDIO PHYSIC loudspeakers
in the comfort of your own home.
As a rule, your competent AUDIO PHYSIC dealer will deliver and install your loudspeakers. If you would rather install
your product yourself, the following pages provide you with detailed tips and steps to follow in order to safely set up
your loudspeakers. Have fun with your new CLASSIC LINE loudspeakers!
You have our word:
We put our name on every model in
order to guarantee the tested quality
of our loudspeakers.

15
CLASSIC Line Deutsch | English
General Tips
Depending on the size and weight of your loudspeakers, it is a good idea for two people to unpack them. The ideal
way to do so in the case of oor-standing loudspeakers is to stand the boxes upright so that the top of the loudspeaker
is resting on the oor (the boxes are marked accordingly) and you can easily attach the spikes. The spikes for both
loudspeakers can be found in your “Welcome to the Audio Physic Family“ package. The CLASSIC Compact and
CLASSIC Center should ideally be removed from their boxes when the boxes are lying on the ground. Please follow
the instructions in the chapter “Unpacking and Assembly“ to ensure the safe and correct installation of your loudspeakers.
The loudspeakers should reach a temperature that is approximately equivalent to room temperature before you
connect them to the HiFi system and/or operate them. This instruction predominately refers to the winter months in
case the loudspeakers were previously stored in a cold room.
Maintenance
Our loudspeakers are coated in high-quality veneers or high-gloss lacquers. Some parts of the cabinet may have a
glass surface depending on the loudspeaker design in question. You should avoid using chemical cleaning agents
because these may attack the loudspeaker surfaces and make them go matt. As a rule, a ne, soft and damp cloth
is all that you need to clean the surfaces. If a cleaning agent is required, use this to dampen the cloth and do not
directly apply it to the surface. It is best if you test the suitability of the cleaning agent on a less visible part of the
cabinet. The drivers do not normally need to be cleaned. Dust particles fall off quickly when the loudspeakers are
operated. You can, however, use a soft brush to lightly brush over the surfaces of the drivers. When doing so, make
sure you do not put any pressure on it. Please never use any cleaning agents on the drivers. Do not expose the
loudspeakers to direct sunlight. Anodised surfaces are sensitive to acids and alkalis and to ultraviolet light and may
fade.
The drivers in this range of AUDIO PHYSIC loudspeakers use a unique mounting technique. Rather than directly
mounting the drivers onto the cabinet of the loudspeaker, the drill holes of the loudspeakers contain special neoprene
plugs. These neoprene plugs tighten in the mounting hole when the screws are tted, creating a permanently elastic
connection between the driver and the cabinet that reduces resonance. You do not need to tighten these screws.
Re-tightening the screws may damage the plugs and have a negative effect on the sound.
Burning In
The loudspeakers rst reach their full sound potential after a specic burn-in period. We burn in the drivers at our
factory prior to assembly, meaning that they normally only need a burn-in period of a few hours at a normal room
volume and with music that has a range of frequencies that is as wide as possible, for example orchestral pieces.
Recordings containing ’white or pink noise’ such as those available on many so-called Test CDs are also ideal -
however, for safety reasons, these pieces should never be played at high volumes.
Stray Magnetic Fields
The magnetic eld created by the individual driver magnets may to some extent have an effect outside of the
loudspeaker. This stray magnetic eld may interfere with other devices, particularly televisions and monitors with
cathode ray tubes (not LCD or plasma televisions), for example by causing changes in colour in the picture. We
recommend that you place your loudspeakers approximately half a metre away from such devices (and also from
magnet tapes, video cassettes, credit cards with magnetic stripes, etc.).
Transportation
Where possible, please retain the loudspeaker packaging. You can then securely transport your loudspeakers if you
move house. If you have CLASSIC LINE loudspeakers CLASSIC 10, CLASSIC 20 or CLASSIC 30 in our “Glass High
Gloss“ design, please pack them securely and only transport them in an upright position on a pallet in order to
avoid damages.

Unpacking and Assembly – The CLASSIC 10 | CLASSIC 20 | CLASSIC 30
1. Place the boxes on the oor, making sure that the product labels are facing up, and carefully open the
packaging on the long side where it has been taped up, preferably using a pocket knife or kitchen knife
(similar to illustrations).
2. Remove the “Welcome to the Audio Physic“ package and the accessories.
3. Keep the box on the oor and carefully remove the loudspeaker together with its protective foam pads. It
is ideal if two people carry out this step. Make sure that you do not touch the drivers when removing and
handling the loudspeaker as this may cause irreparable damage to the drivers.
4. Now remove the top foam cover and carefully slide down the protective foil so that you can easily attach the
spikes that come with the loudspeaker.
5. Tighten the lock nuts onto the spikes.
6. Now turn over the loudspeakers so that the loudspeakers are in stable contact with the oor. Two people
should also carry out this step where possible.
Make sure that you do not hurt yourself on the tips of the spikes.
7. Place the loudspeakers in their intended positions and nely adjust the spikes so that the
loudspeakers do not wobble. If you do not place the loudspeakers in a secure and stable
position and they therefore wobble, this will have a major effect on the sound. When the
boxes are standing level and upright, you have set them up perfectly. The enclosed spirit level
will help you to nely adjust the loudspeakers (they are level when the bubble remains in the
inner circle). Now use the lock nuts to again tighten the spikes. Roughly hand-tightening the
nuts is sufcient.
8. Our CLASSIC 10, CLASSIC 20 and CLASSIC 30 models are tted with a solid front panel without fabric when
delivered from our factory. If you wish, you can exchange this panel for the panel covered in fabric that is
also enclosed with your loudspeaker to suit your tastes. To do so, simply use your ngers to carefully lift off the
tted panel. Please ensure that you do not touch the drivers when doing so. Once you have removed
the panel, place the fabric-covered panel in its position and softly push it in into place until it is ush with
the loudspeaker cabinet. You do not need to worry about any limitations or loss of sound details when using
either of the panels.
If you want to increase the sound quality even more in terms of precision and
bass response, try out our high-quality VC feet (for example VCF II M8 in the
image on the right) on your loudspeakers. The “Vibration Control“ feet are not
only an alternative to spikes for high-quality ooring, but also reduce the
transmission of vibrations between the loudspeakers and the oor. The result
is an audible improvement in the level of detail and realistic sound reproduction.
16
English | Deutsch CLASSIC Line
Correct: In order to correctly
unpack the loudspeaker, the top of
the loudspeaker should be facing
down. This means that you will
easily be able to hold on to the
bottom of the loudspeakers when
carefully pulling them out of
the box and also enables you to
attach the spikes without difculty.
False: If the top of the
loudspeaker is facing up,
you will have to turn the
loudspeaker upside down
once you have removed it
from the box in order to
attach the spikes.

17
CLASSIC Line Deutsch | English
Unpacking and Assembly – The CLASSIC Compact | CLASSIC Center
1. Lay the box down on the oor with the product labels facing forward. Carefully open the packaging on
the long side where it has been taped up, preferably using a pocket knife or kitchen knife.
2. Remove the “Welcome to the Family“ package and the accessories.
3. Carefully remove the loudspeakers, together with their protective foam pads, from the box. Make sure that
you do not touch the drivers when removing and handling the loudspeakers as this may cause irreparable
damage to the drivers.
4. Now remove the foam covers and carefully slide down the protective foil.
5. Position the loudspeaker(s) in your listening room. The loudspeaker(s) should stand level and upright. The
enclosed spirit level will help you to nely adjust your loudspeakers (which are level when the bubble
remains in the inner circle).
6. Our CLASSIC Compact and CLASSIC Center models are tted with a solid front panel without fabric when
delivered from our factory. If you wish, you can exchange this panel for the panel covered in fabric that is
also enclosed with your loudspeaker to suit your tastes. To do so, simply use your ngers to carefully lift off
the tted panel. Please ensure that you do not touch the drivers when doing so. Once you have
removed the panel, place the fabric-covered panel in its position and softly push it in into place until it is
ush with the loudspeaker cabinet. You do not need to worry about any limitations or loss of sound details
when using either of the panels.
Connecting the Loudspeakers
Your new loudspeakers are tted with particularly high-quality connectors
from the “nextgen” range made by the specialist manufacturer WBT (see
the image on the right). These connectors feature a unique mechanism
(the torque indicator) that helps you to connect cables with spades as
explained under point 2. The connectors of the CLASSIC LINE accept both
spades and banana plugs. Loose cable strands oxidise easily and are not
suitable for a permanently high-quality listening experience.
1. Please switch off all equipment in your Hi system before you begin
to connect your loudspeakers.
2. If you are using a loudspeaker cable with spade connectors, turn the
screw clamps to the left until you can easily slide the spades into
the openings at the side. Push the spades into these openings and
turn the screw clamps to the right until you hear a clicking noise
- this is the torque indicator. Now turn the clamps until they are
hand-tight, which will normally be the case after a few more ‘clicks‘. After this point, you can indeed tighten
the clamps even more, but this will not improve the results. In the worst case scenario, further tightening
the clamps may lead to damage to the surface structure of the spade connectors.
3. Make sure you have the right polarity. As a rule, loudspeaker cables are accordingly labelled, either by a
permanent marking on one of the two conductors of the cable or by plus “+“ and minus “-“ markings on
the cable ends.
4. Now connect the cable to your amplier and make sure that you have the right polarity here.

Setting Up Your CLASSIC 10 | CLASSIC 20 | CLASSIC 30 Loudspeakers
1. The ideal placement of your loudspeakers in your room involves positioning them in an isosceles triangle
arrangement including your listening seat, creating equal spacing between each loudspeaker and the
listening position.
2. The distance between the loudspeakers should be around 0.8 - 1.2 times as much as the distance between
the loudspeakers and the listening position. The closer you sit to the loudspeakers, the more direct and dry
your sound experience will be. As you move further away from the loudspeakers, the bass response will
normally increase and the spatial imaging will seem more generous.
3. Your loudspeakers should ideally be placed around 30 centimetres
or even further away from the surrounding walls, The larger the
space between the loudspeakers and the back wall, the more
precise the sound reproduction, particularly where bass
performance is concerned. (The gures below show the
placement of a CLASSIC 10 model as an example.)
4. The closer the loudspeakers come to the back wall (and/or side
wall), the more powerful the broadband reproduction of the low
frequencies will be – resulting in stronger bass tones and
full-bodied voice tones.
5. This effect can be made even more intense when the loudspeakers
are placed in a corner. Low tones become around 6 decibels (or
more) louder. Use software with which you are familiar to try out
different placements and you will soon nd the position that
best suits your own personal tastes.
Setup in the corners of the room: Low tones become
signicantly louder and overlap into the midrange frequencies.
Setup close to the wall: Low frequencies are broadly reinforced
by around +3 and +6 decibels when the loudspeakers are
positioned close to the wall.
Setup away from the wall: The loudspeakers are positioned at
least 30 centimetres away from the surrounding walls. This
provides a clearly dened bass response and a clean, crisp
reproduction of midrange frequencies.
> 30 cm
> 50 cm
Bass boost of > 6 dB
≤ 20 cm
≤ 20 cm
≤ 20 cm
> 40 cm
Bass boost of +3 to +6 dB
18
English | Deutsch CLASSIC Line

19
CLASSIC Line Deutsch | English
6. Alongside the strength of the bass response, the distance from the side walls also particularly affects the
localisation of sound events and therefore the precision of the spatial imaging. As the distance from the
walls increases, the localisation will become more precise and the sound will be more balanced.When the
loudspeakers are extremely close to the side walls, this will result in early reections, leading to reduced
spatial perception and tending towards nervous sound reproduction. Curtains or shelves or similar at the
sides reduce this effect.
7. If you want to position your CLASSIC LINE loudspeakers on the left and right-hand sides of a cupboard
or a tall sideboard, please ensure that the fronts of the loudspeakers are level with the front of the
cupboard or sideboard. If the loudspeakers are positioned further back than the furniture, this will have
an effect on the sound, not only in the form of early reections from the side walls of the cupboard as
explained under point 6 but also, in some cases, by disrupting the unobstructed radiation of sound.
Positioning Your CLASSIC 10 | CLASSIC 20 Loudspeakers
1. Once the loudspeakers are positioned parallel to the side walls, turn them inwards until an imaginary line
is pointing from the tweeter of each loudspeaker towards your preferred listening position. If you prefer
to listen to music alone, the two imaginary lines coming from the loudspeakers should ‘intersect‘ at your
listening position. This will result in excellent localisation and spatial image. If you would rather listen to
music in a group, turn the loudspeakers further inwards so that the imaginary lines cross in front of the
listening position.
2. If you prefer a wider soundstage and more generous spatial imaging, position the loudspeakers at less of an
angle so that the imaginary lines (in blue) cross just behind the listening position. Once a specic angle has been
reached, the spatial image in the centre between the loudspeakers will begin to lose structure and precision.
You can easily identify the ideal angle by using a mono recording. When the voice of the artist sounds clear
again and comes directly from the middle between the loudspeakers, you have found the ideal position.
Second step: Experiment with the angle.
When it comes to positioning your
loudspeakers, your listening taste plays an
important role. To nd the ideal position,
mono recordings are extremely useful,
particularly those with a singing voice and
few instruments.
First step: Angle the loudspeakers so that
an imaginary line is in place between the
tweeters and your listening position.

20
English | Deutsch CLASSIC Line
Setting Up Your CLASSIC Compact Loudspeakers
We strongly recommend that you operate the loudspeakers on suitable stands, for example the
AUDIO PHYSIC SHERPA II (see the image on the right). In terms of sound, the use of suitable loudspeaker
feet or stands is normally far more superior than placing your speakers directly on a shelf. On the one
hand, it ensures that the tweeters are located in an ideal position (at an ideal height) in relation to your
listening position, which is particularly important for the spatial image and the acoustic neutrality. On
the other hand, it helps to prevent interactions between the loudspeaker and the surface on which it
is placed, for example a cupboard or shelf. If you want to operate your CLASSIC Compact on a shelf,
you should ensure that it is placed a good hand‘s width away from the back wall.
Your loudspeakers are in an ideal position when they are ush with the front of the shelf, which helps
to prevent early reections. If you choose to operate your loudspeakers on a shelf, sideboard or lowboard,
we recommend that you use our VCF Component feet in order to mechanically decouple the
loudspeakers from the surface. In response to sound energy, shelves and cupboard surfaces in particular
tend to produce natural vibrations that can, in turn, be transmitted to the loudspeaker. These
micro-vibrations have an adverse effect on the quality of the sound, especially in the midrange area,
which may result in a diffuse and less precise sound image. The AUDIO PHYSIC Vibration Control feet
stop the transmission of vibrations from the surface, thus resulting in an audible improvement in the
level of detail and realistic sound reproduction.Another advantage of the VCF Component feet is that
they reliably prevent scratches on cupboard or shelf surfaces.
1. The CLASSIC Compact loudspeakers should be placed in a position in which the tweeters are at ear height in
relation to your listening position.
2. The ideal placement of your loudspeakers in your room involves positioning them in an isosceles triangle
arrangement including your listening seat, creating equal spacing between each loudspeaker and the listening
position.
3. The distance between the loudspeakers should be around 0.8 - 1.2 times as much as the distance between
the loudspeakers and the listening position.The closer you sit to the loudspeakers, the more direct and dry
your sound experience will be. As you move further away from the loudspeakers, the sound image will more
generous, although the focusing will decrease. The larger the space between the listening position and the
loudspeakers, the more you will be aware of the acoustic effects of the room on the sound produced.
4. The CLASSIC Compact loudspeakers are designed to be set up close to the wall.They should therefore be positioned
approximately 20 to 30 centimetres away from the back wall and around 40 centimetres away from the side
walls. It is also possible to set up your loudspeakers further away from the surrounding walls according to your
personal listening tastes. This position will result in a leaner sound. Our LUNA subwoofer is an ideal addition
to our CLASSIC Compact loudspeakers and is able to signicantly extend the depth of the bass reproduction.
Setup close to the wall: The CLASSIC
Compact loudspeakers are
congured in such a way that they
produce extremely clear and precise
bass tones up to a distance of
approximately 20 centimetres away
from the walls. As they are moved
further away from the wall, their sound
will become leaner and their bass
reproduction more restrained.
≥ 20 cm
≥ 40 cm
This manual suits for next models
4
Table of contents
Languages:
Other Audio Physic Speakers manuals

Audio Physic
Audio Physic TEMPO plus User manual

Audio Physic
Audio Physic VIRGO III User manual

Audio Physic
Audio Physic STEP plus User manual

Audio Physic
Audio Physic OREA User manual

Audio Physic
Audio Physic CARDEAS 30 User manual

Audio Physic
Audio Physic CLASSIC On-Wall User manual

Audio Physic
Audio Physic AVANTI User manual

Audio Physic
Audio Physic Virgo 25 plus User manual

Audio Physic
Audio Physic AVANTI User manual